The evil within the passage of Akum. The Evil Within. Walkthrough
3 years after the release of the first The Evil Within, its direct sequel has finally been released, which turned out to be better than the original in almost every way. For example, now players will be able to roam not only narrow corridors, but also in huge urban locations. True, all this has made the game even more difficult, so, from time to time, you will surely wonder where to go and what to do. It is for this reason that we decided to write a detailed walkthrough Evil Within 2 posted on this page.
Chapter one - Into the fire
There will be no cut-scenes at the beginning, that is, we will immediately be thrown into the thick of things. We will face small house engulfed in flames. We run to the mansion and try to open the door by pressing the button for interacting with objects. We turn right and inspect the sliding glass door - the main character will immediately break it.
Once inside the house, go to the kitchen, and then turn left. Open the door on the left side and go up the stairs to the next floor. We look into the room for children (children's drawings hang on its door) and watch a long cut-scene - apparently, this is an introductory video.


Having plunged into STEM, we go forward to the different objects that will appear in front of us. As a result, we get to the table and pick up the walkie-talkie. We contact Kidman and find an office, which is the main safe area where we can talk with our partner. We listen to the conversation, and then we begin the passage of the second chapter.
Chapter 2 - Something Went Wrong

We approach the board with information hanging on the right side and inspect it. We read information about all the missing members of the Mobius group. These are the following characters:
- William Baker is the leader of the group.
- Miles Harrison is a combat specialist.
- Liam O'Neill is a technical specialist.
- Julian Sykes is one of the STEM programmers.
- Yukiko Hoffmane is a psychologist.

Then we study several photos on the board, and then we leave the room. On the table we notice a black cat. We approach it and raise a slide near it. We'll be able to view these images and then discuss them with Kidman. We use the projector located next to the cat to look at the slide.

We get up from the chair and find a jar of green gel - a woolen ball will point to it. We head to the end of the room and click on the terminal located on the right side of the mirror. These devices are designed to create saves. Then we use the mirror and leave this location.
We look through a new cut-scene, and then we go through the door, go up the stairs and approach the picture, which shows the door. We turn around and see the previously seen door in front of us. We open it and we pass into the corridor. We turn on the flashlight, enter the left door and see Baker, who was shot right in the head. It's a memory that we can constantly play back and forth. Don't forget to take a look at your camera.

We head to the left room, where we were developing the photo. On the table we find a picture of William Baker (one of the documents). In the next room we find racks - we examine the floor near them and come to the conclusion that one of the racks was constantly moved. We click on the rack, open a secret passage and head into the corridor. Having reached its end, we answer the call (the phone is in a well-hidden niche) and listen to an ominous laugh. Are the hamstrings already shaking? We still have…
We rise to the next floor and try to unlock the door with glass inserts - we will notice a girl who cannot be helped in any way. We squat down and make our way under the bars on the left side. We find an unusual letter (one of the documents) on the table located near the right wall.

We go to the floor above and pass through the room in which red curtains are hung. We click on the door and see how the mysterious killer deals with an unknown man. This event is also a memory, and therefore it is repeated all the time.
We hide behind the sofa and move to the left. We approach the corner and go around the maniac. When the killer leaves through the entrance where we came from, we examine the victim, and then we get out of the room. We will again find ourselves near the previous ladder, but the location itself will look much scarier. We head to the right corridor and notice someone's legs peeking out of the opening. Suddenly, someone will drag the corpse inside. We open the locked door, jump over the table and the picture, and then we find a photo of another victim (one of the documents) lying on the table in the left corner.

We rise to the next level, we pass through the door, behind which one could see the girl. We go out to the balcony and go forward until we notice a large installation with bodies. We study it and click on the Rebirth board. We enter the left elevator and go down to the lower floor.

We pass through the hole on the left side, bending down in advance. We approach the symbol on the wall, turn around and go to the camera standing on the tripod. Then we look back again and see the door. We open it and face a man holding a camera. We come to ourselves, and then we approach the mirror on which the photo is fixed. We put it in inventory, and then we meet with the monster.

We go around the boxes, and then we run away from the monster along the corridor. We close the door, and then we try to find a way out of the room, which is located in the far left corner (if you stand behind the door). We find a ladder near the wall. Click on it and climb inside the pipe.
We go along the ventilation passage until we see an opening. We jump down and run away from the monster again. In the end, he will catch us - we quickly click on the "E" key and run away from the monster to a safe house. Health will be restored, but only up to a certain point on the scale.
We unlock the door, go to the table and find the syringe. We use it, and then we go to the next room and find a diary on the table (one of the documents). Next, we get out of the house and watch how the main character finds a gun and examines a photograph of the Castellanos family (one of the documents).

We go along the road, examine the dead body in the car, and then head to the house for the girl. We finish it off with a pistol, go into the kitchen with a corpse and find a first aid kit with a syringe near the right wall. We rise to the 2nd floor and find a jar of gunpowder. We can use this item in the future to create cartridges.
Exit the building and turn left. We destroy several boxes and find useful little things in them. We continue to walk along the path until we notice how the STEAM members are trying to escape from the monsters. One of them will manage to hide in the house. We squat down and hide behind the car.

We wait until the monster goes home, and then we go to the left through the bushes, picking up grass from the ground. We sneak up on the enemy and imperceptibly attack him in the back. We do the same with the monster that knocks on the door. Green gel will flow from each monster after death - do not forget to pick it up.

We pass into the house, turn left, go down and find another shelter. We look through the cut-scene in which we will be able to talk with Liam O'Neal.
Chapter Three - Resonance
We talk with Liam and get from him side mission called "Unusual signal", which we can perform a little later. In addition, Liam will indicate on our map the point where the armored personnel carrier is located. Near it you will be able to find the Guardian crossbow.

We look at the shelter. With the help of a coffee machine, we will be able to fully replenish our life scale, and we will not have to pay for it. The supply boxes contain medicines and ammunition - over time they will fill up, so we advise you to visit them when there is no ammo for weapons.
With the help of a workbench, we will be able to craft various things, such as ammo and first aid kits, and modify weapons. In the first case, you will need grass, gunpowder, and so on, and in the second - spare parts for weapons (a few are in this shelter). We should have enough parts to improve the pistol.
We get out of the shelter and meet a nurse named Tatyana, who helped us in the original. We follow her straight into the mirror and get into the office of Castellanos. Then we sit in a wheelchair and find ourselves in the hospital. Here we will be able to acquire various improvements by spending green gel.

Note: The system for modifying weapons and buying upgrades has been improved - now we cannot collect a bunch of green gel and buy everything. The fact is that the best skills and upgrades are locked and can only be opened with the help of parts. High Quality or red gel.
We get out and watch how the protagonist takes out his communicator. We turn it and wait for the prompt to appear. Then we pinpoint the desired target. We hide the device in our pocket and cross the road. We enter the church and deal with the priest and his novices. We pass behind the altar, on which the dead body lies, and we find a figurine with a key, standing on the floor.


We go along the path located on the right side of the church and turn left. We go forward and after a few tens of meters we find a dead body on the road, next to which lies a pouch that increases the number of carried cartridges for a pistol by 6 units.
Then we return to Liam's hideout and find a building opposite him with large doors, which is the tourist center of the city. Near him on the bench is another statue with a key. We go inside the building and find a booklet on the right side (one of the documents). We try to open the door to the basement - it will be closed, but we still have to get there a little later.

We get out of the building, stand in front of him and look to the left. We find a ladder in the alley that leads to the roof of another house. Climb up the stairs first, and then use the fire escape. We kill the monster upstairs, and then we search a couple of corpses of operatives - we can find a magazine about the communicator from one of them (one of the documents). On the edge of the roof, by the way, lies a faulty sniper rifle.


Side Mission: "Unusual Signal"
Now it’s worth taking on a secondary task, but at the same time we will find a few useful little things. We follow the green marker, and then we take the communicator in our hands and approach the dark silhouettes. Standing next to use the device and get a piece of memories.

Next, we will need to study a couple more places with resonance. However, to begin with, we turn our attention to the trailers standing nearby. We pass to the farthest of them and go inside. We pass through all the cars, cracking down on all the enemies on our way. At the end, we will find the body of a girl, near which there is another place of resonance. We get closer and use our communicator to view another fragment of memories. There is also a red gel next to the corpse.

We leave the car and go after the resonant "spot". As a result, we find ourselves near the auto repair shop. Opposite the entrance to the auto center we see a house, on the porch of which there is a statue with a key.

We don't go straight to the shop. First, we go around it on the left side and find a door in a mesh fence. We shoot at the castle and pass into private property. We jump over the chain and approach the dead body lying near the car, which has an activated alarm. We examine the corpse, and then kill the monster that appears. Then we pick up a pistol with a laser sight from the ground.


We restore the power supply with the help of the shield we noticed in the memory. Click on the 2nd and 4th toggle switches from left to right (we can do this in any order). After that, we will have to fight a white dead man, who is much stronger than usual. By the way, it is impossible to kill him on the sly. Having dealt with the monster, we raise the car closest to us, squat down and open the hatch leading to the basement. We go forward, turn left and find a dead body. We pick up the communicator and find a new memory.
We squat again and go through the tunnel. We get into the corridor, in which there are doors on both sides. On the left side it will be closed with a combination lock, but nearby you can find a body, after a search of which we find a special card. No, it will not automatically open the door, but it will help us find the right combination. We look at the closed door and remember the inscription on it: B-34.

Then we click on the access panel - a card with a sign and numbers will appear to the right of it. We find the required table by letter, and then select the chain of numbers next to the desired numbers. As a result, we got the code 7696 . Enter it and go to the arsenal. Here we will find an explosive bolt for a crossbow, which we found next to an armored personnel carrier.
We pass into the room opposite and pick up all the useful little things. Then we deal with opponents and lift the load on the loader. We shift the cart and open the passage leading outside. In one of the rooms we will be able to find the best parts for weapons, with which you can unlock some upgrades.
We get out into the street and opposite the auto repair shop we look for a garage - it is located on the right side of the house, on the porch of which there was a figurine. We enter the building and collect all the useful items. Then we go out and go around it to catch a new signal. We take the device and see that it leads us to a house standing nearby. We pass into it, head to the back room and take another diary from the table (one of the documents). Suddenly the picture will change and the temperature in the room will drop. We go back and see the ghost of a certain girl.

We run away from the ghost and look around. Here we find a door with a combination lock - you need an access card. We find another door nearby and go inside. Then turn into the door on the right side. We make our way to another room, using the hole in the wall and take out the key card from the nightstand, on which there is a photo. We go back, run to the door with a combination lock and open it with the key card. Then we get into the original world and find a slide on the table.
We go outside and notice a large two-story mansion standing across the road, but we do not need it, but a house located to the left of it. Approaching him, we take out the communicator and detect the signal. We enter the building, and then go through the door white color and get into the garage. We raise a request for examination (one of the documents) on the left side of the car.

We will find ourselves in a new nightmare, where we have to visit several rooms. We go into the bedroom and select the report (one of the documents), which was viewed by the ghost of the doctor. We continue to explore the "dream" until we get to the hospital "Mayak". We take the slide that lies on the chair for the disabled, and then we examine the body sitting on the chair. We return to the original world and select the harpoon bolt from the corpse.
Easter Egg: On the right side of the mansion we mentioned earlier, there is another house. On its roof, a dead man roams with a Molotov cocktail. We rise to the barn, located side by side, and on the boards we pass to the roof of this house. There we find a mysterious weapon, which is a reference to Quake.


If we talk about a two-story estate, then on one of its sides we are looking for a yellow ladder. Climb up it and go through the balcony. We touch the cord that activates the slowdown and kill the monster. On the balcony we find a dead body and a box in which we find a pouch for a shotgun, which increases the number of cartridges carried with us for this weapon.
We go outside and run towards the second signal, which we managed to fix after finding the first one during the passage of the secondary task. We enter the building, we pass into the last room, we kill all the opponents and with the help of the device we catch another piece of memories. We go through the door, behind the boxes we find a hatch leading to the basement. Here is a PC - click on it and get into the "Network" arsenal.

Here we move around the premises and deal with opponents until we reach a dead end with two doors - on the left side we can open it with an electric bolt fired into the shield. Since we don’t have a bolt yet, and there’s no point in opening this door either, because it only gives us the opportunity to cut off the path leading back, we immediately open the door on the right. To do this, we combine the waves in such a way that they are connected to each other in frequency and amplitude. Inside we look for a new weapon - a shotgun. We take all the other useful things and return to the city.


After activating both points of resonance, a third one will appear, pointing to the tourist center. When going to this building, we return to the shelter and upgrade our skills and weapons. Then we pass to the center and go to the outer door - it will automatically open. We get down and launch the device to activate a new scrap. We look through it, and then we select a new magazine from the table (one of the documents).

As soon as we take this magazine, signs will immediately appear on the map showing exactly where all the bodies of the Mobius operatives lie. They will have a few useful items. We are trying to get out, but a strange stranger will take a picture of us. We pass forward, deal with all the enemies and get out.
We go to O'Neill in the shelter and tell him about everything that we saw in order to receive a reward and complete an additional task. Then we go from the corner in which the armored personnel carrier is located, up the map and pass next to the company engaged in the transportation of goods.
Easter egg: We pass to the private territory where the transport organization is located. We deal with all the monsters, inspect several trucks and find a mysterious mechanism inside the red car, referring us to Wolfenstein: The New Order.

We continue to go north and come across a new intersection. A little ahead on the right side, we can find another shelter, but for now we are interested in a building standing even further. It will not be possible to enter it, however, there is a garage at the back, where we can find spare parts for a sniper rifle, with which we can repair the weapons we found earlier using a workbench.

Then we approach the doors of the new shelter, shoot from the crossbow at the shield, using an electric bolt, and thereby raise the gate of the building. We kill the monster lurking inside and activate the communicator to view a new memory.

We pass into the shelter through the left door and find report 00122 (one of the documents) on a table not far from the supply box. Inside the box we find a smoke bolt, which is a new ammunition for the crossbow.

We continue to follow the sign that will lead us to the Pit Stop diner. By the way, next to this building on a bench is a statue with a key for a locker.

We fight with several enemies, among which there will be one brand new one - he screams from time to time, thus calling other monsters to help. We deal with the screamer at a distance using a sniper rifle.
Next to the diner, we activate the communicator and decode the signal by going to Lily's ghost. We go inside, head to the far door and try to unlock it - nothing will come of it. Nearby we find a hole, but first we move the bedside table. We go inside, look around and take the Lily doll from the floor.

We get out into the street, go around the building and find a window leading from the utility room. We examine the trash can and find traces of the girl. As a result, we get a new pointer on the map. We follow him and stumble upon new opponents. We deal with them and reach the marker. We turn on the devices and continue to follow in the footsteps of the daughter. Sometimes we will have to click on objects lying on the ground. We repeat the same procedure next to the transport organization.
The main character will think that his daughter went to the warehouses. We go to them and inspect the door - it is necessary to supply electricity. We pay attention to the wire leading straight to the electrical panel. We go around the boxes, break the chain and destroy all the monsters. Next, click on the switch to restore the supply of electricity. We open the warehouse by clicking on the switch next to the gate. We pass into the room and examine the plank that blocks our way.
Click on it and Sebastian will break the board. We go to the wall on the left side and shoot down the target to use the door. We rise to the next floor and go into the last room to collect useful things. We return to the first level and go next to the left wall. We squat down and make our way under the racks. We deal with the monster and go up the stairs.
We enter the room on the left side, where the workbench is located. On the shelves we find report 00654 (one of the documents). We go into the room nearby and pick up the doll of the World. We look at the cut-scene, leave the room and destroy all enemies. We return to O'Neill and talk to him. He will give us a gas mask.
Now we are heading to the northern shelter, where there is a computer with which you can get into the "Network" and go through the tunnel that leads to the city hall.
Chapter four - Behind the scenes
After receiving a gas mask from O'Neill, we study a new goal - we need to reach the shelter in the north, where we were earlier and use the computer to enter the "Network". This computer system is protected by a code, but Liam will tell it to us. We talk a little more with a technical specialist, and then we learn that Tyr has appeared in the hospital.

To visit the shooting range, we interact with the mirror and get into Sebastian's office. Next, pay attention to the white door. We pass into a new room and shoot at the shooting range. Then we will be able to participate in two challenges: in the first one we can just shoot at targets and score points without time limits (there is no reward), and in the second one (chain shooting) we will be able to get a good prize. In the latter, you need to open fire on various targets that are located close to each other, and an hourglass that increases time. Do not shoot at squares with crosses, otherwise we will reduce the number of points scored and reduce the time given to us for shooting. The reward directly depends on the points received. However, getting the same prize twice will not work. Therefore, if we score 100 thousand points the first time, then we can no longer take part in it.
After shooting at the shooting range, we head for the sign to the shelter in the north. We enter it and talk with Kidman. Near the entrance to the building we look for report 00122 (one of the documents). Next, use a PC and move to the "Network" control room. We get out of it and move forward along the corridor. We hit the vending machine on the left side twice to get the gel. We pass into the room on the right and interact with the computer. As a result, we get a new message (one of the documents).

We get out onto the balcony and go down, as all the doors will be closed. Opposite we find a ladder. We rise along it, open the door and find the dead body of the Mobius operative. Near it lies a pouch for a crossbow. We leave, go down again and approach the door with the display. We take out the communicator, set up the wave and watch how the blocking system begins to be cut down. As a result, various monsters will fall from previously locked doors. We kill them all and inspect new rooms.

Next, we pass through the door with the screen. We reach the tunnels and lower the handle to drain the water. After we use the ladder and go down. We go to the opposite side and rise a little higher. We can press another switch to lower the bridge. Then we go through the double doors. Before that, the main character will put on a gas mask and the camera will switch to the 1st person view.
There will not be very many opponents here, but we can only fight with a knife or an ax, so it’s worth acting carefully. We get to the white door, closed with an electronic lock. We follow the wires, we reach the first fork and turn left into a gloomy tunnel. We activate the lantern and find the statue with the key, which stands on the barrel.

We break the figurine, and then we continue to follow the wire to the last room. Here we will find a shield and 4 toggle switches. Each of them can add a specific number of lamps. It is necessary to turn them on so that the total number of bulbs does not exceed 10 pieces. We activate the 1st, 2nd and 4th toggle switches. We return back to the closed door, open it and climb the stairs. The camera will return to its usual position.
We rise even higher, examine the PC, which is on the table on the left side, and find a new letter (one of the documents). We leave and run along the corridor. Climb the stairs to the right to find supplies. We pass through the white door, approach the dead body and use the communicator to view the memories. We return to the door of this room and to the right of it we find a vent. We move forward along it until we find ourselves on the other side of the cliff. We enter a new room and again interact with the computer to exit the "Network". As a result, we find ourselves in the part of the city where the City Hall is located.

We use a coffee machine to replenish health, a save terminal to save, and a mirror to visit Sebastian's office. By the way, there is a red gel behind the mirror. We rise to the top floor, take out the device and detect the resonance point. As a result, a green indicator of a neighboring building will appear on the map. We get out into the street and head towards the city hall, where we find a mysterious stranger. After that, the next chapter starts.
Chapter Five - Waiting
We pass to the gazebo, marked with a green pointer and take out the device to view a new memory. We get to the passage leading to the city hall and fenced with a thorn. We examine the dead body, to the head of which a photo of Sebastian is attached (one of the documents). We go forward and get into the courtyard. Suddenly, a Guardian with a huge circular saw will rise from the dead bodies.
We will need to deal with this enemy. There are 3 places on the level with a wire, when touched, the slow action mode is activated. We lure the enemy into these points, and then shoot at the boss while he is in a state of inhibition. We can also force him to constantly swing and hit - at this moment we run away and discharge the entire clip into him. It is best to attack this enemy with a shotgun or crossbow with explosive bolts. After defeating the boss, we collect green gel and other useful gizmos. Now we can enter the city hall.
We approach a soldier with serious wounds and learn from him about the emitter. He will also give us Harrison's communicator. We pass through the door in front. First, we check the locations on the right and left, having collected all the valuable items there, and then we go forward, where there is a spacious hall with a still delayed event. We head to the door on the left side, go inside, turn left and at the end of the corridor we look for a ladder. Climb up and go through the curtain. We look around and see a picture on the wall, which is a hint. Under the picture in a vase we find roses - we select them.
We look to the right side and on the bedside table we find a mannequin with a necklace. We take the decoration and hang it on the mannequin, which is wearing a blue dress. After we turn it towards the camera. Then we put the roses in a vase, standing not far from the mannequin. Next, interact with the camera and take a picture. If everything was done correctly, then the picture behind the mannequin will become a real corridor.
When studying the corridor, pay attention to the table on the left side. On it you can see a useful article (one of the documents). Next, we examine the paintings that hang on the walls, turn around and see that another one has appeared on them. We look at the drawing, which depicts Lily, we run to the end of the corridor, turn back again and notice from the side open door. We pass into it, we approach the new image and listen to the maniac.
Then we turn around and notice the open door. On the table of the far room we find a new photo (one of the documents). We try to reach the photographer, and then we go down the ladder and approach the chair on which we lie the head of the mannequin. Then we find ourselves in a room with a large number of people. We approach the door and from the table standing on the left side of it, we select a note (one of the documents).

We pass into the room where the emitter is located, turn it on and watch a cut-scene in which we get to know Stefano. Then a terrible monster called Obscura will appear. Dealing with him will not work, but we can stun him for a while. Sometimes the monster will take pictures of the emitter, which will cause it to be knocked out. You must try not to die while the countdown is on. If the monster stopped the passage of time, then we will need to track it down and shoot at it a couple of times until the countdown starts again. When the timer expires, the monster will immediately disappear.
We leave the room and head to the hole in front. Once on the balcony of the upper level, we turn into the left door and find ourselves in a new room. On the table we find report 00213 (one of the documents). We go down into the hall, in which there was a slow event, and find a new passage. We go there and see a bedside table on which stands a statue with a key. We turn right, go through a couple of rooms and reach a room with bookcases. We find report 00977 (one of the documents) on the table, get out into the street, talk with partners and wait for the start of a new chapter.
Chapter six - On the hunt
We leave the neighborhood of the city hall, turn left and find the dead body of the Mobius operative. We take away the pouch for syringes from the corpse. Again we go to the computer system and move to the "Network". We get out of the room and see how the gates opened. We pass forward, open the doors on the left side (for one of them you will need to connect the frequency and amplitude). Behind the last door on the left lies another dead body, after a search of which we can find a pistol pouch.
We go along the corridor, deal with opponents and go down. We will find ourselves in new corridors in which strange eggs lie. We make our way to the room with screens and wait until the main character views a new memory. Then we pick up a new slide from the table.
We continue to move forward, do not catch the eye of the monster, running away from him along the corridors. Then we shoot at him from a cannon. If we go back, we will see that the monster has gone somewhere. Once in front of the door, which depicts a red symbol (indicates a shelter), we are in no hurry to enter it. First, let's open the door locked with a combination lock (you need to combine the amplitude and frequency). Inside we will find report 00532 (one of the documents). Then we go into the room with a PC and view a new cut-scene.
After a conversation with Hoffman, we interact with a computer system located nearby to save email(one of the documents). With the help of the computer we get to the location with the theater.
We leave the office and immediately use the communicator to find a fragment of memories. We go outside, turn left and try to open the warehouse, but this will require a key. We go to the gas station and inspect the burnt corpses. Here we use the device again and view a new memory. Then another monster will appear, consisting of several corpses, but this time it will not be possible to slow it down. In addition, to kill the monster you will need a lot more ammo.
After killing the monster, we head to the diner, and then a little further, going to the train. As a result, we find a dead body sitting on a chair in the extreme room. We use the device and view a new memory. Then we try to leave the cafe, but then a song from the jukebox will suddenly play. We approach him and are attacked by a ghost emerging from the mirror. We run away through any door and find ourselves in the same place.

The fact is that we will need to choose the right doors, and for this we need to look at the mirror. We find out which door glows in the reflection and go through it, but do not forget that the world in the mirror is turned the other way around. In the second room we do the same, but now we also have to avoid meeting with the witch. In the end, we will be able to return back to the cafe. In addition, in the hand of a corpse on a chair, we will find a new slide that can be viewed in Sebastian's office.
We leave the diner, turn the corner and find a corpse on the porch. We search it and find a pouch for a sniper rifle. We pass through the road, go along the face and see the bar of the devil. We enter it and select a diary from the far right table (one of the documents). You need to be to the left of the diner in order to find a location fenced with a fence, from where cries for help can be heard. We pass into this territory, unlocking the gate, and approach the soldier sitting in an overturned car. This will start a side quest.
Side mission: "Out there"
We deal with all the walking dead, and then we talk with the agent. He will offer to go with him to the shelter. First, we collect all the useful things, and then we agree to accompany the peasant. Once in a safe place, we talk with Sikes and get the first quest from him.
Before taking on its implementation, we go outside, head to the right and go through the gate leading to the location where we found Sykes earlier. We go along the street, keeping to the right side, and turn the corner. We find boxes in the alley of blue color behind which the witch walks. We kill her, jump over the containers and find the body of the Mobius operative. We search it and select the pouch for the shotgun.
Then we go to the pointer placed at the bottom of the map. We need the street where the garbage truck is located. We deal with opponents, turn into the right lane and take out the device next to the girl's body. As a result, we see another piece of memories. We search the corpse and take the key to the warehouse located at the beginning of the location.
We go to the warehouse and fight with the monster, which consists of several bodies. We kill him and go to the warehouse. We pick up everything that is not bolted to the floor. In the suitcase, by the way, is a long-barreled shotgun. The terrible woman will reappear. First we try to unlock the door, and then we hide from the enemy in the corner. When the monster approaches us, we will return to STEM.
Side mission: "Reconnected"
Here we have to get back into the "Network" and go to the pointer. We enter the room and interact with the PC to turn on the server. We find a box on the side of it. It will be open, and therefore we will be able to use it and other similar boxes for storing ammunition. Again we go to Sykes and tell him that we have completed the mission. We open the container located in the shelter to get new supplies and a pistol with a silencer.
Next, we head to the place where the passage to the theater is located, but the road will be closed by a couple of apartments. In the previous study of the location, we have already seen these images - one of them was in the devil's bar, and the second one was in the Abode Hotel. As a result, new pointers will appear, and the communicator will point to resonance points. The next chapter starts.
Chapter Seven - Thirst for Art
First of all, we head to the devil's bar. We go to the last room and click on the picture hanging in the corridor. As a result, we will find ourselves in a different reality. The door will be locked with a key, so you have to find it. We turn around and run to the end of the corridor, listening to the monologue of the creator along the way. We take the key from the hand and go back, bypassing obstacles and cracking down on enemies.
We approach the grate and open it with the key. Stretch marks will appear. We squat down and go to the right side, without touching the stretch marks. Then we see the passage to the mannequin and go through it. Approaching him, we interact with him and thereby destroy.

Then we go to the hotel "Obitel" and go up to the second floor. Then click on the picture. Here we again have to unlock the grate, for which we need a key. We go into the left room and avoid meeting with the Obscura. We find the keys and neutralize the monster, being in the far corridor.
Then we quickly run to the grate and raise it. By the way, we advise you to shoot the monster with electric bolts, which can delay the monster for a long time. We open the door and go through several stretch marks. Next, we sneak up on the mannequin and destroy it. Now the road to the theater is free. We return to it and go inside.
Chapter Eight - Premiere
We enter the theater and head to the upper level. We do not immediately go to the hall in which there are chairs, but first we look for Stefano's work, which is upstairs. We use the communicator and find a new fragment of memories. We watch a long cut-scene, and then we begin to pursue the villain.

Suddenly, the location will begin to fall apart and we will need to run forward without falling into the huge eye. As soon as the monster moves to the right side, follow him and hide behind the covers. Then we wait until the eye moves back, and continue to move on. We repeat this several times, and then we leave the location. We go down the stairs and go along the corridor. Then we open the door and watch another cut-scene. After her, the fight with Stefano starts.
How to kill Stefano?
Finally, we were given the opportunity to deal with one of the main villains of the game. The fight will be pretty easy. You just need to memorize all the main blows of the boss and use electric bolts to temporarily stun him. In the absence of such ammunition, we use a pistol and a shotgun. At the location, by the way, we can find a lot of ammunition.
During the first stage of the battle, the enemy will move around the arena in small jumps, that is, teleport from one place to another. After 4 moves it will stop. We can not even try to get into it during teleportation. When he stops, do not spend a lot of ammo on him: a couple of shots from a pistol or one shot from a shotgun will be enough. We add that after the jumps stop, he will run at us and try to hit with a knife, so we first dodge, and only then we shoot. From time to time, he will throw knives at the hero, but they are easy to dodge.
The boss will also try to slow us down with a camera. If we see that he takes out his camera, then we immediately run away from the zone of his visibility and do not approach him until we hear the shutter go off. Then we turn around and shoot at the enemy again. Having made several accurate shots, we are waiting for the beginning of the second phase of the battle.

Stefano will begin to move even faster and more, and his jumps will be chaotic. A large eye will appear behind it, similar to a camera lens. We choose one of the sides of the room and stay in it. We stayed on the right side (when facing the eye) as it is easy to dodge the giant tentacles in this part. However, the tactics of the battle will not change much. We wait until the boss stops, and then shoot at him. Sometimes he will yell and try to catch up with us, running in a straight line. At these moments, we do not run away from him, but on the contrary, we try to bring him down, shooting without interruption. True, if he manages to catch our hero, he will inflict huge damage on him. Although at the last moment you can always make a dash to the side.
Sometimes the enemy will try to take a picture of us with a camera to slow us down. In addition, orange-colored cubes will begin to appear on the arena. If you touch them, there will be an explosion. That's all. In the end, we will defeat this dangerous enemy.
We watch a cut-scene in which Mira and Lily will participate, and then we watch the appearance of a giant monster.
Chapter 9 - New Evil
We head to the altar for rituals and move to another location. We pass through the door and go down the stairs, ending up in a room with several chairs intended for torture. We collect useful things and continue our journey. We go down again and turn right to find a small opening leading to a secret room with various objects. We take them all and move on.
We head to the basement, which has a closed grate and a mechanism for opening it, which does not have a lever. There will be many locked cages in the basement. We examine all the cameras and kill the enemies (one shot to the head will be enough). The fact is that when we find the right handle and disconnect it, the cages will open. All lying monsters with whole stumps only pretend to be dead, so we shoot them in the head. By the way, in one of the cells on the left there is a figurine with a key. We select it after opening the doors.
We move to the cameras located in the right wing, and next to the last cage we look for a lever and remove it from some equipment. As a result, all the cameras will open, but since we have already killed all the monsters, we can only collect loot from them. Then we go to the mechanism and find on the right side of it a grate that leads to another room. In it we look for an interesting page (one of the documents) and a pouch for the Guardian crossbow.
Next, raise the grate by placing the lever in the mechanism. There will be several cells in this corridor. Pay attention to the second one on the right. We enter there and deal with the Mobius operative (if he turns out to be alive). On the left side of it we find a hole. We squat down and crawl along it in order to reach another cell and use the device to search for a new memory.
We do the same with the cell on the left. It will be open - we go inside, break the boxes and look for a hole that leads to another chamber with a dead body and ammunition for a pistol. The corpse next to the door will turn out to be a living dead, so first we kill him with a shot in the firebrand.
We watch a few nightmares and strange visions, and then find ourselves in a room filled with burning dead. We kill them all, and then we approach the wall with the symbol in flames. There will be a passage and we can use the mirror to move to Sebastian's office and acquire new skills or open additional lockers. Then we head to the spacious hall and reach the closed grate.
Climbing up one of their ladders yellow color and look for 4 valves. First, turn the extreme valve on the left side to adjust the plate closest to the grate. This is easy to do - just turn the plate towards the gate with a narrow part. Although it is better to first adjust the second lever, located on the left. We need to align the left plate with the two extreme exits.

Then we begin to rotate the center so that the wide channel begins to coincide with the top one. Next, turn the left handle again to turn the far plate over. As a result, the narrow part will be turned directly onto the grate. At the end, turn the extreme valve on the right so that the channels on the right side coincide with each other.
Chapter Ten - Originally Hidden
We get acquainted with Torres, but first we destroy all the monsters. First, they will attack us from the front, and then from behind. In the end, they will completely trample from all over, besides, we will have to deal with several creeping freaks. After killing the mutants, we follow Esmeralda into another room. Then we talk with her on various topics.
Next, we will need to follow our newfound partner and help in all her endeavors. In a couple of minutes we will meet the enemy with a flamethrower. He will quickly get away, but at the same time he will leave behind a lot of fire monsters. We deal with them with a sniper rifle (one accurate shot will be enough to kill one enemy). then we approach the tree on which the red flag flaunts and go down. We speak with Kidman and Torres, and then we are waiting for the beginning of the next chapter.
Chapter Eleven - Reunion
In the shelter we find a diary (one of the documents), which will lie on the table. In it, we will be able to find out why exactly Esmeralda decided to join the operation and save Lily. Inside the box, located in the room, you can find a cryo-bog. We talk with Kidman and find out that a certain gift has been left for us in Sebastian's office. We find a mirror and move to the office. Then we go to the room where the information board is located. Under it we find a new slide.
We use the computer to return to the "Network". We search the room and pick up the capacitor needed to craft the shells used by the flamethrower. We leave and find the gate ahead. We click on the electrical panel on the side and activate all the toggle switches, since only in this case we can get exactly 10 luminous bulbs.
We find out that Father Theodore has already been here. We turn to the left, where the charred body lies. Near the door we see a red bedside table on which candles are burning - we examine it and find a slide.
We enter the room on the right side and find the dead body of the Mobius operative there. We move the cart and get access to the box of ammunition. We pass into the Hoffman shelter, but the girl will not be here. But we will find a memory in which we learn that Hoffman went to the back of the laboratory in a closed area. To begin with, we study a PC nearby to obtain a new file (one of the documents). Then we head to the closed area and find the dead body of the Mobius operative behind the corridor. We examine the corpse and find a pouch for a shotgun.
We go down the elevator. Ahead we find several turnstiles and two bodies belonging to the guards. On the left side, a PC and a room with a mirror will be visible through the window. We approach the window and start working with the computer to get another file (one of the documents). We pass through the laboratory rooms and head forward until we see a new memory. We find out that we need a cerebral chip to open the door.
We stand facing the door, which requires a chip. Turn left and go through the screens. IN new room find a new report (one of the documents). We examine the hall and find a door next to which hangs an electrical panel. We shoot at it from a crossbow, using an electric bolt to open the door. However, we do not go into it, but turn left and find a ladder that leads up. Again, we are not in a hurry to use it, but instead we find a small door on the left, leading straight to the morgue. We go inside and head to the last room on the left. On the gurney we find another report (one of the documents).
It will become very cold again. We are trying to go back, but a mysterious ghost will attack us again. We avoid it, hiding behind couches and pillars. First, we try to go through the right side, but the girl will drop a huge pillar, blocking our way. We go to the left and go down the stairs. But the nightmare will not end there, as we have to constantly change our direction in order to get out of the trap and not become a new victim of the ghost. However, here you can cheat a little and just run forward. The fact is that after the witch kills us, we will resurrect in the place where the woman last moved things, that is, we will be closer to the exit.
We continue to run forward along the corridor and get to the hall with a wheelchair. Then we turn right and on the table we find a report (one of the documents). Next, we move to the left side of the room and look for a letter on the gurney (one of the documents). As a result, Sebastian manages to kill the part of himself that was left in STEM after visiting The Lighthouse. We will automatically receive a new-old revolver. Do not forget to find a slide on the table near the PC.
Then we go back and climb up the stairs. We kill all opponents, we pass into the laboratory at number 3. We head to the back room and find a stranger on the operating table. We approach the computer and click on it to get the file (one of the documents). Then we go to the laboratory at number 2, located on the same floor. We use the device to view a fragment of memories. We search the corpse of the Mobius operative and find a pouch for syringes.
We leave for the 3rd laboratory, located on the second level and go into the room where the corpse lies on the table. We examine the plates and find digital combinations on them. We try to enter all of them on the panel located near the legs of the corpse. One of the codes will work and the chip we need will be pulled out of the worker's head. We take it and go down. Then we pass through the necessary door. By the way, in our case the combination looked like this: 0128 . It is possible that it will work for you too.

We get to the 4th laboratory and meet Yukiko and Liam. We have to deal with the latter - just shoot at his little head from a sniper rifle 5-6 times. Do not forget from time to time to press the levers that activate the fire extinguishing system. Having dealt with the enemy, we speak with Yukiko and select a faulty flamethrower.
We enter the new laboratory and take out the communicator to view a new memory. We look around and go along the corridor ahead to the room with the equipment that our past enemy asked to destroy. Torres will come in a few seconds. However, we are not in a hurry to complete the task. We go around the generator and find a figurine with a key. Then we speak with the girl and order her to destroy the system.
Chapter Twelfth - The Abyss
We find ourselves in an unfamiliar area where we were dragged by Theodore. We head towards the light, turn right and approach the second source. We find a pouch for a pistol near him. Then we move forward, cracking down on all enemies. First of all, we deal with all the opponents, and then we turn the handle near the gate. The new location will be replete with monsters of different tailoring - we will need to reach the ladder that leads down. We go there and view the cut-scene.
Important: A statue on fire will appear on the screen at a certain moment. We approach it and take a page with interesting information from the altar (one of the documents).
Once in the main character's house, we leave the bedroom and head to the children's room. We select the slide located on the shelf on the left side. In the room near the ladder that leads to the first floor, we look for a mysterious symbol, which is another Easter egg - now on The Elder Scrolls Online.
We go down to the first floor, head to the kitchen and pick up a letter written by Mira from the table.
Chapter Thirteen - Stronghold
We speak with Yukiko, and then we select an assault rifle, which lies near the corpse of Torres. By the way, we will find out why exactly Esmeralda wanted to save Lily. We head to the PC standing nearby and talk to Sykes, who will give us one more additional task.
Side Mission: "The Last Step"
We get out into the street and notice the enemy, wielding a flamethrower. Be sure to kill him, because after his death we will be able to find the missing part for our own faulty flamethrower. Then we go towards the theater, but before reaching it we turn left. We go down to the fault, and then we rise to the parking lot on the left side. We use the device to find the resonance point. We go to the body of the Mobius operative. We search his corpse and take away the pouch for a sniper rifle. By the way, not far from here is Sykes' hideout.
We go to a safe place, we speak with the technician. He will show us the computer. Click on it and move to the sublevel. Here we deal with all the enemies in the corridor, and then we go through the air duct and get into the next room. We kill other enemies and we reach the electrical panel. Then we lower the 1st, 2nd and 4th toggle switches. We head to the door leading to the laboratory. Inside it, we contact Sykes. We watch the cut-scene with the disappearance of the engineer, and then we head to the room with the capsule and raise the slide from the stand. To the left on the floor there will be a suitcase in which we can find a double-barreled shotgun.
Note: If you carefully read our The Evil Within 2 walkthrough, you currently have exactly 10 slides. It remains to find the last one. Go to Sebastian's office and study all the slides, remembering to discuss them with Kidman. Then follow the cat and take the last slide.
We add that in Union we can meet several monsters with flamethrowers - we deal with the second of them and create a flamethrower for ourselves using the crafting system in our inventory. In the laboratory, we should also study the document on the emergency exit from STEAM. Therefore, it is still unclear whether Sykes was able to get out.
Having completed this secondary mission, we head to Sykes' hideout and find a letter from him on the table (one of the documents).
We leave into the city and go to the lane with the garbage truck, located to the right of the Devil's bar. There will be a dead body of an operative, after a search of which we can find a pouch for an assault rifle. The second pouch for this weapon lies near the corpse, located behind the Abode Hotel. Do not forget to also visit the Devil's bar, where there is a new figurine with a key (we study the corridor with Stefano's painting). We enter the hotel, then we talk with Hoffman. After talking with her, we take a good look around - on the table opposite the fireplace there will be a diary (one of the documents).
We go to the reception desk and look for a mysterious mug, which shows the logo of the company that was present in Prey (2017).
Chapter Fourteen - The Burning Altar
We continue to move forward, picking up various supplies. We go up the stairs and find the writing of Theodore I on the altar (one of the documents). We open the door in front and find ourselves at the fork. First of all, we go to the right side and find a room with a mirror. Here we select the assault rifle pouch lying on the table. Further we go to the left and we get into the hall with the suspended cages engulfed in flames. There will be fiery enemies that you can easily shoot down.
Then we see a couple of passages that lead to the same place. First, we go into the passage, in which we can see pipes with a spark. We approach the grid and go down the stairs. We kill enemies behind bars and only then we pull the handle. After a while, the grate will open. We search the room and return, as another grate should also rise.
We go into the second opening, follow the corridor to the right side and in the room next to the wall we find another lever (it will not be easy to find it). We pull for it and see how the necessary gates open. We pass through them and go up the stairs. We turn the valve and thereby turn off the fire. Let's move forward a bit. We enter the room on the left side and pick up the second scripture (one of the documents).
We continue to climb up and shoot the small handle to turn off the fire tubes. This mechanic was used in the original. We go along the wall to the right and find the door. While approaching it, opponents will attack us. We kill them, go inside and find a pouch for a shotgun.
Then we make our way through the fiery obstacles, deal with all the monsters and head to Theodore on the elevator. Once at the top, turn on the communicator and use the stairs in the room to get into the pool of blood. Here we are looking for a new memory.
We start watching a cut-scene, after which we will have to fight all the monsters from the first part.
First of all, we deal with a psycho wielding a chainsaw, then we watch the video, and then we approach him and cut the poor fellow in half. Then we kill the butcher three times, wearing a safe instead of his head. A cut-scene will start, which will show how another creature is selected from the safe. We can either shoot her or try to lure her into the flames. Watch the video at the end.
Chapter Fifteen - The End of the World
We leave through the door and see what happened to the world. Here we have to chase Mira, shooting ordinary opponents and killing one thug (we shoot at red spots).
Walking through the snow-covered location, we stop next to the pillar and use the communicator to listen to a new piece of memories. We turn right and find another piece next to another pillar. We continue to go to the right and reach a tall building, where we can view the third memory. We rise towards the structure, look at a new piece and go upstairs. Then we watch the cut-scene.
Here the battle with Mira starts, which will become a huge monster. The fight with her is relatively easy. First, we shoot her in the stomach, in which you can see a luminous spot. When it explodes, we destroy one of the hands of the monster. With this limb, the boss will grab the main character, but it is enough to shoot her with a pistol several times. Next, we tear off the second handle, and at the end we make several shots at an empty firebrand of the enemy. We can replenish ammunition by destroying frozen enemies and destroying spiders.
Chapter Sixteen - Exit

It's still easier here. We will need to reach the house, go to the top floor and go into Lily's room. Along with this, it will be necessary to take control of Kidman and deal with several Mobius operatives. Then we watch a long cut-scene. Congratulations, you have completed the game!
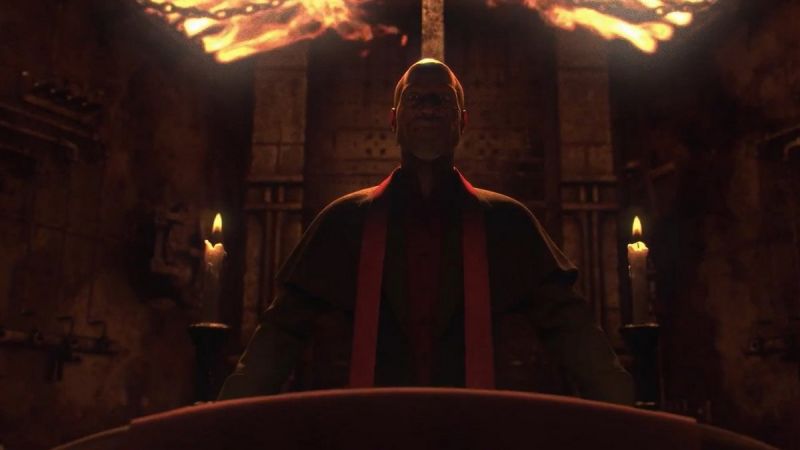
At the beginning The Evil Within 2 Walkthrough does not include anything complicated, the chapter is absolutely linear. The main character is Detective Sebastian. Ahead, the house of the protagonist lights up, inside of which is his daughter. You won't be able to get through the front doors, so make your way through the window on the right side. Climb up to the 2nd floor. There is a daughter in the children's room. Upon arrival, a screensaver will begin.
Next, the hero wakes up in a bar. It's been 3 years since the fire. Next, an interesting dialogue is tied up with Kidman from the last part. As a result, Sebastian is immersed in the virtual world of STEM for the 2nd time. Go to the hero's office, in the police station. After Kidman contacts, inspect the drawing and photos of the previously missing agents (they will have to be found in the story).
Chapter 2: Something Went Wrong

It's time to move on: exit the office, inspect the table next to the cat. To save your progress, use the communication device in your suitcase. You will have to move between the memories of the hero with the help of a mirror. When the hero approaches the mirror, then it will break and the cutscene will start.
Sebastian will be in his house with his family, but soon he will be thrown straight into the museum. Approach the painting, a door will appear. Through the doors, the hero will enter room 102, inside which he will find the first agent - William Baker. The body of this man froze at the time of the murder. Examine the murder scene using slow motion and rewind. Take the evidence.
There is a closet in the room on the right, and behind it there will be a passage further, so move it away and go further. There will be a telephone on the wall on the right side, but picking up the phone you can only hear laughter.
Climb up to the 3rd floor. Find a room with red curtains. In the next room there will be a new scene: a photographer kills a man with a knife and at the same time photographs this moment. The corpse then freezes. You should at this time hide from the photographer behind the furniture on the left. At some point, the maniac will leave.
Through the corridor where the paintings are, go back to the house with the stairs (this level has now changed). Get to the 2nd floor and go through the hall with the sculpture of a woman. Get down to the elevator. Get through the grate. As a result, find yourself in a room with several hanging corpses. There will be an eye on the wall, and a camera next to it. Approach the camera. In place of the eye, a door will appear next. Come out.

Next to the next glass, carefully examine the photo. At a certain point, a monster with a saw will appear in the room. Now you need to get out into the corridor and run forward until you come across a room in which there is a ventilation pipe. Crawl along the shaft into the next room, but don't relax, because the pursuit continues in this room. In the end, the monster will have to be fought and at the end of the battle the hero will receive a knife.
Soon the hero finds himself on the edge of the city. Examine the rooms and take a pistol at the exit from the house. Now you need to get to the main part of the city, but along the way you can see a few houses. On the approach to the city, you will see how several agents shoot back from the monsters. One of the agents manages to escape in a house nearby. I recommend making your way to the house stealthily, killing enemies one at a time. As soon as you are inside the house, the cutscene will start and the third chapter will follow.
Chapter 3: Resonance

In the third chapter, the passage of the game The Evil Within 2 involves the study of the starting area of Union. Therefore, it will be possible to get a couple of additional tasks (for this you should talk to Liam first). If you have little health, then try not to waste first-aid kits, but just drink coffee.
Therefore, when you run around the city to your heart's content and find out how the nurse used the mirror, follow her. So the hero will be in his office. By secondary task "Unusual signal" you will need to get to certain points on the map and at the end reconfigure the communicator.
Once you pass through the mirror, move forward along the corridor. At the end, the nurse will reappear. She will go to the chair, but will soon disappear. You should sit in this chair. Thus, you will be taught how to upgrade the main character with new abilities and characteristics. So after that you can leave the office and go back to Comrade Liam.
According to the plot, the first step is to get to the local eatery to find daughter's ghost hero. Upon arrival, you will need to follow the ghost using a special device. Keep moving until you reach the closet. To go further inside, go towards the refrigerator. Pick up toys, the cutscene will start.
It turns out that Lily really was here, and got out of here through the window. Exit the building and look for a garbage can next to it, near which the hero's communicator will pick up a new signal. In addition, monsters will appear in the same place (in order not to waste a lot of ammo, try to shoot in the head).
The third key point with a signal is located near the house, next to which there is a pickup truck. This time, Lily's silhouette will be hiding in the thicket. Following the tracks, you will reach the car, next to which you will see how the girl runs inside the building.
Move to the marked building. There will be many enemies around, so try not to get into the thick of enemies. Pass the fence, after breaking the castle, and then shoot a couple of monsters. At this point, you will now need to activate the power supply in order to open a further path inside the building.
When you find yourself in a warehouse (where the road will be absolutely linear), move forward, destroying all enemies along the way. There will be a workbench behind the door. On the floor above, there is a room with a girl's toy inside. After interacting with the doll, a cutscene will begin. After the video, exit the warehouse. Soon the hero will stumble upon a killer photographer. A new splash screen will start.

Immediately after the cutscene, you will have to fight enemies, which you will not be able to escape this time. After the massacre, talk to Liam. To finish the third chapter, you just need to go back to the shelter.
Chapter 4: Behind the Scenes
Now O'Neill will give the main character the password that is needed for the computer in the shelter in the north, so go there. Move on until you reach the elevator. On the left side there will be a locked door. You can open these doors with an electric bolt if you shoot directly at the control panel. I recommend opening the doors for the reason that you have a short way back.

Behind the huge door next to the elevator, a huge monster will be waiting for the hero, but since he will eat the corpse, he can be killed secretly. So you can immediately go down to the floor below. Along the way, you will meet another enemy who pretends to be dead. At the end, unlock the doors that block the passage on the left side (to do this, connect the green and red lines).
Just outside the door, Sebastian will find that the system has been rebooted, so everything protective system buildings fell into disrepair. Because of this, monsters will immediately attack the hero, so you have to fight them.
After the massacre, go to the blocked barrier to break the lock and open the way further. In the tunnels, also be sure to pull the lever to clear the passage and go down. At the end of the level there will be a ladder, and next to it is the corpse of an operative (who will have ammo). In addition, at this stage of the passage you will receive a gas mask, which you will have to use, because the area around will be infected. In a gas mask, the gameplay will change a bit, because you have to play from the 1st person.
Move forward and kill all the enemies along the way until you unlock the doors on the level below, after restoring the power supply. Immediately after the corridor, Sebastian will suddenly stumble upon a new monster, which must be killed as quickly as possible, otherwise he will quickly get to the hero and finish him off.
After the battle, you will need to solve a simple switch puzzle. The correct sequence is "1, 2, 4 (down)". Now go back. As soon as you leave the infected area, you will stumble upon a new computer - study it.
Move to the very end of the room, where you will find the last key point with a signal. Once everything is set up, go back and open the ventilation shaft. Go through the pipe to leave this location. At the end of the path, the hero will be right at the city hall.
Chapter 5: Waiting
Study the area carefully. For example, at this location you can find the key to open the cell, fragments of memories (in the gazebo), on the right side of the agent’s corpse there will be a pouch for syringes, and in the center near the city hall gate there will be a photo.
Boss: Guardian. On the square in front of the entrance to the city hall, a battle with a multi-headed monster with a saw will begin. You had already met her before, but then it was impossible to rebuff her. However, even now, this monster can simply be tricked and run past. Be sure to use the advantage of the terrain in the battle with her: on the right side there is a flammable barrel, on the left side there is a huge puddle of fuel. In addition, next to the fence on the side is a room where you can temporarily hide from the monster.
The central passage to the city hall will be locked, so blow up the car on the left and get to the back entrance. Inside the basement, get to the inside of the building. Following the hero will meet Harrison, who will explain how to activate the stabilizer, but immediately after that he will die.
Eventually, following the linear path, you will soon find yourself in a room with a painting of a woman. There will be a shooting area nearby. You need to find two items - rose and necklace. Hang the necklace on a mannequin and place the rose in a vase. Turn the mannequin forward. Now go to the camera and take a picture. As a result, a passage further will open in the background.
At the end of the corridor, examine the paintings so that the image of the daughter appears. Get to the room with the emitter inside. Start recovery. The photographer will appear. He will introduce himself, after which a new massacre will begin.

Boss: Obscura. Despite the fact that only 90 seconds remain before the restart, the monster can slow down time, which thereby delays the battle. To defeat the boss and the installation continued its work, it is necessary to divert the attention of the monster to the hero. You need to shoot clearly at the camera lens, which is the head of the obscura. And it's best to use explosive bolts. As soon as the time runs out, the monster will instantly die. It remains to go back to the streets through the central doors and contact Liam, who will tell you what to do next.
Chapter 6: On the Hunt
Go back to O'Neill using the "Network". Use exit D5 to go through the new unlocked doors (short path). In the next room, the hero will hear the voice of his daughter. To the left of this location is another door that can only be unlocked by solving a simple line puzzle.
In the corridor, kill all the enemies and get down to the level below. Despite the fact that the corridor will be covered with a strange white goo, still move forward to the blocked doors. Opening them, you have to fight a big monster. The path is linear, so you will eventually reach a door where a cut-scene involving a monster will begin.

After the fight with the strange white monster, go to the doors, which will be covered again with a strange white goo. Unlock the doors, take the document, and after the video, immediately study the computer and return back to the city. Find a key connection point to move on to big theater where the maniac photographer Stefano is located.
Chapter 7: Thirst for Art
Now we need to get to the key point where the signal comes from. Upon arrival at this place, the hero will find a living agent who is defending himself from monsters in the local parking lot. Help him and kill all the monsters.
After a little turmoil, the agent will tell a little about himself, after which he will provide access to his own shelter. To complete the current quest, visit his hideout and be sure to drink coffee to heal. In addition, in the shelter, Sikes will issue a new task, during which, again, you will have to look for signal points.
Leave the shelter and move towards the signal. In the end, you will find yourself in a diner, where a fight with a monster with a saw will begin. In battle, again, use the surrounding objects to resist the monster (explode various kinds of balloons and hide behind cars).
There are documents on the rack inside the building. Go to the room at the end. There will be a picture in the room - click on it, the animation starts. The hero will be on the other side of the picture. Move forward along the corridor to find the key, which will lie in the severed hand. In just a couple of steps, you will stumble upon locked doors and enemies. Kill everyone.
Behind the door will be located a room with stretched wires. Go forward, bypassing all the traps along the way, while trying not to touch the wires. At the end, there will be a curved space in the center of the hall - interact with it.
When the distortion is destroyed, the hero will instantly be back in the diner. From here, go to the next signal, which is now in the local inn" Abode". Climb to the top floor of the hotel, click on another painting and find yourself inside it.

In this place, you will again need to find the key first, but you will need to beware of the wandering Obscura. When you find the key, go back and find the plot item, which is surrounded by different wires. It remains only to destroy the second creation of the photographer, so that the path to the theater opens.
Chapter 8: Premiere

After destroying all the paintings, you can enter the theater. Inside, go up to the 2nd floor. In the great hall of the theater is Stefano. In addition, a huge eye will track at the top of the main character. Getting caught many times is highly discouraged. Run from cover to cover.
Boss: Stefano. The enemy will have only one knife with him, but will move extremely quickly, which will make it difficult to kill Stefano. By this time, you need to have a large supply of shotgun ammo (the highest chance to hit with this weapon). The eye at the top will periodically shoot tentacles in 3 directions, so stay close to the walls. If the enemy tries to take a picture of the hero, then you need to run away as quickly as possible, otherwise the hero will be slowed down and very vulnerable. After the victory, Lily will appear, but she will be frightened and run away to Mira (wife), who has turned into a terrible creature from white gel.

Chapter 9: New Evil
After the cutscene, the hero wakes up in his office, and an altar will appear nearby. Find your reflection in the catacombs, find all the items and open the doors to go further. Behind the door you will hear a voice. Turn right, and at the end go into the corridor that leads to the mausoleum.
Find a door around the corner of the next room - it leads to a lever. After activating the mechanism, monsters will appear. You can kill them all, or you can hide in order to calmly pass them all. To go further, you will have to go back to the crypt, and from there to the passage on the right, where the altar is located along with the enemy (there will also be an improvement for the crossbow).
You need to get to the hall, passing all the cells with infected people along the way. At the same time, pay special attention to the altars, because one of them will contain important information. After taking the document, get to the gate on the right side (which is next to the tomb). From there, turn left and you will see a new corridor. The corridor will lead to the mechanism control panel. Install the handle, then activate the mechanism.
So you will find yourself in a new location. Explore everything around, collect all the ammunition and leave the area. After passing through the hall, you will find yourself in a room with one bed. An enemy will lie on the bed - finish him off. Use the passage in the wall on the side to examine the memory fragment. Come back.
At the end of the corridor is another room where there will be stairs. Along the way, the ladder will break, so it will be impossible to go back, so keep moving forward. The cutscene will start shortly. Go to the main character's house. A cut-scene will start. Kill all enemies.
After the fight, carefully inspect the symbol on the wall in the room. Thanks to this symbol, it will be possible to unblock the path further. Use the mirror to return back to the study, restore your health and continue exploring the house.

In the room next door is pressure plate, and a little higher - mechanisms in the form of a steering wheel. Scrolling the steering wheel, you thereby change the location of the plates. The puzzle is simple - you need to arrange the tiles in such a way that in the end the main symbol becomes even. Once the puzzle is solved, move on. The splash screen will start.
Chapter 10: Originally Hidden
Now, when Sebastian regains consciousness, he will find himself in a completely new place - in a small wooden hut. Soon, the possessed begin to attack this house. A new agent (girl) will help to defend the house. There are many different supplies in the house, and in the center there is a barrel of fuel. There will be four waves in total. In the first house, 6 Possessed attack. In the second, 10. In the third, again, a dozen possessed, but from two sides. In the final wave, the dogs will climb inside the house.
After the massacre, the hero meets a girl - her name is Torres. Torres along with Kidman, Theodore and Marie. Based on the conversation, you will also learn that they all had a plan to destroy the Mobius company, but everything went wrong when Theodore and Marie turned into monsters.
Together with Torres, the hero goes to the camp, which, upon arrival, is attacked by monsters. It is necessary to secretly get to the other side of the camp. You can pick up a lot along the way. useful items. It is most effective to kill monsters with a crossbow directly to the head.
Chapter 11: Reunion
Go forward along the corridors. On the way, turn on the machines in the electrical panel. Enter the room with blood and candles. The path is linear, so when you need to go to a closed laboratory, go to the next area of the dungeon. Through a bright white corridor, the hero will enter a large hall with huge flasks, inside of which there are possessed. You can't go any further until you get union chip. Therefore, when you get to the desired computer, enter the password - "0128".
Thus, the hero will receive a chip, but it will be necessary to find another computer through which it will be possible to upload the file. And immediately after this action, the light in the room will disappear, followed by the infected. Kill them covertly or head-on - it's up to you now. The main thing is to get to the fourth laboratory, where the cutscene will begin, in which a new boss will appear.

Boss: Flamethrower. Flamethrower will be O`Neill who came under the influence of Father Theodore. To defeat O'Neill, you will have to shoot an incredibly lot at him. Therefore, if the cartridges run out, just run in a circle, because in two certain places the cartridges will appear constantly. In addition, nitrogen tanks and fire extinguishing levers are in this laboratory. The boss will not receive damage from these two objects, but will be disoriented, thanks to which it will be possible to buy time in order to better aim or to heal.
After the death of O'Neill, it remains to go back to the agents and call Torres, but before that you should definitely prepare.
Chapter 12: The Abyss
Now the hero wakes up in a terrible place, among the ruins and blood. Despite the vast expanse, the level is linear, because you always need to move forward, stumbling across memories and all sorts of tricks along the way. In addition, there will be a lot of enemies here, but each of them can be killed stealthily by sneaking up from behind, since the location is very dark. I recommend inspecting all the ruins in order to collect all sorts of useful items.

Chapter 13: Stronghold
When the hero comes to his senses, you will learn that he accidentally killed Torres. Be sure to take her weapon. In addition, now the hero has returned back to the city, where Theodore's fortress appeared in the middle.
The area around will be filled with monsters. In addition, flamethrowers will run around the location and there will be two of them in total - try to avoid them in any way possible. Because they take a long time to kill. However, if you kill at least one, then you will get a balloon. To fix the flamethrower, you will need two cylinders, so if you finished off one, you will have to finish off the second. In the end, the location will be updated, so it will have a lot of new secrets.
But in any case, you will need to get to the hotel, which is located in the south. Together with her, after the cutscene, the heroes use the device to go to Theodore's fortress, bypassing the fire. The dome will protect from fire, but Hoffman is responsible for it, so she will need to be covered from all fire monsters that will make their way inside. At the end, the girl will die, and the hero will get to the church.
Chapter 14: Burning Altar
Inside the fortress, as expected, you need to get to the top floor. There will be no enemies in the first room, but there will be many useful items. In the next room there will be a fork: the road on the left - lead to the 2nd floor, the road on the right - leads to a mirror and other useful things.
There will be many burning enemies at the top, which should be dealt with strictly separately. Make your way through the room and get to the room on the right, where there will be a mechanism. After opening the gate, the hero will face three fiery opponents. After the fight, go up to the floor above. At some point, the hero will stumble upon a wall of fire, to remove it, you need to shoot the lever on the pipe above.
In the next room, take the document and, if necessary, use the mirror. Overcome another wall of fire, deal with all the infected and move on, collecting all the resources along the way.
Very soon you will stumble upon a new mechanism that is responsible for the gate. After activation, the hero is attacked by several monsters (only after killing them the gates will open), and then a cutscene will begin, in which Sebastian will return to the old memories associated with the Lighthouse.
Boss: Sadist. Sebastian will appear in a rather narrow corridor, where a sadist with a chainsaw will chase him. At this stage of the passage, all that is required of you is to dodge in time to then attack the enemy from behind. As a result, the main character will cut the sadist in half.
Boss: Guardian. Following the hero will fall into the basement to the safehead. The battle tactics are simple: run in circles along the corridors, while shooting at the boss from afar. When two safeheads spawning at the same time are killed, the boss will be defeated.
Boss: Laura. It will be a little more difficult with her, because up close she kills with only one hit. So you have to constantly run away from her. Shooting at her is useless. The essence of the battle is that it must be driven into a fire trap, after unscrewing the two valves that are responsible for the gas supply. After that, she must be lured to the center of the location, stunned with an electric or cryo-bolt so that there is enough time to pull the lever (she can also be killed with a flamethrower).
After defeating all the monsters from the past, the hero will return back to Theodore, but it will not be possible to kill him, because Mira will appear and ruin everything.
Chapter 15: The End of This World
Walkthrough The Evil Within 2 does not end with the last chapter. Despite the fact that all the enemies were killed, a completely new problem in the face of the protagonist's wife Worlds. The white gel that emanates from her filled the entire city, while shattering the world into pieces. Follow your wife through the rubble.
When you get to the road, you'll have to fight the White Gel Possessed. They will be a bit more durable than normal enemies, but they will still be easy to deal with. There will be three skirmishes with white gel enemies in total. The first fight is a couple of possessed. The second fight is a dozen ordinary white possessed. The third battle is a large, incomprehensible monster, which consists of white gel and pillars. When fighting this monster, try to shoot only at the red dot on the body of the monster. If possible, blow up barrels nearby. Having reached Mira, the hero, along with her, falls into another reality.
Chapter 16: Purgatory
You need to get to the house on the mountain. It is in this house that Mira hides her daughter. Along the way, you can collect the remaining fragments of memories. Closer to the house, you will have to climb the ledges higher. A cutscene will start at the top. It turns out that Mira hid her daughter in her own reality and at the same time took part of her strength in order to protect her in the future. She will not let her take her daughter, so she will have to kill her.
Boss: Mira. Mira instantly turns into a huge white monster of white gel. Due to the long range, the shotgun is useless against her. And the fight itself will consist of several key phases.
- First phase. At the very beginning, you should try to shoot only in the stomach. When the armor is destroyed, a weak spot will appear under it - the heart. Mira will then start attacking with her hands, so keep an eye on her movements and step aside in a timely manner. Once you deal enough damage to it, it will bleed out, and spiders will form from the blood - a shotgun will come in handy at this stage. Spiders will drop ammo.
- Second phase. Now the most vulnerable places are the points on the shoulders. Mira will continue to hit with her hands, so dodge and shoot at the growths. As soon as one of the growths takes enough damage, the arm falls off. To finish off the hand completely, you need to shoot further at the yellow bubbles.
- Third phase. In the end, you must shoot strictly in the face. At this stage of the fight, Mira will be defended not with her hands, but now with tentacles, but the tactics do not actually change, so the main thing is to continue to simply dodge. After the battle, a cutscene will start.
Chapter 17: Exit (Final)
In the role of Sebastian, it remains to get to the house, after which you will have to take on the role of Kidman, who, in the control room of the Mobius company, follows the further part of the plan. Therefore, fight off all agents in the control room.

As soon as control returns to Sebastian, pick up your daughter and leave the house. A cutscene begins, after which control again passes to Kidman: continue to kill agents, but already in the corridor. Get to the central hall, where the main character lies in the bathroom. As Sebastian, run with your daughter to the nearest mirror. At the end, the heroes get out into the real world, and Mira becomes the core through which it penetrates the company's network and kills absolutely all agents. The final screensaver begins, in which there will be an epilogue, but it consists entirely of cutscenes, so the passage of The Evil Within 2 is considered completed at this stage.
So, the first meeting with the game. Meet the detective, whose name is Sebastian - he is the main character of this game. He and his partners go to investigate the place where the massacre took place. At the scene, experienced officers encounter a very mysterious force that kills our detective's partners and eventually gets to Sebastian.
After our detective comes to his senses, the world becomes completely different from what it was before. He ended up in a world inhabited by creepy and dangerous creatures, so Sebastian's main task is to survive and deal with whoever is behind it all. Your first difficulty lies in the fact that the main character is suspended on one rope, like a kind of pig, and a terrible Sadist roams the room - he is just huge and not too friendly. Examine the situation and soon notice the knife. The knife sticks out in some body that hangs nearby. Wait for the moment when this healthy Sadist will fall into the next room and swing quickly, then you will take out a knife and you will be able to free yourself.
The Sadist will be back soon. Since you have a knife, you will probably have the idea to fill it up - this is a mistake. We don't kill a sadist at all. Move to the room he passes into and immediately hide. As soon as he comes out at all, then run rather into the room and take the keys on the table, then carefully exit back. Move upstairs to unlock the doors. To distract the enemy, you can use the bottle.
Move forward until the siren goes off. Then a small scene and soon you have to run forward, avoiding the trap along the way. When you see a hatch on the floor, you will need to go down into it as soon as possible. After you go down, you will need to avoid various dangers. As you fall to the bottom of this bloody meat, you will be able to find a ladder by which you can climb out of here. Move on and near the fan on the wall - turn right and jump further into the water. Reach the next staircase and go upstairs, then move to the body, which is located on the office chair. Near the feet of this corpse, you can find an interesting note that will tell you where you need to move on.
Keep moving forward and again you will need to climb the stairs, after which you will find yourself in the next room. On the table, behind a metal grill, there is a leaflet that describes the principles of STEM functioning. Keep moving forward and soon you will go through the doors, after which you will enter the next room and meet your friend again - the Sadist. Rather, hide from him inside the closet nearby and wait for him to pass into the next room. You can climb out and carefully follow the Sadist to the next room. Wait for the moment when he turns away, then go into the room and immediately turn left - here you can hide behind a mountain of boxes. You will have to take the bottle in your hands and throw it to the door through which you once entered - Sadit will immediately turn around in the direction where the bottle was broken and you will thus be able to run to the next doors in the room.
Continue your journey through this Hospital until you find yourself in a corridor that is filled with wheelchairs. At the very end there will be an elevator, but on the way to this elevator, the Sadist will jump out soon from behind, so you will have to run away again. But the good thing is that the elevator will really be our salvation.
Now watch the introductory video and exit the elevator, then exit and move to the large double doors. As soon as the ground starts to tremble under you, then rather run and leave this huge hall, after which another video will follow.
Chapter Two - Remains
Take the newspaper that is on the table and do not forget to take the gel pack. Next, exit the room and fulfill the request of the nurse. You can also save your game. Next, go through the doors on the right side. Behind one chair there will be a part of the map - take it, then sit at this chair. Instructions will immediately appear on your screen that can let you know how you can improve your performance with the help of the found gel. Next, watch a short scene.
And here you are again in this dangerous universe. Move forward and soon you will need to pick up a healing syringe. Continue your way through this "landing" until you come across an animal skeleton. There will also be a box nearby, which if you open it, you can find the gel. Move on and find a lantern - take it and there will be another scene shortly.
As you get closer to the cliff, you will soon meet Connelly, who will be hiding something in his small tent. There will be a pistol nearby - take it. You do not need to use a pistol in a fight with Connelly, as you will spend a huge amount of ammunition. You can simply dodge him and run into his tent, take the body gel and move on with your business. In general, it is not necessary to touch it at all.
Your next destination is the Cave. Soon Connelly will also fall off you, so you can move on calmly. Look around carefully these surroundings and you can find more gel. The gel will come in handy in the future. Soon you will meet Leslie and you can learn how to disarm traps. Move on until you exit this cave. You will stumble upon one body, after which the game will tell you how to burn the corpses. Don't forget to go behind the truck - there will be more gel. Get down from this mound and on the left side, in the booth you can find more gel. Also here you will also find a part of the diary of our hero and a mirror that can move you to the room with Leslie.
Now save your current game and check out the brand new newspaper, poster, and documents. Don't forget to upgrade your character with the collected gel. Next, use the mirror again and return to the booth from which you came.
Go outside and again move to the left side. Keep going down this hill. Next, the game will tell you how to kill your opponents silently. Go into the house and follow Leslie. In front of the huge gate, smash the figurine on the left side - you can find a key in it.
After another scene, Sebastian will face two opponents. You can distract them with a bottle, and then quickly go through dangerous territory. But best of all, try to kill opponents and then search this area, as here you can find a lot of useful things.
Going further you will meet another enemy. There is nothing left for you except to sneak up on the enemy from behind and fill him up. Next, go inside the booth and pick up all the useful items. Now keep moving up to the huge house. Soon you will meet an enemy who is wandering around with a torch. You will need to hide behind the wall and wait for this enemy to turn his back on you, then just kill him. Now go inside this house and take the second part of the map on the left side in the closet. Don't forget to break the lying boxes (you can find useful things inside). There are doors that are barricaded with boards, but in addition, there is a trap among the barrels. So first you need to disarm the trap and only then break the boards. After removing all obstacles, go inside. Consider that you will meet your opponent again. But if you work fast, he won't even have time to hit you. After, take the gel near the entrance and the key on the right side of the entrance.
Exit and move to the gate. In front of them, rather, burn two bodies, but if you don’t, then you will provide yourself with additional problems. After, open these gates. Going further, turn left and you will stumble upon another cabin, inside of which the third part of the map will lie. Continue your way guided by the lights and ignoring all opponents (they still won't be able to catch up with you). Once you get to the second gate, the chapter will end there.
Chapter Three - Jaws of the Horde
Get out of the water as soon as possible and move along the pier, then climb the stairs. Burn the body and soon find yourself in small yard. Go to the building on the right side and disable the trap there. In this building there is a room in which you can save. But also do not forget to search all the houses that are located in this territory - you can find many useful items in them.
In the place where you saved - climb to the top and go further. Move until you meet a doctor named Jimenez. Next, another scene, then go to the gate that opened. Climb a little higher and there you will have to deal with the enemies (there will be three of them).
Carefully inspect the surroundings, as there are various ammunition, equipment and even grenades everywhere in the house. But the found grenades are best debugged for later, since for now you can cope with enemies without them. At the moment, the main thing is not to rush and carefully consider each attack.
Soon you will need to go down and go outside. Dr. Jimenez will just start to distract opponents to himself. But it's better to duck, as one enemy will still try to shoot at our hero. Next, clean the area very carefully. Enemies need to be killed in each house and as always do not forget to collect a variety of things.
Pay your attention to the fact that another Sadist has appeared here with a huge saw, but he is in a barrier and it may seem to many that he will not break out of it, but this is not so. Having come too close, he will soon get out of his cage and get to you, so clear the surroundings of strangers and only then can you go to him. Don't forget to save again before doing this.
Also, take a close look at everything around you. On the left side, there are two houses, and in them you can find ammunition for weapons, gel and other useful little things. And by the way, between the houses there will be a passage in which you can find a chest that also has useful items. In the second house, you can find a shotgun along with a bow. If the shotgun was not here, then check the far house on the right side. And keep in mind that on the right side there is also an observation tower, around which there are a huge number of traps.
Now it's time to deal with the most difficult opponent. To get started, make drop-down charges with grenades and your spare parts. You need to make three shots: the first - on the left side at the foot of one barrier - here you can hear a growl. The second one is in the corner where the pigsty is located, and the third one is in front of the very entrance to the barn.
Go further and the monster will soon break the barrier, but it will also explode immediately on the first mine. Now you need to wind it up for two more installed charges. You yourself will not explode on them. After the third explosion passes, then take a shotgun and kill the monster with it. You can ignore the rest of the opponents, as they are very slow and will not be able to give you any special problems.
After the fight, you can pick up the loot and open the gate.
Chapter Four - Patient
Follow Jimenez to the closed door - there is a mirror behind it, with which you can save your game.
Keep moving and after a while Jimenez will suddenly see his brother. This illusion will soon unfold as a normal skirmish. Try to kill your opponents with a headshot - this way you can save some ammo.
Go to the room where you will need to take the keys from one body. Do not forget to carefully look around - this room is usually quite rich in useful items, after the search, go outside. Move to the left side, then on the left side go through the street to the passage. There will be a door that you will need to open with a blow, and then go down two landings. Don't forget to search the rooms behind the doors - there are useful items here.
After the stairs, Lesky will be in the room, which will soon be attacked by an invisible enemy. You will have to hit the invisible one once, then get your shotgun and shoot him. Two scripted scenes follow.
After these scenes, our hero will find himself in an incomprehensible pit, which, as usual, is full of blood. Examine the columns - on one of them there is a lever with which you can drain this blood. Collect all the loot from the floor, then climb to the top (don't forget to disable the traps here). Revik will appear at the top for a short time, after which a huge number of enemies will begin to attack you. Dealing with all of them will not be too difficult, just try to keep a little distance and do not let them attack you. In the side room there are two barrels containing explosives. You will need to bring your enemies here and wait for the right moment to shoot. Then it remains only to finish off everyone who could survive.
At the end of the corridor there will be another new enemy - a spider, which by the way perfectly climbs the walls. Attacking her is useless, so you just have to run away from her. Run back - behind the door. In a room with a ladder, you will first have to press the button, after which it will block the doors. As a result, you will get some time to collect loot. Next, you will need to go down the stairs. As you find yourself in the next passage, you need to be careful - there are a lot of various traps that will kill you if you step on them. Run into the elevator, then go down and as the doors open, run forward - the spider will continue to pursue.
Rather, run into the door on the left side, and then hide behind it until it is locked. Now you can catch your breath, as you have finally reached a safe place. Next, you need to go down the metal staircase of a spiral type - here you will once again meet Revik. You should not come close, just run away in the opposite direction, after which a scripted cutscene will follow and at this point the chapter will be over.
Chapter Five - In the Depths
This will be followed by a corridor in which there are doors on both sides. You just go through all the doors, because inside you will surely find something very worthwhile. But you will have to act very carefully, because in some room you will probably be attacked by an invisible person. You can find it through the traces that it makes on the water, door handles and other little things. Use the shotgun to kill him.
Soon you will reach the end of the corridor, where go into another room and go down into the hole that is in the floor. Here you will need to fill up the rat, and then break the figurine, inside which you can find the key. The key can be used in the hospital on the chest where you used to save and upgrade your skills. Soon you will come across doors that require a key card to proceed further. You will need to go a little further, killing a couple more invisible enemies along the way (here it is better to immediately take a shotgun into your hands, since for example a pistol will obviously not be enough here). Do not forget to search the premises, in addition to the indicated card, you can find many other useful items.
Pick up a card, then quickly run back - no need to waste your time and ammo on opponents who are not worth it. You will have to move forward until you are locked in a room without any doors. Take a closer look and you will see small indentations on the walls.
Each such recess will open doors on the right side. Go inside and collect all the useful things. Be careful, there are a lot of different traps. As soon as you pass all three rooms, the passage to the fourth room will open for you. Here is Joseph and he will have to provide urgent medical care. Next, check all the rooms in different directions and continue to move along the central road. Soon there will be doors on your way, on which there are three booby traps - your new companion Joseph will be able to deal with them perfectly. Next, watch a short scene, after which move to the passage on the right side. As a result, you will end up in a hospital, where you will need to save the game and pump once again.
Next, go upstairs, where you will meet and soon fight with Julie. The battle will begin with the fact that the main character will first fall, after which he will certainly be attacked by a pack of opponents. Here it is best to use exploding arrows - this way you can blow up large packs of advancing enemies. Please note that some of your opponents will be carrying dynamite with them, so first of all you will need to shoot at them, after which you will kill everyone with a shock wave. The main detail of this battle is to prevent your enemies from getting as close to you as possible.
When you are done with all your opponents, then carefully listen to the following instructions of Joseph. Deal with the indicated cable and kill the next enemies. On the control panel, you need to set the following numbers: 22 and 5. Now watch another short video.
As the video passes, you will fall down, after which enemies will attack you from the side rooms, so do not mess around, but rather destroy them. Move on and soon meet Joseph along with Julie. Here we look at a couple of scripted situations, after which move along the next corridor, avoiding all the oncoming traps along the way. At this moment, do not forget to save your game and, of course, pump your hero as always, unless of course there is such an opportunity and need.
Somewhere at the end of this corridor you will meet two serious opponents. You can kill them with your explosive arrows from long distances. After them, you will meet with the Boss.
You will finally have to fill up the spider, and it is best to use fire against it. If you can lure her into the flames about five times, then she will surely die. It is for this that exploding barrels and a couple of fire traps were made here. The spider, in turn, will pursue the corridor, so you have to be careful and constantly monitor her. You will have to activate the switch when there are traps nearby. Once you finally defeat the crawling creature, you can go through the doors, where you will fight with a pack of enemies for the last time. At this point, the chapter will be completed.
Chapter Six - Not Ourselves
Move along the path in the mountains, along the way, do not forget to check the surrounding areas - here you can find items that are useful to you. About wooden doors our main character will meet his old friend Joseph again - he is just trying to plant his explosives to prevent the monsters from attacking.
On the other side of the door, you can find a Freeze Arrow. You will have to follow Joseph - he will lead you to the room where there will be two explosive barrels. Keep in mind that here you will be attacked by a group of opponents. You should blow up the barrels in the room in such a way that the explosion hits the arriving opponents as much as possible. As you defeat them all, a short video will follow, after which our main character will receive a new weapon - a sniper rifle.
Now your path lies to the tower. On your way you will meet enemies who will attack our hero from long distances. This is where your new weapon, the sniper rifle, comes in handy. Soon you will have a problem - a psycho with a chainsaw. To get rid of him, you will have to lure him to explosive barrels and naturally detonate them when the enemy is nearby.
Next, climb the stairs straight behind Joseph, along the way, burn one body. Now save your game and make some upgrades to your hero. After you finish with your business, then go to the elevator.
After leaving the elevator, you will find yourself on a huge stone bridge. Soon another scripted scene will appear, after which run to the dock made of wood - then take your sniper rifle and kill two enemies who are trying to kill Joseph. After a small operation, you will be reunited with your friend and another scene will follow. You will have to cover Joseph's back so that he can unlock the doors. Try not to spend too much explosive ammunition at this stage of the game, as they will be very useful to you in the future.
You need to make a small pogrom on the market: the more boxes you destroy, the more valuable things you will find for yourself. Then watch the next scene. This time, Joseph will cover your back. He will climb up the stairs and cover you with a sniper rifle. Here you will have to be as careful as possible, because going further, you will come across very large enemies, from which it is best to run until your friend fills them up himself.
Pass through the iron gates and move on. Also, do not forget to collect a variety of loot along the way. You will need a lot of explosives to fight a couple of Bosses, so we hope that we did what was indicated above (save the explosives). You need to aim at the body and it is desirable not to miss. After the Boss falls to his knees, you need to immediately finish him off. In the next step, you will wake up in the basement. Go further into the next room - here numbers will be drawn on the wall, and levers will be located on the other. You need to pull the ninth and fifth levers in order to continue on your way. Use a huge cage, and then collect all the useful loot that lies around. Now go to the locked gate.
At this stage of the passage, you are suddenly attacked by a dog, so you have to try to dodge its attacks. It is worth noting that it is extremely difficult to dodge it - the dog is fast, so shock and freezing arrows will come in handy here, of course, if you have not spent them. You need to hammer the dog at the moment when it is hiding in the local thickets. You just need to get a grenade and throw it straight to the dog in the bushes.
After a short video has passed, another dog will appear, but now you have to run away from it until you take points. Once you put them on, then go to the church. At this point, the chapter will be completed.
Chapter Seven - The Guardian
This chapter of the game will be very linear, but with very dangerous traps (most of them will kill you the first time). At the very beginning of the passage of this stage, move forward. By tradition, collect everything that has value. Near the stairs, your main character will be attacked - you can easily fight off enemies from a distance and shoot only in the head. And do not forget that the bodies must be burned.
Soon you will reach three torches, which you will have to interact with a bit. Here you will get your first old lithograph. In total, you will need to collect three pieces, after which you will receive a well-deserved reward. Do not forget about the hall - here you will also find something to profit from. Going further, you will stumble upon a room with monuments - here are recesses for your lithographs. First, insert the one you recently found. There are two doors in this room: on the left side and on the right side. The right door will lead you to a mirror where you can save and level up.
Open two valves, then go up to the next stairs. On your way there will be new enemies that you will have to deal with again. As you overcome them, then turn the wheel, which will open the passage, but here it is worth considering that the road back will subsequently be blocked. So it's time to search again.
Chapter Eight - The Grain Sprouts
Move inside this cave and soon you will come across a lever. Pull it and keep going. Cross to the opposite side and then you will not be touched by flying stones. Go around or kill another group of walking corpses and soon find yourself in the hospital. Pull the lever and watch another cutscene. After the video, a very nasty Boss will appear. You will have to immediately run away from him along the corridor, along the way you need to look for a place to hide from the pursuer. As you hide, you will have to quietly make your way to the doors, where a new video will follow.
Chapter Nine
We talk with the honey-sister and then go to the mirror. After you have left the Hospital, you will have to go to the local hospital. Here the only piece of advice will come in handy - try not to get caught by Ruvik. You won't be able to kill him, so you'll have to constantly hide somewhere. Go straight ahead and you will come to the doors, but in order to open them, you will need to perform three small operations on the human mind.
Go into the room on the left side and neutralize the monsters there. Insert a bolt into the brain and watch another video. Now you have to run away from Ruvik upstairs, along the way, do not forget to find the keys. Another key will lie in the library. Go back to the laboratory and insert another bolt into the mind of another patient. Now you can go back to the central doors and go through it. Insert two drum keys into the hole and set the following numbers: you need to put 11 on top, and put 2 on the bottom.
Go ahead and watch a scene, after which leave this building. You need to move to the local farm. Soon a big fire will start and you will have to pull the lever, and then turn the valve. Another not too friendly Boss will come to you. It is important just not to let him close to you and subsequently he will simply die from the fire.
Chapter Ten - Master's Tool
Go down the stairs. Go straight down at the bottom. Keep in mind that there are a lot of traps here and they are at almost every turn, so it’s better to kill enemies here, respectively, extremely quietly. Climb up to the floor above and from here go to the left side. Go further - there will be a blue door, next to which lies a spare part. Insert this spare part into the mechanism and turn it on. Now go up the stairs.
Chapter Eleven - Reunion
Swim to the surface and go straight along the corridor, killing all your enemies along the way. As a result, you will go out to the prison courtyard, where you will need to clear the area. Next, you will need to go through the water. You can distract monsters with the help of lying corpses. After crossing the bridge, you will need to kill another monster, then take the key from him and open the locked doors with the same key. You will have to move through the sewer path, killing hordes of zombies along the way. As a result, you will reach the iron doors. Then climb the construction site to the top and save your girlfriend. After the rescue, another cutscene will follow. As you see, then move on. Soon you will come across another lever - pull it and open the gate. You will be attacked by another monster from which you will have to flee. With the help of switches you can get rid of obstacles in your way. Cut in a couple more mechanisms and you can go to the elevator. We talk with the doctor and now the battle with another Boss. Against him, it is effective to shoot from your crossbow and use electro-grenades. After that, you will need to go back to the elevator and watch another cutscene.
Chapter Twelve - Trip
Shoot the monster right in the head. At one fine moment, he will begin to retreat - at this moment, take the ammo and first aid kit as soon as possible. Next, ride along with Kidman. As a result, you will find yourself at a dead end where you have to fight monsters. After a certain time, the Boss will return to you and this time you will need to shoot him in the sides. Then you need to quickly run to the medical transport and take what you see fit. Now go back to the bus and kill packs of zombies. How to cure Joseph - then rather sit down to drive the bus and start crushing everyone who stands in your way.
Chapter Thirteen - Losses
Move through the pile of rubble to Joseph. Watch the next video and after, shoot a couple of times on the cable. Get down to the very bottom and kill opponents. Quietly go around the big man with a safe instead of a head. Using the mine, get out. Continue moving along the intended path. Soon you will have to kill a couple more enemies and meet Ruvik again. After that, you need to move on, cutting down the traps along the way. There will be a meeting with the butcher again - kill him and watch the next cutscene.
Chapter Fourteen - Hidden Motives
Quietly go around the group of monsters and climb into the car. Walk under electric trap and knock it out with the lever. At the bottom, you can not touch the opponents (the next monster will deal with them). Move along the corridor until you meet a monster with huge tentacles. You will need to freeze him with bolts, and then shoot straight at his head. After killing the evil spirits, go to the shield. Restore the power supply to one elevator, then get into it and ride. Another video will follow and you will find yourself in the hospital. You will need to fight back against new enemies, and watch another video.
Chapter Fifteen - The Root of Evil
For most of this chapter, you'll have to kill swarms of zombies and demons. First, everything will start with the most common monsters. You can just climb up and destroy them all with your firearms. This will be followed by a cutscene, after which the next wave of monsters. Here you already have to kill snipers and opponents with grenades. After a new scene, you are transferred to new location. Here you will need to separate the two Bosses from each other. This can be done with the help of improvised levers and traps. Then you have to kill them one by one. After the victory, go along the long corridor and be careful - there are traps. At the end there will be another scene and the Boss. The boss needs to shoot the tentacles and the head. Soon he will throw you aside, but you do not relax and continue to attack him. Wait for the red zone to appear - you need to shoot at it. After the victory, the final cutscene will follow.
This will complete the game. Watch the end credits.
The horror turned out to be not as scary as game designer Shinji Mikami assured before the game's release. However, this does not mean that the new project of the wizard will not make you nervous - it turned out to be quite difficult even at the minimum level of complexity. Our walkthrough should help you go through the path of detective Sebastian Castellanos from start to finish.
Episode 1. Emergency call
After the intro video, get out of the car and head towards the main entrance. Find a partner inside and help him. Then approach the security cameras and view a small cutscene. When you wake up, swing several times to get a knife from a hanging body opposite.
Don't even think about touching the butcher, it's better to wait until he leaves and take a bunch of keys. Return to the first room and turn right. Now the locked door can be opened with a key. After a short cut-scene, you need to hide from the butcher. Run straight along the corridor, then enter the room - there you will find a hatch.
With hearing and vision, the enemies are all right. Try to move crouched and not make noise. Any wrong move can complicate the situation and lead to death.
Jump down, on the descent control your character so that he does not crash into any of the obstacles. Then get out of the cesspool and go through the door behind you. Turn left and go up the small stairs. Move along the wall, then pick up a note near the corpse in the stroller.
After reaching the end of the corridor, go upstairs and press the red button. You can hide from the butcher in the closet. Wait until the psychopath leaves, and then slip past him through the door. After that, run to the elevator and go down. Go forward and turn right to the large doors, then get out. After completing the episode, you will unlock the first achievement.
Break similar boxes. In them you can always find what is so necessary for survival: cartridges, first aid kits and various devices.
Episode 2. Survivors
Climb out of bed and examine the items on the table. Approach the door and take a look at the bugs crawling along the wall. Then follow the nurse and sit in a chair where you can upgrade the first skill.
Get out of the fire and pick up the syringe that lies on the stump. Turn right and follow the bloody trail along the path. Then find a light source, pick up a lantern and get down. Take a revolver and make a few accurate shots in the head of a former partner.
Like many other horror games, The Evil Within suffers from an acute shortage of ammo. Try to use improvised means and covert killings, but use a pistol and all weapons in general only in the most emergency situations.
Enter the cave, turn right and disarm the trap. Look into a lonely house. There you will find a diary and an unusual mirror. Pump over the necessary skills and return to reality through the same mirror.
Pumping in the game is carried out only in the hospital on a special chair. In the hospital, you can also take a breath, save the game and find the necessary evidence that reveals the details of the plot. There you can also find lockers that open with special keys, and find map fragments. For the first piece you will receive valuable items, and for the second - a special reward.
Sneak up on the enemy and stealthily kill him, then go into the house and explore it. Climb over the fence. Pick up a bottle from the ground and throw it at the first zombie, you can kill the second with a headshot. Then you should be more careful - there are five enemies in the next location.
It makes no sense to act on the forehead, so sneak and attack the enemy from the back. Then turn left and go around the second one through the thickets. Attract two more with a bottle, and then lure them to a trap. Front big gate do not rush to use the knife switch. To protect yourself, burn 2 corpses lying a couple of meters away from you.
Burn zombie bodies if you have matches and torches. These creatures with some probability can resurrect at the most inopportune moment, so it's better to play it safe.
Activate the switch and go through the gate. It's better not to touch a pack of zombies occupied by devouring corpses. Sneak to the bridge along the fence and kill the living dead guarding the passage. Just at this moment, the crowd of the dead will hear you, so do not waste a second - run to the gate.
Episode 3. In the claws of monsters
Get out of the water and go to a small village. Look into the first house on the right, go up to the second floor and find a doctor. Then turn the wheel on the right and visit the next room. Kill three zombies, then go downstairs. Quietly deal with the remaining enemies and head towards the gate.
The required chainsaw is at the butcher in the barn - it can be easily found by sounds. Before you attack the boss, make sure that there are no small enemies left around. In the house opposite, you'll find a crossbow next to a table, as well as a shotgun on the second floor. All this will help you deal with the butcher. You can place a few explosive bolts in the path of the boss and then finish him off with powerful shotgun blasts. After the victory, pick up the chainsaw and open the gate.
After almost every battle with a new boss, you can see the biography of the monster. To do this, go to the main menu and delve into the diaries of the protagonist. Such an opportunity will be of interest to those who appreciate a good storyline and atmosphere in games.
Episode 4. Patient
Enter the hospital and turn left. After a short cutscene, kill the doctor's brother with a few headshots. Leave the hospital area. Check out the neighbor's house. Go down the stairs after the fleeing patient. Kill the invisible creature, focusing on the silhouette in the room, and try to get outside.
Despite the hallucinations, follow the person who appears forward. After another vision, get out of the pit and activate the switches. Climb to the other side and go to the white door. Turn around and kill the zombies that have appeared. Don't forget grenades and crossbows. This is the best weapon in the early game. Go through the opened door and watch the spooky boss appear. Fighting him is useless so far, so turn around and run to the end of the corridor. The creature will be distracted by the patient who ran out, and you will have time to escape.
Climb into the ventilation shaft. As you get out, run to the closing door and crawl under it. Climb down until Ruvik reappears. As soon as he appears, turn around and run upstairs.
Episode 5
Go to the end of the corridor and turn left. Get down. The door will be locked, so go to the next room. Kill the invisible one, then another one in the next room. There you will also find a key card with which you can open the gate. Follow Ruvik further until you find yourself in a locked room.
Peep into two rooms through small openings in the wall, then go through the door that appears. After that, you will have access to a small puzzle. In three rooms, you need to press the correct buttons located on the stretcher. If you make a mistake, the main character will die. To determine the correct button, you need to carefully study the drawings on the walls of each room - a hint will be displayed there. Click left flower button, left gear button and right button with nerve cell.
Go through the new door and heal your partner Joseph. Make your way with him to the exit, and then climb up the stairs. Go further until you meet a girl named Kidman. Defend yourself from crowds of enemies, covering new acquaintances. Then go to the control panel and set the code 22 on the top sensor and 5 on the bottom.
Go back and jump down. Climb through a small opening in the wall and go in search of detectives. Go through the open door. Head to the end of the corridor, set fire to a puddle, and then lure the evil creature out of the last door.
Use fire and fuel barrels to finish off the creature, after which the desired passage will open. Go inside the room and watch the cutscene. Now you need to consistently knock down each zombie and turn off their “power” (the same button that is responsible for burning corpses).
Episode 6
Wake up in the hospital and go outside. This time the mirrors don't work, so go into the office and look at the photos. After the video, turn on the lantern and exit into the main corridor. There, turn right and go to the end, then take the stairs down. Get to Leslie and watch the cutscene.
Returning to reality, move forward along the path and find Joseph. Climb up and protect your partner from zombies while he breaks open the door. Do the same in the next room.
Go to the next location. There are four booths hanging in the building on the left, from which a hail of arrows will rain down on you. Periodically, one of the booths opens - just at this moment you must remove the arrow. Crowds of the dead will hinder you in this, which it is better to kill right away. Once you kill all four machine gunners, a butcher with a chainsaw will appear. Since shotgun shells are scattered on the level, there will be no problems killing the villain. You just need to collect all the ammunition as soon as possible.
Enter the building, go up the stairs and burn the corpse that prevents the elevator from working. Climb up and save Joseph (shoot zombies in the legs). Protect your partner while he opens the gate. Explore the cemetery with him until Joseph finds a sniper rifle.
While your partner is covering you, kill two thugs. Then meet Joseph at the two horse statues and move back to the hospital. Approach the mirror and return to the real world. Keep moving until you come to the ritual room. The door will become safe as soon as you arrange all the bodies in the right order, as in the screenshot below.
Take the elevator up and go along the dark corridors. Pass the huge sleeping creature - it is impossible to kill it now. After reaching the locked gate, step on the tile to the left. Then look through the opening in the wall behind you and head towards the gate.
Defeating the boss, despite its size, is quite easy. Just don't let him near you or you're done. When the creature is stunned, feel free to use your arsenal. After doing this several times, take Joseph's glasses and move on.
Episode 7
Enter the church and talk to your partner. Then go a little forward and kill two zombies. There will be a small recess in the wall in front of the gate. Examine it and open the secret passage. Insert the plate you just found, two passages will open. You in the one on the right.
Crawl past the trap in the small hole in the wall. Then lift the lever and climb up on the big slab. Now you need to jump in time to the stone door, from which you can knock out the missing figurine. After that, go back and look for the last statue in the opposite passage.
Activate all the missing elements and go down the large stairs. When the boss appears, turn around and step back a little. Then you need to quickly run through the entire corridor, avoiding the traps placed on the floor. Find Leslie and open his cell. The location will begin to fill with poisonous gas, so run to the opposite end of the room and turn on the valve.
Go through the round door and immediately after the turn, deactivate another valve. All this time you will be pursued by a new type of enemy, which differs only in increased health and damage. The difficulty lies in the fact that this type of enemy constantly respawns at different points, so use up ammunition in the most extreme cases.
Exit the room and turn left. The monster will break the valve, so pick up the missing element lying on the table in the next room and fix the mechanism. Then get out of the room, turn left at the stream and end the episode.
Episode 8
Move deep into the cave, simultaneously shooting enemies. After that, turn the lever and go further. Run across to the other side, hiding behind the rocks. Keep moving. Be careful, there's enough ahead Walking Dead. While in the hospital, turn the lever and move forward until the vision hits you again.
Seeing the next boss, do not panic. They won’t let him fight for now, so as soon as control passes to you, move to the opposite end of the corridor. Close the door behind you and watch the cutscene.
Episode 9
Once again in the hospital, leave the room and look into the next cell. Then follow the nurse. Take a look at the picture. Now turn around and walk towards the mirror. Having moved to another world, visit the hospital.
In this location, Ruvik will attack you from time to time. You can’t kill him, and if you get close to him at arm’s length, then you’ll die right there. It remains only to run away and hide in the nearest closet or under the bed. You can determine that Ruvik is nearby by changing the color of the image.
At this stage, you need to open three locks on the central door. To do this, you need to find three dissected patients and correctly pierce their brains with a special bolt. To gain access to the third patient, you need to find two drums from the safe.
Go to the room on the left and kill the two corpse-eating zombies. Then head to the laboratory and at the operating table, insert the bolt into the brain, as in the screenshot below:
After the vision with the professor and Ruvik, leave the room and run away from the villain to the second floor of the building. There you will find the top drum of the safe. The bottom one is in the library. Go down the corridor, then blow up the trap. Enter the room and climb into the laboratory. There you will be waiting for the second test subject:
Finally, return to the main entrance and open the silver doors. Get to the code lock and insert the two found drums. Put the number 11 on the top one, and 2 on the bottom one. Visit the laboratory and insert the third probe.
The central door is now open - go there for the hero. You will be shown several visions, after which get out of the trap. Look under your feet and beware of traps. There will also be locks on some grates that can be broken with a shot from a pistol.
Once in the field of sunflowers, walk to the farm. The character will again be covered with memories. When the fire starts, pull the lever and turn the valve, then stand on the platform. With a shot from a pistol at the valve blocker, lift yourself to the exit.
A boss fight will begin. You only need to hold out for a while, shooting the ordinary dead. Never go near the boss!
Episode 10
Climb down the stairs and move straight ahead. In this location, you should not raise the alarm, as a trap will work. If enemies notice your presence, then huge saws will begin to rotate throughout the room. Therefore, covertly kill the enemy with a torch and go into the room to your right. Climb to the left, to the second floor. There will be a spare battery at the end of the corridor. Go downstairs and activate the generator in the next room.
Go through the opened iron doors and kill a couple of zombies. Then reach the gate - there will be an idle switch next to it. The missing element will be in the blue door nearby, but there are several enemies waiting for you. Go further, bending over, make your way to the switch and activate it. Now turn around and kill the two enemies. Then a mini-boss will appear. The method of killing is simple: throw grenades at him and shoot from those guns in which there are cartridges.
Activate the switch and climb up the stairs. Be careful and don't step on the traps. Pull the lever and go to the original iron gate - now it will open.
Here, a monster with long black hair and many arms will again make itself known. You need to run away from her. Eliminate the fire barrier using the switches located on the pipe. Do the same with the following traps. Then pull the lever and follow the elevator.
Visit a doctor you know, then watch the video. Once in the parking lot, fight the boss. We recommend using a crossbow with electric and freezing bolts. Immediately after using one of them, shoot the monster in the "eyes". Get into the elevator - this episode is over.
Episode 11
Swim to the surface and move on. Despite the falling objects, it is unlikely that anything can hook you on this level - all the destruction is scripted here. Go along the corridor and deal with the zombies. In the prison yard, quietly deal with enemies and take a comfortable position.
Water creatures cannot be killed, but they can be distracted. Throw corpses into the water by shooting at the ropes on which they hang. You can also lure them with bottles.
New living dead will appear, one of which will have a key to the door. Go forward until the bridge collapses. Then swim out to the asphalt and move along the sewer pipe. As soon as you deal with the enemies that have appeared, an iron door will open.
Go further to the construction site. There, kill all the guards, then go upstairs and save your partner. Look into the room with her, but something will go wrong. Open the door, go outside and go up the stairs.
Episode 12
When the giant monster grabs the bus in its paws, shoot it in the head and tentacles. Then he should let you go - there will be time to pick up ammo and medicine and break away from him. Kidman will bring you to a dead end, so you need to shoot back from the advancing zombies.
The boss will reappear. This time, shoot him in the belly. Deal with the enemies and move towards the ambulance. Take medicine. On the way back, the bus will be attacked by a crowd of the dead. Deal with them using the machine gun placed on the army jeep. After that, heal Joseph. This will be followed by a mini-game "run the bus over as many zombies as possible."
Episode 13
Make your way through the destroyed building to Joseph. After watching the cutscene, shoot the cable holding the elevator. Climb down the stairs and deal with the enemies below. Don't forget about traps - there are quite a lot of them at this level. Passing the butcher with the safe on his head, move through the ventilation shaft to the outside.
Move on through hordes of zombies and obstacles until you meet Ruvik. After it, green traps will appear on the floor, which are best disabled. In the slaughterhouse, kill the butcher using grenades and freeze arrows from the crossbow.
Episode 14
Replenish stocks of first-aid kits and weapons. Move forward and quietly eliminate the zombies. Then go to the subway car. Crawl under the electrical barrier, and then pull the lever to turn off the trap.
In the sewers, do not rush to spend ammo on a lone zombie - a certain creature will take it away on its own. Go through the tunnel further until you meet with giant tentacles. As usual, use the freeze bolts to immobilize and shoot directly at the head. When the creature climbs into the pipe, it will start releasing larvae. They drop ammo, so use that to replenish your ammo. The boss can be driven off the ceiling by shooting him in the head. Do this several times and the creature will die.
Then distribute the parts from the shield as shown in the screenshot below. Enter the elevator and go upstairs. The collapse will take you back to the hospital. Eliminate zombies that will climb out of the baths.
Episode 15
The chapter consists of several battles. The first will unfold in a spacious (and very bloody) arena. You will be attacked by many dead people. Climb up the hill to make it easier to defend. Don't forget to pick up ammunition and medical supplies scattered around the arena. Save your most powerful weapon for the chainsaw-wielding sadist who shows up towards the end of the fight.
On the second arena, snipers will open fire on you. They will be helped by zombies throwing sticks of dynamite. You can deal with them with a rifle or a well-placed grenade.
Soon you will be taken to a new arena where you have to fight with two safe-headed monsters at once. Before the battle, disable the traps in the room and pick up useful items. The battle can be somewhat facilitated by isolating the safeheads from each other. To do this, use the lever on the wall.
After that, you will need to go through a long corridor without falling under the review of huge eyes and without hitting the stretched threads. To extinguish the eye for a short time, shoot it.
During the final fight with the boss, you will be put behind a machine gun located on a special installation. Shoot the creatures at the tentacles and head, after which the car, along with the hero, will be thrown aside. Once on a sheer wall, shoot the RPG straight into the head. You must have time to make 7-8 shots before the creature comes close to you. After one of the hits, a certain part of the monster should glow red. Launch a projectile into the marked area as soon as possible - with this shot you will end the game. Watch the final video.
Text: Artem Kusakov
On this page you will find a complete guide to the passage of the storyline of the game “ The Evil Within ” and tips for certain game situations.
Episode 01
After watching the initial video, we appear at the entrance to the hospital. We go straight to the main entrance. Inside is a rather creepy picture: a bunch of disfigured corpses of hospital staff. The partner finds a survivor, we go to him. When talking, he mentions a certain Ruvik. We watch the recordings of surveillance cameras in the same room ... the nightmare begins.

At first it was not clear where we were and how we got here. However, the situation is the least conducive to thinking about such things. We find ourselves in a room hung with corpses, where a huge native in an iron mask walks around, and, apparently, is preparing to do the same to us. Before us is a corpse in which a knife sticks out. We swing, take out a knife and cut the ropes. After we have freed ourselves, we see the same one in an iron mask stuffing a corpse. We wait until he leaves the door on the left, and pick up the keys that hang right above his workplace. We turn around and go back to the right. There is a door at the end of the room. We unlock it with the found keys. We rise along the stairs and go along the corridor. Of course, no one will notice the banner near the door, the trap works and he appears, the sadist. We run from him through the door. When he slams the grate and turns on the trap, a hatch will be visible on the other side of the room. We move and climb into it. We dodge the traps and fall into the bloody pool. We get out of it on the stairs and go to the door, she is alone here. Near the fan, turn right, jump into the water and climb the stairs again. We go straight, without turning anywhere, in the room on the right there is absolutely nothing. We reach the bars and see the passage on the right, we go in, again the stairs. We rise. Behind the bars is a table on which lies the “Note from the Boiler Room”. We pick up, go to the door and press the red button, the door opens.
We go along the corridors until we hear a characteristic op. Again he. This time you need to hide in the closet. We hide, watch how the psycho destroys the whole room, and then leaves. We leave and go to the door. Next, you need to do everything quickly, in stealth mode. We run past the door on the left, turn left, turn into the first door to the left and immediately there will be a passage on the right, we go there, keeping to the left side. Let's go. We keep to the left and along the wall we go to the door. We pass, at the end of the corridor - the door on the right. Behind her is a corridor with an elevator at the other end, we move towards it, not paying attention to anything, we move. Let's watch the credits. When we go up the elevator, we find ourselves in the waiting room of the Hospital, where we were already at the beginning of the game. We go to the door on the right. Let's watch the video. Episode completed.
Episode 02
We appear in the room. We take away everything that lies badly, and we approach the door. We follow the girl and sign on the document (this is such an exotic way to save).

We go further and sit down in a chair. Apparently, getting into it, we will get into the menu for improving the character and abilities. After we again find ourselves near the fallen ambulance. We take the medicine and carefully examine the area, there is a lot of green gel. The right path is determined by the lighter parts of the forest and the blood on the ground. We hold on to them until we reach the killed animal, and then to the lamp. We select it and in the distance we see a person. Later we realize that this is no longer a person. We select a revolver and kill. Do not forget to carefully examine the area and break the boxes, they may contain something valuable. We go into the cave to the right of the tent, neutralize our first trap, move on, exit the cave. We go through training in burning defeated enemies and go to the house with a bloodied door. We pick up the items and see that something happened to the mirror. We approach it and press use. We get back into the room. In this way, we can save ourselves, leave paintings and improve abilities.
Exit the house and go left. We see how Leslie runs away from the dead man, and he is breaking in the door. We sneak up on him and kill him. We open the door and climb into the window. We go further, we go into the gate. Let's watch the video. Next, we covertly cut out the dead (it may not be covert, but it is many times more difficult), and examine the house on the right. Do not stumble upon the trap located on the left side of the house. We continue along the path we left. You can turn onto the bridge on the left and look at the lighthouse. Next, you will find a small open area with a bunch of dead people. With the help of a bottle, we distract the first one standing by the fire and cut it out. We go straight, past the fire on an unlit road. There will be a house near which a dead man is wandering. We kill and examine the house. There is nothing more to do here. We go back to the crossroads and turn right. Beware of traps, there are plenty of them in this location. Kill the dead until their grunts are no longer heard. Explore the location, collect items and neutralize all the traps you find. Next, we go to open the wooden gate, after burning the dead lying on the ground in front of them. We run and the gate will close. A meal is being held in this location, and it is highly discouraged to disturb the dead. We covertly go along the right edge of the location to the bridge. Here we are blocked by one of the dead, and without falling into his eyes, we will not be able to pass. So we leave the stealth mode and run headlong across the bridge. After halfway through, a cutscene will play and the episode will end.
Episode 03
We get out on land and find ourselves on the pier. We collect items in the district and go straight to the stairs. There are matches, and a bunch of corpses block the way. We burn them and move on. The passage fills up, and we find ourselves in some village. Exactly opposite the collapsed passage there is a small house. We go there and take everything we need. Further in this area there are two passages that will lead us to the same place. The first is the house on the left, the second is the house on the right. I advise you to go through both options in order to collect the maximum equipment. In addition, in the house on the right on the first floor there is a bloody door, behind which there is a mirror where you can save your progress and improve your Hero with the green gel you found.

Watch out for mines on the walls. To disarm them, you need to sneak up on them and press the key in time, a little practice, and this will not be a problem. On the second floor we find a doctor who rode with us in an ambulance. He says that he saw his patient Leslie run through the gate at the other end of the village, the only problem is that a horde of the dead separates you from the gate. We open the iron grate, using the mechanism on the right on the balcony, and proceed to clean up the area. We act covertly, or, if the equipment allows, you can relax a bit and knock your heads off the firearm. Do not forget to take the crossbow in the last building on the left on the second floor on the chair. When you kill everyone, there will be a problem with opening the gate. We need a chainsaw to cut the chain. Of course, in fact, using this tool for this purpose, at best, the chain will break on the saw itself ... Nevertheless, we are looking for a chainsaw, it is located in a pigsty, from which familiar growls are emitted. We go there and again we see the Sadist who annoyed us so much at the beginning of the game (or maybe not him, but very similar to him). We run to the chain, simultaneously shooting the fat man until we kill him. good remedy Killing this creature is a crossbow with explosive bolts. We take a chainsaw, we saw a chain. The episode is over.
Episode 04
Once again, we find ourselves on a piece of location that needs to be explored. There are several houses here. On the territory with a two-story house there is a small house with a mirror. The goal of the mission is to find Leslie, he is in one of the houses on the territory. You will understand in which one by the cry of “Save”. We examine the entire territory provided and find a rather interesting place.

Then we go to the right house. We go to the basement, find Leslie and see that someone opened the door. This is a new type of enemy. They are almost invisible, and you can tell that they are nearby by a blurry, very faintly visible silhouette (you are unlikely to notice him if you move), if he walks through a puddle, you will also understand that he is nearby and, in fact, if he will attack you. There will be two of them. We kill both and go to the exit. But my God. There are no stairs, but there was. Madness? Madness? Not really. This is Ruvik. We follow him and find that we are in a long corridor. We empathize with the Main Character and get into a room with a pool of blood on the floor and several platforms. Here you need to thoroughly study the room, all its traps and advantages, collect all the equipment and be ready for a fierce battle. When ready, go to the white illuminated door, and Ruvik will raise a group of the dead from the pool, among which there is a particularly tenacious one. We take advantage of the knowledge of the situation and give eternal rest to all the unfortunate.
We go to the door at which Ruvik appeared. We go into it, we see a corridor and pay attention to the closed door on the right. Now we go all the way to the room. Don't rush into it. Get ready to run back as the next enemy is impossible to kill. As soon as he (or she) appears, we run to that very door and run through it, resting against the wall. A dead man will jump out of the door, and the boss will rush at him. We quickly run there. Run along the corridor to the gate. We quickly close them with the button on the left and burn two corpses nearby. We collect items and go down the stairs. Another corridor. We go around or neutralize the traps and run to the elevator. A little delay, and you're done. Having descended, headlong we jump out of the elevator and break into the door on the left. The gates are lowering, and the scarecrow is behind us! Despite everything, we run to the descending gate and slip through. Huh. It looks like they're gone, but it's not over yet. We go down, collecting ammunition along the way, and at the transition to the fourth landing Ruvik will appear. In no case do not approach him, he will kill you with one touch. We run to the very top, where we came from, and we see that this whole structure is collapsing. We fall down and land on the wall. Yes, on the wall. Ruvik has a lot of surprises in store for us...
Episode 05
The duration of this episode is about the same as all the previous episodes combined, as there are no open locations.
We appear in front of a long corridor and a bloodied door. The wall behind us says "He's watching, we can't leave"

Behind the door is a mirror, you can save and pump skills. We go along the corridor and examine all the doors on the right and left. Carefully! Toward the end of the corridor, an invisible enemy will appear. We kill him with a pool of blood on the floor and go to the last door on the left. We get to the restroom. We pass through a hole in the wall and see that the floor in this room has collapsed. We jump down and collect all the items in the room. We pass, crouching, through the boarded up door and get into a room with closed gates and one door on the right. You will need a key card to open the gate. We go to the door on the right, and again invisible. If there is no puddle nearby that can be used to determine the location of the enemy, then one of the most effective weapons for killing this type of enemy is the Crossbow. With the help of his sight, you can determine where the enemy is.

Next, we move along the ward, examine it and approach the double door. We go into it, take a few steps and hear someone breaking through the door we just entered. Again invisible. We deal with him and go into the security room on the right. There we collect all the items and select the key card from the floor. We go to the locked gate. Along the way, exactly at the same place where we fought with the invisible one for the last time, in exactly the same way another one will appear, but this time without knocking. We kill, we reach the gate and use the key card. Now the path is open. We go in and move along the corridor. Do not forget to break cabinets with melee attacks, they store various items. At the end of the corridor we see Ruvik, he enters the door on the left and disappears.
We go in the door, go down the stairs, again through the door, and find ourselves locked in a small square room, all the doors are gone. After a few seconds, holes will appear in the walls, looking through which, to the right of each of them, a door will appear. It's a mystery. Each room has a corpse on the table, drawings on the walls, and holes in the floor. Each riddle has two possible answers. Choose the right one - the spikes will pierce the corpse, the wrong one - you. When you pierce 3 corpses, then in the room in which Ruvik locked us, a door will appear on the wall without a hole. There are holes on 3 walls. We go into the room, on the wall of which the body of a man with an eye instead of a head is painted. At the table with the corpse, select the left button. Spikes pierced the corpse, and blood flowed to the wall. Next, we go into the room with a huge drawing of the brain and again select the option on the left (the one that is drawn on the very wall from the bottom right). We go to the last room with two posters on the wall, listen to the audio recording and conclude that everything indicates that we must choose the option on the right. Choose. Spikes pierce the last corpse, and a door will appear on the wall, to which all the blood flowed. We got out, but only from one of the many traps.
We pass along the corridor, go in the door and watch the video. We found our partner Joseph, and he is clearly not in the best shape. We treat our companion (your medicines will not be spent at the same time) and go through the door behind the bathroom. First we go to the right, we go in the door and check all the cabinets. In one of them there will be a corpse, but it is not dangerous. We leave the room. We pay attention to the gasoline spilled on the floor and go into the ward. There are a lot of dead people here. We lure them to a puddle of gasoline and set fire to it, most of it will burn, and we finish off the rest with a firearm. We move along the ward and get to the stairs. Before going down it, let's look into the room on the left, there is some equipment and a suspended enemy, which will soon come to life, so we burn it without tightening it. Now we go down the stairs and wait until Joseph clears the door. We go into the room and watch the video. This room has a door that leads upstairs. We rise and see on the right a bloodied door with a mirror behind it. We pass through the mirror and follow the girl. Next, spend the accumulated green gel and save the game. Returning, we go into the door, near which stands Joseph. Here we find another partner named Kidman, but she is not in the best situation.

Kidman is locked in a cylinder that gradually fills with water. Joseph falls down and the massacre begins. We fight off several groups of enemies until Joseph approaches the cylinder. Next, you need to act quickly, as the countdown has begun until the cylinder is completely filled with water, and Kidman dies. We run into the gate, which Joseph looks at through the cylinder. Along the way, we will meet alternately two enemies with dynamite. We shoot at them with a shotgun, and while they rise, the dynamite will explode and kill them. We run through all the cameras. We run into the last one on the right and climb into the hole in the wall. Right up the stairs and turn off the control panel, listening to the advice of Joseph. Set the top dial to 22 and the bottom dial to 5. After that, the cylinder doors will open and Kidman will be safe. But hour by hour it doesn't get any easier. The floor under our partners falls through, and they fall down.
Now you can relax a little, take a breath, collect all the equipment that fell from the killed enemies, and explore the hall. Also, with the help of a melee attack, you can open the grates that we ran past, keeping our way to the control panel. We go down into the hole. We are looking for a gap in one of the walls in the room in which we found ourselves. We climb into it and go to the end of the corridor, fighting off enemies. Walking along the corridor, do not forget to go into the room on the left, there is some equipment. Having reached the end of the corridor, we jump into the bloody pool and pass to the other side. Having risen to land, you can go back along the collapsed concrete slab above the pool and take equipment. Next, we go along the corridor, hung with lamps, do not forget to go into the room on the right. Having reached the end of the corridor, we see the collapsed floor. We jump down, go forward and help our comrades fight off the dead. After the enemies are destroyed, we approach Joseph and help him raise the gate so that Kidman can climb through and open the door for us from the other side. We go in the door and watch the video again.

We kindly find ourselves right in front of a door with a mirror. We do our business and go down the corridor. The passage on the left is littered with various objects, so we just can’t get there. Exactly opposite this passage there is a room with stairs down. We get down and slowly go through the tunnel. There is a button on the floor, stepping on which activates the trap, and after a couple of meters, spikes will come out from it. We calmly pass on the button, wait until the trap works, and slowly move on. We see the dead man rise, and the first thing he will do when he rises is pull the lever, which will reactivate the trap. Therefore, as soon as we see that he reaches for the lever, we immediately run back from the zone of action of the trap. After we finish him, we climb the stairs at the other end of the passage. We clear the chest, collect all the equipment and go back to the other side. When we find ourselves on the opposite side of the littered door, we will clear the extension right behind it. In the passage on the right, two dead men are waiting for us. We deal with them and go through the fence, and then through the white door. Going through the door, we see what is spilled on the floor hot liquid and take note of this. We turn right and go into the room on the left with a red light.
Getting ready to meet the Boss. Having entered the room, this multi-armed creature will again crawl out of the pool of blood, from which we fled in the previous episode. We run to a puddle of liquid, set it on fire and wait for the Boss to light up. Here we understand that this creature does not tolerate fire on the spirit. Before going through the door that the Boss broke down, we go into the room and collect equipment. We pass through the door and see that the passage disappears behind us, and a solid wall appears. There is no way back. We got into a square room in the center of which the same Boss will appear, if you go there.

We keep to the edges of the location, carefully examining the room, remembering the location of all barrels, furnaces and gas taps. Furnaces can be activated with a lever. In the furnace on the right, the lever is at the top, and on the left - at the bottom. There are two in total. The boss is rather slow, but it happens that he makes rapid jerks towards us - at these moments you need to run away from him using sprint. If the Boss disappears from our field of vision, we move all the time, otherwise we risk being killed from the rear. You need to burn it four times. Upon achieving victory, we will be able to go through the door that was previously inaccessible. We go in the door, we pass along the corridor, and again in the door. We are watching a plot insert, after which three dead men will rise from the baths. In order to kill them, we need to knock them down with a firearm, and then pull out some foreign bodies from the back of the head of each of them. Let's watch the video. The episode is over.
Episode 06
This episode differs from the previous ones in a serious "action". So let's get ready to shoot!
Let's watch the video. Appearing, we pay attention to the papers and photographs on the table. We watch them, and ... something suspicious happens. We remain in pitch darkness. We turn on the flashlight and go to the mirror, which is located at the other end of the corridor, with a pumping chair. Approaching him, we see the Nurse, and we understand that the location has changed. In place of the mirror, a fork formed. We turn right on it and go down the stairs. The silhouette of a huge man with a hammer suddenly appears, and in a split second we find ourselves in a completely different place. We go along the corridor and turn right at the end. We find Leslie, who, without stopping, pronounces our name.
We find ourselves near a broken mirror in some brick building. We climb onto the boxes and climb over the wall. We climb up the stairs, collecting items and ... the sun, the day, the singing of birds and the gentle sea breeze. It would seem that now nothing threatens us. But it was not there.

We pass to the gate, simultaneously examining the extensions on the sides of the path. As soon as we open the gate, we will find our colleague Joseph lying unconscious on the lawn. After watching the video, from which we learn that Kidman is missing, we will be attacked by a whole army of the dead. We must run, but the doors are mined. Our task: to cover Joseph while he clears the door. We try to save ammo and not miss. We shoot exactly in the head, but if “critical damage” is not pumped on the weapon, then even from a direct hit between the eyes, the enemy will die at least from the second shot. Against large opponents, it is better to use a shotgun. We also try to set fire to large groups of enemies using explosive barrels. When Joseph opens the door, we throw the fight and run into it. Further down the stairs. Another door. The task is similar. When the door is open, we run into it and lock the gate. On the left we see a mirror. Now, after a hard fight, you can relax, upgrade and save the game.
Now we are in the arena. What will now take place in this place, itself defines it. First of all, open the case that lies on the table and pick up the sniper rifle. We go to the left. On a hill, a dead man will come out of the building. We kill him (preferably with a sniper shot in the head so that he does not have time to call for help). We don't go through the door. Immediately on the steps on the right there will be another one, we take it out the same way. We go to the steps, clear the bomb and climb into the building. Carefully. There is another bomb hanging right above this ladder, so we move carefully. We deal with all the enemies and pull the lever in the same room. We go upstairs and find that we are being fired upon. We remove the dead man who is firing from the hanging balcony, and as soon as you kill the first one, and the balcony collapses, a dead man will appear in the same area below, who will use the lever to release a pack of enemies at us, and as soon as we destroy all the dead, he will again runs to pull the lever. At this point, he is vulnerable and can be easily shot with a sniper rifle. Next, we go around the location in such places so that the rest of the shooters start firing at us from guns and become open for a shot. As soon as we destroy the other three balconies, we go to the lower entrance, into the building from which the enemies ran out. We approach and fall into a trap. Here appears a familiar guy with a chainsaw. He will require to release a considerable amount of ammunition.

We do not let him close and use the sprint only when it is really necessary. We use a crossbow to immobilize the target and at these moments we stuff it with lead. When the enemy is killed, the gate will open. We go in and go up to the second floor. Save.
We need to get to the top, and for obvious reasons, the elevator does not work. We burn the corpse and enjoy the ride. Having risen, we go across the bridge and see how two dead men are executing a man. Clumsy Joseph, it would seem, already sees how he cuts them into pieces, and without thinking twice, rushed to chop the dead with an overweight ax, as he accidentally touches a stretch, blows up the floor of the bridge and falls into the place of a just beheaded man. But that's why we are partners, to help each other. We go to the left to the edge of the wooden bridge and shoot the enemies with a well-aimed headshot. Now Joseph, as a sign of gratitude, will put a crossbar for us so that we can get over to him.

After talking with Joseph, he goes to open the door, and our task is to cover him. It is better to stay against the wall to the left in front of the collapsed bridge and shoot enemies from there, otherwise we risk being torn to pieces by a grenade. We run into the opened gate and get to the market. There are no enemies, and a lot of items. We carefully examine the market, we reach the gate and find ourselves in a cemetery. We go straight, watch the cutscene and save the game.
We return, leave the house and see how Kidman is being dragged somewhere. Joseph climbed up the hill and will cover us from above. Our task: to get to the church. We immediately take out the sniper and begin to move forward, crushing all the dead in our path. Having reached the gate, which opens with a button on the floor on only one side, we are preparing for a serious fight. We pass through the gate and see how the dead man releases the Giant, he immediately kills his liberator, grabs the first thing that comes to hand, and purposefully moves towards us. Let's not get close. We fire from all calibers straight to the head until he falls to his knees. We do not stop the fire, and as a result he will die. But without having time to come to his senses, a second, more ferocious, bloodthirsty and agile giant will immediately attack us. He will break through the wall to the left of the place where the first one appeared and rush at us. This will be much more difficult to deal with, but the principle is the same. After killing the enemy, we pass into the broken wall (do not forget to look to the right to the broken wall and examine the cleared territory) and head to Joseph. Save.
We got into the wolf's lair, turn on the lantern and start moving forward. We reach the room with fouraltars. Again a riddle, but obscenely simple. Our task is to lower the corpses on the altars as it is painted on the wall. On altars 3, 5, 9 there should be corpses, on 7 - no. After that, it will be possible to safely pass through the door in which there were pins.

We go and go up the elevator. We move along the corridor to the room and pass into the archway. Having advanced a little, we will see a huge mutant wolf, good in a cage. We calmly find a passage to the right of the cage with him and go there to the gate. We open them with the button on the floor, we pass and hear bad sounds. We ask Joseph to open the gate, as the wolf destroys the wall, rushes at Joseph, and he loses consciousness. Battle time. We try to catch the wolf at the moment when he thinks what to do. We shoot with a shotgun, preferably after immobilizing with a crossbow. When the wolf is hiding in the bushes, we smoke it out with a grenade. After the victory, we discover that Joseph cannot live without his glasses. Now our task is to pick them up and return back. We climb through the broken bars, take the points and climb back, ignoring the wolf. Joseph will distract him, so there will be no problems. After returning the glasses, we go to the church and open the door. The episode is over.
Episode 07
We are in the church. After walking a few meters, Joseph sits down on a bench, we approach him and watch the video. We find ourselves in the very catacombs that we found under the church, as we could find out by studying diaries and documents. We advance to the room with candles, in the center of which lies the coffin. We pass by and go to the door. We go to the picture hanging above the candle, and turn left. Don't forget to break bowls on the floor and collect items. We go up the stairs, to the right. Three dead men roam here. We deal with them by the usual methods, examine the room on the left and go further along the corridor. At the end of the corridor on the right there will be a room where you can take several items, and on the left there is a monument from which you need to cut off a small part of it with a knife. After this is done, the wall will rise up and we will be able to pass. We go. We clear the room of the items we need and go right along the corridor. Down the stairs and see a creature with a safe on its head and a large hammer. We open the gate and in the center of the room we see a large monument, in which three parts are missing. On the right there is a door with a mirror. We insert the part that we found, and set off to look for the other two.

Passage on the left:
We pass to the corridor and close the valve that shuts off the supply of poisonous gas, which blocks our path. Open the door and turn left in the hallway. There are two enemies in this corridor, the rest are behind bars. We deal with them and go to the end of the corridor past the last grate on the right, while deactivating the bomb on the wall on the left. At the end, we turn right, activate the trap, thereby bringing down the spiked ceiling on the three dead people in the room, and examine the room cleared of villains. We return to the end of the corridor, turn left and go down into the hatch. Having gone down, they lock us up and let poisonous gas into the room. The scale fills up fairly quickly. We block the first valve, move on, kill the dead man and exactly at the end of the passage there will be a second valve. After we block it, the supply of poisonous gas will stop. We turn left from the valve and go down the stairs. We go along the aisle, dealing with three dead men and deactivating the bomb. At the fork, turn right and open the grate on the left. We pass along the next corridor, shooting enemies and neutralizing traps. At the end, open the grate again and climb up the stairs at the end of the passage. There is a monument at the end of the corridor on the right. We cut off a piece and again find ourselves in a hall with a fork in the aisles.
Passage on the right:
We go down the stairs. In the room with spikes at its very end we see a passage on the right. We go there, and we are cut off the way back. Walking along the corridor, we neutralize the trap. Next, we see a burning door and two mechanisms to the right and left on the sides of it. Without going down, we shoot at each of them in turn. A trap is triggered, and a spiked ceiling falls in front of us. While he is down, climb on him and climb up. We deal with the enemies and go through the opened door. We find ourselves in a hall, in the center of which there is a mechanism with a trap. A dead man hangs around him. We kill him and go to open the grate, which is behind the mechanism with a trap. As soon as we touch the valve, a door will open to the left of us, from which a couple of ghouls will come out. Using a trap, we deal with them and go into the passage from which they left. We neutralize the traps and, having reached the end, we can pick up a considerable amount of green gel. We go back and open the grate. We pass along the corridor, neutralize the dead, turn right and see the monument. We break off a piece and again we get into the big hall.
Main entrance:
Now that we have all the parts of the monument, we paste them and go down the stairs.We go in the door and fall into a trap. We are released from it by pressing the appropriate button and run away from the affected area of the falling ceiling. Now our task is to overcome the corridor lined with wire mines without hitting any of them, as the ceiling will fall behind us. Having overcome difficulties, we turn left and find Leslie. We release it from the chamber and open the door using the mechanism. Let's watch the video. Now we are left alone with this nightmare with a safe on our heads. Could you have imagined a worse course of events?

We shoot him until he dies, and he dies quickly. It is best to use a crossbow with mined bolts. When we kill him, we pass through the opened door and understand that now everything is really bad. We pick up equipment from the table and pay attention to the fact that there is a valve on the table, which we cannot take yet. We go to the right, and immediately to the right there will be one of the valves that must be closed in order to shut off the gas supply. We quickly run up to it and start spinning, and at these moments we notice that the enemy we just killed is rising from the gas fog. As soon as the valve is closed, we immediately run through the door on the left, after which Sebastian will close it himself. Right valve. We twist it and see that the big man decides to commit suicide in order to appear in the room with us. We kill him again, and the doors open. After passing through the door, we run into the passage to the left and see how the villain breaks the valve that separates us from salvation. This is where the very valve that we saw on the table when we entered this room comes in handy.

We pick it up and run to fix the damage. The Keeper will always try to send us to another world and will prevent us from turning the valve calmly. We immobilize him with a crossbow, or kill him in order to have time. When the job is done, the supply of poisonous gas will completely stop, and we can go down the stairs to the left of the valve. We go down, Sebastian again locks the door. We rise along the stairs and fight off the safe. After that, we are satisfied with what we saw and go to the end of the passage. We turn left and go along the wall. We go into the cave on the left, at the end of which there is a ladder. We're going down. The episode is over.
Episode 08
We are in the very depths of evil. Several dead people are wandering around the cave. We give them peace and examine the area. We pass through the boarded up door, go a little further and again encounter the dead. We try not to miss, as the ammunition will come across quite rarely. We raise the grate and pass. Here the shelling of the area is carried out at short intervals in time. We run to the other end of the cave, hiding behind the rocks, and climb into the gap in the wall. Before opening the gate, explore the area and discover a new type of enemy. You don't need to waste ammo on them, it's enough to use a melee attack, since these guys will usually appear in large numbers, and there will simply not be enough ammo for everyone, given that they are killed in one hit. Raise the grate and pass through the water, along the way trampling vile creatures. Next will be two dead and a few crawling. At this point, there may be problems with ammunition, but do not forget that we can craft bolts for the crossbow. Having dealt with everyone, we move along the cave and again climb into the gap. We check the platforms on the left and right for the presence of useful items and go to the bloodied room with a corpse and holes in the walls.

We examine the corpse and select the plate from the floor next to it, which must be inserted into the door. Having examined it, we conclude that it is necessary to put the clean side towards us, since the other side is stained with the blood of the corpse that we examined. We pass through the opened door and go to the source of impulses. Suddenly we find ourselves abruptly in the hospital. We pass to the end of the corridor and communicate with the doctor. Then we examine the round hall and go through the door. As soon as we enter, a terrible creature will appear, from which we must escape. We just run forward without bumping into anything. Having escaped from him, we meet Ruvik. The episode is over.
Episode 09
This episode will be extremely informative. We learn many details from the tragic life of Ruvik and Sebastian.
We appear in the hospital and go to the registry. We look at the picture and notice that something has happened. We go to the far mirror, which is in the same corridor with the door to our room, and find ourselves in the forest. A gate is visible ahead. We move towards them and see a huge mansion. We examine the area and enter it through the main entrance. We immediately see how the Doctor leads Leslie through the door, which immediately closes.

In order to open it, you need to start three mechanisms with the help of blood supply. To the left of the door there is a room with a mirror, which I advise you to use more often in this episode, since Ruvik can appear at any time during the passage, and it will not always be possible to escape from him. In order to do this, you need to hide in closets, under sofas, under tables, etc., without being in his field of vision. First we go to the door on the right on the first floor. We examine the rooms, collect equipment, neutralize the traps and, having reached the end, we find a safe without two dials. We return to the main hall. Now we go to the central room on the second floor and immediately to the left we find the lower dial of the safe. Now we go into the room on the first floor on the left. We go along it until we rest against a table with a human head. We use the tool and, looking at the picture on the table, aim at the M-33 zone. The first mechanism is running. After starting each mechanism, the ghosts of the Doctor and Ruvik will appear in the room with us, who will have very informative conversations.
We return to the main hall. Now the only door we haven't been through yet is on the second floor on the left. We go there and get into the library. We turn left and go along the right wall until we see a ladder. We rise along it, deal with two dead men and find the upper dial from the safe. We return to the entrance to the library and move to the door on the right. We kill the dead, who found dinner for themselves, and move along the corridor, examining the two rooms on the left. Don't forget to defuse the bomb on the wall near the second door. At the end of the corridor, we turn right and go to the end of the room, having previously cleared the restroom on the right from objects. As soon as we run up to the end, a trap will work, which will actively pull us onto the spinning shafts. We shoot at the red light from above and disable the motor, as a result of which the shafts stop spinning. We pass through the door and climb into the fireplace. Again we get into the room with the head on the table. We use the device and aim at zone A-2, again using the drawing. The second mechanism is running. We get out of the fireplace, leave the room and go left. We move to the boarded up door through the room and again we get into the main hall.
Now it remains for us to open the safe in order to start the last mechanism. We go to it and by the method of elimination we select the code. Most likely there is a random here, and if not, then we put 11 on the upper dial, and 2 on the lower one.

The doors open and we find ourselves in a room with the last, third human head cut in half. Using the device and drawing, we aim at the area C-4. After the mechanism is started, we return to the main hall, and the doors open.
Ahead we see a long corridor. As soon as we enter, the doors will immediately close. We move along the corridor and see Ruvik walking towards him. No panic. When he overtakes us, we will be transported to his memories. We go along the corridors and rooms until we encounter a huge blood clot in the form of a man. We run from him from the room along the corridor, break into the door, and the room stretches along. We find thin threads that we must pass by, crouching before we are pierced by spikes from the ceiling. It's not difficult, we just mentally imagine that the threads are walls that cannot be touched. We pass only in the obvious gaps between them, you should not meddle in small openings. When we go to the other end of the room, we find a mannequin and move again. We ended up in a location with huge heads.

We go past them, and a blood clot appears again. This is where we enter the labyrinth. We must run fast, because the clot has the ability to pass through the bars, and we will have to write out zigzags back and forth, shoot locks, explode bombs, go through spinning saws and at the same time not fall into a trap on the floor. The route is like this. To the left, to the right, to the right, we shoot the castle straight to the stop, to the right, to the left, to the left, we explode the bomb, right to the stop, we shoot the castle, to the left, to the left, to the right, we carefully pass the traps, to the left, we explode the bomb from the left, to the right, we go to the saws and we pass on the same site with them, to the right, we shoot the castle, to the left. We quickly run into the light, because the heads after us will close.
We again got into the room, but after passing along the corridor and going through the door, we find ourselves in a field with sunflowers and a barn in front.

We go inside and observe the ghosts. After the house lights up, we need to get out through the window on the second floor. There are two mechanisms near the entrance on the left. We twist the one on the right, thereby dragging the lift to the edge of the second floor. Then use the mechanism on the left to lower the lift. We stand on it and shoot at the mechanism that is responsible for the rise, and go up to the second floor. We go to the window, and we are thrown back to the first floor. Another blood clot. This time we just shoot the enemies that he will send at us until the cutscene starts. We again find ourselves in a long red corridor. We go forward and go in the door. We get into a room in which there is a gap between the wall and bookcase. We climb there, and the closet moves. The episode is over.
Episode 10
We start exactly from the same place where the previous episode ended. We go down the stairs and get into the basement of the mansion. We move straight and see a door with a mirror. We go into the passage on the right and again we go down the stairs. We neutralize the trap, examine the passage on the left and go straight through the red fog to the door. Here we find ourselves in a large dark room. If you touch the trap, then turn on the carousel with huge spinning knives, and two snipers from above will fire at us. Our task: to reach the corridor on the right, disarming the traps, to where the dead man with the torch is walking around. It is also desirable to kill him secretly.

After we get into the corridor, the trap is activated in any case. Crouching, we pass by the windows and shoot the ghouls. Turn right and go up the stairs. We carry out the massacre and go to the balcony. From there, you can easily kill the snipers, they are on the balcony on the right. We leave the balcony and turn left, go to the end and pick up the battery. Now we go down and go straight to the hall with the carousel through the door near the stairs. We move crouching, as it is worth standing up for a few seconds, and Sebastian will be cut off his head. The mechanism, by the way, can be used against enemies. We go to the right, moving over the fences, and go into the door on the wall on the right. We neutralize the enemies and go along the corridor. Watch out, there's a bomb on the left. At the end, we insert the battery and see that the doors in the hall open. We pass through the spinning knives and go in the door.
Having examined the area, we go down the stairs. We pass through the lake of blood and get into a room with a closed door. In order to open it, you need to restore the power supply. We pass through the door on the left and clear the room of enemies. It is better to lure them out so as not to fall into a trap. When the room is cleared, in its left part we select the battery from the shelf. We go into the door, which is behind us on the right, and move along the corridors. There is only one way here. When we reach the last room, we notice a broken grid. Crouching, we climb there, neutralizing the trap. We insert the battery, the power supply is restored, but with it the traps come into action. I'm going back. We deal with the dead, go further and see a new type of enemy.

To kill this one, you need to release a very serious amount of ammunition into it. We wait until he rushes at us, freeze him and quickly run to pull the lever into the room from which the enemy appeared. He sets the traps in motion, i.e. they will not only work but also move, which will allow us to run under them. We run under the spinning saws on the right and wait for the next trap to work. We run into the door, again into the door, and wait until all three traps work, after leaving the room. Further, crouching, we pass to the right and climb the stairs to the right. We run through the second floor and at the end we climb into the ventilation. After passing through it, we jump down.
In this room, two huge ghouls and one ordinary are waiting for us. Dealing with them will not be easy. We use the environment. Next, we raise the grate using the mechanism, activate the lever, crawl under the saws and again find ourselves in a room with the door we need. We open. We pass along the corridor, and again we are transferred to another location.
We go straight and see how the familiar scarecrow creeps so well through the window (apparently, this is Ruvik's sister, but since in all the dialogues of the ghosts we heard the name Rubin, not Ruvik, we can’t be sure of anything). We go along the corridors and find a room with a mirror. We open the double door and see it again. Now only a net separates us from the four-armed creature. We go around it and go down. We see the lever and pull it. At this time, the creature breaks the grid, and nothing more separates us. Quickly crouching, we climb through the two opening gates and run straight. There is only one way. We run past all the cameras, at the end we turn right and slam the door. We pass through the door and see how the elevator descends, into which, in fact, we need to get in order to escape from the bloodthirsty creature. On the right we see a wall of fire, and on the left - a lever, pulling which, after a while, the supply of fire will stop. We pass and see another wall of fire. Pay attention to the pipes from above. We see a lever on one of them, shooting at which, the fire will disappear.

We wind both options for turning off the fire, namely, that by pulling the lever, the supply of fire will stop only after a while. We pass and meet with the creature again. We turn left, run past the bomb to the right and see a wall of fire. Quickly activate the lever and drive the creature around load-bearing structure in the same room until the supply stops. We climb up the stairs. We run to the next wall of fire and pull the lever again. We do exactly the same manipulation. We run and turn right. The doors close and the room starts to burst into flames. We shoot at the lever from above and open the door in front of us with our hands. The creature won't let go. Here we need to shoot three levers. The first is on the right, the second is on the left, the third is directly next to the wall with fire. We run and jump down. Here we need to shoot at the lever, which will stop the supply of fire that blocks the lever for us. There are also a few more levers, shooting at which, a stream of fire will begin to flow from the pipe. This can be used to buy time by setting the creature on fire. Next, we pull the lever itself, wait until the wall leaves, and run straight to the lift. We go down and find ourselves in a familiar place.
We go straight into the room that can be seen in the distance, go through the door and watch the video. We are thrown back to another location. On the right there is a door with a mirror. We go down into the mine and pass into the next room. We go through the mine again and move to the door with the inscription “Exit”. We get to the parking lot, and then the boss starts chasing us. We run from it and find ourselves on the lower level of the parking lot. Now we need to kill this offspring of Ruvik's sick mind. This is the tactic. We need to hide from him, and when he uses the eye to find us, shoot directly at him.
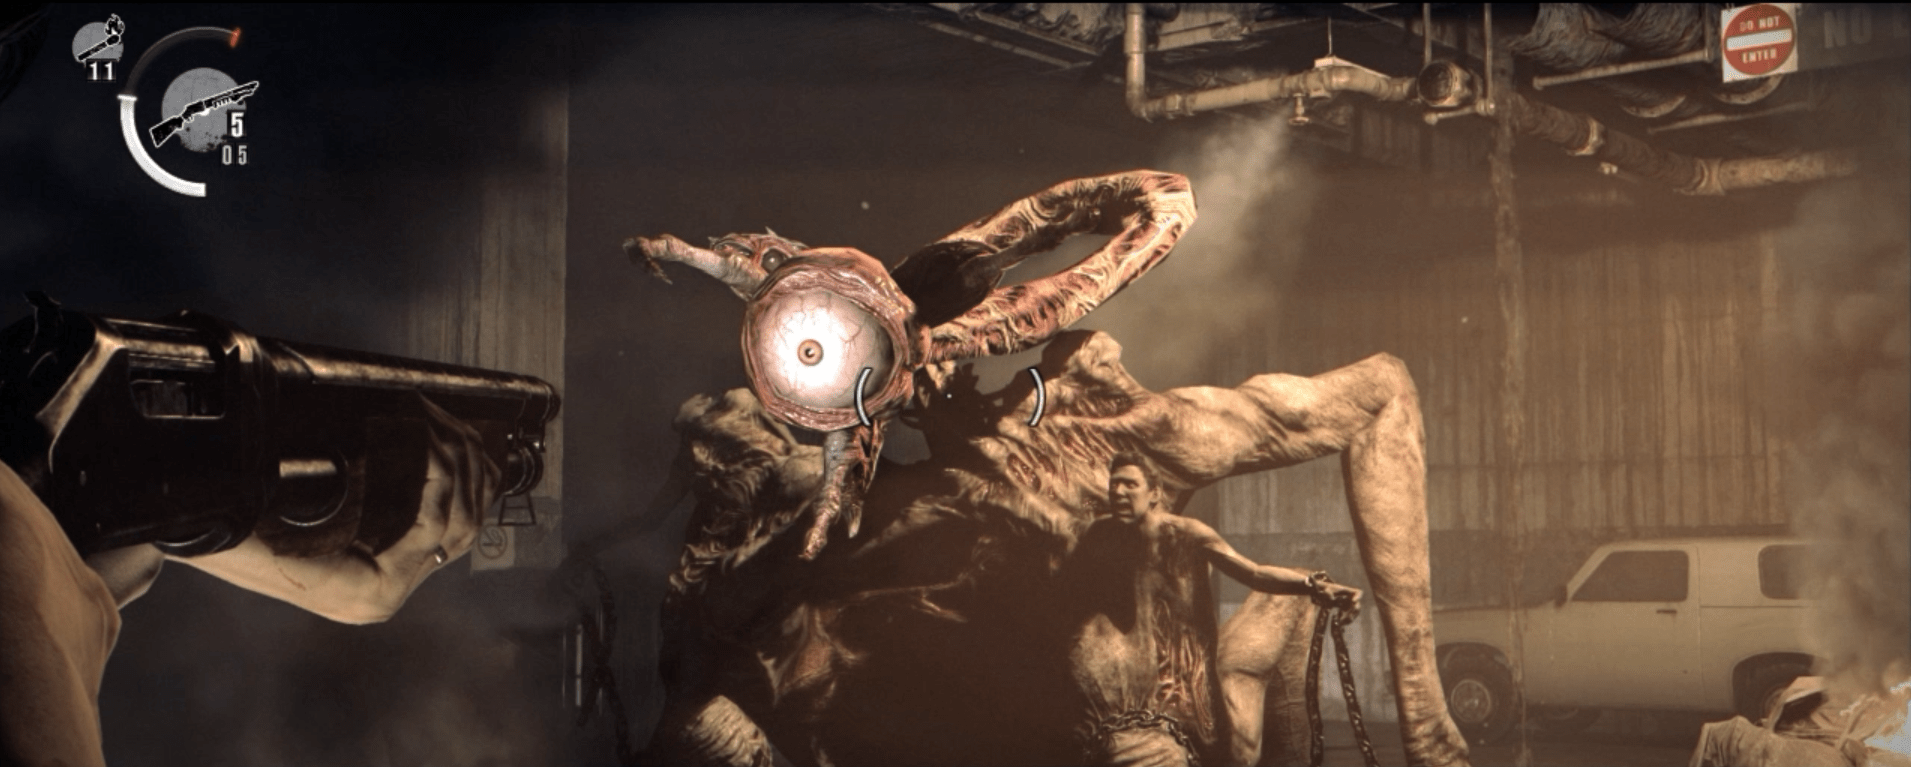
For a few seconds, the creature will immobilize, it is necessary to shoot at all the heads that are visible, and there are 5 of these heads in total, in order to inflict maximum damage on it. When the life of the creature reaches a certain level, a red eye will appear in the center, shooting into which, the creature will again be immobilized, and then we finish it off from all the trunks that are at hand. For killing her, we will receive 20,000 green gel, and the doors to the elevator will open. We go through them. The episode is over.
Episode 11
The elevator is falling. We find ourselves in a city where only one hospital has survived. Everything else is crumbling right before our eyes.

We learn that Sebastian can swim. We swim to the red car on the left and get out on it to land. We go right past the carousel and go along the collapsing road to a hole in the wall with a fallen “Open” sign. We climb there and go through the door. To the right, through the door again. In the room on the right, which is in line with the door we left from, you can find a brand new Magnum on the table in a case. We move into the opening in the wall and go right. We jump down, go down the alley. We go to the left, collect equipment and go into the passage. We climb over the fence behind the minibus and get into a small open area. Our task is to clear it of the undead, reach the door to the right of the container with the stairs, and try to open it. When nothing comes of it, the door near the minibus will open, and the undead will trample from there. We go there and select the keys from the ground. More ghouls and a shooter appear on a container with a ladder. He's wearing a mask, so it's useless to shoot him in the head. We take out everyone and open the doors with the help of the found keys.
We go around the bus on the right and go down. We go down the blue container, go past the bus, and Sebastian falls into the water. We swim to the blue pipe and find that a monster lives in the local waters. We learn from the video that in order to distract the monster, you need to shoot at the hanging corpses, thereby dropping them into the water. We shoot at the corpse closest to us, and as soon as it falls into the water, we dive and actively swim to the other side. By the time the monster duplicates what happened, we will already be on land. In the second section, the tactics are similar.

We climb up the slope and go down the red container on the left. We see familiar impulses, already assuming what will happen next. We go to the end of the street to the source of impulses and approach the door on the right. Ruvik appears, and a creature very similar to him appears to our left and sends us bloody hands emerging from the ground. You have to run from them. We will also be attacked by a dozen ghouls, but the main task is to kill a copy of Ruvik. To do this, we make a circle to break away from the bloody hands that are trying to overtake us. Having found the enemy, we release a harpoon from a crossbow into it and burn it with a match. This is the easiest way. All enemies around us will die. The doors are open. We pass and find a mirror. Save.
We pass through the half-open door crouching and get into a location with a lot of undead behind the cage. We jump off the ledge on the right and see how one ghoul uses the trolley to escape. The undead that is in the cage will spawn in small groups of 2-3 from the gate below as soon as we get close enough to them. The last two are the most dangerous, as they are armed with machine guns. After killing everyone, we can go through these very gates. We pass and go up the stairs. We go along the platforms and jump down. Next, we climb the stairs to the mechanism and call the trolley to us. We shoot the undead and climb the stairs to the trolley. We start going to the other side. We will be accompanied by enemies on the left and right. It is best to shoot them when they are close to the edge - in this case they will fall down, and we will spend only one round. It is advisable to shoot at the body, not at the head, since most of them are masked. We use barrels and first of all we kill enemies with Molotov cocktails. Having reached the other side, we jump off the trolley, go to the left, jump down and move along the pipes on the left to another building. We find a door with a mirror on the right. Save.
We move on. We pass the offices and hear the screams of Kidman. We approach the opening in the wall on the left and see how Kidman is running from the undead. We jump to the red container on the right. We see doors that open after a certain period of time.

We approach the edge of the container and, as soon as the doors begin to open, emitting sound signals, we jump into the water and swim through them. If we hesitate, we will be eaten alive by one of the representatives of the local fauna. We climb the stairs to the left and go to the edge of the platform. We kill the dead near Kidman, so that later it would be easier and the dead man, who stands below in the car, if he is not killed, he will interfere with us further. We go to the stairs to the place where the cartridges for the pistol lay, and we shoot at the corpse closest to us. We rush headlong into the water, swim to the car near the floating pallets and climb onto it. Here it is necessary to guess the moment. As soon as the door starts to open, we immediately shoot at the corpse, which hangs on the platform under Kidman, and abruptly dive into the water. We swim through the door and climb the stairs. We pass to the floor where Kidman is located, and carve all the undead in the room. Kidman will open the door and attack new wave enemies. We kill everyone and go through the opened door.
We're going down. We go outside and go along the platform, listening to the dialogue of the characters. We go down the stairs and go to the door opposite. We rise and go into the building through the red door. Let's watch the video.

We pass through the door and see the inscription "flammable". So, the use of firearms will not work. We move forward, turning off the lantern. We crawl under the shelf and wait for the enemy to pass by, freeing us to pass. We get out of there and head to the stairs on the wall to the left. We pass to the other end of the bridge and go down. Before us is a door that requires a key card. We go in search and find that the area is patrolled by a crowd of enemies. Our task is to secretly pass them exactly straight and first of all close the valve, as a result of which the supply of flammable gas will stop, and we will be able to open fire. After killing the enemies, we are looking for a map. It is located near the blue container in which the ghouls eat. We pick it up and go to open the gate. We go up the stairs, go out into the street and catch a glimpse of how Joseph ran near the building on the right. We go down the stairs and go into the alley, after running into the room with the mirror and saving the game.
We pass the alley and go up the stairs. We examine the room on the left and go to the other side, where we stumble upon Joseph. The episode is over.
Episode 12
We talk with Joseph and find out that he no longer had seizures, this makes us understand that Ruvik has completely turned his attention to us. Joseph found transportation - a school bus. We go into it and Kidman breaks in, trying to start the bus, as she is being pursued by a huge Arachnoid, and now us. We shoot him in the head so that he unhooks from the bus. Kidman starts moving. We do not spend ammunition while he is chasing us, we will not cause any harm to him. The road is blocked by a truck with a tanker. We shoot enemies until one of them drops the dynamite and blows up the tank. Let's go further. Another Arachnoid. Tactics are similar. We shoot in the head until he unhooks. By the way, from the slugs that he releases, there is a drop of ammunition. The arachnoid is killed against the wall, and we continue on our way.

Joseph has been shot, and by chance, there is an ambulance nearby. Our task: to get to it and take a first aid kit. We go through a dense row of cars, collecting ammunition and shooting the undead, picking up a first-aid kit, and then a military “patriot” arrives with a machine gun and opens fire on us. We go to him, hiding behind the cars. Keep in mind that if you stay behind the car after he fires a burst at it, you will most likely die from a car explosion. We go around the "patriot" from behind, kill the shooter and personally sit down at the machine gun. In our hands, it will be much more useful. We shoot a sickly bunch of undead and go to the bus. Here we will be given a short time to take over the management of transport. We crush all the undead and at the end of the road we notice Ruvik.

We step on the gas and watch the video. The episode is over.
Episode 13
We jumped off the bus, ending up in the building. We discover that Kidman is not with us, and we conclude that she remained on the bus. Our goal: to go down, breaking through the floors. Immediately to the right of the hole in the wall there is a mirror. We examine the floor and jump down. We see a new, acid trap, which is neutralized longer than the others. We pass along the corridor to the elevator shaft, shoot the cable and go down. Joseph will not be able to follow us along this path, so we move on alone.
We go through the ventilation and again we come across the Guardian. In fact, you don’t have to be afraid of him on this site, but then there will be as many as two copies of Ruvik, which are better to kill covertly. We turn left, on the right we find the enemy. We wait until he comes to face us, and as soon as he turns around, we move towards him in stealth mode. Do not forget to neutralize the trap, which is located immediately after the turn. We covertly kill him and approach the edge of the corridor, watching Ruvik's double. As soon as he starts to enter the room, we immediately move towards him and plunge the knife into the skull.

- You can jump from one balcony to another and covertly first cut out the ghouls, and then another copy of Ruvik.
- The second option is to go through the door into the corridor and kill the fake Ruvik first, and only then deal with the dead.
- And the last, not the most recommended in case you have problems with ammunition - to cheekily shoot all enemies with a menacing expression on your face.
Do not forget that there are many traps on the floor. When the job is done, we neutralize the acid trap blocking the path to the stairs and move on.
We go down to the floor below. The Guardian is here. Having entered the corridor, we turn right, observe the Guardian and see that he is leaving. We neutralize the traps, collect equipment and neutralize the acid trap that prevents us from passing. We see that the rats run into the ventilation. We do the same, since rats have a very developed instinct for self-preservation. We pass through the ventilation shaft and see the bus. Kidman does not respond to Sebastian's call. We go along the left side of the destroyed building and go down until we see the door. We go in and see a closed door on the left and a door with a mirror. Save.
After saving, the door will open. We pass into it and jump down. In the corridor we see traces of blood and an enemy with red lights. You can guess that the red lights are mines, which will naturally explode as soon as we approach the enemy. Don't try to kill him by stealth. As soon as the enemy dies, another one of the same will jump out of the first door. When the kamikaze are killed, we examine the room behind the door from which the now deceased jumped out. Next, we climb into the ventilation on the right wall at the end of the corridor. We collect equipment and reach the kitchen. We see how Joseph flies away from the Guardian, and Ruvik appears, who launches into the kitchen small discs with saws that move across the floor.

We pass the kitchen, neutralizing the traps and bypassing the disks. It is advisable to move slowly and crouching, as at some points spikes will come out from the ceiling and walls. We reach the end of the kitchen and neutralize the acid trap. We pass through the door. First we go to the right, we collect equipment. Then left to the door. We get into a room with hanging carcasses. We see how Joseph escapes from the Guardian through the elevator. Now the enemy is completely focused on us. We need to kill him twice in order for the elevator to return to our floor. The best way to do this is with grenades. When the elevator doors open, we climb into it and run away from the Guardian. We collect equipment in the room and go through the door. We look out the window and see Kidman and Leslie. We pass further along the corridor, go down the stairs and go out into the street. Let's watch the video. The episode is over.
Episode 14
We appear at the entrance to the subway. We go down the escalator. We go into the room on the right, defuse the bomb and pick up items. Next, we go to the men's toilet, it is located opposite this room. We are not in a hurry to go there quickly, first it is recommended to throw a grenade. If you don’t have them, then we go in, get closer to the bomb until we hear characteristic signals, and quickly run back. Also there is an enemy with a crossbow, which shoots these same bombs. We clean the restroom and collect the green gel. Continue down the escalator again. Ruvik's doppelgänger wanders to the left. We deal with him and a couple of the dead. We turn right, defuse the bomb and open the gate. We get on the subway tracks.

There are a lot of undead and a doppelgänger roaming around. We cut everyone and go to the car. We move along it, exploding mines. We pass to the end of the cars, taking the traps. We jump into the water and go into the next one. I advise you to detonate the bombs first, preferably when the enemy passes by. We jump from the car, having passed a little along the mine, we go into another one. We see the wagons hanging over the abyss and we understand that we are there. We leave the car through the open door on the left, then through another one and see a web of mucus. We burn it with a match and move on.

Downstairs. We kill undead and we pass to the left. We are not in a hurry, we pass into the room behind the grid, first we neutralize the trap in the opening. We collect equipment and go along the corridor. We pass to the end, right down the stairs. We see that we are blocked by an electric field. You can walk under the first one by crouching, and the second one must be turned off using the lever on the wall on the left. But first, burn the corpse that lies between the fields. To the right, down the stairs again, turn off the field again with the lever. We crawl under the mucus and pay attention to the grate on the left. We go to the end of the room. On the right we see ventilation, at the end of which is a jar of green gel, and on the left is a door with a mirror. Save.
We go to the grate, which was noticed some time ago, and a dead man jumps out of it. We neutralize the villain and climb into the mine. We fall into a flooded passage. We turn left and see how a certain claw takes the dead man. We follow her to the right. Again to the right, we collect equipment and we go to the stairs. We go slowly and carefully, as there are traps under the water, hitting which you can get big problems on your already completely clogged head with thoughts. We reach the stairs and go up. We turn left and take the fuse from the shield. The field is off and we can get through. We pass to the end along the platform and twist the valve. The water is leaving, now we have a passage into the pipe, which was flooded.

Having passed into it, we climb up the stairs and see how the claw takes the next dead man as soon as he pays attention to us. Again up the stairs. We pass along the corridor and turn right into the pipe. We burn the mucus and climb between the growths. We get into the room and see several electric fields, two passages on the right, one of which is flooded, and the hanging dead. They all aggro, so we shoot at them without hesitation. We pass to the end of the tunnel and take out the fuse from the shield. The shields go down and the room grows infested. New dead appear. We go into the passage with the valve, turn it, and the water leaves the second passage. We get down into it and pass along the corridor.
The same creature that dragged the dead is grabbing us with a claw by the leg. We shoot her right in the face, and she will let us go. We burn the mucus on the left, pick up the items and climb the stairs to the very top. After walking a little along the corridor, we find a room with a mirror. Save.
We find ourselves in a room in which there is a mechanism and an electrical panel. We pass to the end of the corridor and pick up the fuse from the shield. Now we are heading to the main shield. As a result, we have three fuses. We put them like this: triple on the left to the red lamp, single in the middle to the blue lamp and double to the right to the green.

We go to turn the mechanism, and the boss attacks us.
We fire at the creature from all trunks, hiding behind the pillars. When it disappears, we look where the slugs are crawling from, and we shoot exactly at this place. It happens that the creature is hiding in the pipes from above. We freeze, immobilize, undermine with grenades and generally use the entire available arsenal. Slugs will drop ammo when killed. When the creature dies, we take away the green gel and again we go to turn the mechanism. We take the elevator up and find ourselves in a place where the cars hang over the abyss. We pass through them, and we are again transferred to the hospital. We perform the same operation as in the 5th episode. We pull out some cords from the back of the head, after knocking them down. And on a similar note, the episode comes to an end.
Episode 15
This episode is an epilogue with a bewitching denouement, so, in order not to spoil your experience, it will do without screenshots and detailed descriptions situations.
We go to the hospital for Leslie. After passing through the hospital and going into the lighthouse itself, there is a room on the right where you can save. We pass through the door and enjoy the videos. When we find ourselves in Ruvik's head, our task will simply be to shoot the crowds of the undead until a sadist with a bazooka appears. Coming closer to him and showing off a little on him with a firearm, he will take his old saw and will chase us around the location. We lead him by the nose and kill him. We pass through the door. Here on the sides behind the fences in front of us, the ghouls are sitting. Two on the left and two on the right. On both sides there is a sniper and a demoman with dynamite. We remove them from the sniper and go through the door. We get into the shower. We neutralize all the traps and pull the lever, go to the door, and we are attacked by two Keepers. We just kill them one by one, cutting circles around the shower room through the passage on the right. The main thing - do not let them surround you and do not fall into a trap. The door appears again, we pass through it.
Here our task is to reach the end. We pass the first zone without falling under the rays of light. We pull two levers, first on the left, then on the right. I walk along the edge of the cliff. We do not touch the bomb, the blue zone is too small, bending down will not work. We pass through the stretch marks, first keeping to the wall on the left, and after reaching the last one, turn right. We go further and again we pass through the stretch marks in exactly the same way, but taking into account that light passes along the perimeter. We run forward. A huge saw appears behind us. We run from it into the light, running around pools of blood. Having reached the goal, we again get to the lighthouse. We go into it and go up the elevator. We enjoy the videos.
We need to run forward, running around the monster's paws. We run around the first and second on the right, the third and fourth on the left. We run straight and fall behind the Hammer machine gun. We shoot at the selected red limbs, and when we fly past the head, we shoot at it, and so on several times. When we have a bazooka in our hands, we shoot at the monster until its head is highlighted with a red outline, and only after that we shoot at the head. Then we repeat the operation. When we fall, we make a control shot to Ruvik in the head. The enemy is defeated. I think further explanation is unnecessary. Let's watch the final video. GAME PASSED!
Congratulations, dear reader, on completing The Evil Within. After the credits are over, you will get very nice bonuses. Thanks for reading this walkthrough!
 Delicious and Easy Pear Pie Pear Pie Recipes Easy at Home
 Flourless syrniki - step by step cooking recipes with semolina, oatmeal or starch with a photo Delicate syrniki without flour
 Shchi ingredients. Shchi from fresh cabbage. Prepare a stir fry