To help the hostess there is an ironing board built into the wardrobe. Built-in ironing board, self-made Drawing of a children's ironing board

DIY ironing board
Your wife complains about the ironing board, which is narrow and short, and therefore it is inconvenient to iron oversized items, sheets, duvet covers, curtains and curtains? Whatever you can do for the sake of peace in the family!
To make an ironing board, we need:
Piece of chipboard 1400 x 11 50 mm (if the panels of the disassembled cabinet are not left)
Piano hinge piece 680 mm
Screws 3 mm x 30 mm (6 pcs.)
Screws 3 mm x 14 mm (25 pcs.)
Hacksaw for metal
Screwdriver
- a piece of old flannel or a rug measuring 500 mm x 1500 mm
A piece of upholstery material 500 mm x 1,500 mm
Stapler with staples or hammer and shoe nails

We take the tool in hand and take out the panels of the disassembled cabinet. Here is the appearance of the ironing board and a drawing with dimensions. The width of the board is 40 cm and the width of the support panels is 34 cm.
Bars 2 under the board are fixed either with screws with a diameter of 3 mm and a length of 30 mm, or with screws and nuts. In this case, it is necessary to make grooves for the heads of screws or screws and for nuts. Elements 1 - piano hinges, for the fastening of which self-tapping screws 0.3 mm and a length of 14 mm are used.
The transverse element 3 does not allow the structure to creep apart. It can be made from the same material or from an old ski pole. A distance of 3 cm between the ends of the board and the ends of the bars 2 will be quite enough for attaching the upholstery fabric.
When assembled, this ironing board is only 8 cm thick. If you want to lighten the structure, cut out the areas shown by hatching on the slope panels.
If you don't have a stapler, keep in mind that the boot nails are driven into the end of the board, not the bottom.
You have a small apartment and nowhere to hide a huge ironing board? Not even large table to quickly iron your favorite thing? Do not despair! The ironing accessory does not have to be oversized. We propose to create a comfortable and compact ironing surface that can be easily installed, for example, on a washing machine and just as easily rolled up for cleaning in a closet. Intrigued? Still would…
After all, the proposed solution has little secret- these are practically invisible magnets that will firmly fix the ironing assistant to the surface washing machine, which will make it possible to quickly iron the desired thing. Simply put, it is a rug with magnets measuring approximately 45 x 95 cm.
So, to create such an indispensable thing in the household, prepare:
- 45 cm of fabric for the front side (width 90-100 cm);
- 45 cm piece of fabric for the seamy side (width 90-100 cm);
- 45 cm padding polyester (width 90-100 cm);
- additional thin fabric for magnets (if possible, the same as for the wrong side)
- magnets
Also get sewing machine, scissors, threads, needles, pins, measuring tape - basic sewing kit.
Master class "How to sew a replacement ironing board"
Step one. It is most convenient to sew magnets on a separate strip. Sew on each magnet by hand.

Step two. Baste the strip with magnets to the cut for the seamy side. Sew on the second from the other end. It turns out that only the edges will be fixed with magnets.

Step three. Fold the front and back sides face to face (the magnets should be inside the mat).

Step four... Add a padding polyester blank, connect the cuts and corners and secure with pins.

Step five. Stitch around the edge, backing 1 cm from the edge and leaving holes for turning.
A detailed guide on how to make an ironing board with your own hands will help you find an approach to your spouse so that you always have ironed things.
What should be the ironing board
- Lightweight and durable. If lightness doesn't provide strength, sacrifice it for safety. It is better to pump up the muscles by folding and unfolding the board than a burn or injury from the fact that the board fell apart from the pressure of the iron.
- The length of the plane on which things are ironed should be such that large size clothes fit on it. Otherwise, you will no longer get tired of the process, but from the constant twisting and turning of the linen.
- The board must be properly fitted. Otherwise, ironing will be inconvenient and you will have to underlay something. Therefore, cover the surface with a dense material, under which you need to lay a soft backing.
What tools and materials will be needed to make an ironing board with your own hands
- Jigsaw
- Milling machine
- Drill and drills (cork with a diameter of 2.5 cm and for wood with a diameter of 8 mm)
- Stapler
- Furniture board 18 mm thick
- Planed timber (you will make legs from it)
Do not make your ironing board out of plywood because it deforms when exposed to temperature extremes.
- Screws - the more the better
- M10 bolts - the number of the same recommendations as for screws
- Foam rubber or geotextile - underlay for upholstery
- Upholstery fabric - must be non-stick and waterproof.
If you don't find one, cotton will do.
How to make a DIY ironing board
- Determine the dimensions first. For our example, we chose the following:
- ironing surface - 122x30 cm
- 3 bars measuring 3.5x4x110 cm
- 2 bars measuring 3.5x4x30 cm
You will choose your size based on the height and storage location of the ironing board.
If you made a mistake with the size, then cut off the excess.
And this is what should be the result.
How to make a transforming ironing board built into a wardrobe yourself - video
That's all. Happy ironing.
The history of the ironing board is only slightly more than a century and a half. Various options versions of this accessory have one common drawback - they require space for their storage. We bring to your attention a description of the technology for making an ironing board with your own hands, which will not occupy a corner in your utility room and periodically fall from there while searching for other items. It is about the version of this product built into the wall space.

Niche making
We begin the independent production of the board by preparing a niche in the wall for storing it. V frame house for these purposes, it is enough just to remove inner lining walls and limit the space of the future cavity with suitable materials.
It should be sized so that the ironing board can be freely positioned. The lower limiter for the space of the niche should be located at a distance of about 80 cm from the floor, which will allow the board to be installed at a convenient working height.
Performing similar work in houses with brick, block or wooden walls requires much more effort.
Making an ironing board
We start making the board itself with a choice suitable material for its foundation. To do this, you can apply moisture resistant or construction plywood at least 12-14 mm thick, chipboard or furniture board from any wood. The size of the workpiece should allow making a board about 40 cm wide and 120-130 cm long.
Having picked up suitable option, proceeding to the marking of the product. For these purposes, you can use a metal ruler with a length of at least a meter, as well as a flat, planed rail of the same length. If desired, you can pre-make a template from thick packaging cardboard, or carry out all the marking of the base of the board directly on the material.

To give the ironing board a neater appearance, the leading edge is made with a radial curvature of a small radius. To mark it, you can use a traditional drawing compass, or take suitable cylindrical objects - a roll of adhesive tape, a jar, a saucer, etc.
Having finished with the markup, we proceed to cutting the workpiece. It is convenient to make curved cuts with a jigsaw, straight cuts - circular saw with a disc equipped with small teeth.

The resulting edge and both planes of the workpiece must be carefully sanded. You can, of course, perform this operation manually by attaching a piece of skin with small studs to wooden block, but it is better to use an electric grinder - disc, belt or vibration.

Due to the significant dust formation, these works are best done outdoors or in a small workshop equipped with an extractor hood.
Fastening the board in working position
Fixation of the built-in board in the working position can be carried out in several ways. The first, the simplest, is to equip a flat table with an additional folding support, which is not difficult to make of 10 mm thick plywood.

Attach it to the base of the board using a piano hinge or other hinge. In this case, the support will easily recline when installing the device and just as easily hide in a niche in a folded (non-working) position.

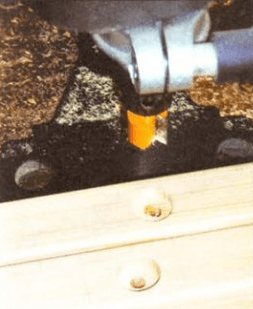
We offer a simpler, but at the same time no less reliable option... To support the board in the place of its attachment to the niche, fix two bars at least 40 mm thick and 70 mm wide. The edges of the bars must be sawn off perpendicularly.

For the convenience of fastening, pre-drill two through holes in the supports, the diameter of which will allow the self-tapping screws used for connection to freely pass through them. If you can't find the screws optimal length equal to the sum of the thickness of the material of the board and the bars, use longer fasteners. Cut off the excess protruding on the working side with a grinder and carefully grind the cut site. Temporarily connect the ironing board and the support bar with the hinges before marking the bar attachment points. This will allow you not to be mistaken with the location of the supports. (see fig.)

In the future, to ensure maximum strength of the attachment, grease the inside of the bars with wood glue before installation.
Ironing board cover
The next step is finishing the ironing board. To optimize the ironing process, we recommend upholstery work surface dense natural fabric. You can use a bath towel or woolen blanket to do this. Fastening the underlay must be done after installing the hinge hinges used to secure the board to the base.

The optimal tool for this operation is furniture stapler... It easily drives steel staples into almost any wood material.
After attaching the backing, carefully cut off any excess material with scissors. Try to leave an allowance of at least 5 mm. If the stapler does not finish off the staples slightly, you can additionally finish them off with a hammer.

Having secured the substrate, go to final finishing boards with a cloth. Select a material for these purposes based on natural materials resistant to high temperatures.
There is an ironing board in every apartment. This is an item that a modern housewife simply cannot do without. And everything would be fine, if not for one "but": usually the trowels are large enough. Today we will show you where to hide the ironing board so that it is always convenient to use it and does not spoil the interior.
Smoothing iron on the wall

Often the space behind the door or on the walls is not used. A lot of space is not required for the board, so you can safely hang it on the walls. This will not interfere with your movement around the room and save space. If you decide on this option, choose the upholstery of the ironer to match the color of curtains, furniture or accessories so that it decorates the interior and becomes a part of it.

To fix the trowel to the wall, use regular hooks for outerwear, which are usually used in hallways. It is enough to fix two such hooks on the wall and you can already hang the ironing board on them. Just make sure that the fasteners are reliable and withstand the load. For these purposes, choose metal hooks.

Ironing board on the door

For expressive individuals who can slam the door hotly, this option is clearly not suitable. But if you have a calm character and like to ennoble your interior, then you may be interested in the location of the board on the door. You can fix it according to the same principle as on the wall, using hooks.
Just for reliability, so that the trowel does not rattle every time you open and close, mount a few additional nails into the surface of the door and bend them. If necessary, you can fix the ironing board with them, and it will be firmly fixed.
In a drawer
Another very interesting option storage of the trowel - in drawer... Moreover, it can be both traditional horizontal and vertical. This is great if you have a small board and a chest of drawers or wardrobe of sufficient depth.


Today, there are also special built-in ironing boards, which are already included with the furniture. Pay attention to these options if you are going to update your furniture.


In a wall cabinet
If you like to craft furniture with your own hands, then you can make a special wall cabinet for the ironer. This will make your interior more harmonious and attractive, as well as functional.
The ironer can be hidden in a single cabinet or supplemented with shelves for storing household chemicals and various little things... And do not forget that such a piece of furniture should harmoniously fit into your interior, so think it over carefully color scheme and the material from which it will be made.

 Invisible calories: why alcohol gains weight Calorie content of alcoholic beverages in 100 g
 Olives: useful properties
 How many calories in buckwheat Kcal of buckwheat porridge on water