Diffuser material. We make a speaker from scrap materials Devices with a closed case
Hello, dear readers of the blog Own laboratory! Today we will be engaged in the manufacture of the most that neither is a real speaker. If you are impatient to listen to music, and you do not have any acoustics, then the problem can be easily solved with the help of scrap materials. Of course, you cannot expect such a speaker to be the crown of creation in the field of acoustic systems (although, who knows, you may be destined to revolutionize this area). But this is not our task either. Our goal is to understand how it works and apply knowledge in practice.
As usual, if "a lot of beeches" scares you, you can go directly to or look at how to make a speaker. If you want to understand how this acoustic device works, read on. Before proceeding to practice, you should figure out what kind of animal such a “speaker” is and how it makes sounds.
A speaker is a device for converting an electrical signal into an acoustic one. Does this definition remind you of anything? If you read the article about that, then you may remember that there was also a talk about the transformation of the vibrational movements of the filament into an acoustic wave. In the case of the speaker, the circuit is very similar. You only need to convert the electrical signal coming from the playback device (computer, player, etc.).
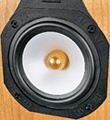
It happens like this. The speaker structure consists of permanent magnet, in the magnetic field of which a coil is located, connected to a diffuser - a plate-shaped structure. An electrical signal is sent to the speaker coil. Under the influence of electricity, a magnetic field is generated in the coil, which interacts with the magnetic field of a permanent magnet. This interaction causes the coil to vibrate, and therefore the paper cone (diffuser) that is attached to the coil. The vibrations of the paper plate cause vibrations in the air. A sound wave arises, and, voila, from the speaker pours out, say, the melodic voice of the lead singer of your favorite heavy metal band. Well, we figured out the device - you can start practice.
To make a speaker, we need:
- Magnet. You can take any, but the stronger the better. If there is neodymium, great.
- The wire. It is best if it is a thin wire in a varnish sheath, and the thinner the better. You can, of course, take any isolated copper wire, but then it should be quite long and the coil can be quite bulky. I have a wire with a diameter of 0.13 mm.
- A metal cylinder - it could be anything, I used a bolt.
- Paper.
- Paper tape. You can just do with paper, but in order not to mess with the glue, it's better to use scotch tape after all.
- Sound source. Better to use an amplifier.

First, let's make a coil. We take a metal rod and wrap it with several turns of scotch tape.

Now we turn the tape over with the adhesive side up and again make several turns.

And now comes important point, in which we cannot do without knowledge of some laws of physics. Well, or rather, you can get by, but as a result you can get an inoperative speaker. Most speakers have an 8 ohm coil impedance. And as soon as we want to get sound from, let's say, a standard amplifier, then we need to at least approximately approach that the impedance of our homemade coil was also 8 ohms. If the resistance is much lower, then this can cause overheating and even burn out our coil or damage the amplifier (the latter is unlikely, but it is possible if the resistance is too low). If the resistance is too high, the resulting sound can be very quiet. Therefore, we will use the formula for calculating the resistance of the conductor in order to at least approximately calculate the length of the wire that we need to wind on the coil.
Perhaps some will say, well, they say, it has begun, I wanted to quickly make a speaker from improvised materials, and here I am offered to calculate an almost large hadron collider. But do not be alarmed, we will not have to make any complicated calculations, all mathematics is at the elementary school level.
The formula for calculating the resistance of a conductor looks like this: R = ρ * l \ s, where R is the resistance (in our case, 8 ohms), ρ is the electrical resistivity of the material (for copper it is 0.0175 ohm * mm 2 / m), S - cross-sectional area of the wire (since I have a wire diameter of 0.13 mm, then the cross-sectional area of my conductor will be π * R 2 = 3.14 * (0.13 / 2) 2 = 0.013 mm 2), l is the length of the conductor (then that we just need to find). Hence l = R / ρ * S = 8 / 0.0175 * 0.013 = 5.9 m. That is, I need to take my wire about 6 meters.
Fu-oo-oo-x, the most difficult part is over, you can start winding the coil. We take our piece of wire and start winding it on the frame, preferably with a turn to a turn. True, the thinner the wire, the more difficult it will be to wind it with a coil to a coil. But it's okay if some of the loops intersect.

After the wire has been wound, the coil can be wrapped with a couple more turns of scotch tape so that the wire does not unwind.

That's it, the coil is ready, we remove it from the frame.

The first layer of adhesive tape must be removed from the metal rod; it is no longer necessary.

And on the coil we make cuts and bend the resulting petals in the form of a chamomile. We make the cuts carefully so as not to damage the coil wire.

Now we are making a diffuser. It looks like a plate. Therefore, we draw a circle on paper ...

... cut it out and make a radial cut on it, like this:

Now we connect the cut parts with glue with a small overlap to make a small cone.

On the convex side of the diffuser, attach the coil with glue or the same tape.

So, now we need to make a small spring. I made it from soft wire, wrapping it around a felt-tip pen.


We start assembling our speaker. We put a magnet on a sheet of cardboard, a metal cylinder on it, and a spring on the end of the cylinder.

Cut out strips from plain paper, fold them like an accordion ...

... and then attach them to the diffuser.

We put the diffuser on a metal rod and fix the strips of paper on a piece of cardboard.

That's it, the speaker is ready. We carefully strip the coil leads, connect them to the amplifier and you can enjoy the music.
Here small video about assembling the speaker with your own hands, at the end you can listen to how it works. By the way, this video is hosted on youtube - channel of your laboratory... This is the first video on our channel, but there will be others - subscribe not to miss the video news or join us on social networks
The technique can be used to repair the 25GDN-1 (10GD-34) speaker and for other similar speakers and cannot be regarded as the only correct one.To do this, you will need the following basic materials:
1. Suspension matching the dynamics
2. Any contact adhesive (Moment-1, 88)
3. Latex or diluted PVA
The hangers are supplied uncut as per inner size, and on the outside. are used not only for the repair of 75 GDN. It must be cut to the desired diameter.
The cap is peeled off by soaking the glue with acetone. The place for the suspension glue is cleaned (on the diffuser and the holder). The diffuser is cut around the perimeter by 2 mm. Using strips of paper (plastic, etc.), the movable system is centered (the strips are placed in the gap between the coil and the core of the magnetic system). Contact glue is applied to the suspension, diffuser and holder (the suspension will first lose its shape, then return to its original position). And, armed with dexterous hands, we evenly lower the suspension onto the diffuser and holder. It is better to slightly pull the diffuser out of the holder so that it first rests on the diffuser, and then together with it, glue it to the holder. We take out the strips, control the build quality and glue the cap. To do this, you can use PVA or 88 glue.
To facilitate the process, you can peel off the washer from the diffuser by soaking it with acetone (fortunately, the quality of the adhesives of our speakers leaves much to be desired), and unsolder the leads (or it is better to replace them altogether).
You can, of course, peel off the washer from the holder, using the solvent 88 of the glue - ethyl acetate.
Then, you need to put the suspension on flat surface, spread the diffuser and suspension with glue, and then lower the diffuser with the coil onto it. Then we put 88 glue on the suspension, the holder, and the BF on the diffuser and the washer, center the movable system using the above method and glue it in.
Good tone it is considered to fill the place indicated in the figure with latex (or diluted PVA).
It is also good to make holes under the hood for better ventilation.


Prepared based on materials from the portal "www.diffusor.spb.ru"
If you are a person already sophisticated in the world of sound, then you know that for an improved attack of sound waves, so to speak, superhard and superhard materials of diffusers are used. Moreover, such diffusers should also be lightweight for minimum inertia. A striking example such a diffuser are domed mid-range and tweeters top series of acoustics (Onkyo, Diatone and the like).
Basically it is a thin titanium dome, in some cases reinforced with a boron sputtering. In principle, the conversation will not be about the materials used, but about the not entirely pleasant option, when for some reason this very dome has broken. We will consider the option of repairing the dome speaker, we will tell you about replacing the dome on it
Dome speaker repair process (dome replacement)
So we have a speaker with a cracked dome.

In our case, this is the Diatone - ovsky midrange speaker. The speaker itself is covered with a protective mesh. First of all, it is necessary to dissolve, soften the glue that holds the mesh. This can be done with acetone. Put it in a syringe and distribute it evenly over the surface of the glue. Around the grid.


After that, we clean the installation groove for the protective mesh from the glue.


It is worth removing the pad carefully so as not to damage the coil and contacts. However, it is worth carefully performing all operations in this process.

Now it was the turn of the dome, for the sake of which everything was started. Break out large pieces, pieces with your fingers.


As a result, only the base of the dome glued into the suspension should remain at the edge.

After that, we grind the glue at the base of the former dome with a cutter. Jewelry work, as it is necessary to provide a flat docking surface and not damage the speaker elements. Next, you need to find a donor, which is also not an easy task. After all, destroying one dome for the sake of another means that you are definitely either out of your mind or you probably know that the result will exceed expectations!

We carefully cut it out from its rightful place. Initially, after weighing everything and checking that this dome will fit instead of the remote one.

After that, we finally adjust the dome and install it in place of the destroyed one. In order to make it easier to manipulate the cut out dome, we carefully attach the cork from the plastic bottle to it with the help of masking tape.


Spill the dome with glue around the perimeter. It will also be a sealant for all cracks around the perimeter, so that dust and everything like that does not get into the speaker system. The glue should be evenly distributed over the edge of the dome without dripping.

As a result, when the glue hardens, we get a repaired speaker. It remains to collect everything back.

Installing parts in reverse order, we collect the speaker. We put the speaker in the speaker.

This completes the repair. Once again, you can enjoy dynamic and high quality sound.
When assembling the diffuser, the speakers are used modern materials... For example, UV-curable polymer adhesives are used to glue the voice coil bobbin to a ceramic or metal dome. The coil leads are connected to the contacts on the connection board using special, very flexible wires.
Despite continuous research in materials science, most woofer and midrange drivers, which are similar in design but differ in size, use paper pulp cone diffusers. In addition, materials such as polypropylene, bextrene are used, and in recent times and light metals (aluminum, titanium, magnesium). Firms with a name and history, having their own research centers or ordering development, are actively experimenting with various fillers and composite materials, creating combined diffusers. Here, the most famous example is midrange heads. B&W with impregnated woven Kevlar diffuser.
Straight-line cones were used in low-frequency drivers only in the very first heads. The rigidity of such a structure is not enough for the entire operating frequency range, and above a certain frequency, the radiation acquires a bending character: only its central part actually works. The diffuser is too heavy and too soft to accurately follow the movement of the coil. It simply does not have time to completely deviate and return, and bending vibrations generate overtones and additional coloration of the sound. The simplest and most ancient way to combat this phenomenon is to form a series of concentric grooves on the surface of the cone during the manufacturing process. Modern loudspeakers use a whole range of measures to suppress parametric resonances. Firstly, almost all diffusers have a curved generatrix. Secondly, more and more of them are made of materials that effectively damp longitudinal vibrations and, in addition, they have a variable cross-section: it is larger for the coil, and smaller for the suspension. Of course, it all depends on the material chosen. For a paper diffuser, a special impregnation is suitable, and for a layered or composite structure, it is important to combine the physical and mechanical properties of its constituent materials. Since the range of reproducible frequencies of a loudspeaker head is determined by the area of the piston movement of its cone, it is important that it is as rigid as possible, while still having a minimum mass.
The external suspension of the diffuser, which ensures its translational movement during operation, can be made as a whole with the diffuser (in the form of a corrugation with one or more grooves) or as a stand-alone ring made of rubber, rubber, polyurethane and other materials with similar properties, which is then glued to the outer edge of the diffuser. The suspension, especially of the low-frequency driver, must be very flexible: this provides a low natural resonance frequency. Almost immediately below this frequency, the efficiency of the head drops sharply, that is, its own resonance determines the boundary of bass reproduction. The second main requirement for the suspension is that the elastic properties must remain linear over the entire range of displacement of the loudspeaker's moving system.
 For a long time, the high-frequency heads had the same conical diffuser, only of a smaller size. However, the most common tweeter today is the domed diffuser. It can be soft (from textiles, for example, impregnated silk) or hard - from metal or ceramic. The design of a typical tweeter differs not only in the size of the cone. Typically, a suspended dome diffuser is manufactured in one piece, to which the voice coil sleeve is glued. At the same time, there is no flexible centering washer in the design. The magnet system, like the diffuser, is fixed to the front flange plate.
Dome diffusers, which can be convex or less often concave, are made by pressing from natural or synthetic fabrics with mandatory subsequent impregnation. HF diffusers - heads made of synthetic polymer films or metal foil - are becoming more widespread. Diffusers are manufactured using vapor deposition to increase rigidity. various materials: boron, beryllium, gold and even diamond. There are numerous examples of ceramic dome diffusers, which are essentially an oxide of metals such as aluminum.
 Centering washer - an indispensable part of the bass - or midrange - head; its task is to provide correct position sleeves with a voice coil in the air gap of the magnetic system. The requirements for the washer are the same as for the hanger - maximum flexibility in the axial direction and preservation of linearity over the entire range of movements, complemented by the requirement for maximum rigidity in the radial direction. To improve the efficiency of the head, the gap must be minimal, and the slightest displacement in the radial direction will inevitably lead to jamming of the voice coil. Throughout the development of the heads, the centering washer was made of different materials(cardboard, paper, PCB, fabric). Today, almost all heads have a centering washer with concentric grooves, pressed from fabric and then impregnated.
The most important element of the design and the head, which largely determines its electroacoustic characteristics, is the magnetic system. It is formed by an annular magnet located between the two annular flanges and a cylindrical core that forms an air gap with the front flange. The design of the magnetic system with a core magnet, which was widespread in the middle of the last century, is now practically not used in heads designed for multiband acoustic systems. The magnetic system creates a constant magnetic field in the gap. When a signal is applied to the coil, its magnetic field interacts with the field of the magnetic system, forcing it to move, depending on the direction of the current, back and forth and move the diffuser attached to it. The gap should be as small as possible: this increases the efficiency of the interaction between the coil and the permanent magnet.
The magnetic field of the ring magnet system is not completely closed in the magnetic circuits. This design has an external stray field that can affect other devices, such as a color TV picture tube. Therefore, in the case of using such heads in home theater speaker systems, an additional magnetic screen is required, which is a glass of soft magnetic material, which covers the entire magnetic system from the outside.
The shape of the pole pieces (holes of the upper flange) and the core determines the magnitude of the magnetic induction in the air gap and the uniformity of the distribution of the magnetic flux in it. The size of the elements of the magnetic system and the width of the air gap determine the degree of heating of the voice coil and, consequently, its heat resistance. There are conflicting demands here. To improve ventilation, you need to increase the gap, but this decreases the sensitivity of the head and requires an increase in the magnet. This is where a field of activity appears for finding a compromise engineering solution. Therefore, for example, in high-power low-frequency drivers, the coil diameter is larger, and two ring magnets are often used.
As you know, for effective work The woofers need to isolate the sound waves from the front and rear of the cone (see Acoustic Design, S&V, 4/2004). Therefore, the central opening of the conical diffuser is closed with a cap, which, due to additional function called dustproof. In some designs, a hole is made in the central core of the magnetic system, closed with a sound absorber, and a dense fabric or nonwoven material with high acoustic resistance is used as the material for the cap. The piston movement of the diffuser in a wide frequency band is possible only with its ideal rigidity. For real diffusers, due to the occurrence of longitudinal vibrations of the diffuser, the effective bandwidth is significantly narrowed. Note that for an ideal diffuser, the band is limited by its physical dimensions, but for a different reason. The speed of sound in air has a final value of about 340 m / s at room temperature.
At a certain frequency, the sound wavelength becomes commensurate with the size of the diffuser and even smaller. In practice, this manifests itself as a narrowing of the directional pattern of the dynamic head with increasing frequency. That is, the higher the frequency, the closer to the head axis the listener must be in order to hear high frequencies... So for a 10-inch (250 cm) diffuser, the theoretical maximum frequency at which the acoustic radiation pattern is compressed to a narrow beam is 1335 Hz. For the most commonly used size 8 "(200 mm) it will already be 2015 Hz, for a 5" (125 mm) cone it is 3316 Hz, and for a typical 1 "(25 mm) tweeter it will be 13680 Hz. At low and mid frequencies, designers try not to force the heads to work above these frequencies. For HF - heads you have to go to the technical tricks. As a rule, a diffuser of one form or another is installed in front of the diffuser, depending on which plane it is necessary to expand the radiation pattern. In our example of a HF head design, a six-beam diffuser provides optimal dispersion, both in the vertical and horizontal planes. In the midrange heads, to expand the diagram, dividers in the form of cones with a complex generatrix are also used.
Highly important parameter a dynamic loudspeaker is the linearity of its amplitude characteristic. This is the dependence of the sound pressure on the amplitude of the oscillation of the diffuser. In a certain range of average values, everything works fine. However, at low values of the input signal, the force of interaction between the field of the coil and the permanent magnet is not enough to overcome the elastic forces of the suspension. This manifests itself aurally as a deterioration in the reproduction of low frequencies at low signal levels. At high amplitudes, the coil goes beyond the magnet field in the gap, which sharply increases the level of nonlinear distortion. The amplitude of the displacement of the diffuser, within which the amplitude characteristic of the head remains linear, is very small. For woofers, it rarely exceeds 6 mm, and for tweeters - 0.3 mm. Due to such a small stroke to improve heat transfer in the HF - heads, the gap of the magnetic system is filled with a magnetic fluid, which is a mixture of silicone grease and the smallest powder of ferromagnetic material. However, their use limits the life of the head due to the significant increase in the viscosity of the lubricant over time.
Speaker selection remains the most important of all system components for the final sound you want in your listening room. Among other things, there is a very wide price range for speaker systems: from less than $ 100 to more than $ 70,000 per pair. The question arises, what is there inside, if the price is so high. The answer is as simple as with expensive amplifiers. More expensive loudspeakers come in small batches, with bespoke drivers (and, moreover, carefully selected for parameters) and high-quality enclosures, most often self made... V general case You can see what you are paying for, but the tonal characteristics of loudspeakers are individual: the differences from sample to sample are possibly greater than that of all other components of the sound reproduction system. Need to listen and listen various systems to finally find the one that sounds most pleasing to your ear.
One acoustics give a bright sound at highs, the other - a harsh sound at the mids, and the third - very deep bass. Although, of course, there are systems with a more neutral (tonally correct) sound, there is no loudspeaker that reproduces the entire sound range correctly (the one that the human ear hears). They all color the sound to varying degrees, depending on their price. Sometimes tonal coloring is specially added according to the taste of the creator speaker system... Finding an acoustics that suits your taste takes time and effort.
Finally, I mustered the strength to write a detailed article on making paper diffusers at home. I will say in advance that these speakers were specially designed for the alpha-pat, which determined their parameters. And the parameters were as follows:
Fs-30
Qms-3
Vas-45
Mms-40
Qts-0.3
Qes-0.334
Re-4
Sd-210
Bl-9.5
The calculation was carried out relative to bl, as it was known.
To begin with, it was necessary to find a basket with a magnet, since it is unrealistic to do this at home, and there is nothing to do. After digging in the trash, two magnets were found (although I originally planned them), and a couple of not quite identical baskets, in other main dimensions in place, took them. I decided to glue the magnets to the baskets, glued them to epoxy, and it is imperative to peel off the paint from the basket at the gluing point, otherwise the seam will not be strong.


Now the diffuser. The main thing in the diffuser is correct shape, but it cannot be obtained without a poison. Here you can go in two ways, fill in a suitable diff with plaster, or make it yourself. If you will put on a stream, or there is simply an opportunity, especially if you are making thin diffusers, make the poison transparent, for example from plexiglass, so you can control the thickness of the paper pulp. Well, I have no opportunity, and I made a poison from putty on an improvised potter's wheel. It was good at least forming a cone, it was convenient to shape. The grooves were made with a round file. So that nothing sticks to the poison, we cover it with paraffin, and varnish on the bottom.
Now the most important part is the paper. Since the woofer, or more precisely the sub, I decided to make paper with a high damping coefficient. For this, reinforcing additives were introduced into the mass. But everything is in order.
From the beginning, the bulk. since this is a sub, I took fine pulp, which was quite good cardboard, and in particular, covers from notebooks. It is just not heavily treated with chemicals, which is what we need, in Russia there seem to be no such notebooks, so we will have to look for another source. Let's say we have cardboard, we need to grind it, depending on the length of the fibers, you can use a mixer or food processor the shorter the fibers, the harder you can grind them. After grinding, we get such a not appetizing gruel, well at least the aroma does not match the appearance.

Now this mass needs to be boiled, you can also do this on gas in a saucepan, but I use an autoclave to speed up the process, this reduces the cooking time, one drawback is that you do not pour caustic soda into it, as I do in such cases, you have to do with baking soda.

Such a thing holds 9 bar without problems, but I don't raise more than 6, there is no need.
After cooking, the mass must be thoroughly rinsed with water. It is best to dissolve it in water and pass it through a fine sieve. The paper should be free of impurities and residual reagents. After the paper has been washed, it can be dried, and it cannot be heated too much, it is allowed to leave it in the sun.
It's time to start with reinforcing additives. In my case, there are two of them. Going to the store for artists and other rubbish, I found two types of paper, with very long fibers and fabric fibers, let's start with the first. The sheet looks like this:

We cut it into small squares, about three by three, fill it with water and into a metal jar for cooking. When the water boils, you can throw in a little caustic, or ordinary soda, and quite a bit, the concentration of the solution should be 3 ... 10%.

After about 20 minutes, drain the water, rinse it a couple of times with water. Even a mixer will not work to separate paper with such long fibers. But a tight-fitting jar will do, preferably a plastic one. In order for the fibers to disperse, you need to shake her well, you can play football for her, or another entertaining game... When finished with this stage, rinse the paper one more time, and again boil for 15 minutes, then rinse again and you're done.
Here's the result:

We cook the second part of the additive according to the same principle.


Those who do not sell such paper can try to boil tow and ride in unnecessary jeans on a concrete slide.
After all parts of the paper pulp are ready, we put everything together, put it in a jar, fill it with water, "process" it well, add glue, and you can cast diffuses. At the expense of glue, there is someone who is good for anything, well, and how the din will be used, there is a choice, starch, pva, gum, personally I poured titanium.
The finished mass is poured into a deep plate, and scooped up with a fork, spread on a poison. It is better to stir the pulp not like tea, in circles, but shaking a fork in different directions, I don’t know what to call it culturally. It is better to spread it in small portions, from the center to the edge (from the coil) and moving in a circle until the required amount of mass is laid out. During the laying out, it is impossible to release water from the mass and even squeeze it, you can only correct it a little with a fork. The laid out, not wrung out mass looks like this:

After laying, you need to release all the water, if possible. This is done gently with a fork, teeth down, slowly releasing water from the paper with not strong pressing. After three circles, when the paper has lost half of the moisture and has become more compressed, we move on to the sponges, also gradually separating the water. When the sponge stops picking up water, we take toilet paper and blot all the leftovers, pressing relatively hard. Let it dry for a day, to be sure. If the water is not drained, the diff will be loose, otherwise it can be beneficial for a large shp, not to mention the fact that such paper will dry for a week.
And here is the result, the mass of such a diff is 8.6 grams, while it is very hard, the thickness of the paper is about a millimeter.
 Forbidden Ancient Magic and Ancestral Spells
 The meaning of the name Adam Adam's family relationship
 How to dry a man's love on an apple