How to make a wigwam in the nursery with your own hands. How to sew a wigwam for children with your own hands. Step-by-step photo of the process How to make collapsible sticks for a wigwam
All the same, the Internet is an abyss of ideas. I saw enough of all kinds of needlework and thought: I need this too!
Sew! Suddenly. And if you consider that the last time I sewed an apron in the 10th grade, and my mother sewed it for me, so that I would at least hand over something. And take into account that I have zero perseverance, then I am generally surprised at my impulses. Honestly, after giving birth, women change)))))
Caught in the wigwams. What they do not sew! In ruffles, with decorative elements, but how much I looked for information on patterns - NOTHING. This is apparently some kind of terrible secret. Even a bunch of master classes offered - no numbers are given. After a week of searching, I was already annoyed by posts about "everything is simple, bought fabric, cut it out." The dimensions are accurate! Give me the dimensions!
I decided to draw my own. Yes, I might be mistaken, I will fit on my knees - I decided so. For three days I was hatching an idea - what it should be, the approximate height, how to arrange the entrance and fastenings, I watched other people's results, here one thing, then another, but I want it to be so.
I'll show you what happened right away. And then I'll show you how it was at the time of drawing-cutting-assembly. Sonya's raptures is a topic for a separate post))))
Several people have already asked me for a pattern, so I will write here in detail
I drew on a simple sheet at a scale of 1:10.
First, I assembled two trapezoids. The first is the three walls of the wigwam, the second is the front wall, which is also the entrance.
Bottom - 120 cm (read 1.2 meters)
Height - 150 cm (1.5 meters)
The top of the trapezoid is 40 cm (here it actually turned out a little wide, 5 cm can be safely reduced)
Front wall (entrance)
We build the same trapezoid, inside we measure the top (lilac) 50 cm (0.5 meters)
Then there are two doors - I wanted them to overlap me - but here, as fantasy tells me. You can just halve it.
So the flap (pink) - top 55 cm, bottom 80 cm. She cut out 2 colors, then sewed it on, so that it turned out to be interesting on the spread as well.
The sash height is 100 cm. (1 meter)
Loops - in the figure there are 2 loops, but in the process I changed them into three loops so that there were less sagging.
The size of the loop - width - it is better to measure the diameter of the stick +4 cm for hem and sewing. I made the length 20 cm, well, in fact, it is better to add another 5 cm so that the distance between the loops is smaller - again due to the sagging of the fabric, but it was very heavy for men, it may not be easier with the fabric.

It took me 3 days to cut and sew - it was I who sewed in the daytime in Sonya's dreams and in the evening it was already overhauled. And even at midnight alone - I could not stop, the sewing fever covered until my husband came and took the machine away))))
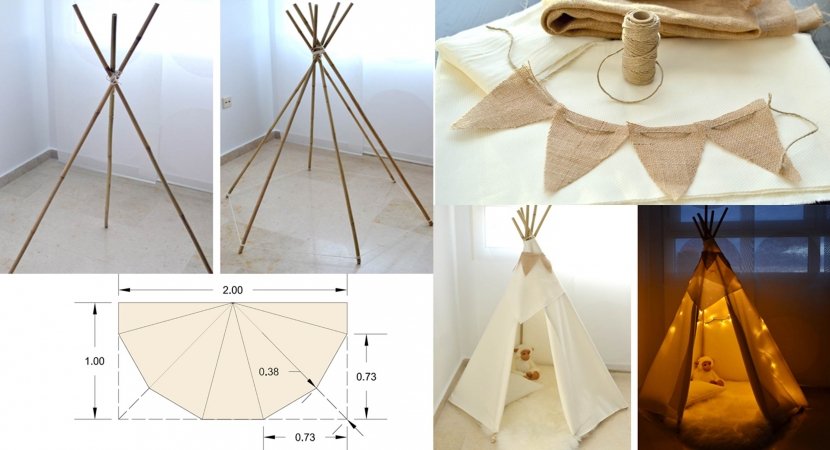
I bought sticks at OBI, two-meter cuttings are sold there, so we need them. The husband above drilled holes in the place of the bundle of sticks, through which I stretched the rope so that the sticks would not creep apart. And one more thing - the sticks tied so that the tepee turned out to be folding. those. it is not necessary to remove the fabric every time, you can grab the top and move it to another place.
Fabric ... I went to a lot of fabric stores. More or less suitable rubles were offered at 600-700 per meter. Having estimated how much the whole house would cost, I realized that I would have to take it on a mortgage with such prices. Therefore, I went to IKEA, which is our everything. And the colors there are superb and the prices are 90-200 rubles per meter. And the fabric itself is heavy and dense - exactly what you need, it seems to me that even in the rain it will not immediately get wet.
As a result, I took 6 meters of white and 2 meters of color. I still have a white meter, but it will also go for finishing parts.
The moment of assembly caused a storm of delight, Sonic lay down and refused to get up already at this stage)))) 
Here is the result. Of course, it was not without jambs, and in one place I was mistaken and messed up with the panels, but it's not scary and even almost like a "trick". And I can't say anything about "the first pancake is lumpy" - I like the result. Well, of course, it is better not to consider the seams close up. In reality, everything was sewn on a stool in the "sic" position, the fabric was constantly creeping under its weight. And do not count how many needles I broke trying to sew in some places the fabric folded six times (this is where I sewed the loops). Well, my machine is an old woman, manual (but beautiful and rare!)))

I also found such a scheme on the Internet

How to make a wigwam for children with your own hands.
Modern children practically do not play "Indians" and, nevertheless, if you make a real wigwam for them, then there will be an abundance of delight and joy from such a house, and given that the wigwam can be easily disassembled and assembled in a new place (on street, in the country, in nature), then the time and effort spent is not a pity for such a good deed.
Look at a few photos of wigwams for children that you can make with your own hands from the available materials:


To make such a wigwam, you will need the following materials:
- fabric, 137 m wide and 315 cm long;
- tape, length 250 cm
- strip of fabric, width 75 mm, length - 7 m;
- sticks, diameter 20-25 mm - 4 pcs.
Cut the fabric into 5 pieces according to the following diagram:

The front panel is made from the two extreme parts of the cut. Fold the parts on top of each other and grind the upper 30 cm long piece with a 12 mm offset, the rest of the fabric is folded and stitched:

In the area where the fabric is sewn, make eight loops (or insert metal ones) and thread and tie a piece of tape.
Side and back panels are grinded in the same way with an offset of 12 mm. When sewing the front and side fabric, be sure to insert the tape 50 cm from the bottom with one end of the tape on the inside and the other on the outside. The length of the tape is 50 cm and it serves for tying the entrance panels:


The bearing elements of the wigwam are four support sticks, which are inserted into a kind of "covers" sewn to the main panel. These covers are made of strips of fabric 75 mm wide. folded in half and sewn to the side vertical seams. So that the sticks don't ruin the floor lower part covers can be sewn up:

If the main material is dense enough, then you can do without stripes - when sewing parts of the fabric, make an indent of 50 mm and, turning the fabric,make another seam along its edge. In this case, the total length of the material used will increase slightly.
Below, in the center of the side and rear walls You can also sew tapes that fix the floor material (if any) to the walls of the tepee:

You may be interested in watching the next video.
Everyone knows how almost every child loves to get a job in homemade houses where it is warm and cozy. Who among us, as a child, did not build ourselves a house with chairs and blankets? This article will discuss how to sew a wigwam - a tent that you can take outside when the weather is sunny, or play in it in your house when the weather is inclement.
It is not difficult to make it with your own hands, for this you do not need to be a master, you only need hands that confidently hold the tools, and with due diligence and careful handling, it will serve you and your child for a long time.
How to make a hut with your own hands
# 1. We sew our children's hut
To do it, it will take no more than a few hours of your time.

Such color solutions perfect for decorating a little girl's room
You will need:
- scissors;
- sewing machine;
- PVC tubes (4 pieces, about 2 cm in diameter);
- electric drill;
- ruler;
- lace or thick strong thread;
- the cloth;
- tube material.
Manufacturing:
- Cut out 4 triangles from the material for the sides. You should get about 130 centimeters of material and 1 meter for the floor.
- Cut long strips from the tube material, about 130 cm long and 17 cm wide.
- Using a sewing machine, sew the sides of all triangles and tube strips.
- Fold the strips of fabric for tubes in half, right side out, and sew the outer edges. The pipe covers are ready.
- Place the triangle face up. Along one of the sides of the triangle, lay the stitched corner of one part of the covers parallel to the cut (not sewn) side of the triangle. Then place the second triangle on top, face down. The side of this upper triangle should be parallel to the sewn edge of the cover and the side edge of the lower triangle. Now we fasten the three pieces together along the edge. Sew along the secured edge, making sure all three pieces are sewn together. Then we repeat the step with the rest of the sides.
- We drill a hole in the tube (about 2.5 centimeters from top edge), then we push the tube into the cover so that it exits through the upper corner of the cover. Repeat with the rest of the tubes, thread a thread or lace through the holes and fix it. Ready.
# 2. No sewing
You don't need to sew anything to make a dwelling.
You will need:
- 4 wooden pins (2 x 15.5 centimeters)
- strong rope;
- canvas 1.5x1.2 meters;
- 3 washers;
- 3 nuts;
- canvas 1.5x2.2 meters;
- scissors;
- lighter;
- electric drill.

This "baby shelter" can be easily carried with you. For example, to the dacha
Manufacturing:
- Cut off big piece rope and burn the end with a lighter.
- We drill holes in the pins.
- We pass a rope through it and tie a knot at the very hole.
- We thread the rope through the second, then wrap it around twice to fix it.
- Add a third pin by doing the same.
- We repeat for the fourth.
- Open the material horizontally and find the middle. We begin to wrap the frame, starting from the back, fix it in the place where they converge with a nut. To do this, first we drill a hole in the dowel, add a washer to the nut and insert the nut into the dowel half a day later.
- We continue to wrap the frame, repeating the previous step with each dowel. Ready.
No. 3. A hut from an old sheet
This option is more difficult to make than the previous two.

Every small child should have a place not only for games, but also for silence.
You will need:
- wooden dowels with a diameter of 5 × 8 mm and a length of 180 cm;
- electric drill;
- drill 5 mm;
- cotton rope 5 mm, at least 1 m long;
- measuring tape;
- pencil;
- adhesive tape;
- sandpaper;
- sheet for a double bed;
- sewing machine;
- fabric marker.
Manufacturing:
- We retreat from the top of the dowel 26 centimeters and make a mark with a marker.
- We drill a hole in each dowel. We pass the rope through the holes, having previously wrapped the end of the rope with duct tape for convenience.
- Tie a knot, then wrap the rope around the dowels and tie a tight knot again.
- We cut out the first part of the structure from the fabric, as in the photo, use it as a sample for cutting out the remaining four.
- We make a vertical cut on the part with the door.
- Sew together the long edges of the five parts of the canvas, as in the photo.
- We sew the upper hole.
- Turn inside out and sew long edges.
- Sewing the bottom.
- We put the material on the frame. Ready.
No. 4. We use an iron to create a hut
It will take more time and diligence to make such a house, as well as more than one pair of hands. Master Class.
You will need:
- canvas, cotton or any other dense cloth (320 cm, at least 140 cm wide);
- tape (10 centimeters, 20 mm wide);
- wide tape (7 meters, 75 mm wide);
- twine (2.5 meters, 15 mm wide);
- 11 metal eyes;
- iron;
- sewing machine;
- scissors;
- 4 bamboo sticks(approx. two meters).

Scheme, with the specified parameters and designations for the future small house
Manufacturing:
- Cut out the parts as in the pattern.
- Starting at the top, we sew two half-triangles.
- Sew along the top 30 centimeters down from the top of the triangle, then sew each side of the seam with a 12mm allowance.
- We heat the iron and fix the connection rectangle with the inside of the front, where the eyelets will be attached. Use a set of eyelets to insert 8 into the top front and insert the string.
- Between the front and side parts, we attach a 50 cm long tape between the parts so that 25 cm of the tape are inside and 25 cm outside (approximately 50 centimeters from the edge). Sew together using a 12mm allowance.
- We repeat on all parts.
- At the base of each part, where the lugs are located (30 mm up from the bottom edge), iron the rectangle connecting the inner part with an iron to strengthen it.
- We iron with an iron at the junction with the upper part of the canvas for strengthening. Alternatively, you can add an extra layer of fabric.
- Fold the wide ribbon in half. Sew over the side seam on each piece.
- Sew the back hole and attach the wide tape in the same way as above.
- Insert bamboo sticks. Ready.
Photo gallery
Children's homemade huts
On the aliexpress website, I found a bunch of all sorts of cool things for the children's room. Since I decided to make it in such a rather nautical style, I needed to find elements of a nautical theme.
I put the whole thing in a basket, and oh, horror, there were such purchases that it’s even inconvenient to say. And I just looked at some pads, wooden seahorses, decorative fishing net and something else there - in general, as my husband would say, all unnecessary garbage. Of course, I didn't buy all this. But one more thing sunk into my soul that, well, I never got out of my head, namely children's wigwam... This is a house that is placed in a children's room. The kids play in it, read, in general - the dream of my childhood.
After a good search, I found several VKontakte groups that sell wigwams for children. Bright, beautiful - just a symbol of comfort. In general, I fell in love. But the prices for those wigwams for children that I liked were frankly biting. If you take a wigwam of good bright colors and a soft mattress for it, it comes out about 10,000 rubles. I thought about it and decided that I could easily sew such a wigwam for children myself, make it with my own hands.
In the Metro store I bought 4 sticks, 180 cm high, they were well polished and had the desired height and were great for a children's wigwam, and it's also 100% natural material Also!
Each stick cost me 200 rubles, in total all 4 sticks 800 rubles - not cheap for sticks, but "not a bitch, not a hitch."
Then it was necessary to buy cloth for a wigwam for children. The fabric was needed dense and preferably natural. I remembered that somehow my husband and I, passing by in IKEA, came across an assortment of different fabrics that were intended for interior solutions. And the fabric was dense, bright - just what you need.
On the website, I made an order, choosing a beautiful blue and white striped fabric for the bedspread with pillows and blue and white ethnic-style fabric for our children's wigwam.
There are 4 meters of striped fabric on the bedspread with pillows, but we are not talking about that now.
There are 7 meters of ethnic-style fabric on the wigwam.
In total, the materials for the wigwam, together with the sticks, cost me 3,530 rubles.

We cut out a wigwam for children on our own
To make a pattern, I made a wigwam out of sticks without fabric, so to speak, constructive, and measured its sides.
Then I drew a miniature pattern on paper.


This is my pattern, as you can see there is nothing complicated here.
Then we take cloth, crayon or pencil and draw a pattern on the fabric. Everything must be done carefully, since such a fabric allows you to cut and cut without any particular difficulties. For example, I was worn out with a fabric for a Roman shade made of bare synthetics in due time, and in comparison with it, it was a pleasure to cut a children's wigwam.
Having cut out 3 sides of our wigwam, we begin to cut the last frontal one.
In fact, everyone does it differently. Someone overlaps the floor-doors, stitching them to the upper part-triangle. I did it differently. I just took and cut the same triangle, only halved, and then sewed it with a curly stitch cross to a cross.
So what's important. My sticks have a round cut with a diameter of 5cm. Therefore, I made allowances for the covers for sticks of 5 cm + 2 cm for the seam, it turned out 7 cm.

We sew a wigwam for children:
- Bend the upper and lower edges of each triangle by two times and sew.
- We sew our triangles, the sides of the children's wigwam.


- We iron well.
- We retreat 5 cm (the size of the diameter of your sticks) and draw a line on the left along each seam for a cover under each stick, guiding our children's wigwam.

- We sew, folding the sides of the wigwam along the seam, so as to get a pocket for a stick. Pre-check if everything is measured correctly and whether the sticks will climb. They should not go in too tightly, but they should not dangle inside either. Should be moving forward tightly.

- We pass the sticks into the covers and put the wigwam, fix the structure at the top with ropes.
- Sew at the top, at a distance of 25-30 cm, the floors of the front side of the wigwam so that it is safe and beautiful.
I haven’t gotten around to the flags yet. You can make decorative flags from the remnants of fabric and put them on the ends of the wigwam sticks.
Well, it remains to sew a mattress from the remnants inside the wigwam.

And that's it!
Wigwams for children "came" to us from the USA, where various children's houses of all kinds and designs are very common. if you have a desire and a sewing machine, then sewing a wigwam for children with your own hands should not be too difficult for you, and this miracle sea will bring joy.
Hello everyone! Today we will become real builders! I think that after what we do with you today, our children will be really proud of us! What kind of program is waiting for us today? Do-it-yourself wigwam sewing patterns! Did you have houses, tents in your childhood? I'm sure there were! Nobody grew up without having their own house, their own personal space! So let's go?
But first things first! First, it is still worth saying a few words about what a house for a baby is. Why does he need it and how we can help our little ones. And then a master class awaits you! Yes, not one, but 3 at once! I have compiled a selection of three wonderful wigwam models that are going to different ways... You can choose exactly the one that you like best, suits and which seems more accessible to you.
Wigwam for toddlers
I'll tell you right away why this tent is important for kids:
- This is their personal space;
- As your gift.
- This is a space designed specifically for crumbs. It is clear that they can own the whole room. But adults can also enter the room, no one will just "break in" into the tent.
- You have devoted your time and work to create a hut. And the little ones, seeing how you try, felt your attention and love!
It is convenient to take such huts to the beach or to nature; they fold easily and can protect from the sun and wind.
Wigwam Making Instructions
Now let's talk about how to make a wigwam. I will offer 3 options and tell you in detail and step by step how to make houses for crumbs. Which one will you do? The choice is yours. It is only worth considering:
- age of the toddler,
- its capabilities,
- how long will it be interesting for him to play in his hut,
- how much free space do you have,
- what "building" materials are available to you.
Our option. A hut in 10 minutes without sewing and patterns.

How you can design a house for crumbs in a few minutes, we showed my son in the video:
Option two... Wigwam without sewing from patches

Any old clothes, scraps of fabric will do. It looks bright, cheerful, but it is done very simply and interestingly.


Option three."Triangular tent". Frame construction

What we need:
- Wooden slats - 4 pieces, each measuring 2.5 x 4 x 150 cm;
- Rod dowel (round slats) - 3 pieces measuring 1.5 x 100 cm;
- Fabric - 4.5 m;
- Colored tape.

Option four... "Indian's House". Stable construction

We need:
- Wooden sticks with a diameter of 2 x 2.5 cm and a length of 150 cm;
- Fabric - 137 x 315cm;
- Ribbon - 250cm;
- A strip of fabric - 7.5 x 700cm.
This is more complex construction, and therefore a step-by-step photo is attached in detail describing all the actions.


- Cut out the rectangle of the fabric so that on one side along the length of the fabric there are 2 triangles, on the other - 1 triangle and 2 halves of the triangle along the edges. The dimensions of the triangles at the bottom are 152cm (2 patterns) and 155.5cm (2 patterns, one whole, the other of two halves, 77.5cm each). Everywhere between the triangles there is a distance of 4 cm. By the same amount, 4 cm, the top of each triangle is not connected.


Option five... "Shalash". Temporary construction

We need:
- Sticks - from 4 to 6 pcs. length about 1.5;
- Fabric - 1.5 x 3m;
- Rope - 2-3m;
- Plastic rings - according to the number of sticks.
This option is so simple that our child can help. A children's hut pattern is not needed here. The main thing is that the structure itself is temporary and collapsible, but must remain safe for toddlers. What are we doing for this.
- Before starting work, we align all the sticks. It is important that the structure is stable.
- We tie the ropes firmly to the edge, stepping back about 20cm.
- Fold the fabric in half, and then diagonally. Cut off a semicircle at the top, and at the bottom. By cutting off all surplus, we ensure safety. The fabric will not be under your baby's feet, and he will not trip over it.
- Now the fabric is simply thrown over the base of sticks, slats or bamboo. We firmly tie the top with a rope to the sticks.
- We put rings on the sticks from below and sew them to the canvas of the tent.
- We sew the edges of the canvas. We put a blanket, wool or a warm rug on the floor of the hut.
If you want to better fix the sticks so that the ropes do not interfere with the bottom, then the easiest option is to make a hexagon rug, in the corners of which to sew rings or ties and insert parkas into these rings. Then they will not disperse and arbitrarily change position.
The best gift for children is their childhood! To make it the best, it is enough sometimes to remember all the brightest moments of your youth. Remember how your parents pampered you, gave you a lot of impressions and enveloped us in their love. Then it becomes clear that children need both pranks and funny games. They need us to make toys for them. They will never forget this! And in due time, these fond memories will help them become great parents.
Now it's time to say goodbye! I remind you about the subscription so that we do not get lost. Not only will you be able to read the articles yourself, and participate in our conversations, but you can also invite your friends! Then each topic will be even more widely disclosed thanks to joint efforts and comments!
So, I'm waiting for everyone at a party. And now, bye, bye!
 New rules for personal property tax
 Features of the sale of an apartment with illegal redevelopment
 Rules and procedure for the exam