Decorating wooden ceilings, how to create the best interior. Ceiling arrangement in a wooden house: options for insulation and decoration Interesting ceiling in a wooden house
Today, wooden houses have gained particular popularity, this is due to their high environmental friendliness. And during the construction of this house, sooner or later the question may arise: what kind of materials is suitable for finishing ceilings? Currently, this issue is completely clear and this is due to a large type of finishing building materials that can be used for cladding wooden ceilings. In the given conditions of the modern wide variety of finishing building materials, when finishing the ceiling in wooden houses, there will be no special difficulties. Although, log cabins can be left in their original form, with lumber and, home owners prefer to finish them with modern building materials.
Ceiling decoration in a wooden house
 Rack ceiling in a private house
 When choosing a tree, it is most important to give preference to traditional standard species: poplar, elm, aspen, this will save on purchasing building material.
Before installing the slatted ceilings, make sure that the wood and special fire-resistant compounds, as well as, in the case of a poor-quality slat, carry out its preliminary grinding. The slats are attached to with nails and screws, or when installing wooden beams in the grooves of all guides. The slatted ceiling is being processed.
Alfrey ceiling decoration in the house
 Alfrey painting
 Painting ceilings made of wood or alfrey finish are currently practically not used, experts do not advise neglecting this method of decorating a wooden ceiling. Using this finishing method, you can radically change the appearance of the house at low cost. And it is not necessary to paint the entire area of the ceiling - you can simply apply the drawing to not significant areas to transform the room.
When repairing ceilings in a wooden house, you can also decorate with alfrey-type finishes.
Modern methods of finishing wooden ceilings
Over the past decade, popularity has grown, and in this regard, it is difficult to imagine now modern renovation without finishing of this type. The characteristic advantages of a suspended ceiling in a house will justify all the funds that you will spend on its installation and installation.
Advantages of stretch ceilings in a private house:
 Stretch ceiling in a frame house
 - When compared with either a plastered surface, suspended ceilings have a perfectly flat external texture;
- The use of a suspended ceiling will make it possible to bring to life original design ideas, for example, multi-level ceilings or zoning of rooms;
- Creation of different textures is possible with the help of suspended ceilings. In wooden houses, the ideal option would be to create a suspended ceiling with imitation of wood;
- Resistant to various deformations and shrinkage of the log house;
The disadvantages of a suspended ceiling in a wooden house:
- The installation of the suspended ceiling is carried out only a couple of years after the end of the construction, which is also associated with a certain shrinkage of the log house, in which they can be done immediately;
- This ceiling is not always able to fit into the overall style of the room.
Wooden lining on the ceiling
In order to preserve the ideal appearance of the structure, different builders give their preference to building material for the ceiling in a wooden house.
 Lacquered lining on the ceiling
 Among the advantages of the lining are such indicators as:
- High level and;
- Perfect combination with the general style of the room;
- The ability to hide defects that arise during the construction of a building;
- When, the ceiling does not need preliminary processing, and there is also no need for grinding and leveling the entire surface;
- To increase the service life of the lining, it is necessary to process it with modern special ones;
Cons of wooden lining for the ceiling in a wooden house with your own hands:
- Increased fire hazard, it can be reduced by treating the entire surface with special fireproof impregnations;
- Complex treatment is required to prevent its damage by fungi and various insects;
- Reduced resistance to changes in temperature and humidity, which leads to deformation.
 Lining ceiling with square beams
 - Breathability, allows you not to worry about condensation and provides a certain level of humidity in the room;
- Using drywall, you can hide all the cons of the ceiling;
- Various engineering communications can be hidden under the sheets.
The disadvantages of drywall include the impossibility of installing it on the wooden ceiling of a frame house, before installing it, you need to install a metal frame;
- Additional finishing required;
- Plasterboard structures can deform over time.
Preparatory measures for finishing the ceiling
The preparatory measures are quite versatile and involve a special entire surface. If the basis of the future structure is part of the roof that has been processed during roofing work, then you can proceed to the next stage of work.
 How the ceiling is arranged in a frame house
 Depends on its shape. If the roof structure does not provide for the presence of an attic space, roof insulation must be started from the plane of the slopes. The sequence of installation of thermal insulation layers is as follows: initially they are laid, after thermal insulation, etc. Today, the market offers building materials, they imitate a ready-made roofing cake, and lathing cells.
The choice of heat-insulating building material must be carried out based on certain conditions in which the roof is in the process of use.
If you need roof slopes that have a small distance between the rafters, and the width of the insulation layer should be wider than this distance, and this will allow you to easily put the insulation layer between the rafters.
The installation and installation of rafters must be carried out with a large step, and before the insulation layer, it is necessary to install a wooden lathing from. Initially, a roll-up membrane must be glued to the base surface, and after installing the crate, an insulating layer is installed in the resulting cells.
DIY plasterboard ceiling decoration
 Fastening drywall
 In the process of finishing a wooden ceiling with your own hands, it may be necessary to reduce the time spent on installation work and the possibility of installing complex multi-level structures.
In these cases, you need to resort to installing drywall on a wooden ceiling.
Installation and installation of drywall does not present any particular difficulties, although the installation of drywall requires a certain approach to work.
And this is due to the fact that the floors are characterized by a certain mobility associated with the shrinkage of the tree and a change in the configuration of the entire structure.
Options for fixing drywall sheets
In construction, there are several ways of attaching drywall sheets to a wooden ceiling, and each of them can be characterized by pros and cons.
- In the first method, drywall is attached to a wooden wall;
- Plasterboard sheets are mounted on a pre-assembled wooden frame;
- Installation of plasterboard sheets is carried out on a metal frame.
Cons and pros of this installation method:
- The advantages of this method are reduced material costs;
- Not significant time costs;
- The original ceiling height remains unchanged.
Cons of this method:
- It is quite rare to find high-quality wooden bases - aligned on the base and plane, which is needed for installation;
- Not every type of tree is capable of reliably fixing hardware;
- In connection with a certain shrinkage of the wood, a certain deformation of the drywall occurs.
Wooden houses in suburban areas are very popular today. The arrangement of such buildings includes many stages. One of the most important is the finishing of the ceiling, which significantly extends its service life and favorably emphasizes the interior of the room.
In this article, we will look at the most common options for finishing the ceiling in a wooden house.
Materials and their features
First of all, finishing materials for the ceiling in a wooden house should be in harmony with the environment inside the building, including wooden walls.
Plaster

Nowadays there are many special mixtures that will help to make the ceiling even, smooth and light.
But if their rather high price does not suit you, then you can turn to the method that our ancestors used many times:
- We knock down a relief mesh from three-millimeter rails.
- We fix it with nails to the ceiling surface.
Tip: instead of rails, you can use a ready-made nylon frame net.
This will greatly reduce the volume and facilitate the necessary work.

- We dilute asbestos plaster with water in the percentage indicated on the package.
- Apply two layers of solution, letting the previous one dry.
Drywall

The fact is that it is very pliable when wet, like clay, and when it hardens, it takes on a solid, durable form. Which is ideal for creating various unusual designs.

Also, the following qualities are inherent in drywall:
- Long service life. Compliance with the correct installation technology guarantees more than a dozen years of service.
- Ease of maintenance. It is enough to tint the fading places.
Lining

Decorating ceilings in a wooden house with clapboard is in perfect harmony with the walls of the building.
In addition, it also has a solid list of advantages:
- Affordable cost. You can always choose less expensive tree species on a tight budget.
- Ecological cleanliness due to natural origin.
- Low thermal conductivity, allowing you to keep warm inside the house.
Tip: the installation of the lining allows additional laying of insulating material under its surface.
So you can further increase the heat-saving properties of the building.
- High level of sound insulation. It will help to isolate yourself from the noise of the rain.
- Long service life.

Tip: using clamps to fix products will completely hide the fasteners.

Veneered panels

These are very interesting materials for finishing the ceiling in a wooden house. The technology of manufacturing such panels is that a thin layer from 0.5 mm to 3 mm of expensive wood is glued onto a board made of cheap wood using a special technology. So we get the same lining with all its inherent advantages, only it looks much richer.
Array

This is what veneer is trying to imitate. Real expensive tree species. But copying the exterior, the veneered panel will never be able to match the quality of the array.
The instructions for installing it are similar to the lining, but the characteristics, of course, differ:
- Very high strength.
- Long service life of decades.
- Solid aesthetic appearance.
- High price.
Plywood

Finishing the ceiling in a wooden house with plywood is a more economical and simple option than using tongue-and-groove boards. Laminate board is made of high quality veneer, which allows it to fit well into the woody environment and at the same time remain cheap.
Installation work with it is faster due to its large size and light weight, but it requires an assistant.
Stretch ceiling

This striking innovation is great for a house made of any material, but in the case of a log house, there is an additional nuance. The suspended ceiling, due to its elasticity, is not afraid of the inevitable shrinkage of the building. Therefore, it can be installed immediately after the construction of the building.
Pros:
- Nice appearance.
- A wide range of colors.

- Unique moisture resistance. If suddenly the roof of your house leaks, it will stretch, accumulating all the water, and will wait for the maintenance personnel to pump out the liquid.

We bring to your attention 20 illustrative examples of the use of wooden ceilings in interiors (implemented and design projects), which were published on the pages of the Ideas of Your House magazine.
1. Wooden decorative panels
Architect Alexander Gusev. Photo: Alexander Ivasenko (IVD 2/2017)
In this room, the overhead space is finished with a variety of materials. Ceiling beams are combined with cladding in the form of decorative wooden panels with built-in lamps, between which a metal mesh is stretched.

2. Floor, passing into the ceiling

Designer: Anna Dyomushkina. Photo: Evgeny Kulibaba (IVD 6/2015)
The original version: the oak parquet board passes from the floor to the wall and then partially fills. At the same time, all the ceiling lighting was built into the drywall on both sides of the wooden plane.
3. Contrasting parquet ceiling

Architect: Olga Simagina. Photo: Konstantin Smilga (IVD2 / 2017)
Not only the floor, but also part of the ceiling and walls of the living-dining room, located in a small St. Petersburg apartment, was decorated with parquet boards with wide and contrasting longitudinal stripes. In this case, light "inclusions" are associated with the rays of light emanating from the window.
4. Volumetric ceiling

Designers: Anastasia Mezenova, Larisa Gracheva. Photo: Vladimir Burtsev / TV program "Fazenda" (IVD 4/2017)
The option of using natural wood for decoration. The volumetric structure with oak paneling, which occupies part of the ceiling and wall, is based on a complex frame made of metal profiles and chipboard. The symmetry of the pattern of diamond-shaped modules, reminiscent of a bee hive, is broken in order to impart dynamics to the composition.
5. Thermal board ceiling

Architects: Tatiana Levina, Mikhail Levin. Photo: Denis Vasiliev (IVD 5/2015)
The decoration of the ceiling and walls in the area near the window is made of dark brown thermal board, which gives the room in a Moscow apartment a feeling of warmth and comfort, like in a country house.
6. Wooden ceiling in the bathroom

Architect-designer: Tatiana Zhivolupova. Visualization - Anastasia Yashchenko (IVD 1/2016)
In a damp room, the space above your head can also be trimmed with wood. For example, in this case, the lining of the ceiling continues on one of the walls and is repeated in the finish of the washbasin countertop. The rest of the surfaces are white with a glossy effect or mirrored, while the black sinks act as contrasting accents.
7. Ceiling made of artificially aged boards

Designers: Pavel and Svetlana Alekseevs. Visualization by Pavel Alekseev (IVD 4/2016)
The material for the ceiling was artificially aged boards, which were laid according to a pattern reminiscent of a playing chess field. A ventilation duct is hidden in the space above the ceiling, which runs from the cooker hood to the ventilation duct.
8. Illuminated ceiling

Designer: Olga Podolskaya. Photo: Ivan Sorokin (IVD 1/2016)
Above the working area of the kitchen, the ledge of the ceiling beam was faced with panels veneered with tinted oak. A ventilation duct was hidden inside this "box", and a backlight was mounted in the lower plane.
9. Ceiling, partly finished with laminate

Architect: Maria Elmanova. Photo: Andrey Avdeenko (IVD 8/2015)
Ceiling decoration in this Kiev apartment has become a stylish accent in the restrained appearance of the living room. The ceiling is partially finished with laminate in a pleasant warm shade, and is lowered around the perimeter to incorporate several paired light sources. The center of the wooden square was marked with a chandelier with a translucent, visually almost weightless lampshade.
10. Ceiling as a means of zoning

Architect: Marina Izmailova. Visualization of the author of the project (IVD 2/2014)
In this example, the different ceiling finishes represent the boundary between the dining and working halves of the kitchen. The ceiling in the cooking area is faced with the same MDF panels as the furniture fronts.
11. Ceiling niche

Designer: Egle Prunskaite. Photo: Darius Gumbrevichus (IVD 8/2015)
Another example of successful zoning: covering the ceiling niche with veneered panels visually separates the seating area and watching TV from the kitchen and dining room.
12. Wooden ceiling and minimalism style

Designers: Alexey Strelyuk, Nasima Boimatova. Photo: Sergey Tomenko (IVD 5/2015)
In the interior, executed in the spirit of minimalism with elements of functionalism, the pronounced texture of wood on the ceiling is contrasted with glossy self-leveling floors and white walls.
13. Surface mounted veneer ceiling light

Architect-designer: Ilona Boleyshits, architect Igor Orlov. Visualization: Arseny Lavrukhin (IVD 11/2015)
The illumination of the children's half of the bedroom is made using a ceiling lamp made of wood veneer with cut-outs in the form of leaves, the same as that adorn the radiator screen.
14. Wooden slats as an element of decor

Designer: Nina Romanyuk. Visualization: Design Studio Ideas (IVD 5/2016)
The composition of wooden slats on the ceiling gives the interior dynamics and visually emphasizes the sleeping area.
15. Wooden grill with overhead lights

Designer: Olga Alexandrova. Visualization: Archivizer (IVD 5/2016)
The ceiling is decorated with a wooden grille with overhead linear light sources, which reflects in the glossy kitchen facades, giving additional depth to the room.
16. Black wood ceiling

Architect-designer: Tatiana Zhivolupova. Visualization: Anastasia Yashchenko (IVD 1/2016)
The ceiling and one of the walls of the living room are sheathed with black decorative panels. A fairly voluminous dark surface was effectively diluted with linear lamps with a compositionally verified rhythmic pattern.
17. Ceiling that visually enlarges the space

Design Studio: Zi-Design Interiors. Visualization: Created in Space (IVD 11/2016)
Another illustration of the use of wooden slats and linear fixtures under the ceiling, but this time. Thanks to this solution, as well as the built-in wardrobes with mirrored fronts, the small space is doubled.
18. Wood-paneled ceiling

An unusual idea: the ceiling in the kitchen, hallway and bathroom area is sheathed with FSF wood panels, in the seams between which RGB LEDs are installed with the ability to adjust color and brightness. Thus, the ceiling resembles a geometric puzzle with a luminous web between its elements.
19. Ceiling false beams

Designers: Natalia Grishchenko, Anna Kashutina. Visualization of the authors of the project (IVD 9/2015)
In this example, false ceiling beams visually align the overall height of the studio ceiling, and also serve as the basis for fixing the fixtures.
20. Wooden beams and drywall

Chief architect of the project: Rodion Prazdnikov. Photo: Ilya Ivanov (IVD 7/2016)
The ceilings in the Moscow studio apartment were uneven, therefore, a decoration with hidden electrical wiring was created from wooden beams, imitating box vaults.
The main advantage of your own house, built on a suburban area, is the ability to independently choose materials for walls and coverings, create a layout of your choice and a variable design.
And a considerable number of people, having an almost limitless choice, prefer wooden houses. Why? Firstly, recently suburban housing from a bar or a log cabin received a "second wind" and again became relevant and fashionable. Secondly, wood as a material itself has many advantages, the main of which are its attractive appearance and environmental friendliness. But, in addition to the material for the walls, the owner of a new cottage must choose what and how the ceiling will be finished.

Ceiling Trim Requirements
First of all, you need to understand what requirements are imposed on the ceiling in a wooden house and how you expect it (the ceiling) to be seen. There are not so many requirements, they cannot be called complex and difficult to fulfill. Let's get acquainted with them.

Ceiling preparation
Before you start finishing the ceiling, its surface must be prepared. First, the rough surface of the ceiling is treated with an antiseptic, which is necessary to protect the structure from rotting, the appearance of fungi and mold. Treated wood will last much longer.
Important! If the antiseptic was applied during the construction of the house, then this stage can be skipped.

Fire retardant prices
fire retardant

Fire retardants - impregnations for imparting refractory properties
The final stage of preparation is the installation of the heat-insulating layer. As the name implies, the task of thermal insulation is to minimize the leakage of air heated to room temperature from the house through the ceiling and roof. The effectiveness of thermal insulation largely depends on the material chosen.


Each of the heat insulators has its own advantages, disadvantages and features, but this is a topic for a separate article. The table below is an attempt to briefly consider thermal insulation materials and their properties.
Table. Comparative characteristics of insulation materials for the ceiling.
| Name | Density, kg / m3 | Thermal conductivity, W / (mK) | Advantages | disadvantages |
|---|---|---|---|---|
| Mineral wool | 75-200, depending on the area of application of the material | 0,03-0,12 | Only melts at high temperatures, easy to install | A tendency to absorb moisture |
| Styrofoam | 45-150 | 0,041 | Good thermal insulation performance, low cost | It burns and, when burning, emits harmful substances, rodents can start |
| Ecowool | 45-75 | 0,038 | At high temperatures only melts, environmentally friendly, good thermal insulation characteristics | Installation requires special equipment |
| Expanded clay | 800-1200 | 0,18 | No burning, environmentally friendly, very easy installation process | Large weight, thermal insulation performance is worse than that of other materials |
| Sawdust | 200-450 | 0,08 | The cheapest material | They burn, rodents can start, are not resistant to rotting and the formation of fungi |
Mineral wool prices
mineral wool
Important! Please note that the lower the thermal conductivity coefficient (expressed in watts divided by the multiplied meter and kelvin or W / (mK), in short), the better the thermal insulation properties of this or that material.

For a better understanding of the last stage of preparing the ceiling for finishing, we will consider step by step the process of thermal insulation using rolls of mineral wool.
- First you need to level and clean the surface of the rough ceiling.

- A waterproofing film is laid and fixed on the cleaned surface. The joints between individual sheets are overlapped and sealed with adhesive tape made of waterproofing material.
- A crate is nailed to the ceiling, serving as a frame for the future insulation. It is made either from a wooden bar or from a metal profile. The distance between the elements of the lathing should be 1-2 centimeters less than the width of the roll of mineral wool - this is how a reliable "adhesion" of the heat-insulating material to the frame is achieved.

- Rolls of mineral wool are placed between wooden beams or steel profiles. The minimum layer thickness is 50 millimeters. If several layers of mineral wool are laid, the joints of the rolls of the first layer are overlapped by the next one.

- A layer of insulation and a crate from above are closed with a vapor barrier film.


Prices for vapor barrier film
vapor barrier film
Attention! If the lathing of the thermal insulation is made of a wooden bar, do not forget to treat it with antiseptic additives.
Only at the end of these works can you start finishing the ceiling in a wooden house.

Alternative option - external insulation of the ceiling
Most often, for a wooden private house, lining is used as a finishing material for the ceiling. It is a planed board, on one side of which there is a tongue (also called a ledge or ridge) and a groove. During installation, the board is inserted with a tongue into the groove of the previous one - this is how the elements are attached to each other.


The types of lining differ in the length and width of the boards, in the material from which they are made, in color and texture. There is even a lining, stylized as a log cabin. This is the main advantage - a rich assortment, from which you can always choose something suitable for the interior.

But the dignity of the lining does not end there.
- High performance of sound insulation - in a room where the ceiling is sheathed with clapboard, walking and talking on the floor above will not be heard, especially if there is a heat-insulating layer.
- Durability - lining treated with antiseptics, varnish or other coatings can last for many years without the need for replacement.
- The lining is ideally combined with wooden walls.
- Vapor permeability - due to the fact that the lining "breathes", excess moisture and condensation will not accumulate between it and the rough ceiling, which can reduce the service life of the ceiling and reduce the effectiveness of the thermal insulation layer.

It should be understood that such a finish is not suitable for all rooms - in very large rooms, the lining seems very monotonous, boring. But there is an elegant way to solve this problem - the use of finishes in several colors. Thus, it is possible to divide the space of a room into several zones, which is especially important for a living room or a common room. You can also diversify the ceiling with the help of carving, painting or patterns made on the lining before installation. Often, the material is artificially aged from the outside, thereby creating the atmosphere of an old and venerable mansion in the room.
Important! There is a subspecies of lining, called eurolining. These are finishing boards made according to DIN 68-126 standard. In most cases, it is distinguished by a higher surface quality, grooves and grooves.

Consider how the lining is installed on the ceiling.
Step 1. The height is measured from the floor to the draft ceiling in all corners of the room. The corner with the smallest height is selected, 50 mm is measured downwards from it.
Step 2. With the help of a laser level or a marking thread, a line for the location of the frame is drawn from the point selected at the previous stage. In this way, the ceiling is as flat as possible in relation to the floor.

Step 3. A frame is created using a small section of wood. The lathing lines are laid perpendicular to the location of the future finish. The interval between them is from 40 cm to half a meter, a distance of 10-15 cm should be observed between the wall and the timber. Before installation, the frame elements are treated with an antiseptic and fire retardant.


Step 4. If the lining boards are not painted or varnished, then appropriate coatings are applied to them.

Step 5. The lining is cut to the width of the room, but at the same time there should be a gap of 10-20 mm wide on each side between it and the walls, so that when the material expands under the influence of moisture, swelling and deformation does not occur.


We use a guide when cutting boards - a metal square
Step 6. The first board is attached to the frame with clamps, nails or screws. The methods of fixing the lining are shown in one of the figures below.


Step 7. The next board is installed, the tongue is inserted into the groove of the previous one. The lining should be carefully adjusted to each other, it is permissible to use a rubber mallet.

Step 8. The previous stage is repeated sequentially for all planks.
Wall paneling prices

Step 9. The last plank must be cut if necessary. In most cases, it is fastened to the frame with nails hammered in "obliquely".
Step 10. Compensation gaps between the lining and the walls are closed with a ceiling plinth.

Wood veneer
An alternative to lining can be veneered panels - strips with locks for mounting and fastening, covered from the outside with veneer (a thin wooden sheet several millimeters thick). Typically, valuable types of wood are used for this material. The thinness of the veneer allows for an attractive and rich looking ceiling finish, while being reasonably cheap.


The technology for installing veneered panels does not differ much from the installation methods for the lining: the ceiling is marked, the lathing is created, the first panel is attached to it with the help of nails or self-tapping screws, the following finishing elements are connected to the previous ones with the help of tongue-and-groove locks.


Plywood
In everyday life, plywood is perceived as a cheap and not the most attractive material for finishing the ceiling. But there are such varieties of plywood that are not inferior in their aesthetics to lining or veneered panels, therefore it is still worth considering how to install this material.

The main advantages of plywood are its low price and resistance to moisture (if the sheets have been properly processed and covered with a laminate on the outside). The laying technology is as follows.

Step 1. The ceiling is marked and a frame is created from a wooden bar. This stage has already been described in more detail in. It is only worth mentioning that the distance between the elements of the sheathing should be several centimeters less than the width of the sheet so that the plywood can be nailed directly to the frame.


Step 2. A solid sheet of plywood is applied to the crate in such a way that the edges are in the middle of the beam, which acts as a frame. Using screws or nails, plywood is first fixed in the corners, then along the entire perimeter in 20-25 cm increments.
Prices for plywood sheets

Step 3. The remaining sheets are sequentially stacked in the same way.

Step 4. The process ends with plywood scraps along the edges near the walls.

Step 5. The joints between the sheets are glued with decorative overlays - or.

Important! Remember that the area of a single sheet of plywood is large, so the installation should be done with the assistance of assistants.
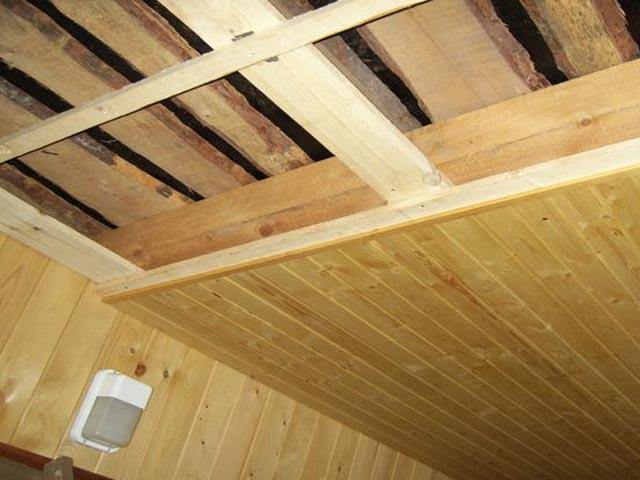
Natural wood
Planed planks made of precious woods blend perfectly with most interiors. To create the atmosphere of a country house, adding "naturalness", the finishing is complemented by a surface flooring made of slab or obapol - a board that is only partially planed.


The technology of laying the boards repeats the method of creating a hemmed ceiling in a bathhouse or a shed - first, at the construction stage, beams from a large section bar are mounted. Then boards are hemmed from below, fixed with self-tapping screws and carefully fitted to each other with minimal gaps. Both the boards and the ceiling frame are treated with protective compounds before installation, and after installation, the ceiling is covered with various types of varnish.

Another addition to the natural wood ceiling finish is the ceiling beams. But you should think about this in advance, since the cutouts in the wall for their installation are made even at the construction stage. The beams are treated with compounds that protect the wood from decay, varnished and sometimes artificially aged.
Advice! If you do not want to make cutouts in the wall and install heavy beams, but you want to see them under the ceiling, then you can use false beams, which are made of wood or plastic and are hollow inside. They are much lighter and easier to work with than with a solid bar.

Video - Wood ceiling sheathing
Drywall
Drywall is a "layer cake", where the outside is sheets of thick cardboard, and inside is a solid composition based on gypsum with the addition of various fillers and additives. This is a very convenient material for decoration, as it can be used to make multi-level ceilings suitable for spacious rooms. In addition, it is most convenient to install spotlights in gypsum cardboard that can emphasize the features of your interior and highlight important areas in the room.
Drywall prices
drywall

Installation of a plasterboard ceiling in a wooden house is as follows:
- A frame made of UD- and CD-type metal profiles is laid on the crate of the heat-insulating layer. Frame elements should be positioned perpendicular to the wooden lathing. It is advisable to leave an expansion gap of 10-15 millimeters between the wall and the metal profile, so that during shrinkage and other movements of the ceiling, the drywall does not bend.

- With the help of self-tapping screws and a screwdriver, the drywall sheets are fixed on the steel profile.

We make ceiling tiles. We fasten the sheet as in the figure, stepping back 2 mm from the walls


The same technological gap of 2 mm between sheets

Following this principle, we install the remaining sheets
- The joints between the sheets should be putty. How this is done is described in detail in.


- Plasterboard is being finished. This can be embossed plaster, paint, ceiling tiles, or wallpaper.

Advice! If you plan to install spotlights, then first mark the places of their future location, mount the wiring there and, before laying the gypsum board, make cutouts in the sheets for lighting fixtures.
Video - DIY plasterboard ceiling
Stretch ceiling
Stretch ceiling - a canvas made of polymer fabric or polyvinyl chloride, fixed with a frame made of plastic or aluminum profiles. This type of finish is especially well suited for only erected houses from a log cabin, where over the next couple of years there will be shrinkage of the floors, which makes painting or plastering impossible.

In addition, a stretch ceiling can be made multi-level by combining it with drywall sheets. But such a ceiling has a drawback - the height of the room is significantly reduced.

Remember that the ceiling finish will turn out beautiful and durable only if the technology of its installation is carefully followed. We hope this article will help you choose the most suitable method.
Video - Installation of a single-level stretch ceiling
To decorate the ceiling in a wooden house, with the modern variety of building materials, only one problem arises - which option to choose? To a large extent, the design style is influenced by the functional purpose of the room. You can leave everything as it is, for example, in a log house, but most people prefer to make the cladding.
There are various ways to decorate the ceiling using artificial and natural materials. Each of them brings its own flavor to the interior of the room. Installation has a lot in common, but in each case, its own characteristics are taken into account.
- limited selection of drawings;
- predominantly geometric patterns;
- fragile parts;
- not a particularly attractive look.
- good thermal insulation, muffles sounds;
- fits perfectly with the overall style;
- the surface does not need pretreatment.
- 1. Extra. Top quality with perfect surface. Made of valuable wood species.
- 2. Grades A and B. There are slight defects that do not affect strength.
- 3. С - economical option. Inexpensive wood is used, sometimes there are small irregularities, there are knots. A good finish hides manufacturing flaws.
- fire hazard - treated with fire retardant impregnation;
- sensitivity to fungi and insects - special means are used;
- low resistance to temperature extremes and humidity - used in rooms with a constant microclimate.
- length 2-4 m;
- 70–150 mm wide;
- 10–25 mm thick.
- 1. Moisture resistance. This property is especially important for an unheated summer cottage. The laminated top layer further increases this figure.
- 2. Wood used for production. For the middle part, conifers are usually used, and the top is covered with more valuable material: maple, birch, alder.
- 3. Cleanliness. In some cases, for example, in a dacha, where there are arrivals, it is advisable to use raw material. For residential premises, plywood sanded on one side is desirable.
- 4. External cladding. Manufacturers cover the decorative layer with plastic, special paper, make a pattern or leave a natural look.
- smooth white surface;
- embossed drawing;
- applied texture;
- imitation of wood or stone;
- a semblance of stucco molding.
- from the side of the attic, the boards are covered with a vapor barrier;
- insulation is laid on top;
- wrapped in a waterproofing film, which is fixed with staples;
- make an attic floor from boards.
Show all
Finishes and materials
A simple and popular design option is the creation of suspended or false ceilings. For the first, a frame is made on which the main covering is fixed. The latter do not require a suspension device. In both cases, wood, products imitating it, as well as artificial materials are used.
The use of plastic panels is cheap, but this method of finishing has certain disadvantages:

False ceilings are very popular due to one important property - inside, above the finish, there are engineering communications: electrical wiring, heating pipes, ventilation system elements. This feature gives this option big advantages. The rough overlap does not require effort to prepare - all the flaws will hide under the finish. The frame is made quickly, the costs are low.

There are many options for decorating false ceilings, and each one looks beautiful. Plasterboard constructions are especially diverse. Its use creates endless possibilities for imagination, which allows you to form unique ceiling compositions. They construct coatings with a smooth surface and multi-level. There are small drawbacks that can be easily eliminated. The material is afraid of moisture, but finishing with putty, paints eliminates this. As a result, the cost increases significantly.

Plastic panels or MDF are often used. In suspended structures, they have the same disadvantages as in hemmed ones. A tangible plus is the low cost, if you do not use the imitation of a valuable wood. Sometimes, even a laminate intended for the floor is used in the decoration of ceilings. He has a large selection of textures and colors. The price will be decent, but beautiful.

Wood paneling allows you to create a unique finish. To solve the problem with high cost, they use a compromise option - lining. It has many benefits:

For a wooden building, the best way is stretch ceilings. If earlier they belonged to the elite option, now their cost is significantly lower. They combine everything positive that is available in suspended and hemmed structures. The material is environmentally friendly, breathable, not afraid of dampness and mold, maintenance is limited to wiping. Installation is much faster than using wood or drywall.

When the filing has been sorted out, it remains to decide how to arrange the ceiling. There are two options: the beams are either hidden or left as a decorative element. In the latter case, the room takes on a stylized antique look. The first method often requires leveling in the plane to install the battens, but the work is not so difficult as to be abandoned.
Plasterboard structures - features of the device in a wooden house
For those who are already familiar with the installation of gypsum board, it may seem that there is nothing complicated. In fact, there are important points to consider. The first is that a wooden house, especially a log house, is highly mobile, displaces, cracks appear. The material is significantly affected by humidity and temperature changes, therefore it swells or shrinks. This negatively affects the integrity of the plasterboard ceiling - gaps form between the sheets. To prevent this from happening, it is important to have some secrets.
You will not need a special rough structure for cladding. If the house is old, renovations are being done, then there may be difficulties with fixing the slabs to the ceiling. Previously, they did not really follow the horizontality of the floor and its elements. We'll have to align. The new building uses beams that are located in the same plane. They will perfectly act as a supporting base for the crate.

Start with the markup. The lowest point is determined on the ceiling, this place is marked on the wall. Further along the entire perimeter, a horizontal line is drawn using the building level. It will make the frame perfectly flat. Before installing it, they are engaged in waterproofing. In the new building, beams are protected, in the old building - a rough ceiling.

For the lathing, metal or wood is used, which does not make a significant difference. One and the other are made independent of the walls. This helps to avoid the deformation that accompanies all wooden structures. The lathing of strips of 30 × 40 mm is fixed perpendicular to the beams after 40 cm, which is enough to securely fix the drywall.
The metal profile is positioned in a similar way, but after 60 cm. The distance between the beams is often too large, which makes installation difficult. The way out in such a situation is the device of a wooden frame. In any case, a gap of 10 mm is left between the wall and the crate. It will compensate for various deformation processes that will not affect the ceiling. The slots are closed with plinths.
Do not forget about the electrical wiring before finishing. If it is then put on top, the cable will not decorate the structure. They outline places for lamps, lay wires, hiding in a corrugated sleeve. This approach is applicable to any suspended ceiling, regardless of the cladding material chosen.

The ease of fastening drywall sheets requires at the same time adherence to the rules that will avoid such unpleasant phenomena as cracks and breaks. They try to stack the sheets in a checkerboard pattern, the edges are aligned with the middle part of the profile. For work, a screwdriver with a bat and self-tapping screws are used, the pitch between which is 15 cm. They are deepened by no more than 2 mm.
Finishing a plasterboard ceiling in a wooden house also has its own characteristics. The usual filling with tape is sometimes not enough - cracks appear. An improved version is used to guarantee. The seams are cut with a knife, achieving a gap of 5 mm. Each bevel is made at an angle of 45 °. Fill with an elastic filler, glue the reinforcing material. An additional putty layer is applied on top of the tape. Even a strong shrinkage at home is no longer terrible. After drying and sanding, the surface is ready for painting.
Using lining for the ceiling
The environmentally friendly and lightweight material attracts many. It blends perfectly with the wooden walls of the house. The cladding method affects the design performance of the room. The lining, located in one direction, looks rather boring. To add variety, ceiling beams are used. They are finished in the same key as the main surface or played in contrast.

If the lining is in the gap between them, the shade and direction of the cladding change. This gives the design originality and variety. On a solid surface, painting, carving, artificial aging are used. This retro style looks modern and fashionable, reminiscent of the houses in which distant ancestors lived.

The lining has longitudinal grooves and grooves at the ends, due to which the installation does not cause difficulties. There are varieties of material:
The lining has certain disadvantages that are eliminated:
For a number of indicators, veneered panels are close to the lining. The production technology is the same, but a finishing layer is glued to cheap wood, which makes it possible to obtain an imitation of valuable wood species. Products may differ in size from the lining, which is produced with the following parameters:
For the device of the frame, a pine bar of 40 × 40 mm is used. The amount of material is calculated based on the size of the room. The first lath of the lining and the subsequent ones are nailed to the crate with small nails or screwed in with self-tapping screws. To dock the panels, use a rubber mallet. They are not placed tightly to the wall - they leave a deformation gap, which is subsequently closed with a plinth.

The installation of veneered panels is practically the same. Their cost is only slightly higher than the price of lining, but they look more noble. They choose an imitation of any type of valuable wood based on personal preferences. Sheathing the ceiling with their own hands is possible even for people without appropriate experience due to the lock connection, which is available on each element.
Plywood is a practical and inexpensive material
Few people pay attention to it when finishing the ceiling, but with its help an original design is created, a house is decorated without unnecessary financial costs. At first glance, it is difficult to understand that plywood boards were used for cladding. The material differs in the number of sheets glued together and other parameters, including:

To sew up the ceiling in a wooden house with plywood sheets, they arrange a crate. It is made from pine blocks or aluminum slats. Fastening, depending on the material of the frame, is carried out with nails or self-tapping screws. The joints are sealed in one of the ways: with putty or decorative wooden linings. It turns out a beautiful, sufficiently insulated, even without the use of special materials, the ceiling.
Plastic is a profitable budget option
Ceilings in a wooden house decorated with PVC panels look pretty decent. For many people, on a tight budget, this is a way out. The decoration is simple, if the rough ceiling is even, they are attached directly to it. Otherwise, you will have to make a crate of wood or metal profile.
All artificial materials have one drawback - they do not allow air to pass through, which is why moisture accumulates, and mold and mildew may form. If the ceiling is suspended, it is imperative to lay insulation, because plastic allows cold to pass through, unlike natural materials.

Plastic panels are used mainly in the kitchen, bathroom and other similar premises. They are always on sale, have several types of colors, are glossy or matte. The most attractive with wood grain, marble, fabric print. When choosing, take into account the general interior of the room. Recently, plastic panels have appeared, the design of which is suitable for installation in a living room, study and even a bedroom.
Acquire ceiling products that are thinner and lighter than wall products. The sizes differ from manufacturer to manufacturer. Installation is simple - individual elements are connected with locks. Some features are taken into account when working with PVC material. They are quite fragile, therefore, with strong pressure, the edges break off, dents are formed on the surface. The instrument is also handled with care: excessive force, falling leaves marks.
Pay attention to fire safety, because plastic supports combustion, releases toxic substances. The wooden floor is treated with a refractory compound, the wiring is placed in reliable insulation from non-combustible pipes or cable channels.

A simple and cheap solution is the production of expanded polystyrene ceilings. The material is quite popular, it quickly gives the room a decorative look. The choice is very large, products are sold in almost all hardware stores. Plates differ in a variety of designs:
They are almost weightless, so they are attached directly to a flat ceiling with a special polymer glue. It is applied with dots along the edges. It is not necessary to remove small irregularities and other defects, the plates will hide them.
Wall and panel methods for installing the ceiling
A similar option is used if the floor of the room does not have beams. These are small rooms, not exceeding 2.5 m in width. The boards are laid on load-bearing walls or a beam fixed 10-15 cm from the top. It is installed on brackets made of reinforcement, additionally fixed with nails. All material is required with a thickness of at least 50 mm, since the insulation and the details of the attic floor press on it with its weight.

For flooring, a wooden lining is preferable, which is securely fastened to each other with locks. Guidance is offered for further action:
In a sense, the version of the panel ceiling is similar, when individual elements are assembled into one structure. The assembly takes place at the bottom, then the finished parts are lifted and fixed on the floor beams, connecting together. Small blocks are easy to handle due to their low weight. Some craftsmen prefer to assemble at a height across the entire size of the room.

 Liquid Center Chocolate Fondant - Yummy Chocolate Milk Chocolate Fondant Recipe
 Delicious and healthy cherry jelly
 How to cook lightly salted cucumbers on mineral water - instant recipes with gas