Hand drill for earthwork with your own hands drawings. How to make a homemade drill for drilling holes under pillars. Device care
When building a house and arranging a site, it is often required to make round holes in the ground. They are needed when arranging a fence - for installing poles, when building gazebos, installing arches and other light utility structures. The same pits, but with a larger diameter and depth, are required when constructing a pile foundation. These pits are made with a motorized or hand drill. There are enough of them in stores, but many prefer homemade products: they are often more productive and reliable than factory products. In addition, a drill with your own hands can be made of any design, and there are many of them.
There are three main designs of earth drills:
- Garden. Usually these are two semicircular blades welded at an angle to one another. A hand drill of this design is used to organize holes for planting plants, from which it is called "garden". But pits are made with the same tool when installing posts for fences, gazebos and other light buildings.
An example of a homemade earthen garden drill

The auger auger is characterized by spirally wound several spiral turns

Retractable blade - features of the TISE pile drill
Garden earth drills, which are easier to make. Depending on the type of soil on which drilling is carried out, their design is slightly modified. This is the beauty of home-made drills - they can be "sharpened" for specific conditions and it's not only about the size - the blades can be made removable, bolted, but also in the design features. Yes, regular borax in the store are inexpensive, but they are "universal". They work well on "light" soils. " On loams, clays, marls, etc. they are ineffective.
A garden drill is the simplest but most effective design. It consists of:
- Cutting part. It usually consists of two steel semicircles with sharpened edges. The diameter of the blades is selected depending on the diameter of the holes to be drilled. For convenience, the blades can be made removable - bolted.

Pole drill can be with an assembly rod
This is a basic design, and there are many improvements to it. But first, let's talk about what a ground drill can be made of.
As already mentioned, the rod is most often made from a round or square pipe. Diameter - from 3/4 'to 1.5', profiled pipe can be taken from 20 * 20 mm to 35 * 35 mm.
Blade knives can be made from:
- sheet steel with a thickness of 4 mm;
- saw blade for a grinder of a suitable diameter.

Earth auger with blades from a saw blade for a grinder
It is easier to make blades from a saw blade. In this case, the cutting edges are already prepared. It will be possible to additionally sharpen the side edges so that the soil is cut easier.
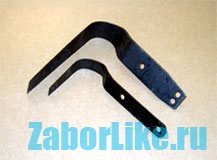
The pico drill is made of different materials - there are a lot of its designs. They just make a sharpened rod. Then you need a piece of a large diameter bar. The second option is to make something like a drill from a strip of steel. And yet - a combination of the two.
And finally, about the pen. It is more convenient if it is made of a round pipe. Its diameter can be selected according to the girth of the palms. The main requirement is that you should be comfortable.
First of all, you need to decide whether you are making a drill with your own hands with removable or stationary blades. If the blades are removable, weld thick steel shelves at one end of the rod. The shelves are made at an angle - so that the planes of the knives are divorced at an angle of 25-30 °.
After the shelves have been welded, two or three holes are made in them - for fasteners. Then the same holes will have to be made in the blades, and they will be installed on bolts of solid diameter.

One rod can have several sets of cutting blades - for pits of different diameters
In the discs themselves, holes will have to be cut in the center - so that they fit more tightly to the rod, but this operation is also required in the monolithic version - with welded blades.
If you are going to make the blades from sheet steel, cut out a template from paper, along it - a circle of steel. Drill a hole in the center - a rod will need to be inserted and welded into it. Circle or square - depending on the selected bar. The dimensions of the hole are slightly larger than the dimensions of the rod.

Manual drills with one turn
It is also necessary to part the edges by 25-30 ° degrees. In this case, the drilling efficiency will be maximized. If you work on dense soils (clay, loam with a predominance of clay), the blades can be brought together under load. To avoid this, stops are added from a corner or a thick strip of steel.

Strengthening the hand drill for drilling holes in dense soils
The blades are bent due to the fact that the steel is used unhardened, but it is almost impossible to find it in the sheet, and if it is possible, it will hardly be possible to bend it.
If you have an old saw blade of a suitable diameter, you have found an almost perfect option. They use hardened steel, and it is elastic and strong. But such a disc cannot be bent, therefore it is cut in half and these halves are bred at the required angle.

The disc is sawn in half
Such a homemade drill for earthworks shows a fairly high productivity. Even used discs have a well-sharpened edge. And to make drilling even easier, they also sharpen the drill on the sides with their own hands.
In dense soils, it can be difficult to cut the soil with large blades. In this case, several blades of different sizes are welded onto the rod. Below, near the peak, the smallest are welded, higher, retreating a few centimeters - the large ones. There can be three such tiers, maximum four. The entire cutting part should not be more than 50 cm, otherwise it is very difficult to work physically.

Cutting blades can be arranged in several tiers
If a drill is needed for shallow pits - for installing poles, etc., then such a design is optimal - it has a relatively low weight, it is easy to work with it. The process of work is as follows - they lowered it into the hole, turned it several times - pulled out, poured out the soil stuck between the blades. But if you need to drill deep pits, you will be tortured to drag a small amount of soil from the depth. For such cases, a box for collecting soil is welded over the blades.

Homemade drill with soil receiver is suitable for installing poles and piles
And all these are hand-made boers. All of them are highly efficient - it is much easier to work than purchased ones.
The auger drill, due to the large number of turns, creates significant resistance, that is, it is much more difficult to work with it than with a garden drill. But augers are used mainly in the presence of a mechanized drive - when they make a drill for wells of great depth - for water, devices of underground probes for a heat pump, etc.

This is what a screw auger looks like
To make a homemade auger drill, you will need several metal discs. The number of disks is equal to the number of turns. The discs are cut out the same, in them, in the center, a hole for the rod is cut out, as well as the same sector - so that they can be welded.

A sector is marked in the rings, cut out
The disks are welded on one side, then, slightly stretching the resulting accordion, the seam is welded on the other side. Rings are welded on the outer discs. The welded discs are put on the rod, the lower edge is welded.


In the author's version, the TISE drill is a blade with a soil receiver and a wider folding knife, which forms an extension in the lower part of the pile. But working with such a projectile is inconvenient - a folding knife interferes greatly. Therefore, in some structures it is made removable, but in general, it is recommended to drill the pits themselves with an ordinary garden drill, and to expand it, make a separate folding knife with a land receiver. This makes the work easier and faster.

A do-it-yourself drill for TISE piles is one of the options
A cut-off shovel acts as a knife here, and the land receiver is made from a herring can. The knife is fixed movably, when it is lowered into the pit, it is pulled up by a nylon cable tied to the end. Having reached the bottom, the cable is weakened, the blade begins to cut the sides of the pit, forming the necessary expansion.
The photo below shows the second version of a homemade drill for TISE piles. The design is more complex, but also more efficient. The plow-blade is made from a piece of spring, sharpened and welded to the folding structure on bolted connections.

More complex design
Dredger - from an old propane tank. The earth is collected from the bottom, because the receiver is made with a rounded bottom. It has two holes, their edges are sharpened.

This shell works well even on dense clay. True, to reduce friction, the well must be constantly wetted with water.
A self-made drill is good because its design is "sharpened" for the owner. In the manufacturing process, everyone makes their own changes, then many more modify the product. But it can be difficult to do without basic drawings. This grave contains several drawings with the dimensions of various drills. As you can imagine, the sizes are conditional, they can and should be changed, adjusting to the sizes of the required wells.
For planting plants, it makes no sense to make a serious structure. In this case, you can make a garden drill from a shovel. Choose a high-quality shovel made of good steel, apply the markings, as shown in the drawing. According to the markings, you will need to cut out two small fragments, cut the lower part in the middle to a depth of 30 cm (pictured).

If the ground is soft, conventional construction does not work very well. For such cases, there is a special drill with an extended cutting part. It is a kind of glass with slots on the sides. The cuts are provided with cutting edges. It is better to make them from well-hardened steel.

Drill for soft soils
This drawing shows an interesting design of the handle - it can be rearranged as the length of the bar is increased.
Both of these units work well, but the garden unit has to be removed often, and the auger is harder to rotate. Choose according to your own preferences.

Auger and garden auger for soil of different density

Detailed drawing in projections of the auger auger

Garden drill drawing
This is what a new drill looks like
Surely the owners of land plots at least once in their lives had to deal with the need to dig holes that are required to install pillars, supports, arches and other details involved in the arrangement of the exterior. Narrow holes and boreholes sometimes have to be drilled in awkward locations or difficult soils. An ordinary shovel cannot cope with digging deep holes, so the owner has to rent a drill or hire a specialist to work with the tool.
A garden drill is a useful tool for a summer resident. It is lightweight and compact, easy to carry and easy to use. Made of hard metals, it splits small stones and plant roots hidden in the bowels of the earth. For digging holes, it is used by substituting it to the right place and making several rotational movements by analogy with a kitchen corkscrew.
Description of construction
The main purpose of the drill is to dig wells to the depth of the columnar foundation. The cutting part makes holes, the shape of which can be different:
- In the form of a screw;
- Two-bladed;
- Helical;
- In the form of half-discs;
- Multi-tiered;
- Removable or whole welded.
Some models start with small blades with  gradually increasing to the largest at the top. But prefabricated drills do not always turn out to be functional in practice, because the tool may not penetrate into the ground to the required depth or its nozzles will not coincide with the estimated diameter of the hole. And although the price of the finished product is low, it makes sense to learn how to make it yourself. The technology for creating a drill at home is simple and inexpensive, it is only important to decide on the configuration of the model.
Let's take a look at a few differences between the different constructs responsible for the functionality of the tool:
- Baking powder... The part looks like a pair of inclined planes or auger. In the second case, a knife resembling a spiral is located on the bar.
- Soil receiver... So-called storage is where soil accumulates. The part facilitates work when drilling holes with a diameter of 35 cm.
- Shaper plow lower extended zone. The use of the structure helps to strengthen the columnar foundation, which is important when erecting massive structures.
The bolted connection of the drill secures the auger part to the handle. The length of the assembled product is slightly more than 1 m, due to which the tool makes holes up to 700 mm. If it is required to dig holes of greater depth, the structure can be supplemented with a connecting pipe (500 mm). The feature looks like a part with a bolt and nut located at the end portions of the pipe.
Manufacturing and selection of components
When making a manual drill for digging wells under pillars with your own hands, difficulties usually arise. But in the production process, the master will need parts and materials from which the finished product is obtained.
Parts list
- M20 bolt and nut
- 2 discs with a diameter of 100 and 150 mm
- Tip and drill with a diameter of 20 mm
- Three pieces of pipe: two for 500 mm and one for 400 mm. Additional parameters: wall thickness - 3.5 mm, outer diameter - 40 mm.
Necessary materials
The requirement imposed on the wall thickness of iron pipes (3.5 mm) is explained by the strengthening of the product and the ability to work in solid ground. Discs for work are allowed to be removed from the circular saw or made by yourself. They will need metal sheets with a minimum thickness of 3 mm.


Of the tools come in handy:
- Hammer and grinder
- Welding technology
- Locksmith set
- Electric drill with metal drills
- Circle sharpener for cutting elements.
In the absence of a tip with a drill, they are replaced with a taper shank drill. The diameter must match the screw section. Use soft bicycle handles to avoid injury in your home.
Step-by-step description of tool making

Protective coating
To prevent corrosion processes, all parts of a manual drill made for installing poles with your own hands must be cleaned with sandpaper, treated with a phosphating solution and a primer. After that, the product can be painted.
Already during operation, after each work, the drill must be disassembled to clean the bolted joints from dust and covered with a waterproof grease. Do not be lazy - careful maintenance of the tool is the prevention of jamming of bolted joints and the guarantee of long-term operation of the entire structure.
Methods to improve tool performance
In the process of work, builders have to deal with an abundance of roots of various vegetation lying in the ground. Sharply sharpened knife edges make the drill easier to use. Also, for the convenience of working on the sloping part of each blade, you can cut teeth or round off the cutting zone.
Design improvements

Drill bit with replaceable cutters
The first "highlight" will be the production of a drill with replaceable cutters. Thanks to this tool, the master will be able to dig holes of any diameter. In addition to making spare parts, it is important to provide for a way to attach them to the crank. The easiest way is to connect the products using two welded iron plates. In relation to the plane of rotation, welding is performed at an angle of 20 °.
Holes for bolts are drilled in the blades and mounting plates - 2 pcs. on every detail. The cutters are screwed with M6 bolts with washers and nuts. To prevent the bolts from interfering with drilling, they are inserted with the thread upward.
The second way to improve the drill is to increase the functionality of the lower end of the wrench. A narrow plate 10 x 2 cm is cut out of sheet iron and grinded with a grinder under a cone, giving the appearance of a point. The cuts in the end of the knob are not made - a turned plate is inserted into this part of the product, welded and flattened. The result should look like a peak.
In a different way, the pike is made like this. The plate is cut off a longer one (about 17 cm), heated and rolled into a screw (like a corkscrew). Work on the creation of the peak continues, as in the first version.
Under the auger, you can use a drill of a suitable diameter, which can handle wood or metal. The unusual tool easily penetrates the ground and drills it to the desired depth without problems.
 Third tip useful for builders working on compacted deep soil layers. If a small plane cutter is welded between the lance and the cutter, using the device it will be possible to perform preliminary loosening of the soil and additional centering during drilling. To manufacture this part, you will need 2 plates measuring 8 x 3 cm. It speeds up the workflow.
Fourth: you can get friezes from discs from a grinder intended for 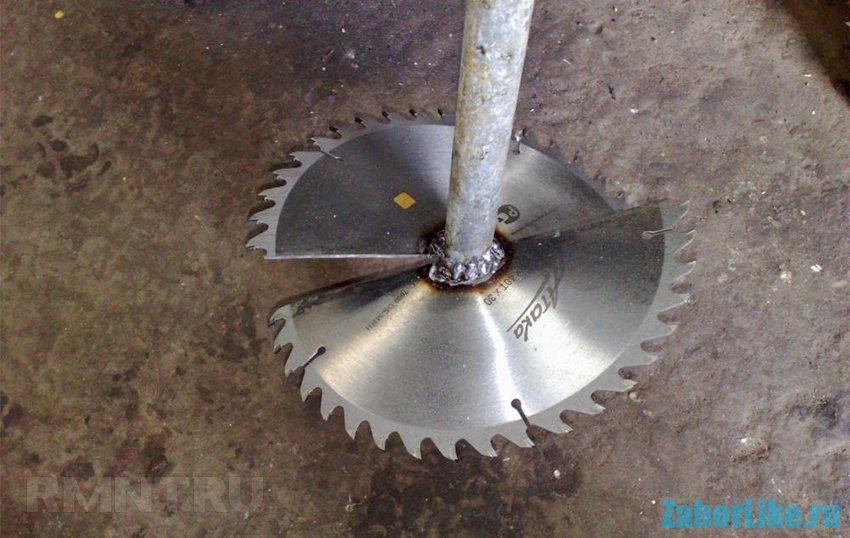 stone processing. The circles are cut along the radius line and widen the central hole, adjusting the hole to the diameter of the wrench. Its extension with the extension of the ends in different directions gives a semblance of an auger. It remains only to weld it, as described above.
The production of a cutter is easily accomplished from a circular saw blade. The sharp teeth of the modernized model will easily cut the unruly roots of even the toughest vegetation. What you choose for yourself, decide for yourself. In general, the manufacture of a drill is not difficult and requires minimal costs. The whole process takes about 2 hours.
DIY hand drill
The operation of the universal hand auger will be more productive if the auger blades are removable, and not tightly meshed with the rack. And if you supplement the product with round blades of various sizes and configurations, the drill will become a truly multifunctional device that will be useful to a person in many household chores.
Experienced craftsmen say that blades with a diameter of 9 and 12 cm do an excellent job with drilling holes for water wells and seedlings, arranging holes for the construction of greenhouses and for installing tunnels for laying underground utilities. Large knives with a diameter of 17 and 25 cm will serve as a rational solution for those who fill the supports of fences and small buildings, arrange compost pits and plant plants with powerful rhizomes, build wells and surround the territory with a fence.
Step by step photo guide:
To maintain the specified angle of inclination of the lever, which will serve as a handle, it is recommended to use a welding clamp when connecting the part to the rack. The handle must be attached to the rack itself at a right angle.
And one more tip: on the eve of drilling, loosen the topsoil with a shovel. Then the tool will enter the ground more easily. We hope our recommendations will help you effortlessly make a functional drill that will last more than one year and will bring many benefits on the farm.
For owners of personal plots, a garden drill is a necessary tool. Wells of different depths are made by a rotor. It is not possible to drill the soil everywhere - where there is rocky soil with large inclusions of hard rocks, it is impossible to use a drill. In soft soils, a hand-made hand drill for the earth with your own hands effectively copes with excavation of a rather large depth.
The construction of fences, supports for greenhouses, foundations of small buildings is carried out with the help of a land drill. In places where there is no central water supply, they reach the aquifer with a hand drill. Self-made tools are used to develop cavities in the soil for the construction of reinforced concrete piles. The dug wells are filled with reinforcement and liquid concrete, receiving columnar for structures on the personal plot.
Design
There are many variations of homemade hand tool designs published in the media. They are united by one idea - to make excavation of a certain diameter and depth with the help of a person's physical strength.
The hand drill consists of several main parts:
- holder (handle);
- shaft (rod);
- extension cords;
- cutting head (screw);
- scrap (peak).
Holder
The handle of the tool is a power lever that, with the help of the worker's hands, imparts a rotational movement through the shaft to the cutting body of the drill. The steel holder is made of the same diameter as the shaft tube. This usually looks like a "T". The handle is welded perpendicular to the rod. There are models where the handle is attached coaxially to the shaft with several bends. Tubes are put on the vertical parts of the holder so that the worker's hands are not subject to friction from the handle.
Shaft
The bar is made from a water pipe. Rod diameters range from ½ "to 1". It makes no sense to make the shaft thicker - it will require more effort to rotate the drill. At one end of the axis, a holder is welded, and on the other side, a cutting head is attached, ending in a sharpened drill (lance).
Extension cords
Additional sections of the shaft allow to increase the depth of passage of the cutting head up to 10-15 m. The sections are equipped with screw connections. The length of the shaft is increased by installing additional boom sections.
Cutting head
The main working body of the drill is designed to loosen the soil and push it up. The planes of the blades, cutting off the layers of soil, accumulate the earth on their surface. The soil is removed during the next pulling of the device from the well to the surface.
Scrap
The shaft guide can be made in the form of a large drill or a sharpened blade. The pike enters strictly vertically into the ground, thereby fixing the direction of the drill. The scrap produces preliminary loosening of the soil in the center of the borehole, which makes it easier for the cutters to cut the soil layer.
The design of the yamobur may be somewhat different, equipped with additional devices - this does not change the structure of the instrument.
Popular homemade drill designs
Of the entire mass of homemade products, the most popular models of drills can be distinguished:
- Lobed.
- Auger.
- Spoon.
- Shock.
- Shovel drill.
- Bur Tise.
Lobed
The design of the cutting unit of the bladed hole auger consists of two blades welded to the shaft, the edges of the planes of which are separated from each other at an angle of 300.

In order to make a yamobur with your own hands, you will need the following tools and materials:
Instruments
- electric welding machine;
- corner machine;
- electric drill;
- ticks;
- roulette;
- hammer;
- compass;
- vice;
- sharpener.
Materials (edit)
- inch steel pipe;
- steel sheet;
- inch couplings;
- inch nuts;
- old drill ø 30 mm or steel strip;
- welding electrodes.
Step-by-step instructions for assembling a bladed drill
Having prepared tools and materials, perform the following actions:
- The pipe is cut with an abrasive wheel into segments, 400 mm and 1200 mm long.
- A circle of ø 300 mm is drawn on a metal sheet with a compass.
- The circle is cut out with a corner machine.
- A hole is drilled in the center of the circle, which is then bored to ø 33.5 mm.
- The circle is put on the shaft (pipe 1200 mm long) at a distance of 50 mm from the lower end of the rod.
- The disc is welded to the shaft.
- The disc is cut into two halves with an angled machine.
- The shaft is clamped in a vise and the edges of the circle are spread with pliers at an angle of 300.
- I sharpen the edges of the disc on a sharpener.
- The middle of the pipe, 400 mm long, is welded to the upper end of the rod.
- If you cannot find an old drill of a suitable diameter, take a steel strip 50 x 30 x 3 mm.
- One end of the strip is sharpened in the form of a lance, and the other side is welded to the bottom of the shaft.
- If it is required to drill wells with a depth of 2 meters or more, extensions are prepared from pipe sections 1200 mm long.
- A plumbing sleeve is welded to one side of the segment so that half of the internal thread is free.
- A thread is cut at the other end of the segment. It is better not to do this yourself, but to order work from a turner.
- A nut is put on and welded onto the pipe so that the thread remains outside.
- I cut the drill shaft in the middle, and threaded connections are also arranged.

When making another version of the blade drill, they go in a simpler way. Take a saw blade from a circular saw and cut it in half. Two parts of the disk are welded with a blade spread of 300.
The drill will do its job much more efficiently thanks to the sharp, serrated edges of the cutters.

Auger
There is a sample auger in every kitchen. This is the internal screw in any grinder. A screw drill is also arranged. The cutting head is a stretched solid spiral. The auger can consist of 2 or more turns. The design of the cutting unit is more efficient than the paddle model.
The circles from the steel sheet are cut to the center. The edges are bent at an angle of 300. Then the cut discs are welded into a single spiral, the turns are welded to the shaft.

Lozhkovy
The bur-spoon is used for the development of soft soils. The principle of operation of the spoon device is based on the accumulation of worked-out soil in the cylindrical body of the device. A spoon drill is made from a thick-walled pipe.
What will be its diameter, so will be the diameter of the well. When the shaft rotates, the spoon accumulates a workout, which is knocked out of the cylinder at the next removal of the device from the well.
To manufacture the device, you will need a set of locksmith tools and an electric welding machine.
Step-by-step instructions for assembling a spoon drill:
- A longitudinal cut is made in the pipe with an oval top and bottom.
- The edges of the cutout are sharpened.
- The upper and lower opening of the pipe is welded with steel mugs.
- The top of the pipe is welded to the rod.
- The axes of the shaft and the spoon should be offset by 1 - 1.5 cm relative to each other. This is necessary so that when rotating, the spoon performs a stroke motion.
- A thick drill or lance is welded to the bottom plug, as in the previous version of the drill.
- The split shaft is made with threaded connections (see blade drill).
- Additional boom sections are also made.
- All cutting surfaces must be hardened to ensure a long service life of the drill.

Shock
The type of construction is used only for producing wells in soft soil. The principle of the drill is that a sleeve from a pipe with sharpened edges is driven into the soil by impact force or under its own weight.
The trapped soil is compacted in the liner body. The soil is then knocked out of the pipe and work continues until the desired well depth is reached. The drilling method is used to obtain shallow working depths.
Step-by-step instructions for making a percussion drill
- A pipe section is sharpened on one side.
- Another hole is tightly welded with a circle of steel.
- A loop is welded to the top of the sleeve.
- A tripod made of a metal profile or a wooden bar is installed over the place of the future well.
- A cable block is attached to the top of the tripod.
- A horizontal drum with a cable is installed on the supports next to the structure.
- The end of the cable is led through the block and connected to the loop of the impact sleeve.
By rotating the handle of the drum, the sleeve is raised to the maximum height. The released handle creates a condition for the liner to fall into the well. The operation is repeated until the desired working depth is reached.
Shovel drill
In the gardening business, the spade drill brings significant benefits. Such a device is convenient to use for arranging planting sites for various seedlings of trees and plants.
The shovel is cut with metal scissors in several places - to form blades. The incised planes are bent in the desired direction to obtain a weather vane structure.

Bur Tise
A special type of drilling device is TISE drills. The abbreviation TISE stands for "Technology of Individual Construction and Ecology". The design was invented by the Soviet engineer R.N. Yakovlev.

The drill is intended for the development of cavities in the ground - for the subsequent formation of monolithic columnar foundations with an expanded base.
The TISE drill is equipped with a wide soil receiver, it accumulates the worked-out soil with small stone inclusions. When the drill reaches the bottom of the well, a folding blade is switched on, which, as it descends, expands the side surface of the working.

Making a TISE drill with your own hands
- Metal tubes of small diameter are welded along the entire length of the rod and additional sections for the passage of the cable.
- A hinge is welded to the bar above the cutting blade, to which a folding blade is attached.
- Closer to the edge of the blade, a loop is welded into which the cable is wound. It is taken out of the guide tube.
- The cable at the top ends in a loop, sized for the worker's hand, or a special lever is made.
- As the base of the well expands, the cable is gradually released.
- Around the blades, a steel strip soil receiver rim is installed.
- At the end of the expansion of the base of the columnar foundation, the drill is removed and the soil is removed from the storage.
Conclusion
When making a manual drill, craftsmen proceed from their experience, the availability of this or that equipment, materials, characteristics of the subgrade and the need for the size and depth of the wells. In any case, a homemade device will cost much less than purchasing a factory product.
The drill is a useful and necessary tool, especially if you have a summer cottage or personal plot.
With its help, you can easily drill a deep hole in the ground with perfectly flat walls. This type of pits is needed so that a pipe can be cemented in it, which will serve as a support for any type of structure. The most famous examples of buildings are a shed, an arbor, a fence or a support for grapes.
Now we will tell you how you can make a drill for a summer residence with your own hands.
To do this, you will need such materials and tools.
Three pieces of metal pipes. The length of two of them should be five hundred millimeters, and the third four hundred millimeters. Moreover, they must be forty millimeters in diameter and have a wall thickness of no more than three and a half millimeters.
Sharpen the lower end of the rod at an angle of thirty degrees so that it becomes sharp.
If you want the tool to drill well into hard packed soil, you can weld a metal drill to the end of the tool.
Attach the handle to the other end in such a way that it holds firmly, but at the same time can be easily removed. You can fix the handle using a bushing. If necessary, you can grind more bushings and base pieces than necessary to keep stock. Also, using more of the base, you can lengthen the tool if it becomes necessary to drill a deeper hole.
At the last stage, paint our product and let it dry.
- Metal pipe for the rack.
- Screw. This is the part of the product that will be directly used for drilling.
- Metal handle.
- Welding machine and electrodes to it.
- Lathe for turning parts.
- Sandpaper circle.
- A drill and a drill for metal to it.
- High strength steel sheet.
- Part of the gas pipe.
- Metal rod. Its diameter should be sixteen millimeters.
- Grinder and cutting wheel for metal to it.
- Welding.
- Clamps for welding.
- The die is the same diameter as the base.
- Plate holder.
- A pair of gas keys.
- Vise mounted on a solid surface.
- Clamp for welding.
- Electric drill.
Show all
The next way
You will need

Grinder and two cutting discs. One of them should be one hundred and fifty millimeters in diameter, and the other one hundred millimeters.

Bolt and nut with a section of twenty millimeters.

A drill that has a diameter of twenty millimeters. You will also need a tip that is seventy millimeters long.

Welding machine and electrodes for it.
Take a piece of metal pipe, which is five hundred millimeters long, and flatten either side a little with a vise.

You should now weld the oval side to the middle of the smaller pipe. It will act as a handle for the drill, which you can make with your own hands.

Now weld the nut to the bottom of the long pipe.

After that, weld a bolt and a tip to the remaining pipe from different sides. This way you can connect both pipes using a thread.

Saw both discs for the grinder into two parts.

Now you weld the parts of the one-millimeter disc to each other, while the welding angle should be forty degrees. Then the resulting product is welded to the edge of a five hundred millimeter pipe directly to the tip.

Weld the two parts of the other disc in the same way, only above the first. The distance between them should be about ten centimeters. The photo below shows everything clearly.

After the work done, you will have two parts that can be connected together.

Now you can twist both crafts that you managed to do with your own hands. As a result, you will receive a drill.

Now you can test the product. If you did everything correctly, you can drill this kind of hole.

As you can see, it turned out to be deep and with almost perfectly flat walls.
After a successful test, you need to do it yourself so that this drill will serve you as long as possible. To do this, completely cleanse it of clods of earth and paint it in any color.

How to make a drill using one disc?
Materials and tools

How to make such a drill with your own hands?
First, take a steel sheet and cut out circles of different diameters from it. Different sizes need to be cut in order to dig holes of different diameters. Make the size of each circle five millimeters larger than the width of the intended fossa.
Drill holes exactly in the center of each workpiece. Each hole should be one millimeter larger in diameter than the prepared metal rod. It will serve as the basis for our product.
Using a lathe, you grind steel bushings into which you drill two holes. Cut the threads into them. Then you can attach our different sized circles to the base using bolts.

Make cuts on round parts using a cut-off wheel. Now the ends of the cuts need to be stretched in different directions to make a screw. Sharpen the cutting edges with an emery wheel at an angle of approximately sixty degrees. The blade is ready.
On the rod, you need to make cuts with a depth of three millimeters using a grinder and a cutting wheel.
Thus, you were able to make a drill with your own hands.
Another way
What do you need
Let's show a visual diagram of the product.

Since it is very difficult to make a worm-type cutting edge, we will consider another option.
We will replace the stepped auger with two rippers. They need to be welded to the base of the product. In this case, it is necessary for the diameter to gradually increase. Thanks to this, you will distribute the resistance of the soil along the resulting steps and reduce the effort expended when drilling.
In this case, the first knife will crumble solid ground, and the second will cut the rock and feed it to the top, gradually sinking deeper. Remember to periodically pull out the drill and shake the dirt off of it.
Now sharpen the cutting edges. Weld the rippers to the base of the bar, and attach the blades to them.
Weld a connecting bolt to the other end of the product or cut a thread.

Screw the coupling onto the thread and weld it to the base.
Now cut off a piece of pipe and attach it to the drill. This will be our pen.
Now just paint the tool.
When building a private residential building or a comfortable comfortable summer cottage, it is necessary to think over the water supply and sewerage system. The main component of the system is a source of clean water. If the water supply is not supplied to the building, a well will have to be drilled on the territory of the property. You can do this procedure yourself if you have a drill.
The tool will drill neat, even holes to the correct size in the soil. It is impossible to carry out such work with an ordinary shovel. The choice of tool must be taken very seriously. Here it is worth considering the characteristics of the soil, the estimated depth of the aquifer and other points.

Peculiarities
The drill is designed for digging vertical holes of great depth and small diameter. At the same time, human efforts are minimized. The beginning of the well on the surface layer of the soil is called the wellhead, the walls of the well along the entire length form the wellbore, the end of the well is called the bottomhole.
The main components of any drill are:
- lower carrier pipe;
- tip;
- incisor or incisal part;
- handle;
- drill bits;
- auger (auger part of the drill).


The screw part of the drill destroys the layer of soil in which drilling takes place and brings the soil up. The shape of the tip is sharp but slightly rounded for quick penetration and a more stable position of the instrument. If necessary, the handle can be easily removed, and an extension pipe is attached to the drill, which allows you to dig a well to a great depth. The use of drills is extensive, from making wells and strengthening fence posts to planting shrubs and trees.


Views
The most commonly used are hand-held augers. There are several types of them.
Auger
It performs drilling by cutting the soil layer with specialized plates that are at the heart of the structure. The plates are welded at a 90 degree angle. So the soil is partially removed from the wellbore, so it is cleaned out with a shovel manually. For drills with blades welded at an angle of 30 to 70 degrees, all the soil comes out with ease. These tools are suitable for the drainage system.


Coronal
The design of such a product includes a pipe and a crown, which is located at the bottom. The crown is made of extra strong material in the form of pointed incisors. This allows for maneuvering.
Drilling with a core drill is possible only with other additional tools: chisels, rods, fasteners. When drilling, in this case, a bit is first used, and only then a drill.


To prevent the walls of the well from collapsing, water is used. If the drill is not long enough, it is guided by adding rods. Good care only improves the technical characteristics of the instrument.
Shock rope
It is an unusual tool of large size, consisting of a pipe with a bailer. To use this type of drill, you need a tripod. It is installed at a height of about 2 meters.
With this type of drilling, the task is to make a well. From a height, a pipe of heavy weight with a sharp end is thrown into it, tied with a thick rope or rope to a tripod. The soil layer is loosened and falls into the pipe. Then it is pulled to the surface using a winch and cleaned from the ground. Only one person can be employed in such work.


Lozhkovy
It includes a long metal rod with a cylinder at the end. There are 2 parts in the cylinder, which are arranged along or in the form of a spiral. A sharp cutting edge is located on the bottom of the cylinder. While drilling the hole, the cylinder is filled with soil and then removed to be cleaned. This type of drill is suitable for areas with dense, moist soil that is not prone to crumbling. This tool is often used to make water wells.


Spiral drill or coil
It is used for drilling in dense clay and loamy soils containing pebbles or fine gravel. The constituent elements of such a drill: a head with a thread, spiral turns with blades and a rod. They work with such a drill slowly, calmly turning it inward. The soil sticks on the turns; when they are completely filled, the drill is removed and cleaned.

Chisel
This option is great for dry clayey or loose sandy and sandy loamy soils. A piece of steel is used to create it. Drilling is carried out by the impact method with the subsequent rotation of the tool by 15-20 degrees. Chisels are also used for crushing small stones.


Rod
Rotary or percussion drilling can also be performed with a rod drill. For its manufacture, pipes with a length of 1 to 3 meters are required.


Diamond
In especially strong foundations (concrete, stone), drilling is carried out using diamond drills. They are of two types: electrical and hydraulic. Electric tools are used to drill small wells. They require an electric current. Certain examples of electric diamond drills run on gasoline or diesel fuel. The use of hydraulic requires the use of a special pump for making large holes.
In the description of the technical capabilities of each type of drill, you can find the following data: maximum drilling depth, hole diameter, tool weight. The ease of the work performed by the drill directly depends on its mass. The larger and heavier it is, the harder it is to work with it.


How to make a drill with your own hands
Any craftsman can independently design a unique drilling machine from the materials and tools available to him. However, assembly requires at least basic metalworking and plumbing skills.

Making the simplest drill under water
The simplest drill to manufacture, which does not have a screw spiral, is made from a handle and a drilling blade. A metal pipe with a diameter of no more than 3 cm can play the role of a handle. If there is no metal pipe, it can be replaced by a wooden element. A strip of steel is required for the drill blade.
A loop-tip is attached to the working part of the strip. A handle slot is formed on the other side. During drilling, a small amount of soil becomes clogged with the tip-loop, which is pulled to the surface. Then the steps are repeated. To obtain a well of the required depth, several strips join and rotate the structure.


There is also another manufacturing option. Take a strip of steel about one and a half meters long, 5 to 10 cm wide, about 1 cm thick. Make an indent from the edge of the strip 8 cm, cut a gap of 150x2 mm. Bend the other end of the strip into a circle to insert the handle.
The working edge of the metal must be unbent from the slot in different directions, forming an oval. The tape near the nib needs to be cut to form a nib. It needs to be sharpened and bent in the opposite direction. Next, insert the lever handle into the ring. It will give the device the ability to make rotational movements.


Making auger auger
To manufacture an apparatus of this type, you will need a pipe with thick walls, a steel disk with a diameter of the future well and a thickness of at least 6 mm. If a steel blade is not available, it can be replaced with a circular saw blade of the same size.
A sharp steel tip is welded to the pipe; in its absence, the edge of the pipe is simply sharpened until sharpness is obtained. Then the disc is cut in half. The edges of these halves are sharpened to obtain teeth.
Both parts of the disc are welded to the pipe, stepping back from the sharpened edge of the pipe from different sides by 13 cm at an angle of 65 degrees. The angle between the resulting screw parts should be 40 degrees.


If mistakes were made during the assembly of the drill structure and a very large angle between the blades was set, then the earth from the drill will crumble down, and additional efforts will be required to extract it. In the upper part of the pipe, a coupling is arranged to increase the length of the rod (if necessary).


Assembling the spoon drill
If you plan to drill a well on moving soils with soft soil, it is best to use a homemade spoon drill. In this case, loosening of the soil layer will be carried out by the bottom and side surfaces of the structure.
First of all, you need to prepare drawings and everything you need. To make this type of drill, you need: a thick-walled pipe with walls more than 5 mm, a welding machine, locksmith tools.
A wide cut is cut along the longitudinal side of the pipe. The width of this section directly depends on the type of soil. The less looseness of the soil, the wider the cut should be, and vice versa. The pipe is leveled and widened, giving it the shape of a spoon. The work is carried out with a hammer and crowbar. The edges are grinded, a drill is attached at the bottom of the structure. A rod is installed in the upper part of the pipe with a shift of 1 cm to the pipe axis.


Production of a percussion rope drill
In the percussion method of drilling a well, two tools are used: a sharp pipe and a bailer. The bailer needs a strong alloy that is resistant to damage and deformation. Steel and cast iron work best. Such drills are suitable for the development of aquifers up to 10 meters deep.
For construction, you will need a pipe about 85 cm long and 6 cm in diameter, a steel ball with a diameter of 4 cm, a washer, and a metal lattice made of rods. The washer is tightly fixed to the end of the pipe. The seat size must match the diameter of the ball. A grid is welded on top of the pipe. It prevents the ball from falling out. Here, a metal arc is attached to install the thief on a cable or a strong cord. To make the structure more durable and efficient, teeth can be attached to the bottom of the thief to loosen the soil.
 Pastry merchandising and ways to increase sales
 Ideas for a winter photo shoot
 Taurus January Love Horoscope