Refine the door slope of the front door. Finishing the slopes of the entrance door from the inside: types of finishing materials. Platbands on the front door inside the apartment and outside
Professional finishing of the entrance door slopes should be carried out by qualified craftsmen. On Yuda, you will order the services of such specialists, as well as find out the current prices for repair and construction work. The performers registered on the site perform high-quality finishing of the slopes.
Services of finishing door slopes
High-quality finishing of the entrance door slopes, which you order on YouDo, is carried out at the time specified by you. The craftsmen will carry out the work quickly and accurately. Specialists use different types of materials, including:
- decorative rock
- laminated panels
- drywall
Services for finishing the slopes of the entrance door include preparatory rough work, as well as connecting switches after installing decorative coverings. Discuss with the contractor the need to purchase consumables. Specialists registered in Yuda will assist in the selection of elements for decoration.
Features of the work of the masters
The decoration of the slopes of the entrance door is carried out taking into account the characteristics of the selected material. Professionals work with both expensive and budget decor options. Order their services if you need finishing the slopes using:
- wallpaper
- paints
- putties
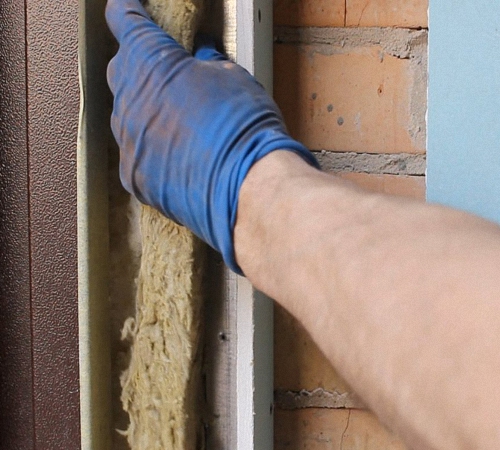
Craftsmen also install plastic slopes. If necessary, specialists fix cable TV wires around the perimeter or hide them along with electrical wiring. Rough finishing involves removing cracks with cement mortar, leveling the surface. Experts carry out the insulation of the portals and the device of water protection.
Yudu performers achieve an absolutely even and neat decorative finish. The finishing of the slopes of the entrance doors lasts a long time.
Prices for professional services
The prices for the services of specialists registered in Yuda are low. You will find a suitable contractor in no time. The cost of work depends on:
- type of material selected
- difficulty of the task
- need to urgently complete work
Also on youdo.com you can order other repair and construction services. Craftsmen inexpensively install entrance doors, lay laminate flooring and redevelop premises.
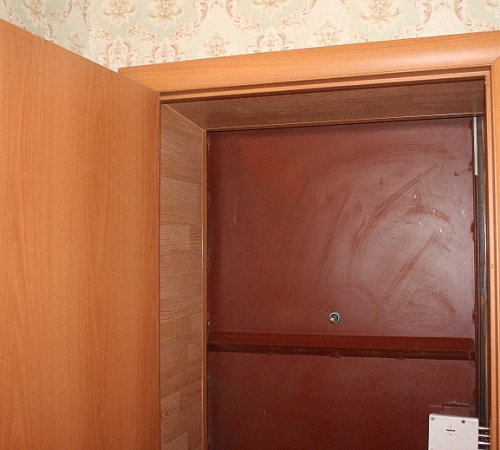
The slopes on the doors are not only an insulating element for door decoration, but also perform an aesthetic function. The process of installing slopes on the door requires special attention, because there are different methods and technologies for finishing. In the provided article, we will consider issues related to the installation of slopes in various ways.
Ways to design slopes
There are different options for installing door slopes, which are determined by the type of material, work technology, and the like. When installing with your own hands, it is important to follow the recommendations of specialists and detailed installation instructions. It is important to ensure that the materials used are practical and durable, while they must perform an insulating function, especially when finishing the slopes of the entrance door.

The installation of door slopes must correspond to some tasks, which are to securely fix the fasteners, as well as to perform a decorative function. Determining the variations in the finishing of the slopes, experts highlight the surface cladding with different materials, which are attached to the base with the assistance of mortar and plaster. Some elements can be attached to the frame base using a drill or other devices.
As objects of decoration, you can revet the slopes on doors made of laminate, drywall, plastic or wood panels, MDF and the like. All materials are perfect for finishing, both for interior doors and for entrance doors. In the latter case, it is necessary to provide reliable sound insulation and complete sealing, which foresees a thorough embedding of the slopes.
The slopes for the entrance door should not have any voids, which increases the strength and reliability of the cladding. On top of the putty or mortar, you can use different materials for finishing. The main thing is that they are combined with the interior design of an apartment or house. If a huge amount of mortar is needed for finishing, for example, to align corners, then a frame can be installed on the slopes. Its base can be wooden slats or a metal profile on which facing materials are installed.
It is worth noting that finishing the slopes under the frame will create a smoother surface than plastering. Moreover, finishing with wood or plastic panels looks more attractive than painting the surface and so on. In particular, it is much easier to conduct telephone, electrical and other communications through the frame slopes.
It is important that the opening in the doors has a maximum service life, is durable and practically does not succumb to mechanical and other damage. To do this, you need to know the rules and technologies for installing slopes on the door yourself. No less attention is paid to the choice of facing material, which are distinguished:
1. Finishing with plasterboard. Such material will hide all the unevenness of the slopes. Using this option, you will get rid of unnecessary waste for the purchase of putty and other solutions designed to level a certain area. In this case, the possibility of installing the frame base will disappear.
2. Plastering the slopes on the door. This method is considered the most economical and practical, while all the work can be done independently. For this, it is important to cover the work surface with plaster, after which you can start finishing.
3. Plastic panels. They are very often used for finishing window openings. They are rarely used in door openings, because plastic materials will stand out against the background of a wooden product. Moreover, this option is not reliable and durable.
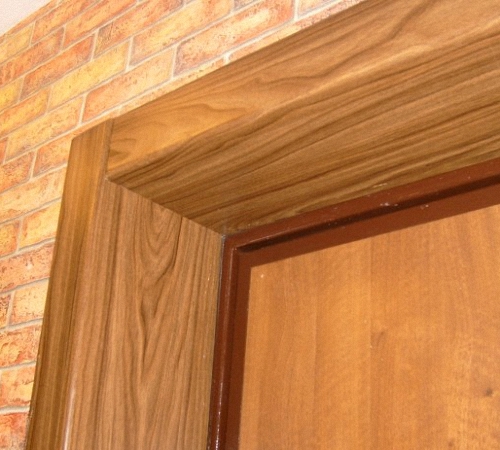
4. Wooden slopes. This finish is the most popular. Wood is a durable and reliable material that will last a long time. This finish will suit different room interiors.
Plasterboard door slopes
Drywall is not used for decoration, but is the basis for the slopes. This option is used to save money on the purchase of different mixtures for leveling the walls. Installation work should begin with preliminary surface preparation, which includes cleaning the walls, as well as priming:
1. After the surface has dried, it is necessary to make all measurements and prepare materials for finishing the slopes on the front door with your own hands. When trimming material, make sure that some parts are cut at an angle. This is necessary for fixing parts to a deflected surface.
2. After cutting the sheets, check if all the elements fit under the doorway.
3. Next, you should wait for the complete drying of the primer layer, after which you can install the panels. Special glue or dowels can be used as fasteners. It is recommended to use the first option, which will allow the drywall sheets to be held together more evenly.
4. The installation process should begin with the installation of the side parts of the opening, and in the end, the upper area lends itself to finishing.
5. The adhesive can be applied in a continuous strip or in separate dots, for example, every 15 centimeters.
6. After the drywall sheets are securely fixed, it is necessary to finish the surface by attaching the perforated corners by applying a putty.

Plastering door slopes
This type of work does not present certain difficulties and requires minimal costs. The process of finishing with plaster of slopes has the following sequence:
1. First, the work surface must be cleaned and primed.
2. After the primer layer has dried, it is advised to start applying the solution to the surface of the slopes. It is recommended to use a spatula for work.
3. For the corners of the opening to be even, it is important to use perforated metal corners. They are attached to the surface using a plaster layer and carefully painted over.
4. After the plaster has dried, the surface of the slopes should be cleaned with sandpaper.
5. The last stage is the treatment of the walls with the use of paints and varnishes that will add aesthetics.

Decorating slopes with plastic panels
Do-it-yourself slopes on the door can be made from plastic panels. The execution of work has the following sequence:
1. First, it is necessary to make measurements of door slopes and cut plastic panels that would correspond to these parameters.
2. In work, use an electric jigsaw, not a regular knife. This is necessary so that all parts in the cut points are even.
3. After trimming, all panels must be checked against the doorway.
4. First, install the side slopes. For this, a special profile is fixed to the opening with the assistance of self-tapping screws.
5. From the edge of the wall, you need to attach wooden slats. It is important to check the evenness of the installation elements with the assistance of the building level. Plastic panels will be attached to such slats using staples.
6. In the lower area, a plug is installed on the plastic panels, and the trim item is inserted into the slopes on the sides and into the initial profile. The same procedure is for finishing the slopes above the doors.
7. The last step is the treatment and sealing of the joints using silicone. For the installation of plastic slopes, it is recommended to choose PVC sheets, as well as special sandwich panels.
Decorating slopes with wood
Wood trim is perfect for both metal door slopes and wooden ones. Of course, in the work you can use materials made of natural wood, or use laminated or MDF panels. If you want to prefer a material that would have excellent insulating properties, then it is recommended to use MDV boards. If their parameters do not fit the dimensions of the slopes, then laminate flooring can be an excellent alternative.
Initially, the installation work begins with the careful sealing of the joints between the door frame and the wall surface. After that, the remaining foam must be removed, cleaned and carefully primed. Slopes can be made at right angles or with a slight slope. After determining the shape of the slopes, it is necessary to fix all the panels. In work, it is necessary to carefully monitor the correct selection of wooden planks. It is important that they have the same thickness and dimensions on both sides.
The slats or frame must be attached to the wall with the assistance of dowels, which refers to fixing all parts. Slopes can be attached using glue or self-tapping screws. All gaps must be sealed with silicone sealant. Slopes made of wooden panels look very aesthetically pleasing in any room interior.
Detailed instructions for installing slopes for entrance doors
Finishing work must be carried out taking into account the dimensions of the doorway and the materials used. If, when installing slopes in interior openings, there is no need to make insulation, then for entrance doors such a procedure is an important element. To the question: how to make slopes on the front door, it is necessary to pay special attention to sealing openings from drafts and sounds that come from the staircase.
Slopes must be strong and reliable. In this case, experts suggest doing plastering or using different combinations. For example, you can plaster the walls on top of which MDF panels are attached. Each one uses items for decoration from his own preferences. To carry out the work, it is necessary to prepare such materials and devices:
- polyurethane foam;
- lime, cement;
- putty, primer;
- sand;
- glue, dowels, if necessary, "liquid nails";
- electric jigsaw;
- building level;
- brushes, spatula;
- perforated corners.

To reveal the question: how to make the slopes on the doors even? - we recommend that you study the detailed instructions for performing work.
1. First of all, it is important to seal all the cracks. After installing the door, it is important to carefully fill all the gaps between the frame and the wall with polyurethane foam. Next, you need to wait until the foam hardens. All residues must be cut off with an ordinary knife and carefully smoothed out the cracks.
2. Surface preparation is important for further plastering of the wall. All work takes a long time, so it is recommended to process the surface in several layers. First, a layer of primer is applied to the wall, which will better strengthen the plaster mortar. To achieve a perfectly flat surface, it is necessary to use a beacon profile, which is fixed with dowels.
3. Next, we carry out the plastering of the slopes. For the manufacture of mortar, it is necessary to use cement, sand, lime mortar. The technology for applying the mixture to the surface should be started from the upper area of the slopes. First, the putty is applied in a thick layer, after which the excess amount is removed by leveling the wall. To keep the slope angles even, it is recommended to use a perforated profile. They are fixed on the surface with the applied plaster mixture. Next, a fine layer of plaster is applied, which should be thin. This process will remove all irregularities and roughness.
4. The final stage is fixing the MDF panels. The base for such panels must be made of lime-cement mortar. After it dries, a layer of primer is applied to the surface. The panels must be divided into three parts, each of which must correspond to the door slopes. A layer of glue must be applied to the surface of the wall, after which the panels are applied to the wall. Such work must be done with all the details.
To understand the scheme of work, we recommend watching the video about finishing the slopes for doors, presented at the end of the article. When finishing, due attention must be paid to cutting the slab. For this, all angles are carefully measured, and it is important to cut the panels at a certain angle. After trimming the plastic or wood panel, all parts need to be connected to check if they match the door slopes. The ideal combination of finishing slopes will be the use of wood panels and doors made of such material.
Installation of door slopes is one of the final stages of door installation, which allows you to add completeness to their design and successfully fit the doors into the interior. Door slopes not only serve as a decorative function, but also allow for completion.
Decorating door slopes can be done in several ways:
- Plastering followed by painting or wallpapering;
- Plastering with decorative panels for glue;
- Finishing with MDF panels, plasterboard, laminate, mounted on the frame.
The technology for making door slopes from all these materials is given below.
Preparatory work
Before starting work, it is necessary not only to choose a finishing method, but also to prepare the doorway, the door itself and the surrounding space for construction work, so as not to damage them. It is advisable to cover the doors and the section of the wall on which they are located with plastic wrap, gluing it onto tape. It is better to cover the floor with cardboard. It is also necessary to remove all protruding elements that may interfere with installation: door handles, locks, chains.

Old plaster with poor adhesion must be beaten off, slopes must be cleaned of dirt and dust. All gaps between the opening and the door frame on the front door must be covered with polyurethane foam - this will improve its heat and sound insulation. Before this, dust and debris are removed from the cracks and the concrete is slightly moistened with a spray gun for better adhesion. The gaps are filled with foam and they are expected to fully expand and solidify within the time indicated on the package. After hardening, the excess foam is cut off with a sharp knife.

Also, at the preparation stage, you can lay an electric cable for lighting installed above the entrance, or other communications that must be hidden under the slopes.

Plastering door slopes
Plastering is performed before painting or finishing with decorative panels with glue. Door slopes are plastered with a cement-sand mortar, sometimes components are added to the solution that promote quick setting, for example, alabaster. For painting, plastered slopes are additionally leveled with putty.

- Deep penetration concrete primer;
- Beacon profiles;
- Cement-sand mixture (DSP);
- Leveling and finishing putty;
- Alabaster;
- Reinforcing mesh and serpyanka;
- Building level;
- Spatula and trowel;
- Construction mixer for mixing mortar;
- Primer brush.
Technology:
- The prepared cleaned surface of the slopes is treated with a brush with a primer on concrete. Maintain for the time recommended by the primer manufacturer.
- Beacon profiles are set according to the level. To install profiles on the slopes, small areas of the solution are applied, it is possible with the addition of alabaster - this way it will set faster. Level the beacons in all directions. Wait until the solution sets.
- With a trowel, apply the solution to the slopes and, using a spatula or rules, align it along the beacons. Wait a day or two before setting the solution and gaining strength.
- If you plan to paint the slopes with paint, they must be finally leveled using a putty. First, a leveling layer with large particles is applied along the reinforcing mesh, then a layer of finishing putty. It is recommended to glue the corners and joints with a serpentine.
- The leveled surface can be painted with any wall paint or wallpaper.
Installation of slopes with glue
After plastering, the leveled slopes can not only be painted, but also finished with MDF, plastic, vinyl panels, gluing them to a glue suitable for these materials. This method of finishing the slopes is good in that it allows you to make a single design of the doorway, choosing the material of the same shade and texture as the door covering.

Required materials and tools:
- Selected finishing panels;
- Plastic corner for finishing corners and joints;
- Platbands;
- Adhesive recommended by the manufacturer of the finishing material;
- Sharp knife or metal hacksaw for hard panels;
- Roulette;
- Level;
- Putty knife.
Technology:
- The slopes of the doors are plastered according to the above technology and, after the plaster has hardened, they are covered with a primer and dried.
- Cut out the slopes from the selected material, apply them to the attachment point and trim if necessary.
- Apply glue with a spatula in an even layer on the surface of the wall and decorative panels, stand for several minutes and press the slopes tightly against the wall. Remove excess glue. If necessary, install spacers to support the panels until the adhesive dries.
- Platbands and decorative corners are installed.
Video - how to make slopes
This method is chosen when plastering work can or should be avoided. Finishing with panels on the frame is somewhat inferior to plaster in terms of thermal insulation, but it allows you to quickly replace the finish of the slopes during repairs. In this case, the panels are attached to a metal or wooden frame with self-tapping screws. The frame is set in level, while rather large differences and irregularities can be smoothed out. As a finishing material, you can use drywall, any panels and even laminate.

Required materials and tools:
- Selected finishing material;
- Metal profile for drywall or wooden blocks;
- Self-tapping screws;
- For drywall slopes - putty and serpyanka;
- Screwdriver;
- Level and tape measure;
- Hacksaw, sharp knife.
Technology:
- The surface of the doorway is prepared: peeling paint, plaster, dust and dirt are removed. The surface is primed to reduce dusting. It is not necessary to align it.
- Attach drywall guides or wooden blocks to the slopes according to the level. If the wall has large distortions, align them with pieces of plywood or boards of different thicknesses, placing them under the guide bars. You can also use drywall hangers. When attaching the guides, the thickness of the finishing material is taken into account.
- Mineral insulation can be laid between the guides, this is especially true for entrance doors.
- Cut the finishing material to the size of the slopes, try on and adjust if necessary. Fix the slopes to the frame.
- When fixing drywall, self-tapping screws are screwed along the perimeter of the slopes, slightly sinking them, after which the joints are glued with a serpentine and putty on two layers. MDF panels can be mounted on liquid nails, point-applied on the rails.
- When finishing vertical slopes with laminate, the lower board is fixed, the next three are fastened to the lock, the fourth is again fixed with self-tapping screws or finishing nails. Each laminate board must be secured to the horizontal upper slope.
- Slope corners and walls must be finished with platbands or decorative corners.
Do-it-yourself door slopes are not such a difficult task. Selection of the right material and technology will allow you to complete this work quickly and with minimal costs, while you can use the remnants of building materials from repairs or substandard purchased at a large discount.
The front door will look complete only in one case - if the walls near it are finished. As a rule, it is installed in a small recess in the opening in the wall, and completely ugly elements are formed on the sides of it, which need to be covered with something or somehow trimmed. But the design process often depends on what shape the doorway is in the apartment.

Table. Types of doorways.
| Type of | short info |
|---|---|
| This is the most common rectangular entrance. Any option for finishing the slopes is suitable here, and various materials can be used, which will be discussed below. Despite the general simplicity of finishing such a doorway, many are faced with certain problems here, which are most often associated with the choice of the most suitable and convenient material to work with. In general, it is not so difficult to design a classic doorway, since there are no complex and curved lines here. |
| This version of the doorway looks much more spectacular than the usual classic, and is a rectangle with a rounded top in the form of an arch. Doors that fit it are more difficult to install and technically more difficult to design. Usually, for finishing the slopes, sufficiently elastic materials are used that can be bent, or plaster. Often the door comes complete with special overlays, clearly matching the shape of the door. In general, finishing such an entrance is much more difficult than a regular one. |


Advice! If you want to have an arched entrance to the apartment, but install an ordinary rectangular door, then there is a way out. You can simply install an arched cover plate from the inside at the top of the doorway, but at the same time the door will look like a regular door from the outside.

Plasterboard slopes are a very common type of slopes
What are slopes?
The framing of the door is usually called jambs, but not everyone knows that the end part of the wall where the door (or window) is located is called slope... By the way, some decorative linings that are used to finish the opening are also called slopes.

The slopes themselves can have different sizes, but in any case, in terms of their parameters, they should be suitable for the end part of the wall where the entrance door is installed. In general, they can have different thicknesses, but if we are talking about decorative overlays, then in order to avoid deformation and damage to the material, its thickness should be at least 1 cm.

The easiest way to create a slope is to use "L" -shaped panels
The purpose of finishing and installing the slopes is to achieve a beautiful frame for the door. In any case, when the door itself is installed, the slopes will be damaged, and in general, the end part of the wall does not look beautiful - it is either concrete, or brick, or any other material that becomes visible to everyone. Usually the ends are quite uneven, and it will not work just to glue them with wallpaper - you will need to make some preparation. Also, the slopes will help to hide the foam, anchors and other elements and substances that were used directly during the installation of the door. Only in the presence of slopes or their correct finishing can the door look beautiful and the doorway complete and neat.

On a note! Slopes will help to achieve a certain level of heat and sound insulation - apartment residents will hear less sounds coming from the entrance. Do not assume that the slopes are just a decorative component.
Basic information on door installation and decoration
In general, finishing an entrance door includes three stages:
- registration of the threshold;
- finishing of slopes;
- installation of platbands and extensions.

All these works are carried out after the installation of the door leaf itself. As for the threshold, it must be strong enough and resistant to various types of loads. Usually it is made of wood, metal, concrete. These types of materials are much more stable than the now so widespread PVC and can last for many years until the next door replacement.
As for platbands and add-ons, they are usually used in order to achieve accuracy in the design of the doorway. So, they help to hide flaws and irregularities in case of a mismatch between the physical parameters of the wall and the very door frame that is installed. Without them, the door will look crooked and sloppy. Quite often, these elements are made from MDF, and then you don't have to think about leveling the slopes themselves with putty. The voids between the extensions and the wall are simply filled with polyurethane foam.

On a note! Platbands and extensions will also help protect the door from subsidence, which may occur in the future.
The finishing of the slopes is done after the door is installed. It can be done in different ways:
- sheathing;
- finishing;
- plastering.

The last option is considered the best, since it allows you to achieve perfect evenness of the end of the wall, sealing the doorway. Also, if you use your imagination, you can create an interesting unique design. And excess dust will not accumulate on top of finishing materials.
Find out in a special article on our portal.
Prices for various types of door trims
Door platbands
Choice of materials
Yes, the slopes perform a protective function, but no one took away the execution of a decorative one from them. And for their design, you can use a lot of different materials. The main requirement for them is the absence of fragility and tendency to mechanical damage. Slopes should be finished so that they can serve for many years without the need for repairs, not even major, but cosmetic ones. Moreover, it should be borne in mind that the doorway is the place where all family members pass every day, and even more than once, something constantly falls here, the door and the slopes themselves can be hit. So the material for their finishing must be taken one that is able to withstand all these loads for a long time and not deteriorate.

Plastering
This is a classic and the most common doorway design option. Probably, this method originated even when the very first front door was installed. The slope, finished with plaster, will serve faithfully for many years without any complaints. The material is not afraid of temperature drops, damage, and all the irregularities of the end of the wall will perfectly hide and fill with itself (in this no other material can compare with it). With the help of this material, you can achieve a perfectly flat plane of the end of the wall.

Slope plastering - a proven method
You can cover the plaster for beauty with paint, paste over with wallpaper, apply some kind of pattern on it. In general, there is a lot of room for imagination here. The main disadvantage of this method is the appearance of a large amount of dirt during the work. Also, the disadvantages include large labor costs, and it will also take time to dry the material. If there is no experience in working with plaster, then it is recommended to carefully study this issue or even invite a master - working with the material is not easy for a beginner.
Advice! To make the slopes look complete, after plastering, they need to be sanded and putty.

Prices for popular types of plaster
Plaster
This material is loved by many craftsmen, and they are willingly used in the production of construction and repair work. It is versatile and easy to use, and therefore can be used for finishing slopes. This option is also called dry plaster.

The main advantages of using drywall are increasing the speed of work and its simplification. If necessary, drywall will perfectly hide all the flaws. In general, the work on its use for the design of slopes looks like this:
- the surface is primed after cleaning it from debris;
- a metal frame is formed from a profile;
- moisture-resistant gypsum plasterboard is cut into pieces of the desired size and fixed on the frame, forming a box;
- after installing the sheets, the cracks and the sheets themselves are putty (it will not work to glue something on the untreated sheets of drywall or cover them with some kind of decorative composition);
- when the putty dries, you can decorate the doorway.

On a note! If necessary, insulation can be laid under the frame on which the drywall is fixed - then it will be warmer in the apartment.
This is also a very popular doorway design option. At the moment, MDF finishing is considered perhaps the most common. The material is resistant to various influences, does not need additional decoration, has a lot of color variations and can be matched to the installed door. Veneered MDF is generally indistinguishable from natural wood.

Advice! If the door slopes are made not only inside the apartment, but also outside, then it is worth purchasing a moisture-resistant version of MDF.
Installing this option is easy - a beginner can do it too. You can buy materials in advance - all you have to do is adjust them to the required dimensions, assemble the box and install. Cavities are foamed with polyurethane foam.
Polyurethane sealant prices
Polyurethane sealant

Unfortunately, it is not cheap and easy to scratch. So you need to handle the slopes of this material with care. Plus, it tends to absorb odors, and grease easily stains it.
Clapboard sheathing
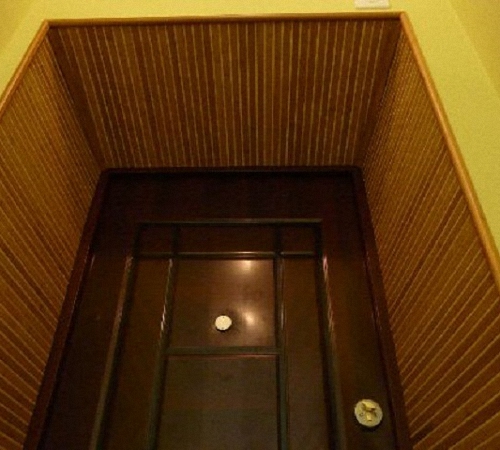
A great option for those who want as much natural wood as possible in the house. By analogy with MDF clapboard, you can arrange the ends of the walls near the front door. They will look very beautiful and noble.

Installation must be done on top of a wooden crate. So the narrow slopes cannot be closed with clapboard. Natural wood is not cheap, so you need to be prepared for the fact that you will have to shell out more money.
It should also be borne in mind that with changes in humidity and temperature, natural wood is prone to deformation. Before installation, it must be covered with protective compounds that prevent rotting and the spread of insects. It is also better to impregnate it with a fire retardant to reduce the level of flammability.

Advice! Instead of varnish, it is better to cover the lining with a special wax-oil composition. It will look better and nobler.
PVC slopes and polyurethane overlays
Wherever PVC is not used now! So the front door can be framed with it. Installation is carried out quickly, and the price for PVC slopes is very low. But this material does not have many advantages.
PVC is fragile and easy to break. Sometimes it's enough just to lean your elbows on it and all the work will go to waste. The slope cannot be repaired; it will only have to be changed. And in general, the service life of the material does not exceed a couple of years. Someone pastes over plastered slopes with plastic, but in fact it looks ugly and cheap.

By the way, you can also decorate the slopes with polyurethane overlays, which can imitate stucco molding. This option looks decent. But the price for such linings is also high. You need to glue the pads on a flat surface, so you still have to plaster or close the ends of the walls with drywall.
How does the process of decorating slopes with MDF panels take place?
Step 1. The first step is to prepare all the tools. This is a tape measure, square, pencil, miter saw, sharp knife, hammer, masking tape, screwdriver, drill. Fastening materials and polyurethane foam are also needed.

Prices for popular models of screwdrivers
Screwdrivers
Step 2. Next, you need to take measurements. The procedure is performed after installing the door - you need to measure the width of the end part of the wall, as well as the width of the doorway. It is better to take measurements at several points at once vertically and horizontally.


Step 3. Now you need to make markings on the MDF strips according to the dimensions obtained. The edge along which the cut will be made must be glued with masking tape. If this is not done, ugly chips may appear on the panel during sawing.


Step 4. With the help of a square, you need to draw a straight cutting line.

Step 5. Using a miter saw, you need to cut the workpieces.

Step 6. Now you need to collect the received extras into one structure. With a drill you need to drill holes for self-tapping screws. It is not recommended to screw them in immediately with a screwdriver - the fasteners can damage the panels. The holes are made in a number of pieces at a distance of 10-15 cm from each other.


Step 8. Now it is necessary to make about 10-12 spacers from a wooden block.

Step 9. Spacers must be hammered between the wall and the box. About 3-4 pieces are hammered vertically, and 2 pieces each along the upper and lower border of the box. The block should not stick out, you need to hammer it tightly.

Step 10. Platbands can now be installed. First you need to attach the platband and measure the desired length.


Step 12. Before installing the platbands, the gaps between the wall and the box must be covered with polyurethane foam. It will help to further fix the box and provide sound and heat insulation. Excess foam can be cut off with a knife after it has set.


Step 14. Now you need to measure and saw off the platband from above and below, and then fix it with studs.

Step 15. After the structure has been assembled, you need to fix it on the door frame with masking tape for about a couple of hours. Once the foam is completely dry, the tape can be removed.

Video - How to make slopes?
Video - Finishing narrow slopes
After the main work on finishing the slopes has been completed, you can proceed with additional decoration. If they were plastered or decorated with drywall, then there is a lot of room for creativity. You can cover the slopes with paint, decorative plaster, wallpaper, draw patterns, attach laminate, stone, tiles and use other materials. The main thing is that they fit the general style of the interior and meet all the wishes of the owner of the house.
After installing a new door, the opening looks unsightly, spoiling the whole impression of the repair. And it's not just beauty - drafts appear in the cracks, unprotected polyurethane foam quickly gains moisture, which sharply increases the heat loss of the entire room. In addition, correctly installed slopes for entrance doors play the role of additional sound insulation. What types of slopes exist, what should be considered when choosing, how to do it yourself?
Outside, a small gap between the opening and the frame can be closed using platbands - special shaped strips, usually included in the door installation kit. However, from the inside of the room, a fairly wide area of open brickwork with layers of concrete mortar remains, and to ensure the proper level of tightness, it must be finished with not one, but several types of materials - insulating, load-bearing and decorative.
Slope trim improves the microclimate and is part of the design
Modern methods and available finishes
According to the method of installation, there are 3 options for finishing the slopes for entrance doors:
- Application of cement mortar directly to the wall and its further plastering. It is considered the most reliable and budgetary method, but also the most time consuming. To lay out perfectly flat surfaces, there must be some experience both in the preparation of the plaster solution and in its application.
- Bonding of finishing panels with a suitable adhesive mixture. Finishing door slopes according to this principle is more expensive, while the "wet" installation process is quite long (you need to let each layer dry), but it is quite accessible even for a beginner in the repair business.
- Fastening of finishing elements to a pre-assembled frame. The fastest solution to achieve a perfectly flat surface, hide telephone or electrical communications, install lighting equipment in the door block. The downside is the low mechanical strength required to protect the door mounts from burglary.

It is advisable to insulate slopes from concrete walls with a layer of polyurethane foam or mineral wool
In order for the slopes to withstand temperature changes, especially noticeable if the door leads directly to the street, and not to the corridor or to the staircase, it is advisable to mount a layer of thermal insulation on the wall: it can be mineral wool, polystyrene or its modification - penoizol. If the width of the trap does not allow installing the insulation (according to SNiP, the dimensions of the doorway should be at least 0.8x1.9 m), glue the slopes with sandwich panels.
Frame slopes are indispensable when the opening is too wide, and a large volume of cement mixture is required to seal it. They are also chosen when there are damp walls, or there is no time to do finishing work - plastic or wooden panels themselves look presentable. In order to fix thin sheets, the space between them and the walls is filled with polyurethane foam sealant, which also serves as a heat barrier.

The color of the entrance door can be matched to the shade of the sandwich panel
The choice of cladding materials for home renovation
In addition to the protective function, the slopes perform the task of decorative design of the opening. To veneer a rough surface, one of the following materials is layered on concrete or drywall:
- paint - thanks to a varied palette, you can choose any shade, and if desired, a textured pattern, thereby original decorating the hallway space;
- wallpaper is a good choice for those who, at the same time as replacing the door, make repairs in the corridor, since using the same wallpaper on the wall and slopes creates the impression of a monolithic surface (a step-by-step algorithm showing how to decorate the slopes at the entrance door with wallpaper is described in the section on finishing operations);
- one-sided sandwich panels - due to the peculiarities of their structure (a layer of extruded polystyrene foam is attached to a sheet of polymer plastic), there is no need for additional measures for warming and soundproofing surfaces, and the minimum weight allows them to be attached directly to the wall using an adhesive method;
- plastic panels - are considered a compromise option, since, despite the external similarity with sandwich panels, plastic is very fragile, and when finishing deep slopes, it is very problematic to achieve uniform rigidity over the entire area;
- MDF - strong enough (withstands an impact load of medium force without the formation of scratches or dents) and easily assembled material, allowing it to be installed even under conditions of increased operational load;
- laminate or parquet board - a wide variety of colors and textures allows you to select the panel in tone with the door leaf and door frame, and the high strength, designed for use as a floor covering, determines the long service life of the slopes.

Laminate cladding
Recently, designers, trying to include the doorway in the overall interior picture, have been using atypical building materials for its decoration - ceramic tiles, mosaics, natural or artificial stone.

Artificial stone in the hallway looks modern

Tiling
Frameless and wireframe mounting technology
Before finishing the slopes of the entrance door, make sure that it is installed vertically and check the tightness of the installation seams. To do this, run a lighted candle around the entire perimeter of the opening and add sealant in places where the flame has deviated to the side. Do not forget to cover the door leaf and frame with masking tape and cut off the remnants of dried polyurethane foam with a clerical knife. Then remove the old plaster and loose areas of the brickwork.

Wallpaper decor
Plastering - complete process algorithm
It is important to thoroughly clean the leveled sections of the wall from construction dust and cover with a deep penetration primer (it will strengthen the base surface and ensure high adhesion of the layers). Pay special attention to the concrete lintel above the door - it should be treated with "Concrete Contact", a special primer for surfaces that do not absorb moisture well.
After the primer has dried (after about 5–8 hours), the most accurate installation of the beacon profiles is required, which is necessary for leveling the plaster of the slopes of the entrance door by the rule:
- Use a laser or conventional level on the side wall 3 cm from the door to mark the position of a strictly vertical line.
- Drill 6 mm holes along it with a step of 30 cm.
- Insert dowels 6x30 mm into the holes and level the caps with twine.
- Install the beacon on the clips and once again check the verticality of the installation with a level.

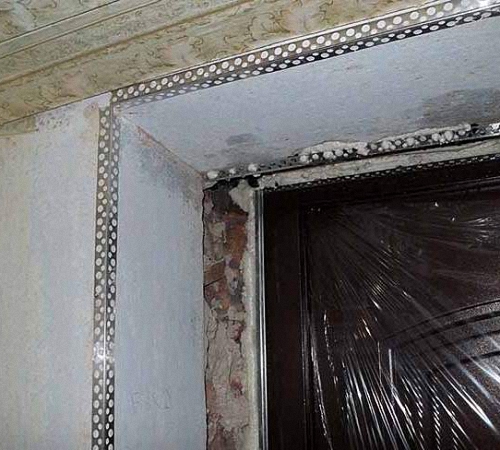
Corner protection profile also serves as a plaster beacon
In the same way, set the corner profiles on top and on the sides of the doorway so that they are flush with the end walls and the above-door section.
After installing the beacons, you can start preparing the cement-sand mixture. The simplest and cheapest option is to use quarry or river sand and cement of the M-150 or M-200 brand as basic ingredients. To get the right consistency, follow a specific sequence:
- Sift the building materials through a 3x3 mm or 5x5 mm sieve.
- In a previously prepared container, mix 3 parts of sand with 1 part of cement.
- Little by little, start adding clean, settled water to the dry mixture and at the same time knead the solution with a trowel or a special nozzle of an electric drill.

With the observance of the technique, plastered slopes serve for decades
As soon as the mixture begins to envelop the instrument, like a dough, the solution is ready to use. Use a trowel or spatula to forcefully throw it onto the wall, trying to completely cover the profiles. After passing a small area, attach the rule to the beacons and smooth the plaster with them. This way you will achieve a perfectly flat surface.
Installation instructions for drywall or finishing panel
Adhesive finishing of the entrance door slopes with laminate, plasterboard, sandwich panels or a thin MDF sheet does not require smoothing the surface. It is important that the base is vertically aligned and free from obvious defects. In this case, a slight blockage of the side wall can be corrected with a layer of plaster with a thickness of 8–10 mm. If you are lucky and the original surface is level, the task is extremely simplified and reduced to a minimum of actions:
- Thoroughly prime the base on which the panels will be mounted.
- Measure the dimensions of the slopes, mark them on the building material, recheck the marks with a tape measure and a square.
- Using an electric jigsaw, cut the sheet into the required number of fragments (you can install laminate and MDF vertically, with one lamella on one slope, or horizontally - by a set of small pieces of lamellae from the bottom up).
- Apply glue to the prepared part using the square-nesting method with a pitch of 15–20 cm with spots approximately the size of a Soviet penny.
- Let the glue spot dry - a film should appear on its surface.
- Attach the element to the desired place, align it with a small amplitude and pointwise, starting from the upper edge, press the panel firmly against the wall with your palms.

Installation of the upper plank of gypsum plasterboard on polyurethane sealant
You can choose liquid nails, for example, Titebond or "Instant grip" ("Moment") as the building and assembly mixture. Polyurethane adhesive PUR 501 (Kleiberit) and even polyurethane foam are also suitable. However, when using the latter, you need to be careful: if you apply it in large quantities to the material, with further polymerization, the finishing details may shift.
In the event that the inner surface of the slope is severely damaged, there is no other way out but to level the doorway with plaster (see the step-by-step description of this process in the previous section), and only then proceed to the above algorithm. After complete drying, it is the turn of the installation on the outer corners of the painting profile and final processing.
How to install door slopes on a frame with your own hands
The heavier the front door, the more likely the slopes will be overloaded. For example, after installing an iron door, finishing the doorway with plaster can threaten it with cracking already in the first year of operation. Therefore, the frame method is optimal when the need arises:
- prevention of surface deformation;
- installation of heavy MDF sheet (more than 4 mm thick);
- elimination of excess space around openings.

Assembly of aluminum profiles into a frame
This option is also suitable for installing slopes in the bathroom or in other rooms where moisture regularly penetrates into the walls, and it is not recommended to directly glue the finishing sheets, especially if it is laminate or drywall. The simplest solution is to use an aluminum profile for the construction of walls and ceilings made of plasterboard or wooden slats of suitable thickness, pre-impregnated with an antiseptic for the supporting base.
The scheme for preparing the walls of the opening and erecting the frame base looks like this:
- Clean the walls of debris and check them for cracks and cracks.
- Repair the surface with cement mortar if necessary.
- After the plaster mixture has dried, treat it with an antiseptic primer.
- Set the extreme beam or profile according to the level and fix it with dowel-nails with plastic sleeves.
- Install the second post parallel to the first element and rigidly attach it to the capital base.
- Fit parallel posts around the entire perimeter of the entrance door opening.
- Reinforce the structure with longitudinal bridges connecting both parts of the skin.

MDF slopes
Next, pass the communication cables through the upper part of the structure and lay insulation in the cells. After that, make the slats exactly in size and install them on the "liquid nails", ensuring that the gaps between them are minimal. Reinforce the fastening with self-tapping screws, hiding their caps under the decorative caps, and carefully fill the gaps between the parts with transparent sealant or tinted putty.
Video: How to make a slope on the front door from MDF with your own hands
Finishing touches - finishing the slopes
As can be seen from the result of the work on the video, the door slopes made of MDF do not need to be additionally trimmed with your own hands - the material looks good on them anyway. This applies to laminated and plastic surfaces: the finishing operation for them is the installation of platbands and masking the joints with furniture stickers or mastic matched to the tone.

Metal door decoration
A roughly plastered doorway needs to be refined with paint, decorative plaster or wallpaper. Before painting, the slope must be covered with two layers of putty - starting, designed to eliminate the main irregularities, and finishing, necessary to obtain a smooth surface. The next step after the filler is to apply a primer and two layers of paint - water-based or acrylic.

Wood trim
Due to the routine of the process, wallpapering is often abandoned, even with the right amount of finishing material available. However, you can handle the process quite easily if you keep some secrets in mind:
- paste over the surfaces not immediately after installing the slopes on the front door, but simultaneously with the entire hallway;
- for finishing the space around the door, choose wallpaper without a pattern;
- calculate the position of the canvas so that it covers the entire width of the slope;
- cut off the excess of the canvas, taking into account its overlap beyond the corner line to the adjacent plane.
Before sealing the opening above the door, cut a piece from the roll that is long enough to turn onto the slope. Glue the wallpaper to the wall, remove all the irregularities and you can enjoy the result of the work done by your own hands.
Video: how to stick wallpaper on a door slope
In the above technologies, far from all the nuances are shown - in each specific case, a sober assessment of many factors affecting the choice of materials and structures is needed. To surely protect yourself from mistakes and, together with the replacement of the front door, bring the slopes into proper form, involve professionals in the reconstruction - they will remove the burden of these far from easy troubles from you.
 Pastry merchandising and ways to increase sales
 Ideas for a winter photo shoot
 Taurus January Love Horoscope