How to make a coffee table. Table: material, manufacturing technology, diagrams, designs - simple and complex. Books, waste paper and an old window - a table can even be made of them
It's hard to be a fan of home furnishings design solutions without having enough free cash to buy them. The point is not only in the level of your income, but also in the price tags that are characteristic of such furniture, because they are often several times higher than for traditional options.
You can solve this problem by making a coffee table with your own hands. You will be pleasantly surprised to know how easy and fun it can be.

Low table
Most often, this option is found among coffee tables. They are not new, they just started getting more attention from the public lately.

They gained popularity two centuries ago, when tea lovers - the British - began to use them. A hundred years later, this trend has spread to other countries of the world, including ours. Now this is not a very popular option, nevertheless, it has the right to life.


Chipboard table
A simple and quite practical option can be a coffee table made of chipboard, which you can make yourself without any problems. Now on the furniture market, chipboard is one of the most affordable materials that can be used to create a traditional table. Why traditional, we will talk later.

The price tag for this option will be significantly lower than if your choice falls on a wooden coffee table. It is best to take sheets coated with laminate or varnish. Nevertheless, you will put such a table in your home, and therefore you need to pay attention to the aesthetic component.

Further more and more depends on the design you choose. At the same time, a simple, small table can be made from several parts. This option will be small and with several shelves. Perfect for a living room, and will stand next to a sofa or armchair.

The shelves are well suited for magazines and remote controls for controlling equipment. This makes them less likely to get lost.

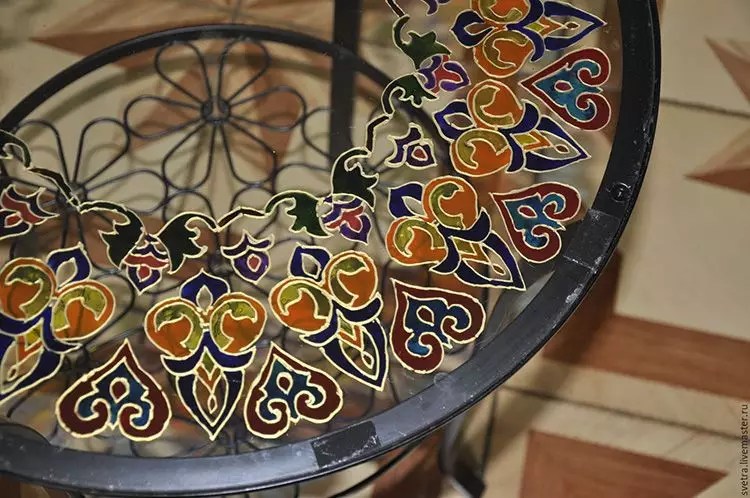
Glass table
Drawings of such coffee tables can be found on the Internet without any problems. You just need to take into account one feature - in almost any case, you will need to buy a glass part of the table. You can also solve this issue with the help of old glass, which may be in your shed or garage.

The main part of the table can be made of a material that suits you, and cover it with a sheet of glass on top. To do this, you need to cut it out in shape, then process the edges and fix it on the main structure.

Even if such a table is not made entirely of glass, with the exception of the frame, you can get a very attractive and interesting result that will look good both in a modern interior and in the design of apartments familiar to everyone without any peculiarities.


Wood side table
Quite detailed instructions on how to make a coffee table out of wood can be found on the pages of thematic magazines. This option will be more expensive than in the case of chipboard, but the appearance pays off. Such material is better suited for tables of large sizes, at which, if necessary, you can work or use them to store documents that you view while sitting in front of the TV in the evening.

The design can be trivially simple: four legs for the legs, which are complemented by a tabletop of the desired shape. Depending on the latter, you can take three legs, which will look even more interesting.

On top of this, you can add various decorative and functional details - be it shelves or some kind of decorations. Here you can give freedom to your creative nature.

Unusual table options
You could often come across photos of coffee tables that are made of unusual materials. These include a table made from an old suitcase.


The most interesting thing about this is that you practically do not need to do anything to create such an item. It will be enough for you to do the restoration of a pleasant appearance, if at all necessary, and install such a table.

A huge advantage of this solution will be the intelligent use of the space in the room. Well this will be in front of the sofa, while the space inside the suitcase would also be good to use. You can put some kind of blanket there, or boxes of shoes. In general, here the matter is already behind a personal choice, in any case it is very convenient and practical.


Table made of scrap materials
Separately, I would like to consider a do-it-yourself coffee table from scrap materials. There are several options that I really liked, and I want to share them with you.

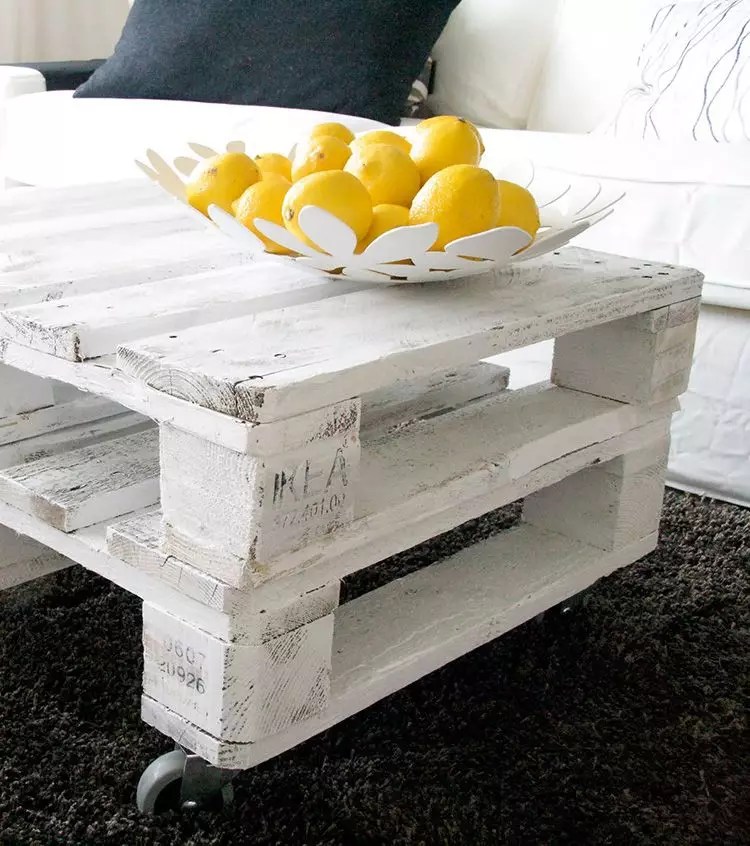
The first is the pallet table. They can be found in any supermarket or warehouse, and therefore it will not be difficult to get them. They are made of wood, which is very good for the interior. This tree can be varnished, which will greatly change its appearance.

Take two such pallets, or pallets, whichever is more convenient for you, put the first with the legs up, and put the second on top so that the legs converge. They can be connected additionally with self-tapping screws, and a sheet of glass can be put on top of them. The option is very beautiful and easy to implement.


As you already understood, I prefer the options when you do not need to deal with the work of furniture companies, and cut out all the details, and then adjust them. I'm more interested in creative and fresh solutions.

For the second option, only four old boxes will be needed, which, when placed on their side, need to be connected to each other in a clockwise direction. We cover them with varnish beforehand, connect and that's it - the table is ready. The empty space inside can be closed with a tree and a flower can be placed on top. Good luck with your choice.


Diy photo of coffee tables


It would seem, how can a coffee table surprise a modern person? A long-forgotten object can no longer be found in many apartments. A modern man loves space, remembering that at a bulky table they often stumble, here and there, newspapers and unsolved crosswords are lying around. What now? It turns out that coffee tables not only have not lost their relevance, but have also become an ultra-modern piece of decor, craftsmen make masterpieces with their own hands. And yes, there are even annual exhibitions dedicated only to this type of furniture.
Read in the article
What is he like today, a modern coffee table that has survived more than one generation of Russians. The answer is not that simple at all. The only thing that sometimes unites this name is only a collective phenomenon related to a certain type of furniture with quite understandable tasks. The rest is a problem.


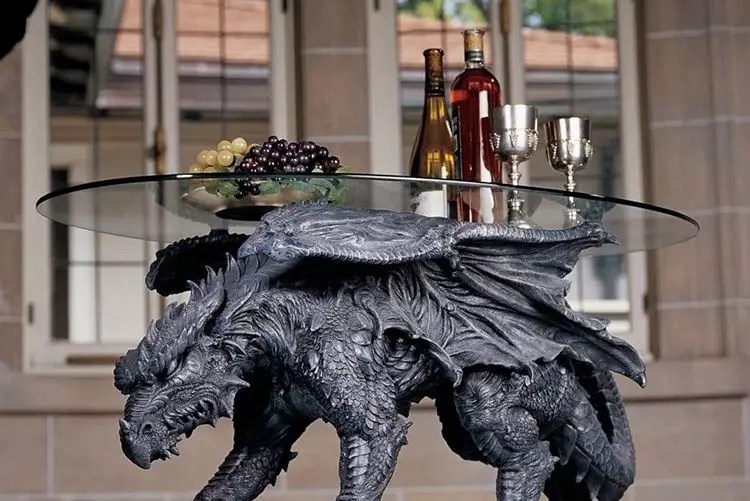
Sometimes it seems that a person is a little crazy and drags all the trash home. But no…. This is also a piece of furniture art.

It would seem that there is no rational grain in this chaos. But no! It turns out that each of these samples must meet both aesthetic standards and correspond to a certain functionality.
Indeed, there is a whole list of norms and specifications for manufactured products. For example, they must be stable and safe. Forms - "perfect, providing ease of use." And the materials should be simple and environmentally friendly. In fact, a coffee table is one of the simplest designs. With this, looking at some surprisingly simple and graceful masterpieces, you can not argue.
Simple, but how graceful! Another recommendation that furniture makers talk about is that the coffee table should be assembled and disassembled. More complex models can have drawers, for example, these are. And even if some of them are a little not standard, but such a table will definitely attract the attention of guests.


Another requirement is the accuracy and cleanliness of assembly and fitting of elements. Here again questions arise. And if the table has practically not been processed. What to do in these cases?

You will be surprised, but each table left from the factory has a long history of creation. From a simple sketch to a pile of papers. All details must be consistent. That is why in Soviet times, factory tables created such a dull impression.

And it's great that today there are enough art workshops, videos and other ways of exchanging information and knowledge to try to spy on really interesting projects to create such small works of art.


The main thing to remember is that the coffee table really needs to be stable and safe. And even the same as in the photo.

How to prepare do-it-yourself drawings with dimensions for a coffee table
Drawings are the most important part of working on your own table design. It is important to choose the middle ground between functionality and originality. As a basis, you can take ready-made drawings, and today there are a huge number of them, and already in the process of work, modernize it. Options for schemes that may come in handy during work.


But how seemingly ordinary, at first glance, the table can be turned into a small front garden. The main thing is to imagine in advance what your table will be like, and the decision will arise by itself.


Advice! To build your own drawing, prepare a sheet of paper, a pencil and a tape measure. With a centimeter, you need to measure the area of space where you plan to place your creation. Based on the data obtained, prepare a drawing.
The schematic drawing is the basis for further work on the creation of furniture. The drawing will help you choose the right base for the structure, calculate the load on the frame, prepare the required number of corners, screws or clamps, as well as supports or legs on wheels. Do not forget that in the drawings, in addition to the dimensions of other materials, the thickness of the tabletop is indicated.
What materials can you make a coffee table
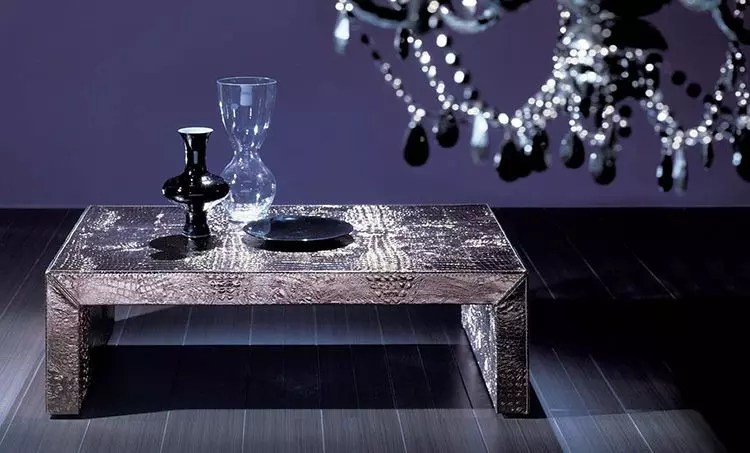
The coffee table is most often made from one or two types of materials. Usually it is both metal and glass. However, there are hundreds of solutions out there to imagine what your dream could be and how it might look.


The most important thing here is to think over all the elements in advance. Sometimes you have to work with each of them separately. Plastic, glass, metal - all of these can become an important part of your art object.
Table top
How to make a coffee table from chipboard
For the manufacture of the simplest table, you need to purchase sheets of chipboard. For work we need. In general, the work process resembles the previous instruction with the only difference that in the case of the sheets are attached to the corners.
Advice! If you do not have a jigsaw, then the sawing work can be carried out right in the store. To do this, you just need to name the dimensions of the blanks.
Shelves can be fixed to confirmations. To screw them in, we drill holes in advance with a 4.5 mm drill. If you have questions about how best to make a coffee table, you can watch this tutorial video.
Do-it-yourself glass table
The glass table will make yours light and airy. Very often, a similar technique is resorted to in small rooms so that this piece of furniture does not clutter up the space. In some cases, tabletop painting is allowed.
Particular attention should be paid to the quality of the glass fasteners. For this, there are special fixation systems that prevent damage to it.

Making a coffee table with your own hands from scrap materials
Despite the abundance of ready-made solutions, in our country, the favorite pastime has always been and is considered to be the use of unnecessary things to solve quite mundane tasks. Some craftsmen share ways to use unexpected materials to create furniture.
Tire side table
Products made of tires are especially popular - they are convenient to install in summer cottages and. Here are some options for such custom furniture.
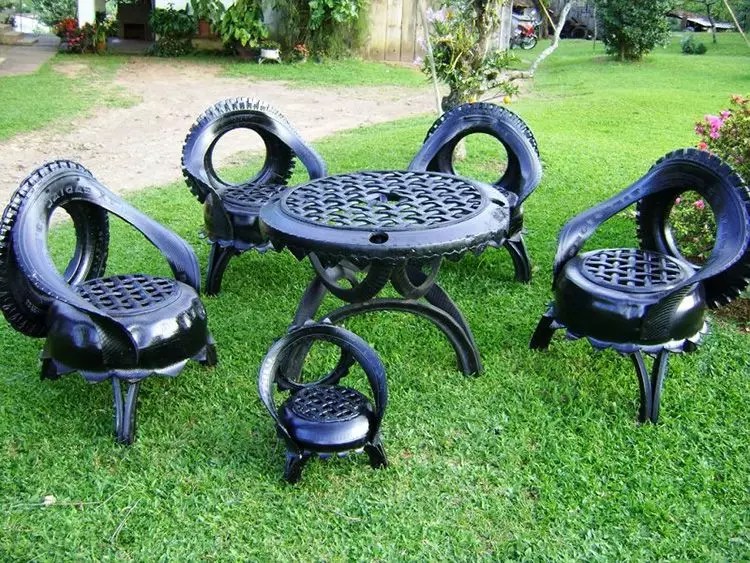
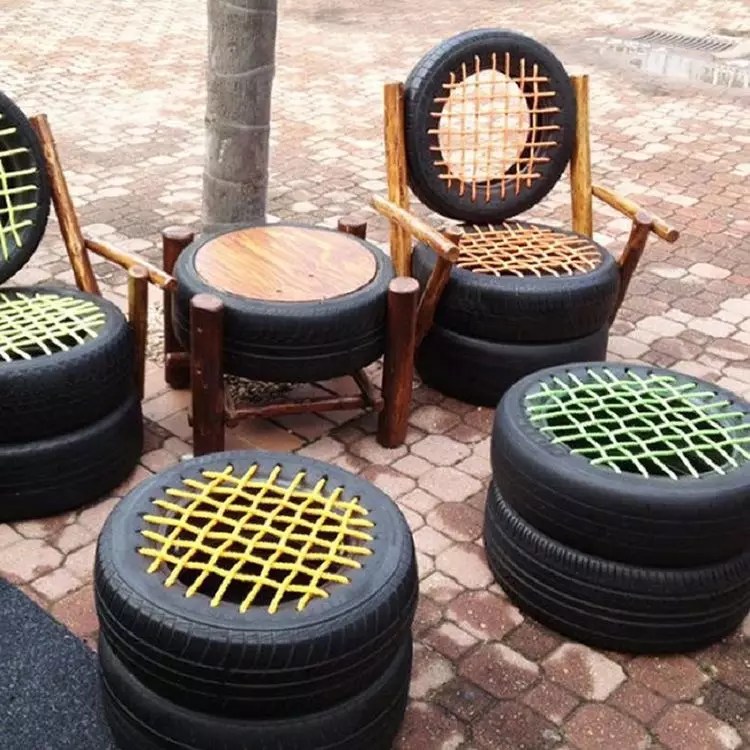
Some craftsmen manage to hide the presence of a junk item with the help of simple, but very effective techniques.

Suitcase table
Very often, an ordinary travel suitcase is used as the basis for a coffee table.

The main task is to provide reliable fastening to the base. By itself, such a table will be distinguished by considerable functionality.


Such tables practically do not require additional processing, and fastenings to the base are very versatile. They can be fixed on a wooden base, tightened with straps to a metal frame.
How to make a do-it-yourself coffee table with additional elements
Now let's look at the order of assembling a simple table. This master class is simple enough to implement and does not require any special skills.
Trolley on wheels
So, today we will disassemble, as on wheels from old wooden boxes from under vegetables or pallets.
| Illustration | Description of action |
 | By tradition, we will prepare the tools and necessary materials for work. |
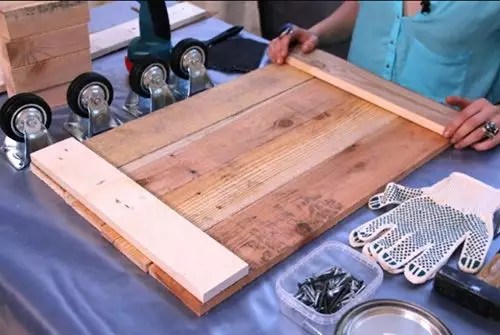 | We start assembling the base, for this we lay out four boards in parallel, we fix them with perpendicular segments of boards. |
 | We fasten all the elements with nails. |
 | We fasten the connecting elements that form the frame of the pallet. |
 | We fasten the top of our pallet. Now it's time to move on to decorating. |
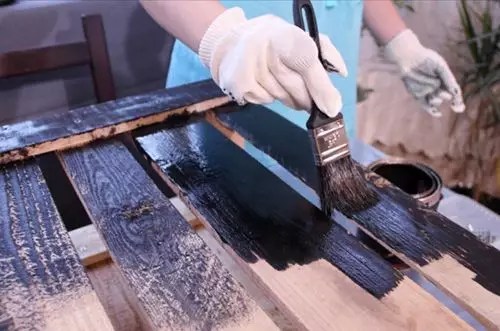 | For coloring, you can choose any color close to the required range. |
 | We prepare an element for fasteners from suede or leather. The material must be tight enough not to tear. |
 | Weave a pigtail. And we fix it on self-tapping screws. |
 | This is how our coffee table turned out. |
Drawer table
The drawer design is considered one of the most difficult for beginners to execute. Take a closer look at how diverse the options for pull-out systems can be.
The design is very simple - table top and support legs or base. Of course, the item can be more complex and include additional countertops, drawers, shelves, etc., but for self-production, these devices are not so difficult.
But a hand-made thing is always completely unique.
This kind of furniture is made from a wide variety of materials: wood, glass, steel, aluminum, plastic, chipboard and plywood. And also from materials much more exotic: tree trunks, fittings, scrap metal, literally, leather, fabric, rods, and so on. Accordingly, different tools for manufacturing will be required.
The main list looks like this:
- jigsaw - the main working tool;
- an electric drill and a set of corresponding drills;
- hacksaw for wood or metal;
- hammer - wooden or rubber, tape measure, level and pencil;
- screwdrivers, a hex wrench, if you need to work with confirmations, a file;
- glass cutter if you intend to work with glass.
Materials are selected in accordance with the model, practical experience and financial capabilities.
- Wood materials - furniture board, veneered MDF, laminated chipboard, plywood. Solid wood is one of the most expensive options, chipboard and plywood are much more affordable and much easier to process. In most industrial models, solid wood is used for strapping and legs, and countertops are made from MDF and chipboard.
- The legs require a separate approach. They can be made from a wooden bar of the corresponding section. However, even the round shape of the leg will require the use of a milling machine. On the other hand, it is on the machine that products of a more complex configuration can be formed. If there is no such equipment in the household, the legs can be ordered from a woodworking workshop.
- Glass - you can only use tempered glass, otherwise the reliability of the table will be in doubt. Glass thickness - 5–8 mm. It is perfectly acceptable to use acrylic glass if the coffee table is not supposed to be used as a seat: designers are now actively offering such models.
- Metal - this option requires equipment, skills, and special knowledge.
The same can be said about the more than flexible and affordable material - the willow rod. Wicker tables are very popular in modern living rooms, but they certainly take some skill to make.
Fasteners and accessories - edge, screws, nails, rollers, suction cups are selected in accordance with the material of the product.
DIY car engine coffee table

How to make a coffee table with your own hands
No matter how simple this product may be, implementation requires great accuracy and thoroughness. After all, a coffee table is a decoration of a living room, which means that it should be beautiful, graceful or unusual, depending on the style, but in any case - made with high quality.
If after the repair you still have chipboard boards, then make a coffee table out of them with your own hands, as shown in the following master class:
Made of wood
Wood is the easiest and most malleable material to work with. This means that the shape and design of products made from it literally have no restrictions. Wood and wood fiber boards of various kinds can be used to make a wonderful thing with a minimum of skills and tools.
The main thing here will be the exact observance of the proportions indicated in the drawing. The latter can be created by yourself or you can use a ready-made project.
- Choose the shape of the table top - square, oval, curved. The latter is easier to make from chipboard or plywood. Saw the material with a jigsaw and a hacksaw.
- The edge of a solid wood countertop or glued furniture board should be machined with a router to give it a beautiful shape, and then sanded with sandpaper. The edge of the chipboard countertop is processed with a grinder or drill with the desired attachment.
- Legs can be made in different ways: glue several round or quarter-shaped planks, grind wooden blocks with a router, buy ready-made ones or use unusual material. It is considered very fashionable to install a tabletop on trimming curved branches or even hemp. The legs are fixed to the tabletop with corners, screws or glue, depending on the material.
- When a coffee table is made of chipboard, especially in structures where shelves are assumed, not legs are made, but supporting sidewalls. Such a product is assembled on dowels, for which holes are drilled at the ends of the sidewalls. Fastening with tongue-and-groove piles is duplicated with glue.
- The shelves are cut out of chipboard and fixed on dowels or self-tapping screws.
- It is somewhat more difficult to assemble a drawer. Observance of angles and planes is very important for this part, therefore, elements and each connection must be checked with a level.
- The finished product is treated with wood stain, painted, varnished or "aged" - at will.

With infinity effect
A tunnel-effect plane is obtained by combining two parallel mirrors and a light source placed between them. In this case, the upper mirror should be translucent, that is, with a level of light reflection of 50% and light transmission of 50%.
As a light source, a monochrome LED strip is used, the color of the radiation is chosen to taste. Mirror-coated glass or acrylic glass with a mirror film is used as a translucent mirror.
- The table top in the form of a frame is assembled from an aluminum profile or chipboard. In the latter case, the frame element is made of two pieces of chipboard with different widths so that a protrusion is formed.
- A mirror is inserted into the frame. Then the LED strip is fixed on the ledge or directly on the profile.
- The table top is covered with a translucent mirror. The distance between the two mirrors is 75–80 mm, but may be larger. The fact is that the depth of the "tunnel" is determined by the distance between the mirrors and is calculated by multiplying the distance by 16.
- The tabletop is checked by connecting it to a power source - through a transformer, of course. And then the product is fixed on the legs or sidewalls.
Diy coffee table with infinity effect

On wheels
Making a coffee table mobile is very simple. To do this, in the store, rollers are selected according to the mass of the product, and then they are fixed with self-tapping screws or screws to the legs, base, sidewalls - whatever. The rollers are hardly noticeable and practically do not affect the appearance of the product.
In non-classical styles - loft, Scandinavian, retro, on the contrary, large ones are selected, their presence is emphasized, since in this case they play the role of a decorative element.
Do you want to make a coffee table on wheels with your own hands? Then the following video will help you:
Glass
This option differs from the wooden one only in the peculiarities of working with glass.
- On a sheet of tempered glass 5–8 mm thick, mark the shape and size of the future tabletop.
- Then a glass cutter, previously lubricated with sunflower oil, is carried out along the cutting line - a shallow notch is obtained. The glass is moved to the edge of the surface on which they are working, so that the excess fragment is suspended, and gently break off.
- The operation is repeated until the countertop of the desired shape is obtained.
- The edge of the product is filed to remove large chips, and then grinded with a grinder with a diamond tip. Then the edge is polished with fine-grained emery paper and a felt wheel.
- The legs are fixed with suction cups. The latter are first fixed on the legs, and then attached to the glass surface. For reliability, you can drop glue on the glass section.
Dreaming of a unique piece with interesting effects? Then the following video will tell you how to make a DIY illuminated glass coffee table:
From scrap materials
No extra chipboard boards or glass scraps at hand? No problem! Do-it-yourself coffee tables can be made from scrap materials. And then we will tell you about the features of creating such a product.
Literally everything can serve as material for a coffee table in a non-classical style.
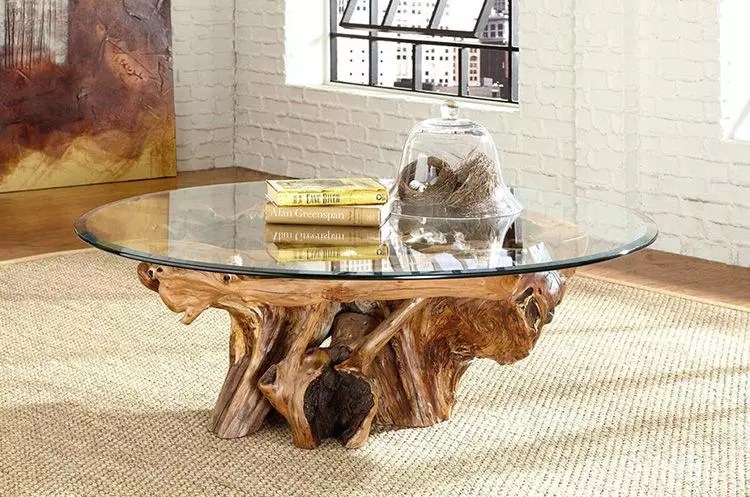
- The easiest way to make the interior special is to make a coffee table, but, however, small, from hemp. You can use a "whole" stump, that is, only with the roots cut off at a certain height. If the product needs to be given mobility, then the cut should be of the same size in the upper and lower sections. The technology is simple: a fragment of a trunk or stump is leveled, flat surfaces are sanded and covered with a transparent polyurethane varnish. Holes are drilled in the lower part of the stump and 3 or 4 rollers are fixed.
- It is not at all difficult to make an option where a stump with "roots" serves as a support for a glass table top. The latter is cut out according to the scheme described above and simply glued to the top of the stump.
A little more patience will be required for a model where the table is formed by vertically standing slices of thin trunks or branches - it takes time to collect an armful of the required size. Fragments of the trunks are fixed on a chipboard base, glued together with a composition based on epoxy resin, level and polish the "table top". The product is opened with varnish.
- For a Provence or retro style, a model made from a solid suitcase is suitable. In its lower part, holes are drilled and fixed on the legs with self-tapping screws. The suitcase can be decorated or painted.
- In a loft style, a table made from a cable reel looks good. The latter is painted and installed on rollers so that it can rotate around its own axis, and the space between the base and the tabletop is divided by partitions into compartments or shelves. A multifunctional mobile table is formed.
- A tribute to fashionable European traditions - a wooden pallet, treated with stain and installed on large rollers. From above, the product is covered with glass and an original display case is obtained.
- The model of bicycle wheels is very interesting. It is a little more difficult to implement, as it requires some skill in working with metal. The arcs serve as the base of a complex shape, to which the tabletop is fixed with self-tapping screws. The latter is made of a wheel covered from above with a round glass screen. For safety, the edge of the tabletop wheel is sealed with a plastic edge, and hose cuttings are put on the ends of the legs.
Unusual DIY coffee tables for the living room
From a stump on wheels From a processed stump From a suitcase From a car rim
From tires From cable spool Crankshaft Wooden pallet
Product drawing with dimensions
On repair sites or communities, you can find blueprints for almost any design. In most cases, they offer not only sketches with dimensions, but also a detailed assembly diagram. The latter is very useful when the design of the model is really complex and includes different elements.
- Most often, products from chipboard or plywood are offered for self-production, for the simple reason that these materials are easy to process, affordable and lightweight.
- Drawings for glass tables are somewhat less common. Firstly, at home, it is possible to make only one option - with a glass tabletop, and, secondly, the structure of such a model is extremely simple.
- Original coffee tables made of unusual materials, as a rule, are presented on forums without drawings and dimensions. But the assembly and the fastening feature are described in detail, since from the point of view of a home craftsman, these points are most important.
The following photos and dimensional drawings will tell you how to do it yourself.
Drawings of coffee tables
Curbstone-table Square On wheels
With drawer With glass top Transformer
How to restore a coffee table with your own hands
Really old products of the late 19th - early 20th century are subjected to this procedure. Mass-produced furniture usually does not represent aesthetic value, and here the repair is reduced not so much to the restoration of the coffee table with your own hands, but to the decoration.
This work is painstaking, takes time and patience. You will need hand tools - a nail puller, screwdrivers, pliers, chisels, and so on and an electric drill. From materials - sandpaper of varying degrees of grain, metal brush, varnish, stain, if the color of the furniture needs to be changed.
- The table can be disassembled whenever possible. First, it is necessary to carefully examine all the details, since some of them are probably deformed or cracked from old age. If any element has fallen into disrepair, you can always order it from the workshop. Secondly, it is much more convenient to process surfaces and remove varnish from parts, and not from the whole product.
- When dismantling, it is best to drill out screws and dowels.
- Remove paint and varnish from the surface. If the layer is thin, it can be removed with a wire brush and regular sandpaper. If the coating is thick or the areas are damaged, using an electric drill with a brush attachment will give the best effect. You can also use a sander.
If the table is made of valuable wood or there are carved parts, it is recommended to remove the varnish using a special paste, which is used by professional restorers. If you cannot find a remedy, you will have to clean the threads and bent wood with cloth-based sandpaper.
- The cleaned surface is degreased with acetone or alcohol based products.
- If it was not possible to remove scratches and chips by grinding, then the defects are putty, and after the putty dries, they are carefully sanded.
- Deep cracks and faults are liquidated as follows: the crack is glued, the part is pulled together and fixed in a clamp until it dries completely - 12-15 hours. You can use self-tapping screws for tightening; after the glue dries, they are removed.
- All joints are cleaned and glued as needed.
- The table is treated with a stain: old wood usually darkens and loses its brightness, the stain returns expressiveness to the material. Then the product is opened with 2-3 layers of varnish.
- After all the parts have dried, the product is assembled.
Below we present a photo of how you can update a coffee table with your own hands.
DIY refurbished coffee tables
Varnishing and painting Mosaic Applied with photo paper with images Leather-covered Coffee stains
The wooden coffee table is a classic that will never disappear from living rooms. Whatever style is implemented in the interior, there is always a place for an elegant and beautiful piece of wood. Originality and beauty are not a property of an expensive material, but the result of imagination, a sense of proportion and taste. Not everyone can afford expensive beech or marble, but everyone can show creativity and make an unusual thing.
In contact with
Do you love designer items, but sigh in frustration looking at the price tags that adorn them in stores? Try to become a designer yourself. Do you think this is difficult? Nothing like this! Following the instructions, you can easily create with your own hands an original piece of furniture from scrap materials. And we suggest starting with a coffee table - such a simple, but very important piece of furniture. Believe me, at such a table you will be happy to give tea to your guests, who will admire your skills. In addition, by creating a coffee table with your own hands, you literally fill your home with warmth and put a piece of your soul into it. So it's definitely worth a try.


Idea in the style of "romantic". All year round, sipping your favorite drink at this table, you will remember the warm sea, gentle surf and moonlit path. A "sea" table is tenderness, sophistication and originality in the very heart of your home.
How to do it?
1. Take an old window frame and clean it of dust and dirt. If the old glass is cracked, insert a new one, then get rid of the layer of old paint and sand the surface. Next, you should remove the metal corners, which additionally fix the frame parts.
2. Cover the frame with white enamel or acrylic paint. If you chose acrylic paint, after drying, sand it with sandpaper so that the wood appears - this will make the table look aged, which will give it a special sophisticated look. You can also use two colors by choosing a white and blue scale. First paint the frame with blue paint, and after the first layer has dried, cover it with white. When the second layer dries, rub it with sandpaper - then blue will come out from under the white paint.
3. We make legs for the table. To do this, take a handle and cut it into 4 equal parts (each about 34 cm), then go over them with sandpaper to remove all the roughness.

5. Now each piece needs to be drilled in 4 places. Pre-mark and then drill a hole for attaching the legs, as well as another one - in any convenient place - in order to secure the legs more securely.
6. Then, using a long self-tapping screw, you need to attach each leg to the base.
7. Next, you need to attach the legs to the frame using self-tapping screws. The window frame is a kind of "box" in which you will need to put all the seafood brought from the holiday - the front part of the frame, which stands on legs, will face the floor, down.

8. Now you will need a coarse thin rope to braid each leg. Secure the rope using a glue gun.
9. Now you need to wash and degrease the glass on both sides. Next - pick up and place "seafood" on the glass. Arrange them so that it seems as if they are carelessly scattered and at the same time flow from one corner of the table to another - and their number should gradually come to naught. Now you need to attach each element with two-component transparent glue. In this case, marine elements should not protrude above the edges of the flat "box".
10. You will need to order glass from a glass workshop, the thickness of which will be 4 mm. The size of the glass should be such that, resting on the frame, it could cover the "box". In this case, on each side, 1.5-2 cm of the frame must be open. In the workshop, you need to ask that the edges of the glass are processed and holes 4 mm in diameter drilled into them. The glass needs to be wiped and covered with a table. Cut out spacers from leather or thin rubber that will be under the washers. Fix the glass using self-tapping screws. They should be screwed in carefully so that the glass does not crack.
11. Take a coarse thick rope and make a loop at one end of it, which will be equal to half the length of the table. Using a glue gun, glue the double-folded string from the center of the long side of the table to the edge. The loop itself (about 12-15 cm) does not need to be glued - it must be free so that later you can tie a knot. Going around the perimeter of the glass and going around all its corners, continue to glue the long end of the rope to it. When you reach the loop, you need to thread the end of the rope through it so that you have a knot. Now, stretching the rope in the opposite direction (doubled), you need to glue it.

12. Decorate the outer corner of the table - on the side where the most marine elements are located. Continue the composition by placing additional details as if they "flow" from the table leg directly under the glass table top.
Ready! Enjoy your creation and bring joy to your guests!
Suitcase table for travel lovers
A very original solution for an old beloved suitcase, which has seen other lands with you and which you do not want to throw away because of the memories.
How to do it?
First, go to the store where you will need to purchase furniture legs (wood or metal). If you want to make a movable table, then you need to take wheels. You will also need plywood, screws and a screwdriver.

Now we make markings at the bottom of the suitcase for future legs and drill holes. Since the legs cannot be attached to the fabric, we put plywood inside the suitcase, make markings on it through the holes and also drill it. Now we attach the mount to the bottom of the suitcase and attach the legs. Using hot glue, glue the felt inside the suitcase.
To give the table an original look reminiscent of distant travels, you can decorate it with stickers made in the form of stamps, or decorate at your discretion.
That's all - the unusual coffee table is ready! By the way, there are a lot of options for turning suitcases into tables: by choosing legs to your liking, you can make a table in retro or classic style. You don't have to attach the legs at all if you have a massive suitcase - it will look truly incredible: such a table will bring to the interior a sense of adventures and adventures, the spirit of travel and unknown distant countries.
Log table for nature lovers
A table made of logs for connoisseurs of the nature of a summer cottage or a country house is warm and natural, it will always inspire the mood of a weekend, in which everything is saturated with tranquility, birdsong and the aromas of nature. Making such a wonderful table is also quite simple.We take wooden beams (in this case, birch) of the same height and width, 32 pieces in total. You also need to take a base for the table, legs (4 pieces), putty to match the wood, a screwdriver and glue designed for wooden surfaces.


First you need to assemble the base for the table, then glue wooden beams around the perimeter, and sew up the middle with cardboard. Then we screw the legs to the bottom. Next, we glue thin wooden dies to the inner surface - thanks to this, it will seem that the table is completely wooden. Now we take the putty and carefully fill up all the voids, and then we rub it until an absolutely flat surface is created. Voila! Now you are the owner of an extraordinary table that will become the highlight of your interior.
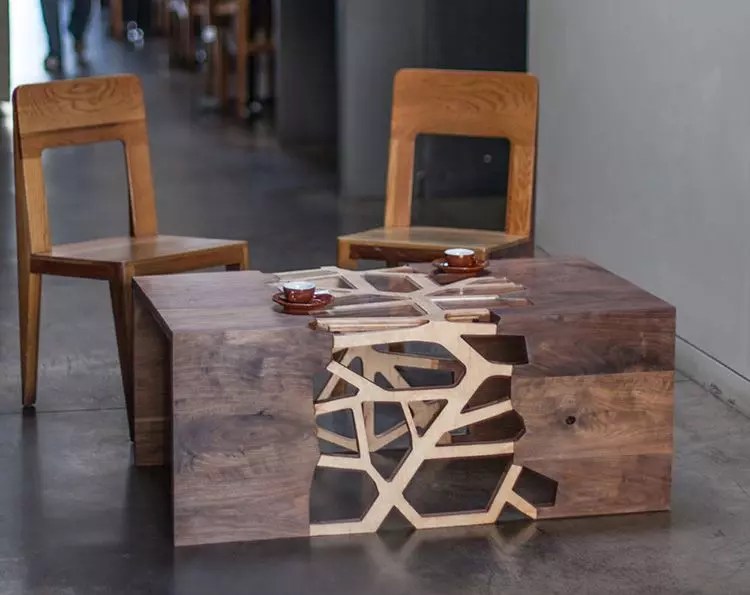
If you like the idea, you can create other tables according to this scheme, using, for example, branches instead of bars. To create such a table, you need to take a plywood box painted with black paint, the size of which is 40x40x60 cm (or any other size at your discretion).
For pasting the frame, we take the branches, from which we first remove the loose bark (we do this with sandpaper). What is the order of pasting: first we glue the branches on the long side of the table, and then we select wooden dies and, like a mosaic, lay them out on the ends. The dies should be about 1 cm thick and can be cut with a parquet or circular saw. And finally - install the glass, which will be the table top. If desired, by screwing the wheel supports to the table, it can be made mobile.


Using the same technology, you can create many more unusual pieces of furniture. You can lay out the branches horizontally and then you get such a wonderful table. Such furniture looks not only very original, but also incredibly stylish.
Original pallet table
An original table made of pallets of pallets, which are likely to be found in every summer cottage? And you can make a very convenient and functional element of the interior out of them.


How to do it?
To get started, collect all the tools necessary for your idea: the pallet itself, a drill, clamps, a hammer, screws, a nail puller, glue designed for wood, wheels, soap, a primer, a screwdriver. In addition, use paint brushes, a petal drill brush with an abrasive bristle brush, varnish, and a colorless primer.

First of all, you should take a drill with a nozzle designed for processing wood and clean the surface of the boards from dirt with it. Now carefully disassemble the sanded pallet into pieces. Use a large hammer to lightly knock out the rusty nails and carefully pull them out with a nail puller. Glue the broken pieces of boards with wood glue. Clamps are needed at this stage. They need to gently grip the boards and wait until they dry out.
Now the parts prepared for the countertop need to be nailed and glued on the back side, then clamp them with clamps and wait until they dry out.

Then cover the table with a colorless primer, and then varnish. Next, on the back of the table, mark the places for the screws to attach the wheels. Drill the holes for the fasteners. Lubricate the screws with soap to make them fit easily into the wood. Using the ratchet wrench, you can quickly and conveniently tighten the hex head screws.
Stylish, compact and quite functional table is ready!

Photo instructions for making a coffee table from pallets
Drawer table
Drawer table? But it has come, and now you yourself can create such an unusual piece of furniture at home. Surely you yourself will be delighted, and your guests will appreciate the originality of this idea at its true worth.

How to do it?
Take 4 wooden boxes, sandpaper, water-based varnish, roller and brush, dowels, 10 mm plywood sheet, PVA glue, 4 wheels and screws.

First you need to oshuk the boxes and varnish them. Then, using a drill with an emphasis, make holes at the ends of the boxes. Using wood glue, you need to fix the dowels at the attachment points and connect the boxes to each other with their ends. Attach the wheels to the plywood sheet, and then attach the sheet to the boxes with self-tapping screws. The table is ready!
Such extraordinary things can be created from quite ordinary materials. Having imagination and a desire for originality and comfort in your home, you can easily work wonders. Look around: maybe the old window frame has every chance of turning into an interesting element of the interior?
Or maybe a huge wooden reel from an industrial cable that can become an elegant piece of furniture?


Believe me, there are a lot of things around us that can turn into something truly unique and precious. You just have to look at them from a slightly different angle.
The arrangement of a summer residence is an ongoing process. You build something, then you improve it. Moreover, furniture is constantly required and tables are most in demand in the country. And put in the garden, and near the house, and also in. We will tell you how to make a table for a summer residence with your own hands in this article using the example of ready-made projects.
Homemade table from pallet boards
Disassembled pallets served as the material for this table. Naturally, new boards can be used. There is only one condition - they must be dry. You can buy dry ones (this is more expensive) or buy ordinary ones, put them somewhere in ventilated piles and keep it that way for at least 4 months, or better - six months. In general, any furniture, including, is made of dry wood.
We assemble the table for the street - put it in the gazebo, therefore we will not glue the boards of the countertop, but we will fasten them from below, using slats. This is a very simple country table and very cheap.
Having disassembled the pallets, we get boards with an individual color and pattern. Having conjured a little, shifting them several dozen times in different manners, we achieve the required result. It turns out quite a nice tabletop.
We take the side parts of the pallet. We use them for the table frame. We grind them first with coarse sandpaper, then we bring them fine to the required smoothness (grain 120 and 220).

We take the strips that have remained unused, with their help we fasten the tabletop. We place them in the place where the joints of the boards are. We use two self-tapping screws to fasten each board with a joint, one to a solid one.
From the processed sidewalls and two boards (also sanded) we assemble the table frame. We fasten its parts with self-tapping screws to the end (two for each joint). The frame can be glued or also "put" on self-tapping screws. Only their length is large. For each, we pre-drill holes with a drill, the diameter of which is slightly less than the diameter of the screws.

Turn the assembled tabletop over and grind it. The procedure is the same - first with coarse sandpaper, then with fine grain.
Next is the installation of the legs. We select four boards of the same size, check their length, and adjust if necessary. Then - sanding again. This is easier than sanding the already screwed legs. We fasten the sanded boards to the frame. These will be the legs. For each one there are two self-tapping screws fixed in a diagonal (look at the photo). For greater stability, we install jumpers at the bottom. From the floor to the lintels, you can leave about 10 cm. We connect everything with self-tapping screws so that the boards do not crack, we pre-drill the holes.


After removing the dust, we again varnish. In theory, the varnish should lie flat, but it depends on the wood, so another sanding / painting cycle may be needed. As a result, we get such a homemade country table.

If you don't like motley planks and old nail marks, you can make them the same design. This table can be rectangular or square. All sizes are arbitrary - see available space.
Country table from the remains of boards
This table for giving with your own hands is assembled from the remains of boards of different breeds and sizes. Pine boards with a thickness of 25 mm and a width of 50 mm were used for the frame of the tabletop, the remains of 15 * 50 mm were used for the legs. We make the frame according to the dimensions you need. This table will stand on the veranda, and it has a small width. So we will make it not wide - 60 cm, and the length 140 cm. The height of the legs is 80 cm (everyone in the family is tall).

Immediately cut off two long boards of 140 cm each.To make the width of the tabletop 60 cm, we subtract twice the thickness of the board used - this is 5 cm. Short bars should be 60 cm - 5 cm = 55 cm.Fold the frame, keeping an eye on the right angles, and twist it with self-tapping screws. We check if the bars were folded correctly - we measure the diagonals, they must be the same.
We cut off four boards of 80 cm each, fasten them from the inside to the assembled frame. You can have 4 self-tapping screws for each leg.

We attach the crossbars approximately in the middle of the height of the legs. This is the frame for the shelf. The shelf can be used for its intended purpose, and it also increases the rigidity of the structure. We fix it strictly at right angles, checking with a large square.

We put the frame on the floor, check if it staggers or not. If everything is done correctly, it should be rigid. Next, we take sandpaper or a sander and grind.
Let's start assembling the countertop. Planks of various types of wood were left from the finishing work, some of them were painted with wood stain. We alternate boards of different colors.

We fasten the boards of the tabletop with finishing nails, carefully finishing them off with a finishing tool. It can be fixed on the shelf with ordinary nails or self-tapping screws. Then we level with a grinder. The last stage is painting. Very unlucky with the choice of varnish. We bought it too dark, didn't like the look. We'll have to sand it again and paint it in a different color.

Wooden table with glued top
This design features L-shaped legs. They are assembled from boards of the same thickness. In this case, 20 mm. In order for them to hold well, 5 self-tapping screws are needed. Pre-drill holes with a drill with a diameter of 1-2 mm less than the diameter of the screws. Then, with a larger diameter drill, we drill recesses for the caps. The diameter can be matched to furniture plugs of a suitable color or made from a wooden rod. Another option is to use wood putty, to which add wood dust that remains after sanding. After drying and sanding, the marks will be difficult to find.

When assembling the legs, make sure that the angle is exactly 90 °. You can choose a bar as a pattern. First, we coat the joint of the two parts of the leg with wood glue, then we install the screws in the following sequence: first the two extreme ones, then the middle one, and only then the other two. After the glue has dried, the legs are sanded, varnished and dried.

It's time to make the countertop. We collect it from boards of the same thickness. We dial in the size you need. Fragments of different widths can be used. It is only important that everything looks organic, and the sides of the boards are even and docked without gaps.
We coat the sides of the boards selected for the tabletop with glue, lay them on a flat surface (some kind of table) and tighten them with clamps. In this case, they cost one, but preferably at least three. We tighten it so that there are no cracks in the resulting shield. We leave for a day. Having removed the clamps, we get an almost finished tabletop. It still needs to be ripped off - to align the edges, and then sanded. You can trim with a jigsaw or a conventional hand saw. Using a grinder is difficult to get a straight line, but you can try. After sanding, we get a beautiful tabletop.

Using the same technique, you can make an oval or round tabletop. It will only be necessary to draw the appropriate line and end the glued boards along it.
To make the table look more attractive, let's make a frame. We take a thin strip, process it with sandpaper and fasten it around the perimeter of the tabletop. You can also use finishing nails. Only the planks are also pre-coated with wood glue, and then with nails.

After the glue dries, we process the joint again with sandpaper.

Now you can attach the table legs. We collect the table frame from four boards (there is no photo, but you can do it as in the previous paragraph). We attach it to the back of the countertop with glue, then install furniture confirmations through the countertop. A preliminary hole is drilled under the confirmations with an expansion under the head. The holes for the fasteners are masked in the same way as on the legs.
We attach the legs to the fixed frame. We put them inside the frame. You can attach it with ordinary self-tapping screws. That's it, we made a table for a summer residence with our own hands.

How to make a garden table from wood with benches
For this table, boards of 38 * 89 mm were used (dismantled themselves), but you can take standard sizes. The difference in millimeters will not greatly affect the results. In the photo below you can see what should turn out.

To connect the parts, studs 16 cm long with washers and nuts (24 pieces) were used. All other connections are made with nails 80 mm long.

The parts are installed in place, a through hole is drilled with a drill. A hairpin is installed in it, washers are put on on both sides and nuts are tightened. Everything is tightened with a wrench. Why is this option convenient? For the winter, it can be disassembled and taken to a shed or garage.
Making seats

According to the drawing, we cut the boards of the required size. Everything is needed in double quantity - for two seats. We grind the boards, pay special attention to the ends.
The short sections, which we use to fasten the three seat boards along the edges, are cut off at an angle of 45 °. First, we assemble the structure that is attached to the bottom of the seat. We take a board with a length of about 160 cm, at the end to it we attach two short boards sawn at an angle. You need to attach it so that this board is in the middle.

Then we attach the legs to the resulting structure (you can use nails). Then we add the boards cut at an angle and pull everything together with studs and bolts.
We attach the seat boards to the resulting structure. Since this is a table for the street, you do not need to knock them close. Leave a gap of at least 5 mm between two adjacent ones. We nail it to the supports (which have been cut down), two for each board.

We fasten the finished seats with four boards 160 cm long. We fasten each leg with studs (if you walk, you can put two studs by placing them in a diagonal or one above the other).

Putting together a table
The table is assembled in a different way. Please note that for the countertop, the transverse boards are sawn at the edges at 52 °. We attach them at such a distance that the legs enter. Each board has 2 nails. You can finish, with small caps, or you can hammer in deep, and then mask the holes with putty.

Now we need to assemble the cross-legs. We take two boards, cross them so that the distance between their ends is 64.5 cm. We outline the place of intersection with a pencil. At this point, you will need to take out the wood half the thickness of the board.

We make the same notch on the second board. If you add them, they turn out to be in the same plane. We connect with four nails.

We make the second leg for the table in the same way. We are not assembling the table yet.
Installing the table
Now you need to fix the legs to the structure on which the benches are installed. We put them at an equal distance from the benches, fasten them with hairpins.


Now we install the table top. We also fasten it with pins. The last stage is painting. Here everyone does as he pleases.
Variations on a theme
According to this drawing, you can make separate benches and a table for a summer residence, a garden. The design is reliable and easy to perform.


Diy table for giving: drawings


 Pastry merchandising and ways to increase sales
 Ideas for a winter photo shoot
 Taurus love horoscope for January