How to make an entrance vestibule in a private house. From the cold, wind and dirt: a vestibule or a warm entrance hall of the extension of the tambura to the trim
By how the entrance looks like, you can understand much.
It allows you to learn about the nature, preferences and mood of the owner. A part of the structure that shares the site and a residential premises is very important and requires a special approach to design. Indeed, it is necessary to take into account the style and overall design of the site, as well as the buildings located on it.
Depending on the design of the main structure, the porch can be performed in a strict style or decorated with architectural elements that will help make it more luxurious.
What is it needed for

Hall in a brick house of year-round residence
In the overwhelming majority of private buildings tambour Before the main door acts as an important functional element of the structure.
It is assigned a function to protect the premises from dampness and low temperatures. If the construction is intended for living in it only during the summer season, then it is not necessary to do it.
After all, even in a cold building, the owner will be able to feel comfortable. Another thing when it comes to capital wooden buildings located in the northern regions of Russia.

Outdoor building option
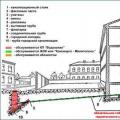
Based on the architectural solution of the construction, the installation is performed in two ways:
- In recess. In this case, this element is embedded in the main building.
- Outdoor. At the same time, the option is made beyond the boundaries of the facade plane.
Must have a depth of at least 1.2 m. Doors can be located differently, however, in terms of practicality, it is better if they are installed at an angle of 90 degrees, although it deprives the building of the parade species. A similar version of the device is most often found where there is a need to create an additional passage.
Choose design

Original terrace combining entrance to the building, corridor and recreation area
To decorate a tambour, you can use a variety of design solutions.
Most often the choice is made in favor terraces, loggia or porch.
However, in addition to them, there are other more rare solutions that are selected taking into account the relief of the adjacent area, natural factors, meteorological conditions prevailing in a particular region.
Also, when choosing a preferred option, other factors have to be taken into account:
- building materials selected by the owner to implement the idea;
- financial opportunities;
- personal tastes of the hosts.

Entrance to the building with a bounted outdoor tree terrace
To the way in the house It was advantageous in the overall interior, it is possible to use planning products and decorative finishing.
The best result brings simultaneous use of both tools. So, it can be put in a niche or on the loggia, in the center of the wall or on the side of it, as well as under the balcony of the second floor.
An interesting solution is the placement of the door in the central part of the facade. Then she will help look like a building solemnlyAnd to enhance the front effect, you can use decor elements or architectural techniques.
For this, the steps are built in front of him, arrange unusual vessels with columns, put large stone vases next to the door with decorative plants.
We plan to build a platform

Open area of \u200b\u200brectangular shape
In the construction process, the owner has to solve many important issues.
One of them is the determination of the optimal floor level. Ideal when the floor is located at an altitude of 30 to 60 cm from the ground level. In this case, in front of the door to build playground, and in height, it should be located below the floor level approximately 5 cm.
In addition, it will be necessary to make a small slope of the site, which should be 2 cm for each meter of length. Such a solution will help the natural way to drain with rainwater and not stagnate.
The playground can be performed in different form - semicircular, oval or rectangular. As for the sizes, here it is necessary to proceed from the fact that spaces should be enough for free placement on it 3-4 people.
To build a platform, you can use a concrete slab or brickwork.
A stone, natural or artificial, ceramic tile, as well as other materials that will seem suitable for owners can be selected as a finishing material.

Natural Stone Playground
The main thing is that they well transfer the effects of low temperatures and moisture. In order for the owner and other people living people did not have difficulty with a rise in the site, several steps are attached to it.
Since the first floor will be located on a small elevation relative to the level of soil, it will be necessary to make a staircase for it, which is set at the stage of building a house. With her registration Need to remember the following points:
- must correspond to the appearance of the facade;
- have a high level of security in the process of use, regardless of weather conditions;
- provide the maximum level of convenience for all living regardless of their age.
Stairs can be performed in a wide variety of options. However, all the same, experts recommend adhere to the recommended dimensional characteristics so that it does not hurt the interior:
- width from 110 cm;
- step height 12-18 cm;
- the depth of the steps 28-35 cm.
It is advisable to make the angle of inclination of the stairs as small as possible. This will help ensure the maximum level of convenience when lifting it.

White terrace with steps and wood railing
When placing the steps, you need to remember that the adoptions were installed with a little from 2 to 3 mm bias out. it will help Avoid accumulating water and the occurrence of ice cover. To ensure the maximum level of security when using a staircase having a height of more than 100 cm, it is recommended to equip it with railings.
If a design concept There are certain monumental decorations at home, it is possible to abandon standard fences and use sculptural elements, pymbol with plants and other decorations instead of them.
Depending on personal preferences regarding construction and finishing, the owner can use various materials for the construction stairs. It can be both brickwork and metal or wood. They can also be used for steps, although optional. It can also be reinforced concrete boosters.
Upon completion of the installation of the ladder, you need to take care of its protection.
To do this, conduct interior processing:
- metal structures are covered with primer and paint;
- wood products are treated with antiseptic compositions and antipirens.
How to do without a tambura

Visor in front of the entrance, decorated with metal forging
If it does not allow a place on a plot or in terms of the house is not provided by a vestibule, then you can do without it, equipping the door with a visor or a canopy. To think about the construction of this element of the facade makes sense if:
- the project does not provide for the presence of the roof over the entrance;
- it is not located in the loggia or under the balcony.
It should be said that visor It is a very important element that plays the last role in the interior design. It provides the protection of the door from the rain droplets from entering it, from the wetting of the owners when they will look for the keys and open the castle.
If you additionally equip the visor with backlight, it will help even more simplify the door to open the door.
Depending on the design of the visors there are two types:
- Console. It is installed in a flat wall and relies on cantilever beams.
- Visor, installed on special supports - walls, columns or pillars.
No less important which roofing material will be used when a visor device. It can be:
- Transparent slate;
- Plexiglas;
- Glass firmly;
- The material selected for the production of the roof of the house is a professionalist or ceramic tile.
Porch
When the owner of a private house goes to stage registration Owl, then most often he begins to build a porch.
The following required elements can be distinguished in the design of this part of the residential structure:
- Brackets or pillars that provide support for canopy;
- Sheds and side walls;
- Fences.

Original porch with a canopy decorated with plenty rose
If competently approach its design, it will not only help make a more attractive facade, but will provide him with protection from snow or rain.
Some time ago, the porch was built traditionally In the center of the wall. Today, a more democratic approach is used in the design of such structures. Alternatively, it can be shifted to the side walls of the building, and it can have a rectangular or asymmetric extended shape towards the door. An additional area arising from this area can be used as a veranda, where, after the completion of the main work on the design of the porch, you can place the table, benches and chairs.
In the event that the work is located above the ground level at the altitude of one step, the porch is allowed to install directly on the ground.
If it is removed from the ground more than one step, then in this case the foundation is made under it, which is made of boot, brick or concrete.
The foundation in this case will fulfill the role of support for steps or Kouryov. In order to avoid possible drawing, the foundation is recommended to lay on the same depth as the basis, necessarily with the unification of them into a single design.
For the structure of the porch, you can use the same materials that were selected for the construction of the walls of the room. Although another option is also possible when the material suitable for the interior texture is selected.
Veranda and its advantages in rural settlements

Wooden veranda
In the villages and villages, access to the house is carried out through the veranda room. This part of the building is essential expands Residential area.
Feel all the advantages on the presence of a veranda owner can in the summer, when this space can be used as a dining room or summer kitchen. It also benefits in winter when it starts to perform the role of a thermal gateway. If it is further comprehensive to make this room, it will help to make a more attractive country cottage or cottage.
In most cases, the insulation of the premises the veranda is not practiced. Instead, executed glazing Most of the surface of the walls. However, in the summer, in a strong heat, this can lead to strong overheating. For this reason, it is necessary to consider other options at the design stage - for example, the installation of removable or opening frames.
In recent years, sliding wall structures are increasingly installed, with which you can make an open terrace from the usual veranda.

Spacious veranda with opening ram
As part of such structures, several glass sections are provided, which are connected to each other with metal loops. During the opening, they are collected in the form of harmonica.
When they are closed, each section is fixed with metal hooks to a horizontally located tube.
Also, brackets that move to the right or left along the guide installed horizontally can also be used as fasteners.
Engaged in construction, an indigestion owner necessarily think about how to make entrance. Among the possible options, the tambura device is most practical.

Glazed Tambour asymmetric shape
If you correctly approach the realization of this idea, you can not only make the building more attractive, but also insulate this part of the building, through which a significant part of the accumulated heat is leaving.
But final decision The owner itself must be taken about the construction of the Tambura. After all, some owners can quite do without him, thereby saving considerable amounts on construction.
We need to highlight the hallway in a private house and tambour. Since the places for these two rooms are a bit, that is, the task is to make a templar of minimal sizes. Question: What (so that he was not close)?
The picture highlighted a tambour with a width of 1.85 m and a depth of 1 m. Plus the area of \u200b\u200bthe door opening of the entrance door. Those. The total area of \u200b\u200bthe tambura is obtained by 1.85 m + (0.5 * 0.8) \u003d 2.25 square meters. m. The entrance door opens into the street, the door from the tambura to the hallway will be opened inside the house.
Little tambour or normal? MB His deepen to 1.2 m?
There is another option not to deepen it, but to expand and make 1M * 2.2 m sizes.
In general, I need recommendations, first of all, from residents of private houses or architects. There is an ambush: the more the vestibule - the less entrance hall. I would not want to cut the hallway. Therefore, the camper is needed minimal.
Options Tambura (in my opinion):
1x1.85 M.
1.2x1.85 M.
1x2.2 M.
The vestibule is panicked: in order to shock snow from the ears, wet clothes, throw off very dirty shoes, etc., before you put it all into the hallway. Clothes and shoes in a warm hallway will be stored. Those. We are not going to put a built-in wardrobe for things in the tambour.
We live in Samara.
The vestibule in a private house is an extension that protects housing from cool air, weather precipitation, carbon monoxide, dirt, dust, different smells. It is located before the main entrance to the house. Almost everyone is interested in the question, and in general, is there a temper in the house or not?
According to the standard of Russia's norms, at the entrance to the apartment house, it is obliged to place a vestibule. However, there are exceptions. For example, it is allowed to install double doors and to build heating in the hallway, then a vestibule is the need for a tambura disappears.
The magnitude of the Tambura
For residential buildings, the gabarites of the tambura must be subsequent: depth 1.4 m, width \u003d width of the doorway + 0.3 m.
For public buildings, the magnitude of the tambour is calculated a little different. The depth should be even twisted the width of the door web + 0.2 m, and the width \u003d width of the door web + 0.15 m on all sides. However, the shallow depth should not be less than 1.2 m, and if people with disabilities are used, the minimum depth should be 1.8 m and a latitude of 2.2 m.
Build a small tambour volumes of 1.4x1.2 m is not entirely correct. Therefore, this construction is often moving into a glazed veranda, where there is more space and allowable to place some kind of furniture.
How to build a tambour?
Like any construction site starting from the ground. The foundation will be pile with painter. To do this, you need to drill holes with a manual depth of depth below the soil freezing. Insert the iron fittings into the hole.
Along the construction and any construction start with the foundation. The foundation will be pile with painter. To do this, you need to drill the holes with a manual brown for a depth below the soil freezing. Install in the hole for pile fittings.

We make waterproofing piles. To do this, we use the runneroid, we turn it into the tube, we have it into the hole. In addition, he will act as a formwork, as the woodlock will be raised above the basis of 10 cm. Pour concrete.

For paintwork, we make a formwork, put iron reinforcement and fill in a circle of concrete. So that it is necessary to raise the base to raise the base, and the bottom of the formwork is to choose a film.


Features of layout Tambura
There are no individual standards for designing tambourists. However, there are rules that, among other things, regulate the arrangement and this space.
It is advisable to place entrance to the house, and with it, it is advisable to consider the wind directions prevailing in the country. The door from the leeward side will make the house a little warmer, because the gusts of the wind will not be blown in it.

At the same time, the tambour can be built into the main volume of the building or attached to it in the form of a protruding part (rizalit), where you can also place a staircase. The entrance door must be opened out: it improves its resistance to hacking, increases the free space in the vestibule, provides a safer evacuation during the fire.

Natural lighting is not necessary, fairly artificial. But in the inner door can be provided with glazing: it will increase and illumination, and improve the visual perception of space. The floor covering should be solid and not slippery (including wet). When installing the mudstit grids, they should be arranged in the top coating of the floor, without a protruding threshold. This ensures more secure movement. Finally, the Tambura zone is often descended into two or three steps below the level of the first floor, which further contributes to the detention of the cold in this room.


- Most often, tambour build from the same material as the house.
- Translucent design, such as glass, can also perform the role of the tambura.
- In small old houses, for example, in the sacred, often made a summer kitchen - essentially the same tambour, insulating the living part of the house from the cold.
- The construction of the Tambura is mainly the volume of the house with reasonable planning can help in zoning space
- If the tambour is small, the door must be installed so to open on the street.
- The vestibule is better to dump autonomously - with the help of a "warm floor" system or installed above the outer door of the fan heater.
- The tambour, lowered by 2-3 steps below the level of residential premises, is better delayed cold.
- To burn a small hallway, turning it into a vestibule, is easy and inexpensive, and the resulting buffer will allow saving on heating.
- Two rugs - with a large cell and hard pile - best clean shoes
What to build a vestibule - heated or not?
A lot of disputes causes the question of the need and the possibility of heating Tambura. Some experts strongly recommend to conduct the contour of the overall heating system here to avoid the appearance of winter in the doors or the ceiling of the room. In addition, according to them, a vestibule in frosts may cool that it will cease to perform the role of the temperature buffer.
However, according to construction standards, heating devices should not be placed in rooms that have external doors, to avoid freezing the coolant. And most of the projectors do not advise you to connect vestibule to traditional heating systems: This leads to excessive, completely unnecessary energy costs. The very essence of the tambour, then why it is needed first, to be a buffer, a cold and warm air mixing area.

Admissible to install two heat devices here. First, this cable warm floor. It will not harm the basic function of the tambura, will provide a more comfortable shift shift to the home slippers, will speed up the melting of snow, which is often closed on the soles. The air heat curtain will benefit, that is, a few fan heaters installed by the appropriate opening, with a flat, clearly directed air flow. It will be enough to install the curtain of small power (I, 5 ~ 5 kW) so that the wall of warm air along the opening is completely cut off cold from the residential area. In this case, the tambour will be used only for changing the shoes and accumulation of street mud.
Tambura thermal insulation
The fullness of the design of the pattern of the structural temperature barrier for the rest of the premises depends primarily on its thermal insulation qualities. The external wall of the tambour, being part of the outdoor design of the house, is an integral element of the thermal contour of the building, and its "pie" should contribute to the provision and maintenance of the "Thermos Effect".
Perform the wall of the same material as the rest of the houses at home. But if additional insulation, for example, for a wall of a cerarmoblock or glued timber, is usually not required, then in the zone of the tambura, experts are recommended to arrange a layer of thermal insulation from foam, perlite or mineral wool slabs (basalt or glass gamblers - read more about seamless insulation here). For the latter, film vapor barrier is required from the inside and waterproofing with external. Outside on the heat insulating layer, the reinforcing mesh is strengthened and then coated with finish paint or plaster.
An attached tambour can also be performed using the technology of the winter garden: a frame of an aluminum or plastic profile with double glazing. The main thing is to ensure a reliable docking of the profile design with the main wall. To do this, compensation seams are satisfied: leave a gap with a thickness of 20-50 mm, filled with a fibrous insulation (palauls or mineral wool, but not polyurethane foam) and protect the facade sealant or waterproofing tape. The same seam needs to be performed at the junction of the foundations of the cottage and the input tambour to avoid the appearance of cracks. But the roof of the extension should not be docked. To cover the attached tambura it is better to perform an independent rafter design, and the joint is close from above the cornice bar.
Also in Tambour, you need to trace with special attention, whether there are no cracks: around the perimeter of doors, along the plinths and in the corners. Large holes are better to lay mineral wool, but it is possible to bleach with polyurethane foam, and small girks to score pacles, take the insulating tape or simply "close" with silicone sealant.
Tambour do it yourself


Collected on corners galvanized, Yellow screws, because Black broke through one. The lower axle pulled with studs in advance embedded in concreting.


Extrastricly remembered that I forgot about the porch (actually wanted welded, but I refused this idea). We make a formwork under the porch.The frame for this time has already been trimmed.


Fill this case, not forgetting mortgages under the railing.
Outside the windproof, inside vapor insulation or vice versa, I do not remember.


We are wearing siding outside, on pre-installed profiles. And also cook pillars for visor
Inside - plastic panels
Tambour from glass packs
- The site is determined on which the vestibule will be.
- The most distant corners of the future premises are pits for support pillars.
- For the correctness of the pillars during installation, concrete. · Filling the alleged floor with soil.
- Distribute metal profiles with their fastening on the support poles.
- Roof beams are added, connecting them with each other using all security measures.
- Attaching roofing beams to profile frame and to a metal profile.
- Next are the materials that insulate the vestibule.
- Wall processing, design style design.
- Inserting double-glazed windows and doors, fixing to power frame.
- Elimination of unfinished trifles.


Small tambour with their own hands
Along the construction and any construction start with the foundation. The foundation will be pile with painter. To do this, you need to drill the holes with a manual brown for a depth below the soil freezing. Install in the hole for pile fittings.


We make waterproofing piles. Take the runneroid and turn it into the tube, install in Zhero. In addition, he will act as a formwork, as Screener is finished raised over the ground by 10 cm. Pour concrete.

For the paintwork, we make a formwork, put the reinforcement and fill with concrete. In order to raise it over the Earth, you need to plug the sand, and the bottom of the formwork is a film to choose.

An appearance after three days can be processed to the reinforced concrete ceiling device.

On the seventh Tuesday we will be erected by the walls that are connected to the outer wall of the house with the help of rewards of fittings.
Building the roof in the tambour.

Size Tambura
For residential buildings, the sizes of the tambour must consist of the following: depth 1.4 m, width \u003d doorway width + 0.3 m.
For public buildings, the size of the tambour is calculated slightly differently. The depth should be peeling the width of the door web + 0.2 m, and the width \u003d width of the door cloth + 0.15 m on each side. Only at the same time the minimum depth should not be less than 1.2 m, and if they are abused people with disabilities, then the minimum depth should be 1.8 m and width 2.2 m.
Building under the table on foot Tambur with dimensions 1.4x1.2 m is not entirely rational. Therefore, often this building will develop into a glazed veranda, where there is already more place and you can place any furniture.
Sources: Imhodom.ru, kak-svoimi-rukami.com, svoidomstroim.ru, HDInterior.ru
It is important to take into account the characteristics of the climatic zone, since our latitudes are distinguished by strong frost and snowfall in winter and elevated in the summer. Reduce the level of impact on the comfort of stay in its own home will allow the correct layout. In order to create an obstacle to cold or heat, the entrance to the house is equipped. Such a small room is called a vestibule.
Main functions
Tambour is an optional element, its presence is not required by technical rules of housing. But it performs a lot of useful functions from which the following can be distinguished:
- Heat and cold insulation. This space is an obstacle to the exit of heat from housing and getting into it. It is also important what is protected from rain droplets, snow and wind, which affects the level of temperature indicators.
- Protection against pollution. The wind into the house, as a rule, can bring dust and dirt, especially difficult when these pollen flower or poplar fluff. Also, often during certain works in the house is entered by trash. A small room is the place where all the types of dirt are delayed, not reaching housing.
These are the basic functions of the tambour. Depending on the size and method of arrangement, it can act.
Necessary parameters
Owners of private houses today are increasingly abandoning unnecessary attacks or seek to make them multifunctional. The standard tambour has several other parameters and is different from the one that is now taken to attach to homes.
Important! According to the construction rules, it must be at least 1.2 meters deep. To increase its protective functions, it is worth it. It is desirable that it is equipped with glass. It will ensure the entrance to the room.
Important! Fire safety rules provide that the door between Street and Tambour, as well as leading to the house should open out.
But, as you know, this requirement does not apply to private buildings, so its compliance is recommended, but not mandatory for implementation. It is also known that the standard tambour is not equipped. Modern extensions in front of the house input are somewhat different from these standards.
Parishion
Tip! Desirable place a mirror thereThat will allow you to put yourself in order immediately before going to walk.
An important role is played by the storage place, which is recommended or must be taken with you before reaching: bag, umbrella, keys. Many owners in the hallway place a wardrobe for the storage of seasonal things, as well as various household appliances.
Unfortunately, small dimensions of our homes do not allow to create a separate one, so many believe that a great solution is to take it into the input annex. This is quite possible if you comply with special requirements.
Tip! Choose the furniture-resistant to the change in temperature indicators for such a room. This will provide longer service life.
Seni.
Today, the word "Seni" seems so outdated that it is found mainly in the villages. But these were the first options for arranging Tambura. But few remember its meaning.
- Seni is a special room that is simultaneously a binder and buffer zone between housing and economic buildings.
Our ancestors were combined under the same roof house and chill. But, fortunately, today from this technique, more and more often refuse. As an adjacent building can be used garage, and other buildings. This allows you to get from one room to another without leaving the street, which is very convenient, especially in winter.
Seni protect not only from natural phenomena and debris penetrating the streets, as well as an excellent obstacle for smells and noise coming from the economic building. Despite this, experts recommend to install ventilation in non-residential premises.
Tip! If an additional entrance from the street is made to the boiler room, then with the help of Seine it can be connected to woodwoman.
This species refers to unheated. For choosing door It is worth a preference to glazed or find a place for the window to ensure sufficient sunlight.
Veranda
The veranda is an excellent embodiment of the impeding space. What is the structure different from others? The answer is very simple: the veranda is a bright room in front of the entrance. This is due to a large number of windows.
Walls can be erected from bricks, foam block and other materials. They may also be, but in this case they need to be insulated.
 What is a hot water supply of an apartment building
 Water supply of an apartment building
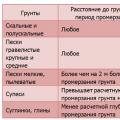 Calculation of the Load for the foundation Installed Electrical Instruments