Drawings of greenhouses made of plastic pipes. Do-it-yourself greenhouse made of plastic pipes over the weekend. Do-it-yourself greenhouse
It is quite difficult to build or purchase a stationary expensive greenhouse, but it is quite possible to build an inexpensive greenhouse from PVC pipes with your own hands. Let's see how this can be done so that you can plant early seedlings in your garden.
Greenhouse made of PVC pipes: its advantages and disadvantages
The design of a greenhouse made of PVC pipes is quite simple and consists of a foundation, PVC pipes, fasteners and special connecting elements, as well as a certain coating.
This greenhouse has many advantages:
- Does not require special skills and qualifications for its installation, as well as complex equipment and expensive tools;
- Has a high level of strength and can even stand for two or three years without dismantling;
- If necessary, the greenhouse can be removed in one day;
- It is not subject to the decomposition process and perfectly tolerates high levels of humidity, unlike greenhouses from old window frames.
Disadvantages of a greenhouse:
- Short service life of the polyethylene film coating;
- Low level of polyethylene thermal insulation.
But these problems can be easily solved with cellular polycarbonate, but this is a more expensive coating.
Attention! In regions where there is frequent precipitation, which falls in the form of a thick and dense snow cover, there is a high risk that the PVC pipe greenhouse can collapse under the mass of sleet. Therefore, when carrying out calculations, it is necessary to lay a large margin of safety.
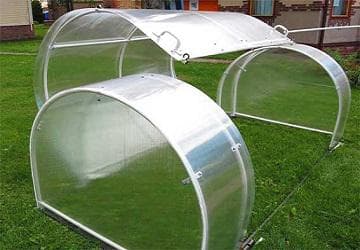
Complete PVC pipe greenhouse
Preparation for construction: drawings, dimensions
Before you start to put a greenhouse, you need to choose the most convenient place for it, level it and make sure that the soil does not sag under the weight of the greenhouse.
If you use a polyethylene film to cover the frame, then the dimensions can be taken arbitrary. We will consider an example with a size of 3.82 x 6.3 meters. Why exactly this size, you ask?

The length of the step between the pipes in the frame will be 900 mm, so with 8 sections we will have 7 spans. And if we multiply 7 spans by 900 mm, then we get the length of the greenhouse 6.3 meters.
greenhouse frame drawing indicating the length of the span
Other sizes can be taken depending on how large the greenhouse you want to build, but remember that the larger the structure, the less stable and durable it is.
Pipes and other materials can be purchased at the store. But when choosing PVC pipes, you must choose very carefully, since they can differ greatly in their quality. You shouldn't buy cheap low quality pipes.
Since the frame is built from engineering PVC pipes, it is recommended to take the material that is used to supply hot water and is easily connected to plastic crosses. Wall thickness 4.2 mm, inner diameter 16.6 mm, outer diameter 25 mm.
The pipe connection elements must be taken from high-quality thermosetting plastic (wall thickness 3 mm).
Since the entire frame of the greenhouse is, as it were, "put on" on special pins driven into the ground, they must be selected in accordance with the diameter of the pipe itself, so that it fits tightly on such a pin and does not "dangle" on it. This will ensure the strength and stability of the entire structure, and there will be no need for additional fastening.
Their length should not be less than 0.5 meters, and we recommend going deep into the ground by at least 15 centimeters.
Material calculation and required tools
For the device of a greenhouse made of polyvinyl chloride pipes, it is necessary to have a certain amount of material and some tools.
Greenhouse materials:
- PVC pipes (Ø25 mm) - 10 pieces;
- Cross and tees (Ø 25 mm);
- Special oblique tees;
- Packing screws and nails;
- Thin iron strip;
- Iron rod;
- Board (size 50x100 mm);
Instruments:
- Hammer and hacksaw for metal;
- Screwdriver (or Phillips screwdriver);
- Bulgarian;
- Welding iron for pipes;
- Building level and tape measure.
DIY step-by-step instructions for building a greenhouse
- We collect the frame of our greenhouse from the board. To do this, before installation, the wooden board must be well impregnated with an antibacterial substance. We install the base on the selected area, observing all geometric shapes. To do this, it is necessary to cut out four rods 50 centimeters long from an iron rod and drive them into the four corners of the base from the inside, adhering to the diagonal exactly.
The device of a wooden base for the future frame
- We install a special mount for installing the frame arcs. To do this, you need to cut 14 identical pieces of reinforcement 70 cm long. Further, along the entire length of the base with a marker, we make markings with an interval of 900 mm. Then, along the broken marks from the outside, we firmly drive in the reinforcement about 40 centimeters. It is necessary to drive in clearly end-to-end to the wooden base. Next, you need to make a markup along the width of the base and to do this, divide the frame into two equal parts. Then, stepping back 40 cm from both sides, make marks. We also hammer the reinforcement according to the marks.
Arrangement of fittings for the frame of the greenhouse made of PVC pipes
- Making arcs. To do this, it is necessary to weld two pieces of pipe 3 meters each with a special welding "iron" so that they have a cross in the very middle. We made the inner arcs, and the outer ones are done a little differently. In the center, pipes are welded with straight tees.
Welding arcs with a cross
- Installation of arcs. To do this, they must be inserted into the pre-clogged fittings from one side and the other. PVC pipes bend without problems. Thus, we get the frame of the future greenhouse over the wooden base.
Installation of arches of PVC pipes
- Next, you need to install a special stiffener in the center of the structure. To do this, we precisely cut the pipe into pieces of 850 mm each and then weld well between the tees and crosses. With these actions, we strengthen the strength of the frame. Then we fix it on a wooden base using a metal strip, a screwdriver and self-tapping screws.
- We make a door and a ventilation window. Since the construction is completed, it is necessary to decide where the door and window for ventilation will be located. Where we installed two rods in width, in this place the door will be located. To do this, measure a straight line up with a level and mark it with a marker on the first pipe.
Ventilation door and window construction
- We marked two points on the same vertical with the reinforcement, and then we will cut the necessary oblique tees into this place. To do this, measure the distance from the bottom of the rod to the mark and, according to the data obtained, cut off the desired piece of pipe. We weld a special tee to it, so that we get a structural detail with a tee at the top. We join the bevel to the pipe.
- Now you need to cut the arc along the marked point, but very carefully, since it is under load. Then we weld the tee into the resulting space. But here we need the help of one more person.
- After you have completely checked the frame for strength, you need to stretch a plastic wrap over it. We take regular nails and wooden slats. We nail the film well along the entire length, first from one side of the base, and then pulling it well, throw it to the opposite side and also nail it on the other side.
We nail the plastic wrap to the wooden base of the greenhouse using nails and rails
- The door and ventilation window can also be easily made from the remains of a pipe. To do this, we make two square structures from a pipe, according to the dimensions that you made before. We weld pipes with an iron using corners. We also weld special latches to the door, which will hold the removable door. We also make a window.
Greenhouse door - blueprint
If you do not want to fix a cheap and low-quality film, then you can use more modern and durable films such as: lutrasil, agrospan, agrotex and others. Reinforced and special bubble wrap can also be an excellent option. The durable 11mm reinforced film can withstand high winds, sleet and hail.
Reinforced film for greenhouses
The film is cut with a sharp knife. You should always cut a piece into the frame with a margin. This is necessary in order to then tuck it and nail it with a wooden plank.
The bottom end is best then lined with bricks or stones and covered with soil to protect the seedlings from being blown by the wind.
The service life of PVC pipes is about 50 years, but since they will stand outside under the harmful effects of UV sunlight, wind, rain, snow and other atmospheric precipitation, they will last no more than 20 years, although this period is quite long.
Also today there is an excellent greenhouse cover (light-stabilized or aluminum-reinforced polypropylene). These types of coatings are not subject to thermal deformation and are resistant to solar radiation.
Light stabilized film for greenhouses
In order for the greenhouse to serve as long as possible, it is recommended to make a concrete coating (foundation) and thereby also increase the strength of the structure. Then, during the off-season, the greenhouse is simply disassembled, and the foundation remains. Thus, your seedling boxes will not be on bare ground, but on a solid concrete base. Also, there will be no need to make a walkway in the middle of the greenhouse made of wood, which will also rot over time.
Video: Greenhouse made of PVC pipes
Such a simple, but very beautiful and durable greenhouse or greenhouse will delight its owners for many years with excellent seedlings or a harvest of early vegetables. And if you are a competent person and think over a good lighting and heating system, then such a design will be indispensable for your whole family.
A home-made greenhouse made of PVC pipes is a profitable alternative to ready-made store buildings, because it is no less functional and practical, but much more economical. However, in order to make a strong and durable greenhouse, you need to understand the mass of subtleties of the process: what material to use, how to draw up a drawing correctly, how to assemble the frame, in what sequence to erect the structure, how to cover the "skeleton"? Learn how to make a greenhouse from plastic pipes with your own hands, and feel free to get down to business!
Plastic pipes as a frame
PVC pipes are gaining more and more popularity and are gradually replacing metal fittings from the market leadership, therefore PVC is often chosen to make both a summer greenhouse from film and a year-round polycarbonate greenhouse. What is the secret of such demand and how not to miscalculate in the choice of pipes in order to experience all the advantages of the material?
A functional and affordable variation of the PVC home greenhouse
What pipes are suitable for a greenhouse
When deciding which pipes to choose for a greenhouse, you should focus on two factors: type and size. As for the first, two types of products are used to assemble a greenhouse:
- rigid - for single-slope and gable structures with straight edges;
- flexible - for arched and other rounded structures.

Rigid pipes are used to assemble greenhouses in the form of "houses"
The dimensions of PVC pipes must be selected for the planned dimensions of the finished greenhouse, but it is important to take into account several recommendations of specialists.
- First, the wall thickness should not be less than 3 mm.
- Secondly, the shorter the segments are, the more connections will have to be made to fasten them together into a single structure, which will negatively affect the strength of the latter.
- Thirdly, the inner diameter of the products must be at least 13 mm.

Flexible products are the best choice for arched greenhouses
Material advantages
PVC pipes have a number of operational advantages:
- Resistance to corrosive processes - PVC does not oxidize under the combined influence of moisture and air, therefore it does not rust when it is exposed to the open air for a long time.
- Light weight - the pipes do not cause hassle in transportation, and the already assembled greenhouse frame can be easily transferred from place to place on the site.
- Flexibility - PVC is easy to bend and cut, so the material can be shaped into almost any shape, even without special equipment.
- Affordable price - polymer is cheaper than metal or wooden products, so assembling a greenhouse with your own hands from PVC pipes does not involve high costs.
- Durability - PVC frame withstands strong mechanical loads and gusts of wind.
- Fire resistance - PVC ignites only after prolonged direct contact with an open source of fire and stops burning immediately after elimination of the source of ignition, which excludes subsequent melting and smoldering of the material.
- Durability - the service life of products can be up to 50 years.
- Ease of use - the manufacture of a greenhouse frame from PVC pipes does not require the use of complex equipment, and the finished structure does not need finishing painting or protective treatment.

The PVC greenhouse structure is strong, flexible and durable
Drawings and assembly features
In order to successfully build a polyethylene or polycarbonate greenhouse from PVC pipes yourself, it is important to carefully think over and work out each stage of installation: draw up drawings, calculate dimensions, prepare the necessary materials, understand the sequence and intricacies of assembling structural elements.

Greenhouse in a warm bed
Calculations and drawing up a drawing
The first step in building a greenhouse is drawing up a drawing of a backyard structure. It will be difficult for a non-professional to cope with this task with his own hands, so it is better to focus on the already developed schemes - use them as a basis for calculating the size of the greenhouse specifically for your site.
The simplest version of the greenhouse is an arched structure made of flexible pipes 2 m high, 6 m long and 4 m wide. In the drawing, it is imperative to provide for the location of the doorway and vents for ventilation. The length of the structure is variable - it depends on the area of the site and the scale of growing garden crops. To calculate the size and number of PVC pipes for such a greenhouse, use the formula L = 2πR, where:
- L is the length of one arc;
- R is the radius of the greenhouse circle;
- π is a constant equal to 3.14.

Simple circuit
Given that the planned width of the greenhouse is 4 m and the height is 2 m, the diameter of the correct circle will be 4 m and the radius will be 2 m.It follows that L = 2 * 3.14 * 2000 mm = 12566 mm
You got the length of the entire circumference of the greenhouse, but only half of it is needed to calculate the length of the arc: 12566/2 = 6283 mm
Since one arc consists of two pipes, then to calculate the length of one product, the indicator should be divided again: 6283/2 = 3141 mm.
Thus, the recommended length of one pipe for an arched greenhouse is 3.2 m.The step between the PVC strips should be about 100 cm.That is, if you are planning to build a greenhouse 6 m long, then for its frame you will need six pairs of pipes 3 each long, 2 m each.

An approximate drawing of an arched greenhouse made of flexible pipes
The second option for building a greenhouse with your own hands is a gable made of rigid plastic pipes. In order to avoid mistakes during construction, it is recommended to erect a structure of typical dimensions:
- width - 4 m,
- length - 6 m,
- height - 2.5 m,
- the angle of the slope is 25-30 degrees.

A more complicated version is a gable structure
For the walls of such a greenhouse, six pairs of pipes 1.5 m long and five pairs of 1 m are required, for the roof - six pairs of 2 m, for the ridge - five products of 1 m in length.
In addition, you will need material for the already mentioned doors and vents, as well as stiffeners. The length of the pipes for door and vents can be selected arbitrarily - according to your preferences and the overall dimensions of the greenhouse, and the length of the products for the stiffeners should correspond to the step between the main frame slats.
Preparatory work
When it is decided with the dimensions, it is necessary to stock up on working materials and tools. To build a greenhouse with your own hands you will need:
- PVC pipes;
- metal rods for the base;
- wooden boards 50x100 mm;
- crosses and tees;
- cellular polycarbonate;
- polyethylene film;
- hinges for doors and vents;
- welding machine for PVC;
- a set of self-tapping screws, thermal washers and nails;
- hacksaw;
- screwdriver;
- steel staples;
- plastic clamps;
- hammer;
- stationery knife;
- furniture stapler and clamps;
- roulette and level.

Wooden foundation for a light greenhouse
At the same stage, you should decide on the location of the greenhouse. Keep in mind that for active development, most plants need access to sunlight, so it is important to choose an area of the site that will not be obscured by trees and outbuildings. The second fundamental point is the possibility of an unobstructed supply of a hose for watering plants.
Now you need to prepare the base. For an ordinary home greenhouse, it is not necessary to fill the foundation - you can get by with a wooden frame. Before installation, align and mark the working platform, and then assemble the frame for its dimensions - tightly connect the boards to each other with self-tapping screws. Then you can go in two ways:
- the first is to dig a shallow trench around the perimeter, lay the frame in it and sprinkle it with earth;
- the second is to install the frame on corner bricks.

Metal rods will add additional rigidity to the overall structure.
To additionally fix the frame, drive in one metal rod 50 cm long in its corners. The rods must be deepened so that their protruding part corresponds to the height of the wooden base. Then, close to the boards, drive in similar rods 70 cm long already around the entire perimeter of the greenhouse in 100 cm increments - they should protrude 40 cm above the base.On parallel sides, the support rods must be installed strictly opposite each other.
Rigid tube frame
Assembling a rigid frame of a greenhouse from a PVC pipe involves five basic steps:
- On each support rod, put one pipe 1.5 m long and fasten them to the boards with steel brackets at the base.
- Put the crosspieces on the tops of all PVC racks.
- Using the side holes of the crosspieces, connect all vertical posts with horizontal jumper pipes 1 m long.
- Assemble the ridge of the roof: using the crosspieces, connect five pipes 1 m long.
- Build the roof: alternately insert plastic pipes for the slope into the upper holes of the crosses of the already installed vertical racks; connect all the components with a common skate.

The simplest frame greenhouse with tees and crosses
Flexible tube base
Do-it-yourself flexible greenhouse frame made of PVC pipes should be assembled according to the scheme:
- Using the crosses, connect two pipes 3.2 m long in four single arcs. Connect two more pairs with tees - these will be the end arches.
- Put the arcs on the metal rods one by one: put on the first part of the plastic arch, fix it to the wooden board with a metal bracket, bend the arch and fix its second end on a parallel rod on the opposite side of the base and fix it in the same way with a bracket.

Assembly principle

The finished "skeleton" of the arched greenhouse
The order of the final assembly of the structure
After installing the frame, proceed to the final stages of assembling the structure - installing stiffeners and arranging door and window openings. Reinforce the frame first: cut five pairs of PVC pipes no more than 1 m long and weld them between the uprights. Next, install horizontal stiffeners at both ends of the structure - weld them between the extreme posts at a height of 1.5 m.
The door and the window are installed on the end sides of the frame. The openings for them are easiest to make from polyvinyl chloride:
- Prepare six pipe sections: four - 1.5 m each, two - 1 m each.
- Slide the long pieces onto the previously hammered metal rods on both end sides and secure to the base with staples.
- Attach the tops of the vertical pipes to the previously installed horizontal stiffeners.
- At the front end of the greenhouse, at the level of the protruding base board, weld a short piece of plastic pipe between the long posts - this way you get a rectangular hole for the future door to the greenhouse.
- At the rear end, at a convenient height, mount a perpendicular short pipe section on vertical posts - this will give you a window opening.

Door with a window
After that, you need to prepare a kind of boxes for the door and vents: already knowing the dimensions of the openings, build two rectangles of the required dimensions according to their shape - they should easily enter the previously prepared holes. At the last stage of arranging the greenhouse, they will need to be hung on butterfly loops on vertical PVC racks.
Greenhouse pipe material
To build a full-fledged greenhouse with your own hands, its frame must be covered with a protective plastic wrap or polycarbonate. The first covering material is rational to use for seasonal greenhouses, the second - for year-round ones. Find out how to correctly "finish" the frame with both materials.

Polyethylene is the most popular material for covering indoor greenhouses
How to attach the film to the frame
To cover the greenhouse from plastic pipes, it is recommended to use a reinforced or multilayer film with increased wear resistance and tightness. The work should be carried out at a temperature not lower than 16 degrees, otherwise sagging of polyethylene cannot be avoided. Finish the frame using the following technology:
- Cover the frame with plastic and distribute it so that there is an equal margin on all sides.
- Using planks, press the foil against the wooden frame and nail it in. First fix the cover on one side, then pull the material tightly, straighten it and secure it on the remaining edges. Nail the tape not from the corners to the center, but vice versa - from the center to the corners.
- Additionally, fix the film on plastic pipes using special clips or stationery clamps.
- Using a furniture stapler or clamps, cover the previously prepared door frames and vents with polyethylene and hang the latter on the frame, securing them to the hinges with self-tapping screws.

The film is best fixed with wooden planks.
How to assemble a greenhouse from pipes and polycarbonate
To build a strong and durable greenhouse from plastic pipes and polycarbonate with your own hands, it is important to take into account a number of rules for working with polymer sheets:
- Before installation, keep the material in a dry room for 24 hours.
- Accurately measure the working panels: measure each frame opening separately and outline the sheets. You need to cut the material with a clerical knife.
- After cutting the panels, their ends must be closed with punched tape and end profiles, which must be included with the material.
- Sheets should be laid out with a protective film - it must not be removed until the polycarbonate is completely installed.
- Start installation from the roof: put the first sheet, align it strictly vertically and carefully fix it with self-tapping screws and thermal washers to the frame with a pitch of 40-45 mm.
- Lay the second sheet in the joint with the first sheet and connect them with the component strips. Attach the second panel to the plastic pipes.
- Install all polycarbonate panels in a similar manner. At the corners, additionally secure them with corner profiles. The bottommost sheets must be fixed to a wooden frame.
- Finally, screw the polycarbonate panels to the door and window blocks and fix the latter to the hinges.

Fastening polycarbonate

Inside view
Video: greenhouse in one weekend
These videos demonstrate the process of building plastic pipe greenhouses. Craftsmen willingly share their experience and proudly show their creations, created in a few days.
Video: Quick assembly of a greenhouse from plastic pipes
Video: DIY PVC greenhouse
As you can see, building a greenhouse from PVC pipes with your own hands is an event available to everyone. Take care of working tools and high-quality materials, think over the project carefully and adhere to the verified instructions at all stages of assembly. The reward for this effort will be a practical, durable and functional greenhouse that will last for years.
Your own greenhouse is always convenient and profitable. When it is still cold outside the window, and vegetables in the supermarket are too expensive, you can serve food on your table by growing them yourself.
Greenhouses are now being erected from different materials, but with the advent of innovative technologies, you can quickly and easily make a greenhouse from PVC pipes.
Previously, old window frames and other similar household items were used to create a greenhouse. Nowadays, everyone has the opportunity to make a cheap but reliable design.
Choosing a place for a greenhouse
Convenience of work, lighting conditions and heat saving depend on the correct location of this structure.
It is necessary to install the structure on an area that is well lit by the sun as well as in an area protected from the wind. For example, you can build this structure between other buildings - this will help to save heat inside the structure.
The distance between the buildings and the greenhouse must be at least 3 meters, otherwise they can shade the structure.
The groundwater level must be taken into account. If the personal plot is located in a lowland, then it will be necessary to build a foundation and a waterproofed basement. Therefore, when choosing a place for the construction of such a simple structure as a greenhouse made of PVC pipes, you should choose a small hill or plain.
Choice of materials
To create a greenhouse, an arched structure with doors and several opening vents from the end of the structure is usually used. This design is not meant to be. Plastic wrap is used for the cover, this material is inexpensive but needs to be replaced every two years. Can be installed by giving the greenhouse reliability. To assemble the frame, you will need the following materials:

- PVC pipes;
- fasteners with different diameters (the larger the greenhouse is, the larger the diameter of the fasteners must be used);
- ends;
- special clamping elements for plastic films;
- for fastening - PVC tees;
- self-tapping screws for fastening pipes and other elements;
- different PVC elements for corner adapters.
You will also need metal rod pegs that are driven into the ground in order for the structure to be stable and reliable. The distance between such supporting elements is no more than one meter, and it is necessary to drive in the rods to a depth of 25 centimeters.

The table shows the amount of building materials required for the construction of a greenhouse made of PVC pipes.
The choice of PVC pipes is based on the calculation of the required footage of this material. To build a small greenhouse, you will need pipes of this length:
- 190 cm (4 pieces);
- 68 cm (10 pieces);
- to create hinges 10 cm (10 pcs);
- 350 cm (2 pcs);
- 558 cm (4 pieces);
- 170 cm (2 pcs);
- 360 cm (2 pcs)
- 90 cm (4 pcs).
The choice of material for cladding can be made in favor of polyethylene, reinforced film, spunbond, or others. Polycarbonate is a durable material, but it is expensive.
The cheapest materials are polyethylene or reinforced film. If you plan to change the material that will cover the frame once every two years, then you can use polyethylene. It is cheap and can handle light wind loads.
If strong winds prevail in the region, then it is better to use reinforced film, it is more reliable, although its cost is slightly higher than that of polyethylene.
Lutrasil and spunbond have a non-woven structure and many gardeners also use these materials to create greenhouses. They will perfectly protect plants from cold and wind, they need to be replaced once every two years.
Estimated cost calculation
According to the above calculations, a little over 70 meters of PVC pipe will be needed. Water pipes cost from 30 rubles. In hardware stores, you can find similar products costing from 97 to 155 rubles, depending on the manufacturer (domestic ones are cheaper, imported ones are more expensive). To build a greenhouse, you do not need to choose the most expensive PVC products; inexpensive products will do.

If you make a calculation, then it turns out that the pipes will need 70 meters x 30 rubles = 2,100 rubles. To this amount should be added 400 - 500 rubles for tees, fasteners, corner transitions and self-tapping screws.
Polyethylene is an inexpensive material for covering the frame of a greenhouse. Let's say the size of the greenhouse turned out to be 6x2.4 m, then the plastic film will need about 30 m2 (standard width is 3 m) - this is 10 running meters. The cost of one running meter of this material is 182 - 185 rubles per meter.
Reinforced film costs a little more - 240 rubles per meter. The rest of the materials have about the same cost. Accordingly, the material for covering the greenhouse will need from 1,800 to 2,500 rubles. As a result, the cost of materials for the entire structure is just over 5,000 rubles.
Technology for erecting a greenhouse from PVC pipes
Also you need to additionally fix the arcs on a wooden base by means of clamps in the form of the symbol Ω. This can be done with ordinary self-tapping screws 3-4 cm long.
Installation of doors and windows
On a wooden base in width, on the segment that will be the entrance, install two pegs of metal reinforcement. A door will be attached to this location. Now you need to do the following:
- draw a straight line up from the reinforcement and make a mark on the extreme arc (you will need a long wooden ruler, a marker of any color and level);
- cut tees in the marked place. To do this, cut off a piece of pipe, attach a tee to get a segment with a tee at the top. The arc must be manipulated with extreme caution, since it is under load.
It will be good for the master who constructs the structure if someone helps in this work and can hold the arched segments.
It turned out to be a door. To make the windows, you need to do the same in the right place. On one side, hinges are screwed onto which a rectangle of bonded PVC pipes will be fixed - this is the door itself or windows. As canopies, you can use pipes, but of a smaller diameter, or you can use real canopies from the store.
Durable and inexpensive PVC pipes have come to be used in agriculture as a material for a greenhouse frame. However, due to distrust of plastic, even those who have old stocks of PVC pipes are neglected, preferring metal or wood. And as practice shows, it is completely in vain - if certain conditions of reliability are met, such a design is enough for a self-made greenhouse made of polycarbonate and plastic pipes to withstand 5-8 years of operation.
Greenhouse project from pipes and polycarbonate
PVC pipes have a lot of advantages: first of all, they are much cheaper than the same rolled metal or wood. Moreover, the material surpasses them in many technical properties - for example, in durability, density, weight. It also lacks such problems as corrosion and decay, and the coefficient of thermal conductivity, which is lower than that of metal, allows you not to worry about the safety of the covering material in the heat.

Mounting, thanks to the large selection of standard sizes, is simple and does not require special tools or many years of experience. It is also easy to repair a greenhouse made of PVC pipes with your own hands - without the invitation of a specialist, you can quickly replace any damaged area.
As for the minuses, there are also enough of them, and the first drawback should be attributed to the light weight of the structure, which is the reason for the high windage. To prevent the wind from tearing off the polycarbonate or skewing the greenhouse due to the wind load, the frame must be installed on the foundation, and the pipes themselves must be rigidly fastened to each other.

The cross connection is reinforced with self-tapping screws
Opponents of using such material for greenhouses also argue that it quickly becomes brittle in the sun, and therefore the frame becomes unusable the next season.
This is partly true - old-style PVC pipes have low lightfastness, which means that they can really crumble into small pieces in 2-3 years. Modern material, due to special additives in the composition, is more stable in relation to ultraviolet light.

Sliding roof model
It is often believed that such a frame will not withstand any other coating, except for film or spunbond. In fact, if it was not possible to achieve its optimal rigidity, it is better not to use polycarbonate, since any loosening of the frame, especially in the fastener area, will lead to cracking or complete destruction of the sheet, which, as you know, cannot be restored by anything.

To increase the UV resistance of the pipes, wrap them with wide electrical tape
Workshop on the construction of an arched greenhouse
If you make the greenhouse exactly according to the instructions, you will get a structure 3.5 m wide, 3.6 m long and about 2 m high.However, you can vary the length according to your own requirements by increasing the length of the foundation and adding the required number of arcs.
In terms of time, construction takes no more than one full working day, and the cost of a do-it-yourself greenhouse made of PVC pipes will be at least two times lower than that of a purchased analog.
Mini greenhouse made of pipes and polycarbonate
Getting Started - Creating a Foundation
A properly constructed foundation is one of the key factors in the longevity of a greenhouse. Since polycarbonate as a covering material implies its multi-season use, shallow point supports are not suitable for the task, and a strip base must be prepared. The harness in the form of a wooden bar is laid on a sand cushion.

A foundation made of timber will significantly strengthen the structure
Before proceeding with the construction, prepare the following materials:
- pine or spruce timber with a section of 100x100 and a length of 3.6 m - 2 pcs.;
- the same bar with a length of 3.5 m - 2 pcs.;
- metal brackets or threaded rods for fixing the frame - 8 pcs.;
- sand-soil mixture for the pillow - the amount depends on the type of soil on the site;
- antiseptic impregnation - its quantity and type depend on the quality of the wood you have.
The laying of a strapping for a polycarbonate greenhouse consists of several successive stages:
- Choosing a place and marking it for a foundation - to facilitate the process, use pre-prepared lumber, setting right angles and checking the geometry of the rectangle using a tape measure, twine and wooden poles.
- Excavation - Dig a trench 10-15 cm deep, pour in and tamp the sand mixture, forming a cushion 5-10 cm higher than the soil level.
- Laying the harness - on a perfectly flat area, assemble the base of the future foundation, joining the beams into a paw or half a tree.
- Checking the accuracy of the installation with a level - make sure that all points of the foundation lie in the same horizontal, as this is important for a trouble-free laying of polycarbonate.
- Fixing the beams - fix the joints of the lumber with self-tapping screws, pins and staples.

Finished wooden base
If poorly drained soils prevail on your site, and the groundwater level is high, the strapping must be laid in the form of a grillage on supports made of bricks, screw piles or concrete blocks.
In this case, the foundation must be fixed with anchors on the thrust bearings, and in all subsequent calculations of materials, take into account the changes in dimensions to the height of the grillage rise.
Consumption of plastic and fixing materials
The undoubted advantage of plastic pipes is their flexibility, thanks to which manually bending an arch of the required size does not seem to be something daunting. If necessary, the process can be simplified even more - by installing the greenhouse in hot weather or by slightly heating with a building hairdryer.
So, what materials, and in what quantity, will be needed to create a greenhouse made of PVC pipes with your own hands according to the drawing:

Greenhouse scheme for calculation and installation
- A - PVC pipe with an inner diameter of 25 mm, wall thickness 2.4 mm (PN 16), length 3.5 m - 2 pcs.;
- B - PVC pipe 3.6 m long - 2 pcs.;
- C - PVC pipe 5.8 m long - 5 pcs.;
- D - PVC pipe 0.9 m long - 4 pcs.;
- E - PVC pipe 1.9 m long - 4 pcs.;
- F - PVC pipe 0.68 m long - 10 pcs.;
- G - PVC pipe 1.7 m long - 2 pcs.;
- H - PVC pipe 32 mm (1-1 / 4 ″) 0.1 m long - 10 pcs. (will be used as hinges);
- I - clamps for the covering material (if at first the greenhouse will be covered not with polycarbonate, but with a film);
- J - plastic tee for 1 ″ pipe - 30 pcs;
- K - corner tee - 4 pcs .;
- L - corner transition (90 ″) - 8 pcs .;
- M - metal reinforcing rods of class A1, 500 mm long - 10 pcs .;
- W - self-tapping screws 20 mm - 120 pcs.;
- Z - glue for plastic surfaces.

Door frame and doors diagram
If in doubt about the rigidity of the structure, supplement it with two side braces. In this case, the number of B pipes will increase to four, and six crosses and four tees are added to connect them to the crossbars.
How to build a frame from plastic pipes
A greenhouse is assembled from PVC pipes like a children's designer - by a sequential set of individual elements into nodes, which are then connected to each other. For ease of assembly, the tees can be modified by bore them in such a way that the pipes pass through them. They can be fixed using ordinary galvanized self-tapping screws.
The assembly algorithm looks like this:
- Drive the reinforcement close to the foundation at a distance of 90 mm from each other to a depth of 300 mm, thereby fixing the base in the area.
- After laying the pipes B next to the foundation, mark where the tees will be attached.
- Install tees at the marked locations on pipes B and centered on future arches C.
- Lay the pipes A in the way they will lie in the finished frame, and mark symmetrically about the center the position of the tees for fixing the door and window frames (the distance between them is 68 cm).
- Attach the ridge pipe segments firmly to the sockets of the tees.
- Bend the pipe C and slide both ends onto the reinforcing rods. Repeat the process to assemble all arches, using tee pieces to connect the ridge pipes and, if present, the side trim pipes.
- Using a string stretched between the extreme arches, check if the arches differ in height. If so, adjust them to the same level.
- Pull the reinforcement with the arches on it to the wooden base with metal clamps.
- Check the rigidity of the resulting structure and, if necessary, reinforce it with additional stiffeners from wood or plastic planks.
- Fix the fastening points firmly with self-tapping screws.

Making a latch for doors
An important condition for the installation of the greenhouse frame is strictly maintaining the horizontal position of all upper points of the greenhouse and the verticality of the arched supports. Only then will you be able to quickly and evenly lay the polycarbonate sheets.
Greenhouse door and window manufacturing
At this stage, it is necessary to build a door and a window, which will be part of the ventilation system. Make them for an arched greenhouse with your own hands from PVC pipes - the photos with assembly diagrams posted above will help you with this. Carry out the assembly on a flat surface and at each stage control the rectangularity of the corners of the structure.

The window is important for ventilation
First, assemble the door frame:
- At a distance of 68 cm, lay 2 pipe pieces E parallel to each other.
- On one of them, put on two hinges (the side of their placement determines whether the door will be left or right), and on the other - a latch.
- At a distance of 200 mm from the top edges of the E pipes, install two J tees, one for each pipe.
- Insert pipe F.

Window frame and vents scheme
The door frame is ready, now it remains to mount the door itself:
- Slide a J tee on each of the G pipes.
- Insert one of the pipes into the door frame hinges.
- Connect the elements G to the crosspieces of the pipe F using tees J and elbows L.
It is quite possible that it will be convenient for you to put together the door frame and door after they have been sewn up with polycarbonate.
To make a window frame and window, use the same technology:
- Put tees J on the E pipes, with one pair at a distance of 880 mm from the top edge, and the other at a distance of 200 mm.
- Pull the two hinges on one of the remaining pipes F, and the latch on the other.
- Insert F pipes horizontally into J tees.
- Separately from 4 pipes F, using corner transitions L, assemble a square - it will serve as an opening window.

Finished frame
Assemble the window and door frames using hinges (for this you need to temporarily remove one of the fittings, insert the pipe into the hinges and put the fitting back in place). Test them horizontally and vertically. If there are gaps, distortions and overlapping parts, eliminate defects by leveling the position of the connecting elements. After that, secure all connections with self-tapping screws.
Laying polycarbonate - installation subtleties
Cellular polycarbonate has earned a lot of praise, but it has caused enough complaints, and all because many builders neglect the basic installation rules. Lightweight and durable sheets require strict observance of the rules, otherwise the material will not serve the 10-15 years promised by the manufacturers.
In the video offered for viewing, the master covers the greenhouse made of PVC pipes with polycarbonate with his own hands. At the same time, he focuses on the main features of the process:
- the thickness of the material should be at least 4, or better - 6 or 8 mm;
- for reliable fastening, it is necessary to use special thermal washers;
- it is important to immediately find out which side of the sheet is UV-stabilized - usually, the manufacturer puts a marking on it;
- polycarbonate must be placed vertically in honeycombs, carefully covering all ends of the canvas with a sealant or U-shaped profiles (but not with tape!);
- during installation, it is impossible to allow the screws to be under-tightened or, conversely, to cut the material due to overtightening;
- it must be laid on a flat surface, leveling it where necessary using wooden battens of the appropriate thickness.
First, cover with polycarbonate and install door and window frames, as well as doors and vents. After that, sheet by sheet, lay and attach the polycarbonate sheets directly to the arches. Leave a gap of up to 5 mm between the panels connected by profiles to compensate for their thermal expansion.

Construction of pipe racks
In view of the high cost of polycarbonate sheets, it is quite rational if a test period is arranged for a plastic structure, temporarily covering it not with polycarbonate, but with a greenhouse film.
Over a short life span, you will be able to identify weak points in the greenhouse and evaluate the cost-effectiveness of replacing the coating with polycarbonate. So, with minimal risk, you will get a reliable, and most importantly, inexpensive greenhouse made of polycarbonate and plastic pipes.
If you want to speed up the process of organizing a closed ground, buy a ready-made greenhouse or seek help from specialists.
The gardening period has already come, and it's time to think - buy or make a greenhouse from plastic pipes with your own hands? A greenhouse is a must for any garden if you grow something other than flowers and parsley. Tomatoes, cucumbers grow well in greenhouses. And if a greenhouse with a winter version, then they can grow there all year round.
But the better the greenhouse, the more expensive it is. In this case, you can try to make a greenhouse with your own hands. It can be made from different materials: someone cooks a frame from metal, someone from wood.
Do-it-yourself greenhouse
But today we will consider a fairly simple option - from plastic pipes that are used for water supply, and sometimes for heating systems. These pipes are notable for the fact that they bend well. In addition, plastic is a versatile material.
It does not suffer from rust, chemical fertilizers, moisture. The only thing that can harm him is mechanical impact. But you are not going to drop stones and concrete slabs on the greenhouse, are you?

Greenhouse materials and tools
In order to determine the materials, you need to decide what exactly will be your greenhouse, what size and configuration. In today's article we will look at the simplest greenhouse: arched configuration, one door, greenhouse film. But keep in mind that you can also make polycarbonate greenhouses from plastic pipes, with additional ventilation (windows), with a gable roof, etc.
Materials:
- Plastic pipes (the number and length are calculated based on the size of the greenhouse)
- Greenhouse film (thick)
- Fittings or any other metal rods that fit well into the pipe. The length of the reinforcement should be approximately 60-70 cm + 4 pins 70-80 cm long for corner fixings
Frame boards
Consider also the fact that the greenhouse described in the article is removable. Capital greenhouses are installed on a concrete, metal or wooden foundation, anchored in the ground.
Greenhouse construction stages
Before you start assembling a greenhouse from plastic pipes with your own hands, you need to prepare a site for it.
 Choose an area with a relatively level surface, even though you will level it. Remove the sod from the area of the future greenhouse + 0.5 m on each side. Now, with the help of a building spirit level, measure the surface, level it. Let's say a drop of 5 cm with a distribution of 2 m.
Now we assemble the frame from the boards, adjusted to the size of the greenhouse. Boards are needed thick, strong. In the corners we fasten them with galvanized self-tapping screws (2-3 pieces, depending on the size) 2.5 times longer than the thickness of the boards.
We check the assembled frame using a tape measure: measure the diagonals, if they are equal, then everything is fine, if not, look for errors.
We install the frame in the right place and fasten it with long pieces of reinforcement or pins. It is necessary to hammer the pins in the corners so that the structure does not move, does not dangle from side to side. There is no need to leave the long parts of the pins, drive them into the ground to the level of the frame.
The advice of experienced gardeners: before installing the frame, treat the wooden structure with hot bitumen - this way it will last longer if it is in constant contact with moist soil.
Now the base for the greenhouse is ready, you can assemble the frame
Mark the wooden frame where the pipe arches will be. It is worth remembering that the more often they are installed, the stronger the structure will be. But you should not get carried away either - 0.5-0.8 m between the arches is enough.
 Drive the pieces of reinforcement into the marked places in the ground outside the frame. Their number is twice as many as the number of arches - the mount will be on both sides. No more than 40 cm of a pin should stick out of the ground. You need to drive in the reinforcement not close to the frame, leave a small gap (about 1 cm).
Now slide the pipes over the pins. Buy PVC pipes with a wall thickness of at least 3 mm for a greenhouse. Fasten the pipes at the base with metal mounting brackets to the wood base.
Install the stiffener. For this, another pipe is fixed along the entire length of the greenhouse at the highest point above or below the arched pipes. It must be attached both to the end pipes and to all arched pipes. When building the simplest greenhouse, the stiffener is fastened with galvanized knitting wire or plastic clamps.
The ends of the greenhouse are made of planks. First, a doorway (box) is made in the middle, then additional structures are installed on both sides. You will get something like the one in the diagram (see fig.). The number of boards can vary depending on the width and height of the greenhouse.
 The frame is ready, it's time to start stretching the film. The film should be greenhouse, dense. Some gardeners recommend using 1.1 mm reinforced film. It will not break even with a shower of hail. Cover the frame with plastic foil, evenly distributing the stock.
Check that the film completely covers the structure on all sides. You can fix it in two ways: with wooden planks or with a construction (furniture) stapler.
Better, of course, with planks. They do not need to be made of high-quality material; debris and leftovers from the main work will do. But they must be strong and dry! The plank is applied to the foil and nailed to the base frame. In the end openings, the film is wrapped on wooden frames and nailed in the same way.
You just have to make a door with a closing element (a simple latch is quite suitable) according to the size of the end door frame, cover it with foil and hang it on the greenhouse.
Video - a greenhouse made of plastic pipes with your own hands
As you can see, making a greenhouse from plastic pipes is not so difficult with your own hands, but you need to have some skill. Having practiced a simple one, you can make a more reliable greenhouse from pipes with fittings with fittings of any design and with any coating, including polycarbonate.
 Pastry merchandising and ways to increase sales
 Ideas for a winter photo shoot
 Taurus January Love Horoscope