The better plastering the walls from aerated concrete outside. Facade plaster for aerated concrete: how to choose the composition and apply correctly. Nuances of work with gas silicate blocks
Properly plastered walls - the key to high-quality construction of the house. How should the inner plaster of walls from aerated concrete want to know many. The article will tell all the nuances and the sequence of decorative plaster walls.
Foot concrete blocks are most often used in the construction of low-rise buildings.

Their main characteristics are presented in Table:
In the manufacture of aerated concrete blocks, a powder from aluminum performing the role of a gas formator is added to the solution. This creates an open cellular structure, which increases the vapor permeability of the blocks. Such characteristics need to be considered when plastering aerated concrete inside the house or outside.
Watching aerated concrete should be started from the inside of the building, and then its facade. This is due to the fact that the water used in the "wet works" will be through blocks and existing ventilation, go out.
Water steam with a negative ambient temperature will be condensed inside the walls of the house and on the border of the blocks with an outer decoration (see the outdoor decoration of the house of aerated concrete - the case is responsible). When freezing, the moisture will lead to an inevitable cracking of the layer of plaster, and then delay it.
Tip: Watching walls from aerated concrete must first inside the building.
Types of plaster
Internal decorative plaster for walls from aerated concrete can be:
- Parotypes. It includes mixtures made on a plaster basis. The optimal option is a plastering mixture of Egid TM35, which includes lime.

The mixture has a minimum weight, sufficiently high adhesive properties, good strength of the solidal coating layer.
- Vaporizolation. Distinguished by the presence of a large amount of polymer impurities. It includes: plastic decorative inner plaster and the usual cement-sand mixture without additives.
The optimal option than plastering the gasoblock inside is the usual inexpensive gypsum mixture used in conjunction with vapor barrier primer.
Currently, such a building material like a gas concrete is becoming more and more widespread. To build a low-rise home, it is the best solution. The active use of aerated concrete in modern construction is due to the low cost of blocks, low specific weight, high thermal insulation properties, mechanical processing capabilities with a hand tool, high fire safety.
However, after the completion of the main construction work, the question of the further internal and exterior decoration of the house is inevitably arise. There are various types of finishes, but it was the greatest distribution that exactly the plaster. We will try to figure out than plastering aerated concrete inside the house.
Options for plastering walls of aerated concrete
In addition to the above advantages, ensuring the popularity of such a building material, it is also characteristic of the disadvantages that require a number of additional rules during the finishing work. To these disadvantages of aerated concrete include:
- High vapor permeability;
- The ability is very fast and in large quantities to absorb moisture;
- Fragility.
The first two drawbacks have a particularly important impact on the plaster of aerated concrete. It is the high level of adhesion that makes it difficult to finish both from the inside of the house and outside. There are three options for plaster for walls from aerated concrete:
- Cement - sandy;
- Gypsum;
- Facade.
It is important to note that whatever material for plaster you have chosen, the decoration of aerated concrete walls should be started with internal works. This is due to the high vapor permeability of aerated concrete. When performing outdoor plastering, the humidity of the room increases significantly, which can adversely affect the quality of internal work.

The decoration of walls inside the house may chase two goals:
- Saving, or even increase the vapor permeability of aerated concrete. This option is used if the main purpose of the finish is the creation of an optimal microclimate in the house.
- Full vaporizolation. This option is used if the outer surface of the aerated concrete is also plastered; In this case, it is reduced to a minimum of a pair of outward, which has a positive effect on the durability of the outer plaster.
Now consider which material will be the most suitable for plastering your home.
Cement - sandy plaster. Often, many wonder: is it possible to plaster aerated concrete mortar? The walls of the walls are extremely undesirable for the following reasons:
- The cement vapor permeability rate is significantly lower than that of aerated concrete. Provide the optimal microclimate in a gas-concrete house is possible only when the vapor permeability of the finishing material is equal to or exceeds the indicators of the aerated concrete.
- With significant indicators of moisture absorption, aerated concrete will be intensively absorbed by moisture from a sandy-cement mortar, and this will significantly reduce the quality of plaster, since the acquisition of the cement plaster optimal strength parameters is possible only under the condition of slow and uniform drying.
- Low adhesion and high specific weight of the solution exclude the possibility of its reliable clutch with the material.
Gypsum. Plastering aerated concrete inside the house by plaster has its own both the advantages and some disadvantages. Benefits include:
- 1. Rapid drying;
- 2. Lack of shrinkage;
- 3. The possibility of obtaining a smooth surface;
- 4. When skillfully plastering the wall of aerated concrete, you can avoid applying the finish layer. It is unlikely that the quality of the surface will make tinting, but the sticking of the wallpaper is quite acceptable.
The disadvantages of gypsum mixtures include:
- Low vapor permeability;
- To mix the mixture, a rather large volume of water is required;
- High adhesion of dried plaster to atmospheric precipitation and moisture at all.
Despite the shortcomings given, plastering aerated concrete plaster is quite acceptable.
Facade. This type of plaster mixtures is optimal for plastering aerated concrete inside and outside the room. Indicators of vapor permeability of such a composition correspond to the indicators of aerated concrete blocks, it is characterized by high adhesion, as well as they are characterized by good aesthetic properties after drying.
Interior decoration of a housekeeping house
Currently, there are a large number of ready-made dry mixes for plastering walls. When choosing a material for plastering work, the following factors should be taken into account:
- The plastering mixture must have parameters good vapor permeability, at a minimum equal to the parameters of the aerated concrete;
- Excessive amounts of water should not be used to prepare the working mixture.
- The selected mixture should have a high adhesion coefficient with a base;
- The plasticity of plaster should provide wall resistance to the appearance of cracks;
- The frost resistance of the selected mixture must comply with climatic conditions;
- Time to the beginning of setting the newly prepared mixture, in other words, the time during which the prepared mixture has sufficient plasticity for applying to the base.
Currently, in the market of dry mixes for plastering aerated concrete, with a huge variety of choice, according to the price-quality ratio, confidently leads Ceresit CT 24.
In conclusion, I would like to remind you that no matter what to plaster aerated concrete, the observance of the technological regimes specified by the performer of the plastering mixture is directly related to the quality and durability of the work. Do not neglect the preparation of the foundation. Preliminary removal of various masonry irregularities will allow you to significantly reduce the layer of plaster on aerated concrete, and, therefore, its consumption.
Gas-silicate blocks are excellent building material. The designs of them are obtained warm and reliable. But after construction, the question arises: how is the plaster of building gas-silicate blocks from the inside? There is a special technology for performing the work we consider. This will help quickly and efficiently prepare walls from gas-silicate blocks to finishing from the inside.
Requirements for plaster
The range of products for work is quite large, but not all of them are suitable for the plaster of the gas silicate. The surface of the material is porous, which causes difficulties. Consider the requirements for the plastering mixture:
- parry permeability, due to which the wall of gas silicate blocks will breathe;
- if the work is carried out outside, the plaster is selected moisture resistant and frost-resistant, in order to withstand atmospheric influences;
- high quality adhesion (clutch with a surface);
- good strength;
- elasticity, so that it could be easily applied, and during operation, the plaster did not crack;
- resistance to elevated temperature, for compliance with fire safety.
All this is important to take into account before plastering gas-silicate blocks. Most of the modern mixtures are suitable for almost all criteria. If we talk about the finishing of gas-silicate blocks from the inside, it is much simpler, since it does not turn out to be such an aggressive effect.
What mixture to choose
The question arises than to plaster gas-silicate blocks inside? Some prefer to use cement-sand mixes for plaster. But it's not right. That is, two good reasons:
- The quality of the clutch with the wall is low. Aerated concrete, due to its porous structure, quickly absorbs all the water from the mixture. As a result, the plaster when dried by cracks. Even the primer does not always help get rid of such a phenomenon.
- This plaster will significantly reduce the vapor permeability of the walls of aerated concrete blocks. The microclimate will be disturbed, and condensate is formed on the walls. For walls of brick or foaming it is not so important. And the house from the gas silicate should breathe.

Instead of cement-sand mixture, specially developed plaster for gas-silicate blocks is recommended. It has all the necessary properties that are needed for work. For specifics, we will provide a list of popular compounds: Ceresit Art 24, Atlas Silikat, Glims TS40 Velur, Mask + MSh, Sibit. Middle consumption of plaster - up to 9 kg / m2.
Note! It is better to do plaster yourself, since the price of professional works can bite. Watching 1 m2 walls will cost 300 rubles, priming and putty - another 300 rubles / m2, reinforcement of the wall with a mesh - 100 rubles / m2, finish staining - from 120 rubles / m2.
Nuances of work with gas silicate blocks
It is impossible to compare the usual brick or concrete with a gas-silicate. Material has special properties. Plastering of walls from gas silicate blocks has its difficulty:

Given all this, you can begin the process of plastering walls. But first take care of the necessary tools and materials.
Arsenal for plaster
Let's start with the fact that plastering work will be performed by lighthouses. This is allowed to make the surface perfectly even and simplify the task for beginners. Below the list of tools that will be required to work:
- Rule for stretching and leveling plaster between beacons.
- Lighthouses made from wood or metal. These are railings or profiles that serve as a guideline.
- Roulette, plumb, marker, level, dowels and self-tapping screws.
- The primer for gas-silicate blocks under the plaster is performed due to the roller and painting brush.
- Plastering is performed by a bucket or a trowel.
- For preparation, the mixture is used a bucket and a building mixer.
- Grater and halfter.

As for the materials, everything is simple here: primer, selected plaster, fiberglass mesh, finish coating.
Preparatory stage
It all starts with training. It is very important, since the final result directly depends on this. The instruction is as follows:
- To begin with, the surface is cleared from all superfluous: dust, dirt, stains, old coating.
- After that the primer is applied. It is easier to do it with a roller, and hard-to-reach places to handle a tassel.
- Alternatively, on the wall you can make notches instead of primer. They are made by the grinder.
- In the end, it remains to perform the installation of beacons. This is one of the difficult stages, without which the plaster of the gas silicate will be problematic.
Installation of beacons begins with marking on the wall. To start from the corner of the wall, it is necessary to retreat 30 cm, from the floor and the ceiling of 15 cm and draw a flat line. The same to do on the other side. At points where the lines end, drill a hole, knock the dowels there and tighten the screws. The resulting fasteners align in the level so that they have one depth. The residue of the wall is also placed, withsting indentation from lines in 130-150 cm.
Note! The distance from the lighthouses should not exceed the length of the working rule.
Then they are connected in a horizontal position with a thread, forming a rectangle on the wall. The markers are scheduled for those places where the thread intersects with the line drawn inside. A hole is drilled there, the dowel is inserted and the screw is twisted. It remains to pull the diagonal threads to check evenly. All elements must be in the same plane.

It remains only to install beacons along the drawn lines. Installation is performed on the solution or on fastening elements. If the walls are relatively smooth, it is possible to do with a solution on a solution, which in small portions are applied over the line with an interval of up to 20 cm. The profile is interpreted into the solution and is aligned by screwed screws. Now you can apply plaster.
Wall shockting
Work begins with the preparation of the solution. Usually the instruction is indicated on the package from the goods. It will take a building mixer and a container for the kneading. The consistency of plaster must resemble pasta. If there is no primer layer, the wall is slightly moistened. Phased instructions for plastering gas silicate blocks:
- With the help of a trowel or bucket, the composition is applied to the wall with a thick layer. Work is performed from below, moving up. Do not fill the entire wall, but only one section of two lighthouses.
- Next with the help of the rule, the plaster for the gas silicate is stretched and the surface is aligned. At the same time, the movements must be zigzag, starting below, moving up.
- Excess the composition are put up. Work is performed until the entire section is filled and perfectly aligned. Tip! The layer thickness depends on the location of the lighthouses. If the thickness exceeds 3 mm, then the reinforcing grid is needed. It is interpreted into the solution. The surface should be smooth and without folds.
- This principle is treated with the entire surface of the wall of gas-silicate blocks. Special attention should be paid to the corners. They must be smooth and well fortified.
- When the wall is processed and dried a little, the lighthouses can be removed their walls. After them, the shorters will remain without a solution. They are also filled with a mixture and align.
- The solidity of the resulting wall is checked using a level.
- When the surface dried, you can proceed to grinding walls. It is performed by grater and half surge.
At this stage of plaster walls completed. Further manipulations depend on the finishing decorative layer. If you plan to finish with wallpaper, painting or decorative plaster, the surface is processed by the starting and finishing putty. After that, it can be painted or stick wallpaper. That's all, work on plastering gas silicate blocks is completed.
Let's summarize
After fulfilling all the work with your own hands, you can save tens of thousand rubles. Saving products can be spent on furniture, high-quality finishing materials or something else. If you first do this work for the first time, it is better to study in detail the whole process and only then engage in the plaster of gas-silicate blocks. Make everything with your own hands is quite real. It remains to implement all this in practice.
The inner and outer plaster of gas-silicate blocks is one of the most common methods for finishing walls from this material. Performing these works, many forget that it follows somewhat different than ordinary brick or monolithic concrete surfaces.
Since the houses from aerated concrete are easily absorbed by moisture, they should be placed.
Plaster errors
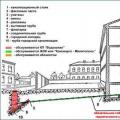
For example, the case that needs to be considered to be clear which consequences may be in errors in performing the finishing of walls from aerated concrete.
For outdoor decoration, the use of a conventional cement-sand solution is simply unacceptable. This is connected with the same vapor permeability and leads to a violation of the main rule, which states that any multi-layer breathable wall must have vapor permeability that increases from the inside to the layer to the layer or to be at least commensurate.
The plastering mixture for walls containing is implemented as a dry powder with special additives that help respond to the following operational characteristics:

If you leave a house from aerated concrete, it is not plastered to winter, then the next year he will "delight" a network of cracks.
- vapor permeability (most important factor);
- water resistance (no less important and protects blocks from the blotch);
- good frost resistance;
- high adhesion (ability to tightly adjacent to blocks);
- resistance to mechanical damage;
- elasticity (prevents the appearance of cracks during precipitation and in the process of expanding compression at temperature drops outside);
- heat resistance (increases the ability of confronting the effects of fire, i.e. increases the fire safety of the whole structure).
Before starting plaster works, preparatory work is required. Clean the surface of the wall from dust, dirt, bitumen spots or old layer of plaster, paint.
The solution of plaster for gas-silicate blocks must be prepared by observing strictly instructions on the package. To begin with, the mixture can be shipped into the capacity of sufficient sizes, observing the proportion by quantity and weight. On 1 kg of mixture, 0.20 liters of water is usually required. It is very important to correctly add the required amount of water, as it is undesirable to dilute the plaster mixes of too thick consistency, and too liquid plaster is simply inconvenient. The mixture of ideal consistency should be like a cream.
Mix the plaster mixes can be manually, but more convenient, better and faster, if you use a drill with a special nozzle.
Step-by-step instruction
Plastering the walls from gas-silicate blocks in the following sequence:

The trim of the facade occurs in three stages - primer, plastering and painting.
- A wall coating with a special primer, which is made of acrylatexylosane, which has strengthened and hydrophobic properties.
- Mounting to the wall of the mesh made of fiberglass is performed, which is resistant to alkali solutions and has a surface density of 200 gr / m³. It should have a high resistance to the loads on the gap and should not stretch.
- After installing the guides of beacons, a solution is evenly applied to the wall. This is done with the plastering unit, a trowel or bucket. The layer thickness of the plaster should not be more than 1.5 cm. If the plaster mixture is applied in 2 layers, then each layer must be in the range of 7 - 9 mm.
- Still fresh stucco are aligned with plastering racks, surplus are cleaned with a wooden grater.
- Long with a little to dry the surface, it is watched.
- Not earlier than 48 hours of the walls are covered by specially intended vapor-permeable paints, for example, Atlas Arkol S or Fastel.
The entire tool immediately after the end of the work should be thoroughly rinsed with water, otherwise the remaining plaster hardens, and its removal will take a lot of time and effort.
The quality of the plastering layer is checked with a long rail (from floor to ceiling), which is applied in several places as horizontally, and vertically. The presence of irregularities and protrusions relative to the rail plane immediately. A permissible error is 5-7 mm, as it is imperceptible to a common look.
In order to increase the life of the facade, the finish coating can be additionally treated with a hydrophobizer layer. But before applying it is necessary to wait until the house is dry as possible. That is, it can be done after 1 - 1.5 years after the end of all works on finishing (outdoor and internal). The applied layer of the hydrophobizator should be as thin as possible.
Summing up, it is clear that the plastering aerated concrete is not cheap, as many people think. Savings on materials can lead to deposits, as shown by the example at the beginning of the article. Here you can say with confidence: it's not in bad building materials, but in the wrong and inappropriate use of them. And if it is decided to plaster gas-silicate concrete, then it is necessary to do this using only the appropriate materials for these works.
The construction of houses from gas-silicate blocks is one of the most promising areas in the field of private construction. In particular, gas-concrete blocks acquired great popularity, in the production of which special additives, causing abundant gas formation, are introduced into the composition of the solution. As a result, aerated concrete has a pronounced open porous structure, which causes its significant advantages over other materials for masonry walls.
However, a similar structure of aerated concrete brings a number of difficulties on the decoration of the erected walls. Here you need a special approach, both in the sequence of work and according to the materials used. In addition, the plaster of walls from aerated concrete indoor will depend on their external finishing planned.
What is the "capriciousness" of a alendeton in the decoration issues, and in which these problems can be solved - this publication is devoted to these issues.
Features aerated concrete
But on materials for work, you should walk in more detail.
- The open porous structure of the aerated concrete will not be limited to the shpatleeping of the walls - the thin layer simply will not hold onto such a surface. Therefore, even if the wall is posted with the highest accuracy and does not require special adjustments to its plane - it is still not to do without stucco. And they will have to "throw up a layer at least 5 mm on a gas-concrete wall.
- Such a layer will be susceptible to cracking and squeezing (adhesive features of a highly resistant structure are affected), if not enhanced by its reinforcing grid. If on other wall materials, the use of a reinforcing mesh is desirable, then in the case of aerated concrete, this condition should be considered as required. The grid is best - fiberglass, resistant to alkaline medium so that it is simply not dissolved in the thicketer of frozen plastering.
 The use of reinforcing fiberglass stacks - a prerequisite for high-quality plaster
 - Fetal walls are distinguished by high moisture absorption. As experienced malyars say, this material literally "drinks" water. It would seem that it is not bad for good adhesion, but it turns out just the opposite. Aerated concrete "sucks" moisture from applied, which causes its rapid dryness, cracking and sprinkling - in the case of gypsum compositions, and a violation of normal cement hydration, if plasters based on it are used. And in that, and in another case, the quality of the coating will be low, and the finish itself is extremely short-lived.
 It is important to find the "Balance of Humidity" correctly, otherwise the work will be poor quality
 On the other hand, excessive oversaturation of the aerated concrete water is also fraught with negative consequences. Yes, and this wall is very difficult - the pounce solution begins "crawling", the layer becomes a loose or inhomogeneous, etc.
Which exit?
- Special plaster mixes can be used for aerated concrete intended for interior finishing works. Their component composition, with proper shutdown, in accordance with the instruction, is fully optimized for the peculiarities of such a surface and even sometimes does not require pre-priming the surface. All this is mandatory indicated by the manufacturer in the instructions for applying the composition.
- The use of special primer deep penetration. Here, however, the balance is also important - the oversaturation of the aerated concipe impregnating compositions can lead to the opposite effect, since the surface absorption of the surface for applying plasters is still important.
And in that, and in another case, the professionals are not advised to immediately give a thick sketch - it is best to limit the minimum layer in which the reinforcing fiberglass mesh is taken. Such a certain amount is not required for a large amount of moisture, it is much easier with the effort to "sweat" into aerated concrete, and reinforcement will make it possible to create a solid foundation, without cracks. But after drying such a substrate, it will be safe to move on to the main plastering by lighthouses.
Video: Wizard Wizard Wizard Flower Wall
As already mentioned, the composition of the plastering mixture directly depends on whether the wall need to leave its high vapor-permeable properties, or, on the contrary, the penetration of moisture into the material will make it possible.
- In the first case, preference is often given to special plastering compositions on a plaster basis, which often involves light perlite sand. Usually, the instructions for the use of the composition it is indicated that it is combined with aerated concrete (gas-silicate) walls. A classic example of such mixes - plastering "Plaster" or "Best - Plastervel".

Manufacturers argue that it does not even require a reinforcing grid for applying such compositions. But in the case of aerated concrete, this moment is better not to ignore.
- Silicate plasters, on the basis, are very well suited for aerated concrete, especially in paramount parameters. However, such a wall decoration will significantly limit the owners in choosing the finishing coating, since silicate mixtures are incompatible with many other decorative compositions on an organic basis - acrylic, silicone, latex, etc.
- Especially for aerated concrete or similar surfaces, plaster on a cement-lime-based basis. Their composition is optimized for such surfaces that do not even require pre-priming before plastering. An example is the plaster "Baumit Handputz" or a mixture of a set of a whole "ensemble" of solutions specially designed for AeroStone aerated concrete.

The composition of such plasters includes cement, building lime, special light aggregates and plasticizing additives, finely phrase peeled sand. This coating has good vapor permeability, and can be used for both external and internal work on a gas concrete.
- If the owners of the houses have achieved the minimum vapor permeability of the walls from the inside, then they usually resort to the use of cement-sand plasters without inclusions of lime or dolomite crumb (flour). Naturally, the composition usually includes special plasticizing additives, suffering the adhesion of the created coating with a porous base.
All specialized mixtures for gas silicate surfaces have one common drawback - they are quite expensive, and with large volumes of work, such internal plastering of the walls will be poured into a fair amount. But this is only a preliminary alignment, excluding the finish finish! Is it easy to do it easier, apply more accessible mixtures or generally ordinary homemade plaster solutions, for example, on the basis of cement and sand?
It is possible, but only an experienced master that his long-term practice can determine the condition of the wall, and the need for its moisturizing or priming, and the need for its moisturizing or priming, and the exact component composition of the plastering, can be performed. And without the experience of such work, make a mistake on a gas-concrete surface - easier for a simple, and all work will be done by Nammark.
However, one can recommend one very interesting way to pre-prepare a gas silicate wall to further. If you fulfill everything in accordance with the recommendations, it will be possible to impose almost any plaster composition, without fear for the appearance of cracks, sliding the solution, its rapid dryness or, on the contrary, is excessive overwhelming wall.
How to qualitatively prepare an internal gas-concrete wall to shuttering
To work, it will take the usual, the most inexpensive of all those represented in the store, glue for ceramic tiles, fiberglass mesh, deep penetration soil (normal, type Ceresit CT 17). And the plaster can then be any composition on plaster, cement, cement-lime and the other basis. In particular, the familiar cement-sand mixture is completely suitable even in the ratio of 1: 5.
To determine the amount of plaster mixture to bring the wall in order is quite difficult, as it depends on the state of the surface, its evenness, the presence and depth of the level drops and vertically, and horizontally. But our calculator will help to determine the number of materials for the preparatory cycle.
It takes into account the conditions for the priming of the surface in two layers, and with the dilution of primer with water with initial application, and the creation of a preparatory reinforced adhesive layer with a thickness of 5 mm. Calculations will show the result with a 15% margin of "just in case" received from the finishing builders.
The calculation is carried out for rectangular surfaces, minus window and doorways.
 What is a hot water supply of an apartment building
 Water supply of an apartment building
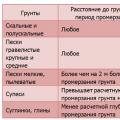 Calculation of the Load for the foundation Installed Electrical Instruments