Sayunas. Interior trim bath: options, choice of style and materials based on type. Video - Camping Ceilings
Sauna and Bath - a combination of words resembling a kinder surprise or two in one. There is only one difference.
People who are tired of their whining do not like, send them to the bath, and who like and pleasant are invited to the sauna. The share of truth in the joke is present, although it is difficult to disagree that the bath and the sauna belong to the healing agents, proven centuries, delivering true and unique pleasure to the soul and body.
Why became a popular and relevant construction and finishing of the sauna in private sites and even in the apartments of high-rise buildings? Why for many people who wish to acquire prepared buildings and viewing photos and video offers in print editions and on the Internet, the presence of a sauna or bath is a decisive factor in decision making.
The sauna can be equipped in any apartment - in Stalinke, Khrushchev and later buildings, not to mention its own home. The minimum required sauna area designed for two people is 1.5-2 m².
Measure your bathroom and make sure it can easily fit in a standard room. There are two alternatives so that the sauna finish in the house and apartment was produced by their own hands or team of specialists.
When building a new apartment or at home, it is possible to immediately decide on the place where the sauna will be. The complexity arises where the bathroom was already renovated in some distant years and the walls are lined with tiles.
It is not worth the upset because there is an instruction for performing work in a small room:
- We need naked concrete walls, so the tile and the old finish are removed completely.
- The floor of the sauna can be made board, but this option is more applicable in your own home. In the bathroom, it is preferable to lay it out of the tile.
ATTENTION: The floors from the tile are laid out before the construction or design of the walls before, and not after.
Estimation costs for a sauna set
The question always rests on the cost of construction, repair, alterations, restoration. Get a visual picture will allow a simple list of necessary materials to arrange a small sauna on an area of \u200b\u200b1.5x 2 m² if there is a large surface, then the calculations are not difficult to produce yourself.
So:
- The conversion of the sauna inside begins with the purchase of flame retardant or panel for shielding saunas, baths, fireplaces. The mount is made in close proximity to the fuel elements.
The stove refers to non-heat materials with a working range of temperatures from 80-150 ° C and the maximum temperature in 400ᵒs. When heated does not release toxic and harmful components, environmentally friendly components are used for production, to which fibrocement, lime filler reinforced by cellulose fiber.
The material is not susceptible to fungal diseases and mold. If the moisture does not fall down, the strength does not change, the size of the panel does not change, which allows you to install it.
The cost depends on the manufacturers and quality, it begins with 700 rubles. - The trim of the sauna and the bath is not without foil, its properties have no need to list, they are known to everyone, it will cost the sauna at 1150 rubles.
- Mineral wool refers to one of the cheapest materials - 1700 rubles.
- Heat resistant cable, primer and diffuser Another 1000 rubles.
- The most expensive articles of the estimates are electric furnaces from 14,000, lining 7000, and the purchase of a door of 7,000 rubles.
- The rest of the purchases - the lamp, the lamp, the bucket, thermometer, the hygrometer, the drip-lyrzhak will fit in 4000-5000 rubles
It is possible to produce simple mathematical calculations and determine the cost of a small sauna, which will fall out at 37000-4000 rubles, this is subject to independent work. Appeal to a specialized brigade of masters and the price will grow to the amount of payment for the work performed.
Bath sauna device
You can position the steam room in any closed room where dry and no drafts, in the apartment is a bathroom, in a private house it can be an extension or a separate built room.
So:
- Before the start of the main work on the arrangement of the sauna, the interior decoration, and to avoid fire hazardous situations, copper cable is laid.
- Fully processed walls offered disinfectants against fungus.
- The concrete walls and the ceiling mounted frame made of wooden rivers, which is the basis of the future sauna.
- The mineral wool is stacked on the frame, which performs the role of the insulation and on top covers foil, which serves as a reflector of heat.
- The ceiling and walls of the sauna are shedding with lining.
So briefly looks like a sauna structure algorithm.
What needs to be paid when performing these works:
- Sufficient frame height is 2 meters.
- Frame bars are well pressed against the wall, and their strapping on five levels is made.
- Marking is made on foil, where 5 horizontal lines are marked with chalk.
- The first line is located at a height of 3 cm from the floor, the second - 60 cm, the third 100 cm. From above, the fifth line of 5 cm from the ceiling is measured, and the fourth will be the middle between the third and fifth.
- The frame is attached through pre-made special holes, strictly along the lines through the insulation.
- The step between the holes 50-70 cm, the holes are stuck with wooden corks and dowel dowels.
It is known that the internal finish of the sauna cannot do without the heart of the room, electric oven. Installation of the furnace is made on the wall to save space.
ATTENTION: The furnace should be factory manufacture and must with automatic shutdown.
The sauna door always opens out and should not have any valves, no locks. It can be made of special tempered glass, looks very stylish and luxurious.
Dry steam in the sauna gives very low humidity, but moisture there is quite a lot, so the ventilation should be in order. The role of the supply opening can perform a slot under the door, but the exhaust hole is mounted in the far from the stove of the corner.
The lighting in the sauna is done in such a way that the moisture cannot penetrate the source of electricity. Luminaires should be resistant to high temperature and humidity, they are covered with special caps or lampshade, not on the ceiling, but are mounted into the walls. It is forbidden to install a lamp directly above the Kamenka.
It remains to place bath accessories and sauna in the apartment ready.
When building a bath, in addition to creating a solid construction and compliance with all the rules of fire safety, do not forget about the external and internal decoration of the room.
The thermoregulation of the room will depend on the quality of these works, and how long the required temperature can be saved. In our work, we use only natural materials: wood, stone and glass, which are not terrible high temperatures and increased humidity. The sauna finish occurs without the use of synthetic coatings (olifa, varnishes and paints), since when heated, they highlight hazardous substances and worsen the absorption of moisture into wood.
Approximate prices for a sauna finish
The price of the sauna finish, largely depends on what tree the pair of pair will be performed. An important factor affecting the cost of manufacturing a turnkey sauna is the choice of equipment. We work with such famous manufacturers like Harvia (Finland), Tylo (Sweden), as well as with equipment manufacturers for professional paired - EOS (Germany).
What materials we use
When performing this type of work, as a sauna finish, it is recommended to use a lip, aspen, alder, chestnut, etc.
One of the best options for price-quality is Lipa. It is possible to finish with a clapboard or block house. Light, nice shade, not intrusive fragrance, long service life makes the liquip of the most popular material when finishing the sauna.

The lining from alder is also a favorite option when finishing a steam room. Alder has a pleasant reddish tint.

Abash and Termoabash
The more original material is African Abash. Most often, this material is used for the manufacture of polls and backspores in the sauna, as it has a pleasant structure and does not "roll up" for a long time. To create an interesting, individual design, you can also use the thermoabash - it has a dark brown homogeneous color and creates the necessary contrast.

Canadian cedar
A more expensive option serves the Canadian cedar - the material has moisture resistance and is distinguished by a long service life. Color - from light brown to dark chocolate. Canadian cedar is an excellent material, the content of wood resins in cedar is minimal, and the unique structure of the wood will decorate any interior.
Products of coniferous origin are categorically not suitable as materials for decorating walls, because they excrete specific resins at a very large temperature. These substances can deliver many inconveniences and even lead to burns. Oak rocks are characterized by a more dense structure and are also not used in pairs, because they are heated at a large temperature and can harm the human skin.
Photo gallery saunas
Features of the walls and interior of the sauna
In order for the floor successfully combined with the walls, use the tile as a coating. It is convenient to maintain purity in the steam room with it, and the removable wooden lattice of the floor will allow walking along the wooden flooring and with time it is easily replaced. Also, the internal interior is complemented by lighting, which can be made in the form of geometric lamps or "starry sky". These elements contribute to relaxing and forming a pleasant relaxed atmosphere, which guarantees a positive attitude and relaxation after a hard day.


When the sauna is needed, with the choice of materials, many pay attention to their external characteristics. Products can have different color gamuts. Very harmoniously looks like lining of different shades, competently combined with each other. For example, light products from the linden in combination with a dark chocolate thermoabash look quite beautifully. Another successful solution is alder with elements of the Canadian cedar. It is also possible to apply special embossing on the lining or shelves, for example, a pattern in the form of bamboo, bricks, snake skin, etc. The sauna finish also provides for the use of Russian traditions and modern technologies. At the same time, very often designers use solutions that make a possible visual increase in the pair of steam room.
Get a high-quality finish of a sauna or bath is easy!
Of course, wood is considered an ideal option for paired room, after all it creates ideal conditions for the proper temperature and humidity, which provides high-quality care. Its insulating properties helps to hold the desired degree of the room and prevent heat yield. To do this, it is also necessary to organize the ceiling insulation, gender and double doors. The use of dried tree of valuable breeds guarantees a long operational period and trouble-free use.
We will provide the competent lining of the sauna walls, which will ensure the beautiful design of the room and the functioning of the internal structures.
Making the decoration of the sauna from the inside, it is necessary to use extremely natural materials. This moment is very important, since the allocation of harmful chemicals in the process of adopting procedures may cause harm to human health.
Even when using standard building materials, the decoration of the bath and sauna can be original and interesting as in the photo. All works do not require possession of special information and skills, so you can create an interior in the room yourself.
Selection of materials for registration
The perfect material for finishing the sauna is definitely a tree. Wood for premises should be high density, resistant to rotting processes, have a beautiful pattern. Experts do not advise the use of pine materials for these purposes, because when heated, they will be allocated to the resin in large quantities.
If you have a financial opportunity, it is desirable to give preference to the Canadian cedar, a barisandra or an African oak. Such wood for decoration of the sauna has a bare-catching aroma, has a beautiful view and pleasant shades.
More available at the cost of birch, ash, linden, alder and aspen. Especially in demand when finishing a bath with a linden hill with a flavor, since its surface is pleasant to the touch, it is still heated and has a porous structure, due to which it has the ability to adjust the level of humidity in the steam room. It is also necessary to finish the washer in the bath, which must be provided in advance.

As for birch or alder, their wood appreciates the healing properties, and ash for durability and the presence of a beautiful core cut.
If the sauna finishes are carried out, it is not necessary to use the same breed for the wing room cladding as for steam room. For this room, the lining of pine is quite suitable, since due to the resin contained in this wood, the material is not afraid of strong humidity, does not rot, long retains an attractive appearance. Similar qualities are characterized by spruce lining, so it also draws the room washing.

An important value is given to the quality of the wood used. Such finishing materials for the sauna must have a minimum number of bitch, be carefully dried, without dark spots and curvature, with a smooth and bright shade on the cut. The presence of gray is indicated about low product quality and inappropriate storage conditions.
Together with the tree in the construction process, other finishing materials for the bath and sauna are involved. Since the surfaces of the surfaces near the stove are exposed to high temperatures, they need cladding with a stone or heat-resistant tile. It is recommended to use it by laying out the walls of the soul, the floor and some areas in the wedroom compartment.

Since the tile floor covering is cold, rectangular or square wooden pallets are installed on it for comfort. The room is unusually and stylish if the internal finish of the sauna is made by a competent combination of ceramics, wood and stone.
Proper preparation of surfaces
Before the start of facing works, it is necessary to prepare walls, ceiling overlap and floor. They should be isolated from moisture ingress, insulate and make sure the strength. Wooden surfaces of the ceiling and walls need to be treated with penetrating primer with an antiseptic additive. If the sauna walls are lined with bricks or blocks, they are aligned with cement plaster.

In the process of finishing work, the following materials and tools will be needed:
- drill;
- electrolovik;
- toothed spatula;
- hammers (rubber and usual);
- screwdriver;
- building level;
- film for vaporizolation;
- insulation;
- heat-resistant tile;
- bar and racks;
- lining;
- glue composition for tiles;
- nails and selflessness.
Technology holding finishing
Finishing work in the sauna and the bath is step by step:
Facing outdoor surface. The finish should be started from the floor. As a rule, lay the clinker tiles, in which the surface does not slide even when wet. Glue is diluted, lay the tile and use a toothed spatula.
Facing begins to do from the corner located against the entrance doors in the steam room. A layer of heat-resistant glue is applied to the concrete base and aligned with his spatula. The first of the tiles is placed and pressed to the base. Between the wall and the edge of the product are placed plastic crosses.
Then they begin to lay the adjacent elements, inserting cross between them, and thus ensure the uniformity of the seams. In the process of mounting the tile, it is necessary to check the horizontal position of its location, with the presence of protruding fragments, use a rubber hammer. The surplus of the adhesive composition is cleaned with a dry cloth.

When the floor facing is complete, performing the seams, using special compositions that are applied to the spatula and then carefully rubbing the jacks between the elements. Excess means are removed. At the end of the work, the floor surface is wiped with a damp cloth. They give dry glue. During this time, you can make wooden lattices.
Arrangement of crate on the walls. When the saunol is performed from the inside, for the installation of vaporizolation and insulation, it is necessary to make a cutter from a bar with a cross section of 50x50 millimeters and nurtures it to the walls. If they are posted from blocks or bricks, then anchor bolts are used for attachment. The trim on the crate is fixed perpendicular to the location of the BRUSEV (more: ""). The distance between adjacent posts should be 50 centimeters.
Installation of thermal insulation. At the crate with the help of a stapler, the waterproofing membrane is fixed in such a way that it saves it slightly. Between the racks made from the bar are placed in one or two layers of the insulation, while the thickness of the material should not exceed this parameter at the racks. In the case of cracks and gaps, they are eliminated by mounting foam.

Then the last layer of vapor barrier film is placed. On the frame, it is fixed with brackets, observing a 10-centimeter science. Seams should be sealing scotch.
Testing the surface of the walls. At this stage, the conversion of the sauna depends on the personal preferences of its owners. One of the options is a complete lining of the walls with clapboard or wooden fragments. The second method is a combination of wood and tiles or facing a stone masonry furnace. You can also show a fantasy and create an original interior in the sauna (more detailed: ").
Before the start of finishing works, wooden elements are entering the room for acclimatization. First there are areas where the tile and wood will be located and only then they are engaged in the trim. Take wooden rails and pinch them perpendicular to the racks. Then with the help of self-tapping screws, the lining is fixed on them. The level check the location of the vertical slats.

In the room of the pair insert from the tile, experts advise only around the furnace, and in the washing department and in the pre-banner it is allowed to be facing any of the surfaces. In the presence of junctions between ceramic products and an extreme wooden element, you need to make them as smooth as possible and dense, for this, the gaps are sealed with mastic.
Finishing ceiling overlap. First, the beams on the ceiling are closed with a waterproofing film that the stapler brackets are fixed. The empty space between them is filled with thermal insulating material. Its thickness should not be greater than that of ceiling beams. The heat-displacement layer is carefully covered with a vapor insulation film or use foil, and the seams are sealed with adhesive tape.

Beams every 50 centimeters are stuffed with a 2-centimeter thickness rail. They record the finish finish, which is the lining.
Production of regiments and their subsequent installation
Important importance in the design of the sauna interior is removed. Special attention is paid to the shelves. As a rule, they are made of rectangular shape and installed in 2-3 levels. What they look can be seen in the photo. You can sow their boards from the linden as a skylight and leaving small gaps.
The shelves in the steam room are one of three ways:
- by type "coupe";
- stepwise;
- M-shaped.
In the first case, it is equipped with lower stationary and upper lifting shelves that fit to the wall. This method is ideal for saunas having a small area, since it saves a place in it. If necessary, the seat can be lifted and fixed near the wall in this position.

In the second embodiment, one of the walls are mounted three shelves of different widths. They are placed one above the other. The widest of them is placed at the bottom, while it will be the most cold.
With a g-shaped method, 2 shelves are mounted on both sides of the angle, and one of them is placed third.
All three options suggest standard regiments, but if you connect fantasy, the interior of the steam room can be made much more interesting. For example, a lighter material is used to cover the shelf, and the darker element is attached along the edge. The corners of the design can be rounded, and insert the lattice elements between the solid rows of the sheat.
When the construction and the sauna finish is performed with their own hands, you need to remember that there is a difficult work that will require significant spending time, strength and money. In order for the adoption of procedures in it delivered joy and soul, and the body, its internal decoration must be done in compliance with all technological processes.
The bustle of the densely populated city makes us forget how much useful, at least occasionally get into ,. However, not every pair private sector boasts aesthetics of the inner and appearance. And this is an important factor. It is unlikely to be able to relax in the soul and body in gray, sad building. Today, the conversation will go about the interior of the bath. We will understand which material is better to use for one or another room, consider the stages of the work that you need to produce. It makes sense to familiarize yourself with the photo of the bathrooms inside, which will be presented in today's article.
The inner trim of the bath begins with the floor. It is poured by a concrete tie, which subsequently laid lags, a roughing coating, and after a steeter, the first floors. The next step is the decoration of the walls. The ceiling is frozen last. But in order to fulfill finishing work, you should choose and purchase material, the assortment of which today is huge in the construction markets.
After completing the construction, the first thing must be thought out, which is performed from the inside. Although no one bothers and take the heat insulating layer of polyplex or other.

Materials used for steam finishing
Materials intended for such work are quite varied. Among them:
- lining;
- block house;
- imitation of timber;
- oriented chipboard (OSP).
If we talk about benefits, aesthetics and compare the complexity of the installation of various materials, then wins the lining on all articles. However, its cost, if you take quality products, quite high. Let's try to consider all the listed finishing materials. Only this can be understood, which one to give preference.

Lining: pluses and disadvantages of finishing material
The algorithm of work with the trap next. The guides are recorded on the wall - or the unintent fat board, with a step of 80-100 cm. Their location coincides with the planned direction of the lining.
Important! The lining is better to arrange vertically - it will not allow dripping moisture drops to linger in the connecting joints. If it is still decided to place the boards horizontally, then the spike of the compound is directed to the top, and the groove, respectively, down. It will not give moisture to get inside.
Fixing the guides, lay the layers of mineral wool between them (it is not necessary to break it) and the stereo vapor insulation material, whose seams are suture with the help of aluminum tape.

Good to know! When installing thermal insulation, special attention is paid to the corners. They are the "weak link" for drafts, cold from the street, and therefore heat leaks from the steam room.
We offer to familiarize yourself with the photo of the bathhouse inside with your own hands:
Nuances finishing baths with lining inside with their own hands
Like any work, the trimming of the bathroom has its own nuances. The main of them can be called fastening the finishing material to the crate. To do this, you can use nails (better "German" having a corrugated surface). However, it is optimal to use.
The microclimate in the steam room periodically changes, which leads to the expansion and drying of the wood. This will eventually lead to the fact that nails will stop performing their function - keep the lining on the crate. In this sense, Screw Screw is more reliable.
Important! Before starting finishing work, you need to handle the bracket with antiseptic and flame retardant and wait for complete drying. This processing is needed only once.

Block House: What is this material and how to work with it
Block House (from English Block House) is a kind of lining (according to the method of connecting parts). However, the appearance of the block house is different. The finished wall looks as if laid out of logs. The material is used for facades and interior finishing works.
Installation of block house does not differ from the lining, but there is one nuance in its application. The coating requires the treatment with antiseptics and antipirens no less than once in 2-3 years.
Important! When choosing such a finishing material, pay attention to the tree of the tree, from which the blockochus is made. Only deciduous breeds will suit the inner covering of the bath (Lipa is the best option). For the pre-banner, cheaper ash or white acacia wood is chosen. The outer finish is performed by coniferous rocks of trees - pine or spruce (the use of aspen is allowed).
The photo presented below the bath outside and inside will allow you to draw up the overall concept of the future project:
Imitation of timber: features, dignity, disadvantages
Again the wall cladding technology is similar to clapboard. However, the panels, imitate the timber, wider. In addition, they have a serious advantage - with drops of temperature, humidity, they do not crack. This is achieved by the grooves on the inside, serving to remove the voltage of wood.
The selection of the material is subject to the same rules as in the case of the choice of block house. Speaking of minuses, we note only unfair manufacturers, disorders of drying technology. In addition to the "human factor", the imitation of the timber flaws has no shortcomings. The average service life of such a finishing material is 10-20 years.
Helpful information! If there is no desire, time or ability to wash the bath inside yourself, you can contact professionals. But such services can punch a significant breach in the family budget. According to the most modest calculations, the cost of finishing 1 m 2 will be 2000-2500 rubles.

Laying tile - perform yourself or contact professionals?
Tile is used to finish the floor. It is less used for walls. Inexperienced homemade masters fear that they independently do this work, but this is a delusion. In order to dispel doubts, we suggest you familiarize yourself with the step-by-step instructions for laying the tile on the example of sexual coating of the kitchen or hallway. The work algorithm is identical. The difference is only as part of the tiled glue - for the bath you need to choose a composition that is not afraid of high temperatures.
Article on the topic:
Photo examples of layout options, advantages and disadvantages of coating, technical characteristics and sizes of tile, selection criteria, styling subtlety, recommendations of specialists - read in publications.
Some nuances are in choosing tiles. It should be paid attention to the surface - the glazed here is not suitable, the surface must be not smooth, preventing slipping. In general, flooring in a steam room requires a special approach. Let's try to disassemble it in more detail.

Rules for laying flooring of the washer or steam room
The first thing to pay attention to is a screed. It is performed in the 3 stages. First poured the first layer. After complete drying, the thermal insulation, after which the finishing layer is poured. In this case, the flooring should be higher than the composite concrete by 5-20 cm.
When installing wooden floors, the "occurring" option is often used when water freely seeps through the slots in the floor. It will be necessary to install from the outside. This method of drainage is easier and does not require high time, forces and means.

The second option is not flowing, hermetic floors. It is more often used when finishing the floor. In this case, the slope of the floor is done in a certain direction, and at the bottom point the ladder is mounted - the hole for the drain. Under the floor from the ladder there is a sewer or.
However, in addition to drainage from the flooring in the bath there is another nuance - the use of tile requires heating. Ceramics - cold material. Given the fact that the temperature is always lower than top, you should consider the system.

Warm floor mounting options in the bath
Warm floor systems are quite useful not only in the apartment, but also in the bath. The main task here is the right choice of the species. They can be:
- electrical (using a warm cable);
- water - using a coolant heated with a boiler;
- - A relatively new type of heating with infrared radiation.
If we talk about wooden floors, then the optimal (albeit rather labor) will be the use of water heating. The tiled floor covering is more compatible with electrical warm floors using the cable. Installation of infraredes in the systems "Warm floor" in the bath is rarely applied due to high cost. Although electricity savings in such a type of devices are significant, in comparison with the cord.

Bath interior options inside: photos of various rooms
As you know, the bath can be divided into several rooms, each of which is drawn up, based on the preferences of the wizard. It can be one style, and maybe each of the rooms will be framed in its own way. Now consider in detail how the interior of the bath can be performed with your own hands, depending on the purpose of the premises. But first you should familiarize yourself with the ideas of domestic masters. Below are the design projects of baths created not by professionals, but by ordinary people:
Design Parling in Ban: Multiple Photo Examples
Pair - Ban Heart. It should be light and cozy. Here, like in any other room, it takes special attention to pay the choice of finishing material. It must carry the drops of temperature, humidity, not to swell from steam. At the same time, the appearance is of great importance. For example, if we separate the pair inside the wood coniferous rocks (pine or spruce), then after a few wets, the walls will darken, get gray, unsightly shade. Moreover, no matter what protective compositions they were processed. We offer to familiarize yourself with the photo of the trim of the bathrooms inside. Perhaps they will pump the reader for some thoughts:
Interior Waste in Ban: Features
The washing in the bath is a room, on the walls of which splashes or even jet of water constantly fall, and therefore it is necessary to take care of the choice of material with regard to this nuance. If we are talking about wood, then a larch or linden is used - these varieties are not better suited for such operating conditions. However, the best option will be the flooring of the floor and walls with tiles. In order to be clearer, how the washing finish is performed, pay attention to the frequency of finished premises of this type:
Best photos of the bathrooms inside: shower room or cabin
Today, homemade masters prefer the shower cabins, which is not surprising. They can be installed in the washing room, the installation is easy, there will be no such devices such devices. The finish is made in the style of waters or not at all, if the shower cabin is purchased in the store, in factory execution. Below you can see how the shower may look in the interior:
Restroom in Ban - Interior Design Design
Such rooms are designed to relax from hot steam. The temperature in them is maintained, which contributes to good thermal insulation of the steam room and the location between it and the pre-equipment of the washer.
The decoration of the rest room provides for the use of various materials - harsh requirements, as in the steam room or washer finished, it is not presented to them, however, an aesthetic appearance is even more important here. Tones are used darker. The perfect wood for finishing the pre-banner will be a bog oak. For example, you can pay attention to the photo design photos, the finish of which was performed by domestic masters:
And a few more photos of the interiors of the bath and recreation rooms:

Looking at these photos of the inner design of a bath with recreation rooms, hardly believes that the finish was performed by masters without any experience and education of the designer, but this is a fact.
Decorating the locker room in the bath and its features
The locker room is the most dry room, which means that the finishing materials of high demands are not presented. Even the use of pine or ate is allowed - after all, the microclimate here will be similar to the residential premises.
Important information! If wood coniferous wood is chosen for trimming, the wood of coniferous rocks is chosen, the outer coating of the lining, block house or imitation of the bar should be born. The defense is needed here not so much for wood as for clothes that will come into contact with the walls. Conifer boards can highlight drops of resin, which are quite problematic to cleaned from things. Below are the photo of the trim of the sauna inside, namely ideas for the locker room in the bath.
Outdoor finish with your own hands: Photos of beautiful bath
The trim of the facade of the bath is no less important. In addition to the aesthetic, it performs both protective functions. Consider examples of the design of the appearance of baths in the photo examples:
Conclusion
Summarizing the above information, we note that with the right and thoughtful approach to the trim, you can do on our own, without the involvement of professional masters. Additional savings are achieved by a thoughtful approach to the selection of material.
If all actions are performed in compliance with non-hard rules, the steam room will last for many years, will delight aesthetic appearance for a relatively small cost. But the main thing is nothing inclusive feeling of relaxation that gives a rustic bath drilled by birch lanes.
And finally, we suggest view a cognitive video on the theme of the insulation of the ceiling of the bath.
Build a box of a bath is just the beginning of a complex of work, after which, from the usual premises, it will be all a favorite facility. Internal trim Ban and Sauna can create exactly the microclimate, which will heal, help produce a "hormone of joy", will give the body to recover after a hard work week. Therefore, it should be treated with all thoroughness.
In addition to the steer, attention should be paid to the restroom, where you have to carry out the bulk of the time. The finish should create a calm, peaceful atmosphere, while the floor, the ceiling and walls should be harmonized with each other.
Choose materials
With natural wood, any other finishing materials for the bath and sauna can compete. You can use not only lining, but also an ordinary board, creating an original interior to it.

For example, lime boards are blown up on the width of the log, and it is not necessary to overtake them from the sides, and use no more than 10 mm thick. Then they stuff on the wall with a small overlapping of each other.
As a result, you will succeed in an inexpensive, but effective facing.
- If it is not possible to purchase expensive and high-quality materials, then Pine remains. It is available, and the price fully corresponds to its quality. However, it is necessary to remember that it highlights the resin when heated, which can cause burns in the steam room.
Her evaporation is also harmful to health. When choosing, pay attention to the presence of resin pockets in the boards.

- If you decide not to save on - larch and linden. How much time did not pass, the latter will always look like a new, does not darken and does not crack. In addition, the fragrance of the material is positive effect on human health.
The larch can withstand the appearance of mold and fungi, is not susceptible to rotting and operated for a very long time. But for the pre-banner, then you can choose a pine or cheaper materials for finishing.
Tip: If you want to separate the bath with a more interesting material, then take the wood of Abashi.
The main advantage is low thermal conductivity and ability to adapt to the temperature of the human body.
Boards of it will never be hot in the steam room, so do not worry about possible burns.

Wall decoration and ceiling
Interior decoration of the bath and sauna has a general structure of installation:
- Perform a laminate from a wooden bar with a cross section of 50x50 mm or 100x100 mm, i.e. It must be the same thickness of the insulation, namely mineral wad. Before installing it on the walls and the ceiling, you should cover them with vapor barrier so that not a wet insulation. In concrete, brick and stone walls fasteners are made by self-drawers and dowels, in wooden - on the self-tapping screw.

- Be sure to insulate the steam room and the bath as a whole so that the heat remains in the room. It is best for this mineral wool insulation, since it has zero flammability and low thermal conductivity. Locked one or two layers into the crate, depending on the territorial location of the object. On top of the insulation, a vapor insulation film and a fooled thermal insulation foil inside the steam wage.

- The last stage is the interior decoration of the bath and sauna selected material. In detail how to attach wooden lining to the crate is written on our website. (See also Article.)
Tip: You can impregnate the boards with special means to increase their service life, you do not need to do this in the steam room.
The sauna or bath does not differ from the walls of the walls. One should only consider that all warmth in the steam room will be concentrated near him, so it should be insulated much more reliable.
Do not install wood or fir wood on the ceiling, otherwise, after a set of temperature, resin will begin to drip the resin, delivering large trouble with steambags.
Floor manufacture
Most often, the floor in the sauna is lined with ceramic tiles, while choosing non-slip options. Today, such special types can be found in almost all construction stores.
The material is very durable, which is its main dignity. It is possible to use ceramic tiles to finish the shower part of the bath. Instructions for its laying on the floor of the concrete are on our website.
Tip: For better protection from falling on a wet tile, install a wooden crate to the floor, which will almost save you from such trouble.
The rest room is better to give preference to wood, in particular larch. It is durable, does not rot, but for service life can fully compare with tiles. However, the price of the material is quite high.

Perform the floor finish after laying the heat insulating layer on it. Usually apply for this clay, falling asleep between wooden lags, and topping the finishing floor from above. In a concrete base, the insulation layer place between the layers of concrete, and put the tile on top.
Arrangement
Furniture in the bath should also be special, better if it is from a tree, completing the overall interior. For the pair shelves and their backs should not be covered with some kind of compositions, and even more paint. Try to use a lipa or other similar material, the same Abashi, which will not be injured with a burn burn.
A good solution will be placed in the resting room of wooden Nara around the perimeter, here you can use the usual pine, and between them the table.
Output
The decoration of the bath or sauna is the necessary stage of construction, which actually creates a steam room, a washing and rest room. Use for walls and ceiling is better suitable for the room wood, but for the floor tile or larch. In the video presented in this article, you will find additional information on this topic.
 What is a hot water supply of an apartment building
 Water supply of an apartment building
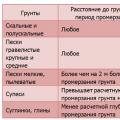 Calculation of the Load for the foundation Installed Electrical Instruments