How to turn off the tap. How to turn off the water yourself? Opened it completely
Pancake faced a problem - to change the taps in the kitchen, bathroom and toilet for new ones. I decided to do "as usual" - go down to the basement and turn off the water on the risers, unfortunately it did not work out - not a single tap holds. I call the housing department - they say that we will not change the cranes, and you have no right to shut them off in principle - so forget, it's useless to argue, I say that you have to fulfill your duties (keep the cranes in working order) and then download the rights whoever does what - she didn't care, had no right to walk ... in general, only paid, 500 rubles for a hot riser and 250 for a cold riser, for four risers - 1500 comes out, there is nothing to do for a campaign - you have to pay, but then I found instructions on replacing taps without shutting off, that's actually the question - is it worth trying to change the taps without turning off the water?
And somebody changed the valves on both risers (hot and cold water) without turning off the water
on the risers? Probably no one but me. And I will teach you how to do it yourself alone.
Initial data:
We have two risers of cold and hot water, the pressure in the pipes is about 7 atmospheres.
Task:
It is necessary to replace both valves with new ones, without turning off the water supply in the risers, without help
hack locksmiths who charge grandmothers for shutting down the riser.
What is necessary:and the absolute confidence that you will succeed.
- Tool - two adjustable wrenches, one "gripping" the pipe.
- Valves, better imported full bore, with a 90 degree rotation handle.
- Fum tape, or tow.
- Two squeegees or threaded pipes 10-15 cm long.
- A water inlet hose from a washing machine, or better a hose from a vacuum cleaner, or a piece of garden hose.
- Load, it must be tied to the end of the hose, it is better if it is a metal bar.
- Bucket.
- A stool, or a small table.
- Winter gloves, or leather mittens for a hot stand.
- Ability to work with a tool, strong hands, determination, ingenuity, nerves of iron,
If you do not have any of this, it is better not to take it - you will flood your neighbors.
Mobile phone, and the phone number of the emergency service or your ZHEK,
but this is just to be on the safe side.
It is advisable to have an assistant.
The stand is usually located in the toilet, we put a stool there, and lay out the tool.
We put the bucket under the valve.
Things to check:
The full-bore valve must have a washer-gasket, it must sit there deafly, i.e. tight,
so as not to jump out.
The pipe from the vacuum cleaner should not be clogged with a dust plug, rinse it in advance.
The thread on the valve must be full, and appropriate for both the diameter and the pitch, make sure of this in advance.
The valve is serviceable, new.
There should be no blockage in the toilet - the water runs out.
Process:If the jet was beating sideways, then you have 1-2 liters of water on the floor. If the stream hit down - into the bucket, then zero.
- We release the valve from the squeegee (we disengage the system).
- We take a new valve and tightly screw the pipe onto it, OPEN THE VALVE, this is the most important thing.
- Screw the second pipe into the old valve.
- We take the adjustable wrenches and grabbing the pipe going to the riser and holding it (so as not to tear it off) we pull the valve off its place.
And we begin to screw it slowly and carefully. After making one and a half turns, we clean the old thread and start
wind the fum tape in the direction "along the thread", and not against the grain, otherwise when you screw on the new valve,
it will "ripple".- Now we take a pipe from a vacuum cleaner or wash. machines we put it on the pipe screwed onto the old valve.
- We lower the other end WITH THE LOAD into the toilet. Or your assistant is holding him there.
- We open the old valve to the full. The water leaves with a noise.
- We continue to unscrew the old valve, cleaning the threads and winding up the fum tape.
- When the first splashes appear from under the thread, it means there are a couple of turns left and the valve will soon fly off.
Now complete composure. You take a new valve with a pipe in your hand, and you continue to screw the old one, the water goes into the toilet.- Now the water is gurgling, and ... bam! The valve fell, or was pushed away by the pressure of water, water hits the bucket, or into the wall.
The riser is open! Throw out the old valve from the pipe of the vacuum cleaner and instantly insert a new one there (pipe into pipe).
And then with force you put the riser to the pipe and screw it onto it.
This should be done as quickly as possible. Water went back into the pipe from the vacuum cleaner.
Having hooked on the thread, screw it on, screw it on, after four turns you can close the valve, it will not fly off.- Then tighten the valve with an adjustable wrench.
Everything, you won.- Wrap up the squeegee, restore the system.
Now some lyrics.
A hot riser must be done with gloves, you will get burned if the water is very hot.
I cheated, - I did at night, she was in a stand when everyone was asleep, and I did it with my bare hands.
But when screwing on the old valve, he did not let the water in at all, so as not to let out warm water and boiling water did not go after it.
You will have time to screw it up while it comes out warm.
The only unpleasant thing is that the old valve flies off in the closed position, a fountain of splashes turns out,
and the abrupt transition from silence to bronze gun is somewhat uncomfortable. Purely psychologically.
The main thing is not to get confused, and to do everything exactly according to plan.
Let the fountain beat for a second or two, but you act clearly as it is written.
Most importantly, the new valve must be open so that water can flow freely through it into the toilet.
You do not need any plug, it will not help, you will never tighten it, the water pressure is 7 atm. you won't let
bring it closer to the pipe than half a centimeter, and a closed tap too, unless you are a champion in armwrestling.
If you have a long garden hose, you can throw it out the window and water the yard while you screw on the old valve.
Even boiling water flying from above will cool down and will not burn anyone.
Convenient to change and with two hoses, as soon as the old valve goes off, you drop the first hose and grab
the second with a squeegee already inserted into it with a new valve, or already hold it ready in your hand.
The load is required, otherwise your pipe from the washing machine due to the pressure of water will simply fly around the toilet around you, the pipe from the vacuum cleaner is heavier. The first time I did it in two stages, the water gushed down the pipe into the toilet, and I even managed to smoke and collect my thoughts on how to proceed clearly. Well, and that the valve had to be opened, I figured out along the way after several unsuccessful attempts to pull it onto the thread.
Four valves on my account. more than two liters did not fill the floor, I have horizontal pipes. When I changed the third valve, I even corrected the thread on the riser pipe with a die with a knob,
though I had an assistant who tightly pressed a pipe with a nozzle to drain the water to the die.
If you prepare well, think over everything, take into account the specific conditions of the condition and position of the riser,
you can even practice on the suburban water supply system, then pouring over the neighbors is very hard to try.The devil is not so terrible as he is painted ...
What to do if the ball valve does not close? Many do not know that the ball valve must be turned at least once a month as follows - shut off to the end by 90 ° in one direction and to the end by 90 ° in the other. If the handle is parallel to the tap, the tap is open; if it is perpendicular, the tap is closed.
This simple operation - opening and closing the valve - will extend the life of the valve. If this is not done, then after about 5-7 years the cold water tap may overgrow with stalactites and the ball will simply jam - it will be impossible to shut it off. If you are faced with a similar situation, and your tap does not turn off, you can try to turn off such a tap using a simple operation.
The tap does not close
There are times when the crane does not move at all. In this case, many people take pliers and try to turn the handle with pliers. Unfortunately, this almost always ends with the butterfly just breaking off, so we don't recommend this method - the handle is usually made of either silumin or aluminum, and in any case it breaks very easily. You need to unscrew the nut and remove the butterfly.


Some valves have a compression nut to hold the gland down. If the stem does not move at all, unscrew the oil seal a little.

After you release it, the PTFE oil seal will unclench a little. After that, use a suitable wrench to grip this stem:

You can do this with pliers, but you can crush the stem with pliers. With the key, you perform this operation a little bit, very carefully. In this case, there is no need to rush anywhere, gradually increase the amplitude, otherwise you will break either the screwdriver or the ball. There is a screwdriver inside the stem at the end, which fits into the groove on the ball, and if you turn the stem too sharply, you will break and crush either the ball or the stem. Both will lead to the fact that the crane will have to be changed.
Broken crane

Too harsh movement has caused the handle at the tap to move and the ball stays in place. We disassemble the crane - the ball just cracked.

In most cases, if the crane is reinforced or in a thick body, this operation will revive the crane, which will work for a long time. How long such an operation can take - it all depends on the degree of jamming. It can take up to 10 minutes - as a rule, there is no more. If a drop of water has flowed out - it's okay, it's just that the stock is unclenched. Tighten the nut, the PTFE gasket will shrink - and everything will be all right.

In order to make sure that the valve is 100% closed, we put the butterfly back and see that it touches the ball valve until it stops.

If this does not happen, stir the crane further.

We tighten this nut - the oil seal:

After tightening the gland, wipe the tap dry with a paper towel or toilet paper and check for leaks. After that, we put on the handle and tighten the nut to the end, making sure that the butterfly touches the stops when opening and closing.

If your valve does not have a gland, do the same without the nut. In the event of a leak, the valve will have to be changed. Ball valves flow only in this position:

If the valve is fully open or fully closed, it will not leak. We revived the crane - it works well.
Thick and thin taps
As you can see, the operation is not very difficult, and almost anyone can handle it. The only thing I would like to warn against: if you have a reinforced crane - the body of the crane is thick, then you can easily try what we recommend.

If the valve body looks very thin, it is best not to do this operation, because the valve body may simply break.

The faucet may break, not because it is thin, but because it is made of something incomprehensible - such as silumin. For such cranes, it is better not to do such operations. If the faucet is thin, turn off the water somewhere before the faucet and change it without trying to recover. If this is a riser valve, you will have to call the housing office and ask them to shut off the riser or change the valve.
All rights to the video belong to: Good-natured plumber
Even the highest quality plumbing breaks down after a while. However, not everyone is able to independently solve the problem and fix a leaking tap. Do not postpone repairs for a long time. After all, a leak increases water consumption, spoils the appearance of plumbing with ugly smudges and traces of rust. You can fix the faucet yourself. What is required for this and how to carry out the repair?
Plumbing preparation
If the tap is leaking, you can fix it yourself. First, you need to prepare everything. If the packaging from the mixer has been preserved, then it is worth finding it. As a rule, it will contain detailed instructions describing the structure of the accessory and some recommendations for its repair. In addition, the package may contain tools needed to repair the crane.
Before starting repairs, turn off the water. To do this, close the valve. In this case, it is necessary to turn off the supply of not only cold, but also hot water. You will need a deep container, such as a bowl, to collect the liquid. Have dry cloths or sponges handy during repairs to wipe away splashes.
What is required for repair
After the preparatory work, you can start troubleshooting the mixer. If a closed tap is leaking, then special tools will be required to repair it. They need to be prepared in advance. To troubleshoot you will need:
- Flat screwdriver.
- Crosshead screwdriver.
- Replacement part.
- or flax.
- Soft material.
- Dry rags.
- Deep capacity.
This simple set of tools is usually enough to fix a leak. If there is no time to run after new pads, then they can be made of leather or rubber. Typically, the valve leaks due to wear on this part. A soft material is required to protect the sink from damage. After all, the tool can slip out of your hands. As a result, ceramic products may break, and enamel will crack on metal ones.

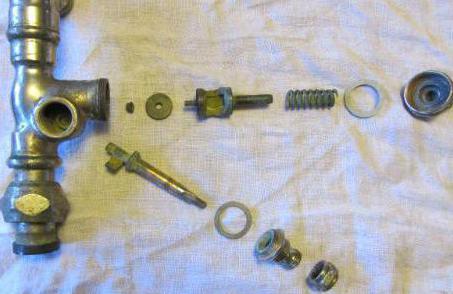
Two-valve valve: replacing the gasket
Why is the tap leaking? Most often, these accessories wear out the liner or gasket. To replace it, you need:
- Unscrew the valve body. To do this, the part must be turned counterclockwise.
- The damaged gasket can now be removed.
- A new part should be made from a piece of thick leather or rubber. A worn gasket should be taken as a sample.
- The new part must be carefully installed in place of the old one.
- It is worth winding a little sealing tape around the stop edge. You can use flax.
- Finally, it is worth replacing the valve body. To do this, the part must be rotated clockwise.
- The installed valve must be tightened well. You can use a wrench for this.
If the valve has been leaking for a long time and a quick replacement is required, then a new gasket can be purchased from a specialized store. This will save time. As for the homemade part, it is more suitable for short-term repair of a breakdown.

How to replace the oil seal insert
The two-valve valve leaks for several reasons: a worn-out gasket or wear of the gland seal insert. If necessary, both parts can be replaced by yourself. Wearing the packing gland can be recognized by the flowing water between the valve stem and the packing nut. To fix a breakdown, you must:
- Unscrew the gland nut itself. This can be done using a screwdriver with an appropriate tip.
- It is worth making a new liner from a sealing fluoroplastic tape based on the model of the old one.
- The worn part must be carefully removed.
- The new liner should be wound around the valve stem.
- Finally, tighten the nut.
If everything is done correctly, the flow will stop. This will make the valve turn more smoothly.

How to replace the shower hose gasket
Often, a leak appears in the place where the shower hose and mixer are connected. The main reason for this failure is the wear of the O-ring. This part can be easily replaced. For this it is worth:
- Disconnect the shower hose from the mixer using an adjustable wrench. Everything must be done very carefully so as not to damage the thread. Otherwise, the hose itself will need to be replaced.
- The worn part can now be removed.
- Replace the old O-ring with a new one.
- In conclusion, it remains to screw the shower hose into place, acting carefully and without pinching it.
To eliminate such a leak, experts recommend using a silicone O-ring. Parts made of rubber are short-lived and wear out quickly.
If, when switching the water flow to the shower hose, everything flows smoothly, then the shut-off element must be replaced. This part is called "axle-box crane". The shut-off element is located in the mixer handle. You can buy a crane box in a specialized store.
The main causes of failure of a single-lever ball valve
If the tap is leaking, then it is necessary to fix the problem quickly and efficiently. Otherwise, water can cause more destruction and permanently ruin the plumbing. Single-lever ball-type products may become unusable:
- Due to wear on the gasket.
- Chips and cracks on the body, which have arisen as a result of mechanical damage.
- Rusted aerator.
- Accumulation of large amounts of dirt.
- Blockage between ball and seats.
A defect on the body can be repaired by applying cold welding or sealant. However, this is only a temporary measure. After some time, a complete replacement of the structure will be required.
If the reason lies in a rusted aerator, then it should be removed and then cleaned. This can be done with an old toothbrush. It is worth noting that after cleaning, the water pressure will become stronger.
If the ball valve is broken
A ball valve has a more complex structure and differs from a two-valve one. Most often, such products break down due to dirt accumulated inside the case. It is she who disrupts the operation of the mixer. If water flows from the tap, then it must be disassembled, well cleaned and reassembled. This requires:

Problems with a new crane
What to do if the tap is leaking? How to fix a new mixer? As a rule, such products cannot be repaired. The main reason for their occurrence is a factory defect. For troubleshooting, dismantle the new mixer and take it back to the store. You are obliged to replace the damaged product. The main thing is not to throw away the receipt and documents before the first sample of the mixer. Only a professional plumber can repair a crane that has a factory defect at home.
Is it possible to avoid breakage
If desired, the mixer in the bath or in the kitchen can be repaired by yourself. This will save you a decent amount. However, repairs do not always allow you to fully restore the functions of the crane. In most cases, a complete one is required. In order to avoid frequent breakdowns in the future, you should carefully consider the choice of an accessory. Consider:

In conclusion
A running tap in a bathroom or kitchen is unpleasant. Constantly dripping water irritates and spoils the appearance of the plumbing. You can fix the problem yourself. The main thing is to clearly understand the structure of the structure and have the necessary tools at hand. The repair of the product also depends on its type. Most often, ball and two-valve mixers fail.
Probably, there is no such person who at least once in his life had to deal with a crane breakdown. If you decide to fix the mixer yourself, then before replacing the faucet, you need to find out the reason for its breakdown.
What are the reasons, how to fix them, and how much it costs to change the faucet - you will find out in our article.
There may be several of them:
1) 2) This valve may need to be replaced 3) 4) 5) 6)You need to know what kind of crane you have installed. Then it will be easier for you to change the faucet in the kitchen or, for example, in the bathroom.
 Replacing the faucet in the kitchen
 Crane device - general characteristics
The tap (aka mixer) is designed to adjust the water supply to the required temperature. The required tap water temperature is achieved by mixing cold and hot water. There are several common types of cranes:
1. Valve valve 2.
  Lever faucet
 The device of a crane with two valves is quite simple, which consists of:
- Main building,
- Two crane boxes,
- Outpouring,
- Two valves.
The valves are located on both sides of the valve and are screwed into special holes. These valves regulate the height of the crane-axle box. The latter, with the help of a rubber gasket at the end, opens and closes cold and hot water through special holes inside the tap.
A crane with one lever can be of the following types:
1) Ball valve in bathroom 2)
  Ceramic faucet in the process of disassembly
 How to change the faucet in the bathroom or in the kitchen - with valves
Let's say you are experiencing damage. It doesn't matter if you need to change both the kitchen faucet and the bathroom faucet - you need to start repairing by shutting off the water. Your actions should be as follows:
1. Replacing the valve 2.
 - Remove the valve and unscrew the corresponding valve-axle.
- Change the gaskets and seal the threads with fum tape.
- Screw the valve-axle into place carefully and all the way.
Important!
If the crane box becomes unusable, replace it
How to change the crane box?
For this:
 This is how the crane-axle box is replaced.
 - Turn off the water and remove or unscrew the button (depending on which model).
- Remove the screw. If it is very stuck, then lubricate with machine oil.
- Unscrew the valve-axle counterclockwise.
- Install the gasket.
- Install the crane box back.
If you have a question about how to change the ceramic valve box, then this is also done according to the instructions described above.
 Replacing the ceramic faucet (mixer)
 How to change the crane-axle box, the video instruction can be found here:
If water flows from the water supply valve
- Check how tightly the tap-box is fixed to the mixer. If necessary, screw it up.
- If everything is normal, unscrew the crane-axle box. Seal the threads with fum tape and screw the valve box back into place.
How to fix a tap leak? at your disposal on our website
 Replacing the gasket in mixers
 If the tap leaks at the spout fixing point
- Unscrew the spout holder.
- Change the gasket.
- Reinstall the spout carefully.
If the tap leaks in the place where the hoses are fixed to the mixer
Check the integrity of the gaskets. If necessary, replace them, as well as the hoses.
If the faucet leaks at the point of attachment to the sink
Replace the gasket or fit the valve onto silicone.
If the crane itself is damaged
Then it must also be replaced
1) Close the hot and cold water valves.
2) Remove the flexible hoses from the valves with which the tap is attached to them.
 Removing flexible hoses
 3) Unscrew the large nuts that secure the tap.
4) Carefully remove the old tap using an adjustable wrench.
5) Thoroughly clean the area where the old product used to be and install a new tap. But before that, attach new hoses to it.
6) Tighten the nuts on the underside of the sink.
 Tightening the nuts
 7) Connect the hoses to the valves and secure them.
8) Turn on the water and check if the tap is leaking now. Tighten the nuts again if necessary.
 Checking the valve for leaks
 So, now you know how to change the faucet in the sink with your own hands. This does not require much effort. Clearly how to change the tap, the video instruction can be viewed here:
In addition, on how to change the faucet in the bathroom, a video with detailed instructions can be viewed here:
How to replace a valve with a lever?
If a faucet with a lever began to leak in the place where the hoses were fixed to the mixer or attached to the sink, then in these cases the instructions for replacing it are no different from the above.
 Replacing the lever valve
 How to change the ball valve?
If the tap leaks from the spout when the water supply lever is turned off or is pouring from under it:
 Do-it-yourself ball valve replacement
 - Disassemble the tap using a screwdriver or an Allen key into its component parts, which are then cleaned of lime deposits.
- If the gaskets are worn out, replace them, having previously treated them with silicone grease.
- Reassemble the tap in reverse order.
How to change a ceramic faucet?
- Disassemble the tap.
- Remove the ceramic cartridge and replace it with a new one.
- If the integrity of the crane is damaged, then replace it with a new one.
How to change a tap on a riser with water shutoff?

- Shut off the riser water supply.
- Drain water from the piping system. Having previously obtained the consent of the management company.
- Wrap tape with a sealing agent or fum tape on the tap threads.
Important!
Wrap in the direction of the tap on the pipe. - Screw the tap onto the pipe. If it twists easily, then add more fum tapes, but don't overdo it! The product should be twisted with some effort.
How to change the tap without shutting off the water?
- In a high-rise building (flooding of neighbors or basement is possible),
- On the heating riser
- And hot water.
So, the order of work is as follows:
1) Prepare buckets, a few rags and ask someone to help you. One cannot cope here.
2) On the new valve, tighten the threads and open it.
 Sealing the threads on the tap: stages
 3) Unscrew the broken tap.
4) Run water through a new tap.
5) Tighten the tap about 2 turns.
6) Turn off the new tap and screw it on completely.
How much does it cost to change a tap?
The cost of replacing a crane directly depends on its type.
If you decide to entrust the plumber to change the faucet in the bathroom, the price "does not bite" - 700-1,500 rubles. And if you want to change the faucet in the kitchen. The price is reasonable - from 800 rubles. up to 2 thousand rubles.
If we talk about plumbing, then from the technical point of view, everything should be clear. But in practice, it usually depends more and more on the situation in which you have to work. Everyone knows that when working with plumbing, first of all, you need to turn off the water and only after that do what needs to be done. But what if this cannot be done, how to change the pressure tap? Let's talk about this.
The basics
First of all, do not try to do this in a multi-storey building, especially on its upper floors. The same goes for heating with hot water - not only can there be burns, but hot water can cause more serious damage to your repair, and in the worst case, not only to yours.

Now let's figure out if it is possible to replace the tap under pressure. Naturally, this can be done, but there are several conditions. To begin with, you can try to do this with pipes of small diameter, in which there is not high pressure.

Replacing a valve with a riser overlap
In order to understand how to properly replace a tap under water pressure, you need to figure out how to do this under normal conditions - with the water pressure shut off. First you need to fix all the pipes on which the meters are installed. After that, it is worth blocking the riser.

Usually, similar problems arise with a tap, which should shut off the water in the entire apartment or private house. Sometimes another crane is installed - a redundant one, but it is very undesirable to do so.


The riser needs to be closed off, since some pipes often have to be re-soldered - sometimes for convenience, more often as needed. The clamp is needed in order to apply force in the opposite direction, if you need to unscrew the counter or the old tap.

To the basic rules and tips for replacing the tap with your own hands, I would also add sealing of all joints, which should not be forgotten.
Replacement without overlap
First of all, there are several ways to replace a pressure valve. Among them there are such unusual ones, both with a tool for freezing pipes, and banal simple ones, like - just take and do. The first, again, will not work with pipes in which hot water flows, but the second is already quite an extreme option.

Usually, special tools and devices are not at hand, and therefore you have to improvise. First you need to find a larger container - as large as it can fit under the tap.


Despite the fact that you roughly know, or have seen a video or photo, how to replace a tap in such conditions, you should still not do this without an extreme need, if under the room in which you will work there is a room that can be flooded - even being on the first floor of a multi-storey building, it may turn out that under you in the basement is either a warehouse, or a store, or whatever.

Back-up tap
The method is good for its simplicity. This works fine, provided that the broken tap is on the movable pipe, and has intact threads, to which you can screw another tap.
If the first valve has an internal thread, then you will need a valve with a suitable external thread. It must be treated with a sealant or sealant, and then screwed tightly into the first tap.

During this, the new valve should be kept in the open position - if you turn it off, then during installation you will have additional problems caused by the growing pressure inside the pipe, which will make it more difficult to wind the valve.


Drainage
If you are working in a bathroom, then you can make a simple drainage system yourself. Such an instruction for replacing a tap under pressure is also well suited in the case of a toilet - in the first case, the drainage will be directed to the bathroom or shower stall, in the second - to the toilet.

To do this, you need a kind of funnel, a large diameter hose and a seal. For the funnel, there are several options that you can implement from available tools. First of all, you can take a simple bowl or bowl, preferably a larger one, and make a hole in it according to the diameter of the existing hose.

For the second option, you need a simple eggplant or plastic water bottle. To do this, you will need to cut off the bottom, and then insert the neck from the container into a hose or flexible pipe.
Note! 

In this case, you will need to look for a hose that will fit as best as possible in diameter to the neck. Then the same sealant and you can start working.


Please note that the container that will collect the water should not be very small. If it is located below the level of the bathroom or toilet, then there may not be enough pressure in order to transport water.

If the faucet and the entire workspace are above the bathroom level, then you should not worry about this. Despite this, it is better to look for a way to shut off the water, even if it is for the entire residential building, if it is not possible to shut off the riser.


Note! 


Note! 


 What is the dream of an office based on a dream book Office based on a dream book of the sorceress Medea
 Characteristics of the Capricorn man by zodiac sign - an avid pragmatist
 Strong biofield in humans, signs