How to make a wardrobe with your own hands. Do-it-yourself corner wardrobe: project preparation, material selection and cabinet assembly Large corner wardrobe drawings and diagrams
In an effort to save money, many people try to assemble furniture with their own hands. This also allows you to realize your plan, not depending on anyone, and in addition, raises self-esteem, like any possession of a useful skill. There are certain rules for how corner cabinets are created.
Step-by-step instruction
Making furniture (the same corner cabinet) is not so difficult, you just need to know some key points and be able to use the drawings.
Before drawing, you need to decide on the geometric shape of the future product:
- trapezoid;
- the letter G;
- triangle.
There is another option - with five walls.


We decided to do it ourselves - it means that you need to think over all the dimensions, which wall, shelf or box will take how long.
Take, for example, the following values: length and width 90 cm, height 250 cm. According to the assembly scheme, they calculate how much material will be needed and for what purpose.
You cannot make a homemade cabinet without the following materials:
- self-tapping screws;
- glue;
- rollers;
- fittings;
- profile;
- mirrors (optional).
The desire to save money is understandable by working with your own hands, and not by ordering a wardrobe, but there are moments on which it is undesirable to save money. A big mistake is made by those who order bad rollers or refuse the steel profile due to its perceived high cost.


Be sure to prepare the workplace, the corner cabinet can be assembled properly only in this case.
Tools Needed:
- drill;
- building level;
- puncher;
- hand saw;
- hammer.
If you want to speed up the work and do it neatly, order the cutting of the boards from a professional workshop.

The size of the product should correspond to the area of the room where the future cabinet will stand. The basic principles are also taken into account. So, for outerwear it makes no sense to set aside a compartment already 80 centimeters and below 140 cm.This is where the diagram comes in handy, having drawn up and using it, you will not miss the size, you will not find that there is not enough space inside for everything you need. The appearance of the cabinet has very little effect on its assembly.
The first step is to attach the steel corners., which will hold the sidewalls of the structure, will not allow it to deviate from the floor and ceiling. Finished parts are used to make a frame, rollers are attached to the door, guides are installed and the doors are dealt with. At this last step, all actions are certainly controlled by the level in order to eliminate the slightest distortions.


The inner workings are just as important as the formation of the shell.
The steps are as follows:
- put brackets;
- fix the shelves in their proper places;
- mount the fittings (first of all, partitions, then shelves and hangers, mirrors, and leave the handles for later).
Be sure to select the fasteners in accordance with the material of the base (for brick and concrete, a dowel-nail, for wood - a nail or a self-tapping screw, special dowels with expansion whiskers and a transverse notch must be screwed into aerated concrete). The vertical posts, inserting them into the guides, should be fixed with hangers. Stiffening ribs cannot be neglected, you need to try to make them as large as possible - primarily in places where a box or shelf will stand. Replacing a metal profile with slats is permissible in exceptional cases, and the tree must be completely dry, otherwise shrinkage will deform the entire cabinet.


Without any special changes, this scheme is also applied when assembling drywall cabinets, but there are still certain differences.
The starting point in this case is not the installation of the frame, but the marking of the floor and ceiling in accordance with the scheme. It is most practical to mark it with a rubber shock-absorbing tape, and only along it, it is already possible to attach metal profiles as accurately as possible. To make the cabinet structure last longer, be sure to use stiffeners by inserting them between the rack profiles.
If you do not want to face a situation where something needs to be redone, perform the next step especially carefully. The workpieces must be placed at the points allotted to them and attached to the self-tapping screws (screwing them at a distance of 20 cm or so). Make sure that the hats enter the material by a millimeter, and wherever you will then attach the shelves, corners are installed.


In no case do it yourself and do not order doors for a homemade cabinet somewhere until the rest of the structure is assembled! Otherwise, you may be faced with the fact that the dimensions have changed somewhat, and it will not work to finish the job. After the doors, there is a turn of rods and (if any) lamps.
Then it only remains to take care of decorating it (priming the internal and external surfaces, sealing the joints with gypsum plaster, gluing the serpentine tape, installing painting corners, filling, drying, sanding and re-filling, priming and finishing). What exactly to finish - with tiles, other material, or simply paint, you need to decide on your own.


Design features
Complaints about the lack of space in an apartment or house are very common; on closer acquaintance with the dwelling, it turns out all too often that some corners are empty, it is impossible to use them in any way. Both problems can be solved at the same time if you make a corner wardrobe - it is also much more economical than buying it in a store or ordering it from a furniture company.
Almost everyone can draw up a drawing, but professionals should cut out the details in accordance with the idea, since it is too difficult and troublesome. The height of the section where fur coats, jackets and coats are to be stored should flexibly adapt to the height of those who are to use the wardrobe, everyone should freely reach the crossbar. An important clarification: by placing the deadbolt across the width, you will achieve more efficiency from the interior space.


A carefully thought-out scheme helps to finally navigate in size, it is better to pay attention to it than to risk in vain.
It is advisable to draw up a diagram, being exactly where the cabinet will have to stand - then do not lose sight of any details. Even the smallest components should be reflected in the drawing. Mark the location of roll-out boxes, doors and baskets; the thickness of the material is indicated accurately and the specification of any item is given. Yes, it’s quite difficult - but there’s no other way to get the job done well. The installation locations of the luminaires (if any) should be noted immediately, both when drawing up a plan, and at the beginning of the work itself.


Styles and placement options
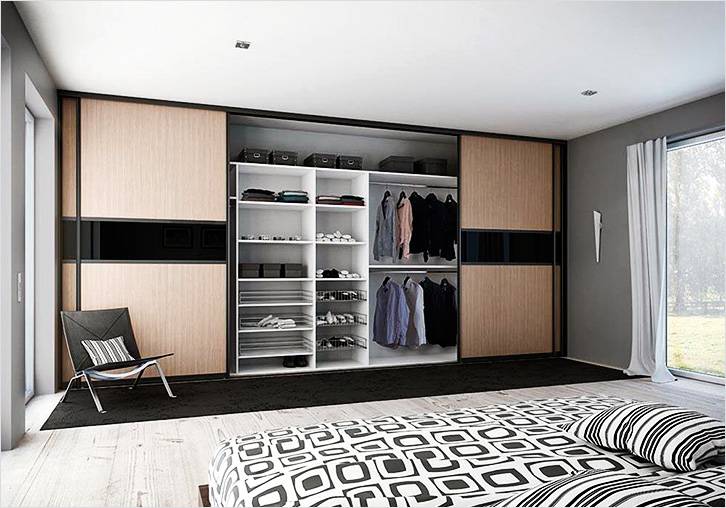
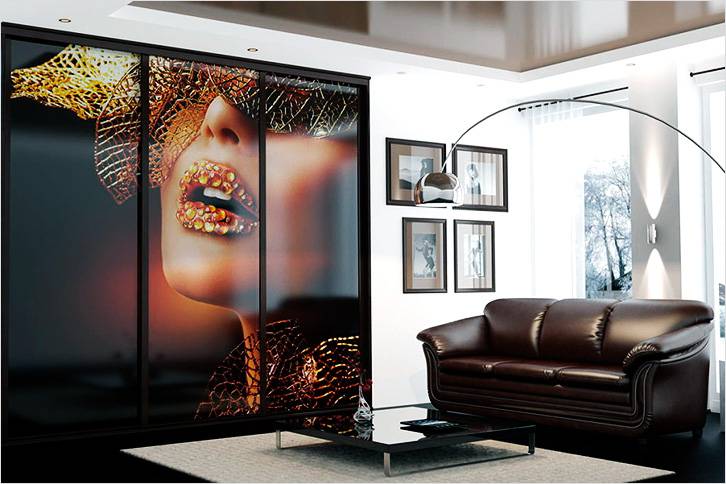
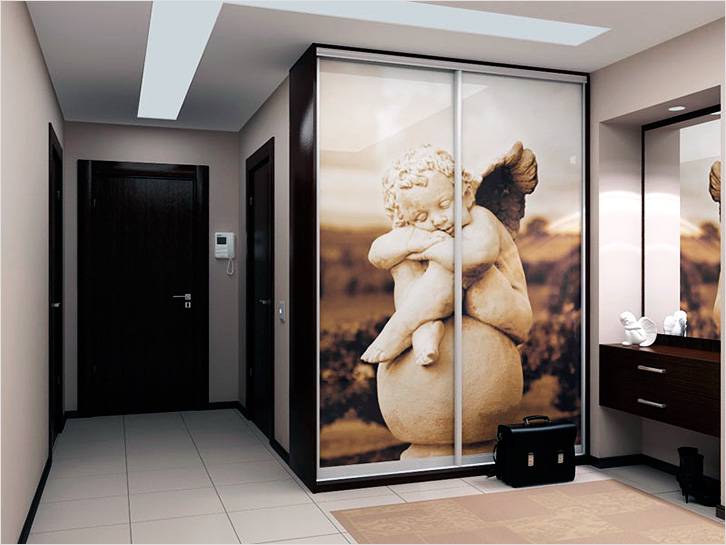
In the bedrooms with traditional interior furniture made of MDF or fiberboard, covered with a film, a plastic layer or veneer, looks perfect. With the help of a mirror sheet, it is not only possible to expand the room, but also to correct some visual problems. Many designers like to use reinforced glass, allowing them to show their imagination and realize the most daring projects.
Country style helps to feel light and at ease, relieve the burden of ever-haunting problems. It is easy to observe it - give up catchy colors and designs, the less processed the tree looks, the more closely the compliance with the style canon.
As for the installation location, most experts consider the place where the walls touch each other is the best solution. If you wish, you can completely cover one of the walls, and leave the other free of furniture.


One of the accommodation options is kitchen, where the cabinet is placed for culinary needs. The arrangement of cabinets in any room has its own characteristics, but even against this background, the kitchen stands out. There is always not enough space, and therefore any way to increase the efficiency of the use of space at least a little is beneficial. Please note that it makes sense to measure surfaces and order blanks only when the floor, walls and ceiling are leveled - otherwise the cabinet may not fit in the given place.
To correctly design a corner kitchen cabinet, you need to use only two types of connections (at a right angle it should be connected to the countertop, and at an angle of 45 degrees - to the sink). Unlike the direct version, additional inserts should be provided (they perform two functions at once - mechanical connection of boxes and replacement of a part of the facade). A ledge is made above and below.
It is impossible to correctly calculate the structure and estimate the consumption of materials for it, unless you take into account that the upper and lower elements are located in the gap dividing the side lobes, otherwise it will not be possible to design the facade properly. The table top necessarily has an identical geometric shape.


Models
It is very important to draw a good diagram, choose a decent material and tool, connect all the parts as expected. But even before these works, you should decide what exactly you want, because the closet is the closet.
There are three main options:
- the simplest (for a pantry or other utility room);
- a full-fledged product (such as a wardrobe or linen option);
- exquisite top-class furniture.
In the absence of sufficient experience and confidence in success, it is worth working only with the first type of corner cabinets - even if the result is not impressive, but practice, and do not expose the errors immediately to public display. Remember that you can save money only when there is already a prepared niche or a solid and very flat floor, otherwise leveling it will require too much effort and money.
Do not try to either excessively reduce or increase the size of the drawers and shelves - this will equally make them impractical, inconvenient to use. When creating a model, you need to take care not only that the facade is beautiful, but the frame is strong. A very important point is the presence of mezzanines, thanks to them, a certain amount of used space is added. A wall cabinet is no more difficult to make than usual, you just have to be careful not to make mistakes.


Dimensions (edit)
The cabinet, which has to stand in the inner corner (except for the single one), begins to design and assemble from the corner section, and only after it comes the turn of the wings and the side rack. Two 80x80 sections (one for outerwear) is the very minimum, without which there is nothing to talk about at all.
Modern furniture has a high cost, and various materials can be used for its manufacture, moreover, the models differ in size, shape, appearance and content. A perfect solution for a living room, bedroom or other room would be a corner wardrobe that does not take up much space, is distinguished by its high capacity and an interesting appearance. Creating a corner cabinet with your own hands is simple, if you carefully understand this process.
Immediately before the process of creating a structure, you should decide on the dimensions, materials and tools that will be used, as well as think over the purpose of the cabinet. Initially, a project is formed, for which drawings are created, according to which parts are prepared that are firmly connected to each other. A decision is made whether the corner cabinet will be triangular or L-shaped, trapezoidal or five-walled.
If you decide to assemble furniture yourself, you should prepare for this process and purchase the necessary materials and tools:
- direct material for creating a cabinet, and the formation of a structure from drywall is considered relevant, which is distinguished by an affordable price, ease of use, environmental friendliness and durability;
- profiles from which the frame will be formed;
- suspensions;
- screws and glue;
- mirrors, if you plan to decorate a wardrobe with them;
- fittings that ensure ease of use of the structure;
- rollers and guides, if compartment doors are made;
- lining material for the cabinet;
- drill, screwdriver, grinder, sharp knife for cutting drywall, level and other small tools.
Working with drywall is considered so simple that no specific tools are usually required.

Tools

Drywall Sheets
Preparation of parts
A do-it-yourself drywall cabinet is made only after the preliminary creation of the circuit. Initially, you should decide on the dimensions of the structure, for which the dimensions of the corner where you plan to install the furniture are taken into account.
It is necessary to decide what parts the corner cabinet will consist of. Usually one large section is made for things that are located on the hangers. The other compartment is narrow and divided into several smaller compartments, which are separated by shelves. Often, in addition, an open pencil case is formed on either side. The standard sizes of such elements are:
- the height of the cabinet itself can vary from 180 to 220 cm;
- the width of two different elements of the corner cabinet can be from 45 to 80 cm;
- it is advisable to leave a distance between the shelves within the range of 30 to 35 cm;
- boxes and shelves are usually 40 to 45 cm wide;
- it is advisable to make boxes with a depth of 25 to 30 cm.
It is considered optimal that there are two large sections on top, called mezzanines, which are used to store large and rarely used products and things, and a narrow compartment for shoes is organized at the bottom.
After determining the dimensions and compartments of the structure, you need to perform the following steps yourself:
- determine the angle where the cabinet will be located;
- depending on its parameters, determine the exact dimensions of the cabinet;
- create a sketch that allows you to calculate the base, cover and plinth;
- divide the entire internal space of the cabinet into separate sections, for which vertical and horizontal partitions are used;
- calculate the doors of the structure;
- calculate the required number of ends covered with end tape.
Based on the resulting diagram, you can prepare the main parts of the cabinet. For this, in accordance with the sketches, the main elements of the frame are made. Metal profiles are cut with a grinder, and the cuts are cleaned. Further, on the basis of pre-made drawings, parts of drywall are formed, and it is advisable to use a thin and sharp knife to cut this material. All elements must be of the same thickness.

Materials (edit)
Site selection and markup
It is advisable to decide on the place of installation of the cabinet in advance, since the structure itself is made for the available parameters of this angle. It is usually installed in the living room, but it can be intended for a bedroom or a children's room. The content and dimensions depend on the number of items that will be stored in the furniture.
After determining the installation location, marking begins, which allows you to determine where the main elements of the cabinet will be located. Since the product will be created from drywall, all the elements of the frame will have to be attached to the wall, therefore the fastening areas are outlined. You will have to navigate along them during fastening and creating a frame.

Surface preparation and marking
Frame installation
How to make a corner cabinet with your own hands using drywall? To do this, you first need to deal with the installation and fastening of the frame. The whole process is divided into stages:
- if it is planned to have lamps in the cabinet, then the areas where they will be fixed are marked, after which electrical wiring is connected to this place;
- shock-absorbing rubber insulation is glued to the guide profile, and it is important to place it from the part that will be laid further on the base of the furniture;
- all guides are fixed along the lines of the previously applied markings, and dowel nails are used to secure them;
- then straight suspensions are fixed on the wall, and for this you need to constantly focus on the markup;
- fasteners for fixing the suspensions depends on what material was used to create the base, since if it is concrete or brick, then it is advisable to use a dowel with nails, and if the base is wooden, aerated concrete or expanded clay concrete, then strong screws or even nails are suitable, and it is also allowed use special dowels equipped with spacers and notches;
- vertical racks are inserted into the fixed guides, after which they are fixed with hangers, and for this it is advisable to use short self-tapping screws equipped with a press washer;
- strong and reliable stiffening ribs are installed between the rack profiles, and the more these elements are used, the more stable the structure will be, and there should be especially many of them in areas where it is planned to store heavy objects.
It is allowed to use not only metal profiles, but also wooden slats to create a frame, but this solution is used extremely rarely, since wood can absorb moisture or dry out, therefore the dimensions of the cabinet will change, which will lead to distortions or increased fragility.

Pasting profiles with damper tape

The metal profile is easy to cut

Finished frame
Frame sheathing
A corner cabinet made of plasterboard is quite simple to create, since after the formation of a high-quality, durable and stable frame, you can start covering it with plasterboard elements. For this, the following steps are performed:
- workpieces are made from drywall, for which, in accordance with the drawings, parts are cut, and it is recommended to use a hacksaw or an electric jigsaw for this purpose;
- it is advisable to choose a durable wall drywall to create a cabinet, the thickness of which will be at least 1.25 cm;
- all edges are processed with an edge plane;
- ready-made drywall elements are inserted into the corresponding sections of the frame, after which they are screwed in with special self-tapping screws for metal;
- the sheets are finally fixed, for which it is important to calculate the number of screws so that there is a distance of 20 cm between them;
- all screw caps are recessed by 1 mm;
- furniture corners are installed in the areas where the shelves will be located;
- rods and lamps are mounted;
- according to the available dimensions, the creation of doors begins, which can be ordered ready-made.
After the completed work, a full-fledged wardrobe will be received, but in order for it to have an attractive appearance, you should take care of the use of finishing materials.

Drywall markings

Drywall cut

Fastening drywall panels

Driving screws with a screwdriver

Finished wall
Finishing
Finishing involves the following stages:
- all surfaces outside and inside are covered with a high-quality primer;
- joints are filled with gypsum plaster;
- then the serpyanka is glued;
- painting corners are mounted on the corners;
- putty is applied, which is sanded after hardening;
- it is advisable to make two layers of putty;
- then the primer is applied again;
- after that, the final finishing materials are applied, which can be represented by decorative panels, tiles or other materials.
It is advisable to use a mirror during finishing to increase the comfort of using the structure.

Perforated corner for corner processing

Cabinet finishing
Drawings and diagrams
The most important thing during the creation of a corner cabinet is the construction of a correct and accurate diagram and drawings. If there are any errors in them, then it will not work to build a full-fledged, durable and stable structure.
Drawings and diagrams can be obtained in different ways:
- independent creation, and the process can be performed manually or using special programs for a computer;
- an order from specialists, which will require significant financial investments;
- search for ready-made drawings, but you should only use them if you are sure that they are correct and accurate.
Corner cabinets are considered to be the perfect solution for different rooms. They can be created from different materials, but the most optimal is the use of drywall, with which the frame is sheathed from metal profiles. Such a cabinet does not require significant investment, and is also easy to create. During independent work, their own wishes and the available dimensions of the selected corner are taken into account, so the design will be ideal for the installation site.
Home furnishing is the final step that brings together all the renovation and design stages. Modern furniture should combine several essential qualities: operational functionality, appearance as such, compliance with the general design idea.
Coupe systems or their elements are present in almost every home. The convenience and functionality of this furniture are indisputable, and for such design styles as minimalism, urban, high-tech, they are completely irreplaceable. The article provides comprehensive recommendations for self-manufacturing of a sliding wardrobe.
Advantages
Having considered the pros and cons of this class of furniture, we will get a complete picture of the modern concept of a wardrobe with a sliding door opening system.
| Advantages | |
| Ergonomics | Standard designs require blind zones for opening. In coupe systems, when opening and closing, the doors move in the same plane along the guides. The area of the room is significantly saved. |
| Spaciousness | The ability to arbitrarily configure the internal space (filling), which determines the spaciousness. The only requirement is ergonomic feasibility. |
| Versatility | Fits into any interior. Various designs and finishes allow you to install the wardrobe in the bedroom, kitchen, living room, etc. |
| Functionality | Inside, unlike ordinary cabinets, you can store large items, household appliances. Build in various devices - ironing board, workbench, table top, etc. |
| Ideal for tight spaces | For narrow aisles and corridors, a wardrobe is often the only solution. Only it can be placed in such places and operated comfortably. |
| Zoning | Dual functionality. Using such furniture, you can easily zone a room, that is, it can also perform the function of a partition. |
| Variety of designs | No restrictions on internal content. A large number of materials for the manufacture of facades, which allows you to embody any design idea. |
| Using a mirror | A mirror can be installed on the facade. This will improve the functionality of the room and visually expand the space. |
| Operational reliability | Doors moving along guides will last much longer than hinged doors. |
There are much fewer disadvantages, but they are:
| Flaws | |
| Failure of the sliding system | Occurs only in case of purchasing a low-quality sliding system. |
| The need for additional lighting | If the dimensions are large, additional light will be required, which significantly increases operational comfort. |
| The need to clean the guides | Over time, the bottom rails become clogged, which can interfere with the movement of the roller. Therefore, sometimes it is necessary to clean the grooves of the guides. |
| The mirror gets dirty quickly | If a mirror is used in the decoration, then it will often have to be washed from stains and marks of hands. |
| No rearrangement possible | When designing, the dimensions are related to the specific location of the cabinet. Not suitable for frequent rearrangement lovers. |
Varieties in shape
There are several varieties, they have structural and external differences:
- built-in;
- freestanding;
- corner;
- diagonal angular.
Let's consider each of them separately.
Built in
When constructing such a cabinet, there is no top, back wall and base. Only partitions are made. The entire structure is screwed directly to the ceiling, walls and floor. Metal corners are used as fixation.
It is a stationary structure, and it is an invariable part of the created interior.
Standing separately

Has sidewalls, top, bottom, back and sliding doors. It is a complete separate piece of furniture. Its movement is possible, it is not attached to any design elements.
Angular

An excellent solution for small apartments where every meter is expensive. Follows the shape of the corner and allows you to efficiently use the space of the room.
Diagonal Angle

This is a kind of corner, but the facade does not follow the shape of the corner, but is made diagonal. The increased capacity of this design determines its frequent use as a dressing room.
Material used
Furniture with a sliding door system is made from a variety of materials. The table shows the main ones:
|
Material |
|
|
|
The most widespread and frequently used one. The chipboard plate, having a low price, is distinguished by sufficient strength. A huge selection of textures, colors, patterns allows you to make the front part for any design decisions. There is one, but significant, drawback - it is difficult to fine-tune it. For this reason, mainly simple structures are made from chipboard or chipboard. |
|
|
Eco-friendly material, easy to process. The variety of facade coatings is not less than that of chipboard. Practical and affordable material. |
|
|
An expensive option, but natural wood will last a long time. A great decoration in any interior. |


Types by design
The classification by design differences is as follows:
- built-in;
- case.
Built-in ... There is no need for top, bottom and side parts. Their function is performed by the walls, floor and ceiling of the niche. For manufacturing, drywall can be used, which will reduce the overall cost of the product.
Hull ... The main difference from a conventional wardrobe is the door opening method. You can move it if necessary. Transportation (moving) without disassembly is possible. The downside is the increased consumption of materials, since the side, bottom and top walls, and the rear part are manufactured.
Now let's take a closer look at the organization of the internal volume of the cabinet.
Design features

When designing, one should take into account the ergonomic and operational specifics.
Consider the main structural elements of the wardrobe.
Door width
The choice of door size depends on factors:
- manufacturers of sliding systems are limited to certain sizes. Some systems allow the manufacture of a sash up to 120 cm wide;
- the width is influenced by the number of inner sections. Each section must be freely accessible;
- the choice is influenced by personal preference. There are no special rules, if this does not go beyond the restrictions listed above.
The optimal width, proven in practice, is from 600 to 900 mm. This size provides the most comfortable conditions for use.
Sliding systems

Sliding systems are classified according to two main criteria:
- profile material;
- the principle of expansion.
For the manufacture of the profile of the movable system, aluminum or steel is used. The material of the sliding system is chosen, as a rule, the same as that used for the door frame. Steel structures are cheaper, but in most cases aluminum is preferred.
Structurally, there are two types of systems - bottom support and top-hung. In the lower support - the door with rollers moves along the rail. In the top-hung one - its rollers move along the top guides.
Height

Any height is chosen. The only limitation may be the ceilings or the small height of the owners of the apartment / house. Structures are made both from ceiling to floor, and of lower height.
The standard length of the material used for the walls is 270 cm. A standard apartment has a ceiling height of 260–270 cm. Almost identical dimensions allow not sawing or building up structural elements.
For ceilings above 270 mm (if you wish to have a floor-to-ceiling cabinet), there are two solutions. First, the sheets of material are joined to the required length. Second, the mezzanine is being assembled. Sheets can be joined using high-precision equipment of companies specializing in such services.
Shelf depth

The depth of the shelves determines the daily usability of the cabinet. The optimal and recommended indicator is 60–70 cm. Usually, a bar for hangers is placed in the closet, the width of which is about 48 cm. A depth of 60 cm will completely exclude contact between the inner surface of the door and clothes hung on the hangers. Most furniture accessories (boxes, trays, etc.) have a width of 50 cm. You should not make the shelves deeper, since it will be inconvenient to get "under the wall" when placing things.
The dimensions of the premises do not always allow installing furniture with the maximum recommended shelf depth. But there are also limitations on the minimum depth. The best option may be a depth of 40 cm.Taking into account that 10 cm goes under the sliding door mechanism, you can purchase small hangers 30 cm wide.Only, installation of a hanging rod (rods) perpendicular to the doors and the rear wall, in this case, the width of the placed hangers not limited.
Such a solution is much better than completely abandoning the installation of a cabinet, especially since even such a "narrow" design for small-sized apartments is an ideal solution.
Length
When designing, the length of the cabinet is chosen in accordance with the place of its further installation.
Height of shelves and rods
![]()
The height between the shelves is 250–350 mm. The selection rule is simple: the greater the depth of the shelves - the greater the distance between them, the smaller the depth - the distance is less. This dependence is associated with the convenience of access to the stacks of linen located in the depths of the shelf (at the back wall).
When designing a mezzanine, one should take into account the size of things to be stored on it. If these are suitcases, then the height of the mezzanine should be equal to the height of the suitcase, plus a small margin.
The mounting height of the hanger bar is determined by the length of the clothes placed on it. The maximum height will be equal to the longest item. Average length of typical wardrobe items:
- shirts - up to 100 cm;
- jackets - up to 110 cm;
- long clothes - up to 130 cm;
- raincoats and fur coats - up to 150 cm.
These calculations are approximate, since the length of the clothes depends on the height, style and other parameters.
Video:
Schemes and drawings
The diagrams show various options for projects and furniture assembly technologies:


Device inside
When designing the filling of the wardrobe, first of all, zoning of the internal space is done. The figure shows a universal scheme for dividing various things into storage areas:
![]()
When buying a finished product, you will have to agree with the filling configuration proposed by the manufacturer. Self-production will allow maximum consideration of the size, functional purpose, location of various zones and much more, which, in the end, will provide maximum operational comfort.
Below is a table with examples of frequently used elements of internal filling and zoning of the wardrobe with their help.
| Zoning | |
|
|
Shelves are one of the main filling elements. They can be stationary and retractable, solid and ventilated, half and full depth, etc. |
|
|
Drawers are the second most important cabinet element. |
|
|
Suspension bar - necessary for clothes on hangers. The material of manufacture is different, more often metal. |
|
|
Convenient storage baskets. All things are clearly visible in them, which creates a certain convenience. |
|
|
This device is called the trouser. Pants are always ironed and ready to be worn. |
|
|
A bar (hanger) for storing ties - it is convenient to choose, it does not wrinkle, the correct suspension protects from changing the shape. |
|
|
Convenient placement of belts, alternatively storage on a shelf in rolls. |
|
|
Compact and convenient storage for underwear. |
|
|
Placing bed linen, towels, some clothes in piles on the shelves. |
|
|
For storing blouses, light blazers, short sundresses, a significant part of the internal volume is allocated. A pipe with shoulders is installed in the opening. You can make several of these sections - for short and long items. |
|
|
Section for accessories - bracelets, watches, glasses, etc. It is recommended to store these items in drawers. Inside, the space can be divided into separate cells. |
|
|
Shelves for storing shoes. In the upper (mezzanine) part, you can place shoes in boxes. |
|
|
Hooks, hangers, carabiners, rings and other accessories for bags. |
| Hiking suitcases | Place suitcases that are rarely used (once a year while on vacation) on the far (upper) shelves or mezzanine. |
|
|
One of the options for bed linen. Shelf width up to 80 cm, height up to 60 cm. |


Characteristics of the main filling elements:
- pull-out and stationary shelves. For convenient use, the distance between them is from 350 to 450 mm;
- drawers. Two types - fully retractable (100%), partially retractable (80%). They can be equipped with door closers providing smooth semi-automatic closing of the box;
- mezzanines, known as hard-to-reach shelves. Located at the top. They store rarely used and large things;
- barbells are required for the hanger. They are mounted to the width of the cabinet;
- pantographs or special "furniture lifts". Thanks to them, clothes are kept at the required level and easily pulled out with a special bar. They are electrical or mechanical;
- baskets are convenient for storing small items. Equipped with rollers and guides.
Facades
The interior filling, thought out to the smallest detail, will sharply discord with the unsuccessfully chosen facades. It is the facades that give the entire cabinet a special finished look. Let's consider several options for their implementation.
Mirrored

The mirror visually enlarges the space and makes the room brighter. It can be whole or divided into several parts. The large weight of the mirror determines the need to select high-quality and reliable rollers. Such a facade creates additional hassle for maintenance - the mirror gets dirty quickly. It will have to be wiped and washed regularly, especially if the family has small children.
For facade mirrors, a variety of finishes are used - sandblasting patterns and drawings, dusting of all kinds of shades (silver, emerald, gold, etc.) for glass, printing color images and much more. For safety reasons, the mirror is covered with an anti-shock (armored) film on the inside. If the mirror breaks, the debris will not fly apart.
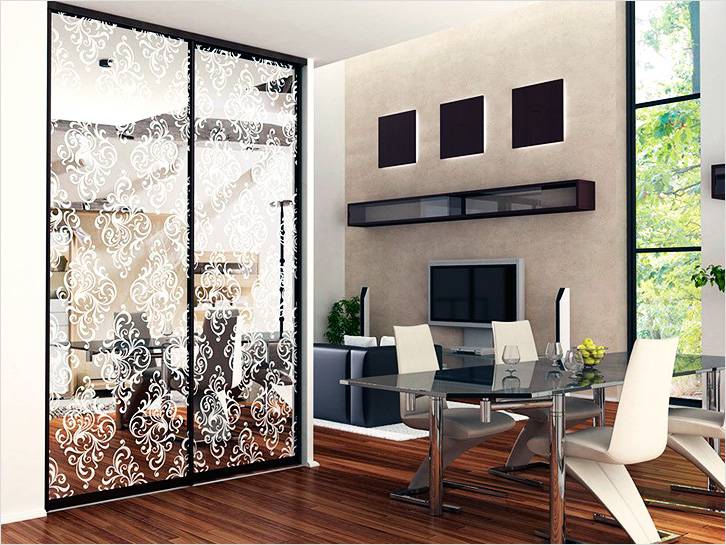
Glass

Glass is no less popular than a mirror; the facades are equipped with an unbreakable one. Frosted glass with a pattern is mainly used. Vertical, horizontal stripes look original, dividing the canvas into separate squares.
MDF and chipboard

These materials are laminated with foil. The facades look massive and heavy. You will need reliable roller systems to install them. One of the advantages is a huge selection of colors, shades and patterns, in texture - from matte to bright glossy.
Photo printing can be applied to MDF and chipboard facades.
These are the main types of facades used in the manufacture of sliding wardrobes. You can combine them with each other. This article contains photographs with a considerable number of original ideas for the manufacture of facades.
Step-by-step manufacturing instructions
Bonding edge tape
After cutting all the elements, the edge tape is glued to the ends of the board. The sequence of operations performed:
| Instructions for gluing the edge to the end face of the workpieces | |
|
|
If there is no assistant, you can use a simple trick. You will need a small box and a quick-clamping clamp. The clamp presses the board against the box, ensuring the stability of the workpiece and the convenience of gluing the edging tape. |
|
|
One side of the edge band has an adhesive surface. When heated to a high temperature, it can be easily glued to the workpiece. |
|
|
Cut the hem to the required length. Leave a margin of 1 cm around the edges. You can cut it off after gluing with ordinary scissors. |
|
|
For gluing, set the position of the temperature sensor of the iron to "2". |
|
|
For safety reasons, wear two gloves on your left hand. There should be no pellets in the palm of your hand. |
|
|
Run the iron along the edge band and hold it with your left hand (even). |
|
|
We run the iron in the opposite direction, at the same time with a gloved hand, firmly press (smooth) the edging tape. |
|
|
Smooth the edge with your hand a few more times. |
|
|
Application of a special roller. Glue the edging tape with an iron and then roll it with a roller. Very comfortably. |
|
|
The cooled tape, carefully cut off the remnants from the end with a sharp knife. |
|
|
We get such a cut. |
|
|
We repeat the procedure for all ends of the workpiece. We measure the tape with a margin of 1 centimeter, from each edge. |
|
|
We glue it with an iron and smooth it. |
|
|
Cut off the cooled edge. The edge is already glued on the adjacent edge, we make the cut very carefully. |
|
|
Cut off the longitudinal remnants of the protruding edge from all sides. |
|
|
Result. We glue the ends of the remaining blanks with an edge tape. |
|
|
All sections are sanded with a special bar. The inner part is filled with foam rubber, and the outside is filled with fine-grained abrasive. |
|
|
Grinding of the sections is done only with longitudinal movements. |


The processing of the main elements is carried out in the same way.
Assembly
The details are cut according to the project. This operation is best done in a workshop on a special formatting machine. After cutting and gluing the edges, we assemble the cabinet:
| Frame assembly instructions | |
|
|
For work, you will need to assemble an additional device consisting of a metal strip and two pieces of boards connected by an angle. It turns out a corner with a metal guide. You will also need two quick-clamping clamps. With this device it is very convenient to connect workpieces at right angles. |
|
|
We do a square check - it should be 90˚. |
|
|
Set aside 70 mm from the top edge. |
|
|
In the example, a 16 mm plate is used, therefore, it is necessary to step back 9 mm from the edge. Why not 8 mm? Because the slab protrudes 1 mm beyond the edge, forming a small side. The middle of the end of the adjoining slab is at a distance of 9 mm. |
|
|
Drilling mark. |
|
|
A similar mark is placed below. |
|
|
Using a drill, we make holes for the fasteners. |
|
|
A special drill replaces three at once. It allows you to make a main hole, a collar and a chamfer in one operation. |
|
|
Drilling. |
|
|
We tighten the confirmation with a screwdriver. |
|
|
Having secured the sidewall, according to the project, we mark the installation locations of the shelves. |
|
|
Next, using a square, we put marks on both sides under the holes for attaching the shelves. |
|
|
Marks along which holes for confirmations will be drilled. |
|
|
The device assembled at the beginning of work is convenient to use for attaching shelves. We measure with a tape measure 1/2 of the plate thickness. The thickness of the slab is 16 mm, so we retreat from the mark by 8 mm. |
|
|
At this level, we install the shelf using quick-clamping clamps. |
|
|
It is clearly seen here that the mark is in the middle of the end of the workpiece. Everything is ready for drilling. |
|
|
We drill. |
|
|
We twist the confirmations. |
|
|
Install the remaining shelves in the same way. |
|
|
Install the cross member. And we fasten each shelf with confirmations. |
|
|
Having fixed the cross member with a quick-clamping clamp, we twist it with confirmations from above and below, after which we fix each shelf. |
|
|
This is how the lower part of the wardrobe is assembled. We clamp the strip from the plate with a clamp and fix it with a confirmation from the end. |
|
|
From below we drill shallow holes for installing furniture legs. |
|
|
We twist a metal sleeve with an external and internal thread. |
|
|
Using the hexagon, we tighten (recessed) to the required position. |
|
|
We twist a leg with a plastic support into the sleeve. Thanks to this, the furniture can be moved and leveled. |
|
|
Two pieces of support leg assembly. |
|
|
After assembling the cabinet, a fiberboard sheet is attached to its back with ordinary nails. |
|
|
We start fixing the fiberboard from the top. Tilting the cabinet from side to side, we achieve a 90˚ angle between the sidewall and the top bar. We nail the side and bottom sides of the fiberboard sheet. |
|
|
During the assembly, no such plastic furniture corners were used. Why? The use of a confirmatory is much more practical, since it is screwed into the plate by a few centimeters and reliably connects the structure, giving it additional rigidity. |
|
|
We close the caps of the confirmations with a decorative plug. |


In the same operating sequence, you can assemble a sliding wardrobe of any configuration.
Video:
Manufacturing of doors
The door consists of a frame, metal guides and a roller system. It is worth ordering it in a company that professionally deals with such systems. Specialized software for the given dimensions will calculate all the elements and issue a complete specification for the assembly. Mirrors or plates from other materials are cut to the size of the doors for fastening to frames.
| Elements for a sliding system | |
|
|
|
|
|
|
|
|
|
|
|
|
|
|
Vertical uprights / handles for door side sections. |
|
|
Sealing rubber for the mirror. |
|
|
Self-adhesive brush to soften the impact of doors when opening / closing them. |
|
|
|
|
|
|
|
|
Brackets for fixing doors in extreme positions. |


The main parts for door assembly are made of aluminum. All metal components must be covered with a protective film that protects them from scratches during transportation.
Assembling the sliding system
Consider the step-by-step assembly of the door leaf. In our example, there will be two flaps from the mirror.
| Door assembly instructions | ||
|
|
The door is located in a horizontal position and provides free access from all sides. | |
|
|
In the upper part of the vertical post, which simultaneously serves as a door handle, we drill two mounting holes. | |
|
|
The lower one is 6.5 mm in diameter. | |
|
|
The top hole is 10 mm. Through it, the upper door profile and roller will be attached. | |
|
|
The lower part of the same vertical profile. The top hole is 10 mm, the bottom hole is 6.5 mm. The distance from the edge of the first hole is 7 mm, the second is 43 mm. The lower roller will be attached closer to the edge. The second hole is for the screw connecting to the profile. | |
| Profile installation | From above we fix the rubber seal with a profile, carefully inserting it. | |
|
|
The procedure is performed sequentially on all faces. We do not cut the rubber seal at the corner, but continuously lay it around the entire perimeter. | |
|
|
This screw is not fully tightened. Later, the upper rollers will be installed in it. | |
|
|
Install the upper rollers and tighten the screw until it stops. | |
|
|
Rubber seal installed at the bottom of the door. | |
| The screw with the upper roller is also tightened. | At the top, we fix the second pair of rollers. | |
|
|
Install the lower roller. We squeeze the spring on the roller and carefully insert it into the hole, fasten it with a screw. | |
|
|
The screw is tightened with a hexagon. | Ready-made wardrobeCabinet with the first door installed. |
|
|
In the same sequence, we collect and mount the second door. | |


Additionally, we install auxiliary elements - a pipe for hangers, etc.
Video:
 In the end it should look like this
We suggest that you familiarize yourself with the diagrams and drawings. They will help you create your own project.
Video:
Video:
Photo


It is difficult to make a drawing of a corner cabinet on your own, our article will tell you a solution.
You can assemble a corner cabinet with your own hands, if you try.
From our article you will learn about all the features of cabinets designed for corners and openings.
In contact with
classmates
Peculiarities
The sliding wardrobe is the same wardrobe with hinged doors, but it has sliding doors. This saves up to 600 mm. space in front of him. By design, they can be:
- Embedded.
At the same time, the structural elements of such furniture are the ceiling, floor, as well as the walls of the room. The most economical from the point of view of the use of living space.
Labor-consuming in the manufacture of poor-quality construction work. The device of fasteners causes defects on walls and ceilings. It is no longer possible to transfer it.
- Case.
They differ from built-in wardrobes in their mobility and installation time. Protect wall decoration from contact with interior contents and doors.

Depending on the location inside the housing, they can be straight, angular and radius. In turn, corner structures can be created:
- with a beveled corner facade with a swing door;
- with elements located at an angle relative to each other;
- as two separate pieces of furniture installed in a corner.
- Radial.
Only a real idea of the technical advantages and functionality of the chosen design will give a tangible economic and aesthetic effect.
Creativity

The issue of coordinating and budgeting an event with stakeholders is not idle. Not only the technical and economic indicators of the designed furniture, but also the social aspects of family life, directly depend on his decision.
The preparation of a draft design is not as laborious as the main process of creating cabinet or built-in furniture. But it is precisely the accuracy of the developed drawings and diagrams that will be the fundamental stone of the whole event.

- roulette;
- plumb line, levels (not bad if laser);
- squares of various sizes;
- a flat wooden lath or metal profile for drywall.
First of all, we decide on the depth of the furniture. In practice, this size is taken equal to 50 cm. Considering at the same time that of them 8-12 cm will be occupied by doors.
We carefully check the geometry of the location of the future furniture. We measure especially accurately:
- the value of the angle between the walls;
- curvature and wall defects;
- distance and parallelism of the floor and ceiling;
- we take into account the minimum distance between them;
- horizontality, evenness, rigidity of the floor.
Note: to eliminate unnecessary material costs and increase labor intensity, even without taking into account moral damage, it is necessary to check the accuracy of all measurements and the performance of all fittings again.
According to the existing draft design and the resulting dimensions, we prepare the project itself, taking into account:
- Assembly sequences carried out on site.
- Ensuring the greatest strength and reliability of the structure.
- In terms of its internal content, it should be functional.
- Provide ease of installation and further use of built-in fittings.
- A rational distance between the shelves will be no more than 40 cm.
- The height of the outerwear compartment is equal to the length of the garment itself + 10 cm.
- The practical height of the hanger bar is at shoulder level.
- The greatest height of the mezzanine shelf is 50cm.
- The breakdown of the pillars of the lower compartment is performed depending on the position of the doors, for the convenience of using them.
- The same applies to drawers and baskets.
Material

Here, both the decorative and the technological aspects of the aspect should be taken into account. The financial side of the issue is also important. What to choose:
- Tree.
Traditional, and now even prestigious material. Its disadvantage is the possibility of warping when the humidity changes. Alternatively, it may have a right to exist.
- Drywall.
It is difficult to attribute it to furniture materials, but it can still be done. It can only be used in conjunction with a metal frame, so it can be built. In this case, the doors will be made of a different material. It is more of a building structure than furniture.

- Chipboard laminated or cached with decorative foil;
- particle board of various density and moisture resistance.
Children's furniture is made from E-1 class slabs.
- MDF (fine fraction) made of wood impregnated with a binder. Found the greatest application in furniture making.
- Fiberboard (wood fiber material), the same hardboard.
MDF - boards and high density laminated chipboard - the most suitable material for furniture construction. The most responsible thing is to approach the calculation of the width of the valves.
Expert advice: the calculation is as follows: choose the largest door width. Determine the number of overlaps (1 less than the number of doors). Checking the resulting width. Does not converge - we increase the number of valves. A variant with a change in the internal layout is possible.
- You can't do too many of them. It will be just uncomfortable.
- Cannot be made too wide - it will jam with a bad move. The most practical width is no more than 700 mm.
- The overlap of doors must be done within 50-70 millimeters. There will be more - there will be inconvenience in using the internal shelves. If it is less, gaps will appear and you will need to use the flaps with caution.
- The narrowest shelf must be wider than the door, otherwise it will be inaccessible.
The eyes are afraid

Each of its technological transitions demonstrates real results of work. Of course, we check the availability of the required tool:
- - with drills (for confirmation - 4.5 mm.);
- screwdriver;
- circular saw with a ruler;
- hand saw;
- angle clamp;
- roulette;
- stapler;
- normal and soft hammer;
- hex key for confirmation (furniture screw).
You will also need confirmations D × L = 6.4 × 50 mm, self-tapping screws, furniture corners for shelves and wooden dowels. Technological moments:
- Pre-cut and edged sheets of MDF or chipboard are marked for drilling holes for dowels and confirmations. The quality of the assembly and the general appearance of the product depend on the accuracy of the marking.
- Clamping and drilling of mutually perpendicular parts is carried out using an angle clamp.
- Drilling for confirmation is performed with a special confirmation drill. The option of drilling with two drills of different diameters with subsequent countersink is possible.
- Tightening the confirmations is performed with a slight effort with a hex wrench.
Take a note: it is convenient to assemble and fasten the cabinet to the wall using a U-shaped profile.
- The choice of hangers for the sash is quite large, but the most practical among them are double-rail systems with a lower support. Best imported.
- At the same time, one should bear in mind the possibility of using both a double-rail system with an upper support and a monorail version.
Specialists' note: with an upper support, the option of the leaves falling out is possible, while their adjustment is difficult. With a monorail support - the complexity of the design and installation. Carefulness is required during operation.
A smartly designed and well-executed built-in corner cabinet will make the most inaccessible and abandoned place inviting and comfortable. Made with your own hands, it will be a source of pride for a long time.
How to make a corner wardrobe with your own hands, see the following video:
In contact with
Do you see inaccuracies, incomplete or incorrect information? Do you know how to make your article better?
Do you want to offer photos on a topic for publication?
Please help us make the site better! Leave a message and your contacts in the comments - we will contact you and together we will make the publication better!
Despite the seeming compactness, corner cabinets are very spacious. Their ergonomic design is also appreciated for the fact that it allows you to beautifully and functionally compose a whole modular complex of cabinets, pencil cases, mirrors, pedestals and arrange them into a single composition. Drawings of corner cabinets with dimensions will help you create your own project for a bedroom, hallway, nursery or living room.
This article discusses various options for internal filling for a corner cabinet with a height of 2200 mm and dimensions from a corner of 900x900 mm. With a sidewall depth of 450 mm, a 613.8 mm wide doorway is formed, which is usually closed with two leaves.
You can easily adapt the proposed options "for yourself" by stretching or narrowing the drawing to the required size. We will also consider how to correctly do this from the point of view of the rules for designing cabinet furniture.
Drawing of a corner cabinet with shelves
Typical internal filling of a corner cabinet involves a rack with shelves on one side and a bar for clothes on the other. But a wardrobe is not always needed. For example, for a living room or a children's room, a drawing of a corner cabinet with dimensions, which has only one shelf in the filling, is more relevant. By the way, if the kitchen is quite spacious, you can also install such a module in it.
The internal construction assumes the presence of an internal partition. Thus, the space is "divided" into two zones - with long shelves extending into the depths, and an independent pencil case. It is quite possible to build boxes into one of the niches of the received pencil case, if you need a place to store any small items.

Drawing of a corner cabinet with bars for short clothes
In a boy's teenage room or "men's" bedroom, there is a reason to design a corner wardrobe with shelves and two-level bars for short clothes.

If there are not so many clothes on the hangers (shirts, jackets, jackets, trousers), then you can remove the upper bar, replacing it with three shelves. By analogy with the previous option.

Drawing of a corner cabinet with a mezzanine shelf
This scheme for the internal filling of a corner cabinet is quite universal. A lot of ready-made modules are made using it; they can be found in serial furniture from various manufacturers.

A drawing of a corner cabinet with a deep mezzanine shelf, a section for hangers and a rack can be used to draw up a project anywhere: in the hallway, bedroom, study, nursery.

Drawing of a wardrobe with hangers for clothes
It is a good idea to use the space of the corner closet completely under the clothes on the hangers.

This option is quite appropriate in a spacious hallway, if the shelves are placed in a separate pencil case. It will help expand the functionality of the furniture set for the hallway, a shoe rack, an open hanger for seasonal clothes, a chest of drawers for accessories and other small things. Still, it is more convenient to store all outerwear in such a separate place where there is simply nothing else (well, perhaps a couple of shelves for shoes, in a section designed for long clothes).

How to change the dimensions of the corner cabinet according to the given drawings
Regardless of the overall dimensions of the corner cabinet, the internal filling of the structure will remain the same as discussed above. Perhaps, drawers and baskets, hooks and trousers, and other storage systems will be added. But the structure itself, the inner frame remains the basis.
There are two ways to change the overall dimensions of corner cabinets according to the considered drawings.
The easiest and most understandable way is to leave the facade unchanged by narrowing or expanding the depth of the sidewalls.

In this case, the internal content will also be lent or expanded, according to the drawing. This method is suitable if the typical dimensions need to be changed slightly, within the range of 50-150 mm. For example, if you need to make a corner cabinet with your own hands measuring 750x900 mm, 1000x800 mm, 1000x1000 mm and so on.
For all other options, it is required to change the front part, expand or narrow it.
A striking example of the minimum dimensions of a corner cabinet is a wall-mounted kitchen cabinet. With dimensions of 600x600 mm and a sidewall depth of 300 mm, the doorway is about 400 mm.
For corner wardrobes, the width of the doorway is practically unlimited. Indeed, instead of two sliding doors, you can put three, if the opening allows it.
The main nuances in drawing up drawings of corner wardrobes
When designing such cabinets, they lean towards built-in and semi-built structures. Almost always, the bottom is removed from the corner wardrobe and. Internal partitions, shelves are fixed to the floor and walls. The roof of the corner wardrobe is also optional. Usually they refuse it altogether.
In fact, a large corner wardrobe is a dressing room, a fenced-in part of the room that you can enter.
The smallest corner dimensions are limited only by the width of the doorway. The compartment sash should not be narrower than 600 mm, otherwise it will be unstable in the track. Basic design standards can be found in the article "".
For example, with dimensions of 1200x1200 mm from the corner and a sidewall width of 400 mm, the opening for compartment doors will be about 1200 mm in the center of the track.

In this case, the width of the guides "eat up" from the functional depth of the sidewalls of the order of 150 mm. This must also be taken into account when designing the interior filling of the corner wardrobe compartment. Doors should not be in the way when driving.

Alternatively, you can place niches for hooks (if a drawing of a corner wardrobe in the hallway is being drawn up), an ironing board or shallow shelves.
 Poroshenko Petr Alekseevich
 Premonition of the Apocalypse: World War III in the predictions of analysts and the Holy Fathers
 Hereditary prisoner petr poroshenko-waltsman