Do-it-yourself drain pit: an overview of types, stages of construction and a training video. How a brick drain pit is built: options and methods of arrangement A drain pit in a private house arrangement methods
Sewerage is one of the most important benefits of civilization. Without a sewer, washing, showering, bathing, and going to the toilet are difficult and inconvenient. But it is not always possible to connect to a centralized sewerage system - it is not available for remote villages, summer cottages and cottage settlements. The way out of the problem is the arrangement of our own facilities for the collection, treatment and disposal of wastewater. The simplest and cheapest solution is to build a cesspool without a bottom with your own hands.
How is a cesspool without a bottom
There are two types of cesspools:
- sealed;
- leaky, without a bottom;
The first are the simplest structures made of concrete, brick or plastic, completely waterproof. They collect liquid and solid waste that flows through the sewer pipe. Regularly, on average 1-2 times a month, a sewer truck should pump them out of a sealed drain pit. The services of such specialists are expensive, because some owners are thinking about how to partially dispose of sewage waste using soil tertiary treatment.

And the simplest option is leaky cesspools. They are a shallow well made of bricks, old tires or concrete rings. They do not have a sealed bottom - either the soil itself or a filtering pad made of sand, gravel or crushed stone is located there. Also, many holes are created in the walls of the cesspool for the purpose of drainage. Through them and the bottom, liquid sewage flows partially go into the ground and undergo natural soil tertiary treatment. The rest remains in the well and is pumped out by a sewage truck 1-2 times a year.
You may be interested in information about how it looks

Such a structure is suitable for solving the problem of waste in a dacha visited during the spring and summer, or for a village house where 1-2 people live. For a large family without a bottom, they are not an effective and environmentally friendly solution - in this case, it is preferable to build from several concrete wells.

Advantages and disadvantages of a cesspool without a bottom
Let's take a quick look at what is good and bad about the design of a leaky cesspool. Its advantages include the following.
- The extremely low cost of the structure compared to the cost of a full-fledged septic tank - both factory-made and home-made, built from rings or monolithic concrete.
- Ease of creation - a pit and a trench are dug under the pipe, the walls of the cesspool and the cover are installed, and the connection is made. All these activities can be performed independently without any problems.
- Construction speed - it is quite possible to equip a cesspool without a bottom made of concrete rings in a couple of days.
- Lower costs compared to a sealed cesspool - you can call a sewer truck not every month, but only 1-2 times in a whole year.

Due to its simplicity and maximum cheapness, such a sewer structure has serious disadvantages.
- Environmental problems - if such is placed near a source of drinking water, then over time the latter may become unusable - sewage seeping through the soil will poison it with E. coli and other microorganisms. It is possible to drink from such a well, but it is not safe.
- Potential for conflict with neighbors - those who live near you are unlikely to like the existence of a potential source of pollution. But, as practice shows, this is a problem only for comfortable cottage settlements and garden associations - in other places, most likely, neighbors have the same or even simpler structures for collecting sewage.
- Problems with SES. If the sanitary-epidemiological service comes to your site with a check, then it may consider that you have a cesspool with seepage into the soil as a violation of the norms, with the corresponding consequences.
- The fragility of the work - it should be understood that such a cesspool is unable to function for a long time - over time, the soil around it will silt up and stop letting water in the same volume. As a result, the structure will be filled with drains faster, so you will have to move it to a new place or replace it with a full-fledged septic tank. Or more often contact the services of a vacuum cleaner.

Choosing a location for the location of the cesspool
It was mentioned several times above that a cesspool without a bottom is not the best solution in terms of ecology and compliance with sanitary standards. But a competent choice of a place for its construction will minimize possible risks and avoid poisoning of reservoirs and wells.
It is worth saying that the current sanitary and building standards do not give a clear answer to the question of the admissibility or, conversely, the inadmissibility of building a cesspool without a bottom. Below are some excerpts from various documents.


So, a leaky cesspool, if possible, should be created on soils with good water permeability and in places where the groundwater level is at least 1 meter below the bottom.
The list below gives the minimum distances between a similar structure and various objects:
- from a cesspool to a drinking well - at least 50 m;
- to the reservoir - at least 30 m;
- to trees and vegetable gardens - at least 5 m;
- to the road or the border of the site - from 2 to 4 m;
- to residential buildings - 5 m.

Advice! Before starting construction, familiarize yourself with how the facilities for collecting sewage from the nearest neighbors are arranged. Also, if the business takes place at the dacha, discuss this issue with the chairman of the partnership. This will avoid unnecessary conflicts and reduce the likelihood of a visit from the sanitary service to your site.
Construction of a cesspool without a bottom from concrete rings
The most popular material for self-arrangement of cesspools without a bottom, drainage wells and septic tanks are concrete rings. They have sufficient strength for such a structure, their installation does not take much time, and their low price makes these products affordable for any household. The process of making a cesspool without a bottom from concrete rings with your own hands is given below in the form of step-by-step instructions.
Important! Before starting your excavation work, determine how many concrete rings and what size you need. For convenience, the main characteristics of the most popular products are summarized in the table.
Table. Dimensions, weight and volume of concrete rings made in accordance with GOST 8020-90.
| Name | Inner diameter, m | Outside diameter, m | Height, m | Weight, kg | Internal volume, m3 |
|---|---|---|---|---|---|
| KS10.3 | 1 | 1,16 | 0,29 | ≈200 | ≈0,3 |
| CS10.6 | 1 | 1,16 | 0,59 | ≈400 | ≈0,62 |
| CS10.9 | 1 | 1,16 | 0,89 | ≈600 | ≈0,94 |
| CS15.6 | 1 | 1,68 | 0,59 | ≈660 | ≈1,3 |
| CS15.9 | 1,5 | 1,68 | 0,89 | ≈1000 | ≈1,97 |
| CS20.6 | 2 | 2,2 | 0,59 | ≈970 | ≈2,24 |
| CS20.9 | 2 | 2,2 | 0,89 | ≈1480 | ≈3,38 |


Step 1. Start the construction of a cesspool without a bottom by determining the place where it will be located. More on this in the previous section of the article.
Step 2. At the chosen place, mark and determine the boundaries of the future excavation. Its diameter is made 20-30 cm larger than the outer diameter of the concrete ring.
Step 3. Begin direct excavation. If the cesspool is supposed to be shallow, and there is enough time, then earthworks can be done manually. It is advisable to do this in pairs - one digs, and the other lifts the excavated soil up. The work is greatly facilitated by using a bucket with a strong rope and a garden wheelbarrow (or walk-behind tractor).


Important! If, when digging a pit manually, it was found that the soil is inclined to crumble, then, for reasons of your own safety, work should be stopped immediately. Otherwise, there is a risk of suddenly being covered with earth. In such situations, you will have to involve an excavator in the case.
Step 4. Regularly measure the depth of the pit using a tape measure. For cesspools without a bottom, this depth does not exceed 3 m. Also remember that there must be a distance of at least 1 m (preferably more) between the sewage and groundwater.

Step 5. The concrete rings are usually delivered by the manufacturer and are transported by truck with a loader crane. Check the availability of all ordered products and their quality.

Step 6. Using a crane, immerse the first concrete ring into the pit.


The ring is lowered into the pit

Important! For better fixing of the rings to each other, apply cement mortar to their ends before laying a new product.
Step 7. Place the second and subsequent rings on the first ring in the same way. At the same time, align them relative to each other.

Step 8. Complete the concrete installation by installing the top round slab in which the hatch hole has been cut.

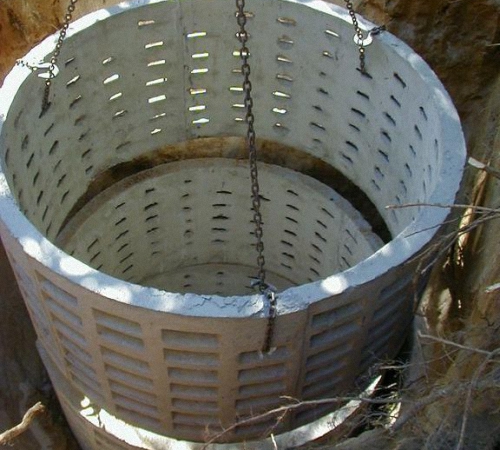
Step 9. In loamy conditions, effective drainage will require a large contact area. If you live in an area where the soil does not absorb water well, drill a series of medium-sized drainage holes at the bottom of the sump. Their total area should reach 10% of the total area of the internal surface of the structure.

Important! Often, a cushion of crushed stone with a thickness of 30 to 50 cm is poured onto the bottom of such a cesspool. Its use allows you to at least slightly clean the sewage drains going into the ground. At the same time, the filler of such a pillow requires regular replacement or washing, which is not the most pleasant and simple job. Each homeowner must decide for himself what is more important to him - the ability not to pollute the surrounding land and groundwater too much, or not having to go down to the cesspool and replace the crushed stone filter cushion. Instead of the latter, you can use ordinary sand.

Step 11. Fill the space between the pit walls and the concrete rings with earth or sand.
Step 10. Complete the arrangement of a cesspool without a bottom made of concrete rings by connecting a sewer pipe and installing a hatch.


Concrete ring prices
concrete rings
Video - Cesspool
Construction of a cesspool without a brick bottom
Another, no less popular option for a cesspool is a brick-built structure. It should be understood that it will require more time and effort than a construction of concrete rings. But if you have a lot of unused bricks on your site after the construction of a house, fence or shed, then it makes sense to put them into operation and make a cesspool without a bottom completely with your own hands, without involving outside people and construction equipment. The step-by-step instructions with photos below will help you in this matter.
Step 1. The construction of a cesspool made of brick, like any other sewer structure, start with earthworks - choose a place and start digging a pit of the appropriate size.


Important! The presence of the simplest lifting device will greatly facilitate the process of extracting soil from the pit.
Step 2. Check the depth and diameter of the pit with a tape measure.
Step 3. Get rid of the excavated earth from the excavation. At the same time, leave part of it for the subsequent filling of the cover of the structure.
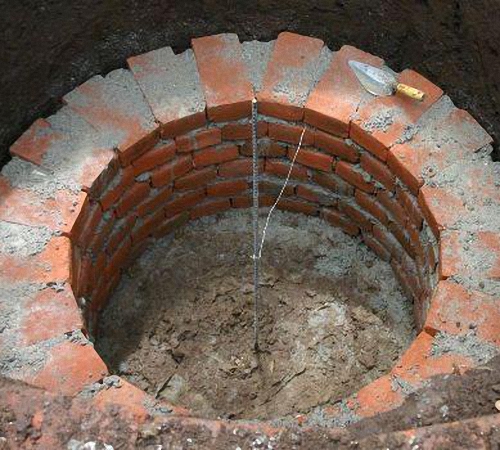
Step 4. At the bottom of the pit, build a flat ring of bricks, as in the image below. It will play the role of a kind of base under the walls of the cesspool.

Step 5. Start laying the bottom of the brick sump walls. If you have not previously dealt with such a material, then the construction of this structure will be a good practice for you, during which you will gain basic skills in working with bricks.

Important! Silicate bricks absorb water well and gradually deteriorate. If you want the sump to last longer, replace them with ceramic ones.
Step 6. Continue laying and climb higher and higher to the edge of the pit. Cover the space between its walls and the brick with sand - it absorbs water well and partially filters it before entering the ground.

Step 7. Finish laying the walls of the cesspool made of brick, not reaching a little to the surface of the ground.

Step 8. Take the sewer pipe out of the house into the cesspool.
Step 9. Reinforce the cesspool with a metal angle set as shown in the image below. Instead, it is allowed to use a wooden bar, but the latter will not last too long - over time, the material in an aggressive environment will begin to collapse and rot.

Step 10. Fold over the same flat brick ring as on the bottom of the sump.

Step 11. Cover the sump from above with a prefabricated concrete slab or poured on site. Do not forget about the hole for the hatch through which the regular pumping out of sewage will be carried out.

A cesspool without a bottom is a quick and economical solution to the problem of drainage of sewage. But, if possible, replace it over time with a full-fledged septic tank produced at the factory or.
In most cases, there is no sewage system in the country. A cesspool is used instead. There are many options for its construction, and each has its own advantages and disadvantages. Next, we will consider in detail the typical designs of cesspools and analyze the methods of their installation.
What is a drain pit and what is it for
A drain pit, or as it is also called a cesspool, is necessary for private houses that do not have a direct sewer supply. A proper drain pit recycles waste, allowing certain substances after treatment to be absorbed into the ground without harm to it.
The popularity of this type of wastewater treatment plant is due to the ease of installation and the speed of work. One person without helpers is able to complete all the work within 3-5 days, depending on the type of construction.
On the other hand, there are certain difficulties associated with the further operation of the cesspool. First of all, this concerns the issue of pumping out sewage. Correctly selected pit volume is of no less importance.
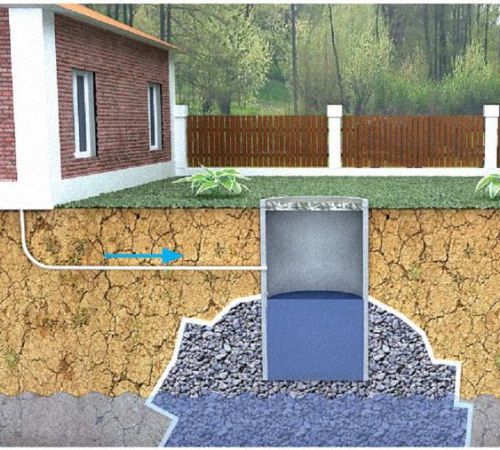
Drain pit device
The simplest structures, which are most often found in rural houses and simple summer cottages, are digging an old barrel or tank into the ground that has served its life. Such a design will allow for the collection and partial filtration of wastewater, provided that their daily amount does not exceed 1 m³. Such schemes have not received approval from the sanitary services, since they can harm the surrounding ecology.
The simplest drain pit in a private house is a simple structure. Through the sewer pipe, although there is often a direct flow, the sewage enters the container, the bottom of which is covered with silt. The drain pit should be equipped with a gas outlet pipe through which the methane generated during the waste processing process will begin to escape to the outside.
Such a system is completely unsuitable for those houses in which permanent residence is planned. Taking into account the fact that the average daily water consumption for a family of four is up to 1 cubic meter, this leads to the need for frequent cleaning of the cesspool, and, accordingly, to financial costs. Previously, a ubiquitous method of removing sewage into the soil with their subsequent natural filtration was widespread, but in current realities this method is understandably prohibited by the sanitary service.
Nevertheless, such a design is quite common, and will not have special alternatives for summer cottages with infrequent visits. It is not difficult to equip it on your own, but the following points must be taken into account:
- The walls of the pit will require strengthening, as the water will gradually begin to collapse the structure. To prevent this, a tank is installed, or walls are built of brickwork or concrete rings.
- The volume of the cesspool must be at least three cubic meters. The correct calculation is made taking into account the fact that each person will need at least one cubic meter of space.
- The installed ventilation will increase the rate of waste processing.
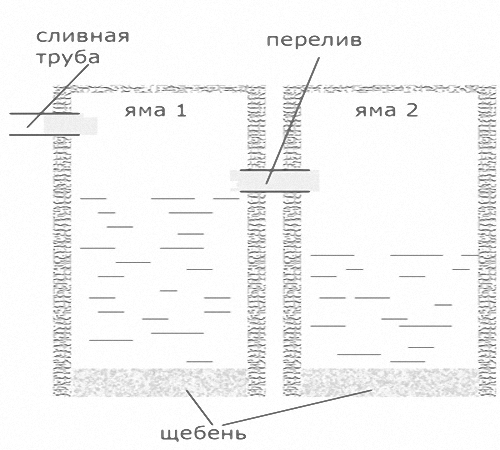
- If an overflow pit is equipped, then it practically does not need to be cleaned, since its design assumes the presence of several chambers for waste processing. In this case, the sewage enters the first chamber, in which it accumulates. After the level of sewage reaches the overflow partition, it will flow into the second pit and there it will be absorbed into the ground. Solid waste remains in the first pit and is recycled by bacteria.
Varieties of drain pits
By the type of execution, cesspools are divided into:
- concrete storage,
- brick,
- with receiving capacity,
- temporary,
- with timber formwork,
- without a bottom, with the output of waste moisture directly into the ground.
Making a drain pit out of concrete
It is a quick-assembly solution for receiving sewage and has the following advantages:
- Construction speed. In fact, with a set of prefabricated concrete rings, such a structure is erected in one day. There is only one drawback - you need a crane or excavator to work.
- Reliability and durability of concrete.
- Minimal installation complexity.
Such a structure is being built quickly:
- First, a hole is dug at the planned depth.
- Further, the site is leveled.
- The first ring is installed with a crane.
- The soil from under the ring is evenly removed, while exposing signal supports that prevent the structure from skewing.
- After the second was installed on the first ring, they are fastened together using metal staples.
The installation continues in a similar manner to the planned depth.
When all the rings have been placed, a concrete ceiling is installed with the help of a crane, with holes made in it for a hatch and a ventilation pipe. The finished structure must rise above the ground at a level of at least 30 cm.
To provide it with the best tightness, all seams and the junction with the sewer pipe are carefully sealed with bitumen mastic.
The problem of a sealed design will be its rapid filling, and the need for frequent call of sewage services, which will pump out sewage. In the same case, if the withdrawal of water into the ground is allowed, then rings with holes made are purchased. Installation technology is no different from the above.
In order to give the finished structure a more complete look from the point of view of aesthetics, it is necessary to sprinkle the part of the drainage system protruding above the ground with earth, while providing the casing with plantings that will perform a decorative function. For example, planting a Mauritanian lawn that is undemanding to the conditions will make it possible to turn the treatment facility into a blooming flower bed. 
Brick drain pit
According to experts, the best option would be to use ceramic bricks, which will ensure the strength and durability of the structure. The very process of erecting a drain pit made of brick is conventionally divided into several stages:
- a drainage layer 20 cm thick, consisting of sand and crushed stone of different fractions, is placed in a hole dug to the required depth,
- after that, they begin to erect the walls, laying the bricks in a checkerboard pattern, taking into account a 5 cm gap between them for better filtration of waste materials,
- on all sides, as the masonry grows, bricks are lined with crushed stone of large fractions,
- make the necessary gap in the masonry for inserting the sewer pipe.

There are often conflicting recommendations about the final stage. For example, to reduce costs, it is proposed to carry out masonry half a brick thick, but it is important to remember that such a structure will hardly take on the weight of the concrete cover.
The design itself provides for two options for laying bricks:
- to ground level
- 80 cm below ground level.
In the case of laying bricks to ground level, space must be left taking into account the thickness of the concrete cover. The recommended construction with the completion of the masonry, before reaching the ground surface by 80 cm, raises some doubts about its advisability for a number of reasons:
- since the design will require the installation of a closing cover, then in the end the drain will still be deepened into the ground by at least 50 cm - which is dangerous with a possible fall into the pit,
- it is advised to fill the cover with earth to the level of the surface, but in this case, either access to the hatch will be blocked, or another pipe with a larger diameter than the size of the cover will have to be mounted on the installed cover - and in this case, the system will be subjected to additional stress.
Masonry is inferior to concrete in a number of factors:
- a concrete structure is erected much faster and ultimately requires less funds for construction,
- brick is more susceptible to moisture,
- to evenly distribute the load on the walls, the cesspool should have a cylindrical shape.
The feasibility of erecting brickwork is manifested only when there is no way to call heavy cargo equipment.
Receiving containers made of plastic
If the question of how to make a drain pit without resorting to special costs is acute, then you need to pay attention to the option of installing a polymer tank of the required capacity. In this case, all work is reduced to the fact that the required amount of earth is dug under the tank, and then the collection is placed in the prepared hole. After that, the remaining space is filled with soil. It is important to remember that sealed structures without fail require the installation of a gas outlet.

The advantages are the following:
- ease of construction,
- minimum costs in terms of labor intensity,
- protection of air from the release of an unpleasant odor,
- durability of the polymer material, which is up to 50 years,
- during use, no waste substances get into the ground.
Of the minuses, you need to pay attention to the need for periodic pumping of sewage and the small capacity of the tank, so this option is optimal for use under low load conditions. For example, if the dacha is visited once a week, and a small amount of waste goes into the drain pit.
Temporary drain pits
They are made from worn-out car tires. It is important to take into account that the inner diameter must be at least one meter, otherwise the pit will quickly become clogged with sewage. In fact, the structure is easily erected: a hole of the required depth and diameter is pulled out, after which it is filled with tires, laying them one by one to ground level.

Of the advantages of the design, the following are distinguished:
- simplicity of work,
- low price of used tires,
- after installation, the empty space is filled with earth, and no additional finishing is required.
It is worth remembering that the design is suitable for a toilet that is taken out to the street and not connected to the house by the sewer system. Since it is assumed that the load on the pit will be negligible. Despite its name, with infrequent use, such a pit will last up to 25 years.
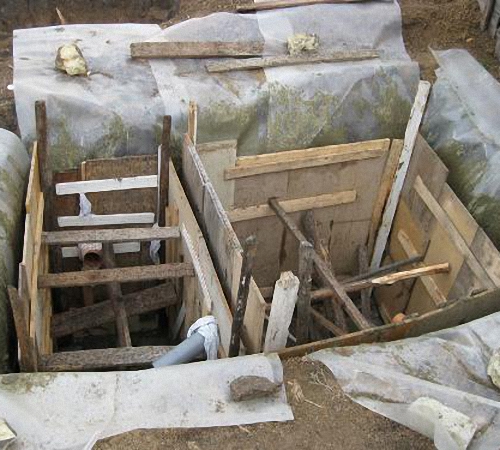
Drain pit with timber formwork
As with the previous design, the use of wood is suitable as a temporary solution. In fact, this option is still sometimes used in rural areas and in some summer cottages, but due to the fact that wood, even with high-quality processing, will not withstand more than ten years, using wooden formwork does not make much sense. Nevertheless, this is a drain pit, the price of which will be the most acceptable and will not exceed 3000-4000 rubles.
Of course, the speed of construction and isolation of the soil from sewage are the advantages of the design, but nevertheless, it is inferior to all types of cesspools and for the most part is a relic of the past.
Drain pit without a bottom
It is a cesspool made of bricks, with the difference that the bottom of the drain is not processed. In some cases, the bottom is covered with a metal mesh, but in a chemically aggressive environment it quickly rusts and loses its usefulness. Sewage evenly falls into the ground, but due to the strong silting of the bottom of the pit, additional cleaning is periodically required.
In addition to the above, when arranging a cesspool, you need to pay attention to some tips to improve the efficiency of processing and ensure greater durability of the structure:
- It is better to drain the bottom of the pit with the help of coarse gravel to prevent premature siltation. The layer thickness must be at least 10 cm.
- To improve drainage, asbestos pipes are inserted at the bottom, which are installed with a ledge at a level of 50 cm from the bottom.
- It is better to finish the walls with clay to reduce the concentration of harmful substances entering the soil.
- In the event that there is one cesspool on the site, but its volume is not enough, it is more advisable to arrange another one nearby and connect a PVC pipe with the first. In this case, the structure will become overflow and will need to be cleaned much less frequently.
- From the first moment of use, it is necessary to use special preparations containing bacteria. They speed up the natural recycling process and reduce unpleasant odors.
- The overlap should go above the ground level so that in the event of heavy rain, the drainage pit does not overflow with water, and its contents do not fall on the site.
- In any version, the structure must have a chimney to remove accumulations of methane and other hazardous substances.
- Inorganic substances, including low-quality toilet paper, can significantly reduce the life of the structure and contribute to strong silting of the surface.
With the arrival of summer, many people leave the stuffy city and spend time at the dacha. But not always at the summer cottage there are elementary amenities, including this also applies to modern sewage. With urban housing (apartment) everything is clear: all waste and waste water "goes" into the centralized sewerage system, but for a summer cottage / private house not connected to a centralized sewerage system, this is a kind of obstacle to good rest. But this problem is completely solvable and the drain hole with your own hands will just bring life in the country closer to the civilized world.
A drain pit in a private house is the simplest, reasonably convenient and functional example of an autonomous sewage system. This system collects used water into a storage pit. And without this there is no way, because a person not only drinks water, but also actively uses it - washing, taking a shower, bath, washing, preparing food. Today it is difficult to do without water and such amenities as an irreplaceable washing machine. Therefore, any summer resident or just the owner of a private home should think about where to put this used liquid.
Drain pit - choice of location
Before making a drain pit, you need to decide on the choice of its location. This is a tricky question because it has a number of aspects. The first aspect: a drain pit - the distance to the building should be at least five to eight meters, such parameters must be adhered to and not have a drain pit near the house. Another issue is the length of the sewer pipes, they should not be excessively long. Well, the third side of the question concerns the cleaning of the drain pit, that is, there should be an access to a sewer truck. And also you need to pay attention to wells and wells: if they are present on the site, then there can be no talk of a drain pit with natural filtration. The minimum distance allowed between these two objects is 30 m.
As for determining the level of groundwater, this argument does not play a large role in the choice of a place for a drainage pit, since groundwater only affects the type of such a structure: drainage or sealed.
The volume of this wastewater tank
Before digging a drain hole, you must correctly determine its volume. This parameter depends on the nature of the use of housing: people live there permanently or seasonally, on the number of family members, on the frequency of using the bath, shower, etc.
The appearance of a typical drain pit
This may also apply to clayey soil that is not prone to rapid filtration, therefore, if the storage pit will still cope with its functions for the first year, then in the future the soil will be saturated with fats and practically cease to absorb waste. Therefore, if possible, it is better to make a drain pit with a margin, for example, for a family of three people - 6 cubes.
Pipe laying rules
If the volume has already been determined, then you can start laying pipes. At this stage, a very important point: maintaining a constant slope of 3-5 degrees, this is approximately 4-7 cm per meter of the pipe being laid. And you also need to take into account the fact that the longer the pipe, the greater the slope must be observed.
The choice of material for the construction of a drainage pit
The device of the drain pit can be different:
- brick;
- plastic;
- concrete rings

The initial stage of construction - foundation pit
All these materials are used to equip the drain structure. The walls of the pit can be lined with bricks, or you can use a container as a base: a barrel without a bottom, a body from an old washing machine, car tires that are stacked one on top of the other.
Waste collection tank shape
Usually, a drain pit in the country is equipped in the shape of a cube. But this is not the best option. It is more rational to use a cylindrical shape, since it is known that a cylinder is a more solid figure. The loads on its walls are evenly distributed, and the probability of destruction of the cylindrical drain pit is practically reduced to zero. And quite the opposite is the case with a cubic drain pit, its walls do not withstand the load and the probability of its destruction is significant.
Ceramic brick drain pit
So, first, a hole is dug according to predetermined dimensions. High-quality soil - black soil, can be distributed on the site, and loam, sand, clay and stones are best removed from the yard.
How to make a brick drain pit? Ceramic brick is the best option. It has positive characteristics: it serves for a long time and does not collapse from the destructive action of moisture. You need to lay it on a light foundation. The thickness of the walls can be half a brick to save money; when laying bricks, you need to remember about the gaps between the ends for filtration (5 cm).
Important: the walls of the pit can be laid out not only with bricks, but also with natural stone.
After completing the laying in the lower part of the pit, you can start the process of drainage filling. For this, the space between the foundation pit and the walls of the drain pit is filled with crushed stone, pebbles or construction waste (broken concrete, brick).
Important: the layer of drainage bedding should be approximately 20 cm.
The laying is done not up to the ground level, but 80 cm lower. At this level, a reinforced concrete slab is equipped for the floor. It can be factory-made or home-made. Do-it-yourself concrete slab can be poured over the formwork (20 cm thick).
Also, in this concrete structure, it is necessary to take care of the hatch for pumping out drains and arrange a reliable cover in order to fully exclude the possibility of children falling into the drain pit. Optionally, ventilation of the drain pit can be made.
Important: if the drain pit is located at the entrance of the vehicle, then the concrete floor slab must be thicker (at least 25 cm), plus it must also be well reinforced.
The remaining space is covered with earth. That's it, the drain pit is ready, you can safely walk and drive on it, and you can also plant a flower bed for the beauty of the yard, then such a device will not spoil the design of the site.
Concrete ring structure
People who want to make a drain accumulator on a site often have a question: how to make a drain pit from concrete rings correctly? A drain pit made of reinforced concrete rings is easy to build, you don't need any special qualifications for this work, you just have to work hard physically.
Stages of work:
- At the site where the placement of the drain pit is planned, the first ring is installed. The ground is selected under it and the ring is lowered.
- The second ring is installed on the first ring (with the same size). The edges of such rings have protrusions, it is thanks to them that the sewer rings are assembled into a single structure.
- The soil is selected until the second ring also lowers.
- The drain hole can consist of 2-3 rings or more, depending on the planned size.
Important: the upper last ring must necessarily rise 20-30 cm above ground level.
- The hole for the outlet pipe is easiest to make with a hammer drill using a crown drill. And if this is not the case, then you need to draw a circle of the location of the drain pipe on the ring, drill it with a regular drill, and then knock it out.
- From above, the drain pit is covered with a solid cover: reinforced concrete, cast iron.
A video clip will tell you how to remove sludge when digging a drain hole with your own hands.
Little tricks of arrangement
It is clear that sooner or later you will have to call a sewer truck to collect wastewater. But how to make a drain hole, so to speak, "long-playing"? There are several nuances that will help extend the cleaning time of the pit. First of all, you can split the drain. That is, in addition to the main drain pit, equip another pit, but only of a smaller size. It will drain water without solid waste (from the washing machine, from the bathroom, shower). The water in the smaller drain pit will quickly drain into the ground, since there will be no accumulation of fatty deposits on its walls.
And secondly, you can take advantage of the achievements of modern science. To do this, you need to purchase special means, consisting of a biological basis. It is a unique liquid with bacteria. Such bacteria recycle waste, drainage is cleaned, and water seepage into the ground is improved.
The technology for arranging drain pits (with bricks and concrete rings) is simple and quite feasible on our own, without the involvement of a team of professional workers. And the benefits of such a device are enormous: comfort, convenience and reliability.
A drain well, known in everyday life as a pit, is the end point in the use of an autonomous water supply system, which allows you to operate communications with maximum convenience for residents. Any country house or summer cottage with a functioning water supply system must be provided with a sufficient drainage depth. Without it, the laying of a water supply system will be meaningless, since the vast majority of small settlements are not provided with a central sewerage system.
Drain pits are of different types, differing in design, but they have the same task - the timely discharge of runoff water. It is not customary to drain the drain from toilets; this structure accumulates sufficiently clean water, which, with appropriate treatment, can be reused for technical needs or irrigation. Of course, we are not talking about sewerage, drainage liquid with a high content of chemicals that are dangerous to the environment. For example, acids, drugs or chlorine.
Device
There are three main structural types of drains. Any of them can be chosen for your suburban area, subject to meeting all the requirements and expectations of the owners.
- Sealed pits are the safest structures for the environment and humans, from which pathogenic bacteria or harmful substances cannot get into the ground. Such structures are often called sedimentation tanks or storage wells. The liquid is stored in them until the very moment of pumping out by flushers. You can build such a pit yourself. For handicraft models, concrete rings are used with subsequent sealing of the joints, old plastic or metal containers (barrels, tanks) equipped with tight-fitting lids.
- Also, industrial designs are produced that are completely ready for use. The only drawback of such a drain will be the volume limitation - more than necessary, the water cannot be drained. And calling the sewers is always an additional expense.
- Filter pits are not entirely legal structures, which, nevertheless, continue to be used by summer residents. The design of the drain involves the use of a bottom filter made of natural sorbents - sand or peat. You can also use broken red brick, crushed stone. The principle of operation of the pit is to gradually drain the liquid into the ground. As it seeps through a thick filter layer (at least 0.5 meters), water is purified from large organic impurities and absorbed into the ground. Such drains are rarely pumped out by pumps or special equipment. The need for the help of sewers arises only when the bottom and walls are clogged with silt or fat deposits.
It should be noted that with the active use of the sewage system, it is prohibited to build such a drain. A large amount of liquid makes filtration of poor quality. As a result, the soil becomes contaminated with bacteria and environmentally harmful chemical impurities (for example, detergents).
According to sanitary standards, filter wells are used only with a daily flow volume of one cubic meter.Such a structure is ideal for draining water from baths, showers, baths.
 In rare cases, it is possible to drain used water from washing machines here (provided that the drain is located remotely from wells, wells and water pipes, as well as vegetable beds and gardens).
Two-chamber structures are an attempt at a makeshift construction of a complex system from a sump and a filter well. Two wells (pits) are connected at the top with an overflow pipe. Water enters the first sealed pit. Gradually, it settles, large impurities settle to the bottom. Then the liquid flows into the adjacent pit, which does not have an airtight bottom. The water is gradually absorbed into the soil. And from the first well, the contents must be regularly pumped out using a drainage or fecal pump. For greater efficiency of the system, it is recommended to fill in biological products into a sealed sump, which will process waste to safe components - the sludge will settle to the bottom, and completely purified water will go into the filter well.
Appointment
It is forbidden to drain the drain from the toilet or kitchen into the drain type pits!Plums are designed to collect relatively clean water: 
- from shower cabins;
- baths or saunas;
- from washing machines;
- washstands and sinks.
Here you can also drain the water through the sewer trays and gutters after washing the car.
But such water must be placed in an airtight pit, as it contains the remains of gasoline and engine oils.
Additionally, you need to take into account the capacity of the sewer truck, which you will periodically have to hire to pump out the drain. If the volume of the pit is too large, it will be pumped out by half, which is not very profitable from an economic point of view.
How to find the right place for the pit
Of course, choosing a place suitable for digging, if the territory of the site is already built up, is quite difficult. However, even in such a difficult situation, it is necessary to strictly adhere to the basic sanitary and technical standards: 
- The pit should be at least five meters apart from the dwelling. Moreover, the distance to the structures located on the neighbor's site is also taken into account. The drain is separated from the fence by the same distance - these are the sanitary standards for this element of sewer systems.
- A free access is provided to the pit - a driveway for a truck is being set up.
- It is forbidden to drain the slopes! Placing in such a place will lead to soil erosion and the collapse of the pit walls (plastic containers may float).
- The pit is located at a distance of 30-50 meters from any sources of drinking water.
The pit itself is two meters deep. Ground water very quickly damages or washes out the structure of the pit, rendering the drain unusable.
What can you build from
For sealed pits use:
- Old plastic or metal containers. This is one of the budget construction options.
- Large diameter concrete rings (the well is sealed!) Or concrete mortar. A timber formwork is pre-built, into which the solution is poured. This type of structure is completely sealed. Additionally, the walls and bottom can be treated with a sealant solution.
- Industrial polymer wells are quite an expensive solution to the problem of sewer drainage. But its installation does not require additional labor costs.
Suitable for filter pits: 
- Brick. With the help of such a building material, it is easy to achieve good water permeability of the walls. Drainage holes are usually made at the bottom of the pit, in addition to the backfill filter.
- Special concrete rings that already have drainage holes.
- Car tires are perhaps the most affordable building material that can provide high-quality absorption of liquid into the soil.
- Old metal or plastic containers are a universal way to build both a sealed and a filter well. In the latter case, holes are cut in the bottom or holes are drilled.
Work order
The construction of the sink includes the following works: 
- Trenches and a foundation pit are being prepared. The size of the pit should be slightly larger than the main pit structure.
- Sand and gravel are laid out on the bottom, the pillow is compacted.
- A concrete slab is laid on top of the pillow or a screed is made. This is not necessary for filter pits.
- Depending on the building material, the following is carried out: brickwork, installation of rings or ready-made containers.
- With the help of rubber couplings, the sewer is connected.
- A ceiling is installed on top (a concrete slab with an opening for a hatch or a board made of boards).
- A hatch with a cover is installed and a ventilation pipe is equipped.
- From above, the structure is backfilled with soil, and for side backfilling, you can use clay, sand or fine gravel.
Tools and building materials
To carry out the work you will need: 
- bayonet and shovel;
- manual roller for compacting cushions:
- hacksaw for cutting pipes;
- puncher for punching technical holes in concrete (if a reinforced concrete structure is being built);
- sealant;
- cement (used when laying concrete rings);
- sand and crushed stone for the bottom cushion;
- plastic or metal container (if you plan to use this option);
- bricks for the construction of a brick well.
Construction work should be preceded by a plan and calculation of the amount of building materials. According to the exact data, the list of building materials and required tools is corrected. see our material.
Very expensive but pays off quickly!
If you have damaged precious metals, then you, in any case, are interested in making a profit from them. You will learn how to do this in our
1.
2.
3.
If in multi-storey buildings the owners of real estate do not think about the question of what to do with the waste water and sewage, then for the owners of private households the problem of disposal of waste and sewage requires a permanent solution. They have no choice but to make a drain pit with their own hands. This option for arranging a sewage treatment plant is the simplest and most affordable when performing construction on its own.
Beginning of the improvement of the personal plot with the installation of a water supply system and a sewerage system, since it is impossible to call being in nature comfortable if you have to carry drinking water from a well and, if necessary, run to the nearby bushes.
There are several options for the disposal and processing of wastewater and sewage, but the most simple design is a cesspool. It is necessary to have knowledge of how to properly make a drain hole without the help of specialists, so that in the future you will not have problems with its operation and the environmental situation in the area adjacent to the house.
Types of drain pits
Despite the simplicity of the design, the drain pits differ in the way they are implemented.They are:
- sealed;
- filtering;
- two-chambered.
When the pit is made sealed, impurities do not pollute the soil and groundwater. As a result, the ecological system will not be threatened by anything, as well as the sources of drinking water. The advantage of such a sewage treatment plant is that it can be used regardless of the hydrogeological conditions in the adjacent area.

But there are also disadvantages. Waste and sewage accumulated in a sealed container must be periodically pumped out, and calling a sewer is not a cheap service. The pumping frequency depends on the volume of the tank being used.
In fact, sanitary norms prohibit the construction of a local sewage system of such a design: getting into the ground, untreated sewage can cause irreparable harm to the environment in a given area. They can even be a source of pollution of drinking water sources, and this is already extremely dangerous for human health.
This option, if used at the present time, is only for summer cottages, since a small amount of water is required for the people living in them. It is recommended to build filter-type waste pits only on condition that the volume of wastewater during the day is no more than a cubic meter. When there is a small amount of wastewater, they manage to be recycled by natural decomposition.
Often, pits of this type are equipped during the construction of baths, steam rooms and for houses in which the separation of drains is provided. In the latter case, it is necessary to lay two sewer branches and build two drainage pits on the site. The first of them, equipped with a filter type, receives waste water from a washing machine, a shower cabin, and a washbasin. These drains are considered to be relatively clean.
In the second pit of a sealed type, sewage from the toilet and water from the kitchen are sent.
Two-chamber drain pit... This solution to the problem of wastewater disposal is considered practical and reasonable.
The principle of operation of this treatment plant, shown in the photo, is as follows:
- a drain pit, consisting of two chambers, is connected in the upper part by an overflow, while the first of them is sealed, and the second is filtering;
- undivided drains initially enter the first of the chambers, sealed, and settle there (mechanically separated);
- solid particles sink down to the bottom, and less polluted water is poured into the next chamber;
- from another chamber, water is filtered into the soil;
- the waste collected in the first chamber must be pumped out from time to time. To reduce the amount of waste, special biological preparations are used. The strains of bacteria contained in them promote the processing of organic matter, which leads to a decrease in the amount of sewage.
How to make a drain pit correctly
Before you make a drain hole in a private house, you need to design a construction plan. It is necessary to select the type of structure, the construction site and calculate the required volume of the tank.Of course, the amount of effluent is determined individually, but generally accepted norms also apply. For example, for a family that permanently resides in a house and has three members, a pit is built with a capacity of 6 cubic meters.
When calculating the volume of the container, the following points are taken into account:
- how affordable is the cost of services provided by sewers;
- the amount of waste that the sewage equipment is capable of pumping out of the pit at a time.
When determining where to make a sump, a number of factors are taken into account:
- distance to the place of occurrence of soil water. It should be sufficient to dig a two-meter deep foundation pit (this is the minimum value). Read also: "".;
- the distance from the source of drinking water to the sump must be at least three tens of meters. It is extremely important to observe the minimum distance from the well to the cesspool, for your own safety;
- you can not make a cesspool on a slope;
- it is necessary to provide for the possibility of an entrance of special equipment designed to clean the pit from the drain;
- it is forbidden to make a sump in the immediate vicinity of a residential building and the fence of a neighboring site. The minimum distance to a residential building should be 5 meters.

Thus, before making a drain hole in your house, the place should be chosen very carefully in order to prevent pollution of the area surrounding the building, especially when the site is built up. In any case, the rules must be followed.
The choice of building materials for arranging a drain pit.
When creating a sealed cesspool, the following materials are used:
When a filter type drain pit is being built, you can:
- impose a brick on it, leaving a gap of 5 centimeters between the rows in a checkerboard pattern;
- install reinforced concrete rings for drainage wells with perforation in it;
- use car tires. They are stacked on top of each other, cutting off the lower rim on each tire;
- use used metal or plastic containers or barrels. The bottom should be cut off in them, and holes should be made in the lower part to improve the filtration of drains.
We make a drain pit with our own hands
There is a certain order of how to make a drain pit with your own hands correctly.At the initial stage, a pit is prepared and trenches are dug for laying the supply pipes.
At the pit, the depth must be greater than the projected depth of the drain pit, since space will be required for the drain cushion. It is made from layers of sand and gravel, which are carefully compacted.
If you plan to equip a sealed pit, then the thickness of the layers should be 10-15 centimeters. On top of the pillow, either a reinforced concrete slab is laid, or a concrete screed is poured.
When equipping a filter pit, for better wastewater purification, the minimum layer of crushed stone should be 20 centimeters. Thanks to this measure, the bottom will not silt for a longer time.
Then you need to start strengthening the walls of the sump. For this, brickwork is performed, or plastic containers are used, or concrete rings are mounted.
In the event that a sealed sump is being built, waterproofing should be performed after the walls have been strengthened.
At the same time, the supply pipeline is connected to the container receiving the drains. It is necessary that the connection of pipes to the reservoir is both leakproof and not rigid: then it will not collapse during ground movements. therefore, rubber couplings should be used for the connection.
About 40 centimeters from the surface of the earth, an overlap is made for the sump. Usually, a ready-made reinforced concrete slab with a hatch hole is used. If desired, it is quite possible to make such a slab yourself, having previously made the formwork. Also, the overlap can be built from boards, but it will not be durable.
In order to control the degree of filling of the tank and to pump out sewage in the ceiling, it is necessary to arrange a hatch. In addition, a ventilation pipe should be mounted on the lid to remove gases (including methane) that are formed during the decomposition of the solid content of the effluent. You can pour soil on top of the ceiling, but so that precipitation cannot get into the pit.
When it is planned to create a local sewage system, for those home craftsmen who are new to this type of work, it will not be superfluous to know how to make a drain pit for servicing a suburban home ownership. Even if hired workers are engaged in the arrangement, it will be easier for the owner to monitor the quality of services.
 What is the dream of an office based on a dream book Office based on a dream book of the sorceress Medea
 Characteristics of the Capricorn man by zodiac sign - an avid pragmatist
 Strong biofield in humans, signs