The main property of laying off corners is definition. Definition. Axioms - Geometry - A great reference book for schoolchildren. Mutual arrangement of straight lines on a plane
TOPIC "Basic properties of a segment"
As an example of the use of an electronic textbook in geometry lessons in grade 7, we will analyze how the concept of "Basic properties of a segment" is introduced.
This choice is due to the following considerations:
1. This is one of the most important concepts of both initial and systematic geometry courses;
2. A segment, unlike, for example, a ray or a straight line, has a metric characteristic - length.
The current mathematics program makes the following recommendations:
1. The study of the material is organized based on the life experience of students, their practical skills;
2. The characteristic properties of a segment are noticed in the course of solving problems and performing constructions;
3. The main attention is paid to the formation of skills for measuring and constructing segments using a ruler.
As a result of studying geometric material in accordance with the current program, students should know:
1. That there is a single segment connecting two points of the plane;
2. That the segment is bounded on both sides and is part of a straight line;
3. Definition of equal segments;
4. The property of the length of a segment - the length of the sum of the segments is equal to the sum of the lengths of the sum of the segments.
Students should be able to:
1. Recognize segments, including those included in various geometric shapes;
2. Build segments, designate and measure them;
3. Compare segments.
In the traditional presentation, the study of this material is carried out in accordance with the following scheme:
1. Construction of a segment;
2. Designation of the segment;
3. The length of the segment, units of length;
4. Properties of laying off segments;
5. Finding the length of the sum of segments.
The exercises contained in various current textbooks and teaching aids can be classified into the following types:
a) construction of segments;
b) designation of segments;
c) measurement and comparison of segments;
d) finding the length of a broken line or the perimeter of a polygon;
e) finding the length of the sum of segments.
Thus, the concept of "segment" is directly related to its length. Consideration of the concept of "Segment" will begin with the allocation of characteristic properties that are not related to the measurement. These are properties that allow you to establish the similarity of a segment with other geometric shapes, its difference from them, that is, to include the idea of a segment in the existing system of geometric representations of students.
The main properties of a segment - straightness and limitedness in two directions - are revealed when it is compared with a straight line or a ray.
These properties allow you to measure a segment, that is, to compare its length with a length standard.
Indeed, the length of a straight line and a ray cannot be measured due to their unboundedness. For a curved line, direct measurement of length is difficult due to its arbitrary shape. However, even if the length of the curve is known, then this number does not say anything about its shape, since there are an infinite number of curved lines of a given length. The length of a segment uniquely defines it as a geometric figure.
In this paper, it is proposed to study the concept of "segment" in accordance with the following scheme:
1. construction of a segment;
2. segment designation;
3. basic non-metric properties of the segment;
4. the main property of postponing the segment;
5. segment length, units of length;
6. equal segments, comparison of segments along the length;
7. finding the length of the sum of segments.
One hour is allotted for acquaintance with the topic “The segment and its properties”.
LESSON "Basic properties of segments."
The purpose of the lesson: the formation of students' ideas about the segment as a limited rectilinear geometric figure and the relative position of points on a plane.
I. Preparation for the study of new material.
Students are familiar with the segment, its construction and measurement from elementary school. Therefore, at the beginning of the lesson, students remember the various ways to construct a segment using a ruler and its designation.
Repetition:
Method 1: Using a ruler, we build a straight line, mark two points A and B on it, which determine the segment AB.
Segment AB - part of a straight line,
A B limited by dots.
Section AB
Method 2: We mark two points A and B on the plane. We connect them along a ruler that does not go beyond points A and B.
Segment AB consists of all points
straight line between points
BUT IN A and B, and the points themselves.
Section AB
Students remember everything they know about a segment: 1) a segment is a flat figure (it lies on a plane); 2) it is part of a straight line; 3) the segment consists of an infinite set of points; 4) it is limited on both sides; 5) each point of the segment lies between two given points, called the ends of the segment.
Students remember all this based on the electronic textbook by opening the “segment” page. (Fig. 8)
Figure 8
Presentation of new material. Using the page of the EUP "Planimetry": "Basic properties of the segment"
After the students have remembered and repeated what they knew about the segment, the teacher says: that the ends of the segment are called boundary points, and all lying between them are the internal points of the segment.
After that, the teacher asks the children to turn to the electronic textbook, which shows a drawing and an explanation that leads students to the basic properties of measuring and postponing a segment.
II. Anchoring
Students are invited to complete several tasks on belonging of points to segments, segments to straight lines and rays, as well as their construction, of the form:
1. Mark points K and M in your notebook. Use a ruler to construct a KM segment. Mark points P and T on this segment. Name the segments into which these points divide the KM segment. Into what segments does the point T divide the segment KM?
2. Which of the points indicated in fig. belong to segment CD, and which of them do not?
Questions for consolidation:
1. How are points and lines designated?
2. Which points marked in the figure lie on the line a, which points on the line c? At what point do lines a and b intersect?
3. Formulate the main properties of segments deposition.
4. Formulate the main property of measuring segments.
>>Mathematics Grade 7. Complete lessons >>Geometry: Deposition of line segments and angles. Complete Lessons
Laying Lines and Corners
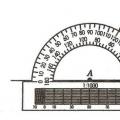
The figure shows how to use rulers on the half-line a with the starting point A, you can draw a segment, 3 cm long.
This figure shows how to use protractor set aside from the half-line a to the upper plane an angle with a degree measure of 60 ° 
Let us formulate the main properties of the deposition of segments and angles:
- on any half-line from its starting point, one can draw a segment of a given length and only one;
- from any half-line to a given half-plane, you can set aside an angle with a given degree measure, less than 180 °.
An example of a problem solution.
On ray AB, segment AC is plotted, smaller than segment AB. Which of the three points A, B, C lies between the other two?

Solution.
Since the points B and C lie on the same half-line with the initial point A, it means that they are not separated by the point A, that is, the point A does not lie between the points B and C.
If point B lies between points A and C, then the equality would be true: AB+BC=AC. This is impossible, since segment AC is less than segment AB by the condition. Therefore point C does not lie between points A and C.
Of the three points A, B, C, only one lies between the other two. In our case: point C is located between points A and B.
Ray.
Draw a line a and mark a point O on it (Fig. 11).

This point divides the line into two parts, each of which is called a ray emanating from the point O (in Figure 11, one of the rays is marked with a bold line). Point O is called the beginning of each of the rays. Usually, a beam is denoted either by a small Latin letter (for example, beam h in Figure 12, a), or by two large Latin letters, the first of which indicates the beginning of the beam, and the second - some point on the beam (for example, beam OA in Figure 12, b).

Injection.
Recall that the angle is a geometric figure that consists of a point and two rays emanating from this point. The rays are called the sides of the angle, and their common origin is the vertex of the angle. Figure 13 shows an angle with vertex O and sides h and k. Points A and B are marked on the sides. This angle is denoted as follows: hk, or AOB, or O.

The angle is called the angle if both sides lie on the same line. We can say that each side of the developed angle is a continuation of the other side. Figure 14 shows a straightened corner with vertex C and sides p and q.

Any angle divides the plane into two parts. If the angle is not developed, then one of the parts is called internal, and the other external the area of this angle (Fig. 15, a). Figure 15b shows an unfolded angle. Points A, B, C lie inside this corner (i.e., in the inner region of the corner), points D and E lie on the sides of the corner, and points P and Q lie outside the corner (i.e., in the outer region of the corner). If the angle is developed, then any of the two parts into which it divides the plane can be considered the interior of the angle. A figure consisting of an angle and its interior is also called an angle.

If a ray comes from the vertex of a non-rotated angle and passes inside the angle, then it divides this angle into two angles. In figure (16, a), the ray OS divides the angle AOB into two angles: AOC and COB. If the angle AOB is developed, then any ray OS that does not coincide with the rays OA and OB divides this angle into two angles: AOC and COB (Fig. 16, b). 
Comparison of segments and angles.
Figure 20, a shows two segments. To establish whether they are equal or not, let's superimpose one segment on another so that the end of one segment is aligned with the end of the other (Fig. 20, b). If at the same time the other two ends are also compatible, then the segments are completely compatible and, therefore, they are equal. If the other two ends do not match, then the segment that forms part of the other is considered smaller. In figure 20, segment AC is part of segment AB, therefore segment AC is smaller than segment AB (written like this: AC<АВ).

The point of the segment dividing it in half, that is, into two equal segments, is called the midpoint of the segment. In Figure 21, point C is the middle of segment AB.

Figure 22, a shows unfolded corners 1 and 2. To establish whether they are equal or not, we impose one angle on the other so that the side of one angle is aligned with the side of the other, and the other two are on the same side of the aligned sides (Fig. 22, b). If the other two sides are also congruent, then the angles are completely congruent and, therefore, they are equal. If these sides do not match, then the smaller angle is considered to be the one that is part of the other. In figure (22,b), angle 1 is part of angle 2, so 1<2.

Unfolded angle is part of the deployed(Fig. 23), so the developed angle is greater than the non-developed angle. Any two straight angles are obviously equal.

A ray emanating from the vertex of an angle and dividing it into two equal angles is called bisector angle. In Figure 24 beam l- bisector of the angle hk.

Questions:
- How many degrees is the angle?
- What is a bisector?
- What is a transporter for?
List of sources used:
- P. I. Altynov, Geometry grades 7-9. Moscow. Publishing house "Drofa", 2005.
- Programs of educational institutions. Geometry grades 7-9. Compiled by: S.A. Burmistrov. Moscow. "Enlightenment", 2009.
- Newspaper "Mathematics" No. 19, 2000.
- Atanasyan, Geometry grades 7-9.
- Pavlov A. N. Geometry: Planimetry in theses and solutions.
- Edited and sent by Potunak S.A.
Worked on the lesson:
Poturnak S.A.
Figure 18 shows how using a ruler on a half-line a with the starting point A, you can set aside a segment of a given length (3 cm).
Look at figure 19. a, continued beyond the starting point A, splits the plane into two half-planes. The figure shows how, using a protractor, to set aside from the half-line a to the upper half-plane an angle with a given degree measure (60 °).

We will call the following properties the main properties of laying off segments and angles:
VI. On any half-line from its starting point, you can put off a segment of a given length, and only one.
VII. From any half-line to a givenhalf-planeit is possible to postpone an angle with a given degree measure less than 180 °, and only one.
Problem (30). On the ray AB, segment AC is plotted, which is smaller than segment AB. Which of the three points A, B, C lies between the other two? Explain the answer.
Solution (Fig. 20). Since points B and C lie on the same half-line with the initial point A, they are not separated by point A, i.e. point A does not lie between points B and C.

Can point B lie between points A and C? If it lay between points A and C, then it would be AB + BC = AC.
But this is impossible, since by condition Section AC is less than segment AB. So point B does not lie between points A and C.
Of the three points A, B, C, one lies between the other two. That's why dot C lies between points A and B.
A. V. Pogorelov, Geometry for grades 7-11, Textbook for educational institutions
 The main property of laying corners definition
 Finding the whole by its part Finding the whole by its share
 Payroll in UPP 8