Installation of windows according to GOST: step-by-step instructions with a photo. Manual for self-installation of the window Instructions for the installation of plastic windows by hand
Good afternoon everyone!
Knowledge is power, you can't argue with that.
A recently acquaintance contacted me with a question whether it is possible to install windows yourself.
He decided to build a country house on his own, to occupy himself, so to speak, after retirement, and is preparing an information base with regards to each stage.
And I, as a window specialist, just came in handy. I threw a short plan of action for him, and decided to consider all the questions in my blog in detail.
Look for all the principles and nuances of installing window structures further in the text.
 Do-it-yourself installation of plastic windows is not as difficult as it seems at first glance.
However, in order to properly install a plastic window, you need to know some things that you cannot do without.
We bring to your attention instructions for self-installation of plastic windows.
Do-it-yourself technology and procedure for installing plastic windows
The sequence for installing a plastic window consists of the following steps:
- Dismantling of old windows (if replacement is in progress).
- Preparation of a new plastic window.
- Installation and alignment of the support profile for the future window.
- Fastening of fasteners to the window frame.
- Creation of recesses in the wall at the points of fastening of fasteners.
- Inserting and placing a plastic window horizontally and vertically.
- Fixing the window in the opening using fasteners in the places of the holes for them.
- Foaming (filling with polyurethane foam) the gaps between the plastic window and the window opening.
- Installation and alignment of the window sill.
- Installation of slopes.
- Adjustment of window fittings.
- Installation of an ebb from the outside of the window.
The last point can be performed at the end of all work, if you are building a private house, cottage.
If you live in an apartment, then the ebb installation must be done after inserting windows without double-glazed windows.
To do this, before installing the window, the glazing beads are removed (a screwdriver is slipped between the glazing bead and the rubber gasket, and with light blows knocks the glazing out of the groove), and then the double-glazed windows are removed.
Thus, it is easy to align and install the ebb through the window.
Before installing the window, a support profile is mounted.
 It's as easy as shelling pears: lay the profile in the right place, align horizontally and foamed.
But before foaming, it is better to put a window on the profile and see if it normally fits into the remaining space.
If there is too much free space at the top, then something should be placed under the profile.
It is better to insert the support profile directly into the bottom groove of the window.
If a profile is not provided in the configuration, then under the window you need to put blocks at the height of the window sill in order to fix the window sill under the lower groove of the window. When the installation of the support profile is completed, we proceed to the installation of the window.
First, you need to attach fasteners to the window on which it will hold. It is best to use flat anchor plates. They should be located perpendicular to the plane of the window at a distance of 10-20 cm from the corners of the frame on each side.
Fastening to the window is carried out with a self-tapping screw for metal about 10 cm long (1 self-tapping screw is screwed into the dowel at the end of the anchor plate into the frame from the outside, the second at the other end of the plate into the wall and also into the dowel).
If you insert a plastic window without double-glazed windows (with empty frames), then the fastening screws are screwed from the inside of the frame into the wall using dowels, but not completely, so as not to damage the frame structure.
 For the dowel, you first need to drill a hole. When the anchors are fixed in the window, insert it into the window opening and align it.
After that, in the future places where the anchor fasteners are attached to the wall, we punch out recesses under the entire plate of fasteners, so that later we will cover the entire fastening with mortar and level the wall to install the slopes.
After fixing the plastic window in the opening, check its vertical and horizontal again. Therefore, you should not immediately screw the screws into the opening completely.
It is better to do the leveling work together, so that one person holds the window, and the other puts the bars for leveling. We proceed to filling the space between the window opening and the plastic window with polyurethane foam.
The main thing is that the foaming is one hundred percent. If the space between the window and the opening is more than 2 cm, then it can be foamed in 2 stages with an interval of 2 hours.
 Note!
Note!
Important! Always wet the surface with water before foaming (using a pshikalka, for example). Only in this way will the foam grasp as much as possible with the structure of the walls.
If you install the window at temperatures below 5 degrees, then use all-season or winter polyurethane foam. If the temperature is over 5 degrees, any foam will do.
The foam should dry for at least half a day. After that, it must be closed from the harmful effects of the sun's rays. This is done either with ordinary mortar, tile adhesive, or a protective impermeable film.
 Installation of a window sill requires preliminary trimming of excess length, since it comes with a margin of size.
A jigsaw or grinder is perfect for these purposes. Then you should move the window sill to the support profile (if any) and align.
If, after alignment, there is a large gap between the window sill and the opening, then it is better to seal it with a solution, having previously removed the window sill.
If everything is fine, then a simple foaming is enough. Do not forget to put plugs on the windowsill. It is advisable to cut the window sill so that it fits into the opening clearly together with the plugs. The caps are best glued to the windowsill with super glue.
After leveling the window sill, it must be checked for subsidence by pressing with your hand in several places.
Helpful advice!
If everything is fine, then you can start foaming, after pressing the window sill with heavy objects (for example, several bottles of water) in order to avoid bulging up from the polyurethane foam. The next day, excess foam under the windowsill can be removed with an ordinary knife.
By the way, you can install a window sill with a very small slope from the window (literally 2-3 degrees) so that possible condensation does not seep between the window and the window sill.
Do-it-yourself installation of slopes on plastic windows
Before installing the slopes, you need to remove the excess foam around the frame perimeter with a knife (this should be done very carefully so as not to damage the window material). To install the slopes, PVC panels are taken and cut to the required length (two - to the height of the opening, the third - to the width of the opening).
After vertical alignment, the fastening is made on polyurethane foam.
And so that the foam does not push the panels away from the wall, they need to be glued to the walls with masking tape (preferably in three places). After the foam has set, the final framing must be made at the ends of the panels. For this, there is an F-shaped profile (thanks to this design, it is inserted between the wall and the strip).
Do-it-yourself installation of ebbs on plastic windows
The ebb is installed very simply: first, it is inserted into the groove under the window, and then it is leveled, pressed, fastened with self-tapping screws to the support profile and foamed.
After installing the plastic windows, the fittings are adjusted, a mosquito net is placed. Window adjustment is a separate topic that will be covered in upcoming articles.
source: gold-cottage.ru
 Do-it-yourself installation of a PVC plastic window is not particularly difficult.
You do not need to have specific skills or special professional equipment for these activities.
Naturally, high-quality double-glazed windows made of plastic cost quite a significant amount of money, but the costs for them can be reduced by doing the installation of plastic windows with your own hands.
At the same time, the savings will be approximately from $ 40 to $ 70. (dollars) and above, on each self-installed double-glazed window.
Just in this article of our blog, construction and repair with our own hands, we will take a closer look at the question of self-installation of plastic windows.
At the end of the article, you will also find a thematic video of installing plastic windows with your own hands in accordance with GOST.
Installation of a plastic window - steps:
- Installation Methods - There are two methods for installing a window with and without unpacking.
- Fasteners - types of fasteners, diagram, immersion depth of fasteners.
- Insulating materials - what is PSUL and diffusion tape, what is where to place - a diagram.
- Opening preparation - how to properly prepare the opening.
- Installation of an ebb - a diagram, recommendations for the use of polyurethane foam.
- Window assembly - we assemble the window after unpacking.
- Window sill installation - recommendations, practical advice.
- Installing slopes - installing plastic slopes with your own hands in steps, diagram.
 Today there are two methods for installing PVC windows:
- with unpacking the window, and without such an action.
The method of installation with unpacking is carried out with a preliminary process of disassembling the double-glazed window:
- remove the glazing beads
- the glass is removed from the frame and placed in a certain place until it is installed.
After that, the frame is attached to the wall surface with dowels (through and through), and then the glazing beads and glass units are installed back. Note that this method of installing plastic windows has a number of nuances on which we will focus your attention.
Because it is this more laborious but safer method (for plastic double-glazed windows) of installation that we chose for writing an article and, of course, it is also present in the video for installing plastic windows with our own hands.
Helpful advice!
When taking out a double-glazed window, you must be very careful, as careless manipulations with glazing beads can lead to the formation of chips and scratches on them.
Double-glazed windows can accidentally break during their removal and transfer, but if everything is done carefully, then nothing terrible will happen.
If this process is carried out without unpacking, then the removal of glasses and glazing beads is not required, since the base is attached to the wall using fastening parts pre-installed on the outer area.
But this type of fastening is not suitable for volumetric windows that have a large mass.
From this we conclude that the use of the first technology for installing a window with your own hands is more simple and expedient, but enough theory, let's get down to practice.
A window usually consists of several parts. These parts can be blind or open sash.
Let's now look at how to remove the glass unit from the blind part of the window and how to properly dismantle the opening sash.
Removing the glass unit.
After the window has been delivered to you, before installing it, it is necessary to remove the double-glazed windows from the blind (non-opening) parts of the window.
 Usually, when new glass is delivered, the glazing beads (glazing bead is a plastic guide that directly holds the glass unit) are not completely hammered in and it is possible to easily dismantle them.
If, nevertheless, the glazing beads were sunk to the end at the manufacturer's company, it is necessary to insert a small spatula into the seam between the glazing bead and the window frame and, with careful tapping of a mallet (wooden hammer) directed from the center of the window to its periphery, try to dismantle the glazing beads (there are 4 of them).
After the glazing beads give in and begin to come out of the grooves, plastic clips begin to fall out, they must be assembled, since we will need them at the time of installing the glazing beads back.
We do not think it is worth reminding that everything must be done very carefully so as not to break an expensive double-glazed window.
It is best to do this operation together, since it is not an easy task to hold a double-glazed window, which weighs an average of 30 kg, and to do something in parallel.
And one more thing, it is necessary to store the removed double-glazed windows on a clean hard surface, or even better, lean the double-glazed window (double-glazed windows) against the wall, if there are several of them, then lay a layer of soft clean rags between them.
 In order to remove the opening sash of the plastic window, you need to open it slightly in order to gain access to the hinges.
Dismantling of the opening sash must begin with the dismantling of the upper hinge.
To do this, you need to remove the spindle (rotating shaft inside the hinge), first you need to press on it from above (most likely with a screwdriver), after which a part of this shaft will appear from below.
Hooking the lower part of the spindle with pliers, take it out, respectively, down.
After the upper hinge is disassembled, it is necessary to slightly deflect the window from the horizontal axis, the lower hinge will let you do this, then raise the sash by about 5 cm.
After that, the sash will also be freed from the second lower hinge. To carry out this dismantling, it would be good to call a partner who will insure you, since the masses of both the sash and double-glazed windows, as we have already noted, are on average 30 kg.
Fasteners.
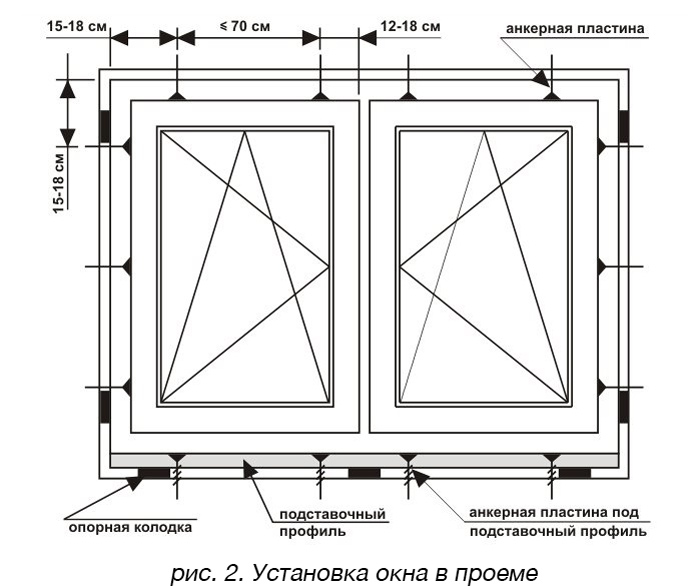
Fasteners, in our case these are anchor bolts, are distributed around the entire perimeter, starting from the edges, with the maximum distance between the bolts 700 mm, and the minimum 150 mm (see diagram below).
Also, the fasteners should be located near the imposts (impost is a horizontal or vertical bar that divides the window into parts) both above and below to give the structure of the plastic window rigidity.
Mounting types.
 According to GOST, there are three types of fastening:
- Fastening using a concrete screw.
- Dowel nails with anchor plates.
- Fastening with an anchor bolt.
When installing plastic pvc windows with our own hands in accordance with GOST, we choose the fastening method using anchor bolts. This is one of the most difficult and at the same time the most durable types of fasteners, where you can not think about the weight of the window.
Fastening with an anchor bolt.
- concrete - 40 mm
- solid brick - 40 mm
- silk brick - 60 mm
- blocks of porous natural stone - 50 mm
Installation of a plastic window in accordance with GOST implies the use of special insulating materials, this is dictated by the fact that the humidity in the room is higher than outside, so some of the moisture penetrates into the seam even with a vapor barrier tape installed.
 If the outer contour of the seam is made as tight as the inner one, then moisture will gradually accumulate in the seam, which will lead to the loss of its heat-shielding qualities, therefore, when installing assembly seams, it is always necessary to observe the principle denser inside than outside.
For these purposes, use PSUL (pre-compressed sealing tape). If the distance between the bottom profile and the bearing wall is less than 40 mm, PSUL is used, if this distance is more than 40 mm, then a diffusion tape with similar properties.
PSUL, as well as diffusion tape, is glued to the window frame, they are designed to protect the foam from the external environment, as well as so that moisture can escape from the assembly seam during the operation of plastic windows.
From all of the above, we conclude that, ideally, it is necessary to use a diffusion tape at the bottom of the window, and PSUL on top and on the sides of the window profile.
An example with a diffusion tape you can see in the video the installation of a plastic window with your own hands, presented at the end of the post, and the use of PSUL is schematically shown in the diagram below.
Opening preparation.
 The opening must be cleaned of debris and dust. If necessary, the edges of the opening must be leveled and reinforced.
After all these procedures, it is necessary to moisten the surface of the opening with water to improve adhesion (Adhesion is the adhesion of surfaces of dissimilar solids and / or liquids).
The frame of the window unit is installed in the opening, while the box should not be placed on the surface of the opening, but must be installed on supporting supports, for this you can use plastic wedges.
These wedges are installed under corner and mullion joints of the frame and there must be at least three of them.
For leveling, attach a level to the base of the glazing bead, since the seam part in practice is not always flat, due to the fact that at the time of drilling it could be deformed.
After that, it is necessary to take a drill with the attached level and drill holes in the window frame and further in the wall.
After that, anchor bolts must be inserted into the drilled holes, but not completely, in order to be able to align the frame.
After all the anchors have been installed in the holes, we re-check whether the frame is evenly installed, and if everything is normal, we sink the anchor bolts and screw in the anchor, at this moment wedging occurs, and the frame is already firmly fixed in the window opening.
Installing an ebb tide.
The next step in installing PVC windows with your own hands is the installation of an ebb. The ebb can be ordered from the window manufacturer, or you can use the old one, if, of course, it is in good condition.
 The ebb tide is attached to the support profile with several self-tapping screws (see figure-diagram).
The moment has come when it is necessary to use polyurethane foam.
During the production of work, the temperature of the cylinder with polyurethane foam should not be lower than 20 degrees C.
Therefore, in the cold season, when the temperature is below zero, it is necessary to wear special coats, both on the barrel of the applicator pistol and on the cylinder itself.
Note!
Polyurethane foam is used with gaps from 10 to 60 mm, but if the width is more than 60 mm, it is recommended to reduce the window opening due to less expensive building material - for example, brick or foam.
Assembling the window.
After we have mounted the window frame and the ebb, all external work on installing the PVC window with our own hands is completed and you can return the sash and glass unit back.
First, we install a double-glazed window.
To do this, we insert the double-glazed window into the installed frame, it would be nice that your partner would hold the double-glazed window in this position, and at that moment you inserted the glazing beads onto the guides and, with neat blows from the mallet, sat them in their places (do not forget about the plastic clips).
Then you need to install the sash of the window, for this you need to raise the sash and align the hinges, then insert the spindle from below and press them in until it stops (here you can also use a mallet and neat blows).
When installing a window sill, you must first cut it.
 Then attach it closely to the support profile, then level the window sill with a level and put in various materials.
The sill may have a slight slope from the window to drain condensate, but in no case should it sag.
After 12 hours, when the foam has frozen, the load can be removed and the excess foam must be cut off.
Helpful advice!
The load was designed so that the foam would not deform the window sill during the drying process.
It is very undesirable that a gap remains between the window sill and the frame, if all the same it remains to be sealed with silicone. We must try to avoid the formation of such a gap.
 The first thing to do when installing the slopes is to attach a wooden plank to the window perimeter (the inner perimeter of the window opening, see the photo).
Fastening with screws approximately 95 mm long.
The plank should not protrude from the window opening, but, as they say, should be flush.
To make the slopes even, it is necessary to level the planks using a level.
After that, we attach the U-shaped starting profile to the outer window frame. Fastening is carried out on self-tapping bugs, which are screwed directly into the window frame.
Slopes will be inserted into this profile, so the outer edges must be connected as neatly as possible.
The next step is to install the F-shaped profile, which is attached with a construction stapler.
The groove of such a profile is located opposite the groove of the U-shaped profile, and the slopes will be placed in these grooves. In the part that is located above the window, the F-shaped groove is carefully cut off either with a knife or with scissors on the iron, because this groove is obtained overlapping the upper part of the window.
After the U-shaped and F-shaped profiles are installed around the entire perimeter, slopes can be inserted. If you can't fit the seams evenly, then you can smear them with white silicone.
source: remont-s-umom.blogspot.ru
Today I will tell you how to install 8 plastic windows and an entrance door with your own hands in one day.
This work does not require special skills or expensive equipment.
 But, of course, there are many nuances that you should definitely pay attention to. And of course there are some secrets on how to save money when ordering.
I used windows that were optimal in terms of thermal performance.
- with a four-chamber window profile
- and a double-glazed window
- as well as a reinforced front door.
By the way, it was the door that made up almost half of the order value.
And the total expenses amounted to 40 thousand rubles for the set and another 4.5 thousand rubles for delivery. How to buy windows at the same price - at the end of the article.
1. Let's get started!
2. We have a newly built house made of aerated concrete, in which you need to install 8 windows and one front door.
 First of all, we remove all dimensions from the openings.
As you remember, I made overhead quarters around the perimeter of the openings on three sides (a quarter is not needed at the bottom - there will be a window sill).
For the quarters, I used standard 5 cm thick aerated concrete blocks, which were installed like all masonry on polyurethane foam.
The depth of the windows during installation should be at least 1/3 of the wall thickness.
It is also worth noting that you should not try to make openings for typical window sizes - the technology for their production is automated and there is no difference in cost between a standard size or a custom-made window.
The final dimensions of the window are calculated taking into account the following factors. On the side and top of the frame to the wall, there should be a gap of 1 to 2 centimeters on each side, which will be filled with polyurethane foam.
At the bottom of all windows from the factory there is a support profile with a height of 3 centimeters, which is needed for easy installation of the window sill.
Plus, under the delivery profile, there should also be a gap of about 1 centimeter for polyurethane foam. Total, roughly speaking, from the internal dimensions of the opening, you need to subtract 4 centimeters horizontally and 6 centimeters vertically.
You should not get carried away and push the frame into the opening without a gap, because it will be extremely inconvenient to pour polyurethane foam into a gap of less than 5 mm.
 3. It is important to know that opening sections greatly increase the cost of the construction of any window. Therefore, if the goal is to save money, you need to make the most of blind non-opening windows.
In the case of a country one-story house, there is no problem to go outside to wash the windows, and for ventilation, an opening transom can be made (due to the design features, it is several times cheaper than the swing-out mechanism, but at the same time its width should be much greater than the height, or rather, to say it the height cannot exceed 50 centimeters).
The advantage of the blind section also lies in the fact that you do not lose usable glazing area. In my case, there are 5 fixed windows measuring 60x60 cm, two fixed panoramic windows 1.4x1.7 meters, one tilt-and-turn window 0.6x1.3 meters and an entrance door with partial glazing of 0.9x2.3 meters.
The above price includes only windows and doors (including hinges, handles and locks). Separately, I needed to buy anchor plates, dowels, self-tapping screws, PSUL sealing tape, mounting foam, window sills and ebbs for a total of 3.5 thousand rubles.
4. We will need: screwdriver with a drill for concrete, polyurethane foam with a gun, PSUL tape, fixing plates, dowels for aerated concrete and self-tapping screws.
Note!
Once again I want to draw your attention to the fact that you cannot save on a measuring tool.
5. There are two ways to secure the window frame: through fastening with unpacking the glass units and using anchor plates.
 The first method requires more time and skills.
In particular, you will need to carefully pull the glass unit out of the frame, and then reinstall it.
The staples holding it are usually fixed very tightly and in order not to scratch the edges, a special spatula and patience are required.
Plus, if we are talking about installation in two hands, then with large windows the problem will be that the removed glass unit cannot be turned over, unlike the frame in which it is installed.
In addition, through fastening requires precise fixation when drilling and an assistant is definitely required. Mounting is much easier on the mounting plates.
Helpful advice!
Each such plate costs 10 rubles. They need to be installed at the rate of 1 plate for every 50 centimeters.
The plate is installed by turning in the groove of the frame and fixed with a self-tapping screw with a drill (to drill a metal frame inside the frame).
 6. After that, on the outside of the frame, on all sides except for the base, the PSUL tape is glued - a pre-compressed sealing tape.
It is used when installing a window in an opening with quarters.
The purpose of the tape is to protect the polyurethane foam from ultraviolet radiation and, therefore, destruction. It is easier to install windows in the cold season, because the tape expands very slowly in the cold.
7. A six-meter roll of PSUL tape costs 140 rubles. When fixing the tape on the outside of the frame, it is preferable to step back 1-1.5 cm from the edge, especially if you have deep quarters.
This should be done so that when pouring polyurethane foam between the frame and the wall, it does not fall on the PSUL tape.
8. Now we turn to the window opening. Its geometrical dimensions are perfect, and the base ideally matches the horizon.
This happens by itself when building from aerated concrete if you follow the technology and level each next row of masonry to zero. I started the installation with small blind windows and they differ from the others in that they will not have window sills. Therefore, we will not use a stand profile.
9. We attach the window and mark the place for the mounting holes. We drill and install special screw dowels for aerated concrete.
It is worth paying special attention not to try to score them with one blow, especially if they are located close to the edge of the block - there is a risk of breaking off a piece of the block. After that, we bait the screws through the mounting plates.
10. Our next task is to set the window strictly vertically.
In the case of small windows, this is not difficult, since there will be no diagonal skewing of the window and it is enough to measure at any point of the frame. After that, we tighten the screws on the mounting plates and take out the laminate trim at the base.
Note!
Any window must be fixed so firmly that it can only be held in the opening by the fastening plates.
Installation foam is used primarily for filling voids and thermal insulation, and not for mechanically fixing the frame in the opening.
11. Large windows will have to tinker with. The weight of each is more than 80 kilograms and it will not be easy to lift it into the opening alone.
I built a ladder of blocks and gradually raised the window 5 centimeters up.

3 on each side, except for the bottom.
Here you need to carefully monitor the verticality of the frame and apply a level in all corners.
On the large windows, there is a support profile at the bottom, into which the window sill will be installed.
I also placed a laminate plate directly under the support profile, which was removed immediately after fixing the anchor plates to the wall.
12. The swing-out window is 2 times smaller in size, but I decided to use 8 anchor plates for it. an open sash will add stress to the frame.
On average, the installation of one window takes about 30 minutes. And a very serious mistake, which most people make - the protective film from the frame must be removed immediately after installation.
Helpful advice!
Even if you installed the windows at the beginning of the renovation, the film must be removed immediately.
If this is not done, then it will be more difficult to peel it off, besides this, the plastic will burn out unevenly (relevant for the outer side of the frame).
 13. We pass to the front door. It is a 3-hinged reinforced door with a full all-round frame. Inward opening is much more convenient than outward opening.
But most people have a stereotype that the door should be opened outward. When installing the door frame, the most important thing is to ensure an even fit around the perimeter.
I used 10 anchor plates to fix the door. Particular attention should be paid to the verticality of the side walls of the door frame in two planes.
For reliability, fixation of each anchor plate can be supplemented with a second self-tapping screw. As in the case of windows - the door must be fully functional when held only by anchor plates.
It should not warp when opened and should fit snugly around the perimeter when closed.
14. Now we take a gun with polyurethane foam. The presence of a pistol is required because it allows you to adjust the foam output volume.
Helpful advice!
There are nuances with foam that you definitely need to know.
First, the foam is afraid of ultraviolet radiation and must be protected from sunlight. On the outside of the window, for this, there is a PSUL tape, on the inside, it is necessary to plaster the slopes or, as an option, paint it with paint. As for the application of foam, it is absolutely impossible to cut it.
The shell that has formed on it protects the internal open cellular structure from moisture absorption and subsequent destruction. Therefore, the seam between the frame and the wall should be filled in exactly the same volume so that the excess does not protrude outward.
It is important not to overdo it with the deepening of the nozzle of the pistol, because do not forget that on the outside we have a PSUL tape and it should not come into contact with fresh foam.
Approximately 5-10 minutes after filling the seams with foam, it is worth visually checking its condition and, if necessary, gently tamping it down (until it hardens, this is easy to do). If the work is carried out at temperatures below +5 degrees, it is imperative to use special winter foam.
Most likely, not in all corners the frame is strictly vertical. This can be corrected by adjusting the hinges and the lock.
16. Done! The windows and the door should be left for a day until the foam completely solidifies. And we are moving on to the finishing stage.
17. We take plastic windowsills with a depth of 20 centimeters.
In total, I need 3 window sills: two 140 cm each and one 70 cm. A finished window sill 150 cm long cost me only 200 rubles. Cut off the excess with a jigsaw and set it under the frame in the support profile.
It should be borne in mind that the depth of the window sills in the frame is 2 centimeters, this is important when choosing the depth.
Note!
Before installing, do not forget to remove the protective film around the perimeter.
We install the window sill either strictly horizontally or with a slight (1 degree) tilt from the window.
18. Cover the edges with special plates, which should be glued to superglue.
As a support when setting the level, you can use a trim from the window sill itself or a wooden block. After that, we load the window sill from above so that it does not rise with the foam.
And fill the entire plane of the base with foam from below. As with window frames, the expansion of the foam should be controlled and not allowed to be cut with a knife. Just tamp it down until it is frozen.
 19. Final chord - setting the ebb. We cut it to length, fix it to the window frame using self-tapping screws (having previously coated the joint with silicone sealant), fill the base with polyurethane foam and load it.
20. Done!
Do not forget to remove the protective film from frames, window sills and ebbs. There is nothing difficult in installing windows and you can handle such a volume of work alone.
Having done this work with my own hands, I saved more than 15 thousand rubles on installation.
Before starting installation work, it is necessary to completely free the window opening and the space next to it:
- remove everything from the windowsill,
- remove the curtains,
- free the approach to the window by moving the furniture at least 1.5 meters away from the window.
Protect the room from dust and dirt by covering the floor and furniture with a cloth or thick oilcloth.
For ease of installation, connect the 220V power supply through the extension cord, prepare garbage bags.
Dismantling the old frame
After the room is ready for the appearance of dust and debris, they begin to dismantle the old window frame.
The sash is removed from the window. Dismantle window frames. If necessary, dismantle (knock off) the slopes.

The old window frame is dismantled, and, as a rule, it is seriously damaged. If you want to use old windows, for example, in the country, you should stipulate the option of keeping old windows when ordering.
The old ebb, the old window sill is being dismantled.
PVC window installation

The sashes are removed from the plastic window, the double-glazed window is removed. A window frame is inserted into the prepared opening and fixed on anchor bolts or mounting plates. In this case, it should be strictly observed that the frame is level, and not along the opening (in houses there are often cases when the horizon line of the window opening is far from ideal, the frame should also be level vertically). Otherwise, the window will not function properly.

The gaps between the wall and the frame are foamed with polyurethane foam. The foam serves both as an insulating function and as a fastening element. The overall result largely depends on the quality of this stage of installation. The foam should be applied evenly and fill all recesses and cavities in the opening, taking into account the expansion rate of the foam.

The installation of a plastic window in most cases means that a new window sill and a new ebb will be installed along with the new window. An exception is the case when repair work is underway in the apartment (house, room) and the window sill can be installed on its own.

If the window to be mounted opens onto a balcony (as in this case), then it is quite expedient and functional to install a window sill instead of an ebb tide (from the outside of the window).
If you have a good old ebb tide, then you can save it for a new window, but in this case it will need to be restored (restored) - a paid service, the cost of which is slightly different from the cost of a new ebb tide.
The window sill is cut out under the opening and attached to the window (to the support profile). If the opening under the windowsill is small, then it foams. Otherwise, it is necessary to masonry or seal the opening with mortar. When installing a window sill (window sill), control that it has a slope from the window within 5 degrees, and the overhang beyond the inner surface of the wall is no more than 60 mm.
When installing the window sill, it should be taken into account that its edges go beyond the finishing of the inner slope to a depth of at least 15-20 mm.

Advice: when choosing the width (depth) of the window sill, it should be borne in mind that the window sill is "recessed" by 2 cm under the window frame, therefore the width of the installed window sill will be 2 cm less)

All gaps between the window and the opening are filled with foam, and after it dries, they are isolated. The outer layer of insulation is designed to protect the insulation layer (which is the foam layer) from moisture penetration into it, as well as from destructive sun exposure.

So, the main part of the work is finished. However, for the finishing of the opening, there are not enough slopes (which are both a decorative addition, under which you can hide the mounting foam, and a functional element that increases the thermal insulation and sound insulation of the window opening). Plastic slopes will give the window a finished look, moreover, it is the best combination with plastic windows.
Installation of plastic slopes

Plastic slopes are installed on the same day with a window for panel and block houses and on the second day for Stalinist houses.

Either a Belgian sandwich panel (in the picture) or German VEKA plastic slopes with removable platbands are used as slopes.
The differences between the various plastic slopes are not significant, but you should be aware of them.
The Belgian sandwich panel can be installed at dawn (not at right angles to the window), which visually enlarges the window opening. The choice of VEKA plastic slopes is justified for more accurate gluing of wallpaper with already installed slopes. Thanks to the removable casing, the edges of the wallpaper will be neatly hidden underneath.
Advice: if your apartment is renovated, then it is better to install the trims on the slopes from the Belgian sandwich panel after gluing the wallpaper yourself - it will turn out neater and prettier).
Installing accessories on windows

At the final stage, a double-glazed window is installed in the window frame and the sashes are hung. Installation of additional accessories, fastening of additional fittings and components, such as: a stepped ventilator, a retainer, a mosquito net, blinds, etc.

The window is ready. Upon completion of all work, an acceptance certificate is signed. In it, if necessary, the customer indicates his comments on the work performed, if any.
Almost immediately after completing all the work, the PVC window can be used. The exception is windows with large opening sashes, which are not recommended to be opened within 24 hours after the installation of the PVC window.
In terms of functionality, a plastic window is much better than old wooden windows. If you follow the simple instructions for its care and use, it will serve you forever.
Don't forget to remove the protective film from the outside of the PVC window!
According to GOST 30674 "Window blocks made of PVC profiles":
Removal of the protective film from the front surfaces of the profiles should be carried out after the installation of products and finishing of the mounting opening, taking into account that the duration of exposure to sunlight on the protective film should not exceed ten days.

If repair work is still underway in the room where the windows were installed, the protective film may remain on the product until they are completed. However, from the outside, the film should not be exposed to sunlight for more than 10 days.
The adhesive base of the protective film loses its properties under heat and UV exposure and can spoil the aesthetic appearance of the plastic profile.
General requirements for installation in accordance with GOST
GOST 30971-2002 “Seams of assembly units for joining window blocks to wall openings. General technical conditions ”was put into effect by the order of the State Construction Committee of the Russian Federation from 01.03.2003.
Due to the need to adjust the design documentation for design and construction organizations, the transition period for the development of GOST was established until 01.07.2003. The republics of Azerbaijan, Kazakhstan, Kyrgyzstan, Moldova and Uzbekistan have joined the Russian norms.
What's new? New standards bring significant formalization of window installation and require numerous documents. Among them, it should be noted the need for each installation company to have "Instructions for the installation of windows", approved by local authorities, the need to develop assembly assemblies of windows for each facility under construction and coordination of assemblies with the customer, it is recommended to analyze the thermal fields, as well as provide for the registration of certificates of delivery - acceptance of window openings before installation, acts of hidden works and acts of acceptance of the completed installation of windows.
Of particular interest in the standards are the Appendices:
- Appendix A (recommended) presents drawings with examples of window installation;
- Appendix B (recommended) sets forth requirements for fastening windows in openings;
- Appendix B (mandatory) represents the actual requirements for the installation of windows in general and, in fact, is the main working document;
- Appendix D (recommended) describes the requirements for the method for calculating thermal fields (isotherm analysis).
In general, Russian installation standards bring us closer to the standards adopted in Europe, and, in particular, in Germany.
GOST requires a large number of formalities from window firms and has more requirements for testing joint structures and materials used for them.
Formalization is justified by the fight against Russian negligence.
The testing of materials and seams in general is justified by the fact that until now in Russia there have been no detailed standards for installation at all, there is no accumulated scientific experience in determining the properties of installation materials and the quality of seams. Of course, for the consumer there is no need to know all the provisions of this GOST, this is the duty of professionals.
Without delving into the intricacies, we can talk about three basic principles of installing windows, which should be paid the closest attention.
Three layers of joint
The content of the main part of the norms is devoted to the rules for filling the mounting gap between window blocks and openings on the basis of the principle "from the inside is tighter than from the outside." Each assembly unit must have three layers of sealing: outside - protection against climatic influences, in the middle - insulation, inside - vapor barrier. You can use different materials for the outer layers and different polyurethane foams, but, in one version or another, these three embedding planes must be present.
Outer layer is designed to protect the insulation layer from moisture penetration into it, and must be vapor permeable in order for the insulation to be ventilated through it. That is, the outer layer must be waterproof and vapor-permeable.

These requirements are due to the fact that when moisture penetrates into the insulation, its thermal insulation qualities fall. In the best way modern requirements for the outer layer correspond to PSUL (pre-compressed sealing strips). These are special mounting tapes that are glued to the window frame before installing it in the opening, and then, expanding, they fill all the leaks of the quarter in the opening.
With serious advantages: optimal construction physics and technological simplicity, they also have disadvantages. It is convenient to use these tapes in new construction when the opening has good geometry. But when replacing windows in old houses, when the slopes are uneven, and even more so, plastering, their use is difficult. Another drawback is that plaster does not apply to the PSUL.
Limited use of silicone outside is possible. In this case, certain rules should be observed: the thickness of the silicone layer should be half the width of the joint to be filled, and the silicone should be glued only on two sides and work in tension, the rest of its sides should remain free.
A sealant can be used when insulating an assembly seam. Although, it is not clearly spelled out in the GOST, but there is no prohibition on its use, no matter how much the supporters of mounting tapes want. An example of the use of silicone outside and inside the room is shown on node A.14 in GOST 30971-2002. It is unacceptable, of course, as you can sometimes observe on objects, just anoint with silicone over the foam - this is an imitation of the protection of the seam, but not the protection itself.
Central layer- heat insulating. Currently, polyurethane foams are used for its execution. It is best to use foams made specifically for window installations. These foams fill the joint evenly and do not need to be trimmed once they have hardened. Other foams, after the end of installation, hang in shreds from the side of the room, and they are cut off, breaking the protective outer crust.
The inner layer- vapor barrier. Its function is to protect the insulation (foam) from moisture vapor penetration into it from the side of the room. For these purposes, when plastering slopes, vapor barrier tapes, mainly based on butyl, are used, as well as paint vapor barriers for moisture-resistant gypsum plasterboards. It is possible to use silicone according to the rules mentioned above.
Lack of cold bridges
An assembly seam is a node where the joining of wall and window structures with completely different properties, including in terms of heat engineering, takes place. And it is important to execute the knots in such a way that cold bridges do not appear on the window slopes.
Basically, the problem of cold bridges is the problem of single-layer wall structures that were used in houses of the past (solid brick, expanded clay concrete, etc.). In this case, the weak zone is the wall itself around the window frame due to its low resistance to heat transfer. An area with a surface temperature below the dew point appears on the slope. In this area, firstly, there are high heat losses, and secondly, condensate falls out on it. If moisture condensation on the slope occurs frequently, then later on these places may form a fungus (mold). The same applies to quarter-cut openings. In their absence, the danger of cold bridges seriously increases, and here you should especially carefully consider the heating technology of the junction nodes.
An important recommendation is to use window frames with a width of at least 130 mm in the absence of quarters. With a narrow window frame, high-quality sealing of the seam is difficult and there is a high probability of cold bridges. The options given in GOST with false quarters from the corners or from the casing are possible only if there is external plaster, and still remain problematic from the point of view of heat engineering.
If there is an effective insulation in the wall (mineral wool or non-combustible polystyrene foam), the window should stand either in the plane of the insulation, or behind a quarter of the insulation. In walls where aerated concrete is combined with external cladding and brick quarters, as a rule, cold bridges also do not arise due to the good thermal properties of aerated concrete.
Fastening the window unit in the opening
The specificity of plastic windows is that they have significant thermal linear expansion. That is, when windows are heated by the sun's rays, the bars of the box and sashes increase in size. As the calculated values of thermal expansion for white windows, 1.5 mm per 1 running meter should be used, for colored windows - 2.5 mm per 1 running meter (the difference in thermal expansion is due to the fact that white window profiles heat up much less than colored).
In accordance with this factor, the window is fastened to the wall. The corners of plastic windows must remain free, the extreme fasteners are placed at a distance of 150 mm from the inner corners of the frames. The rest of the fasteners are placed along the entire perimeter with a step for white profiles no more than 70 cm, for colored ones no more than 60 cm. Near the imposts, fasteners are also placed at a distance of 150 mm from the corner. The gap between the box and the wall must be at least 15 mm. This is due to both thermal expansion of the windows and the fact that it is very difficult to fill a thinner seam with foam insulation evenly.
Bearing blocks are placed under the lower corners of the box and under the imposts. The pads are also placed from the sides as follows: if you look at the window from the inside, then with one pivot sash, the pads are placed on the side opposite to the hinges at the top and on the same side as the hinges below. With two flaps, respectively, four pads are placed.
Schematic diagrams of the nodes of the junction of window boxes to the walls

1 - window board;
2 - foam insulation;
3 - vapor barrier tape;
4 - flexible anchor plate;
5 - support block for the window sill;
6 - plaster mortar;
7 - a dowel with a locking screw;
8 - an insert made of antiseptic lumber or a leveling layer of plaster mortar (recommended only for the lower unit);
9 - waterproof vapor-permeable tape;
10 - noise-absorbing gasket;
11 - drain;
12 - insulating self-expanding vapor-permeable tape (PSUL);
13 - sealant in a thin layer

1 - foam insulation;
2 - insulating self-expanding vapor-permeable tape (PSUL) or vapor-permeable mastic;
3 - frame dowel;
4 - sealant;
5 - vapor barrier tape;
6 - panel for finishing the inner slope;
7 - plaster leveling layer of the inner slope.
Thermal gaps must be taken into account especially carefully when designing large-sized glazing elements: when making bay windows, showcases, glazing to the entire height of the floor. These are three basic principles when installing modern windows, although, of course, there are many nuances and subtleties that depend on the various wall designs and on the materials used for sealing the seam. And - as we said at the beginning of the article - the human factor is very important - the responsible and high-quality work of the installers.
When can you install windows
With the entry into force of Moscow Law No. 42 "On Silence", disturbing the peace of the neighbors is an administrative violation. Please carefully read our instructions for conducting noisy work in order to comply with the requirements in force in Moscow and the Moscow region in various buildings.
How much is the installation of windows in accordance with GOST
The cost consists of two components: the cost of work (hours) and materials.
The assembly seam will comply with GOST for the installation of windows, using both expensive and economical materials. The use of one or another will affect the stages (duration) of work and the final cost of installing windows.
Video instruction for the installation of plastic windows
When planning to replace old windows with new ones, many are wondering how difficult it is to install them on their own. The answer is medium difficulty work. In terms of time, replacing a medium-sized window with dismantling the old one takes about 3.5-4.5 hours. This is for a person with no experience. Employees of firms doing this all the time spend less than an hour on it. But the installation of plastic windows by the owner of the premises with his own hands cannot be compared with the hasty work of "professionals". They simplify the process to the point of indecency, arguing that prices have not been raised for 6 years and they have no time to waste time on trifles. If you are lucky enough to find really masters, then you can entrust them with the installation. If not, you better spend the weekend and install it yourself.
Construction of plastic windows
In order to properly understand the installation process, you need to have an idea of \ u200b \ u200bthe construction of windows. Let's start with materials and titles. Plastic windows are made of polyvinyl chloride, which is abbreviated as PVC. Hence the second name - PVC windows.
The main element of any window is the frame. For plastic windows, the frame is made of a special multi-chamber profile. It is divided by partitions into a number of cells - chambers. The more of these cells, the warmer the window will be. When they talk about how many cameras there will be in a plastic window, they have the number of cells in the profile.
In the middle of the structure, in the largest chamber, a blue insert is visible. This is a reinforcing element of increased rigidity. It gives the profile the required strength. In plastic windows this insert is made of plastic, in metal-plastic windows it is made of metal (usually aluminum). That's the whole difference between them.

There is also a division of profiles into classes: economy, standard and premium. The best choice if you need normal windows is the standard class. In the economy class, partitions are too thin and they begin to freeze almost from the moment of installation. The premium has a high price tag due to options that, in fact, are not needed.
If you want to have the best profile for plastic windows, take the class standard of any factory. There is no particular difference between the products of different companies. They have been standardized for a long time and all the stories of managers about the benefits are fairy tales. If they are made on factory equipment, there is no difference between them: all factory profiles have been standardized for a long time.
Window profiles are white as standard, but they can also be brown - to match the color of any tree, and even pink - on request. Colored profile windows are more expensive than similar white ones.
Window structure
In order to understand what is at stake in the description of the installation process, you need to know the name of each component of the structure.

It consists of:
- Frames. This is the base of the window.
- If the window consists of several parts, the frame is divided into parts by an impost - a vertical component. If the window is of two parts, there is one impost, If of three - two, etc.
- The opening part of the window is called a sash, the fixed part is called a capercaillie. A double-glazed window is inserted into them - two, three or more glasses, hermetically fastened together. A foil tape is laid between the glasses, which ensures tightness. There are double-glazed windows with special properties: with reinforced glass, tinted and energy efficient, which, according to the manufacturers, reduces heat loss through the windows. There are also double-glazed windows, between the glasses of which an inert gas is pumped. It also reduces heat loss.
- Double-glazed windows are pressed against the frame with a cap - a thin plastic strip. The tightness of the connection is ensured by a rubber seal (it is usually black).
- Locking fittings are installed on the sashes. This is a specific set of mechanisms that provide opening and closing. They can be different, as they provide different functionality: opening, opening with ventilation, opening + ventilation + micro ventilation.
- To ensure tightness on all parts - frame, impost and sashes - rubber seals are installed.
At the bottom on the outside of the frame (the one that faces the street) there are drainage holes that are covered with special caps. Through them, condensation is discharged into the street, which forms inside due to the temperature difference between the street and the room.

The window also has an ebb - a board outside that removes precipitation and a window sill inside. Side and top parts from the street and premises. They can also be made of plastic or made using a different technology.
How to measure a plastic window
When ordering windows, you will be asked for six sizes: the height and width of the window, the length and width of the window sill and the slope. In order to measure everything correctly, it is necessary to determine whether you have made a window opening with a quarter or without.

Examine the opening. If the outer part of the window is narrower, the opening is a quarter. In this case, measurements are taken at the narrowest place: openings rarely have ideal geometry, therefore, you will have to measure at several points. Find the smallest value, add 3 cm to it. Transfer the height as it is.
If the opening is even, the calculation is different. Measure the width and height. Subtract 3 cm from the measured width, and 5 cm from the height. This will be the height and width of your window. We remove 3 cm in width, since a gap of at least 1.5 cm is required on both sides for the polyurethane foam. We subtract 5 cm in height, since the same 1.5 cm is needed from above, and 3.5 cm from the bottom will be spent on installing the window sill.
The length of the window sill and low tide is taken with a margin - 5-10 cm more than the width of the window opening. During installation, both the ebb and the window sill "sink" a little into the adjacent walls, and the excess will go there. The ebb tides are standard in width, so the closest larger one is chosen. On the windowsills, the situation is different. Its width is chosen arbitrarily - at the request of the owner. Someone likes wide ones - so that you can put something, someone prefers flush with the wall. So there are no rules.
When ordering, you will need to indicate how many and what parts will be in your window: whether or not the capercaillie is, where it is located, how many doors, which side they are, how they should open. You will need to indicate the type of fittings (ventilation, micro-ventilation).
Preparation
If you change windows, installing plastic windows with your own hands begins with dismantling the old one. Problems usually do not arise: breaking, not building. After dismantling, it is necessary to revise the opening: remove everything that can fall off. If there are any protruding parts, they must be removed - with a hammer, chisel or power tool. When the plane is leveled, all construction debris must be removed. Ideally - sweep everything, even dust, otherwise, during installation, the foam does not “grab” the wall.

If there are too large potholes or cavities, it is better to cover them with cement mortar. The smoother the opening, the easier the installation will be. With a loose material of the walls, they can be treated with binders: penetrating adhesive primers.
How to Install: Choosing an Installation Method
There are two different techniques: with and without unpacking (disassembling) the window. When unpacking, holes are drilled through the frame, through them an anchor is driven into the wall. This method is more difficult, but the fastening is more reliable.

This is an anchor bolt installation. They are placed three pieces on each side.
When installed without unpacking, metal plates are attached to the frame from the outside, and then to the walls. This, of course, is faster, but the fastening is very unreliable: with significant wind loads, the frame will skew or it will sag.

If you really do not want to disassemble the window, you can also mount it on a plate, but use thick and wide rather than narrow and thin ones, which are still often used when installing a rafter system.
In principle, small windows mounted on mounting plates, provided there are no significant wind loads, can stand normally. If you live in a region with strong winds, and they blow mainly through your windows, if the apartment is in a high-rise building on a high floor - in these cases, an installation with unpacking is necessary.
Below you can see an emotional and easy-to-understand video, which explains why it is better to use an anchor.
Do-it-yourself installation of plastic windows: step-by-step instructions
Let's describe both methods: suddenly you need a method with mounting on plates. It is used in buildings made of foam blocks, the bearing capacity of which is low and the load from the windows has to be distributed over a large surface. This method of installing plastic windows is also necessary if the building is built using a "layered" technology. For example, there is concrete in front and behind, and a layer of insulation between them. If the window should stand exactly in a soft layer, then it will need to be fastened with plates. Installation of PVC windows in brick, cinder block, panel, etc. house is desirable for an anchor.
Installation with unpacking
Do-it-yourself installation of plastic windows begins with measurements. Measure the frame and window opening to make sure they are compatible. Then you can get to work. The process begins with disassembling (unpacking) the PVC window. Here are the steps:
- Remove the sash of the window:
- Close the window (handle is turned down).
- Remove the plastic covers on both hinges. They pry off with a screwdriver.
- There is a pin on the top hinge that provides a movable connection. It is centered and protrudes slightly. Press on it until it drowns (you can take a metal plate, rest it on the pin and lightly tap on the plate). The pin will slide out from below. It can now be grasped with side cutters or pliers and pulled downwards to remove.
- Holding the sash at the top, open the lock. To do this, put the handle in a horizontal position. By tilting the upper part towards you slightly, lift the sash, removing it from the lower pin.
The entire sash is removed. To make it clearer, watch the video. It describes in detail how to remove and install the sash on a plastic window.
- On capercaillie, remove the double-glazed window. It is supported by glazing beads. They need to be removed, then the glass unit itself will be removed without problems. They remove the glazing beads like this:
- Something narrow and strong is inserted into the gap between the glazing bead and the frame. If no special tool is available, it is best to use a small putty knife. Disassembly begins on one of the long sides.
- The spatula is carefully driven into the slot with a corner and gradually pushed the glazing bead away from the frame.
- Without taking out the tool, they move along a little, again pushing the glazing bead aside.
- So they go along the entire length. As a result, the glazing bead is almost separated, it is simply taken out.
- With the short side, everything is simpler: the released edge is pushed on and, by turning the spatula, is removed from the groove. Grab the free edge with your hand and pull up.
Now you can try to remove the glass unit. Just be careful: it's heavy. If it does not work, remove another of the glazing beads. Just make sure that the window is inclined and the glass unit does not fall out. Now, if necessary, you can replace the glass unit yourself. Watch a video on how to remove glazing beads from PVC windows.
- Remove the sash of the window:
- The freed frame along the outer perimeter is pasted over with a special self-adhesive tape. Its installation is recommended by GOST. With her, the window is not so cold.

- Remove the campaign logo protective tape. If left, it will melt too much with the frame under the influence of the sun and it will be problematic to remove it.
- The prepared frame is inserted into the window opening. Mounting wedges are used to position it. They must be installed in the corners and under the impost. The rest are arranged as needed. By placing them, the window is set strictly level in three planes. Pre-fix the position of the window. This is where you can use the mounting plates.

- Take a drill and drill, which is the same size as the diameter of the anchors. Make holes for fasteners. 150-180 mm recede from the upper edge. This is the first hole. The bottom is about the same distance from the bottom corner. Another anchor is installed between them in a standard window: the maximum distance between two fasteners should not be more than 700 mm.
- Having made a hole, check if the frame has moved (level in all three planes), then hammer in the anchor and tighten it. You cannot drag: the profile should not bend. This operation is repeated as many times as necessary.

- Install ebb tides outside. To do this, first, a vapor-permeable waterproofing (it is self-adhesive) is glued to the outer part of the frame. Small grooves are made on the sides of the window opening, into which the edges of the ebb tides are then brought in.

- A layer of foam is applied to the part of the window opening from the outside, where the ebb will rest on the wall. Sometimes, if the height difference is large, a lining profile is installed here. and then olive is attached to it. The ebb, cut to size, is brought under the frame ledge and there is attached to the frame with self-tapping screws.

- On the lower edge, the ebb is also foaming.

- Next, the opening is foamed. When installing plastic windows in summer, the gap between the frame and the window opening is sprayed with water from a spray bottle. This is necessary for better foam polymerization.
- A vapor-permeable heat-insulating strip is glued along the frame contour - it is also recommended by GOST.
- Take a balloon with foam and fill the existing gaps by 2/3 of the volume. If the size of the gap is large - more than 2-3 cm - foam is applied in several stages. A time interval of 10-15 minutes is required between the two layers. When the first layer is partially dry, it is also sprayed with water and the second is applied. This is repeated until the volume is filled by 2/3.

Foaming PVC windows during do-it-yourself installation can be carried out in several stages - it depends on the size of the gap
- Without waiting for complete polymerization, the free edge of the heat-insulating tape is glued to the window opening. Just note that when using the tape, the slopes will need to be made of plastic: the plaster and mortar do not "stick" to it.
- Collect all the pieces of the window. Only finishing work remained, and they are not a hindrance to them.
- A vapor barrier tape is also installed under the windowsill in the lower part (also GOST recommendations). The window sill rests on support blocks made of hard grades of impregnated wood. The distance between them is 40-50 cm. They are made in such a way that the window sill is slightly inclined towards the room (about 5 °).

Watch the video on how to properly position the window sill when installing a plastic window. There are many secrets.
Slopes are installed or sealed last. On this occasion, another video.
Installation without unpacking
The main subtleties are described above, so this chapter is short. Installation of this option begins with the installation of the mounting plates. They are of two types: U-shaped and linear. It is important to choose the most reliable thick metal.

They are installed at the same distance as the anchor: 150-250 mm from the edge and no more than 700 mm between the middle ones. They are simply screwed to the profile with self-tapping screws.

Then the installation of plastic windows with your own hands with mounting plates is identical to that described above, starting from the moment the window is level in the opening. Only they do not attach the frame, but the plates and not to the anchor, but to the dowel-nails. Drill a hole, bend the plate, insert the dowel, putting the plate in place, twist the dowel. Further, all actions are identical.
Now it is clear why installers prefer them: a decent chunk of work with disassembly, anchoring, etc., goes away: screws are much easier to tighten. True, if you take powerful plates, they will hold tight. No worse than an anchor. For example, such as in the video.
Plastic window constructions are rapidly replacing their wooden counterparts from the market. If you also decided to replace the old windows with more modern designs, it would not hurt to familiarize yourself with the instructions for self-installation of new PVC windows. Professional installers charge quite a lot of money for such work. Does it make sense to overpay if you can handle all the tasks yourself?
It is assumed that before starting installation, you have already decided what size of windows will suit you, what configuration new systems should have, what accessories you will order, etc. Deal with the solution of these issues on your own or with the help of a consultant of the company to which you have decided to entrust the production of plastic windows.
Immediately before starting the installation, you need to decide whether you will fasten the windows through the frame or use the method that provides for the use of special fastening "ears".

The first option is more common. However, it may seem inconvenient to you for the reason that before starting the installation, you will need to remove the swing doors from the frame, and get double-glazed windows from the blind doors.
The second option is more convenient for self-installation - you don't have to disassemble anything, therefore, the risk of damage to the structure and violation of its tightness is minimized.
When choosing the second method, find yourself an intelligent assistant in advance. The assembled window weighs a lot, and it is incredibly difficult to install it yourself.

Preparatory work
Immediately before the installation of PVC windows, you have to complete a number of important preparatory work.
Site preparation

When ordering windows, specify when they will be delivered to you. Start preparing the site shortly before the delivery of the windows.
First step. Move all furniture and appliances away from the window opening.
Second step. Cover the floor and radiators with a protective film or thick cloth.
Step three. Organize your workplace so that nothing bothers you, and everything you need to complete the installation of the window is at hand.

First step. Remove the sashes and dismantle the double-glazed windows if you prefer the fixing method through the frame.
To remove the glass unit, gently pry the fastening glazing bead using a simple chisel and carefully hit the same chisel with the fasteners out of the groove. Take out the vertical fixing glazing beads first. Then, in the same order, get rid of the horizontal fasteners.
To avoid confusion in the future, be sure to label the fasteners. Their size may differ slightly, but even a fraction of a millimeter difference will be enough for gaps to appear.
Second step. Tilt the window frame. The glass unit will independently come out of the fastening grooves. Carefully place the removed glass unit against a wall or other stable surface at a certain angle.

Step three. Remove the plugs from the sash canopies and unscrew the fastening bolts. Next, you need to free the upper part of the hinged casement. To do this, turn the knob "for ventilation". Remove the hook located in the lower canopy.

As a result, you will end up with a “bare” frame with jumpers.
Fourth step. Prepare anchor holes from the inside of the window frame. Place the holes along the perimeter of the product so that there are at least 3 attachment points on each side, and at least two at the bottom and top.
The diameter of the window anchors is 0.8-1 cm. Use a drill of the same diameter to create the holes.
If the plastic window will be fixed using special "ears", the disassembly of the structure can be ignored. In such a situation, all preparation comes down to fixing the fasteners from the kit to the frame using screws.
Video - How to remove glass from a PVC window
Window dismantling instructions


First step. Remove or tear out the sashes, depending on the design of the window.
Second step. File the box and frame at several points.
Step three. Pry each part of the structure with a crowbar and remove the frame from the opening. In some situations, it is more convenient to immediately find two hundred nails, due to which the window is held, and pull them out.
Fourth step. Remove any insulation and sealing materials that appear under the box.

Fifth step. Dismantle old slopes with a hammer drill. If the slopes are in good condition, you can leave them alone. At this point, be guided by your plans for the further design of the slopes.
Sixth step. Pry up and dismantle the old window sill.
Seventh step. Get rid of the cement backing under the windowsill and at the bottom of the window opening. A puncher will help you with this.

Eighth step. Collect the debris in suitable containers and dispose of in the trash can. Take the remains of the dismantled window there.
Ninth step. Align the ends of the opening, clean them from dirt. Prime the surfaces.

Tenth step. Relevant only for residents of old wooden houses. Lay waterproofing material around the opening. In some situations, it is required to additionally install a wooden reinforcing box.
If necessary, the dimensions of the opening can be reduced using a cement screed. In this moment, focus on the conditions of your specific situation.
Setting up and pinning a new window
Proceed with the installation of the pre-prepared window.

First step. Place special plastic underlays or wooden blocks on the bottom end of the opening. Select the dimensions of the substrates so that their upper edges are connected in a straight horizontal line.
The underlays are laid in the corners and in the center of the opening.
Second step. Install the “bare” or assembled frame on the substrates, depending on the method of window installation you have chosen. It is not necessary to dismantle the substrates, they will continue to perform their supporting function in the future.
Without substrates, the window can simply fall out. Anchors, no matter how often you check and tighten them, will still loosen under the weight of the structure. Therefore, for additional strengthening of the system, the substrates must be placed not only at the bottom, but also along the side faces, closer to the top of the opening.
Step three. Check the horizontal placement of the window structure using an ordinary water level.

If deviations are found, pick up the pegs or get rid of unnecessary elements of the substrate.
Fourth step. Check the vertical position of the window. The detected deviations are eliminated as in the previous step.


Fifth step. Proceed with anchoring the window according to the chosen fixing method.
Fastening by the method "through the frame"
First step. Take a punch and straight through the holes prepared in advance in the frame, drill similar holes for fasteners in the wall.
Second step. Secure the bottom of the structure on both sides. To do this, you need to insert and fix the anchor, but you do not need to complete the fastening immediately to the end.
Step three. Make sure the window is placed vertically. Correct the deviations immediately using the pattern you are already familiar with. If everything is ok, use a punch to drill holes in the center and top of the window frame. Insert and tighten the anchor. Information on the required number of fasteners was provided earlier.
Fourth step. Recheck the alignment of the window. Get rid of deviations immediately if they are found.
Fifth step. Tighten the anchor all the way. Do not overtighten them as the frame can be deformed from excessive tension.
Video - How to install a PVC window
Plate fixing
In this case, special plates will be used to fix the window. They are placed on one or two sides of the window block. The plates are made of thick metal and look like "ears". Holes for anchors are initially provided in such elements.
With this mounting method, you need to bend the mounting plate into a step. The “eyelet” of the plate should adhere as tightly as possible to the wall surface. The second part of the plate is bolted to the frame.
Fastening is done with the same anchors. The window is fixed in the same order: bottom first, then top and middle. At each stage of the installation, be sure to check the evenness of the placement of the structure. Without observing the vertical and horizontal levels, your window will simply deform over time.

Assembly and final check of the window
After fixing all the anchors, go to the assembly of the window, if you originally disassembled it. The process is carried out in the reverse order of disassembly.
First step. Insert double-glazed windows into the window frame and fix them with glazing beads, first at the top, then at the bottom, and finally at the sides. A rubber mallet will help you to snap the glazing beads.
Second step. Reattach and secure the swing leaves accordingly. Adhere to the reverse order of dismantling them.
Make sure that the flaps move normally. In its normal state, the sash does not make any unauthorized movements when it is opened at 45 degrees and 90 degrees.
Step three. Complete the test and seal any existing gaps between the walls and the newly installed window. Fill the gaps with special polyurethane foam in cylinders.
On this, the main work on the hand-made installation of PVC windows is considered complete. In the end, you just have to install a plumb line, a window sill, a mosquito net and make slopes at your discretion.
Installing a window sill (Read the article about installing a window sill with your own hands). Wetting with water. Dedusting

Installation of a window sill Laying out cement mortar

Installation of a window sill. Wetting with water. Dedusting

Installation of a window sill. Alignment. Grout

Installation of a window sill. Drying

Installation of a window sill. Finished work
Successful installation work!
Currently, more and more people give their choice in favor of metal-plastic windows. Such double-glazed windows are used to equip ordinary apartments, country houses, and chic country houses. And quite often people install new windows with their own hands. Depending on the chosen installation method and the skills of the installer, the process of installing one window will take from one and a half hours to half a day. The window installation technology is extremely simple and straightforward. It does not require the use of any complex tools. The main thing is to adhere to the installation order and comply with all the requirements that the installation technology dictates.
Necessary measurements before ordering plastic windows
Correct installation of new windows requires accurate measurement of the window opening. In addition, it is important to know the features of installing windows in openings with a quarter. Such window openings are usually found in aerated concrete buildings. They help to significantly reduce heat loss. The main difference is that a window with a length of 50 mm less than the length of the opening is installed in the opening without a quarter. Subtract 30 mm from the measured width. Along the contour of the opening, leave 15 mm gaps for foaming. In accordance with the current GOST, 20 mm should be left around the perimeter. Leave an additional 35 mm at the bottom under the sill.
If the installation of PVC windows will be carried out in a window opening with a quarter, measure at the narrowest place. When ordering, add 30 mm to the window width. The length does not need to be changed.

As a rule, the window is not installed in the center of the opening, but at a distance of about 1/3 inward from the outer plane. If the installation of PVC windows is done by hand, then the owner can shift the structure to any side convenient for him. Think about the offset in advance and take this parameter into account when ordering an ebb and a window sill.
Add 50 mm to the widths of the ebb and the window sill determined in accordance with the location of the window. When calculating the width of the window sill, consider additionally such an indicator as the location of the battery.
The sill should cover the radiator by half. Add 20 mm to insert the product under the PVC window base. The length margin must be at least 80 mm. But it is better not to save too much and add 150 mm, so that in the future you can beautifully cut the window sill without any problems. Along with the ebb and the window sill, you will be offered to order side plastic plugs. There is no need to give them up.
Back to the table of contents
Which way to attach the frame to choose?
Installation of PVC windows does not depend on the chamberness of the glass unit, or on the number of internal chambers in the profile. The order of installation of the product can only change taking into account the material of the walls and the size of the window. A suitable fastening and installation method for PVC windows is selected in accordance with the listed parameters. To anchor the window structure, you can use:
- Dowels or anchors that cut into the walls through the existing or previously prepared through holes in the profile.
- Serrated plates. They are pressed into profile. The bullet is fastened to the wall and fixed with screws.

Practice shows that the first option is the most reliable. It is most often used when installing heavy and large windows. In the case of a through fastening, the window will normally withstand the multiple shock loads that inevitably occur when turning and folding window sashes. In addition, with the help of anchors, the installer gets the opportunity to adjust the horizontal and vertical of the product to be installed as accurately as possible.
Those who install windows with deaf double-glazed windows, i.e. without pivoting and flap sashes, installation using anchor plates will be more interesting. These products are hidden under the slopes, so that they will not spoil the appearance. If the walls of the house are made of bricks or concrete, then it is recommended to pre-prepare small indentations for the plates. They will eliminate the need to apply a leveling layer in front of the slope device.
Sometimes both methods are used in combination. Anchors are deepened into the walls through the lower profile and the side parts of the frame, and plates are used to fix the structure. If the windows are installed in a building made of wood, it is better to refuse the use of plates, because they loosen after a short time. In this case, galvanized self-tapping screws are more preferable.
Back to the table of contents
What does the owner of a wooden house need to know?
The process of installing PVC windows is very dependent on the material of the walls. In the case of brick and foam concrete structures, the differences are reduced only to the depth of the anchors. With openings from a bar and a log house, everything is a little more complicated.

If the walls of the house are made of wood, there are some important rules to remember. Firstly, it is recommended to start installing PVC windows in a wooden house no earlier than a year later, and even better 2 years after the completion of the construction of the house. This requirement is dictated by the fact that during this time the material shrinks. Glued laminated timber is characterized by the smallest size and shrinkage period. Secondly, the windows are not installed directly into the opening. The product can only be mounted in a wooden box. It will protect the PVC window from deformation. The block must be free from any defects, signs of insect and rot, etc. Before starting any work, the wood must be treated with an antiseptic.
After 1-2 years, shrinkage does not stop completely, but it is no longer as strong. After the installation of PVC windows and the completion of finishing work, it will also occur. That is why a gap of 30-70 mm must be left at the top between the box and the opening. The size of this gap is selected taking into account the type and moisture content of the building materials. After the installation is completed, this gap must be filled with jute and closed with platbands.
Building codes do not set any clear guidelines for materials for window sills and sills. As a rule, standard drips are used, which come with a PVC window. The window sill can be made of wood or polymer. The lower profile can be resting directly on the wooden sill, i.e. you can install this product, if desired, before installing the window. Or you may not get rid of the old window sill if it is well preserved.

Experienced builders give a very useful recommendation, which is not in the regulatory documents, but it will be useful to any person who decides to perform an independent installation of PVC windows. The wood is vapor permeable. If you do not take any action on this matter, these fumes will gradually deteriorate the properties of the polyurethane foam. And to prevent the foam from wetting, a polyethylene foam tape should be glued along the line of its application.
Back to the table of contents
Preparing the opening and window for installation
Before proceeding with further work, prepare the tools for installing PVC windows. You will need the following:
- Screwdriver.
- Foam gun and foam directly.
- Level.
- Electric jigsaw.
- Perforator.
- Hex key set.
- Pencil.
- Yardstick.
- Stationery knife.
After you dismantle the old window, carefully clean the opening of paint and debris. If the walls of your house are made of wood, you will have to additionally shave off the top layer if the new window is mounted in a box that has already served for some time. This pre-treatment provides a stronger adhesion of the foam to the top layer.

Builders recommend using foam to fill the gap only if the gap between the opening and the frame does not exceed 40 mm in size. If the slots are larger, it is better to partially fill them with foam, drywall and other available materials. For example, in a house made of a bar, you can use pieces of the same bar.
First you need to remove the sash from the frame. To do this, pull the pin out of the upper hinge. You can carefully pick it up with a screwdriver or pliers. Then remove the sash from the lower hinge. If the window is deaf, you need to remove the glass unit from it. First, the longitudinal glazing beads are taken, after them - the transverse ones. Glazing beads can be easily removed with a spatula or wide knife. It is enough to insert the auxiliary tool into the gap and begin to move it gradually. Be careful not to damage the glass.
If the window is small, you can insert it using the mounting plates without the need to first remove the double-glazed windows or sashes. If it is possible not to violate the integrity of the factory structure, then it is better not to do this. Take a sash or double-glazed window and lean the product against the wall at a slight angle, placing it on a flat horizontal surface, previously covered with thick cardboard or some kind of soft material.

Never lay double-glazed windows and sashes flat. It is also prohibited to put them skewed. Even the smallest pebble under the base can cause a crack in the product. Remove the protective film from the outside of the frame. Better to do it right away, because in the future, this process will require much more effort.
Mark the locations for the fasteners. Builders recommend installing fasteners with a step of 40 cm. In accordance with the current GOST, the step should not exceed 70 cm. The standard indents from the impost and corners are 15 cm. If you are installing a PVC window using plates, attach them to the frame in advance. For this, self-tapping screws are used. Prepare holes for long screws or anchor bolts. Use a metal drill for this. Drill from the outside of the frame.
Most instructions indicate that fixation must be performed with PSUL protective tape prior to installation. However, practice shows that it is rather inconvenient to glue it before installation. Therefore, you can do this after the completion of the installation, nothing terrible will happen because of this.
 The benefits of wax candles: creating a favorable aura Passionate candle what to do with it
 Protect for good trade: how to do it yourself?
 Is it possible to make a love spell while fasting