Table for the kitchen with your hands drawings. How to make a table with a tree with your own hands: step-by-step master class. What can be made of solid array
The table is an integral attribute of the kitchen interior. At the same time, he should not only combine style, beauty and comfort, but also be quite reliable. And what could be more reliable and durable than a natural tree? The problem is that high-quality wooden furniture is expensive, so not everyone may acquire it for his kitchen. However, it is not necessary to despair, because to make a wooden table with your own hands - quite fulfilling the task for a person who is able to distinguish the screw from the nail and knows how to use the drill, pubescom and grinding machine.
The choice of the design of the kitchen table depends on several factors, such as kitchen dimensions, the number of tenants and interior design. If you look at the options that are offered by furniture manufacturers, then among all the variety of structures, three categories can be distinguished:
- medium-sized tables for 4-6 people;
- overall tables for a large family or reception;
- practical folding tables for small-sized kitchens.
The table in the kitchen should combine three qualities: aesthetics, convenience and practicality
To make a kitchen table with your own hands, you need to have a drawing of the product, a necessary set of tools and at least small skills of working with wood. Below are options for structures for standard, large and small kitchens with photo instructions and a detailed description of each stage of wood table manufacture.
Rectangular dining table on balasines
A rectangular design with a standard size of 1200x600mm is considered the most popular due to its practicality. At this table, a family of 4 people will calmly be located. In addition, it can be installed as in the center of the kitchen (if the area allows), and put it close to the wall in order to save free space.
Schematic drawing
In order to make a wooden table more attractive, instead of straight legs we will use balusters. If there is no turn of the lathe, then such legs can be ordered separately in the nearest furniture workshop.
For your information! Balyasins are figure poles that, first of all, are found on the railing of stairs, balconies and roofs. However, the use of these elements in the manufacture of kitchen tables is also not uncommon.

Drawing of a rectangular table on balasines
For the assembly of the product, the following materials and tools will be needed:
- 4 Ready-made legs-balusters with a height of 720 mm;
- furniture shield with a thickness of 30 mm for table top;
- board 20x100mm for frame;
- screws on a tree with a length of about 30 mm;
- drill (screwdriver);
- a circular saw;
- schlifmashinka;
- sandpaper of different grainability;
- building level;
- corolnic;
- roulette;
- glue on wood.
Step-by-step assembly instructions
A kitchen table made of wood on balasits with their own hands is done in such a sequence:
- We prepare the crossbars. To do this, cut the 100-millimeter board on 4 parts (2 to 400 mm, 2 to 1000 mm), after which we remove the burrs and bring the surface to a smooth state using sandpaper or grinding machine.

- We take the balusters and in pairwise connect with short crossings (400 mm), making a small indentation from the edge of the leg (about 15 mm). The mount is carried out by means of glue and screws that are tightened at an angle from the inside of the board.
Tip! To prevent the appearance of cracks, it is better to pre-take holes for the screws.

Fastening short crossing to legs
- Ready pairs of legs connect long crossbones (1000 mm). The attachment algorithm is the same as in the previous stage.

Finishing Stamp Frame Mounting Stage
- After we have made the wooden table frame with their own hands, go to the tabletop. If it comes to the kitchen, then it is better to buy a finished furniture shield. Although for a gazebo or giving, where the requirements for the appearance of the countertops are not as tough, it can be collected from the headboards.

Furniture shield for table top
- The finished countertop must be combined with a frame. To do this, laid it with the front side on a flat and clean surface, and at the top evenly have a base with legs. The fastening of the across the tabletop is carried out by screws by the same principle that was described in paragraph 2. However, in this case, it is necessary to be extremely neat so as not to drill a tabletop through.

- On this, the manufacture of the kitchen table can be considered practically complete. The last stage is characterized by the surface grinding process, as well as applying the veil or varnish, the color of which is selected under the kitchen interior.
Note! The number of layers of varnish depends on the tree breed. Solid rocks, such as oak or housing, weakly absorb varnish, therefore, in this case, there is enough 1-2 layers. But for pine or ate, you will need at least 3 layers of coating.

Dining table made of wood on balasines
Wooden table for big family
The overall table, followed by a large family in a circle or arrange a feast, inviting friends, should have a reliable design. The usual four legs are usually not enough to keep heavy countertop. Therefore, you have to make additional measures to enhance the framework.
Production of product
In this example, consider how to make a large wooden table for the kitchen with your own hands with a size of 2337x978 mm (naturally, minor deviations are allowed in one direction or another).

Tree drawing
Before you start, you should prepare timber for:
- carrier frame (38x90 mm);
- countertops (38x140 mm);
- supporting slats (19x64 mm).
The following tools will also need:
- a circular saw;
- electrolovik;
- drill;
- screws (4x65 mm);
- drills (3 mm);
- furniture glue;
- pencil, roulette, sandpaper.
Stages of manufacture
In order for the table to be reliable and possessed an attractive appearance, it is necessary to accommodively approach each stage. So, proceed:
- From purchased lumber, we make parts for the future wooden table:
- 2 upper transverse beams (38x90x978 mm);
- 4 legs (38x90x695 mm);
- 2 tents (38x90x921 mm);
- 1 Longitudinal lower beam (38x90x1575 mm);
- 1 Longitudinal upper beam (38x90x1473 mm);
- 2 cuts (38x90x772 mm);
- 7 blanks for table tops (38x90x2337);
- 6 supporting planks (19x64x432 mm).
All the details are carefully grinding, achieving an absolutely smooth surface without burrs.
Important! The quality of the grinding of a wooden surface depends on the properly selected emery grain. For primary grinding, grain size should not be larger than 200 microns. Circumptory processing is carried out by eating with smaller grain - 80-100 μm for soft and 50-63 microns for solid wood.
- The legs pairly fasten with each other with the help of transverse beams (at the top) and the guards (below). For each connection we use two screws.

- With the help of the longitudinal bottom beam, we connect two tents.

Fastening the bottom transverse beam
- Strengthen the design by the top transverse beam.
Tip! So that the beam reliably combined two halves, in addition to screws, additionally should use wooden wars with a diameter of 10 mm.
- The ends of the billets for the splines are cut at an angle of 45 degrees. After that, both cutting to the upper and lower transverse beams are conclusing.

Fastening the top transverse beam

- Designed for table top wooden boards connect with transverse beams on the inside of the design.

- Additionally strengthen the worktop using supporting planks. Watch that they do not go to the wall dimensions.

Strengthening design by supporting planks
- If desired, semicircular angles can be made in the kitchen wooden table, which will give the product a more elegant look.

This option is suitable for both large cuisine or dining room and dacha
Folding table made of wood for small-sized kitchen
If there is not enough space in the kitchen to accommodate a large or medium size in the kitchen size, then a more original approach should be sought. One of these solutions is a folding table, which is attached to the wall and is very simply cleaned, freeing the space engaged in itself.
Materials and tools
To make a folding table made of wood to the kitchen with your own hands, you will need the following:
- furniture shield with a thickness of 30 mm;
- wooden ram 20x60 mm;
- loops (6 pcs.);
- angular lamella (2 pcs.);
- wooden waders;
- dowel;
- screws;
- drill;
- electrolovik;
- grinding or sandpaper;
- glue;
Assembly: step by step
Tip! Before proceeding with the work, decide on the place where the table will be installed. As the design is attached to the wall, it is very important to take into account all the features of the future interior of the kitchen, so that he subsequently did not have to make a permutation, leaving unsightly holes from the dowels in a prominent place.
Stages of assembling kitchen table with their own hands:
- Prepare parts for folding legs. For this, a wooden bar is cut into 8 parts: 4 with a length of 720 mm, 4 with a length of 320 mm. Each element is sketching, removing burrs.

- We collect two rectangular frames. Rakes are connected to each other by means of furniture wanks, which is predetermined to drill a deaf hole with a diameter of 8 mm.

- Ready frames we connect loops among themselves. In addition, to one frame as well as the hinge, you must attach a narrow rail, which will be attached to the wall.

- Fix the frame to the wall by means of a dowel, after which they install the corner slabs on the sides. It is important to locate so that they do not interfere with the legs to develop.
Tip! Instead of angular lamellae, you can use any furniture corners of the appropriate size, selected for the color of the table.

Mounting design to the wall
- From a wooden shield, cut the table top of 900x600 mm. For a more spectacular view, the corners can be rounded. After that, all the ends should be handled with a machine.
- From the tabletop "separate" a piece of 250 mm long, which will be attached to the wall structure. Two parts are connected to each other by loops.


- We establish a 250 mm part on the corner slabs and connect the elements of screws.

The final stage of the installation of a folding table in the kitchen with their own hands
- You can reflect the table at your discretion, applying the veil, varnish or paint. But even in pristine form, such a product looks very good.

Wooden folding table - original solution for small kitchen
On the Internet you can find a lot of options, how to make a wooden table with your own hands. We reviewed the three simplest solutions for standard, large and small-sized kitchens, the production of which is quite economical and does not require any specialized machines and a lot of experience with wood. For the manufacture of more complex designs, we recommend to seek help from specialists.
In conclusion, see the video, which shows how the old wooden boards you can make a completely decent kitchen table.
Video: Table of wood do it yourself
Such a piece of furniture, like a kitchen (or as it is also called a dining) table - the main component of the kitchen interior. Its form, the value must correspond to the size of the room so that all family members can freely accommodately. It is also important that the kitchen table does not interfere with the free passage.
Sliding dining kitchen transformer table
Currently, there are a wide selection of kitchen furniture, various forms and values \u200b\u200bmade from a variety of materials. The market presents tables of both Russian and foreign production.

Original round dining table with chairs in the kitchen interior
Selecting the table for a kitchen of a small size, you have to make a choice - you like it when a lot of free space, or it is important for you that the furniture is comfortable, spacious. If you can't decide on the suitable table in the kitchen, try to make it yourself. Who has definite skill, make it quite bye.

Wooden round table with design on four supports made by hand

Folding table for small cuisine with their own hands
Many men who like to make their own hands can significantly save a family budget, because the finished products are not cheap. Accordingly, you independently select the material for the manufacture of high quality dining table and the required mount. Showing designer abilities, you will collect the original piece of furniture, ideal for the kitchen interior.

Folding table in the kitchen that does not take excess place
Do not think that this is a difficult task. It takes a lot of time on the assembly of the dining table - just a few days. A little harder to make a countertop. Better first consult with acquaintances dealing with such cases, or read information on the Internet.

Table with shelves and folded countertops do it yourself
Collecting the table with your own hands, you will create a unique thing, embody a long idea. Maybe with your light hand, organize the production of kitchen tables, and it will turn into a profitable business.
Determine with design and design

Round wooden table with handmade painting

Square wooden table for dining area
The design and shape of the dining table can be the most varied. Designers, applying fantasy, embody the most unusual ideas.

Dining table sliding oval with chrome legs
Consider the design of this object of furniture.
| Round table | It has smooth lines, as if uniting those who are sitting at the table. It has several legs or one big. It is comfortable to sit comfortably, you will not have an association related to work or study. One drawback is available - it is impossible to put it tightly to the wall |
| Oval | An excellent option for owners of a large kitchen, which is divided into a working and dining area. Perfect choice for a big family, strong enough |
| Square | The incarnation of rigor, but at the same time it is simple and multifunctional. Suitable for small premises, well saves space |
| Rectangular | Widespread option. It can accommodate many people. It is located as you like - in the center, the wall, by the window |
| Triangular | Such a table is rare enough in the kitchen. It is used as an unusual decoration element, for example, as a coffee table. |

Furniture set for wooden kitchen: rectangular table, bench and corner

Dining Corner Glass Table
Shallow kitchen owners prefer to use a table or sliding table. Since in the assembled state, they significantly save space. Other forms of tables are small where you can see. If you prefer artwork products, it is better to make them to order.

Large classic dining table made of wood array
The kitchen table, like any other furniture, is selected under a certain interior style. For example, a regular wooden table is suitable for classics. For high-tech, straight angles and lines are characterized, so they choose tables made of plastic, metal, glass, making focus on white and gray shades. For modern style, unusual furniture with suitius lines is used. Eco-style implies products from natural material.

Original folding dining table in High-tech style
Designer Board. Whatever the table you chose, the main thing is that it corresponds to the interior and complemented the overall appearance.
Necessary materials
Materials for dining table can be different. We give the most used:
- LDSP;
- board glued, edged;
- bar.
If desired, they can be combined. You will also need: corners, loops (for folding models), rollers, confirmates, corner fasteners, eccentric bolts, legs-pads, edge tape, plastic profile for table top, plug.
Required tools
Do not do without a standard set of tools:
- electrolovik;
- drill;
- hacksaw;
- screwdriver;
- drill;
- screwdrivers;
- electrolake;
- grinding machine;
- hexagons;
- construction hairdryer (can be replaced by iron);
- roulette (ruler), pencil.
In the manufacture of complex models, do not do without an additional tool.
Production Process: Step-by-step instruction

Tabletop will do from wooden boards
How to make a kitchen table with your own hands? Consider this on the example of an ordinary dining table. First of all, you prepare tools and materials that will be needed for work.

Scheme of the future dining table with sizes
Then we make markup of furniture elements. We start from the table top, as it is the largest part of the table. In shape it can be rectangular, round, square or oval. If you have conceived to make the table of an unusual form, spend the markup on the sketches.

Shlify the boards with a ruble, carefully process the edges so that the boards as close as possible fit to each other

We connect the boards with glue and the wrenches, remove the excess glue on the surface and grind it
Then we apply on the material the drawing of the side racks - it will be the legs of the future table. Most often in shape they imitate a chess piece. Want, you can make another form at your discretion. The main thing is that the design is stable.

We fasten the legs and make the base for the table top
Then we perform the marking of the upper and lower crossbars, which connect the racks and thereby ensure the reliability of the structure. Remember that the lower crossbar is always sewn upper almost twice. Its form is diverse. Usually legs are placed from the edge of the table surface at a distance of 15-20 cm.

At the next stage of the work we make cutting items. Place the material on the table. Cut the worktop using the jigsaw. In order to avoid the appearance of chips, we put under the bottom of Phane. Similarly, cut the remaining parts. Do not allow material sagging. Because of this, the tool may break or occur a bang of a cut element. At the end of cutting the edge of the parts by grinding a special typewriter or we pass on them sandpaper.

Fresh legs to long crossbars and drill holes in them in order to later install the countertop
Using the tape for the design of the edges and plastic profile, produce a carriage. First we put on the profile on the edge of the surface. In the place of the angular bend, the profile must be heated with a hairdryer and then produce its turn. For high-quality mount, use the universal glue.

After the glue in the frame will dry, you can start installing countertops on the frame
Then we produce the legs of the legs and the crossbar using the ribbon to decorate the edge. Before this surface prepare, cleaning from dirt and fat. Hot iron press the tape to the edge and glue it. Cut the excess knife with a sharp knife. Formed irregularities carefully remove the sandpaper. In the same way, we proceed the edges of the other elements.

If you want to make the table longer and wider, then you need to strengthen it with two additional transverse boards
Build the tables in the following order. Using the confirmates, connect the legs with the crossbars, having an upper one so as to prevent the brasser's deflection. Lower Brepim at an altitude of 20-25 cm from the floor.

A ready-made collected table remained only to handle varnish or a verse or paint, pre-trunking
On the finished base, we put the tabletop, fix it to the corners. At the racks attach legs-lining. Furniture screws with decorating plugs. All, dining table is ready!

Ready Universal Option - Countertop and Legs Covered with Morilka

You can paint the legs into white, and the countertop is covered with a veneer to get an unusual design.
A great way to supplement the interior of the house or giving is to make the original and stylish piece of furniture. About how to make the table with your own hands, we speak this article. Such a piece of furniture will be a real decoration of the living room, a kitchen or a working office. It can be collected at home from specially ordered boards and bars or from remnants of materials. For this, the wizard will need drawings, tools and a little fantasy. But the experience of making homemade furniture may be absent. We offer you a very simple project for assembling a strong and sustainable table. Making furniture on this scheme even newcomer.
Everything starts with ideas
How to make the table? It is necessary to start work with the selection of a ready-made furniture project for the living room or with compiling your own scheme of the future product. You can not limit your fantasy, however, it should be remembered that the drawings according to the degree of complexity should correspond to your skill level. In the absence of sufficient experience, it is better not to try to collect a very complicated design itself.
The table for the house can be depicted with a pencil on paper. First, you need to draw the design of the desired form, and only then designate its size. Most often, the table is made with their own hands for the living room square or round, but for the kitchen or the work office (and any small room) is suitable for a compact corner or adjustable table.

The size of the table with their own hands can be absolutely any, when choosing the dimensions of the product, it is recommended to take into account, first of all, the size of the room in which it will stand. Then, using drawings, you can count the amount of material to buy. Acquire materials recommended with a small margin (just in case).
If you are a novice that first collects furniture at home, then you better give preference to soft wood (for example, pine).
Such materials are very compatible and not split during the assembly. If you make the living room furniture and aesthetics are important to you, choose a poplar. If the homemade table is used outside the house, it is recommended to choose a treated wood or a red tree.

Durability will also be distinguished by a wrought table with a wooden countertop. Charm Your yard will add a wood product decorated with wrought-iron elements.
To collect a simple table at home, you will need:
- edged or tipped boards, a square cross section (for legs) and with a rectangular cross section (for frame);
- white or yellow wood glue;
- screws (preferably taking sammes of 4x60);
- screwdriver;
- drill;
- clip set;
- sandpaper or grinding machine.

We make a countertop right
Work is starting with the description of the process of manufacture of table top. There are several ways with which you can solve this task. What does the choice of this or that way depends? First of all, from the skill of the furniture maker and the intended appearance of the table for a living room or a country house. So, here are the main ways of making homemade countertops:
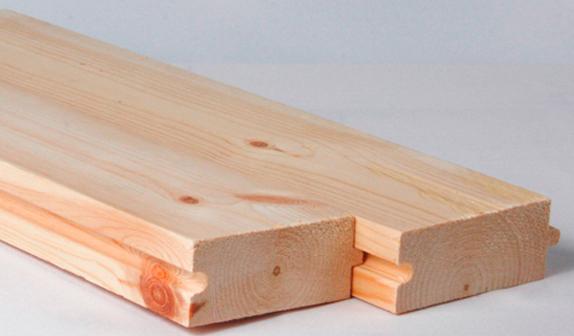
- Production from boards. This material is relatively low cost, excellent appearance and environmental friendliness. If you are a beginner master, you can make a table with your own hands from t-shut-off boards (that is, blanks with crests and grooves.
An experienced master can collect furniture for the living room of their edged boards. To do this, he will need a dowel or primeros small length. They will be used to connect boards with each other.
- Making from a single piece of wood. In this case, you can generally do not break your head over how to make a table with your own hands with a sufficiently durable and beautiful countertop. The optimal option is to purchase plywood from hard wood. However, such a product will cost quite expensive.
- Assembly of products from remnants of materials. This is a very cheapest way to make furniture for the house, but quite complicated performed. It will be necessary to choose fragments of wood, which will harmoniously combine with each other and do not create problems in the process of installation and further use of the product. Connect the remnants is also not easy. In this case, you will have to use screws and a large amount of glue or create a substole (rigidity edges).
In the first case, the boards lay down on each other, connecting with the help of screws and glue. Because all the boards of different sizes, on the finished product it will be necessary to trim the protruding elements and spend thorough grinding. As a result, it turns out the original and comfortable table.

The second method provides for the fastening of the material residues by any convenient way (with the help of glue, screws), followed by strengthening the structure by means of the installation of the podstoly or rigidity. Such a table will be distinguished by stability and durability.

If the table is located in the yard near the house or in a stylized living room, then you can order for it a wrought-made frame with legs. This will add a product of a special color and identity.

When the countertop is ready, it can be left overnight for the night so that it should be drunk. The technology of manufacturing this part of the table is approximately the same, regardless of the selected shape of the product. The main differences in projects in this case are in the form that you need to give the edges of the boards or a solid sheet of wood.
If you make an original corner table, then the edges of the boards will have to do at an angle. It is very important to correctly calculate degrees of each cut, so that the edges of the product are smooth.
However, if as a result, unevenness was formed, the edges of the table will need to be collected. You can also first bore the boards, and then draw a triangle on the workpiece and cut the finished product.

If you make a round table in a living room or a product with rounded edges, it is recommended to bore the boards of the future product, after which it is on the workpiece to draw a pencil or chalk of the future cuts.

The finished countertop on such a project will look like this:

Frame as a basis for a reliable table
The next step is to make a frame of a table for the living room. The frame is a wooden square (for a square or rectangular table) or a polygon (for a round item), which is fastened with the worktop and ensures the fixation of the legs.

Make a frame for an ordinary table will not be difficult even for beginner. To do this, turn the tabletop to the bottom up, measure the canvas, count several centimeters deep into and make a mark. Then, by marks, you can draw a rectangle or square.
After that, you need to cut off four pieces of wood of such sizes that correspond to the drawings on the table top. For the manufacture of a frame, it is recommended to take a rectangular timber. The frame of the boards may not be durable enough. Then the frame must be attached to the tabletop with the help of glue or screws. The second option provides a higher reliability of the design, but the hats of the screws will be visible on the surface of the table top in this case.
We make durable and reliable legs
At the next stage of the realization of an unusual project, you need to make the feet of the table. You can first cut off one leg of the desired height (for the production of legs it is recommended to use a square sections ram), and then using it as a sample, cut off the remaining 3. If you make an angular table, then the legs will not be 4, and 3. After completing the cutting process, Click all the legs together and cut them off in such a way that they were the same length.

At the next stage of the work, the legs need to be pasted with a grinding machine or sandpaper. But the top and bottom of the products should not be grinding, as you can spoil the correct cutting angle. Then you need to attach the legs. For this, the table can be turned upside down.
The first leg should be put into one of the corners of the frame in such a way that the top slice touch the countertops, and the two sides of the legs were adjacent to the frame. Then the parts of the contact details must be abundantly lubricated with glue and connect using fastening screws that are screwed through the table frame. Holes for the screws are preferably made in advance so that the screws do not split a tree in the process of screwing.
From the use of nails and hammer in the manufacture of a standard or corner table, it is better to abandon how nails can split the wood, and the use of the hammer requires the manufacturer of special skills. In addition, the screws are better holding a tree than nails, and if necessary, they can be turned out of the product.
Be sure to trace the legs attached to the table at the right angle. One of the advantages of screws is that they are easily adjustable. If necessary, their position can be easily changed. Then the same operations should be carried out with the rest of the legs. You can also scout legs through the worktop, but in this case there is a risk of splitting the legs. Yes, and the aesthetics of the table for the living room will suffer from this.

When the glue is completely dry, it is necessary to check the product for stability, strongly loosening it. However, if you made an angular table, then this stage can be skipped. It will come in contact with two walls of the living room or office, and it will give him extra strength. Then it remains only to polish the surface of the finished product and cover it with a varnish for wood or special paint. On this work is completed. Now you can supplement the interior of an apartment or garden with a beautiful product.
Country arrangement - the process is permanent. The way to build something, then we are landscaped. Moreover, the furniture is constantly required and the tables are most in demand. And put in the garden, and near the house, and even in. How to make a table for giving your own hands in this article on the example of ready-made projects.
Homemade table from palalet board
The material for this table was the disassembled pallets. Naturally, you can use new boards. Only one condition - they should be dry. You can buy dry (it is more expensive) or buy ordinary, fold them somewhere in the ventilated stacks and to withstand so at least 4 months, and better - six months. In general, any furniture, including, make out of dry wood.
We collect the table for the street - put in the gazebo, because you will not glue the boards, and we will scrape them from below, with the help of planks. This is a very simple country table and very cheap.
Runlying pallets we get board with individual color and pattern. Little entered by shifting several dozen times of them on a different manner, we achieve the result. It turns out quite a pretty tabletop.
We take the side parts of the pallet. We use them for the table frame. They are grinding them first by coarse sandpaper, then thin, bring to the required smoothness (grain 120 and 220).

We take the planks that remained unused, with their help fasten the tabletop. We have them in the place where the butts of the boards are. For the mount of each board with a joint, we use two self-pressing, one-piece one.
From the processed sidewalls and two boards (also polished) we collect the frame of the table. Its parts are secure self-drawing in the end (two for each joint). The frame can be glued or also to "plant" on the self-tapping screw. Only the length is big. Under each previously drilled holes with a drill, the diameter of which is slightly smaller than the diameter of the screws.

The collected worktop turn over and grind. The same order is first sandpaper with large grain, then with small.
Next - setting the legs. Select four boards of the same size, check their length, adjust if necessary. Then - grinding again. So easier than to grind already screwed legs. Coloring boards screw to the frame. This will be the legs for each one - two self-assembly fixed in diagonal (see photos). For greater stability at the bottom install jumpers. From the floor to the jumpers, you can leave about 10 cm. All connect the screws to the boards, so that the boards are not cracked, the holes are drilled.


Removing the dust, turn lacquer again. In theory, varnish should lie down exactly, but depends on the wood, so it may take another cycle of grinding / painting. As a result, we get such a homemade country table.

If you do not like a variety of planks and traces of old nails, you can make the same design of their boards. This table can be rectangular, maybe square. All sizes are arbitrary - see the existing place.
Country table from boards
This table for giving with your own hands is collected from the remains of boards of different breeds and sizes. Pine boards 25 mm thick and 50 mm width of 50 mm were on the frame of the table top. We make the frame for the size you need. This table will stand on the veranda, and it has a small width. So we will make it unbroken - 60 cm, and the length is 140 cm. The height of the legs is 80 cm (in the family all high).

Immediately cut off the two long boards of 140 cm. In order for the tabletop width to be 60 cm, you will take a double thickness of the board used - this is 5 cm. Short bars should be 60 cm - 5 cm \u003d 55 cm. Fold the frame, watching straight corners, twist the scrolls. We check whether the bars have folded correctly - we are diagonally, they should be the same.
Cut up the board four boards of 80 cm, fed them from the inside to the collected frame. You can 4 screws on each leg.

At about the middle of the height of the legs, the crossbar is fed. This is a frame for a shelf. The shelf can be used for the purpose, and it also increases the rigidity of the structure. Breppy strictly under straight corners, checking with a large square.

We put the frame on the floor, check, rushes or not. If everything is done correctly, it should be rigidly standing. Next, we take sandpaper or grinding and grinding.
Start assembling table tops. The boards of different breeds of wood remained from the finishing work, some painted by verse. We alternate the boards of different colors.

Fresh the boards of the tabletop finish nails, carefully finishing them with Dobochnik. On the shelf can be fixed by ordinary nails or self-drawing. Then grindingly farming. The last stage is painting. Very lucky with the choice of varnish. Bought too dark, did not like the appearance. We will have to sand again and paint in other color.

Wooden table with glued table top
This design is distinguished by M-shaped legs. They are going from the boards of the same thickness. In this case, 20 mm. So that they keep well, 5 screws are needed. Pre-drill holes with a diameter of 1-2 mm with a diameter of 1-2 mm. Then the drill of the larger diameter we drill the recess under the hats. The diameter can be selected under the furniture plugs of suitable color or make them from a wooden rod. Another option is to use a wood putty, which add wood dust that remains after grinding. After drying and processing sandpaper traces will find it difficult to find.

When assembling legs, it is necessary to ensure that the angle is exactly 90 °. As a pattern, you can choose a timber. First, the joint of two parts of the legs with a joinery glue, then we install the screws in the following sequence: first two extreme, then medium, and only then two others. After drying the glue legs, we grind, cover with varnish and dry.

It's time to do a countertop. It is assembled from the board of the same thickness. We recruit this size as necessary. You can use fragments of different widths. It is only important that everything is organically looked, and the sidewalls of the boards were smooth and shied without gaps.
The sidewalls selected for the countertops of the boards are melted with glue, lay on a flat surface (some table) and tighten the clamps. In this case, they cost one, but preferably - at least three. We are tightened so that there is no cracks in the resulting shield. Leave one day. After removing the clamps, we get an almost finished tabletop. It still needs to be thawed - align the edges, and then polish. It is possible to trace a jigsaw or ordinary manual saw. Using the grinder is difficult to get a flat line, but you can try. After grinding, we get a beautiful countertop.

By the same technique, you can make an oval or round tabletop. Only it will be necessary to carry out the appropriate line and to trace glued boards on it.
To make the table look more attractive, make a frame. We take a thin bar, process it with sandpaper and fastened around the perimeter of the table top. You can also use finish nails. Only the slats are also pre-wrapped with carpentry glue, and then nails.

After drying the glue again, the connection place is processed by sandpaper.

Now you can mount the feet of the table. We collect from four boards of the frame of the table (no photo, but can be made as in the previous paragraph). It is fastened to the back of the table top for glue, then we install furniture configmatics through the countertop. The confirmation is drilled by a pre-hole with an extension under the Hat. The holes under fasteners are masked the same way as on the legs.
To the fixed frame is dripped legs. They put them inside the frame. Attach can be ordinary self-drawing. All, we made a table for giving with your own hands.

How to make a garden wooden table benches
For this table, the boards 38 * 89 mm were used (decorated themselves), but you can take standard sizes. The difference in millimeters does not affect results. In the photo below, you can see what should happen.

For connecting parts, a stud 16 cm long with washers and nuts (24 pieces) were used. All other compounds - with nails with a length of 80 mm.

Parts are installed in place, the drill is drilled through a hole. A stilette is installed in it, the washers are put on both sides and the nuts are tightened. Everything is tightened by a wrench. What is convenient for this option? For the winter you can disassemble and attributed to the barn or garage.
Making seats

According to the drawing, cut the boards of the required size. Everything is necessary in double quantities - by two seats. Plaques are grinding, pay special attention to the ends.
Short segments that fasten three seats boards along the edges of the corner of 45 °. First we collect the design that is attached to the seat below. We take a board with a length of about 160 cm, in the end to her, the two cut boards at the angle. Attach it so that this board is in the middle.

Then to the resulting structural feet of the legs (can be nails). Then add more cuttings at the angle of the board and all tighten with stiletto with bolts.
To the resulting design of the seat boards. Since this is a table for the street, it is not necessary to knock them down. Leave the gap between two neighboring at least 5 mm. You feed with nails to supports (which are cut), two for each board.

The finished seats are fixed using four boards with a length of 160 cm. Each leg is secure with spills (if you go, you can put two studs by setting them into a diagonal or one over another).

Collect a table
The table is collected in a different principle. Note, for tabletops, transverse boards across the edges are spilled at 52 °. They are fastened at such a distance to enter the legs. On each board 2 nails. You can finish, with small hats, and you can score deeply, and then the holes to disguise the smell.

Now it is necessary to assemble legs-crosses. We take two boards, we intersect them so that the distance between their ends was 64.5 cm. We supply the place of crossing the pencil. In this place it will be necessary to remove wood on half the thickness of the board.

We make the same recess on the second board. If they are folded, they are obtained in the same plane. Connect four nails.

Similarly, we make the second feet for the table. While the table does not collect.
Install the table
Now we need to fix the legs to the design on which benches are installed. They put them at an equal distance from the benches, fasten with studs.


Now install the worktop. Its fasteners, too, with spills. The last stage is painting. Here everyone does how he likes.
Variations on the topic
On this drawing, you can make separate benches and a table for the cottage, garden. Design reliable and simple performed.


Table for giving with your own hands: Drawings


An integral attribute of each house is a dining table, followed by the whole family. Properly selected furniture allows households convenient to feel in the kitchen. These requirements, undoubtedly, corresponds to a wooden kitchen table that can be performed with their own hands.

Varieties
Before you begin making such a design, you need to decide which type of product you need. Among all this variety, several types of kitchen tables can be distinguished:
- Traditional products.Tables of this type consist of a podstol, to which legs and countertops are attached. Such a system is common quite often, as it is relatively simple in the construction and is quite good resistance. It should be noted that there are several variations of these tables that suggest the ability to dismantle the legs or countertops.
- Boy structures.Different with the presence of two supports located on opposite sides of the table top. The width of the data of the elements in most cases is equal to the smaller size of the upper surface. The manufacture of such tables requires a certain experience and well-equipped joinery.
- Designs without understolia. Such a table consists only of support legs, which are attached in a certain way to the tabletop. The whole system can be like solid and collapsible.
- Wall folding tablesconsist only from the tabletop that is attached to the wall. The design is equipped with special rotary mechanisms that allow the surface parallel to the floor, forming a horizontal surface. Wooden tables of this type are found only in very small kitchens, where there is a need to save the workspace.

Choosing wood
A tree, as a material is distinguished by plasticity and fuel, but the different breeds are characterized by different unique properties. In order to make a kitchen table, you can use any type of this product. It should be borne in mind that if you choose too soft wood, then it will scratch it and faster. But with such rocks it is easy to work, so it can be used if you are new to and decide such a task for the first time.

In the manufacture of a table of wood array, many experts use wood such types:
- Pine. The material is one of the most soft, so products from it need to be protected by several layers of varnish.
- Nut. Walnut tables are distinguished by considerable weight and durable structure. It is used when it is necessary to decorate the product for openwork threads.
- Oak. This breed is one of the most optimal options, since the substance is not only beautiful and durable, but also perfectly processed. Also, oak tables are not as susceptible to rotting in a humid environment.
- Larch. The breed has unique healing properties, but during the construction of the tables, it is impossible to allocate them, since the material is covered with varnish that impede the release of beneficial substances into the air.

Making countertops
A kitchen table made of wood with their own hands to make enough, if you have a desire, some skills of working with this material and a specific tool. As already mentioned, there are many different designs of this kind, which differ in size and designer design. Therefore, if you want to make a beautiful table yourself, you can basically use the ready-made drawings, the style of which you can pick up your interior.
The construction process begins with the facilities of the tabletop.


This process can be divided into several consecutive stages:
- Initially, you need to decide on the size of the countertop and purchase the required number of boards.The width of them can be different, the main thing is that they in the amount given the value you need.
- When the material is ready, you need to adjust the size of all boards under the required tabletop length. Try to cut off the ends at an angle of exactly 90 degrees. Then all the elements are thoroughly aligned and grinded by the plane. Please note that the thickness should also be driven under a single value, since it depends on it how smooth the plane will be.
- The connection of the boards is carried out with the help of the wrenches.To do this, it is necessary on each element through equal segments to mark the location of the fastener, and in the end to drill holes for it. To obtain a durable connection, the surface of the wanks or holes can be cooled with glue.

There is an alternative way of compound, which involves fastening from the bottom side of the tablet. It is located across all the boards that you need to nail to it.

Build construction
The installation process of this design involves pre-formation of a frame:
- First of all, the previously prepared legs are connected together in pairwise short boards.They also need to get across and give a beautiful appearance. The mount is also made with the help of the waders, which you need to drill holes in the legs and the bar.

If it is difficult to combine them difficult, then you can use special corners.

- After that, the two obtained pairs of support are connected in a similar way with long boards.

- The process of facing the product fastening the tabletop on the resulting frame is completed. Please note that if you apply adhesive for fastening, then before assembly, it is necessary to wait for the composition until the makeup will dry.

When the design is ready, you can start covering it with protective compositions.

For such purposes, you can use both ordinary paint and varnish. The last option is more preferable, since it does not spoil the appearance of the surface even after it is repainted.

 Why you can not give icons
 Is it possible to give icons as a gift: Signs, the opinion of the Church
 A year ago left her husband, and now I do not know what to do