The roof of the attic is a step-by-step structure. How to make a nuclear roof of various types - Schemes of rafters. Warming, vaporizolation and waterproofing of mansandrade and its construction with drawings and visual photos. Video: For what and how to lay layers
The attic roof makes it possible to significantly increase the total living area, while investing financial resources will be minimal. The most common option is the double broken design, which is easy to construct independently.
How to make an attic roof yourself
Under the attic roof, you can equip the room for housing. The form of construction can be different, but in most cases, attic is placed under the roof with two slopes. The optimal solution that allows you to obtain a substantial area of \u200b\u200bresidential space is a broken design.
The broken roof is the best option for the arrangement of the attic
Drawings and calculations of the roof of a mansard type
First of all, it is worth deciding on the framework scheme. The rafters can be a weak or hanging type. Current rely on the walls of the building. They are mounted in structures, where the distance between the walls is less than 6.5 m. Hanging rafters are put on the Falkets and Mauerlat. If the width of the flights is large, the system of the rafter will need to strengthen with the auxiliary ligaments.
The main condition for the comfortable construction of the attic is the level of ceilings - it should be higher than 2.5 m. To ensure such a height, the fracture line should be placed at an altitude of more than 2.8 m, taking into account the thickness of the material layer for insulation and the construction of the structure. It is also important to take into account the thickness of the floor.
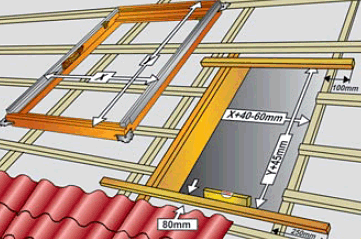
An example of drawing can be seen in the image:
 The minimum height of the attic roof ceilings is 2.5 m
 To calculate the alleged loads from the snow, you will need to apply this formula: S \u003d SG X μ, where S is the load from the snow, SG is the weight of the snow cover on 1 m 2 of the area, μ is a value that depends on the roof slope (1.0 - For a flat design with a slope of 25 °, 0.7 - for a construction with a tilt of 25-60 °).
SG and WO parameters can be found in the corresponding SNiP, in the section "Systems of the Skropil". If the roof has a steep slope, then you can not take into account the load from snow.
Roof Device
The frame design includes such details:
- maurylalat - Support Bar, which transmits the load from rafted the walls of the construction;
- racks - support parts that support the system of rafters in a vertical position;
- overlapping beams - planks that form half of the attic and the ceiling of the lower floor;
- rafyled - rails that form the main contour of the roof;
- ramans - horizontal support parts for rafters;
- dooming - rails or plywood sheets, which are intended for laying the material for the roof;
- falkets - planks that are attached along the axis at the bottom of the rafter feet.
 The framework consists of Maurolat, racks, runs, beams of overlapping and other elements
 The broken roof has differences from ordinary design with two slopes. The difference is that the skates that are posted opposite each other are of particular shape: they form a non-smooth line, and consist of several slopes that are bonded by one with another under a stupid angle. The design is also symmetric.
The extreme part of the rafter is mainly exhibited at an angle of about 60 °. Racks for support that hold rafters form a frame design of the inner walls. The upper part of the rafter is mounted at a small angle, it can be from 15 to 45 °. This makes it possible to reduce the consumption of materials, while retaining the functional properties of the roof and resistance to the loads from snow.
Vertical racks that rest in the slats of overlapping, runs and bonding them, form a parallelepiped. The design limits the dimensions of the attic from the inside. To give the product an additional rigidity, a cracker should be installed between the slats of the ceilings and the bottom rapid legs.
 If the roof spit is more than 8 m, then you will need to install
 After mounting the upper elements for fixing the farm and exclusion of rigleel saving, the suspension support elements should be installed - grandmother. For auxiliary fixation of the lower rafting legs, they must be pulled with racks with tapes. The fastening of parts is performed using nails and bolts.
Stages of self-structures of the attic
If it is decided to make a similar design yourself, it is important for the use of such materials in the project:
- material for roofing;
- vaporizoation;
- waterproofing;
- material for insulation.
The selection of the insulation affects such a parameter as the step of the rafter. To reduce the amount of thermal insulator, it is best to place rafters so that the plate or mat tightly come true between them. From the choice of material for the roof covering will depend on the type of doom and its step. It is necessary to pay attention not only to the choice of quality material for insulation, but also to create an efficient ventilation system.
 Ventilation is decorated by training technological gaps
 The construction of the rafal system should be carried out using fireproof materials. All items should be processed by means of flame retardant. You will need to prepare such elements:
- wooden bars with a cross section from 100x50 mm;
- rake 50x150 mm;
- unedged boards;
- building level;
- self-tapping screw;
- nails;
- steel wire with a diameter of 4-5 mm;
- plumb;
- roulette;
- hacksaw;
- ax;
- a hammer;
- a sharp knife.
Project preparation
One of the most important parts of the work is to draw up a project. It is very important to analyze the features of the private house planning. The dimensions and shape of the built structure should be determined, as well as provide for the placement of windows and the balcony.
 On the project you should designate all the structural elements
 In the process of drawing up a project, such requirements should be taken into account:
- It is important to decide what kind of attic to the attitude of the attic. It should be remembered that the distance from the outdoor base to the highest point of the structure should be at least 0.5 m.
- It is recommended to take into account the heating area and the main elements of the interior.
- The attitude of the attic must be deployed. If you plan to install the windows, then you need to specify in the drawing.
The drawing up drawing should be started from the selection of the shape, determine the cross section of the rafter legs and the step of their placement. To determine the dimensions of the rafter, such parameters must be taken into account:
- bias;
- the material for the roof roof;
- climate Features in the Construction Region.
Also in the project it is important to provide the required number of rafters. They can be a weak or hanging type.
 Rafters can be hanging or urban
 At the end, determine the number of details for fixation. In the figure below, you can see some data necessary for the calculation, but the project preparation is a complex process. This work is recommended to entrust qualified specialists.
Installation Maurolat
The device of the planting roof system should be chosen on the basis of the type of roof, as well as from the prepared project of the attic room. Simple option is the design with two slopes.
The main details of the system rafters of the roof with two slopes are:
- linear elements (column, rod system, beam);
- plane details (stove, flooring, panel);
- spatial elements (arch, shell, volumetric item).
Before performing the work, it will take carefully dry wood. The first thing is the markup and the installation of Mauerlat. It is fixed to the walls of the structure. Detail can be performed from a bar or a powerful rail. If you plan to build a roof with two slops, then Maurylalat is placed on the long walls of the building. The element is necessary not only for reliable fixation of the lower part of the rafted, but also for the correct separation of the load on the walls and the main part of the structure.
To fix Maurylalat, you should use stiletto metal that are attached in the beam from the monolithic concrete.
 To fix the Mauerlat, it is necessary to install stiletto metal
 The beam should be performed at the top of the wall. It is also possible to use steel wire launched in brickwork.
To secure Mauerlat to the top wint of the tree wall, you need to use wooden brazed. Auelarlate requires the performance of high-quality waterproofing of a tree of wood. Therefore, it is necessary to use a runneroid or other material with a water-supplying property.
 Before installing Maurolat, the base must be covered with rubberoid
 the Mauerlatian shock is required if it is planned to run the roof framework, which drops into the upper part of the wall bevelled ends or prepared cutouts.
If it is planned to make a attic, the width of which corresponds to the width of the building, the rafter legs must be removed by the bottom ends into the reference details. As a support, it is possible to use powerful beams laid across long walls. The number of reference elements corresponds to the number of rafters. Beams must be fixed to the walls as well as Mauerlat.
Sequencing:

Construction of carcass
 The skeleton of the attic roof consists of overlapping beams, rafters, runs and racks
 Bruks of coniferous breeds of 200x100 mm often apply as material. Overlapping rails are put on top of the Mauerlat with an indent for the surface of the walls by 30-50 cm or in the prepared grooves in the masonry. In the first case, the details are fixed using corners and self-tapping screws.
 Locking timber to Mauerlat can be performed using steel corners
 To make a smooth overlap, the bar should be installed in this sequence:
- First of all, extreme details are stacked.
- Next, you should pull the cord and it is necessary to install intermediate elements.
- The pitch of the beams should be from 60 to 100 cm. The distance of 60 cm makes it possible to mount insulating plates without subscribing.
- To bridge the beams in height, you can pose. Another option is to use lining from slats.
- If the beams are inserted into the prepared pockets, their extreme parts should be processed with liquid waterproofing and wrap the rubberoid.
It is necessary to put the racks on the extreme planks:

After mounting the racks, riggers and runs, you can get a reliable construction that will limit the internal rooms of the attic. To increase its strength, in the future it should be fixed with pink and patches.
Installation of timidate
At this stage, the installation of the lower rafters is performed:

After that, the upper elements are installed:
- First of all, it is necessary to place the central part of the roof. This can be made using a rack that was pre-attached to Mauerlat and tightening with the end part of the roof. The extreme part of the board should be held in the center of the roof. On this board you need to level the rafting legs.
- Next, you need to prepare a template from the rail 150x25 mm. It should be applied to the extreme part of the mounted rail at the required level and to the run, which will be based on the lower rafting legs.
- You should place the upper and lower rods and cut the template. The device in turn is applied to two sides of the roof. This will make it possible to check the accuracy of the central part markup. If the rows of racks are placed in parallel, then there will be no difficulty when fixing the upper elements - they will have identical dimensions.
- According to the workpiece, it is necessary to prepare the desired number of rafters. Details are put on the run and bind to the upper parts with the help of iron or cutting plates. In the latter case, self-tapping screws are used as fasteners. In the run, the rafting strips rest on the washed and grabbed iron corners. To stood the parts directly, they are fastened with the help of a pod, mounted by the bottom of the tightening. This method establishes all rafters.
- Fixation of suspended racks is performed - pieces of slats 150x25 mm. The upper part of the rail is attached at the place of fixation of the rafted, the lower - to the tightness.
Video: System of rafted roofs of an attic type
Installation of subposses and frontones
Sequencing:

Dooming design
Dooming is needed for:
- distribution and transfer of the weight of the roof material on the rafter;
- performing additional fixing system rafters;
- the grounds for fixing the material for the roof.
Dooming can be made in one or two layers solid or discharge.
 Dooming can be solid or discharge
 The installation method depends on what material to cover the design is planned to be used. If the roof is erected from slate or metal tile, the makeup should be performed from the rails that stick to the rafter feet bars with nails. In this case, the installation step of adjacent slats can be 27-30 cm.
A solid drying is used in the case of attaching a soft material in rolls.
A solid drying is necessary for a soft roof.
In this case, you can use moisture-resistant sheets of plywood or chipboard. It is allowed to use pine wood material - edged slats.
It is important to take into account the fact that with a device of such a dohable, the material that will be laid must repeat the outline outline contours. Therefore, the frame design must be durable and aligned.
In the process of displaying the material, the cord should be used, with which the rails or slabs will go to the smooth. Details must be placed in parallel to each other. Before fixing, the material must be treated with an antiseptic composition to protect it from rotting, the appearance of fungus and dampness. Billets should be smooth and high quality. It is recommended to give preference to wood 1 and 2 varieties. It should not have bitch. So that the boards are not breeding, they must be pre-dried.
Sequence of action on the installation of doom:

Waterproofing of the roof of an attic type
The material for the roof does not have thermal insulation properties, so it will be necessary to prepare high-quality material that will be environmentally friendly to human health. Quite often use mineral wool or glass gambler. Both materials have excellent sound and thermal insulation parameters. It is also important to take into account that if the roof is made of metal, with the warming of the insulation, all its qualities can be reduced to zero. Therefore, it is important to carefully consider the structure of the structure.
To insulate the attic without laying the waterproofing material will not work, so the process should be considered in the aggregate. Step-by-step guide for waterproofing design:

Practice has shown that protecting the insulation is better with the help of modern materials, for example, Taurek or Izospan. The use of an ordinary film from polyethylene gives a bad result, as condensate may appear. Experienced masters believe that it should not be waterproof the design.
Before moving to the performance of work, it is necessary to determine the heat insulating material.
 Mineral wool is a rather popular material used for roof thermal insulation
 The following heat insulators are most often used:
- glass gaming;
- mineral wool;
- styrofoam;
- foamed glass;
- wood chips;
- straw.
You must choose the material taking into account four parameters.
- The thermal conductivity indicator. For thermal insulation of the roof optimal is 0.05 W / m * to or below.
- Water resistance. The higher the indicator, the better.
- Resistance to ignition.
- Environmental Safety.
The insulation qualities of mineral wool after a while deteriorate significantly. Also, the material may be damaged under the influence of mechanical loads. However, mineral wool has a low cost, so the material is used quite often. Polyfoam is not afraid of water and has excellent thermal insulation characteristics. If it is planned to build a house only from eco-friendly materials, you can use foam glass or straw.
Step-by-step guide on the thermal insulation of the roof:

Laying material for roofing and installation of window opening
As an example, the installation of metal tiles will be considered, since this material is used quite often:

The number of windows is determined by the ratio of the useful area of \u200b\u200bglazing to the base of the floor 1:10. For example, if the area of \u200b\u200bthe attic will be 100 m 2, then the glazing must be about 10 m 2. When installing windows, such nuances should be taken into account:
Mansard finish
An internal finish of the attic can be performed using wood or drywall sheets. If the last option is used, then after installing the sheets, it is necessary to salary with wallpaper or paint with waterfront. In some cases, the attic split into several rooms. It is possible to do this with the help of plasterboard partitions.
If you plan to use the attic, then the floor and walls can be additionally insulated. Perform this is possible with, for example, mineral wool.
Interesting Dersighted Room Design Options
Mansarda can be made cozy, symmetrically placing sofas from two sides in the attic. You can arrange a long sofa in the attic. You can equip a place to relax, joining a hammock in the attic you can make not only a residential premises, but also a bathroom on the attic floor you can even do the kitchen if on the territory There is no possibility to place a hammock, then this can be done on the attic floor. One of the parts of the attic can be completely stolen the attic of the attic can be a great place to create a homemade library of the attic of the attic. You can bind a brick in the attic. You can equip a full-fledged living room on the attic floor. You can equip a room for recreation. If the house is located In a beautiful area, then the roof can make a panoramic bed. You can arrange the face to the window in the attic. You can make a bedroom with high ceilings on the attic you can arrange a pendant chair. It will make the roof more cozy
Video: Mansard roof making
The last roof of the attic type is quite popular among the owners of private houses. To feel all the positive sides of living in building a similar type, you need to pay due attention to the insulation of the structure.
Everything is dreaming about the expansion of the useful area of \u200b\u200bdwellings. But not always the area of \u200b\u200bthe house allows you to equip, for example, an extension. One of the best solutions in this case is the construction of an attic roof - an additional element with minimal investments.
Such a roof is built quite easily and quickly. And watched by the help of several friends, you can save on the workforce.
To build an attic roof yourself, it is necessary to arma the knowledge to the maximum in this area. Read more about the devices of the attic roof. So, the attic roofs are:

- in 1 level - the structure has remote consoles, large area and vertical windows. An attic of a single-level roof is put forward for the level of one side of the house;
- In level 2 - a project having a mixed view of the Oppulating. This type of roof is the most difficult at all stages of construction, is designed together with the house;
- Two-tight - superstructures for attic to one level, light in the installation. The main minus is a small area and low ceilings;
- Two-tight broken - structures with 4 pitched planes at different angles. Somewhat more complicated by the previous version, but among the advantages - a full-fledged interior.
Different horror roof projects are almost no different from standard scalves and include the following elements:
- roof - appearance and precipitation;
- doom - base for roofing and insulation materials;
- konk - the crown of the rafter design;
- rafters - inclined ribs of the rigidity of the whole structure;
- mauerlat - base beams to install the rafter system;
- diagonal SCs - connections for longitudinal beams and vertical racks;
- internal beams - supports under the skunk run and / or rafters for the stability of the structure;
- insulation is a design of pair-, hydro, heat and sound insulation layers.

Dersighted roof in a private house - photo in the construction process
For the construction, for example, the slate roof of this type will be needed:
- tree - bars (15, 12, 10), unedged boards, boards 40-50mm 150mm;
- nails - by 80 and slate;
- wire is annealed (3-4mm) and for stretch marks;
- slate;
- insulation;
- hydrobarrier.
Tools for the construction of an attic roof, most likely, do not even have to buy:
- roulette;
- ax;
- a hammer;
- construction stapler;
- plumb;
- hacksaw.
The angle of inclination of the roof ensures the reset of precipitation, but takes the height of the room. That is, the less the angle of inclination, the more the area of \u200b\u200bthe room itself will be released. Partially the useful area of \u200b\u200bthe attic decreases and due to insulation for the roof. Read which exist and how to put them correctly.
Dersighted Roof Construction Technology
An attitudes of the attic roof has some subtleties:
- The thickness of the rafter should be more than 250 mm. This is necessary for a comfortable laying of the insulating layer of 20 cm. The rafters can be made of glued timber;
- For thermal insulation, it is better to use foamed polystyrene or glass - they retain properties even with increasing humidity;
- Between the thermal insulation layer and the roof, it is necessary to install ventilation in all rules - with extracts and purges so that the air is freely circulated under the surface of the structure;
So that the roof is high-quality and reliable, it should have excellent ventilation, thermal insulation, high-quality rafter design from treated wood.
- the inner side of the heat insulation needs a vapor barrier layer over the entire surface;
- a layer of hydro, when necessary, sound insulation is laid out under the roof from the outside of the rafted;
- Wood for the whole structure should be treated by special needs from microorganisms and fire, according to the requirements of SNiP;

- if the attic roof is installed in windy areas, it is worth reduce its angle of inclination;
- if the house is in a quiet, weak place, you need to increase the angle of inclination;
- Such roofs are covered with ceramicper or slate. Metal, due to its low thermal insulation properties, is not recommended;
- for thermal insulation it is necessary to use non-combustible materials;
- The attic roof provides a staircase.
The external staircase will not take the area of \u200b\u200bthe house, but in the attic it will be possible only from the street. Internal - much more convenient, but takes place in the house. To solve this problem, you can install the ceiling staircase on the hinge connection or the screw structure. And as in GOST, please read our instructions on the second floor.
Phased construction of a nursery roof
Before the construction of the roof is necessary:
- To conduct an examination of the building to reveal the maximum load for walls and foundation.
- Develop a Draft Mansard.
- Get permission documents:
- from the city authorities for the construction and reconstruction;
- the conclusion of an expert about the house;
- permission from all owners.

Scroll of a naked roof - scheme
After the design of the roof and the preparatory process, you can start construction:
- We put and fastened Maurylalat around the perimeter of the house - the bar 100 per 100.
- Install the framework. Racks of the rafter will serve as a rack of the frame. For its device take a bar with a cross section similar to the cross-section of longitudinal beams. At the edges of the building, vertical racks are put and attached to longitudinal beams with the help of corners and screws. On top of each rack we make a jumper.
- Mount the rest of the arches. Between the two arches, formed at the previous stage of installation, strictly horizontally stretch the cord. The remaining arches are installed with a cord and step for rafters. Stamped corners or nail plates with arches jumpers connect.
- Go to the rafters. Their upper ends are cut at a certain angle. On the bases of BRUSEV, cut out the groove for montage to Mauerlat. The rafters are fixed to the basic design. Then, according to the template, undercut the upper rafters and also set to its place. Also familiarize yourself with more detailed information for the attic.
- Mount the crate of boards or sheets of plywood.
- Place a layer of vapor and thermal insulation. The layers are installed from the inner part of the rafted. Clamp stuff over insulation.
- From the outer side, rafted by mounting the layer of waterproofing.
- The last step will be the installation of roofing from the selected material. The roof layer is mounted on top of waterproofing.
- Do not forget about the windows of ventilation, as well as window openings. Of course, the window can only be installed in the frontones, but two windows are unlikely to provide sufficient lighting.
How much will the construction of the attic roof cost
Consider the prices of the materials for the attic roof, given that construction will be performed independently.
The price of the insulation (Minvatu) depends on the density to the cubic meter and the basics:
- on fiberglass - 1400-2500 rubles. per cubic meter;
- on basalt fiber - 1100-2000 rubles. per cubic meter;
- on jute fiber - 10-16 rubles. For the temporon meter.
Roofing materials are not much different at the price:
- bituminous tile - about 340 rubles. per square;
- metal tile - about 250 rubles. per square.
Calculations of the final cost of the structure are made based on the area of \u200b\u200bthe attic roof.
Video
About the construction of the attic roof with their own hands on video. About technology itself is visual and several useful tips.
An attic roof is an ideal solution for expanding the area of \u200b\u200bthe house. Having enlisted with the support of several people and armed with knowledge on the construction of the structure, it is possible to build a functional and reliable attic roof for many years of use in the shortest possible time.
Attempts to use attic rooms as residential has been made by our compatriots for a long time. But in those days, there were no effective and easy-to-install insulation, modern innovative membranes were not produced to support the optimal parameters of relative humidity in the room and reliable insulation, roofing materials did not allow to create roofs with the required operational parameters. As a result, mansard premises were used for residential only during a warm period of time, in winter the microclimate indicators became uncomfortable. Today the situation has changed for the better, the roofs of the attic type were widespread.
The developers were able to significantly increase the living area of \u200b\u200bthe structure at relatively small capital investments. A wide variety of architectural projects allows you to choose exactly the style that is currently considered relevant and in demand. If you wish, you can order an exclusive horror roof project, this approach allows you to build a prestigious building.

It is strictly not recommended to start building a roof of an attic type without the complete availability of all building materials and components. Noncomplekt is the reason for stopping work, and this always has a negative impact not only on the total construction time of the house, but also on the quality of architectural elements. To buy materials, financial means are needed, their specific amount can be calculated only when the developer has fully determined with the type of roof and the list of additional elements.
What affects the estimated cost of the attic roof?
| Name | Brief description and operational characteristics |
|---|---|
| An attic roof can be a single, binary broken or holm different complexity. The valve roof will cost more than everyone, but this does not mean that it provides the maximum sizes of attic rooms. From an economic point of view, it is more profitable to build an ordinary or broken rope, it is not only easier, faster and cheaper, but also allows you to equip the attic premises of the largest useful area and volume. Flat rafting systems for such purposes are used quite rarely. As for the hip structures, only secured developers are allowed them. |
| For attic roofs, two types of insulation are mainly used: mineral (basalt) wool or foam of various types. Equata, bulk insulation and other exotic materials are extremely rare. Mineral wool slightly increases the cost of the attic roof, but it is characterized by low thermal conductivity, high ecology and fire safety parameters. As for foam thermal insulation, this is a budget version with quite acceptable operational characteristics. |
| The modern industry produces a wide range of windows and doors directly for attic roofs. These elements significantly increase the comfort of accommodation in the premises, improve the appearance of the structure as a whole, make it possible to make a zonal breakdown of attic rooms. Installation of mansard windows and doors can increase the roof estimate by about 10%. |
| Best on the attic roof there is a roof of a piece natural tile. But this material is considered one of the most expensive among all existing, used only in prestigious buildings. Apply cheaper coatings from galvanized metal sheets is not recommended due to their big noise - for residential premises, this factor is of great importance. Professional builders recommend to use bitumen tiles for mansard roofs, for the totality of all technical and operational characteristics, this is the optimal choice for most developers. |
| The colder climate, the more attention should be paid to the warming roof warming. Errors in choosing the type and thickness of the insulation becomes the reason for the appearance of very large problems. And it's not just that in the premises it is difficult to maintain comfortable temperatures. The main problem - condensate is constantly present in too thin insulation, and the increased humidity extremely negatively affects all the wooden structures of the rafter system. Even the most modern impregnations do not help. The roof quickly loses its initial bearing capacity and requires capital repairs, such works can cost more than new construction. |


The qualifications of performers have a significant impact on the cost of the attic roof. Oddly, it will be enough to know the dependence of the expected expected - the higher the professionalism of the roofers, the cheaper the construction will cost, despite the fact that they will have to pay increased wages. This is explained by several factors.
- Economic building is achieved. In experienced roofers, the number of unproductive waste is minimal, it favorably affects the estimate of the roof.

- The quality of work increases.The higher the quality is the longer the service life, less risks of leakage and other unpleasant situations during accommodation in the house. Elimination of problems requires not only time, but also significant cash. Conclusion - invested enlarged finances during the construction reappeared repeatedly during the operation of the building.

- Determined timing. The complexity of the construction of an attic type roof consists not only in the technology itself, but also depending on climatic conditions. A period of sustainable good weather is selected, but no one can give an accurate forecast. The longer the roof is built, the greater the risks that the weather is worst. The wetting of the structures of the house under construction never costs without negative consequences, significant amounts are required to eliminate them.

Prices on construction boards
Building boards
Types of roofs of a mansard type
It is impossible to give a complete classification, individual changes are allowed in each project, concrete solutions take the developer. Consider only the main types of roofs of an attic type according to the generally accepted classification.
Single-car
The most simple designs are infrequent. Dersighted rooms with limited sizes due to low height, opposite walls are located at various levels. Such attic roofs are recommended to put on small cottages, baths, garages and other economic extensions.

Double
The most common, have a huge number of options, can be symmetrical (bitch in the middle of the building) or asymmetric. Frontones on the line of the facade walls or are shifted inside the attic to arrange the balcony of the attic. The angle of inclination of the skates should provide convenient to the residing room living. Duct roofs can be simple and broken.

The broken struggle have a more complex structure, but it is possible to significantly increase the useful amount of attic rooms. This type is currently being widely popular among developers. Lohanned roofs for attic are used not only in the construction of cottages, but also relative to small buildings.

Walm (four)
The most complicated roof designs are installed at home with a large area. They differ in the increased parameters of the resistance to wind and snow loads, may be simple four-tight and complex multiple. Such types of roofs are applied only in prestigious buildings, the most qualified roofers are involved in construction.


Dersighted roofs with balconies
Recommends to put on large homes, somewhat limit the internal attic rooms. Balconies can be open and closed, sizes and material manufacturing material depends on the manufacture of facade walls.


If you take into account the above factors, purchased materials and fair components, solved questions with builders, you can begin the erection of the attic roof.
The roof of the attic type should be durable, and its solo system withstand heavy loads. We offer to familiarize yourself with detailed information on the design of the attic roofs on our website. You can explore the drawings and step-by-step guide to the installation of rafters.
Prices for bar
Step-by-step mansard roof construction instructions
For example, we will look at the easiest option of the attic roof - double without special windows and access to the balcony. The rafter system is already installed, it does not differ from ordinary.
there is two options for arrangement of residential premises in the atticEach of them has its own strengths and weaknesses.

The first stage of the roof of the roof of the attic type is the installation of insulating cake. Extremely responsible works, follow them with accurate compliance with the construction standards and rules.
Harbor-type roof insulation
Step 1. Come to the rack rafyles with a thickness of approximately 4-5 cm.


The fact is that during the construction of the roof for the rafaline, the boards of 150 mm wide were used, this size is not enough for a warm roof. Even if the thickness of the insulation is 15 cm, then it is necessary to ensure the gap between it and vapor barrier to remove excess moisture.
Important. The thickness of the insulation 150mm is considered minimal for the average climatic zone, in the regions with a colder climate, this parameter increases to 200-250 mm. No need to save money on the thickness of the insulation, it always has very negative consequences.
Step 2.Soak all the wooden elements of the rafter system with an antiseptic.

For an ordinary roof, it is not necessary to do this, it can only worsen from natural precipitation, and they have protection. In addition, there is always effective natural ventilation on non-residential attack. A completely different situation on the roof of a mansard type. The warm layer is closed on both sides, when moisture gets, its evaporation occurs very slowly. Prolonged stay of wooden structures in conditions of high humidity is an order of magnitude accelerates the processes of rotting, they require mandatory additional protection.
Not all types of impregnations are noticeable on the tree after drying, it complicates the process, there is no possibility to control the quality of work. To facilitate the work, it is recommended to add to the solution of the kel, it can be purchased by any construction store.

Cover lumber can be pneumatic, roller or tassel. The choice of tools depends on the number of materials and the preferences of the wizard.


Step 3. After the impregnation dry, secure steam barrier on the rafters. These are very responsible work, the effectiveness of the thermal insulation of the attic roof and durability of the building depends on their quality. The task of vaporizolation does not allow the penetration of warm and wet air from the attic room in mineral wool. The fact is that the wet minvat is perfectly conducting heat, which dramatically increases thermal losses. In addition, the long-term contact of the wet wool with wooden structures increases the likelihood of fungi and rot, and these processes are considered the main enemies of the solo system.

Bashed to the rafter feet from top to bottom, due to this, the amount of wet air falls through the adhesive, it moves up and does not enter the slot. To increase the joint density, you need to sample, modern vapor insulation materials have special strips with an increased adhesion substance. If you use cheap materials, you can use ordinary bilateral scotch for gluing joints.

Pay special attention to the yield of chimneys, attic windows and doors, in these places it is very difficult to make hermetic isolation. Do not hurry, some operations do twice.

Important. Carefully smorify which side you need to navigate vaporizolation. On each package, the manufacturer specifies the recommended position. If you do not observe it, the defense does not work.
Step 4.Surround the rail, the materials of the interior decoration of the attic room are fixed. Another function of the RESEK is to hold the insulating material. In our case, this is a mineral wool, and it has a rather large mass and requires reliable support.


The process of fixing the skates of attic

Step 5. Install the drippers, waterproofing will be glued to them. If there is no factory, then they can be made independently of galvanized sheet metal.


It is not a problem that the elements have an unattractive look, in the future they are completely closed with a drainage chute and invisible from the ground. The drippers are nailed to extremely rakes of the crates, the lower edge should be descended into the chute, the edge of the waterproofing film will be glued to the upper horizontal.

Now proceed to laying thermal insulation.
Prices for vapor insulation
Material for vapor insulation
Laying of mineral wool
If the Minvata lay for a long time in the package, then it is recommended to free it, let it lie in a free state for several hours and will take its original forms.
Practical advice. In implementations there are insulation thickness from 5 cm and up to 20 cm. If your roof is a wool thickness of 15 cm, then it is recommended to buy a thickness of 5 cm thick and lay it into three layers. During the laying of the location of the lower layers, overlapped with the upper, due to such technologies, general heat losses are reduced.

Step 1.Place the first wool layer, the lane length is factory, thickness five centimeters. Carefully keep track of anywhere there is no cracks if there are problem areas, then they need to be sealed with segments.
Step 2.Place the second layer of Minvati. In order to shift joints, cut the first strip in half and start working from halves. In the future, use whole stripes.

Step 3.The third layer begins with a whole strip, due to this joint, it will again shift to half the length.
To facilitate the movement on the scope roof during the laying of the insulation, it is recommended to fill the bars in the size of about 50 × 50mm in various places. After completing the work, they are removed.
Step 4. Start laying, the first strip is fixed from below, it must be placed with such a calculation so that the edge is attached to the dropper. The material is fixed by the stapler to the rafalines. Do not pull it much, leave the sagging between the rafalines about 2-3 cm. The condensate will be dragging on it, the rails will remain dry.


Step 5.After the waterproofing is made, bring it with a thickness of at least 5 cm with a thickness of at least 5 cm - the minimum clearance to ensure the ventilation of the underground space. This is an important parameter, you must be performed.

Waterproofing is fixed by rail
Step 6.Install the counterclaim. The distance between the boards is selected depending on the parameters of the metal tile, in most cases it is equal to 35 cm. Condensate flows freely on the waterproofing in the chute, the elements of the counterclaim remain dry, the warm air from the mineral wool does not blow.


The arrow in the photo shows the template - the usual bar, which is used for the convenience of fastening horizontal rails. The template for controlling the distance between the rails has the kind of an ordinary piece of boards of the required length, insert a template between the rails before screwing them.

Control. Clearance between slats and gadroesolation
If everything is done correctly, the thermal insulation effectively copes with its tasks, the attic roof allows you to maintain a comfortable microclimate in rooms with small losses of thermal energy. This is very important at present with ever-growing energy prices. The counterclaim is ready, you need to start mounting the roof.
Do not forget the skate to leave the pocket for ventilation. Horizontal stripes do not arrive until the very end, leave about 20 cm. It is then covered with a longitudinal piece with slots of at least five centimeters along the entire length of the skate. The piece is nailed to the counterclaim, due to this, the slot for the withdrawal of wet air from the insulation is formed.


Prices for Minvatu
Installation of roofs on the attic roof
Before installing, you need to attach some. A specific list depends on the peculiarity and manufacturer, in most cases it is necessary to fix the brackets for fastening of the gutter and the cornese strips.

Do not forget to withstand the minimum gutter bias, it should be about a centimeter on the temporon meter.
Between the droplet and the counterclaim you need to install the grid, it protects the subcoase space from the penetration of birds and large insects.


You can begin with any side of the skate, but better with leeward. The edges are aligned on the cornese line with a sink ≈ 5 cm. For alignment it is necessary to push the first sheet to one self-tapping screw, to it lock the second and turn them together for the final alignment. Some roofers are recommended for warranty and check the third sheet, and only then fix the roof. Each master chooses technology at its discretion, taking into account personal experience.

Installation of roofing material
Practical advice. Clean the screws correctly. Control the right angle, do not press the rubber gasket and do not leave it free. Hardware is screwed into a checker, on a square meter of at least seven pieces.

After the installation of all sheets is completed, the horse is separated, for this there are special metal challenges. At the final stage, wind (end) strips are attached. The roof is ready, you can finish the installation of the water-filled system, check the functionality and donate.

Video - Construction of a dunning roof of a mansard type
In the desire to effectively use the entire available area of \u200b\u200bthe country house, many owners are equipped with attic. By doing this, you need to be prepared and to the arrangement of the roof in a certain way. At its essence, attic is a re-equipped attic and requires certain design solutions and some alterations in thermal insulation and roof. In general, the construction of a nuclear roof of a country house is not much different from the construction of the roofs of another type. But due to the operational features of the roof of the attic and the requirements for it, it is necessary to possess knowledge and understanding of the specifics of the arrangement of this type of roofs.
Types of mansard roofs
Like any construction work, the construction of the roof of the attic begins from the design stage and the choice of the most suitable for the structure of the attic roof, its type and type. For attic use single or ordinary and broken double roofs. Everything else, the materials and design features of the roof itself affect the appearance of the roof.
Depending on the design of the particular building, the attic of the attic use several standard roof solutions. Children's roofs: photo and description
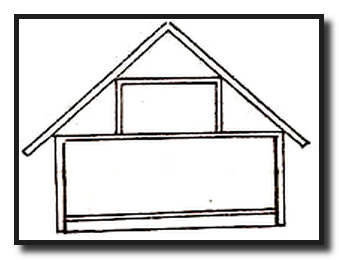
- Double roof For single-level attic. This option is a conventional two-sheet roof under which attic is placed. During design and construction, there are no major difficulties due to the simplicity of calculations and ease of work on the construction of a rafter design. The main disadvantage of such a roof design is a small indoor indoor attitudes with rather low ceilings.
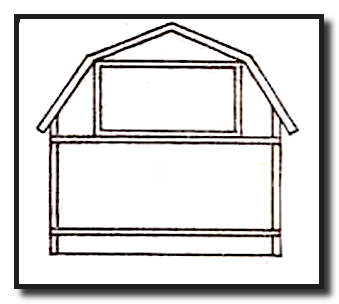
- Loan Double Rooffor single-level attic. In contrast to the conventional bartal roof for the attic, 4-stranded planes located at different angles are used in the broken design. This type of roof design is somewhat more complicated in designing and erection, but its indisputable plus is a full-size interior.
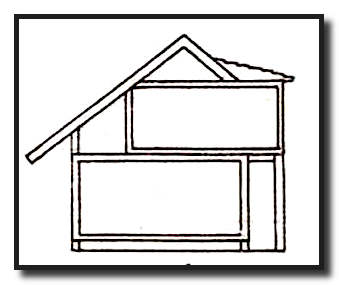
- Single-level mansard roof With remote consoles. The design of this type of roof is more complex in comparison with the previous. But the spacious room and full vertical windows compensate for the disadvantages in the complexity of design and construction. A constructive feature of the attic with such a roof is its offset and extending one of the sides of the house, and the roof is more like a single one.

- Two-level attic roofwith a mixed type of support. The roofs of this type are the most complicated in design and erection. Such roofs are designed in a complex with a house, as one, due to the multi-level placement of rooms.
Different projects of mansard roofs in their design is not much different from ordinary pitched roofs. Of course, there are certain design features, but in general they are the same as double or single-sided, and consist of the following main elements:

. Roof. The outer part of the roof, which performs the function of protection against various atmospheric phenomena.
. Okeekhet. Most often wooden boards to which the roof is attached, as well as insulating materials.
. Skown run. The top of the entire rafter design.
. Rafyla. These are the ribs of the stiffness of the entire roof design, they can be with a rush and hanging. For the roof of the attic uses sprinkled rafters.
. Mauerlat. This design element is beams laid around the perimeter of outer walls and associated with walls using special fasteners. Mauerlat is fastened with all the rafter design.
. Diagonal connections. To ensure the reliability and strength of the entire harrowing design, the rafters are associated with longitudinal beams and vertical racks using diagonal bonds or beeps.
. Internal supports. To impart the roof of the stroke and / or the ski run, support vertical beams.
. Insulating layer. Due to the fact that the roof of the attic and interior premises are almost one whole, for compliance with the temperature and humid regime between the roof and walls of the room, a multilayer insulating pie is stacked. Isolation consists of hydro and vaporizolation, sound and noise insulation, as well as a thick layer of thermal insulation. In addition, the proper insulation of the roof of the attic is important for the preservation of the roof itself.
Dersighted Roof Construction Technology
When designing and erecting an attic roof, many builders and designers or by ignorance, or, performing their work in some way, allow serious errors in isolation, ventilation and a rafter design. As a result, an attic roof is obtained, which literally after a couple of seasons comes in disrepair, a fungus appears, mold, and the roof begins to flow or completely destroys. This happens because of the violation of the construction of the attic roof.
Due to the fact that the roof of the attic is maximally attracted to the walls of the indoor room, and get excellent heat exchange rates in this case are quite difficult, the entire design of the attic roof must have excellent thermal insulation, ventilation and correctly erected rapid design using wood treated with firebi-protein vehicles.

So that the roof of the attic is reliable and durable, you need to know the following:
- the thickness of the rafter should be more than 250 mm. For such rafters, you can use glued bar;
- as thermal insulation, use materials that will not lose their properties in case of increasing humidity. For example, extruded foamed polystyrene or foamed glass;
- between the roof and the heat insulation layer, we make full ventilation with products and hinders, by which the air will circulate under the entire roof surface;
- from the inside, over the entire surface of the heat insulation, it is necessary to equip a layer of vaporizolation;
- from the outer side, the layer of waterproofing is laid under the roof and, if necessary, a soundproofing layer.
Such requirements are due to certain natural and physical phenomena. But first things first:
The large thickness of the rafter is required for the possibility of laying a layer of thermal insulation with a thickness of 20 cm between them, and this in turn entails an increase in the mass of the entire roof design, which the rafters hold on itself.
Wood for the whole design is processed by special means of protection against fire and microorganisms, which is a strict requirement of SNiP. It will keep it from damage to fungi and increase its life.
If it is possible to use such popular materials such as mineral and glassware for thermal insulation, then you can only win in the convenience of laying and facilitating the entire design as a whole. But wool, whatever she, is a cotton, which as a sponge absorbs water, is flourished and loses its insulation qualities. If you choose any other material, in addition to polystyrene and foamed glass, you should navigate to complete moisture resistance, the small coefficient of heat transfer and relatively low weight.
The thickness of thermal insulation is 20 cm is necessary because in our latitudes in winter it is very cold, in the summer very hot. A feature of the design of the attic is large heat losses in winter and the rapid warming of the room in the summer. A large layer of thermal insulation will prevent the heat loss and its penetration inside. But this is just one of the reasons, the second is in the preservation of the roof. The fact is that the heat that leaves their premises in winter, heats the roof, on which there is a layer of snow and partially makes it felt, and the snow is a natural insulation. The lowered snow in the minus temperature turns into ice, which has no heat-insulating properties, it takes off the roof and finally destroys the roof itself. And since in one day there can be up to 100 cycles of thawing and freezing, the roofing material will fail in order in the same time. In the summer, it becomes incredibly hot and stuffy, and the installation of the air conditioner is required, or even two. But these inconvenience can be avoided by equipping a thick layer of proper thermal insulation.

No less important and complete ventilation of the roof. It will help to cool the roof, both in summer and in winter, as well as remove excessive moisture from the roof. All this will ensure comfortable accommodation in the attachment of the attic, will save from the appearance of mold, fungi and rot, in addition to preserve the roof from the destruction in winter.
Regarding steam, hydro and sound insulation, then everything is simple. Parosolation passes through itself excessive moisture on the side of the premises and prevents its penetration from outside, waterproofing protects thermal insulation materials and the room from random moisture. And sound insulation lowers the noise level from rain beats, hail and wind on the surface of the roof.
Phased construction of a nursery roof
The implementation of all the work on the creation of the roof for the attic requires the builders of a certain experience in this area. Unlike conventional pitched roofs, the construction of the attic roof with their own hands is somewhat more complicated due to the improvement in the roof of the windows of the windows and the broken design of the rods. To make the construction of the attic roof with their own hands, you need to follow the following steps:
Design

The first thing you have to do is develop a roof project. To do this, you can contact the specialists or, if you own a well-own computer, do everything yourself in the architectural program. Also at this stage, all the necessary load calculations are carried out, the angle of inclination of the roof rods and so on. To do everything correctly, you should seek the necessary information to such a document, as a lowering of the "load and impact".
Construction of the rafter carcass
This stage of work is the most time-consuming, and that the attic roof will be done with their own hands qualitatively, combined efforts of 3 - 4 people. We begin the construction of the roof of the attic from the laying and fixing Mauerlatov throughout the perimeter of the house using a timing of 100x100 mm.
Construction of a mansard roof Photo:

After that, we establish a frame for the indoor indoor, the racks of which will also perform the role of the backups for the rafter design. To do this, we use a timing by a cross section of no less than the section of the longitudinal beams, to which the racks will be rejected. First of all, we install vertical racks at the beginning and at the end of the building. Fix them to longitudinal beams using special stamped metal corners and screws. To facilitate all work on fastening, we use a screwdriver. Now put the jumper and fix it over the racks.

We stretch the cord between the two arches obtained, and if everything was done correctly, it will be strictly horizon, if not - you have to disassemble one of the arches, it is a bit to cut and reinstall. Now on the stretched cord, we install similar arches in a step, which is provided for rafters. The resulting arches connect with jumpers, which fix the stamped corners or nail plates.

Having gathered the frame of the future indoor premises, proceed to the setting of the rafted. We start with those that have the highest angle of inclination and are on the same level with the frame of the indoors of the attic. There are no special difficulties here. The timber bar is cut to the desired calculated length, at the base of the bar, the groove is cut into the installation on Mauerlat, and the top is cut under a certain angle. After that, each rafter is installed in place and fixed to the main structure.

The next step is somewhat more complicated, as you have to install the upper rafters. The complexity lies in the observance of a certain angle and the centering of the entire structure. To facilitate the task, you can first make a template from two long boards to repeat the future connected rafters. Using this template, cut the rafted on Earth and then set them into place. The mounting algorithm rafters is the same as for the arch of the interior framework.

At the end of the installation of the rafter design, you feed the crate. For the crates can be used both ordinary boards and sheets of plywood or chipboard plates. This will already depend on the type of roofing materials.
Creating insulating cake
By installing the rafyled and the crate, proceed to the creation of the insulating layer. To do this, first of all, from the inside, the rafter put steam barrier and fix it to rafaling brackets. Next, lay the heat-insulating material and carefully follow that it goes close to the rafters and left the gaps. On top of thermal insulation, with a 50 cm increments, feed the crate, which will keep all the heat insulation.

From the outside, the rafter is placed in a layer of waterproofing, which will be protected from the random penetration of moisture. At the end of the waterproofing, we laid the roof.
Construction of a nursery roof: video lesson
A variety of finished roof projects attic is very extensive. They can be with windows and without, burglarous form or strictly straight, with one slope or more. But no matter how the roof of the attic, its construction will require the knowledge and skills of the Master of Construction.
More and more people resort to independent erection of the house.
There are many reasons for this, and everyone is guided by its own motives.
But this is the main savings, of course, subject to the knowledge of the case.
Build your home for each man should become a mandatory attribute of success.
Invest savings in real estate the most loyal business. The house will slightly decades and with time its cost will only increase.
Of course, much depends on the design of both the inner and the outer part of the residential buildings.
For high-quality buildings, it will take the study of the technology of the attitudes of the attic roof. More important skill, knowledge of a joinery. Or you can learn instructions yourself, which describe in detail the entire project of work. You should also draw attention to the fact that there are different.
Starting to the construction, it is necessary to pose with the following issues.:
- What better use materials when building an attic roof?
- How many stages work to be performed?
- How many people need to help in building?
- What attitudes do you want to build?
It is best to plan the building of the attic, setting a duplex roof with a broken lineSo you can get the most large area of \u200b\u200bthe future room.
Before starting any construction should be developed. Working on it, seriously attributed to the figures specified in the calculations, even the slightest error can lead to future damage, both the roof and walls of the house.
So how to make a roof? This article will help you answer this question.
- For soft roofs solid;
- For slate discharged.
Naturally there are certain rules for installing a soft roof, here they are:
- If the rope roof angle is located between 5 to 10 °, then the roof has a form of solid flooring, special waterproof plywood or boards;
- When the inclined corner of the roof is located between 10 and 15 °, in this case the roof is made from a bar with dimensions of 45 × 50 millimeters and with a pitch of 45 cm;
- If the inclined angle is greater than 15 ° for crate it is used 45 × 50 mm rear, but with a pitch of 600 mm;
- For the fastening zone mounted an additional bar.

Soft roof
Mounting Maurolalat and Sropling System
 Mauerlat is stacked after working on lining the attic and the placement of the flooring.
Thanks to the accommodation around the perimeter of the attic room of Mauerlat all indirect angles can be fixed..
The material uses bars. The thickness is selected under the edge of the walls.
When you are placing Mauerlat under the side of the cornice, you should be particularly attentive.
Watch the design to be faultbecause it is impossible to put additional items. We will have to disassemble a part of the external wall masonry and raise the inner part of the wall.

Installation Maurolat
Installation of insulation
Warming the attic room is needed if you are going to solely. First of all, it is necessary to determine the material used in quality. The best solution will be special basalt plates.
The density of the insulation is needed at least 30-40 km on the cubic meterotherwise it is inevitable for her sediment in the future. And thickness - 150 mm. Also, a special film is installed in the roof to protect against the blotch.

Step-by-step installation of insulation
Installation of crates and counterclaims
After the basis is installed, it is necessary to install to enhance the design. It is necessary if the inclined angle is big.
The counterclaim is installed from small barswhich are superimposed on top of the main crate, already on the laid waterproofing layer. When installing a counterclaim between the roof and the basis forms a ventilation space, which allows to increase the service life.

Installation of crates
Installation of waterproofing and vaporizolation
The broken roof requires the installation of waterproofing. To protect the roof from the penetration of moisture between the roof and the basis painted a special layer of rubberoid or film. The counter shoulder helps better ventilation to get rid of the vaporization effect.
The most common protection against evaporation is the three-layer design - hydrobarrier.
- Reinforced grille. It is flying from polyethylene fibers.
- Anti-condensate or Pobarrier.
Installed waterproofing on rafyled or crate.

Installation of waterproofing
Types of roofing materials and their installation
The market offers a large selection of roofing materials for every taste. Each of them has their own advantages and disadvantages. Any builder first looks at the cost of the roof, then on its quality and life.
Roofing material
Conclusion
The construction of an attic roof requires special diligence and painstaking work if you wish to get a qualitative and final result. There will be a lot of strength to invest not only physical, but also moral.
It will take a smart approach to work so that it is completed without problems. When meeting a number of obstacles, most owners turn to the help of hired workers. But on the other hand, that it can bring greater pleasure as not done quality work with their own hands.
Useful video
In this video you will learn how to assemble a roof:
In contact with
 Why you can not give icons
 Is it possible to give icons as a gift: Signs, the opinion of the Church
 A year ago left her husband, and now I do not know what to do