How to build a garage observation pit. Looking pit in the garage with your own hands: phased guide. Purpose of viewing pits
High-quality car service requires sufficient space for various operations. In order not to lie on the back, you should equip the observation pit. To build such a design, you will need to learn the basic principles of the device of such structures. Wiring must be mounted before the wall of the walls. The observation pit is performed pretty quickly. Work time depends on the technology of the construction of walls. To better figure it out in the process, it is worth viewing the photo of the finished viewing holes.
Dimensions of observation yama
The dimensions of the observation pit are often chosen from reasons the convenience of moving and repairing the vehicle. The main parameters that are taken into account are their own growth and size of the car.
The dimensions of the observation pit are selected based on such considerations:
- The standard is the width of the observation pit in 80 cm. This indicator takes into account the freedom of movement of the car owner on the observation pit, as well as the maneuver for the wheels of the machine.
- The length of the observation pit affects the length of the car. It should be added to this indicator. Such dimensions of the observation pit are enough for the work as comfortable as possible.
- The depth of the observation pit is calculated on the basis of growth. To this indicator you need to add about 15 cm. If you fulfill the depth of the pit according to this recommendation, you can not think about the possible head of your head about different parts of the machine.
The drawing of the observation pit is simple enough. It indicates the width, depths and length of the design.
During the execution of the observation pit, the car clearance should be taken into account. Some car deep holes seem very uncomfortable, so they are fulfilled in their own growth. The usual depth of the observation pit, on which many motorists are focused, is 1.5 m.
The length of the observation pit can also be executed by the rules. If there are not enough space, you can make it half the length of the car. If you need to repair, you can drive the car back or before over the observation pit. Such a solution is more economical and practical.
Looking pit in the garage is usually located closer to one wall. It is necessary to free the space for equipment and spare parts. The nearest wall from the edge of the observation pit should be made a distance of 1 m and more. During the digging of the pit, take into account the thickness of the walls and the height of the floor tie. For greater accuracy of work, you should create a drawing of the observation pit.
Necessary materials
The observation pit is usually laid out with concrete blocks or bricks. Often the walls are poured by monolithic concrete. When choosing bricks to build the observation pit, you should pay attention to ceramic. Such products are not terrible increased humidity. Walls of the observation pit are erected in Polkirpich. With a sufficient amount of material, they can be put into brick. The walls can have a thickness of 12 or 25 cm. Such parameters should be taken into account during the markup of the pit. For ease of work, perform an accurate drawing of the design.
The walls of the observation pit are made of bricks only at a low level of soil waters. Such products are perfectly combined with dense soils. If soil waters rise quite high, you need to create concrete walls reinforced by rods.

Building blocks are also selected only by configure specific characteristics. For example, such products are not afraid of moisture. This concerns concrete blocks. For other products, use external type waterproofing. This will ensure their safety in the case of groundwater approach.
When constructing a concrete observation pit, all work is carried out much easier. Such material is not afraid of moisture. To create a high-quality solution, the M250 concrete should be used. When building flooring, M200 is usually used. This is explained quite simply - in the process of winter launches, the most load is not on the floor, but on the wall structures. A certain margin of strength is needed so that they are not deformed under the influence of the load. For this concrete reinforced. To eliminate the grounding of the soil under the garage can be created when creating a scene. At the same time, the water will go away, and not absorbed into the soil under the garage.
Wall structures made of concrete reinforced with steel bars usually have a thickness of 15 cm. For reinforcement, a mesh is used, which has a thickness of a rod of 6 mm. The step between the rods should be 15 cm. The frame of the reinforcement can be knit from the rod with a diameter of 10 mm. In this case, the step between the rod is 20 cm. To make the design more durable, you can install some rods both in the wall and in the floor screed. To do this, it will be necessary to bend them in 2 places.
Waterproofing
It is possible to water the viewing pit in the garage in several ways. Each of them has certain advantages. For example, the outer waterproofing of the observation pit is created only at the construction stage. Internal can be mounted and after creating a full-fledged observation pit. Before working it is better to create a full-fledged drawing in which all materials will be indicated from which the design is manufactured.

Looking Pit Protection Outside
If, at the site of the garage, the soil waters lie very deeply, for example, below 2.5 m, the waterproofing of the observation pit can not be performed. It is important to check the level of soil water in spring. If even during the flood, it does not rise above the specified indicator, you can not worry about waterproofing.
However, the geological situation may change. In a dry place it may easily have water a few years later. With the existing observation pit, it should be equipped with inside. For this use special impregnations. They deeply penetrate the structure of the stone and perfectly protect the observation pit from the penetration of water.

For external waterproofing of the observation pit, a variety of films are used. Drivel is covered with such products from one rus to another. At the same time, it is necessary to make a release of 15 cm on each side. Climb panels are needed. The joints are connected by bilateral scotch. The film should fit well to the walls. To do this, it must be repaid. During installation work, you need to closely monitor the preservation of the integrity of the film.
Internal waterproofing of observation pit
A special impregnation is used as the inner waterproofing of the observation pit. Such waterproofing is called coating. The observation pit in the garage can affait the special makeup for the pools. When using such material on the surface of the walls, a waterproof film appears, which for external parameters and characteristics resembles rubber. It is usually painted in the blue and after the frozen is perfectly clean. When using such a composition, processing should be carried out at least 2 times.

Another option to protect the observation pit from water is to use primer, which is based on cement. It contains polymer particles that can reliably block small channels passing moisture. When performing one of these events, the hygroscopicity of the walls is significantly reduced. If water constantly appears in the pit, it should be processed 2 times.
Caisson device in the observation pit
In order for the observation pit in the garage is reliably protected from moisture, you can make a caisson. For this, the metal sheets are welded and installed in the pita. It must be treated with anti-corrosion products. With hermetically performing welds, water penetrate the pit will not. If the water is too much, the caisson can "pop up".

To eliminate such a situation, a corner, leaving for 1.5 m in the soil, should be accessed to the caisson. In order not to carry out large-scale earthworks, you should score corners before mounting the caisson, and they leave their ends outside. They are welded to the caisson after its room in the pit. The pit at the same time will have to perform large sizes. The advantage of such a solution is that the corners will be clogged into a more dense soil and keep the caisson will be better.
There is another way to avoid raising the caisson in the observation pit under the action of groundwater. At some height, you need to perform a hole. Through it, the water will go to the caisson as lifting. Subsequently, they roll out. Such an observation pit can stand for more than 20 years, until the metal rushes.

Conditions for the catchment in the observation pit
If there is already ready-made pit, water can still penetrate it. From this sometimes does not save and coating waterproofing. In this case, you will have to construct a drainage system. It can be located around the entire garage. You can also perform a special fossa in which an excess moisture will be collected. Picks are performed in the corner of the pit. Accumulating water subsequently roll off the pump from the pit. The system can work automatically. To do this, the water level sensor is installed in the pit.
Under the veils should be filled, and then pour concrete into it. After that, it is necessary to perform waterproofing of the pit. It is usually carried out along with waterproofing work performed throughout the observation pit.
With such a waterproofing, the full deliverance from dampness is impossible, so the boards are laid on the floor. Protect them from rotting will be with the help of special processing. You can buy a special impregnation for a tree that contacts the soil.
Warming of observation yama
If a lot of time is held in the garage, it usually has a heating system. For a faster warm-up, the observation pit should be insulated. For this purpose, extruded polystyrene foam is most suitable. Such material perfectly copes with the task of insulation of the observation pit and the garage as a whole. It is not exposed to moisture, bacteria and fungi. In addition, polystyrene foam is able to withstand substantial loads.
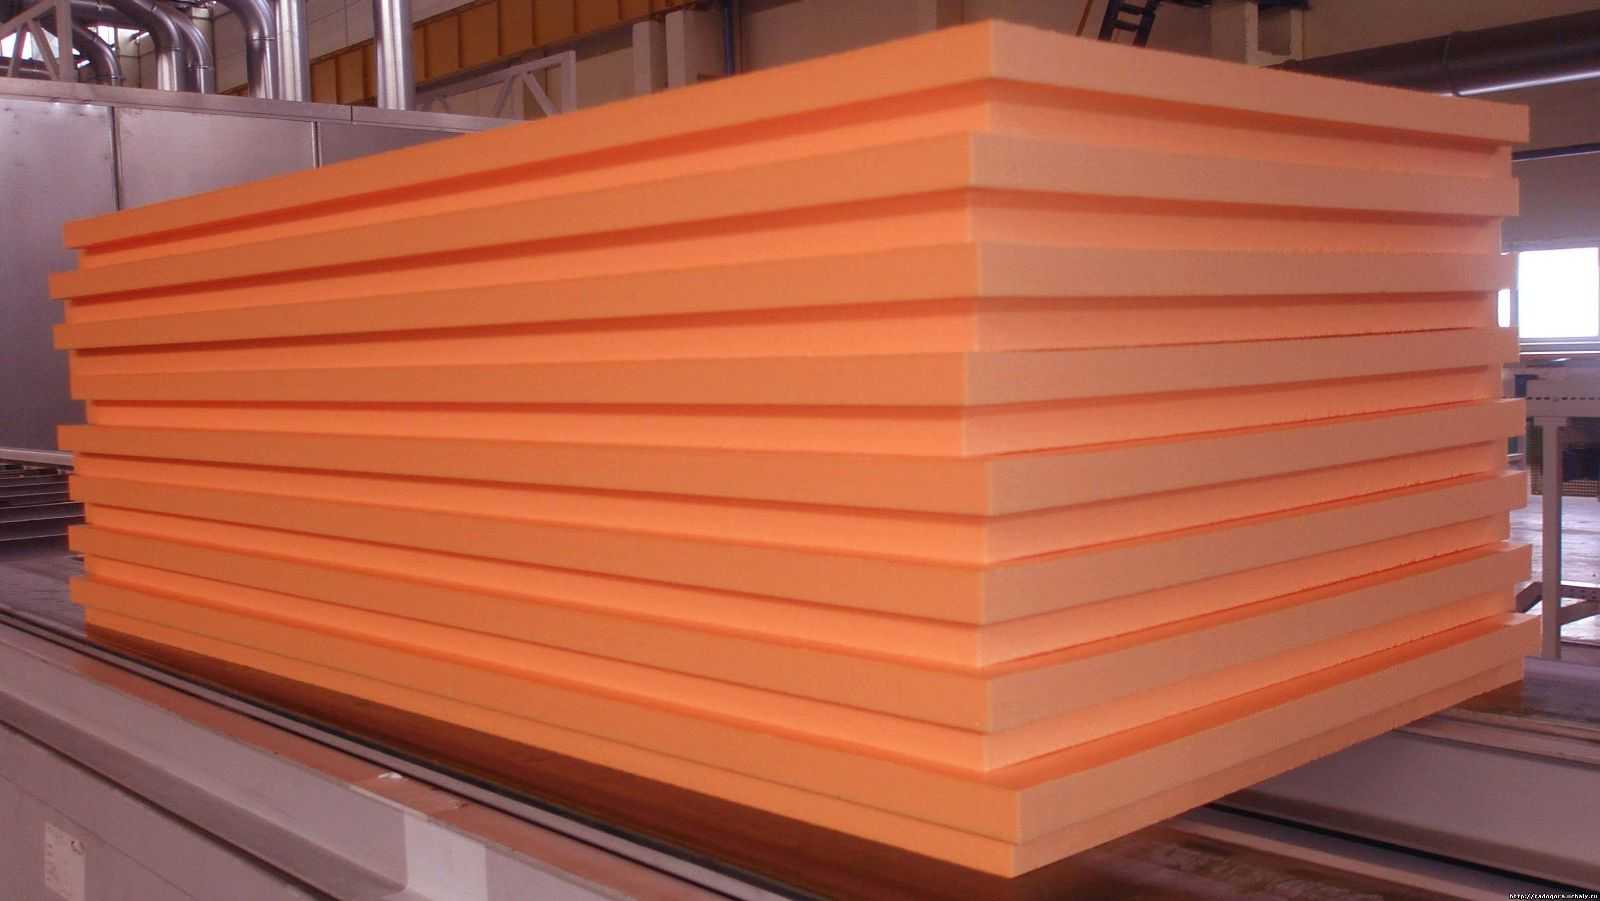
To create high-quality insulation, it will be necessary to put the polystyrene foam 5 cm thick. It must be laid between the pit wall and the soil. First, the soil is placed in waterproofing, then polystyrene foam, and then the wall is mounted.
Polystyrene foam can be laid under the tie. The top of the reinforcement is usually placed on top of it. Then poured concrete.
Construction of observation yama
When all calculations are completed, you can start the markup of the observation pit. For this, in its corners are riding stakes, and between them stretch the rope. On the markup, it is necessary to start digging a kitty. The land is usually taken out and stored before entering the garage. The width and depth of the observation pit should be determined before the start of digging the pit.
Walls of bricks
During the digging of a pit for observation pit, it is necessary to monitor the level of humidity. The design depth takes into account the thickness of the floor screed. If it is achieved, and the water is not yet foreseen, you can not perform waterproofing. However, in order not to risk, it should be immediately causing a waterproofing film with a waterproofing film.

Then the walls should be aligned. It is necessary to remove pits and earth van. The bottom should also be aligned and tamper. The soil must be well sealed. On the bottom it should be filled with crushed stone, and from above - sand (5 cm). Sand during the trimming must be wetted. Tamping is carried out to the state of the high density of the material. The foot after the advancing should not be printed in it. Then the observation pit is assested by a waterproofing film.
The material is thoroughly spilled, refuel into the corners. The panels should be laundered with overhelder at 15 cm. They are sampled with the help of bilateral tape. To eliminate the routing of edges, they should be pressed with screwdrivers.

At the bottom of the observation pit it is necessary to mount the insulation, and on top of the reinforcement grid. Top poured concrete M200. Its minimum thickness should be 5 cm. For simpler orientation, special marks are applied during the laying process. When using cement M400, it is necessary to follow such proportions:
- 5 pieces of rubble - it should be small or medium;
- 3 pieces of sand;
- 1 part of cement.
After you need to wait a few days until the concrete acquires 50% of strength. A more accurate date can be determined taking into account the temperature. With an indicator, about +20 degrees need to wait about 6 days. If the temperature is +17 degrees, you will have to leave the concrete for 2 weeks.

After flooring, you can proceed to the device of the walls of the observation pit. Many car owners decide to fulfill them in Polkirpich. To the elbow level, you can use a circular laying method. When the laying of the walls of the observation yama reaches a level of 1.2 m, a niche for various tools should be performed. Its height equals 3 rows of bricks. The processed board is stacked on top of the depression.
Then the walls are chased to the floor level of the garage. From above on the walls put the steel steel better to choose a thickness of 5 mm. The corner must be deployed so that one of its shelves getting downwards, and the second closed the top of the brick. It is possible to exclude the collapse of the walls, welding to the corner of mortgages, binding to the reinforcement belt.

Walls from concrete
To cast high-quality concrete walls of the observation pit, you will need to build a solid formwork. It is usually erected from plywood with moisture-resistant structure. The thickness of the sheet material should be 16 mm. OSP panels can be used. The shields of the desired dimensions should be shot down together and strengthen the bars from the outside. It is necessary that they do not begged under the action of concrete.
After that, you will need to install internal shields. The thickness of the concrete walls of the observation pit must be at least 15 cm. To eliminate the deformation of the formwork shields, it is necessary to strengthen their struts. Pouring should be made in 1 time. The flooded space is definitely connected. For better air intake, a deep vibrator should be used. The formwork is removed 3 weeks after pouring the solution. You can then start the installation of the floor.

conclusions
The observation pit in the garage is quite simple. To create a comfortable space, it will take to accurately calculate its depth and width. Before work, make up a detailed drawing. This allows you to quickly and accurate the pit with your own hands, do not allow mistakes.

Before the construction of walls and gears, it is necessary to take care of competent waterproofing. It will protect the design from excess moisture. For insulation it is better to use polystyrene foam. It is capable not only to prevent cold penetration into the room, but also exclude the development of fungi and bacteria.
Walls can be performed from materials such as solid concrete, concrete blocks and bricks. In the latter case, less costs will be required. When performing walls from solid concrete, it is necessary to properly approach the creation of formwork and the preparation of the solution.
With your own hands, a manufactured observation pit in the garage will need all motorists, regardless of the maintenance of the car for a hundred. And a person who is accustomed to repair himself, to do without such a device is very difficult.
What a depth of the observation pit is needed in the garage, how to make it properly proposes to find out this article. When building a garage, the observation pit is an integral part of it.
Features of the device in the garage
In the garage, the observation pit has several advantages:
- It is necessary for convenient maintenance of his car.
- Some motorists can independently, without the help of the wizard, perform quite complex operations, having small sizes of small sizes in its own garage. Others turn to specialists working in technical centers, but they do not deny the usefulness of the observation pit.
- Often there are situations on the roads when it follows home to inspect the bottom of the machine. We throw large sizes or stones, occur on the roads every day, and after each impact it is not too convenient to visit the autoslemer.
- In its own garage, where a calm situation, without a queue, and at any convenient time you can check whether there are no strong damage to cars. Allows you to examine the bottom of the car and decide which work will be needed for repair.
Having such a structure, you can view freely:
- Running part.
- The bottom and its defense.
- Muffler.
- Transmission.
- Carter pallet.
- Exhaust pipe.
Its device allows you to independently change the oil, and the price of such a procedure in the workshop is quite large. The advantages of the observation pit include the possibility of performing an inspection of the listed parts of the car, without the help of specialists, which does not require the investment of any means, and the work itself will be very useful.
The spacious sizes of the pit allows you to store in it tools for repair and spare parts for the machine, especially in those rooms where there is little free space.
The disadvantages of such a useful design in the garage include:
- The danger of the close location of groundwater. With an excess of moisture, with poorly performed waterproofing, even in the absence of flooding, water will accumulate on the walls of the device due to temperature differences in the winter period.
Tip: You should know that there is any observation pit to the formation of condensate at the bottom of the car. This occurs due to large temperature differences arising at different levels of construction.
The disadvantages of the pit will be only with violations in the construction technologies and the absence of the participation of the site features when conducting engineering works on its study.
How to perform an observation pit
The construction of the device will be the same in the erection of the future garage and the construction of it in the finished room.
Instructions for carrying out work includes:
- Preparation and marking of the pit.
- Her finish.
- Communication.
In this case, each step requires competent execution with the knowledge of several subtleties.
These include:
- To know, at what level are groundwater on the site being developed. For justified structures, it must be at least 2.5 meters. The check is better to perform independently: the hole in the ground is closed, as close as possible on the plot, where construction is planned.
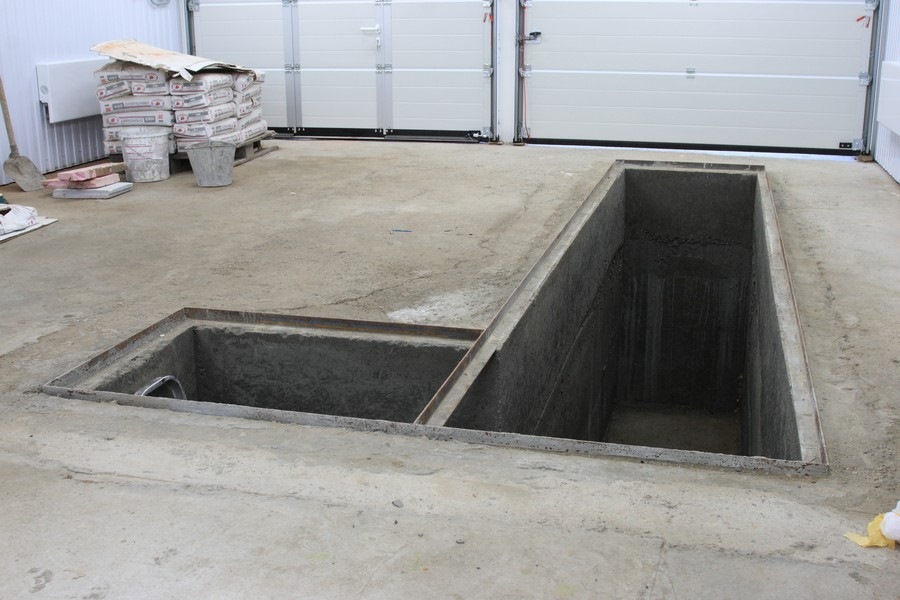
Tip: If the size of the observation pit in the garage and the garage itself is large enough, the device can be made with a side input. In this case, its proportions will be M-shaped, as shown in the photo, which will reduce the length of the trench and make the descent to it more comfortable and simple, while finding the car on the inspection.

- Placed the width of the device. At the same time, it should be convenient to work here, and do not create dangers when moving the car. The sizes of the pit in the garage in width are usually taken about 70 centimeters, and you can add up to 10 centimeters to them.
- It is more difficult to choose the length of the garage observation pit. It should be at least two meters. Otherwise, the entire meaning of the device changes, but its increase can be very useful if possible. If stationary steps are performed, then their length should be added to the minimum value.
In our country, the observation pit is planned first during the construction of the garage. It is an excellent assistant of any motorist, since it allows you to carry out minor repair or preventive work, as well as diagnostics, and without special material costs. From this article you will learn how to make a viewing pit in the garage, what materials will be required for this, as well as what is generally consistent with it.
What is the observation pit?
The answer is obvious: it is necessary in order to be more convenient to serve the vehicle. Some of the breakdowns are treated in special technical centers, but most of the motorists prefers the most difficult operations to spend their own hands. And do it in a cozy and relaxed atmosphere much more convenient
In addition to practical work, the observation pit is capable of providing unhindered access to:
- chassis;
- exhaust pipe;
- bottom;
- carter's pallet;
- speed \u200b\u200bswitching box;
- silent.
Now, having familiarized yourself with the purpose of the observation pit, proceed directly to work.
How to make an observation pit yourself
The process consists of several stages, consider them.
The first stage. Preliminary marking
At first, you must define the shape and size of the observation pit in the garage. This is an extremely important moment, since the pit will be equipped in an already in a given garage, because of which, accordingly, the task will be complicated, and the conditions for work will be crammed.

When performing markup, follow the fact that the soil that forms the walls of the pit will have some bias, while the sizes themselves themselves should be such that the work in it is as comfortable as possible. This is first. And secondly, in the future you should easily park over the pit, without fear that the vehicle fails into it. There are certain measures to protect against slipping, but they are somewhat later.
Based on all this, the working width of the pit should be 70 cm - in this case, even the most small-sized models of cars will be about 15-20 cm for maneuvers. If necessary, the width can be increased.
Note! If you are a happy owner of Zhiguli with a width of a rut of 1.3 m, then you can increase the width of the pit to 80-85 cm.
The length of the design is also determined by considerations of the convenience of work, however, the area of \u200b\u200bthe garage itself should be taken into account. In any case, this should be at least 2 m.
With the help of pegs with a rope or a small amount of lime, we mark the perimeter of the pit on the floor, add the wall thickness on each side (depends on the soil stability) and make a small supply to the slope. If we are talking, for example, about a dense loam, it should be approximately 25-30 cm. But the depth should be such that from the painting of your head to the bottom of the machine there are about 25 cm. We give a small example.
Example .
To do this, we use all the same "Zhiguli". The clearance of this car is approximately 16 cm. And if your growth is, say, 1.8 m, then "clean" the depth of the pit should fluctuate in the range of 1.7-1.8 m. Although it is better to make it somewhat bigger, because in the future You can always equip a raised floor to the required height or, as an option, substitute the bench.
Stage second. Preparation of equipment and consumables
During the work, you will need:
- rule;
- concrete mixer;
- capacity;
- shovel;
- self-tapping screw;
- concrete;
- boards;
- bulk building materials;
- screwdriver;
- roulette.
The number of one or another material depends on the size of the future structures.
Stage Third. Excavation
You have to dig about 9 m³ of land, which is difficult, especially if the soil is durable, and work will be performed manually. This is the most difficult of stages, but professional excavators can be attracted to work.

I dug the trench, leave a part of the Earth in the garage or next to it - with it, you will populate the sinuses at the end of the construction of the walls. Everything else export. To correctly calculate the technique necessary for the export, remember: the volume of loosen soil will be about ¼ exceed the volume of the pit itself.
After that, align the bottom of the trench and sink it using a fine-flower crushed stone. To do this, put a crushed stone with a layer with a thickness of 5-7 cm and compact it with the help of a traam.
Note! Working in the observation yam will be much more convenient if you make a niche for materials, tools and spare parts in the walls. Such niches are foreseen in advance, even at the stage of performing earthworks.
Stage fourth. Wall and Paul
There are two possible material, which in this case can be used:
- brick;
- concrete.
We recommend resorting to the second option, since it will cost cheaper. In addition, the design will be more reliable, and mortgage elements will be fixed better. Therefore, we consider the option with monolithic concrete.
Step 1. At first, on top of the rubble, build a concrete floor with a thickness of 6-7 cm. Up the reinforce with the reinforcing grid with a thickness of 3-4 cm and the cell sizes of maximum 15x15 cm.
Step 2. Prepare the concrete in the following proportion (for 1 m³): "four hundredth" cement (300 kg) + crushed stone with a fraction size from 0.5 to 2 cm (1210 kg) + water (210 l) + sand (680 kg). If you mix manually, the water will need somewhat more, although it is recommended to use the concrete mixer - so the finished solution will be more mobile.
Step 3. Fill the floor with the resulting solution.
Note! The coefficient of compressive strength of such a surface will be approximately 200, which in this case is quite enough.
Step 4. Prepare a solution for walls. The proportions here must be somewhat different: 360 kg of the same cement + 1168 rubble + 670 kg of sand. The volume of water is the same - 210 liters. The wall thickness will be 15 cm.
Step 5.From OSP-plates with a thickness of 1-1.2 cm build a formwork. In the future, these plates may be required for other needs.
Step 6. Reinforce the walls. Many of this neglege, but it is better not to save on quality. To do this, you can use the same grid as for the floor.
Step 7.. Concrete pour in layers, the height of each tier should be 30-40 cm. Each tier compact with a bayonet shovel. In the last tier arrange the "glasses" of a cylindrical form, in which then install the lamps. To do this, in the hole in the formwork, place the pieces of the sewer tube (necessarily at an angle).

Step 8. From previously welded metal corners, perform the framing of the well, use mortgage anchors made from pieces of fittings for fastening. The framing will perform several functions at once:
- strengthening corners;
- "Obiama" for flooring from the board;
- broker for insurance (so that the car does not sculp).
Step 9. Backfilling. In the resulting gaps, fall asleep the ground with layers of 15-20 cm, carefully tamping each of them.
Stage fifth. Waterproofing
If in your region, the groundwater level is high enough, then further take care of high-quality isolation. There are several possible options here.
- Ruberoid. Located two layers on top of bitumen mastic. Adjusts should be 20 cm, they are also sick of hot bitumen. The shelf life of such isolation is up to 15 years.
- Dry penetrating mixes. They are bred by water immediately before use. The mixtures penetrate the structures deep into the structure, but are used primarily as an additional isolation.
- Polymer membranes. Different with a large operational period (up to 50 years). Installation provides for the arrangement of reinforced frame and laying a geotextile layer. The membranes are self-adhesive, the nest must be 10-30 cm.
- Grease clay + waste refinery. Practically not used.
What else to pay attention to?
- If the lighting is provided by the above-mentioned cylindrical recesses, the cable laying and installation of the socket will be required. If the light source is portable, then all this is not necessary.
- Ventilation may be required to protect the pit from condensate, the inflow of fresh air and outflow of various chemistry. The easiest way to do this with a flexible air duct, which should be output from the pit to a height of 25 cm above the floor level.
- When carrying out earthworks, fasten the walls of the pit in obligatory! Use for this board with struts.
- Finally, when performing work, use the means of individual protection (shoes, gloves, when necessary - respirator and glasses).
Looking pit in the garage with your own hands: video
Outcome
The observation pit is easy to make himself. Of course, it is easier to do it at the stage of building a garage, but also in the finished building to do it will not be difficult. With such a "bunker" you will be much easier to repair and maintain your car.
As a result, we note that it is better to work with the assistant. It will not only help or submit tools, but also comes to help in an emergency situation.
The need for observation pit in the garage is obvious, since in cases of oil replacement, the small repair of the bottom of the body or ordinary inspection has to highlight several hours to drive to the maintenance station and pay expensive service.
A pit for technical inspection of the car can also be used as a cellar or a vegetable store. For this, the niches and shelves are constructed inside it.
The condition for the quality use of the observation pit as a technical structure and storage space of products is to comply with all the rules of construction and the presence of reliable waterproofing of the floor and walls.
Even such a simple design requires careful action planning. An important point is to determine the quality of the soil and the level of groundwater. The most appropriate basis for such structures is clay soil. Its feature is that it does not let moisture, and therefore can become a kind of waterproofing layer.
With a large cluster of groundwater and high levels of their location, the observation pit is additionally equipped with a drainage system for removing extra moisture, as well as submersible pumps so that the room can be quickly dried.
The staircase will provide a convenient and safe descent.
Step-by-step guide to the manufacture of observation pit
Installation of the observation pit can be carried out independently. There is nothing difficult in this if you follow.
How to determine size
To make the calculation of the area of \u200b\u200bthe future observation pit, you need to take into account the thickness of the walls and the base. For such calculations, it is necessary to recall the geometry course and resort to the simple formula of the decisive area - S \u003d AH, where A is the length, h - the width of the kittle. The observation pit in the finished form will have the dimensions of 75x185x300 cm. The thickness of concrete walls and gender, as a rule, is about 10 cm. Calculations will be as follows: 0,85x3 \u003d 2.55 m² is the area of \u200b\u200brecovery for observation pit.
Comfortable work in the observation yam creates a correctly calculated space, namely, its parameters must be convenient for the complex of a person in it. Typically, the width of the pit is built in the range from 70 to 75 cm. This width is enough to move freely inside. The same distance between the walls makes an inspection facility convenient for a passenger car.
Drive can be wider if the observation pit is designed for large or trucks. The distance between the inner sides of the wheels of such transport is much larger (from 80 to 90 cm).
The observation pit is shut-off in such a way that the walls are a bit walked to the floor. Schematically, in the context, its design resembles a crushed trapeze. This form provides convenient access to tools in niches and free movement.
The length of the observation pit is selected based on the size of the garage. If the area allows the area, then in the pit it is possible to provide a staircase. For this, the length of the pit is increased by 100-120 cm.
The depth of the pit "With the reserve" to install the floor
The height of the pit is at least 170-180 cm. These dimensions are relative, as the depth is made in accordance with the growth of the owner of the car. Being in the observation yam, a person should not touch the bottom of the machine.
For additional safety of the car and its owner, the observation pit is equipped with metal limiters. Usually they are four columns fixed in the corners of the niche. They rise over it by 10-15 cm. Sometimes not four columns are used for technical inspection, but two metal corners. They are attached against each other around the edges of the length of the pit.
The depth should be greater than the host growth by 25-30 cm. With this distance from the base to the body, the hands will not be quickly tired, as it makes it possible to be in a bent position.
Materials and tools
Most often for the manufacture use concrete, wood, metal or brick.
To calculate the required amount of concrete, it is necessary to use the formula that determines the volume. To do this, multiply the lengths of the length, widths and height of the wall. Similar calculations are carried out for the floor.
If a brick will be used during the construction of the pit, then, knowing its parameters, it is easy to calculate the required amount of this material in pieces. Red brick dimensions - 250x120x60 mm.
With the construction of the observation pit, do not do without the following tools:
- sovic and bayonet shovel;
- verder for ducklings and concrete mix;
- kelma;
- welding machine;
- hacksaws.
The following materials are also necessary:
- bricks;
- cement, sand, crushed stone;
- concrete M200 for base;
- boards cross section 400x50 mm;
- reinforcement rods;
- metal corner 50 mm width;
- waterproofing material.
Instructions for the manufacture of bricks observation pit, boards, concrete and iron
All work should be done in the strict sequence of steps:

Features of mounting partitions depends on the material used.
Concrete Lookout
Before filling the mixture, it is necessary to make a formwork. To do this, it is best to use OSB plates. This material does not skip the blend and is not deformed with time. The plates fasten with each other with boards and screws so that the distance between them was at least 15 cm.
To hold the shape of a wooden structure, it must be fixed with spacers. Clamps in the joints of the plates should be absent or be minimal. Inside the finished formwork should be installed the reinforcing grid.
There is an option to fill concrete with one-sided formwork. To do this, it is necessary to cover the walls of the waterproofing material. Next, OSB plates are installed on the internal perimeter of the pit. Metal grid is placed between them and waterproofing. Concrete poured inside this design.

After the concrete is frozen, the monolithic design is obtained
Bricks observation pit
In the finished, the waterproofing canvas is placed. It must completely cover the floor and walls. The canvas need to lay the waist. So that the edges of the material do not log in, they are pressed by boards. On top of the waterproofing make the laying "in the Polkirpich". When the wall reaches a height of 135 cm, you can make a niche, and then continue the masonry to the top edge of the pit. On the last row it is recommended to install a metal frame from the corner, and it should be welded so that one shelf of each side is parallel to the floor. Thick boards closing the pit will be laid on it. Next make the fill of the concrete floor in the garage.
Observation pit from metal sheets (caisson)
This design resembles a large box. When it is made, the sheets must be combined with solid welding. The finished design must be carefully treated with anti-corrosion coatings. The box should be equipped with fasteners. They are welded metal corners that rest in the ground by 100-150 cm. They are attached to the body with four sides. They will hold the box on the spot. If this is not done, the whole design will simply emerge when picked up the level of groundwater.

The staircase is made of the same material.
Looking pit from wooden boards
Wood without appropriate processing quickly boosts. Therefore, the material is required to impregnate with special antifungal agents and additionally hydroize. Wallboards are better to take thick. Material is installed horizontally. At the edges of the narrow sides of the observation pit fix the struts.

For reliability, the bottom of the pit is manufactured by concrete
Waterproofing device
This process is carried out as before the construction of the structure (external insulation), since after its construction (internal insulation).
If the garage is located on a plot with a low level of groundwater, then many owners are in no hurry to isolate the observation pit from moisture. However, the hydrological situation of any terrain varies every year, so the isolation is recommended to take care of the construction stage. For this purpose, special films or membranes are used, for example, butyl rubber, aquaisole. They must be put in the pit. The edges of the material should be laid in 10-15 cm. To obtain a hermetic seam in the place of the allen use bilateral scotch.
When installing a film or membrane, it is important not to damage their integrity. Otherwise, moisture from the soil will fall into the pit.
The laid waterproofing layer is melted with a soldering lamp. As a result, the film straightens, it is more densely adjacent to the walls and the bottom of the observation pit.

Fasting material will not give moisture leaning inside the pit
Internal waterproofing of the observation pit in the garage with their own hands, implies the processing of the surface of the finished observation facility with liquid substances, which, when drying, form a dense water-repellent layer. It has proven itself the composition for the processing of pools. It is applied with a dense wide brush, and when frozen, the substance forms a waterproof material resembling rubber. For greater reliability, more than two layers should be applied.

Insulating material can be applied using a spray
There is another way of internal insulation from moisture - this is the use of special primers based on cement, which have a property deeply absorbed into the material applied. This effect is achieved due to the polymer particles that are in the mixture. They block capillaries that contribute to the penetration of moisture through the main material.
What to close the ready-made pit
Looking at the observation pit not only protects the car from a random failure, but also serves as an additional waterproofing layer. In the absence of a cover, evapoable moisture settles on the lower parts of the car body, thereby creating favorable conditions for the formation of metal corrosion. To avoid such problems, the observation pit is covered. To do this, use metal sheets or boards.
Wood is a relatively inexpensive and lightweight material. If necessary, the board is easy to replace. Pick them out of solid wood, for example, oak and larch. Before use, the board is coated with antifungal impregnations and antiseptic substances. They put them in the outlook of metal corners, fixed at the top of the observation pit. The thickness of each board must be more than 40 mm.

The most suitable option for this purpose are boards.
The use of metal is less convenient, since this material has a lot of weight, it is not scented and unstable to corrosion. When operating its surface begins.
Video: Observation pit in the garage with their own hands
Step-by-step guide for the construction of vegetable pit with insulation
The construction of a vegetable pit has its own characteristics.
Drawing
For vegetable pit, the presence of waterproofing, and depth.
Place for storage of vegetables must necessarily be lower than the friction point. Otherwise, the meaning of food storage is lost, as they will be corrupted by low temperatures.
Point of freezing depends on the region of the garage location, for example, in Northern regions Land freezes up to 150 cm. Given this fact, you should dig up a depth of at least 190 cm. From 10 to 15 cm, it is necessary to highlight for the drainage layer under the base, about 10 cm required to install the overlap. It remains 170-175 cm to accommodate shelves, racks and niches for vegetables and lighting. Depth depends on the growth of the owner.

Option with optimal sizes for this constructure
The optimal width of the pit for vegetables is 150 cm. This size allows you to optimally place the shelves and racks, while the person will not be arched in movements inside the pit. For the selection of length, the rules must be held - the boobs should not reach the garage walls closer than 50 cm.
Necessary materials and tools
For the manufacture of a vegetable pit in the garage, the following materials will be required:
- waterproofing canvas;
- reinforcement rods;
- sand;
- gravel;
- formwork boards;
- metal corners;
- wire;
- bricks, metal sheets, boards or concrete M 250.
During the construction of this construction, it is not without such tools:
- bayonet and symptoms;
- concrete mixers;
- capacities for concrete mix and water;
- soldering lamp;
- bilateral scotch;
- sculpture.
Calculations of materials for the construction of vegetable pits are similar to observation.
Instructions for manufacture
Prepare all the necessary tools and materials, you can proceed to the construction of a vegetable pit:

Waterproofing device
To the question of the isolated inner surface of the cellar from moisture should be taken particularly carefully. This is important, since the slightest hole in waterproofing will become a source of dampness and cause of damage to vegetables.
You can start this stage only if the concrete is completely dry. You will need a waterproofing canvas or aquaisole. This material needs to cover the walls and floor of a vegetable pit. The canvas need to be stacked with an adhesive at least 15 cm. The locations are fixed with a soldering lamp or double-sided tape. It should be very accurate to carry out all the actions with the lamp so as not to damage the canvas, otherwise the moisture will fall inside the vegetable pit. The same materials cover the outer part of the pit ceiling.
Make a lookout or vegetable pit in the garage with their own hands is completely simple. It is enough to listen to the recommendations of specialists and follow step-by-step instructions. If desired, these two rooms can be combined.
Hi friends!
As always climbing in the internet, it came across a very good topic that many may interest.
I really liked this pit., But the trouble ... the groundwater is very close, and it is terrible to do such beauty,))) But if someone helps, I will be very glad)))
mainavi.ru/dom/stroitelst...motrovuyu-yamu-v-garazhe/
Stroyportal
The presence of observation pit in the garage provides the ability to conduct independent repair of your own car. It is possible to make it with minimal knowledge of construction and the availability of detailed instructions. Using a step-by-step master class, will not work carefully and efficiently perform preparation and independent construction of the pit, regardless of the size and layout of the garage.
🔹 Definition of optimal sizes and form of observation pit
The finished observation pit must be safe, and convenient for use. Therefore, before starting work, it is recommended to explore the data of geological surveys at the state of the soil and the location of the groundwater under the garage. This will determine the optimal depth of the pit. If the groundwater is rather deep, then the recommended floor height to the "ceiling" can be about 2 m or less (the growth of the owner + 20-30 cm). Size can be found in the drawing.
The observation pit is made in the garage with their own hands after drawing up the object plan of the object. Its width is determined according to the car's wheelbase: it should be less, providing the ability to safely arrive. The length should be at least 1 meter more than the length of the car: it will allow convenient to work in the pit.
Allows the device of the observation pit. The presence of small niches. They can be used to store parts, convenient tool location. They should not be done too deep. Nish dimensions are recommended to be determined according to the existing number of autoinstrument and spare parts.
🔹 Wallowing walls and niches in the observation pit
After digging a pit with predetermined sizes, it should be proceeded to strengthen the walls, their protection and subsequent laying of the brick. The use of brick is optimal due to the ease of work with it and ease of purchase. On how to build a viewing pit in the garage from the most affordable building material, you can find out in the following instructions:
1. To begin, it is necessary to make the floor of the observation pit in the garage: to align the bottom of the recovery, laying the rubberoid (with a swim on the walls of about 0.5 m for each of them). Concreting is performed by the M-200 brand, the thickness of the floor should be about 10 cm. The size of the length and width of the floor should include the amount of thickness of the two walls, the length / width of the pit and the increase of 10 cm. After the fill, leave the concrete to be bought for 4 days.
2. The wall output begins with laying 4 rows and the subsequent waterproofing of the observation pit from the outside using bitumen mastic. This will exclude the destruction of walls due to the impact of moisture from the earthly cover adjacent to the brick. After laying out the walls, you need to fall asleep the remaining indentation from the ground to the brick.
3. The final stage of the work will be the installation of a metal framing around the entrance to the pit. It must be dumb opposed above the floor level of the garage box.
Frames NIS should also be performed from a metal corner. This will exclude the seating of bricks or their destruction.
🔹 Features of the ventilation device and selection of stairs
High-quality ventilation in the garage observation pit will warn the appearance of mold and the gradual destruction of the walls. It can be made exclusively exhausting or subtle-exhaust. In the first case, it is necessary when you lay out the last rows of bricks to install a pipe that allows you to remove the air from the pit through the garage box up (will approach the ventilation pipe of the garage or output to the street). In the second case, an additional pipe is installed, which is given out. Its end should be located at a distance of 15 cm from the floor.
Make a comfortable staircase for observation pit can be made of wood, metal corners. For a small block, the rearranged staircase will be much more convenient. On the attached photo, you can see examples of holes in which the steps were laid out of the brick or concreted.
🔹 Lighting
In the process of masonry, the niche need to be tested by 36V in the insulating rubber hose. This will allow you to connect light in the pit and it is convenient to carry out the lighting of the car during the repair. It is desirable when performing these stages of work to invite a qualified electrician, which will help properly determine the optimal location of the wire and guarantee its protection, it will make its correct connection to the power supply.
The diagnostic pit is always welcome the garage attribute. It allows you to use the bottom of the car with convenience. A hand-held car lubber with its help will independently replace the oil or a torn cuff. It is from it that the garage arrangement should be started. Having spent some amount, pit can be built using hired work. The article tells how to make this work with your own hands.
What to build a viewing pit

The observation pit in the garage is usually built of brick or monolithic reinforced concrete. Both options have their advantages and disadvantages. Brick masonry less time-consuming, but not so strong and requires an additional grout of external masonry seams before applying waterproofing.

Reinforced concrete walls are stronger and more durable. The disadvantages include increased labor complexity. For the pouring of the concrete solution, it is necessary to build a formwork, inside of which the fittings knit. A large amount of solution is required. With your own hands it is possible to make both brick and concrete walls.
Dimensions and position of the observation pit

Radarly tear off the observation trench simultaneously with the laying of the basement of the garage. The ditch width is usually 70-80 cm. If you take it less than 70 cm, the trench will be close, wider 80 cm - more risk fall into the pit, which often happens. Well, if there are somewhat strong guys nearby. Trench height makes approximately 180 cm so that from the head to the bottom of the car was about 15 cm of the lumen. The length should be at least two meters, and better - by the length of the car plus 1 meter.

The position of the ditches may be different: in the center of the gate or with a displacement. In this case, the car stands away from the underground with its raw air. To inspect or perform any work, you will have to maneuver to drive to the ditch. For a more convenient entry, the observation pit in the garage may have a M-shaped configuration. You can go down and climb the stairs without rolling cars.

To go down to the pit on the Power Laneke is inconvenient and dangerous. The staircase must be stationary, with comfortable and safe. The best option is the manufacture of steps simultaneously with the construction of the enclosing structure. With brick walls and steps, it is advisable to perform from bricks. Feeding the walls of the monolithic reinforced concrete, it is necessary to cast the steps at the same time. If at this stage they for some reason were not made, then the staircase can be done and later with their own hands, when the arrangement of the viewing ditch will be performed. The staircase is made of wooden - with fastening of steps on governments or cosos, as well as metal - with rebel iron.
How to make the illumination of the observation pit

Performing the arrangement of the garage box, should provide coverage of the observation pit in the garage. According to the rules of the lighting device in the repairmen, the use of incandescent lamps 220 V is prohibited. It is allowed to use light sources with lamps for no more than 36 V. For their power, a downward transformer is used. A good option is daylight lamps in a hermetic case. If you are carrying to 24 V, the safety cable must be at least four meters long.
Ventilation underground

In the repair trench, due to the temperature difference, elevated humidity occurs and condensate with precipitation on the bottom of the car is formed. To avoid this unpleasant phenomenon, the observation pit in the garage must have good ventilation. The exhaust channel is performed from an asbetic or plastic sewer pipe embedded in grain preparation of the floor. This pipe must be combined with a transition knee with a vertical exhaust riser. Hoods from the ceiling of the garage box and trenches should be independent. If you combine them into one - the ventilation efficiency of the technical underground will sharply decrease.
Contours of Kotlovana
Before placing a place in the garage under the future trench, it is necessary to draw a drawing of its cross-section. As a basis, you should take the size of the trench in the light. For example, the width will be 70 cm. To this magnitude, you need to add double wall thickness. If the latter is 20 cm, it turns out: 70 + (2 × 20) \u003d 110 cm. Add more stock - 5 cm on each side. Ultimately, the width of the trench at the bottom will be: 110 + (2 × 5) \u003d 120 cm. In order to facilitate subsequently applying a coating waterproofing, the walls of the trench should be carried out by inclined. To do this, there is a fairly width of the trench on the floor of the garage to increase by 60 cm (30 - to the side). That is, at the top the width of the ditch will be 180 cm. By the same principle digging trenches for the foundation.

Bucket or shovel
If the observation pit in the garage is manufactured simultaneously with the fill of the foundation, it makes sense to resort to the services of the excavator. All work will be completed for half a day. Costs will be the same order as if you hire excavators. Sometimes it happens that in the season they will not find them. Well, if the thought came to arrange a technical trench when the garage is already built? There is only one way out - to dig up with your own hands. In order not to make extra work, some amount of carved soil should be stored not far from the construction schedule, since the land will need for backflow of the sinuses.

The base of the trench from the penetrating moisture should protect the waterproofing. On the rammed bottom of the recovery pre-pour 10-centimeter sweet. To prepare, a solution of the brand M 150 is sufficient. By width, the preparatory layer is performed flush with the outer surface of the future walls of the trench. For insulation, the soles use any kind of rolled insulating material - rubberoid, bikrost, aquaisole, polymer membranes. The canvas should be cut off with puff on the wall.
A concrete floor is poured over an insulating layer. The brand takes the stronger - M 200. Thickness is 7-8 cm, but the surface of the surface is better to reinforce the road grid 150 × 150 with a wire thickness of 4 (3) mm.
Rules design walls
Paraphrasing Henry Ford, one can say - the design of the walls of the trench can be any, provided that it is rigid and durable. In order to be in the near future, the walls were not released and did not crack, you should know - how they do not need to be done:
- put brick walls in one spoons (120 mm thick);
- produce masonry from brick without reinforcement;
- use silicate products for masonry;
- pour a concrete mix directly into the ground (from the outside of the ditch);
- pour concrete without fittings;
- use boobute.
Combined Wall
The following describes one of the possible options for the construction of the enclosing design with their own hands. The outer walls of the pit shovel with inclined, with a width of width to ensure further access for waterproofing work. 4-5 rows of brick masonry in Polkirpich are laid throughout the inner contour of the future facilities. This partition will serve as an inner formwork. Outdoor set, retreating 130 mm from the folded wall immediately to the entire height of the trench, using old boards, plywood sheets, chipboard, osp, and other similar materials. He supported with its struts and bodies, after which a concrete solution is poured with the upper edge of the masonry.
Putting a reinforcing masonry mesh 250 mm wide with a cell 50 × 50 and a wire thickness of 4 or 5 mm. Lay out the next site and reinforce the reinforcement again. For better clutch with concrete, the outer surface of the brick laying is performed "in the void". The stiffness of the structure will give a closed belt from the rods of reinforcement with a diameter of 10 mm, laid down and at the top of the fence. To subsequently equip the lighting of the observation pit in the garage, provide a niche for the installation of lamps. Waterproofing, if it is provided by the project, is performed after removing the outer formwork.
Review ditch and groundwater

Not always, unfortunately, in the garage you can make a sightseeing ditch. When the groundwater is located (GW) under the garage at a depth of less than two meters, it is not worth the construction. Life shows that in this case no waterproofing of the walls will help. When the GW is at the mark below 2.5 meters, the trench can be constructed provided that the high-quality waterproofing of the outer walls of the viewing ditch will be performed. It can be performed with your own hands from several layers of the occasional material: rubberoid, technonikol, glassizol, hydrohotelloisol and others. Warm surfaces with molten bitumen. There are penetrating materials: hydrotect, Aquatron-6, Penetron. They are convenient because they are applied on raw concrete and reduce waiting time. A good clay castle is the fatty mint clay.
Global insulation
In order for the observation pit in the Garage in the winter, it is not covered with an innem, it can be inspired. For this, the outer walls on which waterproofing is applied, it is necessary to be caught with insulation plates - 5 cm thick polystyrene foam. If such a heater is to lay in 2 layers under the breakfast around the perimeter of the entire garage, the floor in the garage and the trench will be still warmer.
Trench in Polyakata
In order not to accidentally fall into the pit, it is necessary to make fuel enclosure on top of it. The simplest design is thick transverse boards, laid inside edging from the corners installed using mortgage elements or attached anchor bolts. Woodworking waste is well suited for this purpose - the hill, laid by convexity down. The observation pit in the garage, closed by them, when looking at the bottom reminds the front dugout.
Finally
The construction of the observation trench reminds the fill of the foundation and the same steps are held:
- markup;
- excavation;
- production of the sole;
- walling;
- waterproofing;
- insulation.
Having finished the construction of trenches from reinforced concrete or brick, produce its arrangement. From the inside the pit can be plastered or bodied by a tile. Such an "underground", built by their own hands, will allow driving a car with full confidence for its technical condition. After all, connecting the lighting of the observation pit in the garage, you can regularly estimate the state of the chassis of your car.

© 2017 All rights reserved
In contact with
Odnoklassniki.
TO Akom motorist knows how you need sometimes observation pit in the garage! It happens, nonsense breakdown, eliminate times spit, and try, get! Or change the oil - five minutes of affairs, and you have to drag on a hundred and pay the amount, completely incommensurable with the work!
Content
1.
2.
3.
4.
5.
6.
7.
Perhaps, perhaps, shed a little sweat, work a few weekends and to get rid of such difficulties forever! How to make a look of the pit and find out here.
We start work. Marking of observation yama
As for all, even the most simple facilities, the construction of our pit is starting with markup, that is, with the definition of the outlines and the size of the future pit. It is necessary, especially since we will arrange a pit in the already built, or even the actual. What, you see, complicates our task, at least because of the constrained working conditions.
The markup of the pit is done based on the fact that the soil forms the walls of the pit, will have a certain slope, while the size of the observation pit must be maintained within the limits of work convenient.
This is on the one hand. On the other hand, performing parking, the driver should not be filled with cold then from fear that the car fails. For insurance from scaling, we will take certain steps, but about it further.
Based on all mentioned requirements, we define the width of the pit "clean" (that is, in the width of the workspace) at 70 cm. This is enough for convenient work, and even for the crumb "Daewoo Matiz" (Kalo 128 cm) will remain space for maneuver order 20 centimeters (between the pit and wheel). And for "Zhiguli", with their kolas 132 cm, the width can be made more. Santimeters are five to ten, but it is not bad.
Determine the length on the basis of personal concepts about the convenience of work, as well as the size of the garage, but it is hardly justified to make it less than two meters.
On the floor of the garage, we draw (or we indicate the spicy) the rectangle of our pit, then add the thickness of the walls in all four sides, guided by the quality of the soil resistant, we give an approximate margin on the slope of the earth walls. For dense loams, this value is approximately 20-30 cm.
Depth, define from the requirements of ergonomics, and in relation to itself to your beloved. It is clear that bent, or standing on tiptoe, do not work much. Therefore, we count on our pit in such a way that it would be a distance of 25-30 cm from the back of the car.
With a clearance of about 16 cm ("Zhiguli") and the growth of the working 180 cm, the depth (again, "clean") will be about 1,70 -1.80 m. It is better to overheat a little than not to get it, if necessary You can always substitute a bench, or to make a raised floor at the desired height. Vividly all is shown in Fig. one.
Earthworks for observation pit do it yourself
Now we have to imagine themselves with a mole for a while. After all, it will be necessary to take out about 9 cubic meters of land, a lot, especially if you dig by hand, and the ground is durable. But the desired by the fact that this is the most time-consuming part of the work (as a last resort, the farms can be hired).
Part of the soil must be left, stored next to the garage or inside it. This land is useful for filling the sinuses after the walls of our construction will be performed. The rest of the land is taken out. When calculating the vessels necessary for exporting equipment, it is necessary to take into account that the volume of the loose land will be larger than the volume of the pit for approximately 20-25%.
Align the earthen floor of the floor, and then perform a seal with rubble. For this, we smell rubble with a uniform layer, a thickness of equal one and a half dimensions of the largest pieces. After that, the rubble "drive" crushed stone into the ground.
The observation pit in the garage will be much more convenient for work, if there is a niche in the walls, where you can put the tool, spare parts and. Places under the niche should be provided in advance, at the stage of earthworks.
How to make walls and sights of observation pit do it yourself
For the device of the walls, the most common and proven capabilities of two: laying of blocks (bricks) and monolithic concrete. In both solutions there are advantages and disadvantages. We recommend and then we will consider monolithic concrete. By the cost of materials (especially if you cook the concrete yourself) will be cheaper. When installing mortgage parts, you can perform their high-quality, durable mount. And the construction as a whole will be more reliable.
We begin with the fact that in the compacted crushed the soil we make a concrete floor. Six - seven centimeters thickness for him will be more than enough. Paul reinforcing wire mesh with a cell no more than 150x150 mm and a 4-5 mm thick reinforcement thickness.
Concrete will prepare on the basis of the following proportions of 1 cubic meter of concrete: 300 kg (0.28 m 3) Cement of PC, 400 brand; 680 kg (0.47 m 3) Sand, 1210 kg (0.9 m 3) rubble fraction 5-20 mm and 210 liters of water. When you knead manually, the water will have to add more so that the mixture is more mobile, but when using concrete mixer, it is better to observe the proportions close to the specified one. If the water you add noticeably more than the norm, increase and the number of kilograms cement is ten to fifteen.
Concrete, thus obtained, will have a compression strength brand 200, which is more than enough for us.
Walls will make a thickness of 15 centimeters, it is quite enough for our pit. The composition of the concrete is slightly different than for the floor: cement 360 kg (0.33 m 3), sand 670 kg (0.46 m 3), crushed stone 1168 kg (0.86 m 3), water all the same 210 liters.
Concreting the walls will be layerly, tiers of thirty - forty centimeters high, sealing pin, for which a narrow shovel will fit well. A thicker array is manually unable to compact, except somewhere to get a deep vibrator (let's say, take a hire). But in this case, you should not make a tier more than 50 cm.
As a formwork, we use OSP sheets with a thickness of 10-12 mm. Subsequently, the OSP is useful for various garage needs: make shelves or racks, trim the gate when insulation, etc.
When the wall of the walls of the observation pit, the reinforcement is sometimes neglected, but it is better not to pamper and still perform this operation. As an armature, you can use the same grid as for the floor. We install it at a distance of 3 cm or slightly less, from the inner wall plane. Installed immediately to the entire height of the pit, the grid will be great to interfere, therefore, they will be assembled by strips, along the concreting.
 , Immediately perform the device of wall niches. The "ceiling" niche is reinforcing along the entire length of two - three reinforcement rods (A-III reinforcements with a diameter of 8-10 mm will be enough), whatever they move, fasten them with each other.
In the last tier, it will not be necessary for inclined cylindrical "glasses", where they subsequently install lamps. The device of such glasses can be ensured, obliquely inserting into the formwork, cropped at the angle of the plastic sewer tube (see Fig. 2).
The perimeter of the pit we framed the mortgage part welded from the corners with the width of the shelf in the range of 60-70 mm. "Mustache" (anchor) of the mortgage details perform from the reinforcement the identity of the one that we used during the reinforcement of niches. Anchor's length is taken equal to 50 cm. If an anchor is not included in the height of the tier, you can bend it as you need.
The framing performs several tasks: strengthens the angle of the wall, serves as a "rope" for laying the board flooring, finally it has already been said, performs the role of an insurracted wipers that impede the scorpion of the wheel of the car in the pit (see Fig. 2).
Whatever our concrete has been collapsed when moving the formwork, you need to grab it, for two to three days. After the device of the last tier, before the beginning of the backflow, let it stand at least a week.
Reverse filling make a louglock, layers of 15-20 cm, thoroughly trambye each layer. Ideally, the backfilling can be performed by the so-called "incompressible" soil (crushed stone, gravel). However, it is expensive, besides, it is not particularly necessary for a car.
You can go for a trick. After we do, it is not possible to concrete the floor immediately, but to plug the chub to the desired height (if the gear was performed in the garage). After a couple of weeks, driving and leaving the garage, you are driving the soil in the pieces of sinuses, after which you can safely concrete the floor, it will not be guaranteed.
Additional work on the device of the observation pit in the garage
Make an observation pit is not enough, it is necessary to "equip it". To do this, set the lamps, and, make the overlap of the pit (flooring).
For flooring, we use the wide board "Society" (40 mm thick). Boards can be knocked down into several shields, but you should not do it too big and hard.
If 220V voltage is used, the wires need to be hidden into the corrugation (better than steel). Outlets and switch apply sealant, moisture-proof.
Waterproofing observation pit with their own hands
If your area is high, the level of groundwater is high, and there is a danger that the observation pit will pour, high-quality waterproofing is necessary.
Waterproofing will be comprehensive and as the first "turn of defense", we apply a barrier from rolled materials.
We lay under the concrete floor layer of waterproofing film (aquaisole, butyl rubber, etc.), so that the edges of the panels enter the walls at least than 15-20 cm throughout the perimeter. Performing concreting walls, sequentially lay insulation layers. Stacking we carry out a muster, not less than 1.5 cm.
With the danger of flooding, we make oily clay, the trambus of its layers of 15-20 cm.
The final protection event will add hydrophobic additives to concrete when prepared.
In custody
A few words about "labor protection", more precisely, the protection of your health, from this very difficulty.
Performing earthworks in unstable soils, be sure to arrange the mounting wall of the pit, (Provide their bias on the line of natural slope The task is obviously more time-consuming). The fact that the soils are unstable and prone to collapse will be visible at the beginning of earthworks.
We perform the mount, putting on the walls of the board and relaxing them with the struts. It is advisable to do when the depth of the pit will reach the meter or a little more.
However, if the soil is unstable, then there is a possibility that there will be extremely difficult to further work without strengthening the walls, and even stop.
Performing work do not neglect individual protective (tarpaulin mittens, durable working boots). Working a perforator, jackhammer, "Bulgarian" do not be lazy to wear protective glasses Otherwise, the observation pit in the garage may be expensive.
Well, finally, work with a partner. Let even a partner red pigtails and twelve years old! The tool will give or water will bring. Forces for this much do not need a lot and will be treated for work! And what happens to the trouble, can call for help.
Experience construction of observation pit (video)
Specify questions either. , Photos, we will publish them on the site. Order works specialists! Support the project! Successes to you, good to your home!
Maintenance or minor car repair Many are trying to do themselves. In order not to lie under the car on the back, the observation pit is needed in the garage.
The dimensions of the observation pit in the garage

This is all far from dogma. Everyone does as it seems necessary. Some deep pits seem uncomfortable and they make them almost exactly growth, and sometimes below - 1.5 meters. If you consider the clearance of the car, from the floor of the pit to the bottom of the car it turns out about 1.7-1.8 meters. You can do so.
Another time in length. Sometimes a long yam cannot do. Then there are approximately half the length of the car, driving it in front or rear, depending on which part of the car needs inspection or repair.
Now about where to have a pit in the garage. Usually it is slightly shifted to one of the walls, leaving a wide side of the installation of equipment, storage of spare parts, etc. At the same time, from the edge of the pit to the near wall should be at least 1 meter.
On this parameters all. Just note that we are talking about the pivot sizes. When you make a pickup, it will be necessary to add the thickness on the walls, and dig deeper to the height of the floor tie (if you do it).
What materials do
The observation pit in the garage (its walls) is laid out by brick, heavy construction blocks, made from monolithic concrete. If we talk about brick, it is better to use ceramic brick: it is not afraid of moisture. Walls make in Pollockich or brick. The wall thickness, depending on the masonry method, it turns out 12 cm or 25 cm. It must be taken into account when you mark the pit.
You can use brick on dry, dense soils. The level of groundwater should be low. If water comes high, it is better to do the walls of the pit from the reinforced concrete.

Building blocks also need to choose those that are not afraid of high humidity. These are concrete blocks. The rest should be used, then with mandatory outer waterproofing, and then this is not a guarantee that they do not crumble, especially if groundwater is located close.
With a concrete observation pit, everything is easier: the moisture concrete is not afraid, he only becomes stronger from her. For the pouring of the walls, concrete brand M 250 is used, for the floor is enough m 200. Why so? Because during winter beagle, the main load is on the walls. So that they do not "form" the safety margin is required, which is achieved by the reinforcement and use of high-strength concrete. By the way, in order to avoid the brightness of the soil under the garage, you need to make a good breakdown, so that water goes away, and not absorbed into the ground.
Wall thickness when pouring observation pit with concrete from 15 cm. Stacks must be reinforced. To do this, use a finished mesh with a wire thickness of 5-6 mm and a step of 150 mm (if groundwater is deep) or knit the frame from the reinforcement with a diameter of 10-12 mm. The step of the fittings is 20 cm. For greater strength, a single rod can be done on the bottom and walls, bent it accordingly.
Waterproofing methods
The observation pit in the garage can be protected from moisture penetration in two ways: with the help of outer waterproofing, which is performed exclusively in the construction process, and the inner, which can be done during operation.
Outdoor protection
If groundwater is deeply in the place of construction of the garage, lower than 2.5 meters and even in the spring or after heavy rains are not closed above, you can do without waterproofing. On the other hand, the hydrological situation is constantly changing, and where it used to be dry, water may appear. If the observation pit in the garage is already built, you will not do outdoor waterproofing. It remains only to use impregnation of deep penetration to reduce the hygroscopicity of the walls. Because if you have the opportunity, exterior isolation do in any case.

How to prevent moisture from entering the observation pit in the garage? Most often use waterproofing films or membranes (butyl rubber, aquaisole, etc.). They are placed by cloths, stagged with one edge to another, with the release of 10-15 cm on each side of the pit on the floor of the garage. Ploves put the brackets. They should overlap at least 15 cm. To get a more sealed joint, they glue them with two-way scotch, you can in two strips - at the beginning and end of the "overlapping". The film is well straightening so that it fits tightly to the walls of the pit. With further work, it is important not to damage the membrane.
Inner waterproofing
Internal waterproofing is usually impregnation of walls with coating waterproofing. If it is possible - makeup for pools. It creates a waterproof dense film, very resembling rubber. It has a blue color and after frozen well wash. Handle this composition is better than the wall twice, but can be more.

Another option is the primer of deep penetration based on cement. The polymer particles contained in it block capillaries, according to which moisture penetrates through the thickness of the material. One such treatment at times reduces the hygroscopicity of the material. In the case of water in the garage pit, there is a minimum, two-time processing (and even more).
Kesson device
There is another option to escape from the soil - make a metal caisson. Cooked from the sheet metal the box of the corresponding sizes, processed by anti-corrosion compositions, then installed in the pita. If the welds are made hermetically, the water will not be, but another problem may occur. With a large amount, water can squeeze the caisson. They say that he "pops up."
To avoid such a situation, there are corners, rods that leave 1-1.5 meters in the ground. In order to make the volume of earthworks, it is not very large (dripping, taking into account these struts, it turns out to be linked. Before installing the caisson, drive into the ground corner or metal rods, having released their ends out. Conduct them to the caisson case after installation. Drive still will have to do more (you need to cook outside), but its size will still be less. The second plus of this method - the rods will be clogged into a dense soil, which means it will be better to hold the caisson.
Another way to exclude "the emergency" caisson is to do at some height in the wall of the hole. If water rises to its level, it will begin to pour inside. Water subsequently can be repaid, the main thing is that everything remains in place. The observation pit arranged on such a principle in the garage stood over 20 years - until the metal rushes.
Pit for collecting water
If the pit has already been built, and the coating waterproofing or impregnation did not give the desired result, it is necessary or to arrange a drainage system around the garage, or collect water in one place. To do this, in the garage observation pit, in one of its ends, make a pit. It accumulates the water, from where it is bought by the pump. In order for the system in automatic mode, the water presence sensor is set, which when triggered turns on the pump.
Under the impressors make formwork, poured concrete. Then make waterproofing the pit together with the waterproofing of the whole pit. For reliability, you can put the metal caisson inside.
Since completely from dampness in this case does not get rid of it, it is knocked down on the floor of the pit. So that the boards are rotten, they can be soaked. If it does not like its smell, take a special impregnation for wood, which has direct contact with the soil (Senezh ultra, for example).
Warming of observation pit in the garage
If you spend a lot of time in the garage, then you will most likely be heating. To warm up faster, it makes sense to insulate the pit. The EPPS (extruded polystyrene foam) is best for these purposes. It is withstanding significant loads, not afraid of dampness, does not rot, the fungi and bacteria do not multiply on it.
EPPS thickness to create a tangible effect - from 50 mm. Lay it between the soil and wall of the pit. Then outside the pit will look like this:

Polystyrene foam can be laid and under the tie at the bottom of the observation pit. On top of it, the reinforcing grid is usually placed on top of it, and then poured concrete.
How to make a look at the garage
After you are determined with the size and the fact that you will make the walls, what kind of thicknesses will be, you can proceed to the markup of the pit. This can be done with the help of pegs robbed around the perimeter. The second option is between the stakes, drove through the corners, pull the twine / rope. On the markup, we begin to dig the pit. The land is usually carried and temporarily stored near the gate.
From brick: step-by-step photo report

Along the way, with earthworks, track the humidity of the soil. If you have reached the design depth (necessary + thickness of the floor screed), and there is no moisture, you can do without waterproofing. Those who do not want to risk can advise immediately to raise the film.
Less walls. It is not necessary to achieve ideal geometry, but there should be no noticeable humps. The bottom of the pit also align, the trambra, well sealing soil. Use usually manual tamping. A layer of rubble (two times 5 cm), each layer also thoroughly tram. Next goes the sand layer. Its enough 5 cm. Sand wettres, trambed to high density - so that the foot is not imprinted. Next, we felt the waterproofing film.
![]()
It is well spilling, fueling in the corners. Punnels are placed with overlap at 15 cm, which are sampled by bilateral scotch. So that the edges are not rolling, we press with girlfriends - boards, stones.
At the bottom of the layer of the insulation, it is a reinforcing mesh from the wire. All this is poured concrete Mask M 200. The layer thickness is at least 5 cm. So that when laying it is easier to navigate, we make markers on the film, for which the layer thickness can be monitored.
If you use Portland cement M 400, the proportions will be the following - cement 1 part, sand - 3, crushed stone of the middle and shallow fraction - 5 parts.

The observation pit is built in the garage: the floor is covered with concrete
We are waiting for several days until the concrete will drop 50% strength. The exact long time depends on temperature. If it is in the area + 20 ° C, it will have to wait days 5-6 days. If + 17 ° C is already two weeks.
We proceed to layout the walls. It was decided to do in Polkirpich. Used brick used, went about 850 pieces (the size of the pit is 4.2 * 0.8 * 1.7 m). To the elbow level laid out the walls in a circle.

At the level of 1.2 meters from the floor, it was decided to make a niche for the tool. Its height in 3 rows of bricks, the top is blocked by the treated board.

In order not to lay out a niche of a brick, a metal liner is inserted. Cooked box suitable in size.

Next, the walls traveled to almost the level with a garage floor. Part of the walls was replaced by two sections of the channels. At the bottom, if necessary, jacks are resting. A metal corner with a shelf of 50 mm is stacked on the top row, the thickness of the steel is 5 mm.

The corner unfolds so that one of his shelf is reduced down, the second closed part of the top surface of the brick. So that when the wall load does not hit, mortgages are welded to this corner, which are then associated with the reinforcing belt of concrete.


Filling the floor in the garage - the level of concrete on the top edge of the corner

Features of the manufacture of concrete walls
When casting concrete walls, it is necessary to make a formwork. It is easier to make it from a sheet material - building moisture resistant plywood from 16 mm thick, osp. They knock off the shields of the required size, strengthen the bars along the outside. They are needed that under the pressure of concrete plywood or OSP did not disintegrate. First put outdoor parts of the formwork. If the walls are smooth, the problems will not arise. They just lean them, put exactly.
Then the internal shields of formwork are displayed. Between them should be a distance of at least 15 cm. So that the walls in the process of fillings are not deformed, there are struts between them.

Pouring is preferably carried out at a time. Updated portions must be sure to bump or process the submersible vibrator for concrete. Remove the formwork in two or three days. After you can set a corner with welded mortgages (strips) and start the floor to fill.
The diagnostic pit is always welcome the garage attribute. It allows you to use the bottom of the car with convenience. A hand-held car lubber with its help will independently replace the oil or a torn cuff. It is from it that the garage arrangement should be started. Having spent some amount, pit can be built using hired work. The article tells how to make this work with your own hands.
What to build a viewing pit

The observation pit in the garage is usually built of brick or monolithic reinforced concrete. Both options have their advantages and disadvantages. Brick masonry less time-consuming, but not so strong and requires an additional grout of external masonry seams before applying waterproofing.

Reinforced concrete walls are stronger and more durable. The disadvantages include increased labor complexity. For the pouring of the concrete solution, it is necessary to build a formwork, inside of which the fittings knit. A large amount of solution is required. With your own hands it is possible to make both brick and concrete walls.
Dimensions and position of the observation pit

Radarly tear off the observation trench simultaneously with the laying of the basement of the garage. The ditch width is usually 70-80 cm. If you take it less than 70 cm, the trench will be close, wider 80 cm - more risk fall into the pit, which often happens. Well, if there are somewhat strong guys nearby. Trench height makes approximately 180 cm so that from the head to the bottom of the car was about 15 cm of the lumen. The length should be at least two meters, and better - by the length of the car plus 1 meter.

The position of the ditches may be different: in the center of the gate or with a displacement. In this case, the car stands away from the underground with its raw air. To inspect or perform any work, you will have to maneuver to drive to the ditch. For a more convenient entry, the observation pit in the garage may have a M-shaped configuration. You can go down and climb the stairs without rolling cars.

To go down to the pit on the Power Laneke is inconvenient and dangerous. The staircase must be stationary, with comfortable and safe. The best option is the manufacture of steps simultaneously with the construction of the enclosing structure. With brick walls and steps, it is advisable to perform from bricks. Feeding the walls of the monolithic reinforced concrete, it is necessary to cast the steps at the same time. If at this stage they for some reason were not made, then the staircase can be done and later with their own hands, when the arrangement of the viewing ditch will be performed. The staircase is made of wooden - with fastening of steps on governments or cosos, as well as metal - with rebel iron.
How to make the illumination of the observation pit

Performing the arrangement of the garage box, should provide coverage of the observation pit in the garage. According to the rules of the lighting device in the repairmen, the use of incandescent lamps 220 V is prohibited. It is allowed to use light sources with lamps for no more than 36 V. For their power, a downward transformer is used. A good option is daylight lamps in a hermetic case. If you are carrying to 24 V, the safety cable must be at least four meters long.
Ventilation underground

In the repair trench, due to the temperature difference, elevated humidity occurs and condensate with precipitation on the bottom of the car is formed. To avoid this unpleasant phenomenon, the observation pit in the garage must have good ventilation. The exhaust channel is performed from an asbetic or plastic sewer pipe embedded in grain preparation of the floor. This pipe must be combined with a transition knee with a vertical exhaust riser. Hoods from the ceiling of the garage box and trenches should be independent. If you combine them into one - the ventilation efficiency of the technical underground will sharply decrease.
Contours of Kotlovana
Before placing a place in the garage under the future trench, it is necessary to draw a drawing of its cross-section. As a basis, you should take the size of the trench in the light. For example, the width will be 70 cm. To this magnitude, you need to add double wall thickness. If the latter is 20 cm, it turns out: 70 + (2 × 20) \u003d 110 cm. Add more stock - 5 cm on each side. Ultimately, the width of the trench at the bottom will be: 110 + (2 × 5) \u003d 120 cm. In order to facilitate subsequently applying a coating waterproofing, the walls of the trench should be carried out by inclined. To do this, there is a fairly width of the trench on the floor of the garage to increase by 60 cm (30 - to the side). That is, at the top the width of the ditch will be 180 cm. By the same principle digging trenches for the foundation.

Bucket or shovel
If the observation pit in the garage is manufactured simultaneously with the fill of the foundation, it makes sense to resort to the services of the excavator. All work will be completed for half a day. Costs will be the same order as if you hire excavators. Sometimes it happens that in the season they will not find them. Well, if the thought came to arrange a technical trench when the garage is already built? There is only one way out - to dig up with your own hands. In order not to make extra work, some amount of carved soil should be stored not far from the construction schedule, since the land will need for backflow of the sinuses.

The base of the trench from the penetrating moisture should protect the waterproofing. On the rammed bottom of the recovery pre-pour 10-centimeter sweet. To prepare, a solution of the brand M 150 is sufficient. By width, the preparatory layer is performed flush with the outer surface of the future walls of the trench. For insulation, the soles use any kind of rolled insulating material - rubberoid, bikrost, aquaisole, polymer membranes. The canvas should be cut off with puff on the wall.
A concrete floor is poured over an insulating layer. The brand takes the stronger - M 200. Thickness is 7-8 cm, but the surface of the surface is better to reinforce the road grid 150 × 150 with a wire thickness of 4 (3) mm.
Rules design walls
Paraphrasing Henry Ford, one can say - the design of the walls of the trench can be any, provided that it is rigid and durable. In order to be in the near future, the walls were not released and did not crack, you should know - how they do not need to be done:
- put brick walls in one spoons (120 mm thick);
- produce masonry from brick without reinforcement;
- use silicate products for masonry;
- pour a concrete mix directly into the ground (from the outside of the ditch);
- pour concrete without fittings;
- use boobute.
Combined Wall
The following describes one of the possible options for the construction of the enclosing design with their own hands. The outer walls of the pit shovel with inclined, with a width of width to ensure further access for waterproofing work. 4-5 rows of brick masonry in Polkirpich are laid throughout the inner contour of the future facilities. This partition will serve as an inner formwork. Outdoor set, retreating 130 mm from the folded wall immediately to the entire height of the trench, using old boards, plywood sheets, chipboard, osp, and other similar materials. He supported with its struts and bodies, after which a concrete solution is poured with the upper edge of the masonry.
Putting a reinforcing masonry mesh 250 mm wide with a cell 50 × 50 and a wire thickness of 4 or 5 mm. Lay out the next site and reinforce the reinforcement again. For better clutch with concrete, the outer surface of the brick laying is performed "in the void". The stiffness of the structure will give a closed belt from the rods of reinforcement with a diameter of 10 mm, laid down and at the top of the fence. To subsequently equip the lighting of the observation pit in the garage, provide a niche for the installation of lamps. Waterproofing, if it is provided by the project, is performed after removing the outer formwork.
Review ditch and groundwater

Not always, unfortunately, in the garage you can make a sightseeing ditch. When the groundwater is located (GW) under the garage at a depth of less than two meters, it is not worth the construction. Life shows that in this case no waterproofing of the walls will help. When the GW is at the mark below 2.5 meters, the trench can be constructed provided that the high-quality waterproofing of the outer walls of the viewing ditch will be performed. It can be performed with your own hands from several layers of the occasional material: rubberoid, technonikol, glassizol, hydrohotelloisol and others. Warm surfaces with molten bitumen. There are penetrating materials: hydrotect, Aquatron-6, Penetron. They are convenient because they are applied on raw concrete and reduce waiting time. A good clay castle is the fatty mint clay.
Global insulation
In order for the observation pit in the Garage in the winter, it is not covered with an innem, it can be inspired. For this, the outer walls on which waterproofing is applied, it is necessary to be caught with insulation plates - 5 cm thick polystyrene foam. If such a heater is to lay in 2 layers under the breakfast around the perimeter of the entire garage, the floor in the garage and the trench will be still warmer.
Trench in Polyakata
In order not to accidentally fall into the pit, it is necessary to make fuel enclosure on top of it. The simplest design is thick transverse boards, laid inside edging from the corners installed using mortgage elements or attached anchor bolts. Woodworking waste is well suited for this purpose - the hill, laid by convexity down. The observation pit in the garage, closed by them, when looking at the bottom reminds the front dugout.
Finally
The construction of the observation trench reminds the fill of the foundation and the same steps are held:
- markup;
- excavation;
- production of the sole;
- walling;
- waterproofing;
- insulation.
Having finished the construction of trenches from reinforced concrete or brick, produce its arrangement. From the inside the pit can be plastered or bodied by a tile. Such an "underground", built by their own hands, will allow driving a car with full confidence for its technical condition. After all, connecting the lighting of the observation pit in the garage, you can regularly estimate the state of the chassis of your car.
 Why you can not give icons
 Is it possible to give icons as a gift: Signs, the opinion of the Church
 A year ago left her husband, and now I do not know what to do