Scan of a house of cardboard. House of paper on ready templates. Paper house layout with your own hands: Two simple ways of making with detailed instructions
You can build a cardboard house with your own hands without making special efforts. Designs can be different - this is a dollhouse, and a garage or parking for toy machines. Children will be delighted with participation in joint work. After all, the process of making crafts in the form of a hut is fascinating.
At the same time, you can create a cozy nest from cardboard, in which a small fidget will fit.

How to make a craft with your own hands
Paying a little time to work together with children and giving the will of fantasy, you can build a lot of original designs. And how to do it, we will tell on.


Christmas hut
In the manufacture of crafts, you must navigate the schemes and templates of houses from cardboard. After you choose the most appropriate option, you should move the markup to the workpiece. Well, then there is nothing complicated:
Cut the part of the paper from a white sheet of paper on the template and stir them in the installed sequence to the cardboard. You can use glue or bilateral scotch.

All cardboard details are neatly cut. To improve windows and doors, use the stationery knife.


Adhering to the drawn folds, bend the workpiece and glue the design. For durability on the house, you can apply a primer composition.

The hut should be frowning and decorated, for example, the roof is often sprinkled with sparkles. Hook the rope to the design, the hut is used as a Christmas decoration.

Cardboard and Foam House
This option is more laborious. But our instruction, how to make a house of cardboard, will help you quickly cope with design.


An ordinary cardboard box is taken. The size is selected individually. A house is built of it - it is required to cut the desired details and glue them. After the designs and doorways will be drawn on the design, they should be cut by a stationery knife.

The hut can be frowning or caught with colored paper. But the original will look at the installation foam. It is applied by stripes, leaving between them the gaps of 3-4 mm for swelling. The foam will dry out after 30-40 minutes.

In the meantime, you can build a stand:
- cut a piece of cardboard in the form of a rectangle with a slightly bigger than the base of the house;
- attach with glue stand to the framework of the building;
- slim snow using foam or wool, glued to the stand.

The excess foam from the crafts is cut off with a knife, and then deactivate the design elements in the selected color scheme.

Residence for gnomes
The task can be simplified if you use existing blanks, for example, cylinders from toilet roll rolls. So that the composition was original and attractive, as in the photo of a house of cardboard, you need to be patient. You can take a 2-3 cylinder and cut into two parts so that it is details of different lengths.

Then you should cut paper stripes. Their length will be about 150 mm, and the width of 15-30 mm is greater than the height of the cylinder house. Out of colored paper, windows and doors are cut and glued to a white strip.

A cardboard cylinder should be wrapped with windows with windows, pre-apply adhesive mass to the surface. The edges of paper go beyond the limits of cardboard wrap inward. From the colored paper you need to make cones that serve the roof. Their glue is fixed on cylinders. Village for gnomes is ready.


House by the hands of a child
Many are interested in how to make a house of cardboard with your own hands. Even your baby will cope with the proposed technology. Apply on white cardboard markup at home or print a template from the Internet. The kid himself can cut the entire design by clear lines.

For the manufacture of the roof, take the cardboard rectangle suitable for length of length and width. This sheet bends in half and attached to the collected frame of the house.

Dollhouse from cardboard
If your child asked to make a dwelling for dolls, then you should not immediately run into the garage and start sawing the boards.

Everything can be done much easier - it's enough to use our instructions on step-by-step making a house for beginners:
Take the cardboard box of the desired size. For example, it can be packaging for parcels or from household appliances. Expand it from below.

Two small side parts are cut from above so that triangles are obtained on both sides, aimed at the top. Triangles on top are aligned vertically, and the longitudinal long elements of the lids are attached to them with glue or scotch, forming the lower part of the roof slide.

To form a roof is not always possible - its top (horse) will remain open. You can solve this problem if you crop covers from the bottom of the box. The longitudinal elements are attached to each other in the form of a shala and fixed to the already constructed part of the roof. As a result, the roofing case will be built. The main thing here is to produce all measurements and secure, observing the joints.


On the walls of the house, windows and the door are drawn, which then cut through with a knife. The roof can be decorated in the form of a tile, and the walls are painted in the preferred color.


Cozy house for children
Making a design in which a child will fit, from a conventional cardboard box from under household large household appliances.

It is desirable that the height of the walls is at least 1-1.5 m for the comfortable finding of the child. If this option is difficult to choose, then the house of cardboard for children can be made of two boxes interconnected by scotch.

The top cover should be closed tightly and fasten the joints with the help of a scotch. Top of a tight box cardboard sheet to strengthen the design. The roof can be made in several ways:
While baking two rectangles of cardboard - they get the roofing rods. If they are made with a small launch of the house walls, then it will turn out a more durable mount.

Top mounted rafters. They are made of two crossed plastic pipes of small diameter. They are attached to the house corners. In the middle, you should put a brine of a wide pipe so that the rafters do not begged. On top of the rafter stacked a lung bedspread or blanket.


Build a house for dolls, christmas tree decorations or a fun time of the child is simple enough. This requires the use of affordable material. The participation of the child in the design will help you to show fantasy to the maximum and take the baby with fascinating work.

Stock Foto Cardboard houses


What could be more interesting and more exciting than to make your own hands any crafts for home decoration? After all, the fact that you can come up with and do it yourself, it is impossible to buy in any store!
Such products are not only elements of the decor in any apartment, creating a cozy atmosphere and mood, but are the reason for the fascinating time in their creation. After all, children love to cut and glue from multicolored paper toys - houses, animals, rockets and ships! In this entertaining business, they often help adults and * houses from paper for children * will be a universal decor for the children's room or the subject for games. At the same time, a fairly simple and very original handicraft - a paper house with your own hands, which you can easily do with the child will serve as a bright decoration to the holiday and bring a lot of pleasant moments when it is created.

It can be a snow-covered hut with a Christmas tree to the new year or a mystical castle with ghosts and bats to the fun Halloween, a multicolored with bows and ruffies a house for dolls or an impregnable fortress for the knights, and maybe a rural house with a fence and flowerflowers, a cozy fit on the windowsill of your Kitchen. After all, creating * a paper house with your own hands * You are completely immersed in the world of fantasies and become the Creator of the most unthinkable ideas! Well, * How to make a paper house * so that it is unusual, bright and pleased with the eye, we will tell you in our article.
How to make a paper home
Materials and tools:
- scheme
- cardboard (White and Color)
- colored paper
- gift paper
- paints
- scissors
- pencil
Decorative elements:
- ribbons
- beads
- artificial flowers
- shishki.
- yagoda
- branches
- moss, etc.
1. To begin with, choose a scheme for the future house.
A used pattern can be printed on the printer or just carefully, without pressure to translate through the monitor screen on thin paper, having previously increased the picture to the desired size. The pattern thus obtained is cut out, superimposed on the cardboard for the future house and completely outlined with a pencil. After the scheme is drawn, it should be carefully cut and prepare for gluing. To do this, on the line of folding the walls you need to spend a stupid side of the scissors so that the cardboard can be easily bent and cut the doors and windows. If you have never been making a paper house before, we advise you not to wise with complex schemes and small details, but choose the easiest version. Your paper house with a scheme to which is simple and understandable has every chance to get beautiful and original from the first time. Some types of schemes for paper houses are presented below. Click the mouse to enlarge:


2. Cut the doors and windows
Doors can be opened if cut off the opening is not fully or completely arched. Also with windows: shutters in them can be opened or the window will be on the plan without stable. The finished color cardboard window can be glued and separately on the wall of the house, without cutting out the disc. Here everything will depend on the scheme that you have chosen or made at your own discretion of the amendment in the design of the house. After all the necessary parts are cut, you can glue the house, giving it a square shape.

3. Produce the roof
The roof is glued separately. Cut from white or colored cardboard, folded in half and attached to the walls of the house. Previously, it can be decorated: draw tile or make it from separate strips of colored paper, cover velvet paper. If a pipe is provided in the diagram, it is cut and it is cut, it is folded along the sections of the fold and glued to the roof. To the pipe can be attached smoke. For this, a wavy smoke is drawn on the cardboard, cuts out and glued at the base to the inside of the pipe.

4. Mastery Stand
The finished house can be glued to any stand from cardboard, wood or plastic, cutting it in advance for the size of the house and decorate the slaughter of colored cardboard strips, grass of green paper, dry flowers, berries, leaflets, moss. You can attach to the stand with a plasticine twig, and hang beads on it and glue the flowers. It turns out a very elegant version of the summer house.


5. Decorating the house
Already ready and fastened on the stand, the house is brought to the final. To do this, decorate and decorate the walls, windows, roof and the foundation of the house. If this is a New Year's option, then the roof with the pipe can be swept in the snowball - crumbling of foam, pre-smeared by glue of the floor-saw, cover with cotton, paint white paint, portray snowflakes, make snow-covered windows. The house is decorating with colored tinsel and beads, attaching a piece of paper silhouette of a snowman and Christmas tree. You can use ready-made pictures for decorating or cutting figures from gift paper.


The house for Halloween is made from dark cardboard, with the addition of the silhouettes of ghosts and volatile mice. The windows can be made of bright yellow or orange paper, creating the effect of light in the house. Near the stand you can stick the trees and fence from cardboard, put on the fence of the black cat. You can be sure your child with great interest and enthusiasm will help you cut out of the pair of terrible characters of a cheerful holiday!

You have never noticed, driving around your neighborhood, how much are unfinished and already as abandoned brick boxes of houses, cottages with gaping windows of windows? Apparently, considerable money is invested in such a number of bricks, concrete, digging of pita and other construction. In essence, most of this money buried to the ground, thrown into the wind. After all, these unfinished houses and cottages are selling at a price much less invested in their construction. And if you look at some built in the recent past of the house or cottages, it is unlikely that you will find among them not that the architectural masterpiece is just a house with its architecture that caused at least respect, and unfortunately. Probably Russia is still the richest country in the world, since we allow yourself so unwise to spend money.
Where does this waste come from? Why do we have accustomed to invest in the construction of ruins or in some awkward buildings?
First of all, from the fact that a private developer cannot often calculate their real opportunities and usually wakes up for the construction of a house or a large cottage than he can alter, bring to mind and subsequently serve.
It happens that a person who built a four-storey house or cottage, as a rule, lives on the same floor, and goes on a tour, but on these floors of the cottage you need to clean the windows, to wash them finally. The cost of construction, exploitation of such a house or cottage is very high. To make money to fly to the wind, it is necessary to act on the principle of reasonable sufficiency.
Starting the construction of the house, the cottage Private customers often treated themselves to the thought that they would be able to find some wonderful, almost darm builders, cheap, but talented architects. As a rule, all these dreams in the process of building a cottage are no more than illusion. And the economy begins. But save not on what it would be necessary. As a result, it turns out that it will cost to correct the work of these miracle builders, it will cost even more expensive than initially finding no normal designers and listen to their recommendations for choosing a contractor for the construction of the house.
I would like to warn potential customers from the architects who swear in a couple of weeks to design the house of your dreams. Already during the construction of a house or cottage, this approach to the case can get sideways, not to mention whether you can live in this dream. After all, if you want to start building a house in the summer, it is better to apply to the architect in the fall.
The practice of building houses, cottages shows that the more attention is paid to the project, the smaller financial costs are waiting for you at the construction stage. It is better to design a house once than rebuilding more than seven times, "the experience suggests.
In order for your presentation of the future house to be the most complete, you should order an architect layout at home with the surrounding area. Many customers believe that the cottage layout is needed to stretch more money from him (customer). This is rooted incorrectly. The layout of the cottage will help save your money and nerves, because you will present your future house, and the result will not be unexpected for you. A cottage layout made on a 1: 100 scale - gives a fairly complete concept about the object, but on the scale of 1:50 it will be possible to show all the architectural features of the house and the various types of finishes so that it will allow you to literally shovel with your unfresphenny house. Photo of house layouts You can look at our page.
It is necessary to make geological surveys on the site and geodesic shooting of the relief of the site - they are necessary as the source data for the design of the cottage foundation. The foundation is the basis of the house and the foundation problems can lead to the dissent of the entire structure. Most of the houses abandoned at the construction stage and abandoned that they have problems with the foundation. Either due to the uneven sediment of the foundation, or due to the force of frosty powders of the soils of the bone foundation. Cracks can go on the walls of the house, so it will be easier to order geological surveys than grieving then over your thinned and cracked home.

Also, in order to save it, it is better not to plunge the ground floor to the ground - you will save on earthworks, the material of the foundation and waterproofing. Another thing, if you want at the minimum building area to get a maximum of useful area - here without the basement you can not do, usually there are pools, gyms, storerooms - everything that did not fit on other floors.
To achieve a tangible savings in the construction, considerable attention should be paid to the selection of building materials. The most progressive wall material for the country house is aerated concrete, laid on a special adhesive solution. A modern gas-concrete block manufactured in German technology, with a thickness of 375 mm fully satisfies the standards for heat engineering. The wall is very smooth, because the seams between the blocks are not more than 2 mm, and does not shrink. Therefore, after a minor preparation of the surface of the wall, it is possible to start its final finish. In general, the value of the material and installation of the gas-concrete wall is two times cheaper than brick and at the same time three times warmly. One of the advantages of the walls from the aerated concrete is also that it is vapor permanent, it allows you to breathe such walls, getting rid of excess water vapor inside the house.
But it should be remembered that the carrying capacity of the aerated concrete is low, although it is enough to carry reinforced concrete overlaps of two or three floors. Also, aerated concrete absorbs moisture well, so it should be protected by its surface from its impact.
To finish facades, vinyl siding is the most economical material. He is attached to the crate, leaving the air gap, which allows you to ventilate the outer surface of the aerated concrete, removing excessive moisture from it.
Siding does not need to be painted, it is not subject to rotting, to maintain the appearance, it is enough to wash it from time to time. Siding finishing can be combined with other, more expensive finishes, for example, decorative synthetic plaster with various fillers: quartz, marble, granite crumbs of various fractions, it is important that the plaster is moisture resistant and vapor-permeable.
The solidity of your home will undoubtedly add cladding with bricks, for savings you can use the products of domestic plants. The use of these materials in harmonious proportions will give the facades of your home unique, individual appearance.
Inexpensive roofing coating, which can be used - bituminous tile, but to give the house of a more representative species, you can apply a domestic polymer-silent tile. It has the same sizes as the Finnish ceramic or cement tile, but it has two times less weight with a much lower price, does not ourselves when falling. The disadvantage of ceramic, cementnet, polymer-sand tile relative to the bituminous - relatively large weight, which entails an increased consumption of material on the rafter structures. But the bituminous tile will be in disrepair faster, the traditional tile is tested for centuries and is undoubtedly more durable.
Metal-plastic windows are the most optimal option for a person who can count money. With metal-plastic windows the same benefits of vinyl siding - they do not need to repaint them with time and they cannot be rotting. In our climate, you must install two-chamber double-glazed windows. Better if the windows have a triple contour seal and high-quality shut-off fittings tightly pressing window sash to the frame. At the same time, it is necessary to remember that it is better to contact the company that gives a multi-year warranty on its windows, because some problems with windows can manifest itself in the year of operation and in two years. Excessive savings on the windows may subsequently lead to unjustified costs.

A well-known planning and constructive solution is playing a large role in the cost savings. Maximum thread of the construction of the house, we reduce the number of necessary operations during installation, the amount of required material - the labor costs and costs will decrease accordingly.
As you know, the plane that flies well and looks beautiful too. Beauty is derived from its functionality. So a good house does not require anything superfluous. After all, the house may have a spectacular appearance not at the expense of architectural excesses like turrets and columns, but due to thoughtful proportions, combinations of various types of finishes, an interesting color solution, and at the same time be simple from a constructive point of view. Moreover, we already live in the twenty-first century and classic columns and stucco parts on the facades look at the new buildings at least strange. Modern architecture is not focused on the details, but operates with color, plane, volume, texture ....
An important role in saving money is played by both the heating system you will stop. Either it will be a traditional radiator system which at the initial stage will be undoubtedly cheaper, or the heating system across the floor. The advantage of the heating system across the floor is that water here is not necessary to heat up to discharge temperatures, because the area of \u200b\u200bheat-return in this case is more, as a result, 15-20% of the means saves compared with the radiator system. In addition, when heating through the floor, the air rises to a smaller height and dust in the house will be significantly less. Also, the refusal of radiators will give the opportunity to more freely separate the furniture, which is important if the area of \u200b\u200bthe premises is small and on the account every square centimeter.
What is the recipe for the construction of a good house? First, it makes a reasonable proportion to find a reasonable proportion in their ratio. Secondly, we suspend the choice of builders, you will definitely look at the houses built for them, operated for several seasons. Thirdly, do not refer to the designers who per week on the computer will be depicted, it is not a computer! When the architect suggests you options for planning Try to imagine them in reality, think - everything is convenient in the layout. (The case towards the case when you ordered a ready-made directory project). Fourth, if you have already decided on the designers, negotiate with them and on the manufacture of a layout of the house and on the design of interior design, listen to the recommendations of the architect on the choice of stronel. Fifthly decide on the materials of which will be built a house, or it will be expensive, durable materials, or less expensive and less durable - the choice of materials depends on what future the house is being built, as soon as you want to settle in it. Simply put, if you want to build for yourself and your family, a beautiful, comfortable home and not to fly "into the pipe" you need to approach this case seriously and weighted.
Based on the foregoing, it is possible to formulate a collective image of a good-quality economy house, which, in our opinion, will be acceptable at cost for a fairly wide range of families who want to live in their own home.
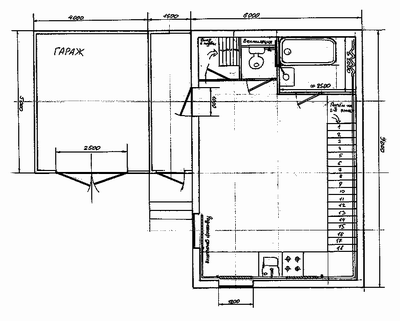
By area, such a house corresponds to a decent urban apartment - 150 m2. On the first floor: living room - 28 m2, kitchen - 12 m2, entrance hall, bathroom, pantry, boiler room, in the attic floor: 3 bedrooms - 20, 16 and 11 m2, as well as two bathrooms. All this - as it were, a residential module to which will then be able to attach a garage, a terrace, a veranda, additional living quarters. The cost of such a residential building will be lower than the cost of a similar urban apartment and at the same time be able to develop. In terms of the house presents a square with sides of 9.4 m. This feature of the project makes it possible to save a little on the wall material and on heating, since the square perimeter has less than that of the rectangle of the same area.
Walls are made of aerated concrete. The lack of a middle carrier wall gives savings on the foundation under this wall and on the wall itself and also makes it possible to easier to redecessing if it is necessary. Wall decoration Outside - Siding and decorative plaster. Roof - bituminous tile. This project may approach both the second guest house on your site and for typical building village.
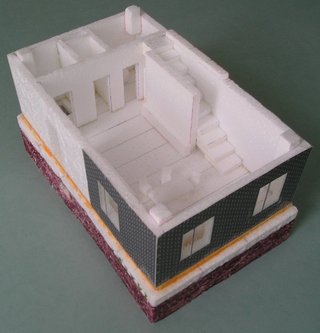
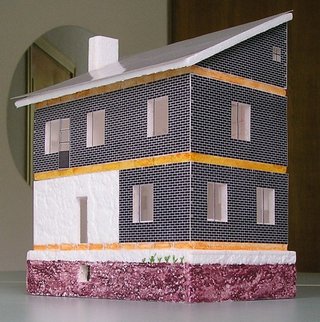
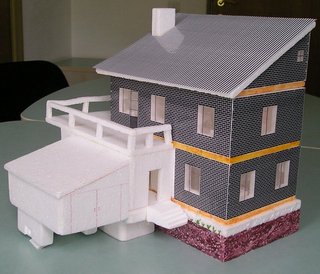
Mock at home made of foam with his own hands
How it all began
I wanted to imagine clearly how the future house would look. For this reason, this common drawing was born.

The result was absolutely not impressed, by that really wanted to consider the house from all sides. Then the search for ideas began to create a layout. Remember in the former children's times Mastered from cardboard and paper of soldiers, but when trying to build at least part of the foundation from these materials it became clear that it is much easier to build a real house than its layout. Without thinking, bought a foam that the ceiling is placed to give a divine species. (Unfortunately, an even foam from two sides was failed to find, so I took that more than more than flowers, petals, and with the texture by the type "loose plaster".) This material approached as it is impossible by the way. Firstly, it has a thickness of 0.5 cm, which almost corresponds in proportion to the thickness of the present wall, and secondly, the foam is very easily and quickly processed - it can be chopped into smooth pieces of a conventional knife. PVA used as glue.
Now let's start
To make a layout at home, you need to know exactly what you do. That is, you need to have a drawing of a house, a sketch or a plan with basic sizes.
I had enough draft architect's sketch, which was at hand at hand. After catching the size, I decided to take a scale as a proportion of 1 m \u003d 2 cm. This proportion is easy to count, and the size of the layout is good - the layout of the house is not large and not small, the wall thickness is almost proportional. And then a lot of routine work - the markup of the foam, cutting the foundation, walls, roofs, gluing pieces together.
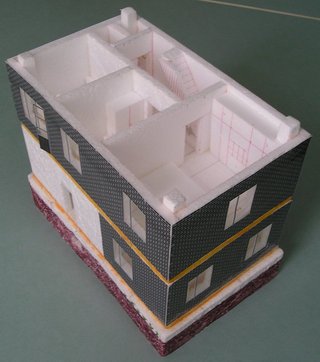
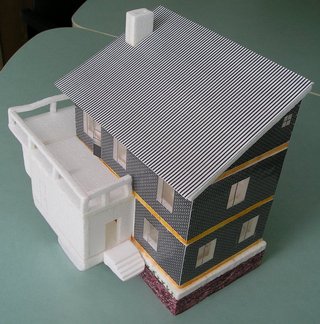
The entrance door to the house is visible on a white background. Ask why there are no steps?! How to climb the house?! There will be steps! And there will be a corridor, just in the place where the wall is white. See below. Mock at home I needed necessarily folding so that you could see the inner location of the rooms, stairs and furniture. For this reason, I did not glue the second floor, but made it removable. This is how the internal arrangement of the house looks like.
Honestly, the staircase I was too lazy to make a completely proportional - one step layout is equal to two real. As they say, the next time :-). But otherwise everything is correct - the slope occupied size, width. The staircase closes the bearing wall of the brick, which is needed in order for the slabs of the overlapping slabs on it.
At the layout you can clearly appreciate the spread of light in the bright time of the day. Just need to know, in which direction to the north will stand the house.

On the mockup of the first floor it is visible as a staircase on the second floor. Visible descent to the basement. Yellow stripes under the windows indicated heating radiators. Bath and toilet are visible "naked eye." Green color is designated heating boiler. Ventilation niche passes the toilet. And also visible to the basement. In principle, the descent to the basement would be logical to place under the stairs, but these are questions to architects. The entrance door to the house is near the sofa. When entering the house, on the one hand there is a bathroom, a toilet and Camorka. On the other hand the kitchen. The room on the first floor is quite spacious, so any redevelopment is possible - you can separate, for example, a cuisine by partition, or hide the inputs in the bathroom and toilet. The sofa can be put in the stairs, and the kitchen is separated by a bar counter. An option without partitions or with sliding partitions is preferable if you are going to get parties and crowded gatherings - then you need a lot of space.
Orange color marked plates of overlaps. Naturally, they will be hidden under the masonry brick, but for clarity of the layout, I brought them out.
On the second floor there is one large bedroom and two small children's rooms. As well as shower and toilet. Also visible the staircase in the attic and access to the balcony in one of the children's rooms.
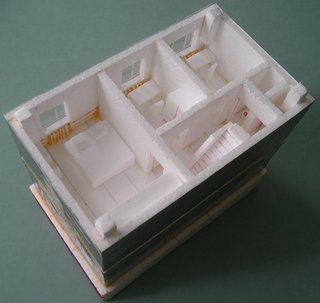
In this picture, two children's rooms are better visible, as well as inlets into rooms. Under the windows are radiators of heating. Unfortunately, the ladder of lifting from the first floor is not visible in the picture on the second - it closes the staircase on the attic. You need to see the layout of the house live!
Now we make the roof of the house and have it over the second floor.
The roof of the house I made a single one, as the house will border the deaf wall with the neighbors, although the duplex would look much more beautiful.
The layout of the house is almost ready! The smallest thing remained - to attach the corridor. The corridor can be built and not immediately, but as finances appeared for construction
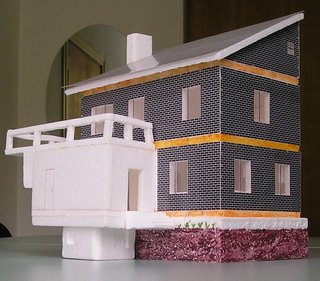
The corridor can make any value - it all depends on your taste. The roof of the corridor is at the same time a balcony where you can spend the laundry for drying or install a hammock. If desired, the balcony can be glazed or just install a plastic transparent visor from rain.
A portion of the balcony enters the deaf wall. There you can hide to tired parents and smoke so that the children see.
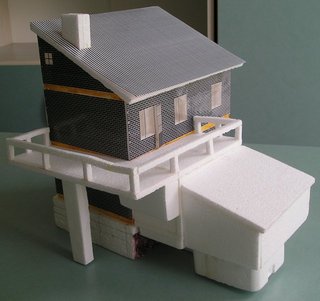
Last barcode - garage. Fucked as finance arrives. From the garage you can immediately go to the corridor through the inner door. If someone seems a balcony too small, then it can be done above the roof of the garage. The garage and the corridor build on a light foundation, as the weight of these buildings is insignificant.
What I needed
From materials you need the following: a foam of 0.5 cm thick, PVA glue, paper, tape. Tools: blade or sharp knife for cutting foam, scissors, handle for applying markings on foam, pencils, line.
"Outdoor finish" in the form of bricks did on the printer, followed by "lamination" - pasted Scotch. Not grateful this is a matter, because just that, the tape is crookedly glued and the workpiece must be thrown away. For the future I want to try on the present laminate. Without lamination, it will not be possible to paste the texture to the house, since the paper swells from glue. But if nevertheless succeeds to glue, the paper is very quickly hidden and the layout of the house will lose its beautiful shiny look.
My brick is black - there was no color printer at hand. Now it is not a problem and you can make a "finish" for any material. And the special fans can stick wallpaper and make parquet. But I am pass. Ungrateful this thing.
Here, actually, and that's it!
How to make a layout of a paper house with your own hands?
How to make an architectural layout of paper with your own hands.
In this lesson, it is enough in detail how you can make an architectural layout from simple materials at home. We decided to show you ways to work with paper and methods for its transformation into bulk forms on the example of the architectural layout of the business center with a plurality of complex elements and cuts.
Materials: Dense toned paper, self-adhesive film, double-sided tape, PVA glue, Children's colored paper, cuttings from a brush (for the spire).
Instruments: Scissors, metal rules of different sizes, a paper knife, a circulation and several tools that I forgot :-).
Phased creation of a building layout.
Part 01. Sequential execution of structural elements of walls.
1. COLOR FLOOR.
In order to show the wall thickness to the window frame, you must install the ribs.
The glass of the outer part of the window is simulated using authonic. Toning is pasted on double-sided adhesion, slightly larger.
2. First floor.
The first and subsequent floors of all walls of the building are performed according to a similar scheme as the ground floor.
All decorative elements are manufactured by gluing the details of the jack, which reduces the error in size.
3. Floors from the second fourth.
4. Fifth floor.
Part 02. Compound of structural elements of walls in the block.
1. Wall No. 1.
2. Wall number 2.
3. Wall number 3.
This wall is a bit more complicated than previous ones.
4. Wall number 4.
Part 0 3. Sequential execution of frontal cuts of the layout.
1. Cut No. 1.
Because The layout of the building is partially executed, it is necessary to make cuts. One of them will be detailed, and the other will indicate only the basic elements of the design in the section of the cut.
2. Cut No. 2.
In contrast to the drawing on the section of the layout, the internal elements of the structure (windows, doors hidden from the wall cut area and partitions are visible, which makes it more accessible to perception.
Actually, for simplicity with gray, it is designated that it falls into the cut area in the drawing.
Part 04. Connection of frontal cuts with walls of the building.
1. Section No. 2 with walls No. 1 and No. 2.
2. Section No. 1 with walls No. 3 and No. 4.
Part 05. Sequential execution of collection and collapsible elements of the layout.
1. Dynamic structural unit number 1.
Under the dynamic structural unit, the moving part of the layout is meant, which is essentially a complex cut.
2. Dynamic Structural Block No. 2.
Both dynamic elements are fixed in the layout by means of magnets.
Part 06. Installing the layout blocks to the stand.
The stand is made of plywood.
Part 07. Phased performance of the central entrance.
Part 08. Phased fulfillment of the facade part of the layout of the building (tower).
Part 09. Sequential horizontal cut (fifth floor).
Part 10. Sequential execution of the dynamic structural unit (roof).
Part 11. General view of the layout with exterior.
How to make a layout of houses from plywood do it yourself
A lot of people, seeing beautiful and neat layouts of buildings made by architects, dream to learn how to create the same reduced copies of beautiful houses. Learning to do real complex layouts is not easy, but in your power and opportunities to collect a decorative layout of the house on a scale of 1:50, in advance drawn the contours of the details and facades at home, as well as roofs and frames.
Instruction
1 Decoming layout you will need a plywood with a thickness of 6-8 mm, as well as materials for facades, partitions and roofs. From plywood, make a frame of the house and place it on a flat surface.
2 Differently prepare the facades cut out according to the drawings, and shift door and window openings in them. Then put the locations of the sections and joints.
The 3-fence of the house make out of wide rails by sticking them to the finished box at home, and also separately make a porch with stairs from solid wood bars.
4 The 4th of thin plywood separately cut the doors and window platbands, stick to their sandpaper, take the contour with thin rails and tightly glue to the frame of the house in the openings. In the windows instead of glass, insert a plexiglass of millimeter thickness with plastic or wood frames glued on the outside.
5 Use a separate sheet of plywood and drink a duptane roof for a house, and then roofs for individual buildings, if you want to complement the house in the yard. Safety from thin tin drain pipes and a gutter, and then fasten them on the roof rods. Choir pipes make out of small tree bars.
6After the small details will be ready, start collecting the house. First, collect the box at home, then place the roof on it, then fasten the roofing doors.
7 Pull separate beautiful columns or rails that you close the joints of the plywood sheets so that the house looks more beautiful. The surface of the building is cast, cover the mourn and varnish or paint paint.
8 Note the manufacture of buildings layouts with simple models - for example, small huts or barns. Then you can improve your skills and move to the construction of more complex layouts.
Now we will look at the topic how to create a kindergarten patterns, a multi-storey or private house, as well as schools and future class in it from paper.
Learn how to create really complex projects is difficult, but in your power and interests to collect a decorative layout of the building on a scale of 1:50, by making the contours of parts and facades of structures, as well as the whole roof and frame. Templates and layouts of structures can be printed.
How to do or build a bulk house, apartments and rooms in it? The technology itself is not complicated, but for the first time it may seem difficult, especially for children, so we share it in stages how to do it. For the manufacture of a layout of the house, you will need a plywood with a thickness of six mm, as well as materials for creating facades, partitions and roofs. From plywood Let's make a frame at home and lay it on a smooth surface.
Gallery: layout of construction houses (25 photos)


Create a scan for a layout of the house with your own hands
 The process of the usual creation of sweeps No less interesting than working with their finished samples. To do this, you will need the program installed on the PC to work with graphics. It is best to take CorelDRAW or similar to it, processing vector image program.
In it, with an increase in or decrease in the size of the picture in the same ratio, the dimensions of the lines are changed, and the textures themselves. It helps to receive real images. Yes, and the library of the textures included in her shell itself, huge.
Fill in the texture detail of the scanner, you can find the ready visual view of the main parts of the layout. . The whole process, including the fill of the scan particles A specific texture, imposing certain effects and architectural details, as well as inserting pictures from the symbol library, will take from ten minutes to half an hour if the construction is not complicated. We will make a scan on our printer, and proceed to maquetting.
Creating complex paper products
The process of creating complicated huge layouts of houses is not very different from the previously described. Just such sweeps are made for individual parts of composite layouts.. On group photography of the entire assembly of such a layout, its individual parts and assembly scheme are shown.

Paper is considered one of the appropriate and simple materials intended for creativity. After the first months of life, the baby shows a lot of attention to pleasantly rustling paper, may be carried away for a long period of time. Keeping kids do not lose their interest in sheets and love to create a variety of objects. Masters really like when parents are engaged in them.
If you ask the crumbs, what he likes to do is often the house it will be. At the same time, make a paper house personally firmly love the guys of any age.

Probably kids, even if not always consciously, perceive the structure as the necessary life attribute. What way simply and in a short time to create a paper house?


Required tools, as well as materials
When you want to brighten a long evening along with your children, turn on the imagination, purchase glue, paper and the necessary tools. As for the paper, it can be diverse: thin from multicolored sets, airtal, landscape sheets, or wallpaper pieces. Scissors, pencil, as well as a ruler, and sometimes brushes intended for glue.

If there is a stationery knife, it is possible to equip the slots of the door and window openings as gently in a short time. You can take any suitable glue.

Directly from your imagination directly depends on the selection of items for the design of the created house. If desired, see the photo of a paper house on the site. Pencils are suitable, gouache, lace, as well as similar elements for appliqué.

You can create a fabulous object on the carpet of the coating, behind a small table, or on a spacious windowsill. The main smoothness of the selected surface and its scratch resistance, as well as glue composition.


Sketch
Creating a house children's paper of any design, it is initially necessary to develop a sketch. The start of the workflow is a drawing. Having a loss of an exceptionally small format to create a large structure, it is necessary to cut the existing drawing, focusing on the dotted, while performing all parts separately.

During the cutting of the drawing, you should not forget that on the right side should not be without bending for the possibility of applying adhesive composition, while it should be daughtered. It is desirable to add an outdoor surface to be added to the created house, which is convenient to place children's toys.

Combining pieces
The master class on the arrangement of the structure of paper provides for the location of door and window openings, through the slots and eliminate the required amount of paper. From one part of the doorway, it should not be done, and temporarily should not be covered.

Then you need to decorate the products, since at the end of the gluing it will be done problematic. The baby will gladly clarify the structure, or wakes it with a multi-colored paper. It is preferable to help the crumb to adhere to the equipped door.

For these purposes, a rectangle carved from the cardboard should be glued to the extreme part of the door, while the jamb will equip a slot - the structure will immediately acquire reliability and maximum comfort. The roof is well made under the tile by cutting the tiles of the required paper.

After that, the part of the structure is cut and proceed to the so-called construction process, conducting promissory, as well as gluing bends. Drying will take a certain period of time.

The created product is important to give stability by putting it, as well as gluing a frame of dense cardboard to the surface. Then the help of adults will not be needed - the kids personally will arrange excellent housewarming.

Using the instructions, how to build a paper structure, you can slightly complicate the design of the design, adding another floor, an attic space and similar details. The phase of the same.


More options
Round buildings are original. Ideas, as well as schemes of such paper structures, provide for the development of a sketch where the body looks like a rectangle. The connection of the product occurs exclusively on solid bending. In this case, the roof is drawn as a circle, after which it is manifold, and is also combined by glue with the body part.

However, you can create a building in unity with the roof. In this case, a lot of cuts should be made for the roof, subsequently glued to the flange for the arrangement of the conical form of the form.


With the great pleasure of kids create houses from Breus. The materials for the workflow are needed the same, but the technological process is absolutely different. In this embodiment, at the initial stage, the preparation of the required material is carried out.

From equal sufficiently long size of rectangular paper sheets through a pencil, brices are created. A wall surface is built from the prepared material.

There are several ways: the surface is glued with the compounds provided, or a dense laying of several tubes are carried out, which are shifted to the side in each next row. The roof can be shaped smooth or log.

Photo of paper houses


 Why you can not give icons
 Is it possible to give icons as a gift: Signs, the opinion of the Church
 A year ago left her husband, and now I do not know what to do