Luke of wood to the basement. Luke to the basement with their own hands: Constructions with an electric drive, a normal version and products with a retractable mechanism. Benefits and features of various covers
For a more convenient descent to such basements, it would be very good to make a special floor safe hidden hatch into a basement under laminate - a device designed to provide convenient and secure access to the room under the house.
Original masking of basement hatch
It is necessary to clarify that the multifunctional and its presence has a number of positive qualities - in it all year round can be stored old things, food and supplies, as well as construction tools, household materials, kitchen utensils and other property, which allows not to occupy an excess room. In addition, the storage of things in the basement is much more convenient than in the barn, as they will always be in close proximity to you.
One of the necessary conditions for the basement is the preservation of the same temperature of the temperature regime throughout the year. You can achieve this goal if you correctly make an outdoor modern hatch into a basement for a laminate with compliance with all the main technologies, which will provide a basement room with good thermal insulation.
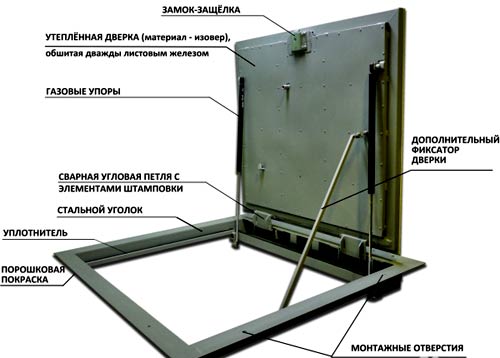
The names of the elements and the design of the hatch in the basement
It is not necessary to make an outdoor insulated hatch to the basement under laminate at all, it is not necessary to leave the appropriate order in the welding workshop. The only possible problem is that a number of necessary building materials can ask you to purchase independently, since they are not kept in the workshops or construction warehouses.
To purchase all the materials best taking into account some reserve, especially since all the excess remains that are formed after construction will be returned to you with the finished hatch.

Valuation of a base hatch made to order
So, in order to make a modern safe outdoor hatch under the laminate in the workshop conditions will be required:
- standard loops for entrance doors;
- castle with a snatching mechanism;
- several metal corners;
- metal tube (for frame);
- steel or aluminum material in the form of sheets;
- metal rod that will be required during the construction of a hatch for the manufacture of a knob of a removable type;
- plasterboard sheet;
- ordinary shock absorbers from the car;
- metal nuts.
Read also
Celebration device in a brick house
Also, masters in the welding shop will preliminarily need to make a detailed scheme or draw the exact drawing in order to build a high-quality floor hatch in the floor under the laminate. 
It is virtually impossible to make it from scratch independently, if you do not have certain knowledge in the calculation of permissible loads on metal designs and construction skills.
However, on the Internet today, you can find a number of already ready-made projects of hatches in the floor, which are in free access. They are easy to partially finalize or transform into account individual preferences and wishes.
Independent manufacture of basement hatch
First, let's consider in detail what the requirements must match the safe basement hatch in the event that you decide to make it with your own hands, pre-drawing a detailed drawing of the design:

Before starting to install a floor hatch, which you decided to build yourself, you need to prepare all the necessary tools and materials in advance:
Original basement hatch decor in a wooden house
- metal corners;
- sheet metal material with an exemplary 4-6 mm thick;
- rubber;
- welding machine and all related items for its safe operation;
- electrodes;
- self-tapping screw;
- scroll or shurtholder;
- bulgarian;
- electric drill;
- roulette or other measuring materials.
Before you begin directly to the construction of a hatch with your own hands, it is originally necessary to make a special framework. It is necessary to build it taking into account all the proportions and technologies so that it is ideal for the overall design.

Construction and drawing of basement hatch
To do this, with the help of a welding machine from the corners and other metal parts, you can construct the workpiece for the main part of the hatch design, the form of it must have a view of a square or rectangle.
It is necessary to leave a small gap between the part of the frame and the discovery, which will be required for the installation of the seal material. The optimal width of the gap is about 5 mm.
At the further course of work, you can make the following notes and give some general advice:

Details for which you need to pay special attention in the manufacture of a basement hatch
Regardless of how you decide to do - order the manufacture of a hatch in a welding shop or make it yourself, it will be necessary to adhere to the following general recommendations:
- When choosing a metal corner, you should pay attention to the fact that they are strong enough, as this is the part that will take on significant loads. The optimal option is the use of angle no less than 5 mm thick, such dimensions will allow it to preserve it geometry and not subject to deformities even with very strong loads.
- If when installing the hatch you will be guided by car shock absorbers, it will be necessary to trace the lid to be reliably fixed and fluttered during operation, otherwise it can lead to different injuries.

An example of a set hatch cover with shock absorbers
If the shock absorber does not cope with the pushing out of the cover, the hatch door simply will not be able to open. Therefore, the power of the shock absorber must be carefully investigated: when the key turns the key, the lid is obliged to rise easily and smoothly. The power of the shock absorbers, as well as their number, can be determined with accuracy only during test tests of the design of the structure. It is also necessary to correctly distribute their location so that the lid is rising strictly at an angle of 90 °, otherwise the mechanism will quickly come to disrepair during operation.
- It will be necessary to find the right balance in the location of the plasterboard panel. If the height is too low, the shrouded cover will not open with the tile. If the height, on the contrary, will be unnecessary, it will be above the floor surface.

Scheme for mounting basement hatch
- It is best to use the technology of hidden mounted loop by analogy with how this is done on vertical doors. However, the complexity arises with the basement hatch, due to the fact that the door has a cladding, the thickness of which can reach 1.5 cm. To do this, it is necessary to consider the minimum requirements for the gap to leave. The process requires a separate study and calculation relative to the design of the loop, which can help qualified specialists.
- All gaps should not have direct contact with other elements of the hatch when opening it, otherwise it threatens the clamps in the loop area.

An example of mounting fasteners
When using the method of installation of hidden loops described above, competently thoughtful gaps with the same distances between elements of the facing should be formed.
- The ideal design is the one that has a dispenser-front opening. In other words, the hatch cover should initially rise upstairs, and then to move aside. If you follow all the listed recommendations, it should be exactly the option that is considered the most reliable, and will provide you with the durability of the basement hatch.
In conclusion, I would like to note that if we qualitatively and competently produce and install the hatch, it will save free space inside the residential premises, and with a proper approach and to hide the presence of a descent on not to harm the design and decorative attractiveness of the residential premises. For many homeowners, this is a prerequisite.
Purpose latch attic
Types of ulives
Location of the hatch in the attic in the concrete floor
How to make a hatch on a wooden floor
Install the door on the attic in the ceiling with your own hands
Thermal insulation of Vala
Comfort Creation Tips
When creating your own home, you need to take into account all the details, even smaller.
Any disadvantage that is already at the initial stage of the operation can cause problems as a draft or unpleasant odor. Very often, the stewards ignore or simply do not remember the small design element and the hatch in the attic.
In most cases, this design is replaced with a thin lid.
As a result, the cold air leaves the room from the attic, the wet pairs from the room rises, causing the destruction of isolation. These reasons require soil in the attic to be installed in accordance with all the rules.
Before making a hatch in the attic, it is important to know that this design is designed to perform the following functions:
- Protection from cold.
- Obstacle on the path of the emerging steam.
- Restricting access for rodents, which very often equip their nest in the attic.
- Free entrance to the attic.
- Some bulkheads in fire mode in case of fire in the lower rooms.

Refractory flap requires special attention.
Therefore, the question arises how to build a flap on the ceiling in the attic that the design prevents the spread of fire and protect it from toxic gases and smoke.
To do this, you need to make several layers of insulation from different materials. Each layer has an individual expansion rate under the influence of high temperature, which avoids the current ignition and destruction of thermal insulation.
The heat insulation layer is necessary for the damper, since pairs of this case will rise through this hole, which leads to the fact that the roof isolation will absorb moisture.
Types of ulives
To solve the problem, how to make a hatch in the attic with your own hands, you can use two ways:
- A simple option is one lid.
- The complex method consists of two coatings, one of which is made in the form of a sandwich.
Standard doors in the attic with their own hands - a wooden frame, lined with fibers.
They include an inner cap from polystyrene 3-6 cm thick, often performed with a compression thickness of 3.5-6.5 cm, as follows: .. On the field using saws, pull the groove in which the round transverse seal section is installed.

The opening of the opening can be metallic or wooden with additional insulation or without it.
The main element of the lid is a mechanism with which it will be open and closed.
The height of the intake should correspond to the parameters of the ladder, which are part of the design.
In most cases, these parameters do not correspond to the thickness of the attic, but complications are very rare.
Today you can meet the throat equipped with a rack flame cover.
This element has one-sided or double-sided protection, and the lateral parts of the design are made of metal. Such a flap structure can resist the spread of fire in half an hour.

In some models there are elements of fence that can be used for rooms of cold and residential attic. If the intic entry is performed very often, it is better not to neglect such an agreement.
The space can be an integral part of the stairs or sold separately.
On the products produced by most modern manufacturers, the parameters are listed in its pure form. Therefore, the flap has a certain external size for which the hole in the ceiling must be longer than a few centimeters.
However, sometimes the manufacturer specifies the exact opening parameters, which means a smaller size of the flap.
Very often you will find unpainted models. This allows you to paint depending on the interior of the apartment.
Industrial roof stairs comply with German DIN standards, which corresponds to the parameters of European buildings. Houses in Russia are built in accordance with other standards, so the attic door should be considered in advance.
Simplify the process when you can buy a staircase with a staircase in advance. In this case, the hole is installed in accordance with the Purchase Model.
Independent manufacture of the flap allows you to build a design by the parameters of the attic space.

Standard roof - flat plate thickness from 16 to 20 mm. The manual cover in the attic has a slightly large thickness of about 32 mm. The frame sews a sheet of fiber cardboard or chipboard filled with foam or polyurethane foam.
Advanced insulation has a thickness of more than 30 mm.
Among the novelties include covers that have a tangible function. The design includes the use of a folding staircase that does not collect dust. That is why even after a long break, the lower staircase does not cause unpleasant sensations. Since the parallel layer of dust serves as an additional insulation, the consumer receives double benefits, while at the same time solving the problem independently isolate the door in the attic.
Location of the hatch in the attic in the concrete floor
Setting the hatch in the attic with concrete overlap looks like this:
- Check the place where the hatch must be installed.
For convenience, you can use meter, ribbon and pencil.
- The use of a tick in concrete, overlapping through the holes in the corners of the elongated rectangle. To do this, you need to perform a drill, the length of which is greater than the thickness of the concrete overlap.
It is important to monitor the vertical in the drilling process. Through the holes, they will help you navigate when you make a brand below.
- Using a sandwich, which has a special disc for working with concrete, it is removed along the edge of the wave front. This will detect the gaps in the overlap and ease drilling.
- Concrete in the identified weak points should be interrupted by a hammer hammer and concrete concrete should be removed with a racket.
- Finally, the reinforcement rods must be cut and finally leveled with a diamond coating.
How to make a hatch on a wooden floor
You can create a square shape aperture for a hatch in the attic in the most wooden ceiling, the process consists of pretty simple actions.
But if you plan to open it circle, pay attention to some shades.
Luke in the attic - we will organize a comfortable LAZ without the help of experts

In this case, the tray must be cut out, which is required in accordance with the following instructions:
- The ceiling of the residential floor is made a mark of the future hole, and at the same time the end thickness must be added to the planned sizes.
If you use a shortcut at the top, there are problems that you can use a simpler option: prepare a model of aperture in the floor in the room, and then use a pencil located on the bottom of the attic.
- Then install the props.
It can be wooden sticks or jacks.
- In the middle of the proposed opening, the through hole is drilled, which implements the measures listed below.
- Now you need to go to the attic and insert a metal pin into the hole. A string and pencil draw a circle in the attic.
- He saw a hole in an elongated circle. The historical ray on the cutting path must be missed and can be cut after the main part.
- Make bending materials for the formation of aperture in the form of a circle.
Install the door on the attic in the ceiling with your own hands
Stretch ceiling is a complex design, therefore, if possible, you should not post such a ceiling in a place where it is planned to get out of the attic.
However, it may be necessary to install a hatch after repair. In this case, the process has some problems. The main problem - the material can be easily damaged during the installation of the hatch. But cautious precautions and the following instructions will help you find a solution. The purpose of this work is to cover the upper ceiling from the total background of the ceiling, without harming the outside.
Detailed step-by-step instructions are as follows:
- At the first stage, the frame is made, for the manufacture of which it is necessary to fill the wooden blocks around the perimeter of the alleged hole.
- The aluminum ceiling profile is attached to the rods.
- Now, along the periphery of aperture, you must define the ceiling profile.
If the arrangement of the hatch in the attic is an inclined plane, an additional separation profile is required.
- Then make measurements from the hatch yourself and take the tissue like a common ceiling.
- Install the ceiling, squeeze and secure the entire design to the opening.
Thermal insulation of Vala
Buying a manufactured shutter with stairs included, you do not need to worry about the isolation of the exit to the attic.
In most cases, the design is produced isolated. When a self-sufficient wooden valve in the attic is neglecting the degree of thermal insulation, it is not recommended. And the process itself requires careful consideration.
The kit has a ready-made attic with a hot shovel, which includes a particularly cost-effective heat plate located on the front of the lid.
The presence of these elements creates the desired effect and prevents heat loss. Mine location with your own hands means heating the closure cover with the material used for the attic insulation.

Before you make doors in the attic, you need to get acquainted with the process of self-defense flap, which consists of:
- First, you must prepare a sheet of plywood and thermal insulation material.
- Now you need to measure the discovery.
- According to the data obtained, the frame is made of plates with a thickness of no more than 3 cm.
- Now you can start making a hatch cover, it should be slightly smaller than the hole.
It will be closely isolating insulation.
- Then place the layer of steam fence, all attached by glue or wooden stripes.
- Completes the installation of an insulating sheet of plywood, which closes the lid.
- The lid on the attic arranged in accordance with the common interior of the apartment.
- Do not forget to treat wooden doors with antiseptic solutions.
- The end cover is attached to the holes with screws and loops.
To get to the attic, it was more comfortable, you can listen and make some tips from experienced masters:
- To comfortably climb the attic, you can build brackets around the hatch.
- For quick and easy opening, you can make a special loop on the lid.
And if you make an elongated handle, you can open the exit to the attic without an additional rack.
Thanks to the special drawings of the box in the attic, you can work, without spoiling the overall interior of the room.
In a wooden house, make a hatch in the attic
The porch very often serves as a replacement of the warehouse. Here you can save things that are used little in everyday life and occupy space in the living room. To easily enter the attic, you need to make a convenient input. The article tells how correctly and quickly make a hatch in the attic.
How to choose the right flap?
There are two ways to create a hatch in the attic.
first Of which there are holes on the front side, where the attic door is installed on it.
It has a big advantage, as it will not prevent the ceiling integrity. To use the neck, it is best to place additional stairs. This option is not cheap.
other The method is simpler because it includes an entrance to the attic through a hole in the ceiling.

When choosing a place, you must consider the fact that the opening and closing of the lid should not have any problems.
The appearance should fit into the inside.
If the ceilings are on the ceiling in the room, you must make sure that the lid is not above them, since the overlap will not be too strong.
When installing, you must take into account that the design should:
- have a simple installation;
- they are attractive;
- be reliable;
- Get warm.
If necessary, you can use accessories, namely gate and handles that can simplify the process of opening and closing.
Types of mansard halls
Using the installation method more various shafts.
They can be:
- vertical;
- horizontally;
- angle.
Fire valves in the attic vertical type are very convenient for use, they can be built with their own hands.
As for the second type, horizontal products are mounted on the ceiling surface. The last type is located exclusively in the attic.

The most common is a hatch for attic from metal, wood or plastic.
Especially popular wooden products.
Loft technology
To build a attic, instructions:
- Make a drawing with which you can determine the exact shape and size. Some structural features are also taken into account here;
- Plates with a thickness of more than 2 cm should be used to make the product frame.
You can create a rectangular design with a suitable size;
- It should be noted that all angles are rounded. The valve of the standard type is 600 x 1200 mm. It is worth considering the weight of the category of people who will be used to determine the necessary parameters;
- Another important step is to create a discovery.
It must be 5 cm above the flap. Such an additive is used for frame frame;
- If the work is performed in the house, you need a tree that is cut from the ceiling to make a hatch. Another option is to buy a right-size tree;
- Because the material is worthy of the choice of larch, because it has good performance and durable properties;
- The hood must have high strength.
There is a strut that can be fixed with self-tapping screws and corners;
- To ensure isolation, it is worth choosing high-quality isolation. In such systems, mineral wool is usually used;
- Next Stage - Installation of Accessories. Since the installation is performed around the perimeter, you can avoid cold air to the room;
- The inner part of the hatch is in the frame and on the ribbon. This allows you to improve its appearance;
- The last stage of the work is to install the stairs.

The advantages of the flap
If you decide to use Loft with a staircase, you must consider them privileges:
- high functionality.
You can easily fold the staircase or use it for home purposes;
- for such a system, a good compactness is characteristic. The door is in the attic when it is closed, connected to the ceiling, so they do not see the view.
How to make the right flap in the attic: work order
To achieve the vertices, you must completely decompose the structure;
- reliability. Since the throat is made of durable materials, they will serve you long enough;
- Easy installation. Setting the hatch and stairs to the attic will not consume a lot of energy;
- easy to use.
Accommodation
Setting the hatch in the attic should occur after the scheme. It is important to note that this process consists of several stages.
The first one is a drawing of a secret drawing for the attic. This will be strongly dependent on the height of the attic and the position of the hatch. After that, you must choose the appropriate location of the flap. If we give an error here, it can not be repaired in the future, because the ceiling will be a hole that will be quite difficult to hide.

Next stage - Making holes for the hatch.
Since the design is equipped with special strips around the perimeter of the product, the main task is to create a clean hole that will correspond to the size. The fourth phase is to align the holes and install the valve. It is important that you carefully worked that the flap is beautiful and clean over time. The most important step - attaching the loskuta.
Here you need a lot of tools to ensure the reliability and durability of the structure. If you want, you can set the floor in the attic.
If you decide to build a hatch in the attic, you can choose any type depending on the size of your home. It is important to choose a high-quality design, with which you can climb and descend. Use the room in the attic rational - install the heated flap and folding staircase.
Features of making an attic hatch with their own hands
So, the introductory: already there is a roof above the head and the ceiling is insulated. At the same time it is necessary to use the attic room, so much space should not disappear for nothing. Should the grandchildren and great-grandchildren somewhere to look for decorations on the tree? (See Prostokvashino) Previously, people were not bored, did the door in the frontonone, put the staircase and used the attic.

At the attic very often harvested hay for livestock, at the same time it was an additional layer of insulation for the house.
If you have reached this stage of construction yourself, then make a hatch in the attic with your own hands for you will not be difficult.
I will start with the fact that it will go about the hatch, which will be located in the ceiling of the boiler room. This is a technical premises, there you can install a reliable ladder not experiencing especially for aesthetics.
Introductors: Need a warmed hatch in the attic, spacious enough to pass quite large items through it.
In theory, the hatch should turn out to be sufficiently heavy, so it is necessary to consider how to open it and close with the maximum convenience.
How to make a hatch in the attic
Let me remind you that the distance between the ceiling beams is 55 cm.
This is enough to drag the 250-liter plastic barrel from which I did a solar collector. Checked! The long attic way was decided to make more meters, and a more accurate value was determined by the multiplicity of the boards when the ceiling washed.
How to make a warm hatch in the attic with your own hands: simple and useful instructions
As a result, the size of the hatch turned 55 × 115 cm.

Please note that the boards of the side, which is located on the opposite loop of the side, must be slightly tilted so that the thick 20-centimeter hatch does not taking its lower part, the upper part of the attic.
To give a rigging hatch, you need to make a diagonal strut.

Warm hatch in the attic
The hatch is insulated in the same way as the rest of the attic, if it is made on wooden beams, of course.
First, the layer of vapor insulation on the bottom of the hatch is stacked.


Large white spots on the photo, it's highlights from dust flying everywhere.
Use respirators when working with insulation, otherwise the cough is provided.
That's all! The ceiling hatch is ready and stops it from falling down while only a small bar, which later I will replace the thick plywood on the size sheet. All over the perimeter, it is necessary to cry the window seal so that there is no cracks.
So the hatch looks below

Ceiling hatch opening system
Open the hatch on the attic that another problem.
I decided her with two such blocks, carbines and ropes, which already a little appeared in the photos above.

The point is to stand at the bottom to pull over the rope and open the ceiling hatch into the attic. Blocks are attached to the rafter system in convenient locations.
A hole flies through which the cord is drilled.
Open hatch can woman, attaching a slight effort. On the video below it can be seen))
After the hatch was laid down and insulated, he began to weigh a little more, but it was not particularly very discovered. The hatch is fixed enough. The ring for which it is necessary to pull, dresses on the hooks.

It is little reminded by a ring))) I wanted to poke the daughter from the tubing, but received a refusal of tough form.
Therefore, so far so, and in the future I will find a normal one.
Thus, it turned out a warm hatch into the attic, made with his own hands.
If you firmly decided to actively use the attic room, most likely, you will have to make a hatch into the attic. In the villages in the old years with this task they coped very simply - it was enough to use the inlet staircase, but for a modern person such a dubious way can hardly be called suitable. Definitely, it will take convenient LAZ from the inside of the house, and not outside, as practiced earlier. There are ready-made solutions on sale, but their installation will still have to do it yourself, and the dimensions of the design may not go. This article will talk about how to make the roof of the house inhabited.
Buy or make it?
Extension of stairsThose who plan to buy a finished product can take advantage of the instructions for its installation, which will also be provided in this article, and wishing to make a comfortable hatch in the attic will be interesting to fulfill full information about the process we offer to read. So, we give some important nuances that will be useful in the work:
- choosing a place for opening Choose with the calculation so as not to hit your head about the rafting elements or roof at the time of the rise.
- under the beams of overlapping, the entrance to the roof of the house is not built;
- if the upper floor is still not insulated, you will have to make thermal insulation;
- the opening must be strengthened. Wooden beams are suitable for wooden structures, and in concrete houses, the amplification is carried out with metal corners;
- it is necessary to provide free space under the hatch for the retractable staircase.
In the event that the hatch together with the staircase you will do yourself, do not be lazy to carefully examine all the stages of the process, then you will not come across difficulties in your work, and it will not seem difficult to you.
Stages of manufacture
Before making a hatch to the attic, you need to make drawings on which all the necessary measurements and parameters are noted: the thickness of the overlap, the size of the lid and the opening, which will be cut. Note that insulated rooms can be supplied with a conventional lid, while cold will require its additional thermal insulation. It doesn't matter how you will form a circuit - from hand on paper or in a special computer program, the main thing is to take into account all the necessary dimensions. When the scheme is compiled, you can proceed to the practical side of the question, as well as prepare tools for work.
Cutting opening
 Cutting Opera for the attic
 If at the stage of construction of the house of LAZ on the roof was not provided, you will have to cut it on your own. Of course, if such a hole for installing the door is already there, this stage of work is passed.
To begin with a markup with the calculation that the hole must be more dimensions of the hatch frame to 5 - 6 cm. In the future, the gap will help compensate for the thickness of the boards, of which the frame will be made. Material from a dranched piece of ceiling overlap can be used for lining facing, of course, if it has a normal aesthetic appearance.
Assembling a durable frame
 Assembling a whean frame for the attic
 Here we will need boards with a thickness of 2 - 3 cm, it is such a caliber that will make it possible to make the basis of durable. Frame may have a round or square shape. The second option provides for the mandatory directness of all angles. Standard can be considered the size of the frame 60x120 cm, and such dimensions are suitable for the absolute majority of homeowners. You are focused on personal preferences and gabarits of the opening, you may want to increase the Lases on the roof of the house, but we do not advise you to do it less. After assembling, the frame is mounted on its seat in the ceiling opening.
Mastery lid.
 Hatch with lid on the attic
 As mentioned earlier, the most common lid can be collected from the cut out of overlapping residues, which were formed as a result of dipping the opening. The assembled door must be reinforced from the back side by the transverse bar. Then it must be fixed at the selected location with loops located along a long or short side of the cover. Look at what way you will be more convenient to open the door, and only then proceed to securing it on the frame. Also, think about how the hatch should be opened, leading to the roof of the house, inside or outdoor.
We are insulated and finished
 Insulation diagram Attica
 The question with insulation, as we said earlier, will fully depend on the degree of thermal insulation of the upper floor. The insteaded floor can cost the elementary layer of isolation, but we advise sound insulation to pay attention. Naturally, the cold room needs a high-quality scale insulating cover. For this, you will have to lay a layer of a vapor barrier membrane and a layer of insulating material according to a standard scheme for a similar process. At the last stage you need to make an external finish.
As you already understood, so mounted the easiest hatch leading to the roof of the house. More complex solutions include a design with a retractable staircase. The assembly process here is performed by a similar scheme with some differences.
Complex structures
 Installing the ladder for the attic
 Luke in the attic can be recycled by a stationary staircase. Here, work begins with the teething of the opening. The further course of the process depends on what kind of design you choose, and in what order you will be mastered. Immediately make a reservation that work on the assembly and installation of the hatch with the ladder in this case will be somewhat more complicated than in the above version. Be sure to ensure that all the dimensions of the interacting elements coincide:
- retractable stairs;
- doors;
- opening;
- ceiling overlap thickness.
All these parameters you can measure yourself or remove from the purchase product if you do not make it your own hands. In this case, the lid should have a space that holds the longest part of the retractable staircase at the assembled position.
Also remember that the weight of the staircase must withstand with a lid, otherwise it is not to avoid breakage, and in the worst case and injury. We must not forget about a reliable latch, which will finish hold down the design in the frame of the ceiling opening.
All the processes that we mentioned are schematic, but if you decorate the hatch yourself in the attic, you do not need more detailed information, because certain skills you most likely are present, but we will not interfere with the general recommendations with an illustration. The same one who buys the finished hatch to exit the roof of the house can take advantage of the instruction on its installation, which is necessarily attached to the product.
Almost all private houses have a private basement or cellar. If the entrance to it is in the floor, it will be necessary to make an outdoor hatch to the basement. How to make such a hatch, largely depends on the characteristics of the structure of the rise and its location. Creating a hatch to the basement with your own hands implies the manufacture of drawings, the choice and acquisition of materials from which the design will be created. The hatch to the basement, first of all, should be completely safe and convenient for use.
Features of the hatch device
The basement has many advantages, including it acts as storage premises, and also allows the floor on the first floor better to maintain heat. The main minus is the high cost of creating a basement, so most of the owners of the houses are engaged in the manufacture of opening in the floor and installing a floor hatch to the basement with their own hands.
To install the hatch you need to think over all stages of work
Features of the manufacture of opening in the floor allow you to save significantly, but for the successful completion of the project you need to think in advance all the details:
- Develop a detailed drawing.
- The choice of installation site is also important. Furniture or other items should not interfere with the lid freely open.
- Set the optimal size. In this case, the internal opening should not be less than 75x75 cm.
- Choose materials that can make the design strong enough, but not heavy, and also fit into the interior.
- Select the optimal option for sealing and thermal insulation of the lid. Warmed hatch in the basement will not allow the cold air to penetrate the house even in winter.
Often, the hatches are equipped with a lifting basement mechanism, which ensures the smoothness of the movement and allows you to fix the lid in the same position. In addition, an electric drive can be installed on the hatch, which will not allow animals or small children to penetrate into it.
What materials do hatch in the basement
For the manufacture of hatch there are many materials. Their choice of a lot depends on the overall interior of the house and floor covering. With the correct selection of materials, you can make a hidden entrance to a basement, which will not disturb the general view of the room.
In this video you will learn how to make a hatch:
Luke in a basement from a tree
If the floor covering consists of a wooden board, then it is recommended to use a tree to mask input to the basement. In addition, with its help the load on the entire design will be significantly less. If the LAZ itself has dimensions of 80x80 cm, then the lid must be slightly smaller. It will provide free adjacent covers to the floor.
Important! Between the floor and the lid, it is also required to leave the gaps of 4-5 mm. This will provide free air circulation.
Production of wood design is carried out according to the following algorithm:
- Keep 4 supports from the bar on which the cover will be lying, to the rough flooring from the basement.
- Prepare wooden blanks of a long 79 cm made of wood for floors and rails.
- Cut the square 79x79 cm (must be 10 mm less than Laza itself).
- Treat all parts from wood with olifa or other substance that can protect the material from moisture and fungus.
In height, the hatch should be equal to the piston and black coating, which is achieved due to the multi-layeredness. This design usually has a slight weight, so that it can be attached to ordinary loops.
Metallic Luc
Make a metal design is much more complicated, but it is more reliable and durable than the previous version. For its manufacture requires:
- Cut the lid from the sheet steel is not less than 3 mm thick.
- Conduct the corners on the inside of steel throughout the perimeter.
Important! Using the corner, you can make the ribs of stiffness, in which then you can install the insulation.
- Clean all welding seams.
- Place the insulation, the size of which should not be more corner.
- To put the bracket with a steel sheet and get the edges with the help of a cinema, fasten with the help of screws to the corners.
Next you need to install the frame. To do this, it is necessary to cut the corners in compliance with the sizes of the hatch hole. Corners need to be welded with each other, after which with the help of anchors, attach to the concrete base. On the protruding edges of the frame, it is necessary to secure a small strip of insulation. At the very end, the lid is fixed.
 This hatch is much more practical
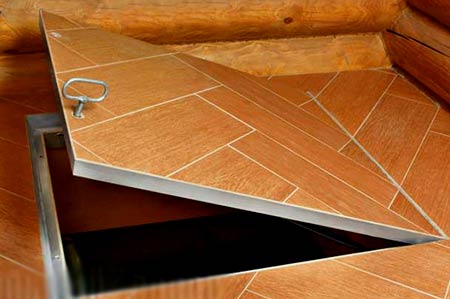
 Luke under the tile
If the hatch is installed under the tile, it will be necessary to initially create the necessary markup. The hatch itself in the underground does not fit on the tile, but is created together with it, that is, it will be necessary to make a metal frame, which will fall below the floor surface level, and the material itself is installed on it.
Creating a hatch comes according to the standard plan, with one exception: the lock must be hidden and not to have outstanding elements.
In short, the process looks like this: a metal base is created, a tile is placed on it with the calculation of the coincidence of the floor elements with the hatch.
Most often, accurate calculations are used before work. This will help to avoid inconsistencies and shortcomings.
Hermetica hatch to the basement
The hatch must be embedded hermetically, but at the same time not to interfere with a full-fledged move. If the entire floor indoors consists of a certain coating option, which cannot be damaged, for example, laminate, then the floor hatches are equipped with additional sealing, which does not interfere with the coating or the design itself.
Sealants are chosen depending on the combination with the materials that were used during construction work.
Electric drive
The electric drive is installed on the hatch for controlling the closing and opening of the basement. There are many options for arrangement, but even with the most simplified, additional markings in the size of the hatch will be required. This is necessary for a full-fledged course.
It is necessary to remember that the rods must be installed correctly. The electric drive itself will be located on the hatch cap.
Creating a retractable mechanism
The retractable mechanism is often used when arranging outdoor hatches. To create a mechanism, a small space is required under the floor, as well as a list of materials:
- steel sheet 2 pcs. Thickness 5 mm;
- set of metal rollers;
- steel rods;
- compact size electric motors - 2 pcs.;
- current source and electrocabolic;
- switch with three positions.
The retractable mechanism is convenient in circulation, but its creation and arrangement must lead a person with experience of such work.
 Each type of hatch has its own nuances
 Types of loops for hatch cap
Luke for the hatch in the basement is an important element to choose with special care. When installing the entrance to the basement, the following types of loops are applied:
- Overhead. They are attached to one side to the lid of the hatch, and the other to the floor or wall. The cost of loops can differ significantly depending on the degree of reliability, decor. The most expensive - wrought loops.
- Hidden. Mounted in the coating itself or internal frame, which allows you to achieve a dense fit of the cover to the floor. Such a mechanism will allow fully hidden the hatch from prying eyes.
- Pantographs. With their help, the hatch smoothly put forward at first, and then to the side. Regardless of the thickness of the material of the edge of the lid, the cover calmly leave the overlaps.
- Gas shock absorbers. With their help, you can easily raise the lid and fix it in the desired position. Such a mechanism allows without an application to lift heavy wooden or metal doors, located horizontally.
- With a drive. Allow free to open or close the large and heavy covers of the hatches. Most often used in the manufacture of metal structures. In turn, the drive mechanism is divided into retractable and retractable. The choice depends only on the desire of the master itself and the existing place.
The choice of loops must be carried out depending on the load that will be assigned to them. In addition, you should not forget about the need for backlash and corrosion protection.
Step-by-step instructions, how to make a hatch in the basement with your own hands
Before starting work, you should develop an accurate scheme of the Luke Location, taking into account the next furniture or passages. It is best to exercise the entrance to the basement at the construction stage of the house itself.
If the design will have a small size, it is recommended to use boards with a thickness of up to 4 cm, which you want to cut plywood, resistant to moisture. If it is assumed that an increased load will be affected, then a solid timber is recommended for the manufacture of frame.
Important! A few days before the start of the work, it is required to process all the wooden elements of the olifoy, antiseptic or hydrophobic impregnation. Only after complete drying can be searched for a hatch collection.
In the manufacture of a similar design of metal, it is recommended to take sheets with a thickness of 3 mm and the same corner. For the insulation of the basement from the residential, it is recommended to be insulated with a foam sheet.
In the manufacture of a design of wood, you need to adhere to step by step instructions:
- Keep into the black floor frame made of 4 bars.
- Collect the workpiece from boards and plywood, the size of which is 10 mm less selected.
- Install from the basement of the loop or shock absorbers.
- Cut a hidden handle.
- Fix at an angle of 90 ° lid and check the work mechanism.
Hidden hatches made of wood, worth making multi-layered. To do this, the first and outer layer is recommended to see the moisture-resistant plywood, and the insulation fill in the edges of the crate and the inner space. Be sure to leave the gap (10 mm).
Metal elements are easier to do on their own. This requires:
- Cut the doors that will match the selected size.
- Conduct corners around the perimeter of the hatch. If the design will have a large size, it is required to be fixed in the inside.
- To lay foam, the thickness of which will not exceed the height of the corner.
- Fix the insulation with a thin sheet of steel and screws.
- Cook and fasten with anchor metal frame.
- Attach reinforced loops with a closer to one side, and to the other, a small strip of insulation.
 Do not forget to follow the settings of the hatch installation
 Important! All parts made of metal must be previously covered with anti-corrosion facilities or paint.
If a concrete overlapping is made simultaneously with the input setting to the basement, then to bring the hatch to one level with the floor, it takes a slightly drowned by a frame of incures 1-2 mm.
Accurate compliance with markup is required when hidden mounting. On metal parts it is required to prepare holes for fastening with accurate observance of sizes. In the case of wooden hatches, it is necessary to make holes by 0.5-1 cm less required, as the fibers can swell.
The last stage is the installation. To do this, under the cover of the lid, it is necessary to put the bar, the height of it will be equal to the gap that is required to leave. Fixation is performed only when the lid is open at 90 °. At the end of the work it is required to check the operation of the mechanism. When jamping on any plot, it is necessary to shift and twist the loops.
Finally
Entrance to the basement, located on the floor, is a convenient way to organize the entire space both inside the basement and outside. Luke for basement with shock absorbers must comply with all safety requirements, as well as be convenient for use.
Installation of hatches for a tile can be carried out independently. To avoid probable errors, it is recommended to make a drawing of the entrance to the dungeon on the shock absorbers.
When entering the entrance to the basement, the reliability and quality of the loops used is important, the installation is not sufficiently durable or not withstanding the elements leads to a rapid separation of doors or complicates the process of opening them. In the presence of the correct drawing, the installation does not represent problems, the maintenance facilities include measures to extend the service life: inspection, twisting, oil lubrication. You can purchase the necessary accessories in any construction store, frame and cover in most cases are made independently.
1. Speed \u200b\u200boverhead loops, fixed on one side of the trim and on the floor or wall. The cost depends on reliability and decorativeness, the maximum costs are observed when using forged types.
2. Hidden, mounted in overlapping or internal framework and allowing the basement door to one level with a floor coating. When choosing this option, LAZ in the underground is easily closed by a carpet, only owners of the house will know about it.
3. Mechanisms with a drive that automatically tear down and closing heavy and massive hatches are most often metallic. This species in turn is divided into retractable and folding groups.
4. Pantographs that ensure the consistent movement of the hatch up and only then to the side. When using such loops, the edges of the door without problems are outlawed, regardless of the thickness of the materials. The best results are achieved when they are installed on wooden structures and doors with two sash.
5. Gas shock absorbers, closers and stops that simplify the lifting of the hatch from the cellar and allow you to fix it in the desired position. The main advantage is the possibility of raising the heavy door of metal and wood by one person with their horizontal location.
Regardless of the type of fasteners used, serious requirements are put forward in terms of withstanding weight loads, providing backlays and anti-corrosion protection. Loops, like handles, are purchased with a margin. With small size of the LAZ (in the range of 0.75-1 m2), there are enough two pieces set closer to the corner, in other cases the axis is enhanced in the center. The actively used hatches need edging of the edges with metal, this requirement is taken into account when selecting a backlash.

Description Kit "Cellar"
With independent manufacture and installation it is worth buying a universal set. Standard kit includes:
- Gas shock absorbers (stops) with the desired length and effort (from 500 N and higher).
- Fastening brackets, including wall.
- Hidden loops (left and right) with a bracket for a gas shock absorber and central without it.
- The assembly lock consisting of an assembly-lifting plate, a shut-off part with a set of keys that simplify the opening of the hatch and its uplift.
The set of "cellar" can be bought completely equipped, but in most cases not all of its details are involved. When installing a simple basement hatch without shock absorbers, there is enough central loops and a lock. Regardless of the selected configuration, the mount provides free opening of the LAZ with a minimum slot along its perimeter with a thickness of the floor coating to 1.5 cm. Hidden or hidden handles with brackets or ring are purchased separately. The cost of the details included in the "cellar" range varies from 150 to 1500 rubles, they are characterized by high quality metal and anti-corrosion protection.
Step by step instructions how to make a hatch with your own hands
Works begin with the preparation of the lid location scheme, taking into account future furniture and seats of the passages, if possible, the entrance is placed at the construction stage. For the manufacture of a small design of a small size, boards with a thickness of up to 40 mm, crossed by moisture-resistant plywood, with the expected intensive load of the frame it is better to build from a solid bar. All wooden elements are pre-treated with oil, antiseptics or similar hydrophobic impregnation. The metal option is recommended to do from the sheet steel from 3 mm and above and the same corner, to isolate the underground it is insulated with a sheet of foam.
In the manufacture of a tree, a simple scheme of action is taken: a frame of 4 pieces of timber is nailed to the draft floor: a blank is going to 1 cm. Less than the selected size → from the side of the basement, ordinary hinges are stacked or shock absorbers → in the desired location. The cover is screwed at an angle of 90 ° and is checked for jamming.
Wooden hidden hatches are recommended to create multi-layered, the best results are achieved when performing the first and outer layer of moisture-resistant plywood, packing around the edges of the crate and filling in the inner space insulation. The presence of 1 cm of the gap necessarily.
Wooden varieties are easier to make it yourself, a welding machine and a bollard with appropriate disks will be required. Step-by-step scheme of work Includes: cutting the doors made of metal with accurate dimensions → The welding of angle along the perimeter of the hatch, with a significant area, it is fixed inside the structure as additional rigid ribs → Laying of the polyfoam sheet with a thickness of no more height of angle → Fixation of the insulation . The next stage consists in welding and fastening the anchors of a metal frame, subsequently, reinforced loops and closers are mounted on one of the selected parties, to the other - the sealer strip.

When the lazium arranged in the basement with simultaneous laying of concrete overlap, there is no problem - for the output of the hatch for one level with the floor, the frame is sufficient for several mm deep. The handle is hidden in this case more difficult, with independent manufacture it is simply welded to the outer side of the metal. The exception is the types closed by floor materials, they require a special approach to fitting fittings. All used steel elements are mandatory coated with anti-corrosion soils or paints.
When carrying out a hidden installation, special attention is paid to the markup. On metal structures, the holes for future attachments are prepared in advance, all elements have accurate dimensions, when working with wooden knocked down or glued hatches, they are cut on 5-10 mm less due to the risk of fiber raising. During the installation under the door of the door, a plank with a height coinciding with the magnitude of the planned gap between it and the floor. Screws or self-tapping screws are screwed at a direct angle loop position. During fixation, the lid open and close several times until the smooth movement is reached, without a suggestion on any site. If necessary, the hinges are shifted and twisted, but in no case are not operated in an incorrectly fixed state.

To ensure a safe and long-term service, a number of measures are taken at the construction of a hatch to the basement with their own hands.
1. In homes with children, protection against the accidental opening of the door is provided, if necessary, a lock with keys is cut into it.
2. The outer part of the lid is separated by the same materials as the rest of the floor. To display the upper plane to the zero mark, the type and thickness of the floor covering are found in advance.
3. At least 1 time per year, rotary elements are processed with lithol or oil, with active operation, this gap is reduced. In lubrication, both attachments are needed and hidden loops, free access is provided by the cellar or from above.
4. Measures are taken on the insulation underground: the hatch is compacted around the perimeter and is insulated.

5. With a high risk of flooring damage to prevent the chalk at the time of opening the edge of the tile or laminate, addressed to the axial side, trimmed at an angle of 60 °.
6. The risks of pickers to the basement are excluded, the width of the corresponding supporting slats at least twice the size of the gap or the sealing layer.
7. The actively operated horizontal hatches are enhanced by the edges of the metal.
Temporary doors in the cellar will focus with a piece of rubber or simple canopies. If it is impossible to purchase factory-quality products, they are fixed on the loop from the hood of the machine with a spring mechanism. This option is also worth choosing with a large weight or need for a frequent installation in the open position. Car shock absorbers successfully fix both wooden and steel varieties.
Possible mistakes
The main problems occur when the upper plane is pinned with a floor marker, especially in the manufacture of a hatch under the tile with their own hands. An erroneous actions include the fixation of the door or screwing the loops before the installation of the floor covering or fit its position with a non-frozen concrete.
Open and modify the fastening is permissible only if there is a steady frame: the heavier design, the stronger the negative consequences. The disorders of installation and operation technology also include the absence of anti-corrosion protection for metal elements and antifungal - for wooden, the use of weak loops and ignoring the need for lubrication.
 Why you can not give icons
 Is it possible to give icons as a gift: Signs, the opinion of the Church
 A year ago left her husband, and now I do not know what to do