How to put the first row of a bar on the foundation. The technology of assembly from the construction bar of the walls of the house or the bath is the first row of timber how to do
Before the construction of directly walls, builders arises a reasonable question: how to put the first crown in the house? To set the first crown of the house with all thoroughness, using mathematical calculations so that in the future the walls are as even as possible, stand under a 90-degree angle. This work is not very difficult, the main thing is not to rush and carefully cook it.
Fastening the lower strapping and waterproofing under the first crown.
To put the first crown for the house from the bar, it is necessary to lay waterproofing at least two layers, after that - a lining board, and on top of it there is still a waterproofing layer.
It is important to provide an effective waterproofing system for the foundation before starting laying the first crown of houses from the bar. For these purposes, the runneroid is placed twice, and then they carry out one-time laying of "glassizola". All layers must exceed the width of the base by about 25 cm along the entire length of the perimeter.
All bars who are laid must closely pressing each other. It is unacceptable to form even small emptiness in the wall, and especially in its lower area. Because in the future it is at the bottom that floor hanging occurs and the greatest loads will be provided here.

The attachment of the bars each other is produced on metal brazed, deepening into a wall of 3 cm, finishing with a wooden Cyan. If there is a slight bend on a bar, it is placed by turning the book with a flat face. In some situations, it is necessary to additionally fasten the lower bars with nails or brackets that put in two crowns of a bath or sauna from a bar.
Before the direct laying of waterproofing to the surface of the foundation, it is necessary to check that its outdoor plane is clearly horizontal. Check the foundation horizontal with a hydraulic level, since an ordinary level often shows some error. The tubercles-snaps should not exceed 1 cm over the entire surface of the foundation. When irregularity is more than 1 cm, the surface is aligned with a solution or another layer of waterproofing.
What to choose a bar for the lower crown of a log cabin?
Suitable quality material should be prepared in advance. The first crown for a bath bar must be formed by material that differs from its high quality characteristics:
- Bruks should pick up even.
- Suchness on them should be expressed not very much.
- A material with a bluish shade is better not to use, it will not fit for laying the lower crown.
- Bruces with the maximum density of the rings should be taken: this raw material is made from the middle of the wood.
Back to the category
The assembly scheme of the first crown of the house for a home bar

Before starting the wint of the crown on the foundation of the house from the bar need to be thought out and ensure the durability of the entire design as a whole. For these purposes, the rails are laid out, pre-treated with an antiseptic, which in the thickness are 10-15 mm. Between them make a gap 25-30 cm.
Reiki is needed to eliminate the contact of the crown of the house from a bar with its foundation. This measure allows in the future to extend the service life of the log bath due to the provision of additional protection against rotting.
Sequence of an assembly of a crown for a bath from a bar
- The first layer of Bruusyev is put on the racks. The emptiness between the timber and the base is gate.
- After that, with the help of the level, the levels of surface measure are measured, since with an uneven lower crown and the wall will also be a curve.
- After the elimination of emptiness defects, they are filled with mounting foam.
As noted, the harvesting of the bar should do in advance. We repeat that it should be with a minimum of bitch, without blue and to be even with a high density of annual rings.
Processing the first crown of timber stands in obligatory, and it is necessary to make it necessary, several times wrapped all the wood with a bitumen mastic couple with the development of the mixture to make the mixture as deeply as possible in the bath bar. You should not only handle ends, because they must be perfectly free to the excess moisture in the tree can be excreted through them. The quality of the wood processing will depend on the life of the lower crown and the period of time through which the need for the replacement of an old timber will appear.
Often, the first crown is not attached to the foundation - under the weight of the house he will not move from the place and without anchors. At the corners of the joints make straightflash, bars joking ends. Bar in the corners during the adjuncing partitions are connected by plates or metal brackets.
How even the future structure will be dependent on many factors. It is important to clarity of the initial markup of the axes, the correcting of the foundation, ensuring the horizontal level of the level of the upper cutting of the base or painter, as well as other, no less significant moments of the building process. The list depends on the design features of the object, which, in turn, determine what exactly pay attention to. For example, for a brusade house, the decisive stage of work is to carefully laying the first crown on the foundation. It requires a thorough and leisurely approach, compliance with technology and regulatory requirements.
Waterproofing device
At the junction of the foundation with walls, the waterproofing layer is mandatory. Initially, the top horizon of the base or scolding is aligned. Most often, a concrete solution is used for this, which allows you to highlight the surface. In the case of a metal strapping of piles, the headbands on which the profile element is placed in the level.
It should be understood that the lower crown assumes not only the most significant loads from the ground part of the structure, but also contacts the foundation. In the absence of hydraulic protection, the capillary moisture will begin to rise up, as a result of which the wood will worset. This will result in raving the timber, the appearance of mold and the gradual destruction of the wood structure as a result of the rivalry of the fungus. In this case, even the best antiseptic impregnation sooner or later will be powerless.
Laying of waterproofing refers to the most important stage of the construction of a church, so it is not allowed to exclude it from the list of work!

Quality Bruus
The sawn timber for the first crown must be selected taking into account certain requirements. It should not have bitch and blue, and all of its four surfaces should be smooth, without jar, depression or sharp bends. The timber must be treated with antiseptic and flame retardant. Even if the seller assures that the material was impregnated in production conditions, truthful information about the thoroughness of processing, circumstances and storage timing, he will not be able to provide. So it is better to be restrained.
Buying a timber bar from solid wood, it is necessary to pay attention to its transverse cut. High-quality material has a medium core location and uniformly removed from the center annual rings. When the sawn timber with another "pattern", problems associated with various wood deformations - bending, twisting, strong cracking, etc. may appear.
As for applying to the ends of the whole timber of the film-forming composition, various opinions can be heard. Some opponents claim to "seal" cross sections need to be immediately so that moisture from the wood did not leave too fast. Others lead arguments about the inadmissibility of such actions, although agree that the ends need to be squeezed. For these purposes, they recommend using clay, lime or water-emulsion. The film also prevents moisture output by naturally, as a result of which foci of rotting is formed inside the trunk. In fact, both sides to some extent right.
Technology of installation of the lower row of a brusade house involves a certain sequence of work. First, on the foundation on top of the waterproofing layer, with a step 25-30cm, the racks with a thickness of 10-15mm impregnated with an antiseptic. The gap is further filled with the mounting foam. Next, they mount the first crown of the brusade house. At the last stage, the horizontal of the laser bar is checked using a construction or laser level. If necessary, the spatial position of the crown is adjusted until the required results are obtained.
Put the first row of timber should consider the correctness of the design of the corners. One side should be strictly perpendicular to another, with the exception of projects providing for the complex shape of the house in the plan. After installing the lower crown on the foundation, the correspondence between the dimensions between opposite angles is also checked. If the structure is rectangular, both lengths must match.

Fastening bar
In this matter, among the masters, disagreements arise. The first are convinced that the erected log house is able to reliably press the first crown to the foundation, so the sustainability of the house is ensured, based on the laws of physics. By the way, replacing the loose-like bar if necessary, it will also be much easier and because the angular joints here are connected not to the castles, but with brackets or metal plates.
If the length of the walls of the house exceeds the identical size of the sawn timber, then the mounting of the bar to the foundation is likely to be required.
Representatives of another group of specialists have their opinions. They prove the need for tight fixation of the lower crown to the foundation by anchors. They assure that this way will be easier to maintain the right geometry of the cut in its construction. In addition, the house on the piles attaching a bar to the underground part of the structure will give greater stability.

Well, both ways have the right to exist. The main thing is that work on the laying of the first timber on the foundation was carried out carefully, without excessively athletes. Then the house will stand longer.
Laying the very first crown of the house from the bar must be performed very thoroughly and with a mathematical approach so that the walls of the houses stood exactly at 90 degrees. Correctly lay the first crown from the bar for the foundationnot such a difficult task, if you do everything in detail and well prepare for this event. And if you want which will serve you for many years, we reaches this construction phase is the most serious way.
Checking the horizon of foundation
Even before laying the 1st crown, we lay two layers of waterproofing, a lining board, and then an additional layer of waterproofing. But before pressing the installation of waterproofing on the foundation it is necessary to check its horizontality. A simple level can give a greater error and it is better to apply its hydraulic option for this that you can buy or use a transparent hose for this.
The drop in the level should not exceed 1 cm for all foundation. The plane can be aligned with a solution using a lining board of different thickness or a different number of waterproofing layers. If the drop in the level is significant and there is no time for alignment with the solution, you can use the bars of different thickness under the lining board or electrical placle to fit the thickness of the lining board.
Selection and preparation of material for the installation of the first crown
The next stage of the process of laying the first crown from the bar is self selection and processing Right material. In no case can you just take the first bar and starting it. After all, in subsequently, your choice will determine the time of production of work on replacing the lower crown. Not a qualitatively processed timber, or a ram mounted without taking into account the requirements of the selection, will lead to an earlier start of work on replacing the lower crown.
Choosing the best bar for the first crown - the key to the long life of the house
We select the right material for the first crown
Bar for the first crown is starting to prepare in advance. As soon as deliver lumber to the site, you need to choose the best bars, without a large number of bitch, without blue, straight without flaws. By cutting of annual rings, you need to choose a bar, in which the density of the rings as much as possible as possible, and the timber itself is the middle part of the tree. At the end you should see the circles divergent from the center.
Processing of timber for mounting the first crown
Wood must be completely blocked by liquid bitumen mastic several times, in a mixture with spent machine oil so that this composition is deeply penetrated into the structure of the wood. You can also use special cutting products for deep wood processing.
The ends do not require processing, they must remain clean. Through the ends will be excessive moisture.
The degree of processing of the structure of the wood will directly depend on the service life of the lowest crown and the time it is easy to replace. Therefore, do not rush and thoroughly prepare all the material for the lower crown. And although it is still quite far away, but the first step is already made!
Fastening the lower crown and checking geometry
 Fastening the lower crown in angular joints
 The first crown does not need to be attached to the foundation. The fact is that the house from the bar is a heavy design itself and will stand perfectly without attaching anchors. Corner joints are made without locks, I joking the bar ends. This is done in order to have the opportunity to replace any bar, without the need for disassembly in the corners. The bar in the corners and when the partitions are adjusted, the metal fasteners are fastened: fastened perforated plates or brackets.
Before the final fastening of the bar in the corners, you need to check the aspect ratio of the house and the correct one, you can say the "ideal" geometry of the house so that the angles make exactly 90 degrees. If the length of opposite sides is equal to each other, and the distance on the diagonal of the house between opposite angles coincide, it can be concluded that the corners of the house are true. To check the corners, you can apply a factory sheet of plywood or OSP, if you apply it from the inside of a bar to the inner corner and to set the bar on it.
Each home master engaged in the construction of his own home, at a certain stage there is a question of how to lay a bar for the foundation.
For the construction of a house from a bar often use a ribbon foundation with a height of 0.5 m above the ground.
Tools and materials
For work it is necessary to prepare the following materials and tools:
- waterproofing material;
- building level;
- fasteners, anchor, brazen, nuts with wide washers;
- wooden mystery;
- antiseptics;
- electrolake.
Back to the category
Bruus laying technology
The main moment of the construction of a wooden house is the choice of timber.

The best of them are considered even, with the smallest number of bitch and without a shade of blue. When choosing a bar, you should pay attention to annual rings. Preference is given to bars, the density of the rings of which is the highest.
Laying timber cannot be spent at a high level without a qualitatively performed foundation. The ideal option is a concrete monolithic stove, but the high cost of material in most cases makes it impossible to use it. An exception is a movable soil, where the foundation of a different type cannot be erected.
Quite often, a ribbon foundation is used for the construction of a wooden house from a bar, the height of which should be at least 0.5 m above the level of land. The elevated part is made of bricks.
- Before laying the bars of the first crown, they first determine the direction of its side that will be indoors. That side of the bar on which there is a visible defect will be directed upwards. The side of the bar having bulges will be the side. In the process of laying a bar, it is necessary to take into account his shrinkage, in accordance with which the final lining of the house is carried out after 1-2 years.
- The Lower Cross Bar is deceived by working out, its remaining part is treated with special antiseptic compositions.
- To put the first crown of a wooden house, everyone spends quite thoroughly, making all the necessary mathematical calculations. This is necessary so that the walls of the new house are strictly at an angle of 90 °. The most important thing is not to hurry at this stage and do everything with maximum accuracy.
Back to the category
Features of the insulating process

Before switching to the installation of the first crown, an insulation must be carried out, for which two layers of waterproofing material should be put together, between which the lining board is placed.
Insulation includes two layers of a rolled backrueroid and glazing. All materials are stacked in such a way that their edges are 25 cm on the foundation. At the corners, the insulation is putting a mustache.
Before the insulation is laid between the crown and the base, it is necessary to check the surface of the foundation, which should be perfectly smooth, without drops. To do this, use a hydraulic level, which is rather normal. The differences of no more than 1 cm relative to the entire foundation plane are allowed. Strong drops are removed by plating the rubberoid or leveling with cement mortar.
An equally important point is to close the gap between the foundation and the lower crown of the bar.
The most common method is the addition of a cement mortar under a layer of waterproofing material. Working may be complicated due to the complexity of access to the right place. In some cases, the slot is simply close in wooden trimming of a certain thickness. Wooden wedges or boards are attached between rubberoid and the lower bar, which are tightly driven until the gap is completely eliminated. Both in length and in the width of such inserts may be an unlimited quantity.

The most common method of embelling the slots has recently been their foaming of construction foam, which is sold in the canopy. It will be better to carry out similar works in crude weather when the material is very well seized.
After a day after the faving, the excess material is cut into a sharp knife. In the future, the plot between the lower crown and the basement is closed with metal molds or decorative plank. This is necessary in order to protect the foam from the effects of direct sunlight, under the action of which it collapses literally in one season. In addition, a reliable barrier is created for the accumulation of moisture, which will lead to the rotting of wood.
Back to the category
Installing bars on the foundation
After it is spent, proceed to the installation of the lower strapping.
The bars, installed on the foundation, should pretrately fit into each other without the formation between them the minimum space. In particular, it concerns the lower part of the church, where the floor will be created and where significant loads will be provided.
Brucks are bonded with metal brazers, which are achieved with the help of a wooden cyan. In some cases, if necessary, the bars additionally fasten with brackets or nails.

Docking the bars of the lower crown with each other happens by sampling on the corners of any of the existing ways:
- "In Polterev" - the option of laying the bars, in which the upper half of the array is removed in the angular connections on one bar, and on the other - the lower half;
- "In the paw" is the most common way to connect BRUSEV, which is the opposite and does not include the end part of the log, protruding beyond the level of the wall.
Through nuts and wide, the washers are carried out fastening the bar to the surface of the foundation. A wide washer will allow you to expand the area of \u200b\u200bthe nut with the surface of the tree. Only you need only a hex nut, and square or round nuts for such purposes are not suitable. If for the attachment of the bars to use narrow nuts or not to use them at all, then during the execution of installation work it will be quite clear that the nut is completely drowned into the surface of the bar and the connection of the elements of the house of the house will be unreliable and short-lived.
Frame assembly technology from a bar for home or bath
Organization of the workplace for assembling walls
In order for the work to argue, the bars lay out to the stack at a distance of 5-6 meters from the structure with one or better - from his two sides. Each layer of BRUSEV in the stack is placed on gaskets from the boards.
Near the storage room tools workplace for marking and cutting BRUSEV. A variant of the device of such a workplace is shown in the figure.
The marking of the timber using the template is convenient to perform at an altitude of 0.9 - 1.1 meters in the markup zone, node A in the figure. After marking, the timber is lowered to low lining into the cutting zone. In this position, the timber is convenient and safely sawing with a chain saw.
Crawled timber raise the wall. To facilitate the lift, signs are suitable - inclined bars, which the top end relieve on the upper crown of the cut. The timber bar is moved using a rope.
Klion-shaped stops are navigated to the windows that make the ramp rise more secure. In addition to safety, the stops allow you to do small forces. Even one person can raise a bar if necessary, fixing it with the help of stops at intermediate points.
Works on the assembly of a log of timber is the most convenient to carry out a brigade of four. You can work together, just work will go slower.
For the installation of the upper crowns of the cut and roofs build forests.
 Three-tiered forests on the front of the house. 1
- extreme racks; 2
- M-shaped rack of forests of the first tier on the side facade; 3
- flooring; 4
- Central racks; 5
- Splits cruciform (shown conditionally); 6
- Baries
Three-tiered forests on the front of the house. 1
- extreme racks; 2
- M-shaped rack of forests of the first tier on the side facade; 3
- flooring; 4
- Central racks; 5
- Splits cruciform (shown conditionally); 6
- Baries The assembly of the upper crowns of the church leads from the level of the first tier. Flooring the first tier is laid on G - shaped racks, pos. 2 in the picture. Racks are installed around the walls of the house and attach to the walls with bobbies, pos.6.
At the end of the roof (attic), on the facades where the device is needed, it is necessary to make forests in three tiers. For the device racks of forests use boards 50 x 150 mm. Flooring the same boards.
Working from the forest is more convenient, faster and safer than with stairs - do not forget about it.
Marking of bars for assembling walls
Practical construction experience shows that the sequence of the elements of angular connections in the head is not realistic.
Prior to the start of work, they draw a scheme of assembling the walls of the house, on which they denote: the sequence number of the crown, the type of connecting element at the ends of the blanks, the position of the openings in the wall.
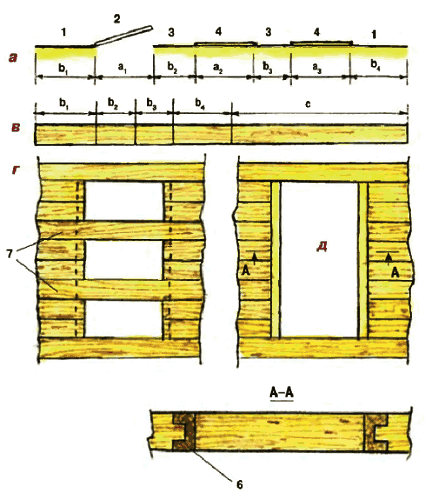
An example of a wall assembly scheme of the house is shown in Figure:
 The layout of the corner joints of the bar and the joints of the details of the longitudinal walls, for the house with the overall dimensions of 6x9 meters. BUT and FROM - longitudinal walls; D. and B. - transverse walls; E. - inner wall of timber - partition; 1
- Shakes of Bruusyev.
The layout of the corner joints of the bar and the joints of the details of the longitudinal walls, for the house with the overall dimensions of 6x9 meters. BUT and FROM - longitudinal walls; D. and B. - transverse walls; E. - inner wall of timber - partition; 1
- Shakes of Bruusyev. At the house, which is shown in the diagram, each crown consists of 7 segments of bars long from 3 to 6 m.
The crown of the longitudinal wall consists of two parts: the main bar of the standard length is 6 meters and a dog, 3 meters long. On one crown lay on the left long bars, and on the right are good. In the next crown, the laying begins in a similar manner, but on the right.
The details of the crown of the transverse wall and partitions are made from one bar of standard length of 6 meters.
To eliminate cold bridges in the outer walls, joints of the bar of the longitudinal wall, pos.1, perform, making vertical cutouts "in the floor of a tree" with Faststom at 15 - 20 cm. The beam in the corners of the crowns is connected to the dressing with a native spike (see below).
How to quickly and quickly perform marking of thorns, grooves and other profiles, ensure the identity of the size of the bars blanks?
The easiest way to do this with the help of templates. The template is applied to the timber and transfer the pattern of the pattern profiles to the surface of the bar.
It is more convenient to place faster and there will be less errors if the template completely repeats the contour of the part, it has the same length with a locked part. I left the template on the bar and immediately moved all the sizes and profiles to the workpiece.
For our example, it will be necessary to make seven templates, according to the number of parts in the crown. One template is placed two mirror wall details.
If you think about, the number of templates can be reduced. Consider how to make universal templates for the markup of the details of the longitudinal walls of the house (for the wall assembly scheme, see above).
 Two templates (isolated bright yellow) for the markup of the bar of longitudinal walls. 4
- groove for indigenous spike; 5
- groove for spike inner wall; 6
- pattern; 7
- Bar of Dog.
Two templates (isolated bright yellow) for the markup of the bar of longitudinal walls. 4
- groove for indigenous spike; 5
- groove for spike inner wall; 6
- pattern; 7
- Bar of Dog. In the figure, at the top shows the template For the markup of the main bar in the crown, whose good is located on the right. On the wall markup scheme, these are the wints A1, A3, A5 and C1, C3, C5.
Lower pattern It serves to mark the main bar in the crowns with a good left - A2, A4, A6 and C2, C4, C6.
Templates at first glance are the same, but differ in that the grooves, pos.5, for connecting to the partition, are located in different places of templates.
The same patterns are used to mark up the details of the good. To do this, on templates at points b. and from drilled through holes, and at points but and d. Cuts are made.
For the markup of the problem, the template is applied to a bar and through the holes and cuts heating points on the surface of the workpiece.
Remember this reception with the device holes in the template. This will help you create universal templates in many other cases.
Templates are made of an arched "inches".
As a result, we manage to reduce the number of templates from seven to three (2 - for longitudinal walls and 1 - for transverse). Two longitudinal templates (right and left) provide the ability to get blanks for longitudinal walls, and one transverse pattern allows you to harvest parts for transverse walls and partitions.
And now consider how to apply templates. For the markup of the first vents of the crown (for example, starting on the left), the left template is laid on the bar and turn the end template to the marker on the left, then two grooves and, finally, the sample for the connection "in the floor of the tree". The marked timber is transferred to the opening site, where unnecessary fragments (they are better at the markup
Stroke) cut with a chain saw.
How to place details with spikes? Obviously, spikes and grooves are elements of the same assembly, which means they must correspond to each other in size and location. In the details with a spike at the place of the groove mark the spike.
If the size of the groove is 5 × 5 cm, then the spike must have dimensions - 4.5 × 4.5 cm. The clearance is filled with interventory insulation.
The profile of the template is transferred to the upper edge of the bar. The markup is transferred to the vertical face of timber with the help of a square. On this markup and carry out neat cuts.
How to collect smooth walls from a timing of different widths
The technical conditions (TU) for the manufacture of timber is allowed to deviate the size of the timber in one direction or another side of the standard value indicated in the documents.
If in the purchase documents, the standard sizes of the timber are indicated, for example, the section 150x150 mm. and 6 meters long, the actual dimensions will differ from the standard.
Each bar, in the bar brought to the construction site, will differ from the dimensions specified in the documents, a few millimeters. Sizes in the section and the length of the bars will be different.
The size in size must be considered when developing templates, marking of the bar and assembly of walls.
How to collect smooth walls if the bar is different in width and length?
 b. - minimum timing width; delta B. - the difference between a narrow and wide bar.
 Obviously, from a bar of different widths, it is possible to make a smooth only one surface of the wall - or outside, or from the inside of the construction.
If you want to make a smooth wall of the house outside, then all bars in the wall are aligned along the outer face. Then inside the house the wide bars will perform from the wall on the value of "Delta b."(The difference between narrow and wide bars). The alignment of the outer face leads to an increase in the gaps in the corner connection of the BRUSEV (see Figure).
If the bars in the wall align on the inner face, then the "steps" of the repellent bars will be already on the outer surface of the wall. The wall is usually trimmed. And if the bar has to remove the chamfer from the outer edges, the steps on the wall will be invisible and without a sheaving. Corner compounds of BRUSIV are obtained more dense, "warm".
How and what to connect the crowns
Each crown of a log is connected to the lower crown with metal or wooden brazers. Begroen placed at a distance of about 250-300 mM. From the end of the bar and then every 1-1.5 meters of the length of the bar.
Each detail of the crown is fixed at least two coppers. The length of the brazen must be at least 1.5 times, more than the height of the bar.
 cm., pos. one.
 Braided from round steel diameter 6-8 mm. - Pins with a pointed end or nails (6x200-250 mM.), just clog the hammer in the bars of the crowns, the option a. on the image.
The upper ends of the napillates from any material must be plugged into the bar on 2-4 cm. If this is not done, then during the drying of the bar and shrinkage, the cutting of the cut will be copied above the bar and raise the upper crown. Between the crowns are formed a large gap.
For the same reason it is impossible to make clogged berthed from reinforcement steel. The corrugated surface of such copiers will hold the bars of the crowns from moving during a shrink shrink, even if the heater is bold to the bar. The crowns will simply hang on such impudations.
Steel clogged gripped small diameter can not always provide the necessary wall rigidity, especially with a large length of the walls of the walls. Their use can be recommended for small-sized buildings - for example, bath. To increase the rigidity of the walls of large buildings, it is necessary to install the increased diameter.
Steel braided with a diameter of 10 and more than millimeters, as well as wooden brazers insert into the holes drilled in a bar. The diameter of the holes make a little less than the diameter of the heater.
With a dense landing of the heel into the hole, the rigidity of the wall increases, but the risk increases that the shrink shrinkage will be interferent.
Wooden braided with a diameter of 25-30 mM. Convenient to cut from round cuttings for the tool. Such cuttings are made of solid wood. From the bottom end of the brazen, it is recommended to remove the chamfer - it will be easier to score the brazen into the hole.
You can cut from the usual chalkboard "inches" beaten square sections 25x25 mm. From one end of the workpiece shoot chamdes. Such stoles are clogged into a hole made by a drill with a diameter of 24 mm.
The ribs of such a heat from a relatively "soft" coniferous wood when smoking smashed, wood is compacted, providing a sufficiently dense landing of brazen in the hole.
How to drill holes in a bar under the brave
The depth of the holes in the wall for the installation of napillates should exceed at least 4 cm. Begotten length. Moreover, the hole should be free from chips.
For drilling holes in a bar, sufficiently deep and large diameter, they usually use a low-speed electric floring (drill). In the passport of the power tool, it is usually indicated that the drill diameter in one or another material is calculated. Given the greater drilling depth, it is better to choose a drill with a reserve in power.
For drilling holes in a bar, it is convenient to equip the drill focus, as shown in the figure.
 The stop bar is attached to a drill with steel clamps.
 Emphasis, in the form of a wooden bar, attach to a drill, for example, clamps. Emphasis stops drilling at the necessary depth, but the rotation of the drill after that does not stop. Continuing to rotate in one place, the drill cleans the hole from the chips, it turns into and, then, easily gets from the deep hole.
The drilling of the holes for connecting the crowns is convenient to produce in a bar, which is already installed on the wall in the project position on the interwetant insulation. But here usually The problem arises - the interventovaya gasket is not amenable to drilling. The fibers of the laying material are simply wound on the drill and clamp it.
You have to install a bar on the wall in two receptions. First, the timber is mounted without gasket and temporarily fix from the offset, for example, nails. Drill holes under bent. Then the timber is shifted from the wall and laid the interventic insulation.
In places of drills gasket cut out with a sharp knife. Then, the pace removed is re-installed in place, already on the gasket, and fastened with bellows.
Drilling holes in a bar laid on the wall should be produced, standing on a solid base - forests, suspensions, flooring. Stand on a narrow wall and drill dangerous. The drill can "eat", a powerful drill will unfold and easily throw an employee from the wall.
How to make a smooth wall of the curve
In the bar brought to the construction site, part of the bars may be curved. The bar may have a curvature in the same plane, or screw the screw and become a rhombid in cross section.
If there is an opportunity, then the curves of the bars are better not to use for the walls of the house or bath. Brux with curvature is recommended to cut into smaller parts and use in other, less responsible places.
A small amount of timber having a curvature in the same plane can be used for wall mounting. You should not put such a timber in the wall in bulk up or down, in the hope that it will straighten under the weight of the house - the bar will not straighten, even if it is placed in the lower crowns.
The curve bar is placed in the wall, straightening it in the horizontal plane as shown in the figure.
 Curve bar straighten consistently fixing it with brazers
 The curved timber is drilled, combining it at the drilling points with a direct bar. After laying the interventovate insulation, the curved timber is fixed with impudent at one end and the intake is consistently fixed with anticipation at the other points.
To extend the timber of great efforts. Easy work will help the lever and bracket
Interventical gasket - insulation, seal
For and cold, gasket is laid between the crowns. Previously, for this was used moss or linen pass. Currently, there are special laying materials based on flank or flax. Material for sale in the form of roll ribbon 20 cm.
The tape of the gasket material is laid throughout the upper face of a bar in two or three layers and fastened with brackets using a construction stapler.
If the wall is not trimmed, the gasket must be 1-2 from the outer edge of the bar cm.Otherwise she will wet.
Some wizards lay the gasket material into one layer and offered after shrinkage to cut the jokes, adding an additional amount of material in the voids of the joints. In this embodiment, we have a smaller flow rate.
Work on the panties of the joints is quite time-consuming and tedious. It is better to immediately put the seal with a cessary, in several layers (three layers) to eliminate the need for horizontal jacks.
How to control the accuracy of the harbor
In the process of construction of the house or bath, it is necessary to regularly check the accuracy of the harness from the bar. To do this, it is enough to control the following five parameters:
- Vertical angles.
- Height of corners and walls.
- The horizontal of the crowns and the upper faces of the bar.
- Straightness of the walls.
- The quality of laying interventory insulation.
For control vertical angles Apply the following method.
 To control the verticality of the angle on each side of the crown apply a vertical line. 1
- lower strapping; 2
- crowns; 3
- control lines; 4
- Cocol.
To control the verticality of the angle on each side of the crown apply a vertical line. 1
- lower strapping; 2
- crowns; 3
- control lines; 4
- Cocol. On each side of the crown at the same distance from the corner rib painted the vertical line.
With the proper laying of the crowns, this line should be direct and coincided with a vertical. The vertical of the line is checked with a plumb.
If deviations are detected, then the operation is suspended and eliminated by the cause.
The height of the corners and walls are measured roulette. The measurement lead from the base horizontal line, which is applied to the strapping bar using a water level.
Horizontal of the crowns and upper faces Bruus check by level.
Straightness of walls Determine visually by pulling along the cord wall.
Especially carefully and constantly check the verticality and height of the corners. Deviations from the verticality are eliminated, up to the replacement of the bar in the crown. The height of the angles is adjusted, increasing the thickness of the gasket between the crowns in the axial angles. Sometimes it helps, if you knock down a sledge hammer in a bar in a high corner.
The quality and thickness of laying interventory insulation check visually, examining the walls.
Window and doorways in Srub
From the second crown, the doorways begin to form doorways. The distance from the floor to the window is selected in the range of 70 - 90 cm.
Laying timets in the crowns in the zone of openings has its own characteristics.
 but
- scheme arrangement of openings in the wall, where: 1
- wall; 2
- open doors; 3
- simpleness; 4
- open windows. in
- Scheme of cutting timber, where C is the balance of cutting. g.
- Option of the device of the opening in a chair with the installation of temporary bonding bars, pos.7. d.
- Option with installation in the opening of the deck, pos.6 - immediately get the opening ready for installation of the door or window.
but
- scheme arrangement of openings in the wall, where: 1
- wall; 2
- open doors; 3
- simpleness; 4
- open windows. in
- Scheme of cutting timber, where C is the balance of cutting. g.
- Option of the device of the opening in a chair with the installation of temporary bonding bars, pos.7. d.
- Option with installation in the opening of the deck, pos.6 - immediately get the opening ready for installation of the door or window. In practice, two options for the formation of openings are used when assembling a church.
One option - " g " on the image. The opening is done in the draft version, it is only preparation for creating an opening. The opening is preparing for the installation of doors and windows not immediately when assembling a log. This work is left for later - usually do after shrinking a church.
This option allows you to speed up the work on the grazing. In the opening, the bars are installed, bonding commonness with a log cabin, pos.7 in the figure. In the doorway, install at least two such bars.
In the process of shrinkage, the seaspler chub can "lead" inward or outward. To prevent it bar in stocks fasten up vertically installed boards.
In another embodiment - " d."In the picture, the openings immediately prepare for the installation of doors and windows. To do this, decks (soups) are installed in the openings - a vertical bar with a groove, pos.6 in the figure. The groove includes spikes of timber. In this way, the plain timber is fixed from the displacement. In this embodiment, the openings are immediately prepared for installation of doors and windows.
The decks (souls) traditionally serve not only for connecting timber in the opening, but also perform the role of window slopes, windowsill. To do this, they are carefully treated, relieve curly chamfer.
 Installation option Window in a wall of timber: 1 - finishing of slopes of the window; 2 - the board of vertical souls with a rail - spike, enters into the slide of the wall of the wall; 3 - frame of the plastic window; 4 - sealing ribbon psyl
 In modern conditions, when installing plastic windows and a device of plastic slopes and windows, the decks (s) can not be done. Brux in the opening fasten so. In the ends of the bars along the entire length of the opening, the vertical grooves drink and insert a railway there, which fixes the bars of simpleness from the offset.
The length of the deck (s) or racks should be less than the height of the opening by 5-7 cmnot to prevent the shrink shrink.
Baths for home, baths in your city
How to install windows in a wall of timber
If the opening in the wall was made in the draft version (see above), then the installation of the window is starting from drinking the opening under the desired size. To do this, the rails are stuck, pos.2 in the figure, and the chain saw along the edge of the rails scolded bars.
 Proper window installation in a wall of a bar. 1
- wall; 2
- Rake; 3
- platband; 4
- window; 5
- window box; 6
- Bar wall above the window; 7
- interwidder insulation; 8
- Shrinking gap over the window and deck; 9
- window frames; 10
- Bar wall (simpleness); 11
- deck; 12
- Nail.
Proper window installation in a wall of a bar. 1
- wall; 2
- Rake; 3
- platband; 4
- window; 5
- window box; 6
- Bar wall above the window; 7
- interwidder insulation; 8
- Shrinking gap over the window and deck; 9
- window frames; 10
- Bar wall (simpleness); 11
- deck; 12
- Nail. Then the disk saw on the ends of the bars wall (simple) is cut out spikes. The spikes, pos.10, are planted with grooves, pos.11. The joints are sealing insulation. The deck is naked to the walls of the wall with nails clogged at an angle, pos. 12. So nails will not prevent the shrink shrink.
In the window prepared in this way, the window box is inserted, which is attached to the decks with self-draws. Above the window box be sure to leave the gap, pos. 8, to compensate for shrinkage. The magnitude of the gap 5-7 cm. The clearance is filled with soft insulation material.
Compensation clearance must be left over the top end of the deck.
Similarly prepare openings and insert the doors to the walls from the bar.
After completing the assembly of the first floor of the house, the log house is overlapped with inter-storey or attic beams (if the structure is one-story) overlap.
May be a constructive element. And can perform and independent function.
The next page describes the structure of the broken roof of the house from the bar, where the beams of floor overlapping simultaneously serve as an element of a malicious roof filament frame.
Look at the video clip in which the logging technology from the construction bar is described in a detail.
 Why you can not give icons
 Is it possible to give icons as a gift: Signs, the opinion of the Church
 A year ago left her husband, and now I do not know what to do