Make luminous lamp. Making creative suspended lamps with their own hands. Table lamp of branches and cuts
Learn how to make a wire lamp, a construction grid so that flowers grow inside it. How to turn into a lamp in the lamp, and the tree branches in the lamp?
How to make the original lamp?

A very interesting designer thing is obtained from the simplest materials, most of which remains from the picnic. If you leave friends, native to nature, trash must be removed. This not always welcome work will be more pleasant if you ask to fold plastic spoons separately. If children went with you, arrange a competition, who more and faster will throw spoons in a separate garbage bag or package.
The canisters from under the water will also be needed. After a fun picnic, arriving home, after a while, you can make the original lamps from the container, which remained after the feast. Hand their friends, leave yourself to hang in the corridor, in the kitchen or at the cottage.
So, here's like such a chandelier with your own hands or with home is created. First, put the next morning:
- 5-liter plastic bottle of oval shape;
- disposable plastic spoons;
- cable with a cartridge and fork;
- lED light bulb low power;
- pliers;
- glue pistol;
- screwdriver;
- stationery knife.
So that such original lamps have not led to ignition, take the LED, and not the usual Light Bulb "Ilyich".
For information: 4-5 W LED bulbs correspond to 40 W, and 8-10 W - 60 W of conventional electrical.

Carefully, not to cut down, remove the bottom of the bottom with the canister.
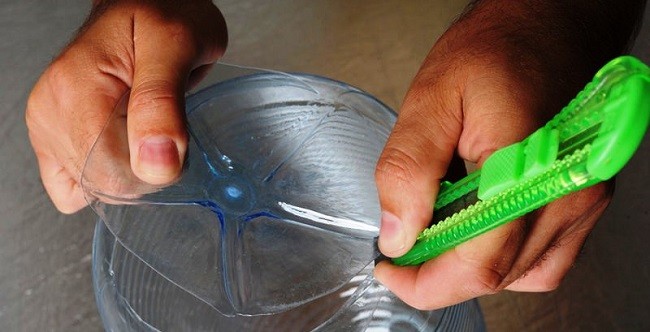
Also, observing safety equipment, so as not to be hurt, do trust each plastic spoon handle completely. Applying a few hot glue from the gun on the "blades" sections, stick them to the bottom tier of the bottle. Usually 17 pieces leave here. Then, whisk, attach the second and subsequent rows, placing elements in a checker order.

To cover the neck, glue together 10-12 blades of spoons, forming them in the form of a ring.

Through the cutting hole in the bottle, grind the cartridge with a light bulb and cable. If this "electric" part will cause women difficulty, call her husband. If there is no such, buy a cable with the cartridge already screwed to it in the business store and fork. You can borrow this work part of the lamp at the old one.

Put on the top of the "Ring" canister from the spoons, tighten the lid. To do this, let the husband be drilled in it a drill hole in it, and you yourself can make this manipulation of a hot nail or a self-tapping screw, holding pliers. The original lamp is ready.

3 models of designer lampshairov do it yourself
Ideas are twisted right in the air. If you are in the country and there is no this interior item, it is easy to make it easily from what is happening at hand. Take:
- hollow dishes;
- wire;
- mounting foam;
- gloves;
- paint;
- brush;
- pliers.
Unexpected things can be used as the basis: an old pan, kashpo, already unnecessary children's pot.
Turn over any of these auxiliary items, put on the plane upside down. Wash the wire, her turns repeat the form of the future product, should be such as the lampshade will be. With your own hands, but in gloves, take a canister in my hands, squeeze out of it gradually foam on the frame, closing the wire, let dry.
After that, make the contours knife for more smooth, cutting off unnecessary. Paint your favorite color, white looks air and elegant. Such a lampshade, with their own hands made, will decorate the country gazebo. You can make a few and spend them here. In order to avoid large spending, so you decorate space.

This lampshade looks stylish and modern, and the following has a classic look. Use:
- thick wire;
- pliers;
- little plastic bottle with water.
Now from wire roll up a large outdoor ring. We will be fixed. To do this, make the pliers of 4 identical segments of the wire, the first end of each fasten on the small, and the second edge - on the large ring. The upper part of the lamp is ready.
The size of the lampshar depend on whether it is done to hang to the ceiling or for a table lamp. The first is more than the second.
Roll from the wire the bottom ring, it is the biggest one. Connect it with the second top five wire segments, distributing those evenly. It remains to decorate the lampshade frame. To do this, through the second ring, skip the wire, turning it wave-like and twisting through the base. Also place the second ring.

It remains to see his cloth. Attach the flap from the second top to the bottom ring, cut the size by adding on the seam. Give the big sides of the resulting rectangle. Stop the side of the side right on the frame, decorating this place to the braid. Everything you made a wonderful lampshade with your own hands.
If you want to get acquainted with the modern ideas themselves on this topic - please! In skillful hands and the construction grid will turn into a stylish lampshade.

With your own hands, or, calling a man, cut off her rectangle with metal scissors. To secure the cartridge, twist the circle from the wire, secure it from above on the lamp four wire segments.
If you do not have a large-scale mesh, pliers cut extra sections so that the distance between the wire strips has become greater. Paint the lampshade, and his frame is ready.
But now the magic begins. You can make the original lamp, which will benefit not only to people, but also plants. Attach at the bottom of the cash porridge with a flower. You can bind, woven with the equipment of Macrame, for the lower turns of the wire with a thick rope. Check that the mount is reliable.
If the house has a man and a welding machine, call this tandem to make a metal ring with "rays", which need to be welded to the bottom of the lamp.

If you have a homemade rigging plant, for example ivy, skip his vacuum between the array cells. The original lamp will become a flower house. It is better not to use conventional light bulbs, as they warm themselves and can burn the leaves of plants. In addition, the air around the colors will be too hot. Screw the LED or fluorescent light bulb.
For such an original lamp, you needed:
- construction grid or durable wire;
- brush and paint (optional);
- pliers;
- light bulb with a carton;
- flower.
You can well fix on such a lamp cupcakes with seedlings, thereby finding an extra room for its cultivation and conditions for lighting in the evening.
Mastery do-it-yourself lampsher, table lamp
Walking in the forest, do not pass by the surrounding hutyivaty squig. Put it in the package, take with you. Wash at home, if there is a bark, consider the knife. Come on the surface of the shallow skin, if required. Cover the tree lacquer.

To keep the table lamp well, the root must be screwed up to a solid pedestal. It should be heavy enough. Oak is suitable for him. If you find the broken branch of this tree in the same forest, scam from the thick part of the circle with a thickness of 5-7 cm.
It will also need to be skilled and paint with varnish. When these wooden blanks are dried, connect them with self-strains of sufficient length, skipping those first through the stand from oak, and then, won in the roasting. You can use bolts with nuts.
How to make lampshade with your own hands, you already know. Therefore, make it and attach it to the crust, putting the wire.
If the old floor stand is no longer happy or you just want to decorate it, also use a tree for this. See how good birch racks look well. Attach the branch of this tree to the lamp and see what a floor lamp you could do.

How to tie a lampshade hook?
If you fed up an old floor lamp, you can transform it with your own hands, giving a "highlight". Take an openwork braid, entering it on the upper and lower part of the tissue lampshar. It can be decorated with glitters, gluing those in the form of a pattern, evenly or arbitrarily.
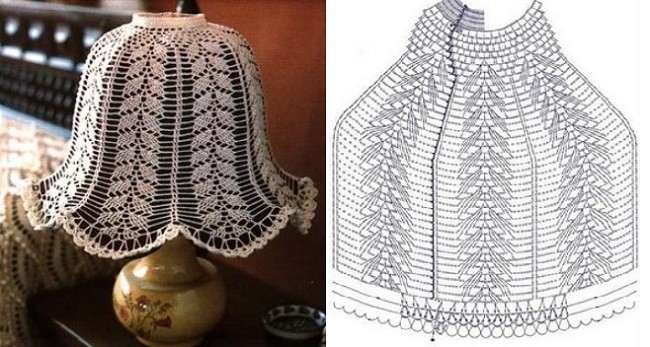
Torster or chandelier will succeed in unique if you connect with your own hands for them. This can be done with crocheted or thin knitting needles. For the first option, you will need:
- hook;
- x / b threads;
- pattern for knitting napkins;
- water;
- starch;
- ribbons.

Water the upper circumference of the lampshar, we need its diameter. From air loops. Tie a chain. Next, knit in a circle, leaning on the napkin scheme. Measure the height of the lampshar and the diameter of its lower circle. Relying on this data, draw a trapezium or rectangle (depends on the shape of the lampshar). Empower this figure with a crochet. Side up.
Bring the top circle of the lamp and this trapezoidal or rectangular part.
Boil the glass of water, stirring, pour here 200 ml of cold water, in which 1.5 tbsp. l starch. Boil 1 min., Remove from the fire, cool down. Lower the knitted lampshade here, well wet, then squeeze, let the water stands, and dries the canvas, but will remain a little wet.
Put it on the plander. To keep the knitted lamp to the lamp, you can skip several ribbon or ribbons between loops, tie them.

Plafones look very beautiful if the flowers associated with crocheted are decorated.

A solution of starch or PVA will help to give the shape of a knitted lamphap. Put it on the frame, apply glue, let's dry.
In the second case (when the needles are used), you need to make calculations for knitting, according to the standards of the lamp draw the pattern, tie a trapezoid or rectangular lampshade. Similar models are suitable for flooring, chandelier strict form. If you need to link a semicircular lamp to the crochet, perform the wedges at first, and then connect them to the columns without Nakid.

Here is another openwork chandelier. It is nice to do Keese and decorate the bottom of the product in a circle. But before you need to create a lampshade yourself. Knitting the crochet scheme of this beautiful thing is represented right there.

A table lamp will look at the bedside table if there is such a lamp lamp on it, the knitting scheme is also given.
If you finish the work, you do not give a son or daughter, requiring attention, offer children to make a lamp to the lamp, let them twist the paper strips in the tube. It is better to wind them on a thin pencil go on a wooden wand for sushi, and then glue the free edge so that it does not turn around.
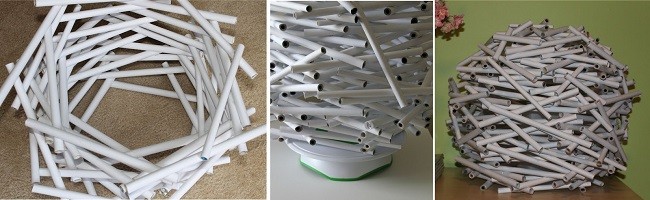
Now you need to glue the resulting blanks using a suitable form as a frame, for example, a 5-liter canister. By making the first inner layer, let the child go to the second. There must be several to close the lumens. When PVA dries, cover the table lamp with this lamp or hang it to the ceiling. It looks original and extravagant.

If you are interested in other ideas on this topic, watch the video:
Very interesting variant of the lamp from the disks:
Recently, it became quite fashionable to make various crafts for home with their own hands. For these purposes, you can use various remedies and materials. Very much space for creativity gives the creation of lighting devices.
Today you can find original ideas for creating any lamp. In today's article, we will try to write a detailed master class on how to create a suspension lamp with their own hands.
A variety of shapes and sizes in this situation unlock hands, because such a device can be made from any girlfriend. This issue will be devoted to our master class.
Advantages of suspension
The suspended lamp on the ceiling today can be found in almost every home. Often, his role is performed by chandelier, which is located in the center of the room. They have the following advantages:
- give sufficient lighting;
- fit into any interior and design of the room;
- are an additional decorative element;
- installation is carried out in different ways and can be carried out with your own hands.
Separately, it is worth talking about how the installation of such lamps on the ceiling is generally possible. Most often, this type of lighting device is attached to a special hook. In modern suspended designs of the ceiling, this hook is hidden under the finishing material or tensioning web.
In a situation, if the ceiling is usual, then the installation of the lamp involves additional decoration of the fastener location.
Design of device
Suspended lighting device, which can be done independently, must have such structural elements:
- plafof. It will perform a protective function and protect the light source from mechanical damage;
Note! After the installation of the device is complete, its ceiling must be directed in the opposite side from the ceiling. This will significantly improve the degree of illumination of the room.
Today's master class will allow you to make with your own hands any type of sliding lighting device. So, proceed.
Before making a ceiling lamp, you must consider the following parameters:
- product capacity. This is the main indicator, which is determined by the lighting standards adopted for a particular room;
- the number of ceiling;
Note! For a small room, a chandelier with one flappon is suitable, and 2-3 plasfones are suitable for the overall room, and maybe more.
- height on which the homemade lighting device should be suspended. This parameter depends on which height has a seat ceiling. An excellent solution will be able to adjust the height with the help of special devices;
- easy and care for the device.
Not every workshop will indicate the need to record these parameters when assembling a self-made lamp. But this focus is necessary.
In addition, it is important to assess the purpose of the room. For example, large chandeliers will be good for living rooms, and for kitchens - smaller products. But for children, bright and non-standard chandeliers are suitable, which will be placed almost under the most ceiling, in order to avoid damage to the device when playing the ball or other active children's games.

Chandelier in children
Another important point of choice is the style of design. The lamp is obliged to harmonize with the rest of the room.
In addition, considerable attention should be paid to the form of chandelier. The correct approach to the assembly of suspended lamps will allow you to make a chandelier with your own hands, which is suitable for frosted, glossy stretch and plasterboard ceilings. At the same time, its form, depending on the selected style of the room, may be:
- spherical;
- conical;
- cubic;
- neleetometric. For example, the chandelier may have a view of the shimmering tracks.
Our master class will help you independently make a ceiling lighting device from undergraduate materials, taking into account the above recommendations.
Getting ready for work
Assembling chandeliers for the ceiling can be carried out from a wide variety of materials:

- bamboo blinds. They can be replaced by conventional wooden chopsticks;
- paint. It is better to use a spray for its uniform application;
- clothespins or clamps;
- base from the old lamp;
- light source (light bulb);
- glue for working with wood.
In addition, for decorating the chandelier, you can use various techniques: beads, appliques from colored paper, small soft toys, satin ribbons, etc.
In addition, you will need conventional scissors and tassels for neat application of glue on the elements of the improvised lighting device.
As you can see, all materials and tools can be easily found at home for the manufacture of a suspended lamp.
How to do

Plafof from a tree
To make a chandelier with your own hands on the ceiling, you must adhere to the assembly instructions:
- wooden elements should be treated by all available chips, so as not to drive in the hands. For this we carry out the grinding of the tree;
- after that, to protect the wooden elements from the negative effect of humidity and temperature drops, it is necessary to cover them with a special varnish. When using bamboo sticks, these steps can be skipped;
- then, with the help of glue, we attach the wooden elements to each other, thus deriving the geometric shape of the plafo. The simplest form is a cube. To create it, you can even use immediately assembled plates, which will play the role of the faces of the figure;
Note! In one of the faces it is necessary to do a pre-hole for the light bulb. It can be filled with a jigsaw or drill with a special nozzle. You can also arrange separate bamboo elements or wooden sticks in such a way as to form the necessary hole.

The flaf itself, as well as the suspension fastener, can be additionally decorated with decorative elements. The entire assembly process, with a clear following instruction, will pass quickly and without problems. On this, our master class is completed. Now you know the secrets, how to make such an irresistible thing!
With this lighting instrument, you can make the interior of any room more original and unique. And at the same time you will save enough funds that would spend on the purchase of a factory lamp.
 Secrets of the installation of point lamps in the stretch ceiling: how difficult it is?
 Introduction to the world of soil lamps -vsor, installation yourself
The lighting system is an integral attribute of the design of any room. This is explained by the fact that chandeliers and lamps have an amazing ability to change the situation. Of course, the easiest way to buy lamps in the store. But much more pleasant to make them with your own hands.
Materials that can be used to create chandeliers
What can I make a chandelier? The answer to this question: "Yes, from anything." Make a suspended lamp can be from:
- paper;
- threads;
- CDs;
- plastic bottles »
- cardboard;
- natural materials;
- sticks for kebabs and others.

Your fantasy will help you choose the material. She will help to choose a suitable model. To create a chandelier, you can use such techniques as origami, thread, embossing. In addition, applying knitting and weaving techniques is appropriate.


Lamp made of kebab chopsticks
Consider step-by-step instructions, how to make the original chandelier using conventional kebab sticks.
You will need:
- stalks for kebab;
- organza ribbons;
- glue.

Make such a design pretty easy:
We lay out the sticks in such a way that they formed a square, and connect them with glue. The height of the chandelier depends on your preferences. But remember that you need to take into account the total amount of material available and the height of the ceiling.

We rush the top of the lamp with cropped chopsticks. You can lay them in parallel to each other or crosswise. Do not forget to leave in the central part the hole of the corresponding diameter for the cartridge.
After drying the glue, we begin to decorate the chandelier. For this purpose, tie on the protruding ends of the ribbons of colored organza. The more they will be, the more beautiful there is a lamp.


We hide the resulting design on the hook in the ceiling. You can do this with the help of the same ribbons. Next, fix the cartridge in it. Chandelier is ready!

Chandelier from bottles
One of the original ideas of homemade chandeliers is a bottle chandelier. It will take:
- frame of an old chandelier;
- plastic bottles (the color palette can be the most different);
- thick steel wire.

Instructions for the creation:
Cut bottles. Cut flowers, animals or geometric shapes. What to choose from this depends on your desire.

Create carved billets to the frame of the old ceiling lamp and attach steel wire. From her it is necessary to do "Hedgehog".


To do this, take a few wire rods, connect them in the middle, using a small segment of the wire. Next, you need to cut off the top rod, thereby creating a place for the light bulb.
The last step is to connect the chandelier to the ceiling. It's not so difficult to make your own hands. Such a lamp will be appropriate in the hallway or in the kitchen.

Wood chandelier
To make a beautiful LED chandelier with your own trees, you need to prepare the following things:
- Wooden planks - 12 pcs. Door platbands are suitable. Optimally, if they have a length of 0.3 - 0.45 m.
- Glass cans with a volume of 1 l - 6 pcs. They will be used as plafones.
- Paint under the tree.
- Saws.
- Machine to order home canned food.
- White gamma paint.
- Emery paper.

Creating a wooden chandelier will require the following actions:
- It is necessary to process the planks using emery paper.
- Make groove holes for wire.
- Drill holes for fastening the ceiling. To do this, take three sheets and we do on each side by the hole.
- Cove the preparation of paint, imitating natural wood.
- Collect the planks using self-tapping screws into a single hexagonal design.
- In the central part of the covers for the spin to make holes for the cartridge. Install cartridges with LED bulbs.
- Roll banks.
- Color the caps of tone paint, and the cans are paint light shades. It remains to secure the design on the ceiling.

Cardboard product
A chandelier from ordinary cardboard can be a very unusual interior decoration. Here is a small master class:
- Using stencil, cut out two identical billets. Do not forget to make slots to secure them in the center. Connect the cut parts.
- If necessary, paint the resulting design.
- To give greater strength, place all the places of connection with a durable thread or wire.
- Fastening to the ceiling occurs on the chain. Through them the wire passes. Optimally, if they are painted into the tone of the lighting device.


As decoration, you can use a variety of things - varnish with gloves, beads, sequins, lace, rhinestones, artificial floral compositions, beads.

The plastic chandelier is similar. Such a product will be more durable. But for its manufacture, the scissors will not be the best option. Instead, it is preferable to apply a jigsaw.

To date, the popularity of the personally created interior details is only grows. The chandelier made with your own hands is a reflection of your personality. It will give the entire setting of uniqueness and uniqueness.


On the Internet you can easily find not only many different variations of homemade lamps, but also detailed instructions for repairing the chandelier made by their own hands.

Photo chandeliers do it yourself


The chandelier is an important element of the interior. Especially original and beautifully look at the lamps created by their own hands. There are many ideas for creating an unusual chandelier, which externally do not give way to expensive design products.
However, to create a high-quality beautiful thing, you need to decide on materials, style, choose the most appropriate technique for creating a lamp. To work justify your expectations, follow the instructions, not missing any item.
If desired, the master can make a design with remote control.
 The frame is the basis of the lighting device on which the ceiling or decorative elements is located. It should be durable. It can be done independently or use the frame from the old chandelier. As a self-made base, a thick metal wire, wooden rails, hoops, a basket, a plastic bottle, etc. are used.
The choice of material for the base depends on the weight of the plaffron used by the materials. If you create a chandelier of paper or lightweight fabric, then a fairly plastic or wooden frame, for models with heavy beams (metal, glass) it is better to use metal bases.
We reanimate the frame from the old chandelier
 If you have an old chandelier with a metal base in the storeroom, then you boldly use it for the incarnation of your fantasies. If the material rustled a little or opened paint - it does not matter. Alkyd enamel, acrylic paint or enamel from the spray can help solve this problem. Just repaint the foundation in any color you like to have the old chandelier to receive a new life.
Alkyd enamel long holds on the metal, but it has a sharp smell. In addition, it will be necessary to apply several layers to the foundation so that it is not proper. Acrylic is perfectly located, but so that he keeps, after drying, you need to apply a layer of varnish. Enamel from the canola cartoon is very easy and fast, but it is better to do it on the street or in advance to cover all the surrounding surfaces with paper. The choice is yours.
After drying, decorate the base with decorative elements or put on the homemade ceiling.
How to make a new one's own hands: options and step-by-step instructions for the manufacture
 The chandeliers of the tree are originally and naturally and naturally look. The finished frame can be disposed of or left in an original form.
Step-by-step instructions for creating a wooden frame:
- Take 12 Raeks (length - from 30 to 45 cm), polish them sandpaper.
- Make holes for wire.
- Make holes that need to fasten the plaffones.
- Treat paint preparation with a shade of natural wood.
- Connect the strips with self-drawers into a suitable design, for example, a hexagon.
To create a wire frame, a solid carbonaceous wire is used (1.5 mm diameter). If so is not, then use aluminum, cast iron or copper material.
First, the base is created from thick wire, it can be round, geometric or fantasy structures. It is desirable to supplement the basis of rigidity ribs. You should also make a mount under the cartridge.
The frame can be made of plastic eggs with a volume of 5 liters. To do this, cut the lower part of the tank, and then decorate with decorative elements.
What are the techniques for the manufacture of ceiling lights
Ceiling lamps can be created in the Origami technique, threads, crops, decoupage. Also, lamps made with the use of knitting or weaving techniques are very beautiful.
The original chandeliers in the Origami technique will become an excellent addition to the modern interior.
Important! During the creation of the Origami-Plaffon, do not use very dense paper, as it will be bad to skip light.
If you are interested in crochet, then use multiple napkins as a base for lampshar. Such a chandelier looks amazingly, it can be hung in the bedroom to create an intimate atmosphere.
Homemade chandeliers with lampshed outboard are made of frame and decor (paper butterflies, beads, wax paper, artificial flowers, etc.). These elements are attached to the lining with glue, and then fixed on the basis.
Veusers are very popular among home masters, which create from a certain material (threads, glue, special paste, ropes, etc.) and a balloon.
Ceiling lamps made of fabric can be calculated with acrylic paints, apply decoupage technique or place on the material any decorative elements.
What can make a chandelier at home
 The chandelier is created by their own hands from different materials:
- paper;
- thread;
- CDs;
- bottles (plastic, glass);
- cardboard;
- napkins;
- tree, etc.
The selected material should have the necessary characteristics you need: safety, aesthetics, practicality, ease of care, strength, durability, etc. In addition, the chandelier must match the interior of the room. Also consider the size of the room and the ceiling height. If the ceiling is low, then fasten the lamp on the bar, if its height is from 3 m, then the suspension design is suitable for the hook.
For the homemade lamp, the energy-saving light is suitable, since it does not heat the case so much as the usual one. Additional bonus - electricity savings.
Advantages and disadvantages of materials for the decor of the flange chandelier do it yourself
 When choosing a material for the chandelier enclosure, emphasize the aesthetic properties and specifications. It is recommended to use materials that do not contain toxic substances, because when heated, they apply.
Prefer the materials for the plaffone, followed by easy to care for. For example, tissue lamps are harvested faster, and plastic is easier to rub rag. A paper case can be quickly replaced.
The choice of material depends on the degree of room lighting. The best transparent glass is missing. And for the bedroom or children's room it is better to make a chandelier with muffled light.
To create a lighting device, almost everything can be found at hand: wooden sticks, pieces of plinth, tanks, wood, metal wands and pipes, glass products, fabrics. Homemade lamps make futuristic, classic, glamorous, minimalist. For each type, several step-by-step master classes are invented. Designer premises are made to decorate unusual lamps. It can be products with slots, a variety of individual fragments, in the form of a large ball or cube. The same lamps are made with their own hands, from any material. They are engaged in this not only the masters selling their products, but also the usual owners of apartments and houses. Homemade chandeliers can be similar to the store or be carried out in an unusual way: from terkons, canned cans, etc. The form depends on the characteristics of the material and fantasy of the performer.
What can be used as materials
Read:
- fat cream;
- pVA glue;
- cotton buckle;
- dye;
- balloon.
There are some interesting options. From ordinary threads it turns out a beautiful glowing ball. First you need to inflate the ball and smear it with a cream. It is placed in a container with water and diluted in it. Then he is wounded by threads. The design is left to dry within 24 hours - it will only be left to put the product on the ceiling. The second way is to use the tubes. Sheets twist diagonally, sticking the tips are glued. You will need two hundred tubes: they glued together in a round or triangular figure. The following option is lamp shade: it is twisted into a spiral or conical shape. You can create a lamp from plastic bottles: they are cut off the bottom and neck. You will need a wire, acrylic paints, sealant and marker. There are many other techniques for creating a lamp with your own hands.
Options for creating lamps from wood
Making a lamp with your own hands is primarily art, not saving. Despite the fact that the tree is a simple and inexpensive material, products from it can compete with the rest of the quality of execution and aesthetics. The process of their manufacture will not be easier. It will be necessary to carry out complex calculations, work with a large number of tools, remove a lot of garbage. Lighting devices are made of sleep, branches, veneers, wooden rails, wooden boxes and frames, wheels, lanes, bars, etc. The lamp of the tree is the perfect solution for the interior, trimmed under the ancient. It can be made it from a piece of trunk or from treated materials, for example, in the form of a complex geometric design of sticks, rings, cylinders or a square created from four or eight bars.
Master class: how to make a lamp of a tree sleep
We will need a trunk of a tree, grinding machine, hacksaw, LED tape (2 m), brushes, wood varnish, glue, matte plastic tube. First, the barrel is cut into sections of the same thickness - about 2 cm. Then in the center of one of the sleeps is made template. He and all other sections are burned by markup. Measurements should be carried out carefully, due to poorly marked fragments, the whole process will have to begin again. After that, they must be pasted. The next step is to strengthen with glue and laying on gaskets for drying. After that, the logs are covered with varnish. In parallel, you can prepare a matte tube - a rod for construction. Its surface is processed to the maximum effect of mattness. The spears are put on the tube and then will still take one more step. The latter is mounted tape. It must be folded in his hands and in this form to put in the tube.
The list of necessary materials and tools includes: self-tapping screws, drill, chipboard, brush, acrylic varnish, electric shoe, 4 cartridges and 7 two-meter rails. From the chipboard you need to cut blanks, and their edges can be saved by the edge. Rakes are collected into a single design in the form of a cross-shaped diamond form in the center. The base is cut out of the 5-millimeter sheet of plywood. In places where the rails create intersections, pieces of bamboo sticks or seasons are installed. At the heart, it is necessary to drill 8 holes: 4 is intended for the ceiling, and as much for the main part of the lamp. From tin, you need to bend 4 corners with beveled edges. They are mounted in self-drawing so that open parts of the corners are directed inside the lampshar. The entire wooden frame is covered with varnish twice, with a drying break. At the end, the cross-shaped design is screwed by the confirmates.
It can be made of twelve stripes. For the inside, it takes a smaller - 60 cm, for external - 70 cm. Strips are made from the sheet: they are cut along the fibers with a steel line and a knife. On a large paper sheet, you must draw a circle with a diameter of 350 mm. It is divided into sectors of 30 °. On the left and right side of the lines separating the sectors, parallel lines are drawn along the perimeter of the circle to determine the desired position of the veneer strips. Then the disk with a small hole is prepared to lay the stripes. They are glued clockwise in the form of snowflakes, first three short, then three long. After drying the glue in the structures of the strips, it will take a hole with a width of about 1 cm. The wire is encountered through it, and the sleeve is attached to the disk. The hanging ends of the strips are fixed with the flange and bolts.
Lamps from textiles and threads
To create a lamp, you can use old clothes: jeans, golf, spoiled dresses, etc. The products are decorated with bows, pockets, threads with beads. In almost all cases, the fabric needs to wear on some framework. It can also be made with his own hands. It is better to choose a metal as a material, sometimes a tree. The basis for homemade chandelier from the fabric can be factory lamps, both new and old. The tissue of an ordinary old lamp lamp can be removed, and instead, consolidate modern, with stylish patterns. To create and design home-made chandeliers use threads of different thickness. They wind up various jars and frames, join the parts of the lamp and hang the design. Instructs look like lampshades of hardened threads. In addition, they also use twine or ropes. They successfully combine with different tissues and paper.
Master Class: Flood Flood Light
To create this product, you will need:
- The base from the desktop lamp.
- Glue.
- Thick threads (up to 4 clubs).
- Air balloons.
First inflated balls. Better somewhat, because they can burst. Their form should be perfect round. On each of them, the felt-tip pen is drawn a decade-cated circle. Through a hole of this size will be inserted with a light tube. The ball is placed on the loaf. Glue solution is prepared. In the hands you need to wear rubber gloves to glow threads into it. When they are impregnated with a solution, they get them; Then removed glue bunches. The end of the thread is tied to the node of the inflatable ball. After that, she is wrapped around the entire ball, it needs to be done evenly over the entire surface, but chaotic. It is advisable to use several threads of different colors. Then the ball is suspended until the design is dry. Then it is shoved, and the knot is cut off. The ball is extracted through a large hole, into which then you will need to insert a cartridge with a light bulb.
Label from fabric do it yourself
You will need dense paper, glue, cloth, threads under the color of the fabric, pins, line, pencil, iron. It will be necessary to make a template to calculate the desired amount of tissue. If the lamp shape must have a cylindrical shape, then the circle and height measure the corresponding lines alternately, creating a straight angle. The opposite sides of the rectangle are drawn. From the paper cuts the desired form. It is applied to the fabric. It requires a larger rectangle from it. It is cut after the desired fragment is selected. Then the matter is fixed on the template with a pin (its edges need to bend). After that you need to use a sewing machine. Processed fabric strokes iron. After that, it is glued to the base. Unprocessed sections are hiding. The seam is done so that the base is closed with a stitched edge.
Plastic chandeliers and lamps
Plastic became one of the most sought-after materials in the modern interior. This also applies to lamps - most diverse models are sold. You can make a chandelier with your own hands, which will not give up with finished products. The lighting device plander is constructed from anything. It can be disposable cups, various wands, painted plastic bottles. They are sometimes decorated with decorative devices: figures, luminous details. Various metal frames can be used as auxiliary material. The easiest way to make a desk lamp. You can use cut parts and shapes with holes. Instead of throwing out unnecessary plastic objects (used disposable dishes, etc.), it is better to try to make a small lamp that can decorate the room.
Master Class: We make plastic spoons
It is necessary to find a large number of identical plastic spoons, up to 200 pieces. Describe the product from integers will be more difficult, but if you cut them, then everything will turn out quickly and simple. Pens spoons need to cut off and remove, leaving only the breadwinner. Then you can use the finished lampshade for pasting the elements or cut it out of the eggplant. It makes the bottom of it and do a hole for a light bulb or the top of the neck is cut off, leaving a wide hole. Next you need to decide on the pattern. The upper surfaces of the cups will create a sink pattern, and the bottom - "schellow" surface. If you choose a second option, then jumpers should be glued to the core. First, it is separated by the upper part, laying out one by one rows of spoons. When the process comes to an open part, then you need to calculate everything so that the last row hid the cut edge of the core.
You can apply as fastening:
- glue;
- office plasticine;
- scotch.
Steel wire for frame, thin wire, soldering iron, scissors, ten plastic bottles of various shades of green. From the bottles you need to cut leaves of different sizes and shapes. Perfect fragments in the form of birch leaves and other leaves with a more or less compact form. Thus, it will be more elements. Sections, imitating plates, better handle the soldering iron to make them slightly bent. The edge of the sting should also be made by the veins: the leaves will gain a more natural look. Since the bottles have a cylindrical shape, the blanks will be with curvature. A hot needle is pierced holes for thin wires. You need at least two on each leaf, but even better four to turn the "eight" wire. Everything is worn as many sheets as possible. Then flexible wires are reliably twisted for the frame of steel wire.
You need to handle the soldering iron as much as possible so as not to burn your fingers and do not burn the leaves.
You can make several types of such lamps. Materials that will need: rubber legs, silicone sticks, a fluorescent lamp, a circle of fiberboard, CDs. Tools such as a triangle line, pencil, cigl, adhesive gun, screwdriver, pliers, ticks, drill. In the round form from the fiberboard there is a hole in the very center, it draws twelve sectors on it. On the lines that share them, one small opening is drilled. Steel wires will be stretched through them, each of which will be a stack of disks. The design will be quite heavy, so metal wires are needed. In a hole in a circle, a wire with a carton is shoved, a light bulb is inserted into it. From the disks you can also make a lamp-polyhedron, a globe in the form of a bowl, petals, a lamp ring.
Methods for creating paper lamps
This material is popular because of its flexibility. You can construct an interesting feature or folded the sheets of paper several times and make flowers. Folded paper sheets are combined into rounded shapes. Paper lamps are performed as plants, animals, abstraction. Some love to make patterns and cutouts. In individual countries of the East, chandeliers of rice paper are widely used. For the manufacture of the lamp, you can apply Origami technique. Paper luminaires are created by two main ways, namely using one or more large sheets or gluing a large number of paper elements. Over the past ten years, the popularity has acquired desktop and floor lamps. From paper you can make lamps, rugged pumpkins and houses. This material is suitable for creating a lampshade of traditional form:
- conical;
- cylindrical;
- elliptical.
From rice or parchment paper
Rice paper is useful for creating a Chinese lantern. Additionally, the thread, awl, the stationery knife, a ruler and a pencil. First on paper you need to mark. The lantern scheme consists of a variety of rhomb-shaped sectors. Half of them are filled with vertical intermittent markup. After that, the sheet is folded into the harmonic. It turns into a circle. To the top and to the bottom you can glue the painted covers. To make a plate of parchment paper, you will need a marking board, a circular knife, two leaf of parchment paper, two rolls of wax paper (similar to parchment), scissors, silk tape, suspended frame. The strips of a satin tape with a length of 18-20 cm and 40 cm are attached to the frame structure. The final stage lies in pasting on ribbons of mugs from parchment and waxed paper. Attach them you need a mustache.
Origami Chandelier from Paper Packages
To make such a lamp with your own hands, you will need a wire with a switch, a LED lamp, two paper packs with a pattern. First you need to learn how to do simple origami. The next case has the bottom of the packages, the handles are cleaned. They glue into one big paper bag. It is folded in half. Both parts are "turning" in the harmonica. You need 16 identical stripes. The extreme of them are diagonally. Sille pierced holes. One of the two open sides is reliably fixed by thick thread. It is necessary to leave the ability to regulate. The second will be open. The LED light bulb connects to the cartridge, the top of the lamp is open and closes back. It is necessary exactly such lighting, it is impossible to use incandescent lamps. The wire is fixed on the high decorative tree branch - the product is ready.
Products from corrugations look very original, so the material has become so popular. LED lamp, cable, thread, glue, knitting, spin, ruler, corrugated paper 44 × 88 cm fragment. First, it is necessary to take a ruler and handle and place paper on the line with the same width. Focusing on drawn lines, you need to make an even leaf accordion. With the help of the knitting needles, it is diagonally from one end, then returns to its original position and folds on the other side. Paper must be deployed again - diamonds should be released on it. The entire sheet now consists of double forms. The first and subsequent bend must be made by the corresponding bandwidth, otherwise the appearance of the paper will deteriorate. The billet twists in a spherical shape, and its upper part is fastened with the thread.
Butterfly chandelier
There are two ways to create such a lamp:
- One big butterfly.
- "Roy" of small moths of different sizes.
Babies of preschool age will like the lamp shade in the form of a variety of suspended figures. Separate parts of the lamp can descend to one and a half meters from the ceiling. The base is taken as the old lamp shade or its frame. If there are no such blanks, you can use rim from metal or wood or thick wire twisted in the circle. You need to prepare sheets with butterflies templates to select the butterflies of the necessary sizes and shapes. It is recommended to make moths at least five different sizes. Then the design will be visually greater. Butterflies are cut with small scissors or stationery knife. It is desirable that the paper is dense. Cut figures are painted with different colors, decorated with sparkles, but on some butterfly patterns can already be color. To bring the product to readiness, butterflies are fixed on the woods and fastened to the base.
The finished Chinese lamp can be used as a basis for other products. They are cheap. It will take an ideal round model. First option: Cut from the fabric circles of different colors and glue the mustache. From the Chinese ball you can do something like a round lamellar cone. The second method: circles cut out of the sheet paper sheets. They are connected in the center, the edges are lifted until the perfect flower turns out. Elements are attached to the ball ordered rows. Beautiful tartlets are obtained from paper sheets. They should be filled with something. Paper is also folded into square envelopes that can be turned into four conical molds. Some use the old wall card instead of paper. In any interior there will be a stylish newspaper lamp shade with printing images of gray or brown.
Metal pipe lamps and loft style tubes
Injunctioning water pipes with cranes can be mounted in a single design, equipped with light bulbs and create, so stylish and useful thing. It is better to post on the wall. This is a very popular element in Loft style. Luminaires are created from large and small pipes in steampunk style. These are complex designs, without special preparation to make them fail. However, you can construct a small robot with "head" in the form of a light bulb. Beautiful ceiling chandeliers are made from pipes. In addition, there are a variety of models of lamps made of metal pipes. Brass is often used as material. Chandeliers are created in the form of compositions of several tubes. Pipes, as a rule, are made suitable, but lamps with various patterns and openings are also produced. They are not inferior in popularity lamps in the Loft style.
You can make it possible to make a beautiful product in the form of a brilliant facet. In addition to the pipes themselves, sandpaper, jigsaw, twine or wire, gloves will be required. To create an original chandelier, you will need 20 pipes: 10 short (6 cm), 5 medium (12 cm) and as many long (25 cm). It is necessary to find a few long blanks, place them and cut the jigsaw. After that, you need to grind the sanding paper, so that the edges of the tubes are perfectly smooth. Further fragments are collected on thick wire or the twine. First, horizontal rows are created: the lower out of five short and medium from the same number of medium tubes. Then they are connected by five more short tubes. The upper part of the design is made of five long fragments that need to be combined with the already cooked part. Long pipes are not completely reduced, in this place you need to fix the cartridge.
Lamps from sanitary pipes
It is necessary to prepare such devices as an electrical cable, tape, tape, different screwdrivers, two-tier wire, cartridges, hinges, fittings that match the parameters of pipes. One of the tubes should be more - it is she who serves to fasten the ceiling. The assembly process is quite complex. It is necessary to create a scheme on paper, and already be accepted for business. At this stage are determined with the configuration of the structure. Splitters need to be combined correctly. All parts of the prepared design can be polished and painted. Preference is better to give white, red, gold and black colors. You need to wait about a day so that everything is completely dried. After that, all pipes are collected together. They are tightened with light bulbs. The last stage is a connection. Since the scheme is complicated, it is better to invite a specialist.
Using glass to create lamps
On the ceiling you can hang a composition of several empty bottles of alcoholic beverages. Three-liter banks can be swallowed for metal chains. Glass dishes are also suitable as a ceiling. The lamp made of multiple glass fragments can mimic a crystal chandelier. Broken glass objects find a new purpose in the form of an original lighting device. Beautiful desktop lamps are created from glasses and fuels. Various glass boxes can be useful, glass from old wall bras, headlights, interior doors. A homemade glass chandelier can be calculated by watercolor or stained in paints. It turns out beautiful stained glass windows. To create suspended lamps, the masters use a variety of decorative containers from under oils and perfumes. Unlike wood and paper, glass has high fire safety.
The list of necessary fixtures includes nippers, screwdrivers, screws, glass cutter, silicone, rag, or brush, stool, pine boards, hooks, chain, ten light bulbs, wiring, bottles from wine. The first thing is handled the containers. Labels and remnants of glue are removed from the bottles. With the help of glass cutters you need to remove the bottom of each bottle: it rests on an altitude of 1-2 cm, and the bottle is spinning around its axis. Cracks need to be sufficient with a hammer until the bottom does not disappear. After that, the electric pipes are placed in bottles and connected with cartridges. They screw light bulbs. Now you need to cook boards. In the lower, greater, hole holes for torn and wires are burned. The top will collect them in one bundle. The hooks for chains that will hold the design are screwed into the lower board. For the kitchen you can make a desktop lamp with a base of a bottle and a plastic from a tree.
Wooden boards can be covered with mourn to give the effect of "old".
Use old cans to create lamps
Old jars can find a new destination. Luminaires can be created using threads, electrical wires, cans for cans. Capacities need to be equipped with handles. They will need to be tied with threads that are fastened to the prepared pre-iron frame. Electrades with cartridges and light bulbs are lowered in banks - the chandelier is ready. You can make an option for giving - Threads are tied around the branches of the tree, and candles or small lanterns are put inside the cans. Beautifully look at the containers, wrapped with multi-colored threads or decorated with patterned napkins. The inner of the cans can be painted in white, and while it has not yet dried, apply a drawing in the form of chaotic lines. Some paint the container from the outer side with different colors, and on top paint an image using wicked shadows. Banks can also be saved with small glass.
Chandelier / Shebbi-Chic Lamp
Beautiful decorative things are created from beads and fabrics, including lamps characteristic of this stylist. SHEBBI-SHIC decoration provides that the room is designed for a girl or a woman. You will need beads, beads, threads, chains, cartridge with a lamp, ready wooden or metal frame. First of all, you need to paint the foundation in some of the soft shades. After that, it can be wrapped in decorative elements or cloth. The top of the ceiling is winding smaller beads, but in more - one thread should be rolled to 40 beads, and about 20 on the lower threads - about 20. This is an exemplary proportion, it, like the tension of the threads, can be changed depending on the size of the design. The lamp is usually tightened with a pink cloth. All decorations suspend so that they flow down.
Conclusion
The chandelier is the only important element of the top of the room, it can create symmetry and other geometric accents. To hang in your room beautiful, stylish, designer lamp, not necessarily buy it in the store. Each house has enough items and tools to do everything on their own. In most cases, there is enough workpiece, scissors, paper, glue, thread, frame, varnish and paints. Sometimes it may be necessary to help the electrician specialist. Most of the "handmade" lamps are performed from wood, plastic, paper, glass, textiles or metals. More exotic options are found using different designs, small parts, molds. A homemade chandelier should not only perform aesthetic function, but also high quality room. Design it follows with the mind.
 Why you can not give icons
 Is it possible to give icons as a gift: Signs, the opinion of the Church
 A year ago left her husband, and now I do not know what to do