Bas-relief on the wall - stylish interior decoration. Basanephs in the interior of the apartment: Advantages, photo decoration of bas-relief
Let's talk about how you can make a bas-relief with your own hands. This question is worried about many property owners, and therefore deserves a detailed study. Many people in our time are trying to make a certain highlight in the interior created.
For example, bas-relief in the interior gradually acquires new fans. It makes it possible to implement interesting ideas to decorate the interior of residential premises into reality.

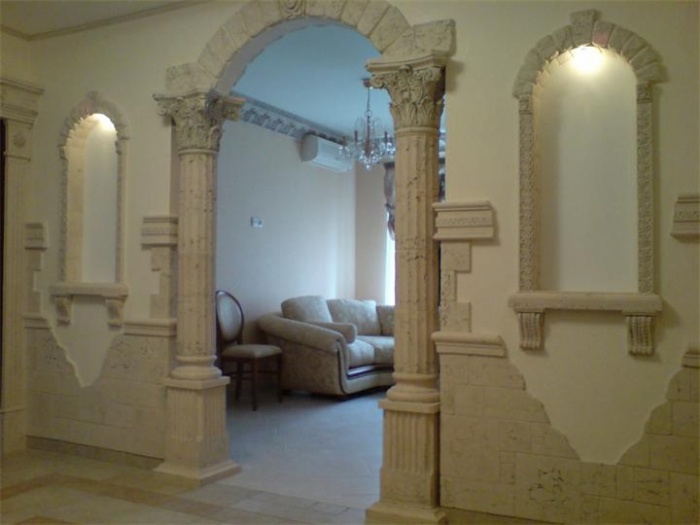
How to make bas-relief on the wall with your own hands? This design taking stylists often use when decorating mansions in which there is a real fireplace.
Original plaster ornaments can catch fireplace, as well as decorate window and doorways.
Attention! The highest pilot in the interior world is a decorative pattern, which includes additional backlight. With it, it is possible to give images of 3D graphics.
How to make bas-relief on the wall with your own hands? We offer step-by-step instructions, compliance with which will create an original relief on the wall with your own hands.

How to create a bulk drawing with your own hands
Those owners of country houses whose profession is not related to repair, believe that such a decorative element, like a bas-relief, is a prefabricated design, cast from plaster. In reality, this element of the decor is made manually, so it can be performed with the original product of modern art.
Any elements from plaster and putty are unique decorative elements, a sketch is first composed when creating them.
Tip! In order to create a volumetric pattern on the wall, some skills and skills are needed, compliance with technological features.
Before creating bas-reliefs on the wall, it is important to choose materials. Currently, alabaster, gypsum, plaster, clay are used for the manufacture of bas-relief.

By choosing a material for making decor, you can move to the manufacture of the base, which will be the base for the future bas-relief. For work it will take a wooden box having low onboard.
Attention! The bottom in the created box will be plywood.

The dimensions of this box will correspond to the size of the created bas-relief. Instead of a box, you can use a box that has a rigid base and walls. The base of the box is neatly covered with a polymer film, following the folds, the folds are not formed. Next, you can move to the process of preparing the solution, fully observing all the manufacturer's recommendations.
After the solution is ready, it is neatly poured into the form.
Attention! In the manufacture of bas-reliefs with high drawings, the wire for the reinforcement process will be required.
The blended mixture remains in the drawer until complete drying, the duration of drying depends on the composition of the solution.
Next, you can proceed to the direct manufacture of the future bas-relief. The main condition is to create a specific contour of the estimated ornament, the subsequent filling of it with a mixture. The decor extension is gradually, and the previous layer must dry out, only then you can create a new layer.
Tip! To draw contours on the finished surface, you can use the film. After all the contours are drawn, the film can be removed.
As a good material for the manufacture of original bas-relief, interior stylists consider plaster. Among the numerous advantages of this material, we highlight the convenience of work with it in a wet state. This material is sufficiently pliable, so you can remove excess plaster, to adjust the shape of the picture being created.
Plaster, which is not fully dried, you can take an open, giving the ready-made bas-relief.
As a mandatory condition for creating a high-quality and beautiful bas-relief, professionals celebrate the complete hardening of each fragment.
In order to create a deepening in a wall panel, you can use in several ways:
- cut out the material and remove the chisel some parts of the bravel created;
- increase the background around a certain point, which will be lower after completion.

Basically, a flower is used as the basis of images on the created bas-relief: tulip or lily. Not everyone can make it possible to make such a complex drawing on their own, so many country house owners try to order bas-relief to professional masters.
In order to simplify the process of creating a lily from plaster or plaster, you can immediately apply it to the surface of the wall.
In such situations, all other elements of the interior must be closed with a special painting ribbon to prevent their damage. Then the resulting base of the pattern is coated with putty, and after a complete drying, the primer is performed.
Tip! Professionals recommend choosing to primitive paint - soil, the properties of which make it possible to create an excellent coupling with decorative elements of the created bas-relief. For complete drying of the finished mixture, it is necessary three to four hours.
With the help of Kelma on the bas-relief, Marseille wax is applied, which is quick-drying material. Fixing the film on the surface of the created bas-relief, it will be possible to draw small details.
Attention! The film must be fixed so that one of its edge can be flexing if necessary.

The outlines of the planned pattern on the film can be drawing, armed with a color marker. Further, moving back the polymer film, on the trails made, you can draw Lily, using Marseille wax. The painting is carried out along the wall, so there is no need to use a special substrate.
Many interior designers choose to carry out work related to the manufacture of bas-reliefs, white wax. The main task of the master is to give the created bas-relief of optimal realism.
Tip! Acrylic paints are suitable for the manufacture of the finish layer of the composition being created.

Conclusion
For a person who is not encountered with a similar decorative element, it is difficult to decide on an independent creation of an unusual bas-relief in your country house or an urban apartment.
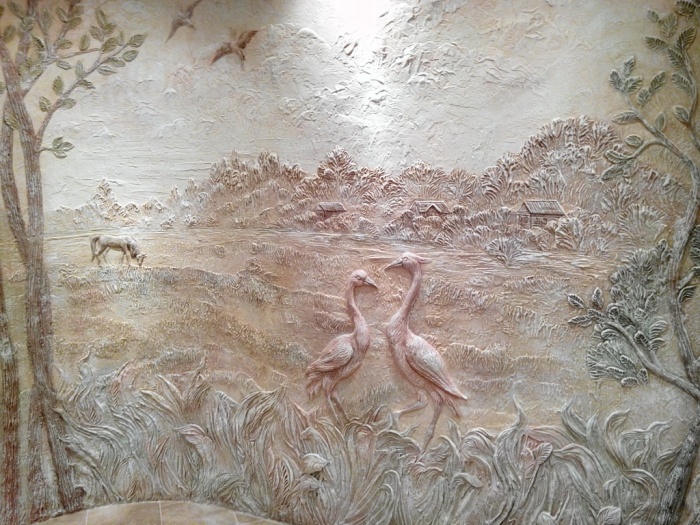
Basically, the bas-reliefs depict trees, flowers, animals, birds, and also create original storylines.

The fashion trend of the last season is the creation of bulk images that originally create in the box are then fixed on the wall.
Even when creating the most simple version of gypsum stucco, you can count on obtaining a solemn and elegant interior.
For complex compositions, professionals are recommended to create bas-reliefs directly on the wall surface.
The bas-reliefs fit both the interior of the bedroom, the living room space. With it, you can make the kitchen individually and unique, focusing on its finishing.

Finished bas-reliefs are suitable for interiors of different styles, starting with modern, ending fusion. To create large pictures, it will take perseverance, accuracy, desire.
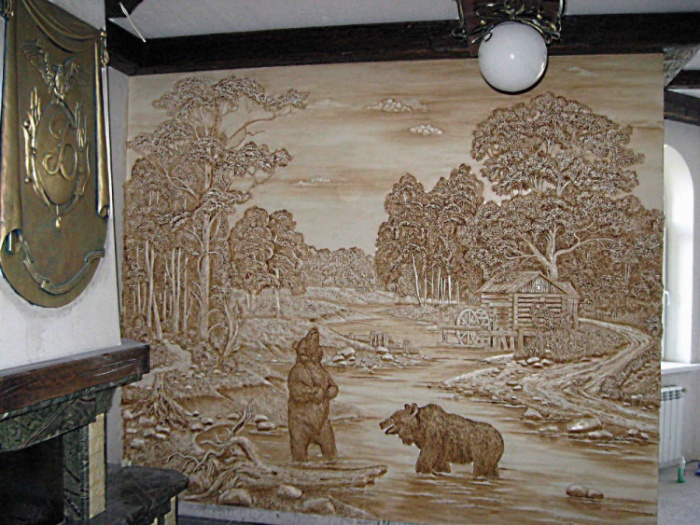
For the manufacture of an individual genre painting, on which wild animals will be depicted, a professional master will be required.
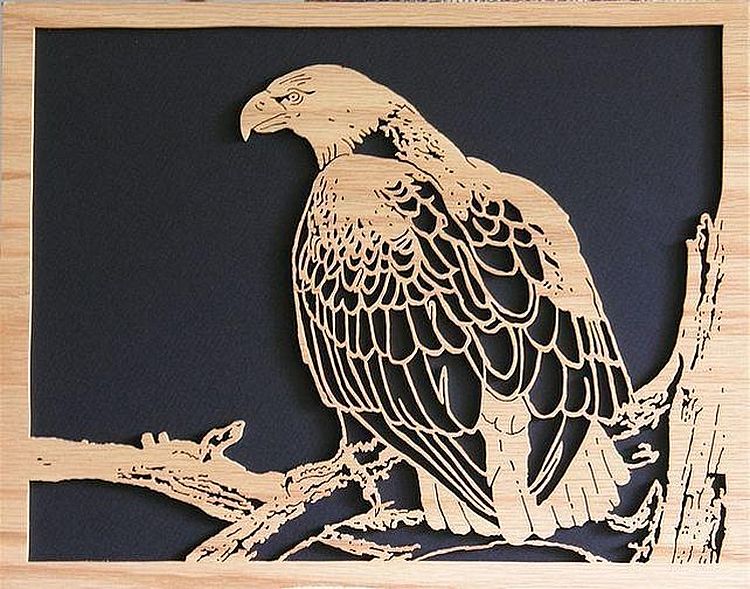
Once the interior decoration with stucco and bas-reliefs was available only to the highest nobody, the ricers and great temples. Nowadays, make a bas-relief with your own hands - the question of only labor and patience. Achievements of modern technologies allow us to bypass the technical difficulties of creating stucco at home to people who do not have artistic education, but not devoid of artistic taste and fantasy. Create bas-reliefs like those in fig. Below, quite under the power of a patient and attentive lover.

New materials
In addition to traditional material for stucco - gypsum - stucco, with their own hands, can be created from modern building mixtures with polymer additives; They are often united under the overall name "Acrylic plasters". How to type the volume of bas-relief with construction spacing compositions, you can learn from the video:
Videos: Basper Implazing
In favorites in the course there is also a basic composition of architectural plaster, acrylic plaster and PVA glue in the proportion of 1: 1: 0.5 by volume. Gypsum and plaster mixture are mixed with dry and indulge in water, i.e. Add water to the mixture, and not vice versa. Conduct to consistency from the test to yogurt or skim kefir and PVA, thoroughly stirring. The thickness of the mixture is chosen according to the nature of working with it, in which case is needed, see below.
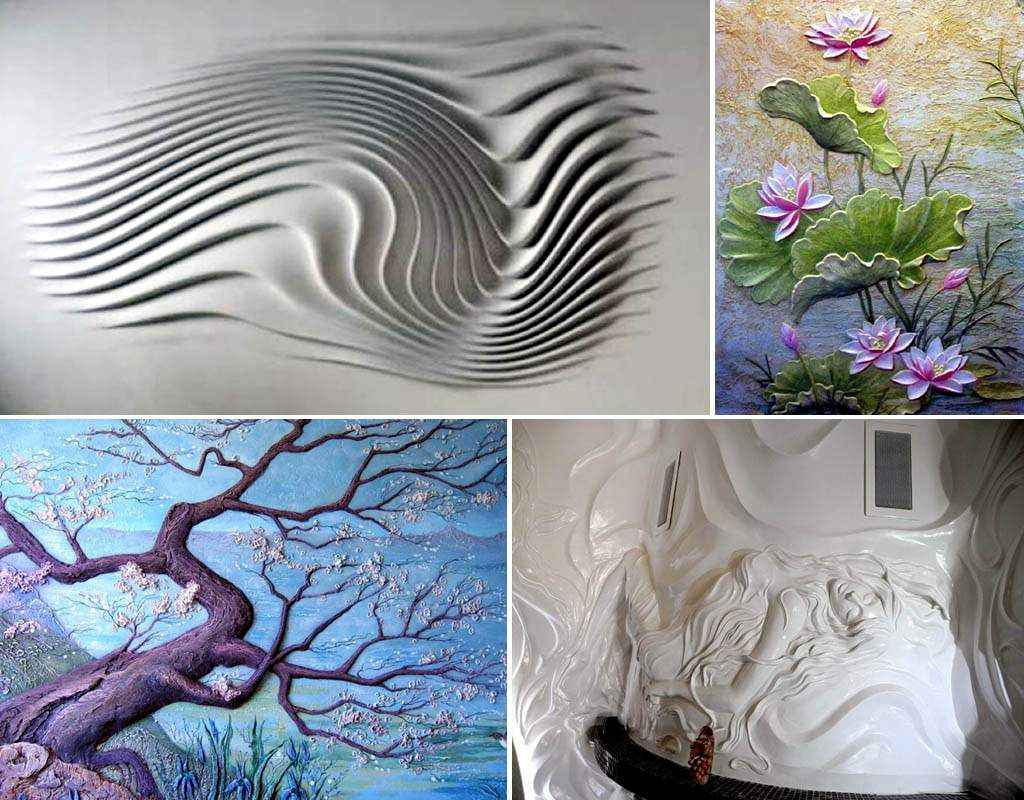
The bas-relief on the wall is performed in the low relief technique (at the top of the left in Fig.) Or high, with protruding figures (above the right). The high bas-relief is called the burrow. Technically, the terminal differs from low bas-relief by the fact that the figures are shaking as a round sculpture (see below). Low bas-relief looks well in any lighting, except for a dull, and the burner is advantageous in the scattered light.

In residential premises, illuminated most often quite brightly and evenly, it makes sense to use the mixed equipment of the bas-relief (left below), without making figures very convex. How to cut out the bas-relief "Tree Climt", see for example Video master class below:
Video: Master class bas-relief "Tree Climt"
The peculiarity of this work is that it uses almost all techniques for creating bas-reliefs at home. Having acquainted with them, it will be easier for you to understand further and apply them in any technique from those described below.
Note: At one time, the Austrian artist Gustav Klimt created the composition "Tree of Life". Its style is so unlikely that the expression "Climt tree" became the winged.
Reverse bas-relief, or counter-relief (downstairs in the center on the top rice.) It is no longer stucco, and the stone carving (contours cut into ruffles), which is technically much more difficult. Therefore, we only note that the counterrelf need a bright and sharp slap light, because The image draws actually shadow. There is still a special type of bas-relief - shadow, bottom to the right, where the entire drawing is formed by shadows from small and smallest protrusions and a definite shape. With the change of direction and the angle of the fall of light, the drawing changes, up to the change in the expression of the person during the day. The shadow bas-relief is the highest art and, alas, short-lived: the protrusions and the depressions are clogged, and they lose the form from cleaning. Figure fade, blurred, disappears.
Bas relief technology
The stucco on the wall at home can be performed by one of their following ways, in order of increasing technical complexity:
- Loose plastering, i.e. initially not fixed on the reference surface, not removed models;
- Playing not removed models on the support surface. These ways are especially good for beginners, because Allow to receive acc. High and low relief, not risking in case of failure the need to redo all the work again;
- Reverse cast from plaster on a removed model. The method is somewhat more time-consuming, but also suitable for newbies, because Over the model, you can nourish as much as it will not be brought to the ideal. In addition, in one model, a table (form, mold) at home can be pulled to 20-30 identical products;
- Art gypsum stucco in place, i.e. Directly on the support surface. Requires solid skills, but makes it possible to create large embossed panels in the entire wall, with the overseas of corners, entering the ceiling, and complete freedom of creative expression.
In place or on a sheet?
Make bas-relief methods 2-4 is possible both in place and parts on the table or semi. Excellent base for fragments of the bas-relief - plasterboard sheet, GLC. It is prepared as a base surface (see below), on individual sheets or their pieces of the desired form, parts of the overall picture or complete compositions (see Fig.), And fasten on the aligned wall.

The fasteners and junctions of fragments are put on the base composition, then plaster and rub it under the basic texture. It is also good in the team bas-reliefs that spoiled by inexperienceing a piece can be remade, not the touch of the rest. And the bad thing is that the whole composition is obtained by severe; Fasten the bas-relief to the weak walls (drywall, partitions from the PGB, etc.) can not be. However, loading weak walls with bas-reliefs is not recommended at all - the bearing base should be stronger than the composition of the composition.
Tool
Making a bas-relief will require to acquire some special tool. Not very expensive, but it is not necessary to count on success without it. First of all, half of the rubber ball for kneading the next portion of the working mixture. It immediately falls out of it, if you turn inside out, and the suckers flourished in the same way. Bas-relief will be the stronger and more beautiful than to form it faster, i.e. The further the working solution is from the beginning of the setting. The ball for the knead is reduced to the loss of time on shaking, embarrassment, etc. to zero. Pick up a solution with small portions from the ball is also more convenient, because There are no corners. For the same reason, it turns out to be more homogeneous (homogeneous), and this is one of the most important factors of the ultimate artisticity of the bas-relief.

Next, we need spatulas for modeling - Mastichens. Set of 6 pcs. (pos. 1 in Fig.) For starters enough. For the formation of bunch of grapes, scheat, etc. We still need convex-concave spatulas. Sets with such cost expensive, up to 30 thousand rubles. (!) For a set of 48 items, so lovers instead of them often use spoons of different sizes (coffee, tea, dessert, table), with round and pricked tips. However, to remove low relief spoons is simply so impossible, the bending of the handle interferes. Therefore, for each spatula take 2 spoons of aluminum and other plastic metal. One uses as it is, it will be a convex spatula. And the knob of the other at the scoop itself is twisted 180 degrees and bent back, a concave spatula is obtained.
Note: Not bad convex-concave mastichens come out of disposable plastic spoons and forks. To obtain a concave spatula, their handles are heated by a lighter from the drawba, twisted and rejuvenate with heating.
You will also need another mastikhin - art knife, pos. 2. Painters they consider the old paint from the palette, and the sculptors hang the edges, cut off the breakdown, put fine texture. Knife Mastichein is perfectly replaced with a wide shoe knife.
The next needed tool is a confectionery syringe with nozzles (pos. 3 and 4) and, possibly, medical for 20 ml without a needle. The confectionery syringe is very desirable to take with a curric drive (pos. 4). The mixtures for bas-reliefs are far from so far as cream for cakes, and form a syringe of twigs, rosettes, leaves (well, what cakes are disappeared, everyone saw) you need, holding it with 2 hands; Leva hold the tool at the tip.
Finally, you will need 2-3 flat picturesque brushes of different sizes and as many round, cheapest, from a bristle with a bullish ear. Dear squirrels and speakers to buy for the bas-relief "Krutisna for the sake of" no sense, they are too soft. Also need a completely tough and rude children's caproic bruster for drawing. In the texture of the texture (see below) and the minor area of \u200b\u200bthe bas-relief are placed.
Working with a tool and care for it
Mastichens and brushes before a set of next portion of the mixture are loose in water. Remains and drums on the working body are the key to spoiled work. After working, the syringe is dismantled and in parts are lowered into water; Mastichens with brushes are also put there. When the tool is offset, the remnants of the working materials are thoroughly flushed with clean water. By the way, the correct confectionery syringe after work on the bas-relief is also suitable for use in direct intended. The whole tool must be stored absolutely clean.
Basialef technology
Creating a bas-relief on the walls in the apartment (or on the sheets of GLC, if the bas-relief is the team) stages are as follows:
- The base surface is cleaned from the old finish, it is not worse than 2 mm / m with accuracy, it is ground and covered with a base composition or any decorative plaster (see also below). GLC Under the Bas-relief Bas-relief does not require;
- According to the base coating, the background texture is presented: a foam or darling roller, "progress" with foam rubber or felt, etc. At the same stage, the base is toned, see below. If the basic coating is decorative plaster, invoices and toning is not required;
- In one way or another (from the above and described below), relief is formed. During the formation of the relief, toning is possible similarly to that for the foundation;
- If necessary, the relief of complete drying is scratched on top. Conveniently surface staining to make special paints for plaster stucco - they are immediately chosen in very thin halftone with a wet sponge. More sharp color transitions will give acrylic paints;
- Fully dried relief is covered with styrene lathex (sold in construction stores). Paints on dried gypsum stucco faded, as on frescoes, and latex treatment restores their coller;
- After 1-2 weeks, so that the excess latex is completely absorbed and disappeared, the finished relief of the need varnishes acrylic varnish.
How to tint stucco?
From the video above it is clear that the formation of a stucco bas-relief need to be layered. To toning the foundation for the relief and, if necessary, its parts, layers are imposed thin, 1-2 mm. Typically, the layers of kneading gestures of low-fat sour cream are applied to brush and smoothed with a knife-masticine. The kneading for each layer is tinted with a plaster (pigment) for gypsum; The deeper, the same darker, or vice versa. For example, for a tree bark take a brown pigment all decreasing concentrations, and for the leaves of green as it is promoted to add. The next layer is applied to the clutched, but still wet previous one. The texture with shades can be brushed immediately or then wipe the sandpaper-zero or, coarse on large areas, metal brushing. For more information about toning plaster stucco, see the video track.
Video: what to cover bas-relief on the wall
"Free" drying
This method is used to create high flower bas-reliefs or low patterned overlays from disposable paper napkins. From the latter, applying as a model inverted and lubricated with a lanolin plate or a bowl, you can get a gypsum vase, but the practical meaning of it is more than doubtful. The basic solution described above is not used. It is durable, keeps well, but its color is not pure white. Also does not apply toning due to excessive material consumption; Ready items are scer.
For dryness, a liquid, almost watery solution of architectural gypsum is prepared. It is dipping the model (artificial flower, napkin) and put on the board covered with a plastic film. Flowers are put in the position in which they will be in the finished composition, see fig. When the solution is grabbing, perch again, then still, until the model is thrown into a layer with a thickness of 1-1.5 mm.

Flowers for drying are put every time in the same position. Thus, flat sites are formed on them, allowing them to firmly glue them to the base. Glue acrylic plaster of thickness sour cream or acrylic glue. You can glue and pva.
Plaster on the spot
This is perhaps the most accessible way to do, say, stucco ceiling under the chandelier (see Fig.) Without experience. The modeling of the model on the spot differs from the previous method in that the model is first glued at the place, but a plaster with a brush. The gypsum solution makes a walk like sour cream. If the stucco on the ceiling, the layers are very thin, translucent, so that there are no drowshes. Accordingly, the layers will be required to 10-15 or more.

The main snag here is the material of the model. Usually they are made of foam, foam, polyurethane, and other soft plastics. But over time they are all decomposed. It happens very slowly, but still, after 3-7 years, dirty-gray or yellow-brown faded stains begin to appeal on the stucco. Therefore, the models for drying in place are best to sculpt from a salt dough, of which the Christmas toys do with their own hands. To plaster, stone, etc. Mineral building materials salty dough gluits acrylic glue or any assembly. The stucco on the unsuccessful models from salt dough retains the appearance of 30-50 years and more.
Reverse casting ...
This is the most common way to create stucco with your own hands, allowing without excessive work and the ability to receive results quite professional appearance and quality. The classic reverse casting procedure from the gypsum is shown step by step in Fig., Pos. A-e. Model 1 of plaster, plasticine, plastic, etc., or a model product, which is desirable to repeat / replicate, stacked on a flat shield 2. Now, to make it easier to pick up the model, the shield is covered with film.

The model is then launched a thin layer of Lanolin. Use medical vaseline is undesirable, the model can stick to the table. Gypsum and any other porous (wooden, salted dough, stone, etc.) The model is missing several times, giving Lanolin to absorb an hour or two, while the surface does not appear with a solid beast.
The model is further failed with a layer of plaster or alabastral solution 3 thickness of the test of OK thick. 1 cm, forming the protrusions-anchors 4 and the ribs of stiffness 5. The climbing and almost hardened, but even slightly pliable coating is tied with a frame of soft (annealed) steel wire 6. The frame branches are bonded by ligaments 7 from fine copper wire.
The next step is a coating of 9 thick cement-sanded mortar from M150 layer thick up to 5 and somewhat more cm, this is already a casting mold. Here you need to not forget to form a support surface of the molding surface 8. After a set of a cement-sand 3/4 of strength (7-20 days, depending on external conditions), the finished table 10 is separated from the shield with a wedge 11. Well, and if the shield was a shield Film, the table is simply removed.
Finally, the inner surface of the alloy is cleaned with a copper brush 12 and, if necessary, corrected defects with plaster or alabastral solution. From the side of the setup 13 remove the breakdown and, from his inner edge, the chamfer. 0.7 mm. In the table without chamfer, the casting is almost certainly stuck. Before casting, the inner surface of the molds are missing by Lanolin, as a model. The molded mass is filled with layers. As soon as its penultimate layer begins to capture, the eyes are inserted into it with a mustache (right at the top in Fig.) For which the casting is then pulled out. For small siblings, the eyes can be made from stationery clips. The last layer is poured when the eyes are already sitting tightly in the penultimate, i.e. When it is completely solid, but a little more wet. Try the strength of the landing of the face of slying is unacceptable!
Currently, for editions up to 15-20 pcs. According to the old man, the plaster is not poured, they are cast to such cases from silicone (right at the bottom). The model prepared as in the pre The case is poured by silicone in layers, layers with a thickness of 1-2 mm, until the thickness of the OK mold will be achieved. 1.5-2 cm. In addition to technological simplicity, the silicone mold allows you to get castings with shallow excavations, because It is elastic and stretched.

Also in silicone molds, small rounded gypsum parts are poured: berries (see Fig.), Justice, Mushrooms, etc., right up to small fish. In this case, the plasticine is tinned with a tray, the model is also plevar from plasticine. Silicone is poured into Operation at once all; Opoku and model do not miss anything. Opening a silicone is simply dying, and the model is smelted. This is t. Naz. Mini - reverse casting of gypsum.
... and not reverse
In plaster mini casting, a remote model is already used; In the sense, the model disappears and for the next part of the castings need to be done again. The silicone table can be made under the gypsum cast on the model being paid, then it will be possible to get up to 100-200 and more castings, but already convex, without depression. In this case, Opech is made in the form of a box without a bottom of plywood with a height of 2-3 cm more than the height of the model and the size of such that the gap between the selection and the model is at least 1-1.5 cm.
The model is formed from wax on the shield shield. Then they put an exterior and plasticine shrink the gap on the bottom. Next, the model is layered by Silicon, as in before. The case, and when it is free to the last layer, it is also layered by the silicone along the contour until the scene is filled with the top. As soon as the last layer is covered, puffly plywood. The model is paid by a household hairdryer: the fastest silicone holds 140 degrees, which does not give hair dryer.
Lepak
The bas-relief modeling at the place allows, as mentioned above, to achieve the maximum artistic effect, but requires certain skills. You can buy them without signing up for the evening branch of an art university or courses. Sufficiently practiced with plasticine; The technique is the same, only in working with plaster time is limited - work with the next site must be finished prior to the beginning of its sealing. Technically laying plaster distinguish low (flat) and high (round).
Flat
The technique of flat modeling of plaster is shown on the selection of the photo below. Rules here are such. The first, material of the thickness of the dough or fatty sour cream is applied by layers. The second, each layer first smoothed, forming at the same way and the relief, and then hang its contour. The third, the next layer, as in general in layer-by-layer filling with plaster, is applied to the clutched, but still the wet previous one. The fourth, as the layers increase goes into a smaller tool. And the fifth, in each layer work lead from the most subtle and small details to thick and rude. In this case, from the teeth of the sheet to its petiole.

About branches
Breaks on bas-reliefs are best removing a confectionery syringe or, very thin, medical. The thickness of the branches adjust, stronger and weaker pressing on the piston (pos. 1 in Fig.). In this case, the texture is brushed in this case, and the foes are formed by the tip of the Mastichene. The syringe is filled with a base solution, and under painting and for snow-white plaster, as not a removable model in place.

Strong winding branches (pos. 2) can be obtained, seeing the cord or twine in the gypsum solution of the thickness of the sour cream, laying on the shield, shining the film, along the contour, and at drying to stick onto the wall. If the bas-relief is prefabricated, the cord is spread immediately, it will suck well. In order to obtain the branches of the decreasing thickness, some of the strands are removed or, on the contrary, drill 3-5 branches of twine at the river, then 2-3, then leave one. If the cord is shifting through the gypsum, the branch of the branch is on the spot, having a solution with a brush
Note: Breaks for bas-relief made of dry cord can be mashed several times in tinted damasters. The desired color is obtained by grouting with zero.
Sharp ribs
In the pictures with bas-reliefs you probably saw sharp ribs. They are formed folded large and index fingers, and large - bent back the fingers of folded both palms. The height and thickness of the edge change, smoothly shifting / spinging the fingers (palms) in motion along the formation of the edge. Fingers, as in general, for manual modeling, should be slightly wet.
Round
The basis of a round modeling is an anatomically similar object framework, i.e. With the proportions of the object and the location of the branches where the basic bone bones. The frame in the round figure works just like a skeleton of a living being. Information about skeletons can be learned from any course of plastic anatomy of man, animals and birds. Plastic anatomy of discipline is not medical, but an art education. The material is outlined there from the point of view, how to sculpt, and not to treat, and is designed for listeners, not located to the intricacies and rigors of science.
Figure Height approx. From 30-40 cm it is painted according to the frame as shown in pos. 1 Fig. For figurines, the framework is made simplified (pos. 2), but observing the principle of an anatomical similarity. In humans, he, by the way, is not so complicated: Growth is divided by 8; 1/8 of its part and will be the dimensional module of the harmonious human body, pos. 3.

Frames of small animal figures are made similarly (pos. 4a and 4b). The weight of figures is more bigger than desirable to reduce so that less than the end of the binding is with fixing the bas-relief (see below). In this case:
- The basic frame (pos. 5a) makes a volume of approximately by the contours of the minus 1-3 cm on the modeling, using the extra. branches from the same wire (pos. 5b). Auxiliary branches are attached to the main and fasten with a thin copper wire with a thin copper, and even better - soldering.
- In a liquid, as a fatged kefir, a gypsum solution is soaked for a medical bandage rollers, as for drying fractures of the limbs (see for example. The film "Diamond Hand"), and wind the framework of the frame, pos. 5V. It is the rolled babies to soak: as soon as the bandage starts to dying badly from the miscarriage, it means that Gypsum began to harden and the residue of the roll went into the departure.
- According to the complete drying of the hipged frame, it is slaughtered in layers in the base solution (toning can be used), they bring to the form and texture tool and skin, and plaster to pure white (if necessary) with a solution of architectural gypsum.
Note: For frames of deployed wings of birds, butterflies, elves, volatile mice, scapions, dragons, etc. It is convenient to use a thin and fine metal mesh. Another option is the branches of the main branches, painted with paper or scraps of kapron tights.
Support for figures
Figures for homemade burners are shaking separately; At the place too difficult. Therefore, each figure should have a flat platform, and on the base surface - acc. The plane so that the figures can be glued to the place.
How to mount bas-reliefs
The burner with round figures is pretty heavy. If 1 square meter. dm. Its reference area accounts for more than 1.5-2 kg, bas-relief needs to back up. Best of all, 80-120 mm rifled nails are suitable for this, driven into plastic dowels. The attachment points are placed in advance under the most thick places, distributing them as much as possible in the area. The nail in the dowel should sit in the wall at least by a depth of 50-60 mm. The protrusion over the wall is 1.5-2 cm, for which the nail drove into the dowel. The basline massif over protruding fasteners should be at least 1-1.5 cm.
SuperBarelf
And in conclusion - how to try yourself in the elite technique of shadow bas-relief. It will be necessary for this just a piece of GLC with a layer of fresh base solution approx. 0.5 cm and nail 100-150 mm. With the edges of the island of the nail, you need to carefully remove the oblast, so that it turns out the correct 4-face pyramid.
Let's consider the most popular techniques step by step.
Believe me, it's much easier than you think! But first, we will explain some technical points related to materials.
What makes a bas-relief? Materials, tools
Immediately alleged: step-by-step technologies and the full list of all components will be listed below, in the corresponding section.
First we will list only the main thing that you need to have:
- Alabaster;
- PVA glue;
- Finish putty;
- Water.
This is the basis of the foundation, but the auxiliary materials are already dependent on the type of drawings, with what we discern here and now.
The most solid bas-reliefs extend from alabastern mass, filled into forms.
Depending on the type of the latter, you can get absolutely any configuration of the convex pattern: fruits, flowers, seashells and even classic capitals.
The main thing here is to just find a suitable form, And the rest is just little things. Pour the gypsum at all is easy.
Here are about such elements of the decor can be made for some hour. This is maritime themes, and you are free to choose anything, to your taste.

These shells are poured with ordinary childish puzzles For sand and attached to sheets of plasterboard. And the frame framing is made by ready-made foam baguettes, which are usually attached to the ceiling butt and walls.
It seems, nothing complicated. Gypsum is fully in construction stores. But where to take a good form?
Here you will have to upset you, the choice is not so great: it is not necessary to find a little visually fitting the sample, you need to still, so that the material has respected the heating of the gypsum during the frost.

Yes, yes, he warms up strongly and expands! Therefore, forms for the manufacture of soap, let's not suit. They just burst and that's it, since they are made too thin plastic, not the best quality.
It is necessary that something is approved, like the same plastic mouths, and even better - silicone for baking. No metamorphosis of the material is not scared, since it is designed for large heating and stretching.

And most importantly, the finished product is much easier to remove from it than from something harsh.
With this type of bas-relief, we have a superficially understood, and we will give you a detailed description of the process below, in the appropriate subhead. There you will find a complete list of necessary materials and devices for each of the types of paintings with your own hands.
But besides casting, there is other versions.
For example, bas-relief from ready-made gypsum statuettes! It looks like this picture is extremely expensive, but its ultimate price cannot but rejoice.

Particularly beautifully looks at Panels with various Greek characters myths, such as Aphrodite or small angels.

If you take these ladies from the gypsum, not marble, then such a purchase does not hit the pocket. But it is not all the options!
You can make a very cute composition using ordinary flowers from matter whose species in souvenir stores do not find. In addition, you can use cones and other suitable forms. It will look like this:
The bas-relief of the gypsum can be made removable, as a conventional picture, and can be monolithic, as one whole with a wall, as you have already seen on the top figure with seashells.
And if you know how to draw, then it will not work for you to make a volumetric drawing straight from the putty, without using any auxiliary means and forms. But for this you need to have an artistic taste and the most elementary smelting skills. This is what can happen:
Or even so, but for this you need to be a master.

Here, in fact, all methods available to almost everyone. And now let's go to the specific And begin to finally do, and not dream!
We make a form for filling gypsum
If for all sorts of different seashells, fruits and bugs, you can find it and make it no sense, then for some parts, like grape berries, it is easier to make the basis yourself than trying to find it.
Of course, they can not cast them, but roll out of the shtlock, but it will look somewhat worse, as this material is more porous when drying.
In general, with a certain skill, you can make any form, using ready-made figurines. We bought one, and then poured at least ten! And you want to give them, you want to make a panel ...
Well, let's proceed. If we are talking about casting the berries of grapes, then you need to pre-roll out of the thick putty mass mixed with PVA glue, in proportion:
- Finish putty - 0.5 kg;
- PVA glue - 1 tbsp;
- Water is 100 grams.
We mix thick ground, pouring water gradually. Since its amount we gave about, because it can differ significantly in applying with different types of shtclowing.
After we knew, tack the grape and put it dry about a day. It should not burst, since the mass with the addition of PVA becomes rather resistant to cracking.
By the way, on the same top picture with seashells, you can see the wall at the bottom of the decorative smears in the technique. So they need to do so such a mixture, based on PVA.
Well, the grape dried? Let's make shape. We will need it for this:
- 0.5 liter of silicone;
- Box of plywood;
- Self-tapping screw;
- Brush.
Liquid silicone is sold in construction stores, and you can pick up a box any, you will lay in her grape and pour it with a silicone mixture.
The main thing is that it can be easily disassembled, and then collect on the self-tapping screw again, and the cutters smeared with a mixture of silicone. It is necessary in order that you then could easily damage, pull out the finished shape. If there was no suitable box, you can collect it from plywood sheets.
We will show you step-by-step photos on the example of the fill of the figurines, and you can already put there anywhere. It is important to understand the sequence, and that's it. And the amount of silicone can be different. The grape requires 100 grams, and on the owl, shown below, already 1 liter.
So:

And now let's go to the most interesting, formation of figures from Alebasra do it yourself.
How to make alabaster mixture for bas-reliefs
If you use silicone molds, you do not need to lubricate them. But if you pour the gypsum into the plastic oracle, then you need to make it a pretty lubricate it with sunflower oil.
Make a mixture for filling so:
- 2 pieces of gypsum
- 1 part of water
Powder suck in water gradually, constantly stirring, not allowing the formation of lumps.
It is not necessary too intensively to interfere, there is no point, you will only leash the substance with oxygen and the finished figure can be covered with bubbles.
Then pour it into the selected shape, in the clove with its edge. And relax, about a day.
In general, gypsum grabbing much earlier. But the longer the figure is like a form in shape, it will be stronger and the chance to damage it, getting, will be zero.
Confirm on the wall of the bas-relief
Now the finished composition must be fixed on the wall or on a piece of plasterboard, if you want to make a removable bas-relief. In any case, they are attached equally. You can attach them using a liquid silicone or a simple splock.
The main thing here is what: to smear the gap between the wall (plasterboard) and the figure, so that this is a single conglomerate. It is also possible to do it with a putty.
If there are any irregularities, they need to carefully remove the abrasive ribbon. And then you cover the finished picture of the water-mounted paint in a couple of layers.
Pure white compositions are best looking at the same background, it is a classic option. But you can paint in any color, but then, on the top of the white paint layer.
Basiered Basin Form
But here we will list everything that you may need for this type of panel:
- Alebaster mixture
- Forms
- The base from the drywall (if it is assumed for your idea)
- Shp Slica (or silicone glue)
- Water-emulsion paint.
How to make alabaster mixture, we have already written above, therefore, we will not repeat, we will better give you some important recommendations regarding the process.
If you have come up with any song, then do not hurry to immediately glue the elements on the wall.
It is better to first lay them out on the floor and see if they look good. After all, several times to remove and glue the blanks again, they will get dirty and the stratum of paint will then need more.
In addition to the elements poured in the forms, you can add different materials to your composition. Suppose if you make a picture with seashells, you can stick to the wall of ordinary crushed stone and paint it with white. By this you give the volume and the picture will look much more interesting.
Bas-relief from ready-made statuettes
You will need:
- Picture frame;
- Profile;
- Self-tapping screw;
- Plasterboard;
- Putty;
- Silicone glue;
- Statuette;
- Decorative elements to choose from;
- Water-emulsion paint.
Panel with antique figures must be done in some framework. Just do not hang it on the wall, it will look ugly. What can you do?
You can fix straight on the wall picture frame, the inside to compriment to the plaqua with it, forming a single whole, then attach the pedestal for the statue (for this it is convenient to use the profile, covered with drywall), which also put off.
Then put the statuette for the glue and go through all the slots again, so that the view turned out to be cast. On the space in the frame, you can add various items: pebbles, seashells, columns (they can be bought in the departments of petrootters, there are many different decorations for aquariums in the form of locks and other suitable beauty style).
And then just cover all the paint, including frame. If necessary, not even two, and three layers. It's nice that this bas-relief looks with your own hands is simply amazing, but in fact, for beginners it is a completely satisfied task.
Bas-relief - Picture of the shtlock
You will need:
- Machine mixture on PVA;
- Water-emulsion paint;
- Artistic talent.
And here everything is already in your hands, and, in the literal sense of the word. There is no special technique that can be given and each will perform, even having a skill.
The only thing we can say is that it is necessary to do the bas-relief with your own hands from the putty.
If you immediately put a big piece on the wall, it will simply won't stay. The drawing form gradually, increasing as drying. And of course, use the PVA-based mixture recipe.
Ready panels cover paint and you can call guests that boast!
Rag-colored bas-relief
You will need:
- Fabrics from fabric or fir cones
- Liquid alabaster mixture
- Glue silicone
- Water-emulsion paint.
Alebaster mixture must be made a little juicy than for filling figures. In her, you do the workpiece and leave them to dry. When they are dried, they dip the second time, so that the figure acquired a homogeneous and monolithic color.
Then you secure them on the wall with glue, and paint them easier from the cannon, matte paint. Since they are quite fluffy and mess around with a brush is not very convenient in this case.
Such colors are not too obliging to stick to a strictly defined interior style. For example, if you do Aphrodite, then you need to duplicate columns or Greek fresco somewhere.
And in this case, everything will be harmonized: bas-reliefs, any pictures on the walls, any kind of kitchen furniture design, photos within, etc.
In conclusion: how to care for bas-reliefs
How much do not bother the PVA, homemade bas-relief, sooner or later, begins to lose sight. The gaps between it and the wall are formed and this is normal. You only need to occasionally shock the gaps and tint these places.
That's it! How to make a bas-relief with your own hands from the gypsum you know and it's small: start acting.
Decorate the wall in the apartment with an original pattern or relief maybe each. Make a bas-relief on the wall with your own hands is not difficult, you only need to choose the style of relief, decide on its shape, make a drawing. The volumetric image on the wall can be done anywhere if the space for applying the selected form was carefully prepared.
The bas-relief visually changes the room, hiding the shortcomings of the wall surface. A variety of relief allows you to choose a drawing, shape and stucco, taking into account the style and design of the room, kitchen, hallway. You can make a bas-relief in the form of an integrated or separate ornament, put the panel in the center of the wall, scatter the relief with individual elements on the wall. You can emphasize the attention, if you place the backlight near the composition
The bas-relief should perform above the surface is no more than half the volume. This type of panel is called low bas-relief. If the shapes act more than half, then it will be already a burner or a high bas-relief. Make a bulk image on the wall can be possible through a solid form, collecting the composition from individual elements. Other types of bas-relief include:
- Scene-visual - in the center of the composition painting.
- Ornamental - pictures are depicted patterns and ornaments.
- Split - between the volumetric parts and the plane, the minimum distance is observed.
- Picturesque - Flat figures are created with barely noticeable elements of nature.
- Multiple - various components are used, contrasts are created between them, the effect of shadows is applied, including incidents.
- Facing - apply during a facing work. Usually such images are created as ornamental.
Bas-reliefs are divided into other types and techniques:
- Simple, which are performed in the form of baguettes for paintings.
- Baged or edging. It looks on the wall luxuriously, but not defiantly. Excellent are suitable for the design of monophonic walls, on which a photo or painting is hanging.
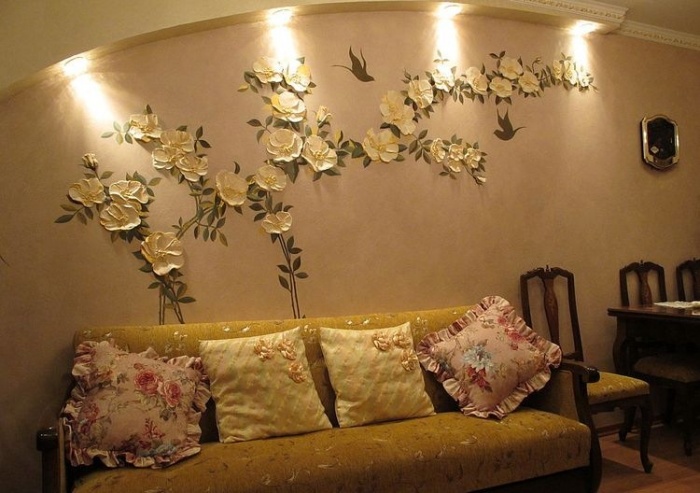
- Wall panels with floral ornament or painting with a plant plot. Such a bas-relief must be accompanied by backlighting to strengthen the individual elements of the composition.
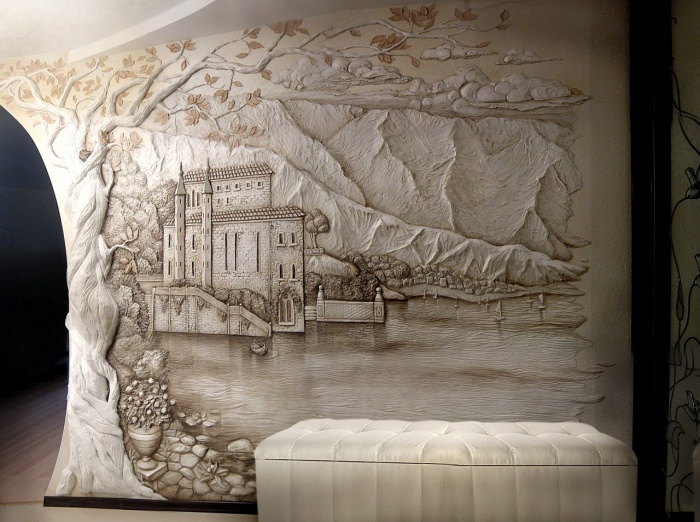
- Bas reliefs that contain images of mountains, lakes, trees, nature, trees.
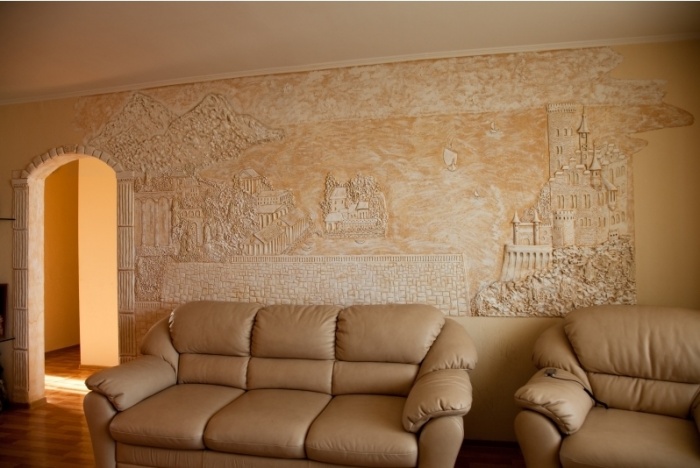
- Scene - occupy the entire wall or only its small part.
Choosing a kind of bas-relief on a wall that can be done with your own hands, it is worth considering the features of the room where the composition will be placed. The following types of volumetric images are excellent for the kitchen:
- Still life.
- Patterns with pets.
- Drawings with kitchen utensils.
- Compositions with fruits and vegetables.
In the nursery, bright and light panels will look great on which it is better to depict magic or fantastic animals, castles, butterflies, cartoons of cartoons. The living room bas-reliefs will look great in combination with stone and wrought iron.

Most often it is plaster that is used to decorate the walls of the walls. Before creating a bas-relief of the gypsum, it is worth considering the drawing, make it a sketch. Consider recommended factors such as:
- Wall background.
- Interior items.
- Direction of natural light and lighting system.
- Entrance to a room or apartment.
Gypsum bas-relief is used to arrange fireplaces, niches, walls with additional illumination. Plots for such bulk images are:
- Nature themes.
- Antique plots.
- Love themes.
- Fairy tale characters.
- Images of sky and locks.
- Still life.
For the manufacture of bas-relief on the wall, they will need special tools that are purchased in construction and artistic vending. 
The main fixtures for working with bas-relief include:
- Sponges from Abrasive.
- The containers in which the mixture will suffer.
- Trowel.
- Brushes.
- Paint.
- Mastichery - blades that help create bulk images on the wall.
- Sandpaper.
- Knives.
- Polyethylene film.
- Simple pencil, handle, marker.
- Scotch larger.
- Scrapers.
- Putty knife.
Additionally, you must purchase primer, gloves, stencils, as well as make sketches of the drawing.
Bas reliefs are created from the following materials:
- Gypsum.
- Alebaster.
- Putty.
- Clay.
- Gypsum or decorative plaster.
- Polyurethane.
Gypsum - environmentally friendly and easy-to-work material from which you can do both simple and complex images. Acrylic paints are easily applied to the gypsum, helping to protect bas-reliefs from damage. Strengthen the strength of the composition applying varnish, primer or glue.
Plastic foamed by special technology is popular with popularity, which is called polyurethane. Its advantages include:
- Practicality.
- Resistance to temperature and moisture changes.
- Environmentally friendly material.
- Does not fade and does not fade in the sun.
- Does not absorb smells.
Polyurethane make bas-reliefs for kitchen, bathroom and pools.

Preparatory work
Include the preparation of the wall surface to create a bas-relief, and pass in several stages:
- Align the wall surface.
- Grinding wall.
Alignment involves the treatment of a solution with a solution made of sand and cement. After that, putty is carried out with the help of alabastra or solutions that exceed the surface perfectly.
A reinforcing mesh is mounted on a wooden wall in front of the plaster.
During the plaster, lighthouses use to track the smooth surface of the wall.
When the plaster serves, then the primer is carried out. For this, the compositions made on the basis of acrylic, alabastra or gypsum mixed on the sand are suitable. The primer is applied with a brush, which is called McList. It has a big width, does not leave the flops during operation. If the recent were formed, then they are immediately removed, without expecting drying.
Preparation for the creation of bas-relief: stages
- First you need to prepare tools and materials for work. In particular, under hand there must be plaster, water, bucket or bowl for the preparation of the solution, a spoon, a form for bas-relief.
- Then the form for the fill is horizontally.
- Prepare a gypsum solution: half a glass of water poured into the container, pour a slower one glass of plaster, constantly stirring with a spoon. When the solution becomes reminiscent of a liquid sour cream, the solution is ready.
- Pour the solution into the bas-relief.
- An hour later, get a casting from the form, stretching her edges. This will make it easy to get a casting.
- The next day, painting parts on which gouache or acrylic paints are applied.
- When the paint is driving, applied with a thin layer of varnish, which allows you to make a bar-relief item strong and durable, and colors are bright and saturated.
Creation of relief and its mounting to the wall: instruction

- The basic surface of the wall is cleaned from the local finish.
- Align, to carry out the primer, cover the basic composition. Sometimes it is replaced with any kind of decorative plaster.
- A background texture is created, for which the roller from the foam rubber or the pile is used.
- The so-called "breakout" process is carried out by felt or foam rubber, after which the base is tinting. These steps are skipped if the wall is processed by decorative plaster or covered with HCL.
- The formation of the relief is underway, which after drying is tinted from above. For gypsum, staining is made with special paints, rustling with a damp sponge on thin halftone. Create sharp transitions from one color to another will help acrylic paints.
- When the paints are dried, then relief can be treated with latex made from butadiene-styrene mixture. The solution helps to save the brightness of the paint for a long time.
- After one or two weeks, relief is recommended to be treated with acrylic varnish.
Separately, the bas-relief is attached to the wall for which the attachments are needed, providing support for the shapes and other components. Installation of bas-relief on the wall is stepdown:
- Use corrugated nails whose length is 80-120mm. They are driven into plastic dowels.
- The attachment points are made in the thick places, are placed in advance at a uniformly remote distance from each other.
- Nails rush into the wall at 50-60mm.
- 15020mm nailing should be over the wall, the tools are superfluous.
- At the top to attach the bas-relief, which should perform over the sleeper by 10-15mm.
Sculptural stacks, cutters and loops
Without such tools, do not do when creating bas-reliefs. Stacks, cutters and loops are designed for such purposes as:
- Removal of an excess solution.
- Aligning bas-relief elements, giving them the right form.
- Creating volumetric images.
- Highlighting the corners and edges.

If you throw out the form for the composition in advance, it accelerates and simplifies the work of the master. You can cast leaves, flowers, trunks and branches of trees, bushes. The use of cast forms visually improves the effect of the bas-relief. Forms of various designs and species are sold in special stores, or are manufactured independently. For this use alabaster or plaster, reinforcing frames must be inside the form. They are designed to preserve the integrity of the shape and cast parts for which a solution of plaster or other material is used. The mixture must be liquid to fully fill all the spaces of the form. Metal frame is inserted before or after the gulf of the solution, which ensures the strength of the obtained part.
The wire frame is made of steel wire, which has a thickness of from 0.7 to 2 mm. Such a blank for the form can be used not only for moving forms, but also for the manufacture of parts of the song directly on the wall. Attach the frame to the surface with the help of a dowel of nails, which drill special holes. One turn of the wire is wound on the dowel, after which the nail is clogged until the stop.
Bravery techniques
- Plasticization of free, not fixed and not removed models on the supporting wall. Suitable for those who are just learn to create bas-reliefs.
- Reverse casting from the gypsum on the model that is deleted. The form is removed as soon as the composition is brought to perfection. In form, the master has the ability to cast up to 30-channel products.
- Artistic plaster stucco, which is held on the spot on the wall. Requires the masters of the presence of certain skills and skills to work with plaster, alabaster.

The bas-reliefs of one or another technique are created on the table, on the floor or drywall sheet, which is then attached to the wall. Prefabricated structures are collected in parts, and if one of them is spoiled, it is removed. The minuses of such bas-reliefs include heavy weight, the inability to attach to partitions and weak walls made of drywall.
Toning stucco
The basis that is used under the relief is caused by subtle layers of the mixture. The thickness of each layer should not be greater than 1-2mm. The solution is applied with a brush, and then smeared with a special knife-masticine. For each layer, they are toned with a pigment intended for gypsum.
The layers are superimposed on each other when the previous layer remains wet. Shades are created by brush, rubbing out the sandpaper (zero) or a coarse metal brush.
Free drying
Technique is suitable for creating high or low floral bas-reliefs, patterned compositions. It is not recommended to apply toning, which retains the material. Paints are subject to finished components. Free drying creates their architectural plaster and water. The solution should be liquid and watery. The mixture is needed to dip in it all parts of the three-dimensional image. Each element after drying is laid out on a plastic film board. Through time, the procedure is repeated so that the models are shipped in a layer from 1 to 1.5 mm. Print parts using PVA glue, acrylic plaster or acrylic glue.
Reverse casting
This technique of stucco can master any newcomer who decided to independently make on the wall in the apartment bas-relief. This method provides for the following actions:
- Models made of plaster, plastic, plasticine and alabastra are created in the desired quantity with the help of refrigerated forms.
- They are laid out on a flat surface, which is covered with a plastic film.
- Each model to deceive Lanolin, which will allow the items to stick to the surface. Lanolin is absorbed within 1-2 hours, bold shine should appear on models.
- Make alabaster or gypsum solution to be deceived by models. The layer thickness should be 1cm. The solution is necessary in order to form an anchor and ribs of stiffness.
- The cooler to treat a frame of soft wire, and its branches are copper with a copper wire.
- Deceive the parts with a solution made of cement and sand. The thickness of the layers should be 5 cm and more.
- To form a support surface, which is called a scene.
- Separate parts from a table or other material on which the models were laid out using a wedge.
- The inner part of the supporting surface is to protect the copper brush, and defects are fixed with plaster or alabaster.
- Remove the oblast with the inside of the inner edge - a chamfer that is needed for passing and fastening parts.
- Lubricate inside with lanolin.
- Fill the inside of the set of layers of mass for casting.
- Insert shapes-eyes with handles, for which the casting is easier to get.
- Pour the last layer of solution when the eyes are firmly stuck in the last layer.
Technique Lappa

It is carried out in place, i.e. directly on the wall. This allows you to get a high artistic effect. Before modeling, it is recommended to stretch on plasticine. It should be borne in mind that when working with plaster, the time to correct errors and flows is limited. Gypsum freezes quickly, so work with the modeling on one site is completed before work is starting on another part of the composition.
Gypsum modeling is low flat, high or round. Flat modeling is made of thick mixture, which is applied by layers. Each layer is smoothed out, which allows you to form a relief and attach its contours. The layers are applied to the previous ones when they have not yet dried finally. With each layer, the Master must go to the tools of smaller size.
Such materials such as plaster and alabaster are harmful to human skin. They dry it, annoy, so the creation of bas-reliefs from plaster or alabaster requires a novice master of compliance with the following rules for the organization of work:
- Use rubber gloves.
- Eyes to protect with glasses that do not give dust and small dust particles get into the eyes.
- Wear a respirator when working with a solution.
Such security measures perfectly protect the lungs and bronons from dust, plaster and putty. The means of protection should be on a person throughout the entire period of work. It is not recommended to shoot them until the last barbell on the bas-relief is dodel.
It is important and correctly organize the workflow, which is a guarantee of creating a beautiful bulk image on the wall. Create the original bas-relief on the wall of the apartment or at home with their own hands will allow the following recommendations:
- Install the powerful light source next to the wall to detect all the disadvantages and fix them before the material is frozen.
- Properly dose the components for the solution so that it is enough to create the entire bas-relief.
- The density of the solution should be optimal. If the mixture is very thick, then some water is added.
- Before working with a wall, a beginner master should be slightly straightened with a mixture on a wooden surface.
- It is worth prepare all the tools and capacities in order not to look for them when mixing the mixture or preparation of bas-relief parts.
Sketches and stencils

Creating a screen drawing is aimed at considering all the wishes and requirements of residents of the apartment, concerning the bas-relief on the wall. Under the screen drawing, it is customary to understand the pattern pattern, which is performed on the film, cardboard or very dense paper. In some cases, a metal sheet is used. First, the fragments of the figure are applied to the material of the stencil, and then the individual parts are cut into the end-to-end holes. Next, they are painted with contrasting colors, and other parts of the drawing remain white. Other features of the creation of the stencil include the following features:
- Stencils are divided into multi-layered and single-layer. For bas-reliefs on the walls of residential premises, one-layer stencils are used. It is easier to make them alone.
- For staining through holes, paints created on the basis of enamel, acrylic or water and emulsion are used.
- Paints are applied on a sponge or roller wall, although special aerosols are often used. Brushes are not recommended not to deform the drawing boundaries. The roller allows you to avoid pushing the paint under the pattern.
What patterns should be chosen to create stencils and sketches? Preferences are given to the following reasons:
- Plant - they allow creating a natural or surreal picture on the wall. Both flowers and branches, and trees always look elegantly, perfectly fitting in any interior of the apartment. In addition, the flowers are suitable for each room in an apartment or at home, they can be applied to the walls in the kitchen and in the bathroom.
- Animalistic. Elegant images of cats and other animals are wonderful on the wall, including fabulous and magical. Often use image of cats. The continuation of the "cat" themes are traces on the wall of lions, tigers, leopards, tigrine stripes.
- Geometric. This is especially true of straight and simple lines that may look stylish and intricate.
- Curb. The focus is on to repeat several times the same drawing. For border stencils, conciseness is characterized and a wide variety of subjects - from butterflies to uncomplicated ornaments.
Exclusive stencils are often manufactured, which reflect individual housing features, adult or child rooms, kitchens, hallway or bathroom.
In order to make a stencil independently, it is worth sticking to these rules:
- Print drawing of the original format or scaling it to the desired size.
- On the drawing, apply a grid with cells that are 1 to 1 per caustimeter.
- On another sheet of paper or cardboard, apply a grid that will have a larger cell.
- The grid is needed in order to carefully transfer all fragments of the drawings.
- After that, the drawing is transferred to the cardboard, film, metal.
- Cut pattern on the outlined lines.
- Cutting is carried out with a sharp knife, which will allow you to get smooth and clear boundaries of lines.
Paper templates will not be able to use repeatedly, maximum - 2-3rds, since the paper from the solution softens. Paper drawings are suitable for the manufacture of single bas-reliefs. Film and metal stencils are more durable - they are attached to the wall of bilateral scotch.
To make the bas-relief on the wall of the apartment independently, you need to adhere to all the recommendations and rules mentioned above. Before starting to work, a detailed sketch of the future image is created, tools are purchased, prepare workplace and wall. And only then, without a rush, you can proceed to work. The process of manufacturing the bas-relief does not take a long time, if you carefully prepare, highlight the place of work, consult with specialists and make a durable pattern.
Refusal to generally accepted clichés, the design of their home in such a way that it was unique, making a special highlight to it - not just a fashionable trend, but a completely justified and natural expression by a person of his own personality. A truly exclusive decoration will be a bas-relief in the interior, and you can create it my own.
The royal palace, the castle, the generic estate of an influential family - that's where it was used to most often meet bas-reliefs. It was caused by the complexity and high cost of creating. Gradually, the fashion came up on them, but now, with the advent of inexpensive and affordable materials, these decorative decorations are worried about the second birth, perfectly combined with the most diverse styles in the apartment.
Features of bas-reliefs
Several features of bas-reliefs, which benefit from them against the background of other types of interior decorations:
- It is possible to make this element of decor from any material (from papier-mache, plaster, decorative plaster, polystyrene, metal, etc.), which is enough plastic or suitable for fill in the form.
- Modern bas-reliefs are simple in performance and installation, differ in low weight and acceptable price, if they are made of natural materials (wood, stone), then with a considerable price look really unique, extraordinary and exclusively.
- The plot of the image is chosen on the basis of the tastes and customer needs, it can be an antique, under ancient, neutral or underlined modern.
- In addition to visual appeal, such decorative elements will help hide communications, defects, surface irregularities.
Bas-relief as an element of the interior
Dilute the bitch and the monographicity of the monophonic surfaces of the walls and the ceiling will help bas-reliefs, especially when adding decorative elements or additional paints is undesirable.
Even the simplest drawing of the bas-relief will revive the surrounding space if it is possible to correctly choose the lighting.
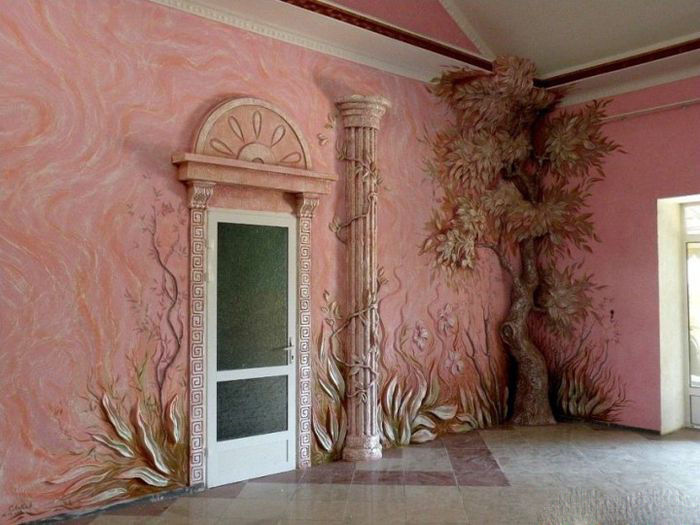
A universal solution for all styles when designing walls and ceiling are branches and a tree trunk or an abstract pattern capable of filling the wall without overloading the space.
Bas-relief can be created in several ways:
- machining method directly on the wall surface;
- by the manufacture of individual elements, followed by mounting on the wall;
- in the form of a volumetric pattern made on a solid basis (for example, on a dry-fiber sheet).
Novo-bas-relief
In 2014, Applico presented a novelty in the world of finishing materials. New-bas-reliefs in the interior are flexible plates of different sizes with a color or monochrome pattern applied to them. Their distinctive features:
- the possibility of mounting on the surface of any form;
- excellent noise and thermal insulation properties;
- flexibility plates;
- bio, thermo- and moisture resistance;
- safety for humans and the environment.
Mounted plates on the walls, according to the numbering indicated on them, they are fixed with a special adhesive composition.
The photo of the new-and-relief is presented below:
Bas-relief painting
As we have already mentioned, materials for creating bas-reliefs may be different. But novice is recommended to start with plaster mixed with stucco. Do not worry, even the simplest plaster stucco will enjoy the room, giving it elegance and solemnity.
The most simple for independent creation is a kind of volumetric element of the decor - bas-relief. Pros of such a product:
- for this type, the bas-relief does not need to be prepared by the wall;
- there is no fear of failure: if the picture does not work, you can postpone work for a while or even abandon the venture, the finish in the room will not be corrupted;
- the bas-relief in the form of a picture at any time can be outweigh at another place, take with you to a new place of residence.
Stages of independent creation picture in bas-relief technique
- At the same stage, we determine the size of the future bas-relief and its location.
It should be understood that the greater the size of the image, the more you need the space for its "reading", in the fine stucco and the decor will be smaller, in detail, will require more execution skills.
- We are preparing a sheet of GLK or GWL, we draw a sketch of the future volumetric picture on it.
- We mix the gypsum plaster and apply it with the help of a masticine - a special spatula for painting - on the working surface. Forming parts can be made by masticines of various shapes, fingers, tassels. Layers of material may be several, the main thing is to wait for the previous one
- After drying, the surface of the bas-relief is polished with shallow emery paper, it is ground.
- If desired, the bas-relief can be painted, subject to artificial aging procedure, give it an antique look.
Before making a decision about painting Belfre, think well: newcomers in most cases are disappointed with the results of this stage, since it requires special skills and knowledge. In addition, white or only slightly tinted bas-relief in most cases looks much better than the product painted by different colors.

 Why you can not give icons
 Is it possible to give icons as a gift: Signs, the opinion of the Church
 A year ago left her husband, and now I do not know what to do