How to attach the shelf to the wall: possible ways. Shelves Brackets: Overview of the main forms, designs and models of wall supports (80 photos) Fastening for wooden shelves to the wall
With all the variety of existing ways of designing the interior and modern design, it is almost impossible to imagine a modern room in which the shelves would not be used.
Decorative and easy to store different trifles, massive for books - shelves are capable not only to be an additional useful surface, but they can also act as a decorative decoration of any room or office.
There are two main ways to fasten the shelves:
- traditional mounting shelves to the wall
- invisible or secret mounting shelves to the wall
The traditional method of fastening with the help of various types of brackets, metal or wooden racks is popular only when competently selected in color, texture and material fasteners also make their "highlight" to the artistic image of the room.
But often, the presence of additional decorative and technological elements is not always consistent with the general intention of the designer and the target direction of structures. In this case, it will be better to take advantage of the second way of fastening.
The development of the modern design craft and the construction industry allows not only to quickly cope with the task of hanging the shelves, but also successfully use the fastening of the shelves to the wall without apparently fastener, thereby creating the illusion of the ward in space.
Invisible mounting shelves to the wall
Consider the main stages of the right mounting of the shelf to the wall, hiding all the fastening elements:
- To begin with, you need to appreciate the strength of the wall or partition on which the shelf will be attached.
With a brick partition thickness from 250 mm and concrete partitions with a thickness of 100 mm, it is possible to use the shelves for hanging without additional bearing structures.

The scheme of the invisible fastening of the shelf.
1 - bracket for fastener shelf; 2 - mounting holes; 3 - steel axis; 4 - suspension; 5 - shelf.
With a smaller brick thickness, slag cloth and drywall walls up to 100 mm, it is possible to use an invisible mounting of the shelves to the wall, but such shelves are suitable only for decorative purposes.
Since they simply cannot withstand additional loads.
Then it is necessary to determine the thickness of the shelf itself.
It can be determined by locating on it of the alleged weight. The absence of visual deflection and deflection to the touch indicates a sufficient bottle thickness.

Exception may be cases when the choice of a thicker board is dictated by the overall interior concept.
However, it is also necessary to take into account the features of fasteners, due to which the thickness of the board, as a rule, can not be less than 30 mm. The thickness of the shelf must be chosen depending on the load, for example, for books - boards with a thickness of 45 to 60 mm are suitable.

The board must be dry and processed according to its destination.
Types of mounting shelves to the wall
After that, the types of fastening of shelves to the wall are selected, depending on its purpose and thickness of the board.
There is a huge amount of fasteners, which can be hidden from prying eyes, consider some of them:
- The most popular at the moment is using hidden hingeslocated on the back of the shelf.

Fastening technology using loops:
For neat hanging, you need to accurately measure the distance between the centers of the loop.
This distance will determine the markup on the wall under the holes for fasteners. To hang the shelf exactly and do not twist, it is better to use a building level that will provide an accurate horizontal shelf line.
After the holes in the wall are drilled in accordance with the markup, they are filled with a plug, into which screws are screwed.
Screw must be screwed enough deeply, but the distance between his hat and the wall should allow putting on the shelves' hinges.
A special fastener is supplied with the shelves, designed for the invisible installation. The regiment installed in this way will be securely fixed. At the same time, a visual impression will be created, which is literally hanging in the air.
Method for installing shelves with special furniture fittings
Consider the step-by-step execution of this installation.
It begins with the acquisition of a modern shelf in a furniture supermarket or online store.

Step 1. Measure the distance between the centers of the mounting holes, directly on the product.

Step 2. After that, place the location of the shelf on the wall. With the help of the construction level, we carry out a horizontal axis, which we note the position of the mounting holes, taking into account the intercentrous distance between them.


Step 4. The next operation will be the drilling of the hole for fastening brackets. They must be accomplished strictly perpendicular to the wall, it will provide an angle of the regiment of 90 degrees relative to the wall. To simplify drilling, it is advisable to apply the square.


Step 6. After that, kpripim brackets to the wall with the help of screws.

Step 7. Now we carry out the immediate installation of the shelf. To do this, we put it on the steel axes of brackets, alternately approach the rubber hammer on the left and right side in the facade part. The shelf will evenly be found on the fasteners elements, excluding the battery.

Step 8. The final step will be checking the backup and reliability of the attachment. After that, we remove the rest of the garbage and install the vase with orchid. Installation process is completed.
Another way of invisible mounting (metal rods)
Technology Installation Mounting Metal Rods:
As a rule, reinforcement pins or threaded studs with a diameter of at least 10-12 mm are used.
First of all, we take our shelf and measure its length and width.

Then, using a ruler and construction level, we note this length on the wall (you can not all distance, but slightly shorter), on the site of the future position of the shelf.

We note on each side of the shelf three thickness of the boards and drill the holes equal to the diameter of the pins, make such holes in the shelf itself (you can use the template, since you should exactly match the holes in the wall and in the shelf).

Then judge from the subsequent filling of the shelf, if there will be lightweight souvenirs there - it will be enough of these two pins, if heavier things are standing - you can make more fixtures (even every 5 cm)
.
We take the right number of long rods (their length should be about 1/3 from the width of the shelves, but note that the wall should be at least 10-15 cm pine).
Insert the rods into the wall on half of their length, check the level to be accurately perpendicular to the wall, the durability of the entire design and the safety of items on it are depends on it. Then secure the rods with synthetic glue or resin, wait for the glue drying.

After that, sit on the rods of the shelf (you can additionally glue the pins to the shelf, pouring into the holes).
One of the mounting options can be considered preliminary installation in the square of the square of the square section (usually used for non-shelves).
Fastening installation technology:
To do this, the wall is mounted in the wall, the side of which is equal to the thickness of the board for the future shelf.

It is attached with the help of dowels, nails or plastic anchors with self-draws. Then, the round wooden pins (brazen) are robbed by the holes, which are lubricated with glue, after which they put on a wide part of the shelves.

In order to put the board on the pins or brazen, the mold is used with a rubber bolt, which is neatly hit on the outer edge of the board. 

Variating the height, texture, color and thickness of the shelves, you can achieve an original and unique design and create a feeling of ordering and the completion of the design of the room.
Without limiting fantasy and using all the advantages of the modern building market, you should remember the safety, carefully produce and check all the fasteners.
In this case, the shelves, like any other element of the functional decor of the room, will serve for a long time, remaining a reliable, useful and beautiful element of the interior.
And you can watch the video hanging the shelf on the wall
Pick out for you:
The shelf with a hidden fastening is a decorative emphasis that creates an illusion. It seems that the shelf "floats" on the wall. By adding such furniture in the interior of your living room, bathroom, kitchen, bedrooms you can solve problems storage of books, fit accessories or souvenirs. Such furniture is often required for registration of children's rooms, in which there are many tiny cars, dolls or other toys. "Floating" shelves are cheap, beautiful, they are still safe on them, and there is little time for the manufacture of such furniture.
Varieties of fasteners
Imperceptive fastening, supporting the shelf, has a wide range of varieties:
- Alcove and niches are a comfortable place to mount the shelves, because they are easily fixed immediately on the three walls.
- The hidden bracket with two jacks is convenient, as it can be used anywhere.
- Invisible fasteners made of durable metal, with connective screws from alloy steel, creates a tension between the racks. It gives them an impressive reference ability. If you need a longer shelf, additional supports are added. Invisible fasteners can be used to create floating shelves with heavy loads.
Bathroom shelves in rustic style
If there is time to upgrade the interior, the shelves with a hidden fastening in the style of Provence - the perfect decor. It creates its own, peculiar home comfort. And at the same time, it seems to soar in the air! Her finished and at the same time simple appearance will decorate the bathroom and any secluded corner in which the storage space is required.
This shelf model is installed as "floating" and is strengthened for additional strength, it is amazing for collectibles, photographs, souvenirs and dishes. The design is inexpensive and requires very few materials.
Instruments:
- level,
- measuring tape
- saw,
- drill.
Consumables:
- wood,
- screws
- finishing for choosing.
Council. It is worth avoided trips at the last minute of shopping, it is better to pre-prepare materials.

Algorithm of creation
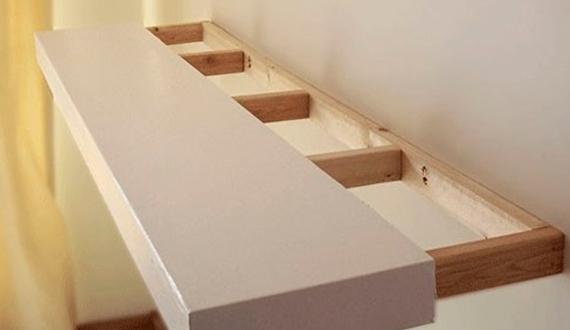
- To make hidden shelves with their own hands, a sketch is pre-drawn, it will help to figure out the design and find out what type and size of wood are needed. The step also includes measuring the width of the space from the wall to the wall.
- The next step is to create a special frame. You can use liquid nails to first glue the frame, and then apply screws and corners to bore all parts.
- Next, color or paint boards, which will then be fixed on the frame. You can use the same paint or varnish, which has already been used for other furniture. It's nice that today the varnishes are sold, which will make the tree look old in a matter of minutes and emphasize his texture, such a finish is great for a rustic style.
- The desired height of future shelves is measured and the supporting frames are attached to the wall. Before drilling, the wall is checked with a detector for the presence of wires and pipes.
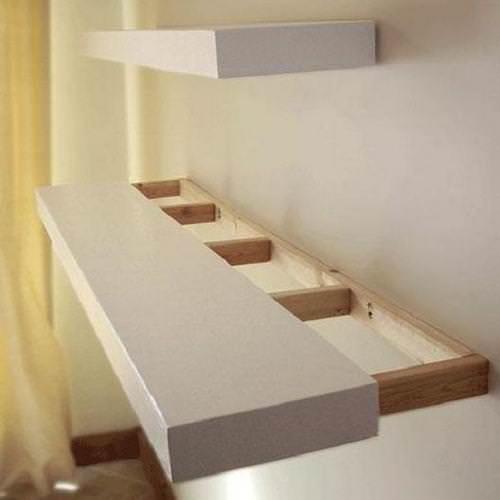
- Next you need to make sure that the invisible shelf is smooth. After all, it is quite difficult to find beautiful boards that will be quite straight. If it turns out that the boards are uneven, go to step 6.
- Pads are added to align the shelf. This step is repeated for the top and bottom board.
- Then the upper board is glued on the frame with liquid nails.
- The bottom board is much more difficult to fix with liquid nails, so it is better to fasten with screws.
- The front part of the shelf is glued.
Attention! The walls of the room are paint to the fastening of the shelves. The beds can be used by MDF.
Hidden shelves made of old drawers
These shelves make out of 2-8 boxes, not necessarily coinciding in color, form or size.
- Boxes are cleaned, extra details are removed. Surfaces are polished.
- Then they cut off the protruding edges of the facing so that the entire side of the bottom in the future felt tightly to the wall.
- Inside the box painted in the color of the wall. This will create the illusion of "floating" shelves.
- Next boxes are laid out on the floor to find beautiful compositions to determine the places where they will be attached. The composition you like is photographed, this photo will replace the sketch.
- On the wall, according to the design, the wooden supports are mounted. They are convinced that they are even.
- Boxes are placed on the supports and fastened with screws (screws are painted if they need to be hidden).
If desired, decorative handles or accessories are added. Another idea is to attach a decorative "note paper" to the inside of the drawers, which have become a full shelf.
Shelves-tubes for toys

- The shoulder is cleaned, labels are removed, the upper part is cut off (use manual or electric saw).
- Future shelves are scented outside paint for plastics.
- Then there are two holes for screws.
- The design is strengthened on the wall.
And, voila, furniture is ready! Such a regiment with your own hands is an economical idea of \u200b\u200bcreating a place for storing small objects.
One of the placements to decorate the room is the use of shelves. But they are not only an item for decoration. Much more often they are functional. Hang shelves on the wall, put on the floor, some suspended to the ceiling or beams. But what is best - they are easy to do themselves, with your own hands.
Types of shelves in the house
At the place of installation, shelves are wall, outdoor and suspended. If the floor shelf has a greater height - from the meter and above it is often called the rack. A few words about suspended: Usually these are decorative designs that hang on a pipe or specially driven bracket. This option is popular in those rooms where heating pipes are under the ceiling: they are asking for something to hang out something. On the pipe hang shelves in the kitchen and in the bathroom: it is convenient there.
They are made of wood, Fiberboard, there are glass shelves. As racks, the same materials are used, but they are made of metal, plastics and other completely incredible things - for example, pipes or bottles.
In residential rooms are not so important from what material the shelf is made. It is important that its design was in the same style with the interior. Even the functionality is not always important: some play an exclusively decorative role. On them if there is something one or two subjects. Their role is to give the interior of the housing of a special style and color.
Laconic style of apartment decoration and the same concise shelves of contrasting color. In this interior, they are the main element. Free space above the sofa is organically filled with shelves in the tone of the walls.
If we talk about the shelves in the technical premises - the kitchen and bathroom, in particular, then the requirements for practicality are also added to the considerations of aesthetics. Even decorative shelves in the kitchen should wash well. For shelves in the bathroom, the requirements are high: periodically there is very high humidity and requires materials that are transferred without any harm. They are not so much. This plastic and stainless steel. There are still shelves for the bathroom from MDF, but they are normally operated with good.
Shelves on the wall
In any room on the wall there are places that simply need to hang something. After all, most modern furniture takes only the bottom - sofas, tables, couches. The upper part remains empty and dissonance occurs: the overloaded bottom of the room and the semi-empty or completely empty top. Here these voids on the walls are organically filled with shelves.

Whole system, and the most "dead" space is used - angle
Structurally, most shelves consist of itself shelves and jumpers. But these components are combined into such a number of options that it is impossible to calculate. Simple design is good: you can make any shelves with your own hands. Moreover, these products may be the first to be manufactured things. It is really simple.
How and on what to fix
We are not in vain from fasteners. The design of the shelf on the wall depends largely on the type of fastening. Or maybe on the contrary. It depends on what to dance ...
Traditional loops

There is a traditional way - on the loop. It is suitable for wood and fiberboard, any other materials that have enough thickness to attach them. Screen soldered on the side parts. Then, between the centers of the hinge holes, the distance is measured, postponed on the wall (follow the horizontal). In the points noted, the holes under the dowel are drilled, a dowel is inserted and a dowel-nail with a small hat screws into it, which enters the loop or bracket (pin, slightly bent up). Then the shelf is hung on them.
Not all materials can be drilled. For example, glass shelves. They will not screw anything exactly. Mounts for glass shelves Special: They consist of two parts, between which the glass is inserted. Often there are elastic gaskets between the holders. In the lower fastener, there is usually a small clamping screw for fixing.
Fasteners for glass shelves
The most popular fastening for glass shelves is called Pelican - for a peculiar form. He himself looks good, there are in different colors. The thickness of the glass that it can hold is from 8 to 34 mm. You can insert not only glass into it, but any other material of such thickness. Just with glass it looks stylish.
Make glass shelves on the wall with it easily: buy mount, in the glass workshop, order the desired size and shape of a piece of glass with processed edges (or cut, if you know). The assembly itself remains:
- Attach "Pelicans" to the wall. Two dowels. The collapsible case - the decorative lining is removed, and there are two holes in the mounting plate. One in the housing is higher, the second is below. Passed, installed a decorative lining.
- Inserted glass.
- Swallowed screw. Everything.

There are other shapes like fasteners. The photo below is some of them.

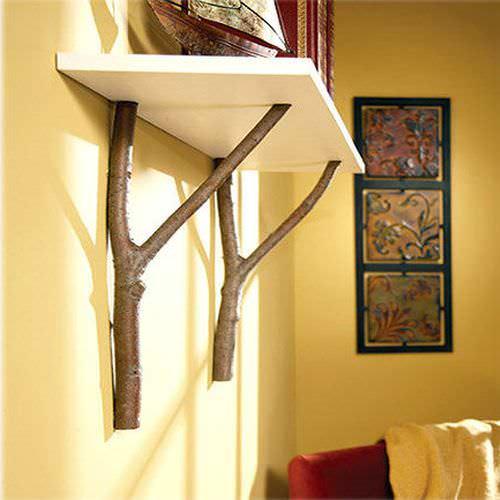
Decorative brackets
Another type of fastening is brackets. They are reliable, some decorative, and so much that they themselves are decoration.

Secret installation - shelves without support
And the most amazing fixture for secret installation. It makes it possible to hide fasteners. In the end, the seat is cut off under the pin and the housing of the holder and the shelf just put on it.

As you can see, even a simple blackboard or a piece of glass on such mounts is not bad. But there is another sea of \u200b\u200bany ideas.
Bookshelves
Requirements for strength are presented to the bookpins: weight is kept significant. Therefore, the fastening and materials and design must be reliable. Traditionally, shelves for books are made of wood, laminated or veneered DVP. And then the Fiberboard with a long span (more than 90 cm) begins over the years.
Planning the shelves on the walls for books on its own sizes, keep in mind that the distance between the supports on should be more than 90 cm. Then even fully loaded it will not bend. And the species and varieties of the shelves are two: wall and outdoor. And those and others may be angular.
In the simplest case, this is the board, enshrined in one way. Some options, especially with proper feed, look very well.

And in the presence of fantasy, a few pavements turn into a very interesting thing that can even be the main element of the decor. Ideas for self-making are collected in the photo gallery.
And this is a serious way to expand the space due to the corners between the two windows nonlinearity - they are always interesting, and the books of different height can be put on such a shelf
Outdoor bookshelves can be loaded more seriously. There are other forms: there are racks to which shelves are attached. The highlight can be a broken or unusual shelf line as well as interesting racks.
It is rather a book rack or even a wardrobe, but the essence does not change - the original color and interesting small shelves in the central part and the structure looks interesting  Very interesting idea - nonlinear shelves and jumpers from thick glass
About the manufacture of fountains (and small indoor, and more solid for the country, native or garden plot) read.
Suspended
Not very numerous, but the original type. The most important thing is that you can do easily: a few dashes, four ropes or two belt and you can start working.
This is a difficult system of blocks ... and the shelves can be at any level two planks, four ropes and half an hour of time - everything is needed in order to make this shelf how to make a suspension shelf - graphic step-by-step instruction
In nursery
While the child is completely small, I want a functional shelves, but with children's drawings. But where are these? Make yourself. Any shelf of the configuration you like can be saved with wallpaper on a fliesline basis or dense wrapping paper (glued on the PVA). After drying, twice covered with water based lacquer. Such shelves can be washed, but what is the most interesting, the shelf can change together with the child. Move the old decor, glue new. The idea is simple, it works on "excellent."

For children, shelves are not very different in design. If we talk about outdoor or about racks, then they should be strong: given the fact that grown children will definitely want to climb them. Therefore, often even those shelves that stand on the floor are fixed in addition to the wall: so that they do not collapse and do not give young climbers. Based on these considerations, they are not made high: even if they fall - not scary.
The shelves in the children's room in color are more bright, they can be made in the form of letters, there may be boxes for toys in them: so it is easier to keep them in order. In general, the functionality and security should be combined.
 The system with drawers - cleaning will be a quick combination of open and closed shelves - convenient for preschool children
Shelves and shelves in the kitchen
Nor say, but in the kitchen, the main thing is functionality. Not so much free space even on the walls: the lockers occupy a large territory. Because one of the tasks - to use the free space to use the maximum. Interesting ideas are for small or even very small gaps between the wall and refrigerator or other household appliances. Strictly in size can be made on the wheels, which goes away and hides completely there. It is wide and narrow (see photo).

Such a retractable shelving shelf on wheels under different jars make it easy. All right at hand and does not interfere
There are still interesting ideas about saving space. If the washing or a hundred is standing near the window, you can take the sidewalls. There is an interesting suspension option - the grille on the chains to which all the utensils are cling. But such a regiment is possible if the desktop is not at the wall. Another option to save space - if the kitchen-dining room is zoned by the counter, you can also make a regiment, which will be partially suspended. One part of it rests on the wall, the second - on the counter or "hanging" on the ceiling.

Cave the whole wall above the work desk by lockers - not the best way out. They look too heavy. You can solve the problem at the expense of the glass door, but it is not all like it. Exit - to make open shelves between the cabinets. They will give more ease of the interior and the work zone will not be so pressing on the rest of the space.
Square and open shelves "make it easy" interior style is another - the idea of \u200b\u200bthe same closed and open shelves in one system - convenient and non-standard
Decorative and original
Often the shelves on the wall play an exceptionally decorative role. They are designed to attract attention and this goal is achieved by an unusual form contrasting with respect to the walls, color. You will not put a lot to her: one or two things, but how interesting they are.
Another option "square" shelves. Two identical sets connoined differently if traditional square shelves arrange on the edge of the curly frames, the style is completely different
Another interesting topic - glass shelves. Just one glass is not very interesting. Its combination with wood and steel is more attractive. The effects are sometimes unexpected. Glass is collected on the guides: the material is fragile and heavy, and it needs to be kept. It was under the power of steel.

In fact, these systems are designed to create interior stores, but also in the apartment in a modern style or look stylish.

To the style "Vintage" are also suitable
What only do the shelves do. Even of the pipes. Metal and plastic. Remaining samples from repair? Use it in business, and get the designer thing, which is interesting, collected from the rubble.
Such is the interesting variation of the bookshelf from pipes
Each person wants to fix the shelf on the wall in such a way that she fits perfectly into the overall design of the room. Such a problem is solved at all. You can nourish the shelf on the wall absolutely any person who has free time and a set of necessary tools.
As the main support for the shelter, you can choose an anchor bolt, thanks to which you can make a reliable fastening of the interior item.
Its dimensions are as follows:
- diameter up to 12 mm,
- length - 180 mm.
At one end of the anchor bolt should be a thread in order to screw the anchor into a wooden surface, and on the other - to screw in the metal clutch.

As the basis of the shelf, you can take a segment of a window sill with an artificial coating.
The dimensions are as follows:
- thickness - 25 mm,
- width - up to 200 mm.
Options for fastening only two:
- classic
- hidden.
The hidden embodiment of the shelves is needed in cases where decorative elements are absolutely not combined with protruding fasteners. Fastening the shelves in this option is also not difficult, as in the traditional one.


Sequence of work
Before making fasteners of the shelves to the wall, you need to know that how the shelf is thicker, one should be thicker and support. In the end, the hole is drilled on average 5 mm below the surface. All holes for the shelves in the wall must coincide, otherwise they will be attached quite problematic.


Fastening the shelf to the wall:
- The template is considered to be a rack of the desired length. It is applied to the end of the shelf and make the hole of the desired diameter, and then applied to the wall.
- The next step will be the drilling that needs to be done with maximum accuracy.
In order to attach the shelf, you will need:
- electric drill,
- coupling with carvings
- brackets
- rake - pattern,
- joiner's glue
- screws.
Installation of the corner shelf (video)
Mounts for shelves from the store
The shelf that bought in the construction store is very difficult to fix on the wall. Be sure to read the instruction that went along with it complete. Most likely, it will have all the necessary recommendations on how to fasten the product on the wall.
Next you need to understand what type of fastening in the shelf. Usually, the elements are also included with the shelf and the instructions for it, with which the product fastener is carried out. You must also choose the brackets, thanks to which the shelf will be fastened.

Bracket variants can be different:
- fastenings that do not go beyond the shelves;
- flat brackets with pear-like holes at the end.
To make the fasteners of the shelves from the store on the wall, pre-conduct thorough measurements that were given above.
Stages of mounting shelves on the wall:
- Based on the possible shelf dimensions, it will be necessary to determine the place where the mount will be performed. Pick the right place to prevent other furniture in the room.
- Using the construction level, you need to control the position of the product.
- The walls are pre-created in the walls so that after this procedure it was possible to calmly fix the shelves. These nests make a perforator or a drill, and after the dowels are driven into the resulting holes.
- After that, the shelves on the wall are fastened.
- The final stage is tooling the elements for fasteners into the holes.
How to hang the shelves on the wall (video)
Thus, it was clearly shown how to fix any shelves on the wall. The mount is carefully planning and only after the development of the plan proceeds to work.
How often in everyday life to think about choosing the attachment for the shelves on the wall. There is a huge number of types of wall shelves. Production uses a wide variety of durable materials.
The main of them: natural wood, LDSP and MDF of plastic, metal or glass are also gaining popularity among consumers.
These composite, curly or multi-tiered structures are firmly entered into our situation.
Therefore, everyone often arises the question of how to hang the shelf on the wall, using the available attachment methods.
Types of mounting for wall shelves:
- Hidden (using hidden fasteners);
- Brackets;
- Corners and loops;
- Holders for glass models.
All these ways to attach the shelf on the wall it is possible to use independently without the help of professionals.
The most convenient to hang the design to the hidden fasteners.
Apply brackets and corners can also be able to anyone "with hands". But, before hanging the shelf on the wall of glass, it is necessary to carefully check everything and preferably consult with knowledgeable people.
Fastening with hidden fasteners

Attaching of this kind allows the owner to hide all the fastening components when creating aesthetic, tidy, weightless composition in any apartment for any interior.
For installation you can use:
- barboard attached to the wall;
- iron rods;
- hidden loops.
Wooden and plywood can be placed on the wall using a bar, in advance attached by a dowel.
So that the bar did not stand out, it should be installed in size, and also correspond to color.
The inner hollow shelf having the shape of the box is put on top of a bar and fixed with self-tapping screws. The reinforcement pins for installing the design are selected by the magnitude of the shelf itself. The required length should be at least 30 percent.
In order to clearly enter the holes in the wall to the shelf, the template is used. To create a solid design for a long time, you should resort to the help of superciles.
If the shelf is sufficiently large, then hidden hidden loops can be applied to securing. Mandatory condition so that the loops were small, did not significantly performed. Before work, it is necessary to clearly place the distances between the central parts of the loops.
According to the markup, the holes are already drilled, the plug insert into them, and after the screws are tightened, which are attached, already directly, to the hinges on the shelf.
Installing shelves on the brackets
This method can be used if there is no need to hide fasteners. To save, you can pick up plastic or iron corners, although decorative fasteners are more common.
You always need to acquire at least a couple of brackets. Their quantity depends on the thickness of the shelf.
The bracket comes complete with all the necessary fittings. This kind of fasteners will not fit into any interior. Best of all, they will look in standard interior solutions without delights.
This is determined by unusual carved patterns that are equipped with a bracket.
There are also the most innovative modifications, called pelicans and strengthening in the form of accurate geometric configurations.
They are perfectly suitable for minimalism and modern interior.
A variant of the color scheme for them is small - matte or ground chrome.
Mounting is largely similar to the installation of hidden fasteners, but much faster. In addition, the wall marked is carried out, according to the horizontal level. The bracket is installed strictly in the place allotted for this.
It is important to remember that any bracket for a removable design should be extensive to firmly hold the wall shelf.
Corners and loops
This type of fastening is most common among consumers. It is quite simple, fast, neat. Suitable for any interior. Unlike bracket, corners and loops of small sizes and are not particularly allocated.
To begin with, it is necessary to determine the place where you need to attach the shelf to the wall.
Of course, it will be better if the selected area is previously not cluttered with pictures or portraits. A set of necessary materials can be purchased at any construction store. We attach them to a pre-marked place at the external bottom of the product.
For installation, self-tapping screws of various lengths and widths are used.
After installing self-discovers, the shelf must be attached so that the drilled holes on the corners (or loops) coincide with marked places.
If everything matches, then you can twist the screws, trying to do it as smaller as possible, smoothly.
Fasteners for glass products
A glass shelf in any room constantly looks beautiful, and most importantly, appropriate. This subject of the interior creates a unique atmosphere, filling all solar rays and lights.
Fastening of such structures should be elected elegance, the crystality of the shelf, while ensuring its fortress and sustainability for a long time.
If you carefully follow all instructions, you can independently fix the uneasy glass design on the wall. The most popular type of fastener is a specialized bracket.
A small thickness (four - twelve millimeters) and the fragility of the shelves leads to the use of soft gaskets designed to protect the glass from all kinds of deformation.
Mounts for such shelves are made in such a way that the surface is protected in the installation section at the bottom and above.
In order for the upper area to remain open, various devices with suction cups are used. They must be secured from the bottom of the glass design.
FEATURES OF MONTAGE
- Before installing, you must make sure that all the necessary tools are at hand and will not have to look for something in the most responsible moment. Construction level and pencil for determining and marking a horizontal line, perforator for drilling holes. Unsubscribe, hammer and screwdriver, if necessary. And it is also necessary to verify that all materials and gaskets going in the sets are fully suitable.
- Using a pencil and level, we determine the boundaries of the wall design. We indicate the middle of the installation and ends on both sides, as well as fasteners.
- In the marked place, drill the desired number of holes with a perforator. The depth of the holes should not exceed 60 mm. To do this, in the tool you need to insert a winning D8 drill (before drilling twice check all the sizes).
- Plastic dowels must be installed in the holes (most often come in the kit).
- Then it is necessary to attach fastenings so that it is a hole below. For greater amenities used screwdriver.
- The shelf must be planted on the brackets with smooth neat movements, so as not to pinch your fingers.
- If necessary, use superclauses for better reliability.
When designing structures, you need to pay attention to the tight fit of the shelf to the wall so that it does not swing and did not hang, because if there are children or pets, unstable design can be unsafe for their health.
Installation rules
Choose the desired location where your design will look the most advantageous. First, before the start of installation, it is necessary to measure the desired shelf to know its thickness, and the level of load, and accordingly.
This is necessary to determine the number and location of fasteners.
For example, the bookshelf will be more loaded than the shelf with souvenirs. Secondly, it is necessary to determine (at least visually) the thickness and strength of the wall, to which the selected design is attached. If the wall is concrete or brick, then you should not worry.
But if it is thin (less than 10 cm), made of drywall, then it is better to hang anything on her own anything, or at least consult with installers. Basically, only decorative finish is fixed on such walls.
Regardless of the selected method and fixtures, it is necessary to conduct a clear line on the selected wall. This uses a construction level or Waterpas.
It is important to do everything smoothly, because this line determines the place to install the fastener. Reliability - the main rule of installation.
Construction dowel construction fixation is most safe. The only drawback of this species - when dismantling, there are small difficulties.
The strength of the fastening of the shelf to the wall also depends on the properly selected for the size of the construction screws and dowels.
Conclusion on the topic
So we figured out the main methods and variants of materials.
Now you can hang the shelves on their own without any problems. Good luck in repair!
 Why you can not give icons
 Is it possible to give icons as a gift: Signs, the opinion of the Church
 A year ago left her husband, and now I do not know what to do