Useful things from canisters, dishes and an old bicycle. Stand for sweets
Do not hurry to throw away the used plastic container, because it can still be useful for it. In a new review, the author collected the most interesting and practical examples of what else can be used by unnecessary plastic bottles.
1. Marine Decoration

To create a unique maritime decoration, you will need a small plastic or glass bottle, which should be filled with simple water and attributes of the seabed: sand, seashells, large beads similar to pearls, coins, brilliant beads and glass fragments. When all components are folded, drip into a bottle of a drop of blue food dye, a few drops of vegetable oil and a little sparkle. It remains only to spin the plug and the amazing decoration is ready.
2. Stand for books and magazines

Non-humid manipulations will allow the unnecessary canister from milk or juice to a comfortable stand for books, newspapers and magazines.
3. Shooting nozzle

From the bottle from the shampoo, you can cut a convenient tap for a crane, which will allow the child to wash his hands without helping, without baying the entire floor.
4. Salpars

A bottle of detergent can be used to create a bright and practical cloth, the design of which is limited to your fantasy.
5. Organizer for stationery

Instead of simply throwing out the next balls from the shampoo and the shower gel, make bright and cheerful stands in the form of funny monster. To begin with, just cut the necks of the bottles and make the places of future cuts. From colored paper or fabric, you can cut a variety of decorative elements, like eyes, teeth and ears, and attach them to bottles using a superclone. The finished products are best attached to the wall with the help of bilateral scotch.
6. Containers for cosmetic accessories

Cropped plastic bottles are perfect for the creation of charming containers for storing makeup for makeup, decorative cosmetics, ear chopsticks and other trifles.
7. Pouff

From a large number of plastic containers, you can make a charming pouf, the process of creating a creation is quite simple and understandable. First you need to make a circle of plastic bottles of one height and consolidate it with a tape. The resulting design is needed to clean the molding of foam polyethylene, fixing all the joints with scotch. The basis of the Purifer is ready, it remains only to sew a suitable case for it.
8. Bracelets

Plastic bottles are an excellent basis for creating original bracelets. Use fabric, threads, skin and any other materials to decorate an unsightly plastic base.
9. Support for sweets

Rounds of plastic bottles of different volumes painted in the desired shade can be used to create a spectacular multi-level stand for comfortable and beautiful storage of sweets.
10. Scoop and blade

Plastic cans from milk and juice can be used to create a practical scoop and comfortable small blade.
11. Protective Cap

Protect the phone from snow or rain will help a simple cap, which can be made in two bills from a conventional plastic bottle.
12. Lamp

A small plastic canister can become a wonderful basis for creating an original lamp.
13. Organizer for decorations

A stunning multi-level organizer, which can be made of several dongs of plastic bottles strung on a metal needle.
14. Kashpo
Capacities for storage of spare parts.
Capacious containers made from unnecessary plastic canisters, which are perfect for storing small parts, nails, screws and other details will be helped and maintaining order in the garage.
17. Toy

Armed with scissors, markers and paints, you can turn unnecessary plastic containers into funny toys, whose creation process, like the result itself, will undoubtedly attract the attention of children.
In continuation of the topic with their own hands.
In order to decorate the garden, it is not necessary to spend big money, on the purchase of decorations, it is enough to use sweater tools. An excellent solution will be old canisters, crafts from which will decorate any plot. About the features of the use of a canister for making crafts, consider further.
Crafts from plastic canister: express method of making bucket
Plastic buckets are very necessary and useful things not only in the garden, but also in the house. If the bucket was in the house urgently, and the ability to purchase it at the moment is absent, but any plastic canister is suitable for its manufacture.
For these purposes, it will be necessary to preserve the canister itself, with a capacity of at least five liters, knives and handles from the old buckets. Using a pencil, make a markup according to which the canister will cut off under the bucket. Next, with a knife, cut the unnecessary part of the canister. Tool on the canister holes for the installation of the handle, set it in the desired position.
To adjust the volume and capacity of the bucket, it is enough to trim the canister. If there is a need for a large amount of buckets, then using old canisters you can build tanks with different capacity.
With the help of such a bucket, it is possible to water the garden or a vegetable garden, measuring the required amount of bulk materials or liquid, in the process of construction work on the site. In addition, such a bucket will not be sorry to throw out the compounds after placing them to combat various insects or animals.
Crafts from old canister: great solution for children
With a large number of canisters, preferably one volume, they can be used to make a decorative vase. A simpler solution is to take one canister, cut off the unnecessary top, fill it with soil and plant flowers. Next, the canister should be painted and decorative to issue with the use of seashells, stones, etc.
A more difficult solution - making trains from Kanister. In this case, you can build the first vase from the largest canister from the largest canister and decorate it as a car. Subsequent vases should be of the same size. In general, it will require:
- approximately 5-8 canisters;
- stationery knife;
- paints, to work outside the room;
- soil or nutritional compositions for plants.

First remove the side part of them from each of the canister. You need to do this with the help of a stationery knife. Next, the canisters are installed in such a manner so that they have the form of the train. To create a locomotive, install one canister on the second, and the covers will become excellent wheels.
In order for the train to become more realistic, paint it into funny colors, blue, yellow, orange, pink. Wait until the containers are dried, and then set the soil and plant the plants.
In the autumn time of the year, before the onset of winter, the vases are covered with polyethylene film or other waterproofing material. Since in the process of accumulating moisture in vases, during a strong frost, they can deform or damage.

DIY CANISTER: Making a decorative night light
If you have a lamp in the garden, it is not at all, it is quite realistic to build this device from the old, preferably a white canister. In addition, it will require:
- acute knife;
- the cartridge in which the bulb will be installed;
- wires on which there is a plug and switch;
- glue, preferably on silicone basis;
- decorative cut of the tissue;
- wipes from paper with which the decoupage is performed.

Cut the unnecessary canister and install wires in it with a light bulb. Next, you should decorate the lamp. To do this, it must be wrapped in a trim of fabric, for fixing which glue base is used.
The second option to decorate the lamp involves the use of napkins for decoupage. With their help, it is possible to achieve the original and incredibly beautiful texture of the lamp. Initially, the canister is lubricated with glue and these napkins are pasted on it.
After drying the adhesion, the wall in the canister make a hole to install the light bulb and the wire institution, perfectly harmonizes this lamp with a wooden stand or a variant of making a special long leg and the use of canisters as a lamp.
With this method, you can also make a chandelier that is installed on the terrace. Plastic is an excellent option for outdoor use, as it is resistant to moisture, high temperature, mold, easily clean and easy to operate. However, chandeliers from a canister with a decoupage or cloth should be protected from moisture and use only warm and dry weather.

Plastic crafts Canisters: Construct cabinet
Another option is to use old plastic canister - a construction with their help of a whole cabinet, in which you can store small inventory and various accessories. In addition, the shoes and even clothing are also well placed in such a closet.
During the work, you will need to have a minimum of 15 canister, knife and clamps. In order for the solidity and stability of the cabinet to remain at the proper level, try to be the cans of the same by volume. To cut the upper part from each canister, however, the board on which the canister begins to narrow, should remain. Thus, things and tools will be securely held inside.
The first row of the canister is fixed among themselves, while the cells are obtained, in addition to which various items can be laid. You specify the closet form, it can be rectangular, square, pyramido-shaped. In mandatory, the wardrobe must be connected to the wall, since its stability does not allow it to be installed separately.
In the same way, shelves for storing books, shoes, things, hats, etc. have been built from the canister By defining the canisters in bright colors, you can get an interesting design solution for the design of the premises both inside and outside.

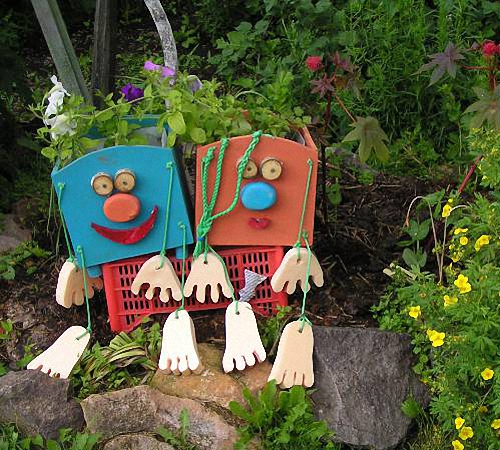
DIY CANISTER FOR GARDEN: Making decorative masks
If after the manufacture of various scenery for the garden from the canister, you have cut off areas of plastic canister, do not hurry to throw them away, and even more so burn. They will become excellent material for making masks that can be hung in both the garden and at the entrance to the house.
The hole from the neck canister can serve as mouth, and if you cut a few more holes, then they will be eyes, ears and even nose. Applying your fantasy, you can very quickly turn these segments canister into interesting decorations.
- segments from the canister, preferably those on which the neck is located;
- glue and ropes;
- various fabrics, ribbons and beads, for decoration;
- buttons and wire of very thin diameter;
- scissors and timed.
With the help of ropes and wires on the mask, hair is fixed. To do the holes under the hair, use the usual sequel. The character hairstyles depend on the overall stylist in the design of the exterior and of course your individual preferences. Eyes most often made, gluing buttons on a mask. For these purposes it will be necessary wire. To draw your eyes, use the paint or marker. So that the mask looked more attractive, decorate her necklace from seashells or large beads.
In order for the mask to look even more effectively, bring the wire to it and install small, possibly multi-colored sailions. Lanterns are suitable for any holiday that is arranged in the garden.
DIY CANISTER DIY: Simple ideas
From plastic canister, you can build boxes for garden tools. To do this, you should cut the neck from the canister and attach the handle to it. This device can also be used in the garage, for storing keys or fasteners.
By cutting the plastic canister in half, it turns out a container in the form of a pallet, which covers the soil and embark on different kinds of plants. At the same time, these mini vases are perfectly transported from place to place. We recommend to paint them, for example in the form of birch or tree.
In addition, children can be attracted to joint manufacturing garden feeders from plastic canisters. Draw rectangular fragments on the canister, approximately retreating from its bottom 4-5 cm. Next, the container should be cut through the previously drawn sketch using the knife. The lower part of the plastic is rejected and serves as a landing platform, on which birds are located. Inside the feeder fall asleep food. If desired, it is cleaned with bright colors.

Unnecessary canisters can also be excellent material for the construction of different garden figures. It is enough to purchase paints used for outdoor work and enable fantasy. Of the small canisters, it is quite realistic to get garden gnomes, various heroes from cartoons, donkey, pig, cheburashka, wolf.
In order for you to get a piglet, you should install the steering wheel to the top, on the bottom, the elements in the form of hooves are fixed using bolts. For their manufacture, the old rubber tire or foam is suitable. As a patch, it is enough to use the lid from the same canister. However, the color of the body and the patch must be different. Buttons are used as an eye, installed using wire, which is made through holes made by shill.
Next should be set ears, which as well as hoofs can be rubber or made of foam. In order to decorate the piglet, it is also made by a bristle, using a bottle or plastic, an old brush or sliced \u200b\u200bstrips. A variant of making several piglets or a whole family is possible.
In addition, it is possible to build a horse for decorating the site, as a torso which can also be used. In order to make the neck for the horses, use the old hose or board. Canister a little smaller volume will serve as a head, to which the hair, eyes, paint the mouth and teeth. For the manufacture of tails, horse branches or a plastic bottle cut by scissors use.
Place for relaxing their old canister
If there is a large number of kanisters in the garden plot, and at the same time garden crafts you do not like, then we recommend to equip the place for rest, namely the bed.
For these purposes, it will be necessary to have the same canister, which previously fluted their owners. To fix the canister with each other uses tape, tape or special welding. All canor is installed in a special portable grid, so the bed is easily transported from one place to another. In order to avoid excessive stiffness from the bed, we recommend supplementing it with a mattress.
In addition, with the help of plastic cans, it is possible to build a raft on which you can swim, having our own reservoir. Also, in the presence of fantasy, playgrounds, benches, tables, arches, houses are built from plastic canisters.
By connecting the canisters with each other in a certain sequence, using liquid nails or special welding, it is possible to get a game house for children. At the same time, at the same time, each canister in his color, it turns out a great and original solution for children. If you break up the canister and align it, it is possible to get the surface in the form of a rectangle. These details are able to construct leaf structures, while they are used as canopies, slides or roofs for the house.
With the help of a combination of plastic canisters, unnecessary bottles, pipes, unnecessary things and your imagination, the garden plot will become a real work of art. Also, you can make a garden tool from the garden canister, such as a rake, a shovel or a small broom.
In skillful hands, old kitchenware will turn into a panel or clock. They can be made more than a bike or even canisters.
What to do from kitchen utensils?
Do not everyone know that excess kitchenware is easily transformed into new interior items. If you have accumulated a lot of such utensils, and you bought new plates, cups, saucers, do not throw old. Of these, you will get wonderful design things.
How to decorate the window, door?
Look at how you can decorate the door with old salad bowls, crystal or glass products.

To implement this idea, you will need:
- transparent glue strong fixation;
- old glass, transparent plastic, crystal salad bowls and plates;
- degreasing solution;
- dishwashing liquid;
- soft rags;
- water;
- door with glass.
- First, wash the foundation with a specialware for dishes. Wipe this glass part with a soft cloth.
- Dry decorated surface wipe the means for degreasing. If you do not have this, then use the usual alcohol.
- See how to position the transparent items. First glue the largest, then medium. After that, fill the space between the salad bowls and dishes of smaller kitchen utensils. Excess glue wipe the soft cloth.
If you change the window in the country, do not throw out the old one, but you need to not remove it from the frame. Enclose on one side of glass transparent kitchen utensils. Cut the window to the wall or to another support. This method will help decorate the cottage, decorate an unsightly building or cover the trunk of a tree.
Picture or photo frame, for wall clock
To further unload the kitchen cabinet for dishes, make a decorative panel. You can be sure that there is no one for anyone.

To make the designer thing to decorate the house, take:
- cups, saucers, kettles;
- transparent super glue;
- big rectangular or round dish;
- soft rag.
- Put in front of you a big dish. It can be made of plastic, porcelain, faience. If you then want to put inside such a photo frame, a picture or clock, then the dish should be with a hole in the center.
- If it is not, you can make this "ambrusura" using a drill and a special drill to work with such fragile materials.
- On this basis, spread the remains of a tea service or several. If there are many items, put one in another. If everything suits, attach them to the dish glue.
- You can write down one item in two, use both halves and glue even broken dishes, but the visible part should be solid.
Shelf out of dishes
The following idea is no less interesting. Make a kitchen shelf to the kitchen will allow cups and saucers from the service.

To create this subject of the interior, you need to take:
- 3 tea cups and 3 sauces;
- 3 metal hooks;
- super glue;
- wooden or glass bar;
- white acrylic paint;
- brush.
- If the bar is not colored, paint it. Acrylic will dry very quickly and after 20-30 minutes you can begin to the next step.
- Cover the scenery with glue, attach them to the bar. Stick to cup saucers.
- Now you need to fix the bar on the wall. This can be done if you first do in its upper part 2 holes, and attach to self-drawing with large hats.
- You can fix on the back of the plank special loops, hang your creation on the nails driven into the wall or on the self-tapping screws that are fixed in dowels.
To make this organizer, take:
- wooden plank;
- antiseptic under the tree;
- tassel;
- self-tapping screw;
- drill;
- emery paper.
- Paint a plate. If you want it to have an old chamber, let's swee in some places.
- Put the top mug on this basis, lock it in this position with the screw. The following two mugs attach sideways to this bar.
- Now you need to hang the finished shelf on the wall, consulting it here with self-draws. In the upper mug you can put artificial flowers, thus decorate your creation.
The twine will not operate in the coil if it is fixed in one of the circles. And on the knobs of the circles you can fasten the clothespins so that they do not lose at the most right moment.

This is how easily unnecessary kitchenware turns into the necessary thing. From old cups, you can make even the author's wall clock. The manufacturing process you will see more.
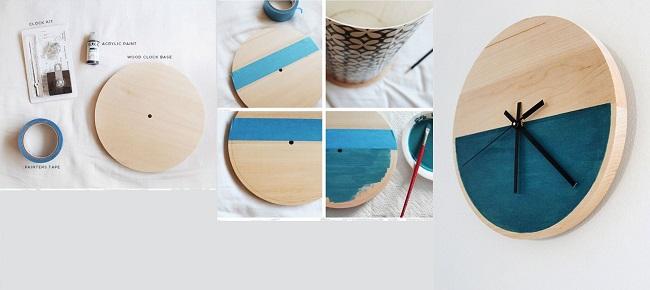
How to make a watch with your own hands?

To make them, take:
- objects from a tea service;
- clockwork;
- panel of processed MDF or other basis;
- reliable glue;
- saws.
You will need 12 cups and as much saucer. First, make the location of their location using the marker. Each cup will be responsible for a certain hour. Stick these items into place.
Pay attention to the length of the arrows, when passing in a circle, they should not touch the cups and saucers.
Not only a set of kitchenware will make such wonderful hours. They can be made it from the cast material.

To make the clock itself or yourself, you will need:
- SD disk;
- super glue;
- clockwork;
- keys from computer keyboard.
- Put the clock mechanism from the back of the disk, attach the arrows on the front. Take the keys from the computer where the numbers are written. Each will correspond to a certain hour.
- Spread them into place in order, while the button with the number 12 will be at the top, and the button 6 is at the bottom.
- If you are all done correctly, glue the buttons to the place, after which you can start the clock and admire how they go.

Look at how to make the clock with your own hands using the next master class.
You will need:
- round plywood harvesting;
- drill;
- insulating tape;
- paint;
- brush;
- clockwork.
Color one half in the selected color. When the paint is driving, remove the isolent. Secure the clock mechanism behind the clock, and the arrows are in front. In such a product, the dial is not drawn, but if you wish, you can portray it.
You can depict various geometric shapes on the billets.

That's how to make hours of this type. To create them, you will need:
- cork substrate;
- awl;
- clockwork;
- insulating tape;
- acrylic paint of different colors;
- tassels;
- clockwork.
- Draw on the substrate smooth circles using a pattern or circulation. In the middle, make holes with sewing.
- Stick the isolate as it is shown in the photo or as you wish yourself. Skin the resulting figures with different colors.
- After drying, the paint will be left to remove the isolent, consolidate the clockwork and hang the clock on the wall.

But it is not all the ideas. See how to make a clock with your own hands on the wall, and at the same time get rid of empty containers. Such can make it possible for giving.

This is what is useful for this:
- empty bottles;
- wooden planks;
- wood veil;
- small nails with large hats;
- glue;
- self-tapping screw;
- tassels;
- clockwork.
- Dispise the plank of the desired length, cover them with paint or verse. Put the table next to each other.
- To connect them all, attach the back of two boards perpendicular to the data. From the reverse side, attach the clockwork, and with the front-arrow.
- Take reliable glue, fix clean dry bottles with cuts out. Their bottom should form a circle.
- Attach the clock to the wall with hinges and screws.
From bike
You can make a clock even from the old bike, only its wheel will be needed for these.

For the manufacture of this interior item you will need:
- metal axis from the bike wheel;
- clock mechanism with arrows;
- figures;
- clothespins;
- black paint with a tassel;
- family photos.
Figures can be made from different materials. To do this, use cardboard, metal or plastic.
You can buy numbers that are sold to designate the door number and paint them, and if the metal rim is in good condition, you can not cover it with paint, but leave the same silver.

The clock on the wall is mastered even from the mechanism that turns the chain. It is called a carriage. If you have several such details from old bicycles, then do the following hours.

You can make them easily using a large and small gear from the bike. Then the chain of the desired length will also be required. Short it easy. Remove one of the fragments, remove the excess length. Match the ends of the chain, put the element on them.
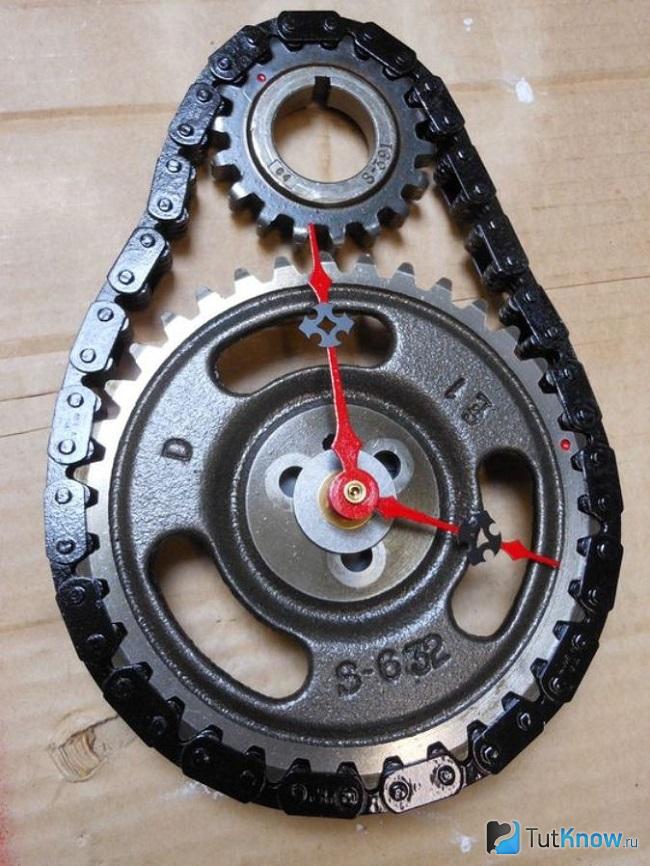
You can also shorten the chain, put it on the gear and fix it. It will remain to fasten the clockwork, after which check the cradle in action.

Now you know how to make a clock with your own hands, what to turn the kitchen dishes if it is old or unpaired. It remains to see what to do for home. Of these, you can make it possible to make remarkable interior items, without any apartment or a country house.
What to do from the canister?
If you buy drinking water in such a container, then these plastic containers periodically accumulate with you. Look at how much useful can be made from them.

Such a wonderful lighting system will result in the result. But before you make it, take:
- 5-liter plastic cans;
- paint;
- tassels;
- bulbs and cartridges to them;
- isolent;
- stationery knife;
- decorative panel;
- drill;
- fasteners.
- Wash the canisters and remove the labels and plastic handles from them, covers. Sharp the stationery knife cut down the bottom of the tank. Color blanks in the desired color. Just do it with the rest of the Tara.
- While the paint dries, prepare the decorative panel. Put three holes in it for three lamps. Pull the cords through these holes, attach them from above to a single lighting system. It should end with a fork that you subsequently insert into the outlet.
- But for now, it is absolutely impossible to do this, but you need to do this. Sharp edges of dried lamps. Close the tape.
- In each plug, make a drill on the hole, the lower ends of the electric cords here. Tighten the plug, and to the wires that are under the lid, attach the cartridge and the light bulb into it.
- Check if everything is well isolated, only after that you can turn on the plug into the socket and watch the lamp beautifully burns.

This is what will be needed for this work:
- canisters from under the water of the same size and shape;
- stationery knife;
- light bulbs with cords and cartridges;
- awl;
- wire.
- Cut the top of the bottles, you will need only billets. Make on their edges on each side of two twil holes.
- Count here with a wire diagonally so that with the help of it in the center you could consolidate the cartridge that you will do.
- Screw the light bulb. Secure the wires on a single panel, attach it to the lighting system.

To make this organizer for newspapers, you will need:
- canister;
- acute knife;
- insulating tape;
- marker.
Not only cans, but another empty packaging will go into business. Look at how to make a beautiful lamp from a plastic bottle. To do this, you need also:
- artificial pebbles;
- transparent glue;
- lamp with cartridge and cord.

To make it possible to conveniently close the packages, not nervous whenever you try to unleash the node, make the following device.
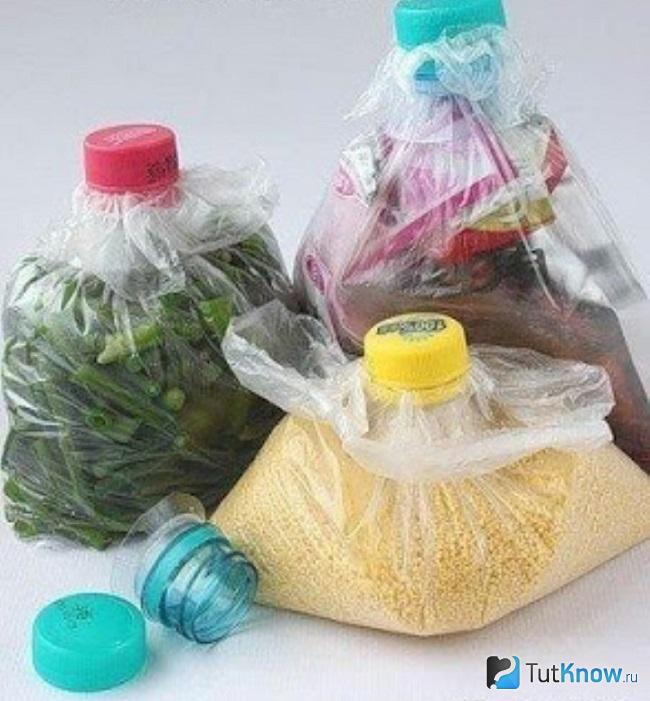
For him will rise:
- plastic bags;
- plastic bottles;
- covers from bottles.
That is how much original and useful can be made from secondary materials.
See how you can make a shelf of plastic canister.
In the next video, it is shown, what other homemade can be made of canisters.
If you want to see how to make a watch from a vinyl disk, then read another workshop.
You can find a variety of things made by skillful people from girlfriend. For example, a very interesting idea is a canister, converted to the bar locker. It looks impressive and stands the same. At the same time, such a thing can be done by himself, so that it satisfies it is your requests and needs. In the bars, the door, as a rule, opens down, which may not always be comfortable.
Below is the instruction, how to make your own cabinet made of canisters with shelves adjustable in height. The layout of the shelves depends on the goals for which the locker is intended, for example, the combination below is suitable for photographic equipment, but you can adjust it to your needs.
Required materials and equipment
It will take the following to work:Materials:
- Old washed or new canister.
- Boards.
- Loops.
- A pen.
- Rubber compressor.
- Screws, bolts and nuts.
- Dremel with a cut off disk.
- Corner grinder with a cutting disc (Bulgarian).
- Ribbon saw (or jigsaw).
- File.
- Marker, handle.
- The angular line (optional, the line is also suitable).
- Sandpaper.
- Plane.
- Desktop drilling machine or drill and drill.
Decide with the size of the door


Before starting to cut the door in the canister, it is worth deciding what kind of size it should be. With the help of a marker attached to the carbon, you can outline the doors of different sizes and choose the most suitable. In the example above, it is 30 mm from the edge of the canister.
In order not to accidentally erase the line drawn with the marker, you can take it with a translucent adhesive tape, and on top of painting a handle a thinner line, which will be more convenient to cut.
Cut the door


The door can be cut with a dopel or grinder.
The second option may be faster, while Bulgarian leaves a wider slot, because She has a wider disk. Since it is planned to stick a rubber seal on the door and edge, it will be a more appropriate option. When working the baccoon, you most likely need help to fix the canister.
At the end stage it is more convenient to use dremel to cut rounded corners. When cutting metal, it is necessary to be very careful with sharp edges on the cut. Use gloves and process edges with a file.
Rubber compactor on the door and fit in size


Stick the rubber seal along the edge of the door and check whether the door fit tightly. If necessary, cut and adjust the angles with a dreamer and a file.
Determine the size and location of the shelves inside the canister


Now you need to make the inner shelves for the locker. Depending on what you plan to store in it, consider it design. The picture shows a layout suitable for photo equipment, while the entire design will be possible to disassemble and redo it, since the lock connection is used for the assembly.
Internal dimensions canisters can be slightly different depending on the manufacturer, so you better proceed from your own measurements. To simulate the end result and imagine how everything will look, you can use the design program as Autodesk Inventor.
We make shelves


First of all, pass the boards. In this case, the boards turned 12 mm thick. Then, using templates, apply markup parts for the shelves on the board. To cut them, it is best to use a ribbon saw. Because This canister has a recess in the middle along a narrow side, in the shelf it was necessary to cut the hole using a drilling machine. Drill also over the hole for connecting with support racks in each corner, at a distance of 6 mm from the edges of 3 mm wide and a depth of 8 mm. When you fix the shelf to the clamp, put a piece of wood between the clip and the shelf itself so as not to damage it.
To accurately fit all the details to each other and to the size of the canister, it will take careful grinding of the edges and connectors. Remember that grinding best along the fibers of wood.
Finally, you need to cut the vertical racks. To connect to the shelves with the help of the waders, do at the ends of the opening columns 12 mm depth, 3 mm in diameter (then the mount should be 20 mm in length).
Preparation and installation of doors


Pick up the suitable loop design. Measuring the width of the loops and determining where you want to attach them, make a mark using a nail or something sharp. One of the options: loops at a distance of 15 mm from the edge of the canister, at a height of 100 and 270 mm.
In order not to be mistaken with the location of the hole, start drilling using a thin drill, preferably 1 or 2 mm with a diameter, and then install a thicker that corresponds to purchased bolts.
Place the loop and cut the seal if necessary. Now it is easy to determine the location of the holes on the door, applying the door and placing it in the desired position. Drill holes on the door, as described above, and secure loops on it.
Last in order, but not much important thing: Secure the door handle in the desired place. In this case, it is installed 45 mm from the edge and 180 mm from the lower edge of the door.
Assembling shelves


Finally you need to assemble the shelves for the locker. It will be easy or difficult to depend on how the intricate design you have come up with.
Fill the locker and enjoy


Come up with where you will store an amazing locker. The most important, of course, find a place where it will be in sight, and you can proudly demonstrate to all the creation of your hands.
 Why you can not give icons
 Is it possible to give icons as a gift: Signs, the opinion of the Church
 A year ago left her husband, and now I do not know what to do