Small country houses projects. Dutch lodge with his own hands - simple step-by-step instruction of stylish summer houses (75 photos). Installing windows and doors
After purchasing a country site for the cottage, the question of how to build a country house with your own hands becomes relevant. Well, to build it yourself - it is quite possible, if, of course, the huge "palace" is not conceived, requiring the involvement of construction equipment and the team of professionals.
Usually, compact buildings are chosen for cottages, but, nevertheless, the house must have everything you need for recreation - Rooms, kitchen, veranda. The latter will become a favorite place for evening strengthening all family. It is very important to make the country house become cozy and comfortable, so you need to think over all the nuances of its arrangement.
The optimal material for the country's construction is wood, and the construction principle is a framework.
Of course, the first thing you need to do is to decide on the place and size of the construction, to make a project, plan further work.
Pro cT of a small country house
The size of the future house depends largely on the area of \u200b\u200bthe country area, the number of family members and the material possibilities of the owners. If we plan to plan, make a good project and choose inexpensive, but high-quality material for construction, then you can save place, means and opening hours.
In any case, the first steps - the preparation of the projectMost often, the country house has a size in 5.0 × 6.0 or 4.0 × 6.0 m. The construction of a larger area is asgraded significantly, and, mostly, in cases where they are planned to be operated year-round. But this is, rather, there will be no country house, but a full-fledged country house.
The planning layout of the house may have to be carried out on the basis of the requirements that can be established by the Board of the Horticultural Partnership, therefore, acquiring, such nuances need to be recognized in advance. Most often, the following distances are required:
- The house should be installed at a distance of 3 meters from the border of the neighboring site, and from the fence separating the plot from the overall travel (Street) - 5 meters.
- In order to ensure fire safety, the stone house from another stone structure is located at a distance of at least six meters, and from wooden to ten. If the house is wooden, then it should be installed at a distance not closer to 15 meters from another wooden structure.
- So that the house does not cover the neighboring buildings from sunlight, if it is placed on the eastern, southern or western side of the site, it is located at a distance from another residential building, at least equal to its height.
Usually for the installation of the country house is chosen the highest place on a plot in which Water will not gather when melting snow or from heavy rains. Increased humidity under the house will never benefit any building material, but it will always affect the overall strength and durability of the design.
Most often, the following technologies of its construction are chosen for the construction of dacha houses: frame-boiled construction, log cabins, walls from blocks or bricks.
For summer cottages, single-storey houses with closed or open verandas, or terraces are predominantly selected. Often the structure has an attic room used for storing gardening equipment and other things that are unnecessary seemingly in everyday use, but which can always come in handy in the country. However, it happens that in some projects the beams of the attic overlap are absent at all, and then the roof rates simultaneously perform the role of the ceiling.
If the family is big, and the plot area is not so great, as I would like, then you can plan a two-storey house that occupies quite a bit of place. In this case, the first floor can be given under the living room, a terrace and a kitchen, and on the second - to arrange cozy beds for the whole family.
Not necessarily In the giving structure to build a full-fledged second floor, as its role can perfectly perform an attic superstructure. By separating it with natural materials, there you can create a wonderful healthy summer atmosphere.
Country houses are mainly used in the warm year of the year, starting with the arrival of spring and ending in autumn. Therefore, they do not require reinforced insulation of walls and roofs, but the instruments for heating rooms must still be provided - in case of cold nights or decrease in temperature with unstable weather. Usually, electrical appliances are used as heaters, such as convectors or infrared film emitters, but sometimes the owners prefer to even install fireplaces or cast iron heating and cooking furnaces.
By the way, if it is conceived by the construction of a real fireplace or a brick furnace, then they must be included in the Compiled Project.
There are also ready-made variants of country houses that are sold complete in the disassembled form, which you just need to deliver to the site and collect. To any similar set of parts, detailed instructions are required, in which the procedure for carrying out works, the main technological methods and schemes of compounds of individual elements and nodes are set out.
For land owner that It has basic construction skills, will not be a lot of work to collect a similar country house independently. The main advantage of this option can be called that often the kit already includes everything you need for an electric network of the building, for its ventilation system, and even for mounting the water supply.
Video: A small neat country house justifies its name
What type of house to choose?
Deciding with an exemplary future house plan, you need to choose the material for its construction. Not only the view of the building itself will depend on this choice, but also the comfort of staying in it, as well as the costs of its construction.
- The traditional material for the country house is wood, which will create a favorable microclimate in it, filling it with the smells of the forest. The wooden house can be embedded with a skeletal way, from a bar or logs. The disadvantage of wooden buildings consider the high fire hazard of the material.
However, wooden houses always built, and many of them stood the century. Today, there are special fire-proof impregnations, which significantly reduce the risk of fire from the wooden structures. And in general, the most important thing here is not the material, but the human factor is the neglect of the elementary requirements of fire safety in the overwhelming number of cases, it becomes cause of fire.
- The construction of a brick structure will cost much more expensive, but it will be possible to call it a full-fledged home with a great reason, which will be able to use not only in the summer, but, if necessary, in winter, if installing the furnace in it. Brick buildings are much less easily susceptible to fire and with high-quality masonry will serve quite a long time. The shortcomings can be called a more complex and long process with trinity, requiring special skills, and high price for materials.
- Very often, with the construction of a country house, different materials are used. For example, the house is erected from wood, but on the foundation of concrete, brick or blocks.
This option can be called optimal, since the foundation of material-resistant materials will create optimal conditions for the construction of walls of wood, so it will become for the home by a reliable basis.
It is this one, the last option and it is worth considering, as it is the most popular of all kinds of country houses.
Stages of the construction of a country house
Building materials for the country house
If there is no desire to bother with calculations, then it is better to purchase a predetermined model of a house, which has a specific area, which will only need to prepare a place.
In all other cases, building materials will be required. Their appearance, size, volume, total - all depending on the size of the planned building, which is determined by the project.
Prices for various types of timber
Material for foundation
For any of the types of foundation, the following materials will be needed:
- sand, crushed stone, cement;
- a third-rate board and a ram for formwork;
- brick or concrete blocks;
- waterproofing material (rubberoid);
- Ceramizite of the middle faction.
Material for walls and roofs
Since wood chosen for the construction of the walls, then, pushing out of this, other materials will be seamless:
- Bruks and boards of different sizes, depending on the design parameters;
- fasteners - nails, self-tapping screws, bolts, studs;
- corners of different configurations, metal plates - for bonding nodes;
- vapor barrier film;
- insulation - mineral wool, eco-water or ceramzit;
- To cover the roof, it is better to choose a lightweight material - Ondulin or professional flooring.
After the installation site of the future house is determined, the materials are purchased, you can go to the arrangement of the foundation. True, first will still have to decide on its type.
Foundation of the country house
Even with the erection of such a small and easy building, like a wooden country house, no foundation can not do. In the case under consideration, for this purpose, one of two types is ideal - this is a column and tape foundation. Which one to choose - depends on the preferences of the builder.
- A columnar foundation will be less costly option, as it will make it possible to save on construction materials seriously. In addition, such foundation VP can be performed independently, without help, which will also save some amount.
How to build it right, you can learn with all the details by passing this link to the corresponding page of our portal.
- To create a ribbon foundation, not only more materials will be required, but also a long time. It is not surprising - throughout the perimeter of the future, you will need to dig a trench, waterproof Its, establish the reinforcement design, to build a formwork and fill the boiler concrete. And after that, you want or not, but also you will also need a monthly time to complete the flooded ribbon and the set of vintage strength.
However, the ribbon foundation of the sun is very popular among individual developers. This option is convenient because it allows you to do a basement under the house, however, for this wall, the foundation will have to be lifted above the soil surface by 700 ÷ 800 mm. In detail described in the article, which can be found on on the seam portal, passing on the proposed link.
If a column foundation is selected, then recommended from the site, which will be under the house and around it by 500 ÷ 600 mm, remove the top layer of the soil at 150 ÷ \u200b\u200b200 mm. Then fall asleep into the resulting pit layer of sand at 30 ÷ 40 mm, which should be tamped. Above sand pillow stacked layer middle-complete Rubble and also compacted, and the remaining space needs to be covered with a grainsite of the average fraction. All these procedures are done so that small rodents cannot get to the house. They do not tolerate the ceramzite (especially - small), as it contains a large amount of dust and has a loose surface.
Ceramizite fine fractions - a great remedy for rodentsTo protect the house from the penetration of large rodents or other intact guests from the world of animals, the space under the house is desirable to close the metal mesh with cells of no more than 10 mm.
Construction of a frame design
For cottage houses optimal choice - frame designThe frame house can be supplied both on the columns and on the ribbon foundation. The construction always starts from the basis that must be reliable waterproofing Two-three layers of the onset runnerdoor.
- If the project provides a veranda, you need to immediately separate its zone on which the roof will be erected, but there will be no solid walls. To maintain the roof over the veranda, you can use the racks of the common wall frame. Other option - Veranda will be attached to the house separately.
- Everything without exception, wooden billets must be treated with antiseptic compositions and antipirens. These impregnations will increase wood resistance to fire, to rotThe appearance of insect nests or colonies of microflora representatives - mold or fungus is presented.
- After the workpieces received proper training and completely dried, along the construction, the lower frame (crown) is first manufactured, which will be laid on the foundation and will be subsequently used for floor mounting.
In order for the floor to be reliable, for the frame you need to take high-quality bars of the desired section. If the tools allow, then it is better to choose wooden elements not by the "bottom boundary" of the sizes, but laying a certain margin in their cross section.
The table shows the optimal dimensions of the bar for the frame house:
- The support beams of the frame are mounted on the cornerboards located around the perimeter of the foundation, at a distance of 600 ÷ 700 mm from each other. They are fixed with the help of the corners or by the side. If the elements are large in the section, they additionally can be copped with metal brackets.
- When the lower strapping with supporting beams will be ready, wall frameworks are made. They can be assembled separately, and then in the finished form are raised and fixed on the bars of the cutting of the frame.
Another option is to raise the frame directly at the place. For example, if the house is erased independently, without helpers, then the finished frame with the wave will be very difficult to raise the strapping to the height, evenly set and temporarily, until the final consolidation is fixed. And this means that each of the bars will have to be exhibited separately.
- The size of the bars for the racks of the wall frame should be at least 100 × 100 mm, but it can also be mounted and from boards having a cross section of at least 50 × 150 mm.
Bruks are fixed on the lower strapping using powerful corners that are able to hold them in a vertical position. It is best to use nails for fastening, but a self-tapping screw - the price difference is not so significant, but the quality and reliability of the assembly is incomparably higher.
- By installing vertical racks, you need to immediately place the location of the openings for windows and doors. Best of all the site where they must be installed, leave in the frame free, and install part of the wall with window opening separately.
Then, when the top strapping bar is installed on all other vertical racks, the area with window opening is fixed to the place left for it.
- In the same way all four walls are collected. At the corners, the side racks are bonded between themselves with corners, or one common angular rack is mounted instead of two separate. It is recommended to be restored by diagonal pan on both sides, they will give the rigidity of the entire wall design.
- The doorway is placed in the frame at once. It is strengthened with an additional rack, since the door-freely suspended on the loop has a certain weight, which must be able to easily be kept both both fortified opening and all wall frame.
- If you plan to observe the frame with the outer side by the lining, then the next step is carried out this event. The covering will give the design additional rigidity that will continue the installation of the attic overlap and
Installation of the floor can be carried out immediately after the outside of the walls of the walls, but only if the roof is covered on the same day the roof. It is extremely undesirable that freshly fed floor covering, if suddenly the rain suddenly go at night. Therefore, it is still better to start solving the question of the roof, and then calmly engage in all other construction events inside the house.
Roof construction and roof laying
Types of rafter systems
A few words should be said about the types of rafting systems, since, by going to the construction of the roof, you need to have a general idea of \u200b\u200bthis, to know which design it is better to choose.
The rafter systems are two species - hanging and ulissions.
Hanging system
The hanging rafter system is characterized by the fact that it is arranged only on the external bearing walls and does not have other supports. It is perfect for erection over a small country structure. In order to facilitate the load on the wooden walls and the foundation, the hanging rafters are tightened.
The hanging design itself consists of a cross bar, which also performs overlapping function, and can simultaneously be a frame for a ceiling cover, as well as from rafting feet forming roofing rods.
System
The utilization system is mounted if there are internal capital partitions in the house, in addition to external walls, which will become additional support points. Such a scheme can also be used in the construction of the roof of the country house, if it has a large area and its rooms are separated by walls built on the foundation.
With the device of this system, the load on the bearing side walls becomes weaker, so it will be possible to use less retaining elements. It is great for indulgence structures that will be used as residential premises.
Overlapping beams
Importing design element - overlap beamsThe beams are stacked smoothly over the vertical stands of the wall frame. In order for them to eat tightly on the upper strapping belt, the grooves are peeling on their edges. The size of the grooves can be calculated by relying on the formula indicated in the figure.
Beams are fixed on the frame design of walls with nails or self-tapping screws, and they are sometimes fixed with metal corners on both sides.
After completing the installation of overlapping beams, you can move to the lining of the rafting roof system. In order to safety on the ceiling beams, a temporary boardwalk is laid in order to ensure the comfort of moving on the plane of the attic during the installation of rafters.
Installation of the rafter system
The rapid roof system can be mounted using a different sequence of fastening its elements:
- First option. It is necessary to bore extreme pairs of rafter feet on the ground, then raise on the strapping and install them in the finished form on the frontal walls of the house. And then connect them to the skate beam, and the rest of the pair of rafters is already mounted.
- Second option. To begin with, install the middle racks along the frontons, then bore them with a skate bar or a board, on which rafters are then attached.
- Third option. In this case, the pairs of rafter feet in the upper part are fastened with a skunk lining together, and the lower part of them is fixed on the strapping of the wall, which in this variant will perform the role of Mauerlat.
The cross section of BRUSEV or logs used for rafter feet should be strictly maintained - depending on the the length of the rafter between the two points of the support, and depending on the Step between adjacent couples rafters
| The maximum allowable length of the rafter foot (in mm) | Stroke step (in mm) | |||||||
|---|---|---|---|---|---|---|---|---|
| 1100 | 1400 | 1750 | 2100 | |||||
| The cross section of the rafter foot (in mm) | ||||||||
| bruces cross section | log Ø. | bruces cross section | log Ø. | bruces cross section | log Ø. | bruces cross section | log Ø. | |
| up to 3000. | 80 × 100. | 100 | 80 × 100. | 130 | 90 × 100. | 150 | 90 × 160. | 160 |
| up to 3600. | 80 × 130. | 130 | 80 × 160. | 160 | 80 × 180. | 180 | 90 × 180. | 180 |
| up to 4300. | 80 × 160. | 160 | 80 × 180. | 180 | 90 × 180. | 180 | 100 × 200. | 200 |
| up to 5000. | 80 × 180. | 180 | 80 × 200. | 200 | 100 × 200. | 200 | - | - |
| up to 5800. | 80 × 200. | 200 | 100 × 200. | 200 | - | - | - | - |
| up to 6500. | 100 × 200. | 200 | 120 × 220. | 240 | - | - | - | - |
It should be noted that the attachment node of the rafter in its lower part will depend on how they are fastened to the skate, and what length is.
If the raftered has a sufficiently large length and protrudes beyond the limits of the bearing walls, the wrist is cut on it, which it will be set to the strapping bar (). An example of such a wrist is shown in the picture:
If the rafter ends on the edge of the carrier wall, then its lower edge is cut at right angles with respect to Mauerlat, and the leg itself can be fixed on it using a special fastener plate, a sliding support, a corner, brackets, nails or long self-tapes.
If the house is very small, then after fixing the rafter on the strapping, binding to their skate bar or board, additional retaining elements are most likely not to be installed.
Detailed information on the exact can be obtained from a special publication of our portal, passing on the recommended link:
To install additional, reinforcing elements of the rafter system, the material can be chosen in accordance with the recommendations specified in the table:
Prices for various types of fasteners for rafters
Fasteners for timing
Roofing system
After the rafters and additional elements form the roofs of the roof, you can move to the installation of the subsystem for the roof flooring.
- The first thing to be done from the outside of the roof, after the installation of the rafter is to be able to wish the vapor insulation film, consolidating it first with the brackets, and then the counter tests on the rafters.
The film is laid perpendicular to the rafters, ranging from the lower, cornice part of the roof. The overweight between two adjacent bands should be at least 200 mm.
- Perpendicular to the counterclaim is mounted the main lattice on which the roofing material will be attached. The installation of the guides depends on the type and size of the sheets of roofing material.
If the soft roof is chosen to cover the roof, instead of the skate cutters, the skates are covered with a planee, and then the rubberoid waterproofing sheets, which is stacked by 150 ÷ \u200b\u200b200 mm and glued together with bitumen mastics. Another option is to use a soft bitumen decorative tile, the laying of which is produced by similar technology.
- For wooden houses, the following roofing materials are most often used (depending on the roof slope steepness).
- On the prepared foundation, the selected roofing material is fixed and enshrines. The work begins on the eaves, and if the first row is placed on the right left, then all other rows are mounted on the same scheme.
Some types of roofing materials have a strictly agreed installation scheme in the direction, which cannot be changed. This is necessarily indicated in the instructions attached to them.
Also, for any of the types of sheet roofing materials, the amount of the adhesion is defined in the direction of the skate (usually 150 ÷ \u200b\u200b200 mm), and the number of waves (relief protrusions) in the horizontal direction, along the roof.
- Almost all roofing materials are fixed on the crate with special nails or screws with waterproofing gaskets.
- It is very important to choose correctly and fasten the skate elements of the roof, otherwise it will give a seside at the first rain. Typically, the ski element is selected from the same material as the coating of roofing rods.
- Next, the roof of the roof is finishing is made - it can be made with wooden or plastic clapboard. Sometimes for these purposes, special plastic elements are used - sofa.
- Then, in the wind board, the elements of the drainage system from the roof - funnels, gutters on brackets, pipes, etc.
- Further, the frontal sides of the rafter system are trimmed. Most often, wooden or plastic lining is used for this or smooth outcast boards.
For the lining around the perimeter of the front-distance triangle, a special profile is fixed, into which prepared and cut under the desired corner of the panel will be installed. Installation is usually done symmetrically - from the middle rack into one, and then the other side - then the plating will be smooth and neat.
By the way, mount the lining, moreover, It is possible horizontally, a Christmas tree or invent a more complex pattern.
Detailed information on technology can be found from the article posted on the seam site by passing link.
Now, having finished in an easy finish of the roof and being confident that the rain will not get involved in the country house, you can go to the installation of windows and doors, insulation, flooring, flooring and walls.
Installing windows and doors
- Window frames are mounted in the frames left for them, are set up by level. For preliminary fixation, when placing a frame between it and bar, the openings are installed spacers from wooden bars or rails.
Then, after controlling the correctness of the installation, the frames are attached to the framework of the walls with metal stripes. The remaining gaps between the frame and skeleton bars are filled with mounting foam. After drying it, the overflows are cut around, and the windquarters will be installed around the windows from the outside of the walls, which will close the unsightly type of gaps and give accuracy with the total date of the house.
- Door installation is best done along with the door frame if it has sufficient rigidity. So it will be much easier to align the entire design by the level in the doorway wall.
Exposing a door frame, if necessary, achieve a clear vertical position, put the clins (inserts) from wooden plates. The door frame is fixed to the frame as well as the window frames, with the help of metal strips, and the clearance is filled with mounting foam.
By installing in the se window and doors, you can move to the floor mounting.
Installation and insulation of the floor
To start from the lower frame, temporary flooring is removed from the boards (if it was), and then you need to carry out the installation of the draft floor.
- To do this, the skeleton beams are nailed or bolted cranial bars. They are necessary for laying on them transverse black floorboards.
- Further, the skulls are stacked by boards, dried exactly in size, or a plywood with a thickness of 8 ÷ 10 mm - this flooring and will perform the functions of the draft floor.
- From above laid by the draft floor closed hydro - paro— Insulating film, which should close and beams, and the entire floor plane. Separate material canvases are stacked by braziness (150 ÷ \u200b\u200b200 mm) and are sampled at the joints of waterproof tape.
- Further, the vapor insulation film is placed or insulating material. If there is no desire to have in the quality of neighbors who love to settle under the floor, then it is better for the insulation of the floor to use a grainzite of medium or small fraction, or an eco-way - in such materials, these tooth pests simply do not live.
- On top of the insulation, another layer of film membrane is laid out, which is nailed on the beams of brackets. The principle of laying is exactly the same as on the draft floor.
- Then the whole design closes with thick plywood or wooden floorboards.
Prices for thermal insulation materials
Heat insulation materials
Events for additional thermal insulation
When the floor is fully prepared, the walls of the house from the inside are insulated and the walls are squeezed. If the structure is used only in the warm season, then the insulation does not interfere anyway - it will work as an insulator of the room from heating into a strong heat. Therefore, it is recommended to put the thermal insulating layer not only in the walls, but also in the ceiling overlap, and if it is missing - to place the insulation on the inner rope of roof.
- First, vapor insulation material is fixed on all walls and ceiling beams. The ceiling is then trimmed with clapboard, plywood or plasterboard.
- After the ceiling is trimmed, walls are insulated. The insulation mats are laid between the frame racks. It must be done so that the mats get up as close as possible with the focus on the bars of the wall frame, so that there is no cracks left.
That is why mineral wool is most often used as a heater - it will break up after tight styling between the racks, fully filling in the space. The material is usually selected so that the thickness of the mats and the thickness of the frame racks were the same.
- After that, all the walls are again tightened by a vapor barrier film.
- The next step is the walls of the walls with wooden clapboard, plywood or. The latter, with the subsequent decorative decoration of the walls, can be painted with water-emulsion paint or assessed by wallpaper.
- Next, the attic overlap is insulated, the insulation is placed between the ceiling beams.
If the ceiling is trimmed from the side of the house with plasterboard or clapboard, then you must not forget that it is impossible to step on it, since the sheath will not stand human weight. It is necessary to move neatly on the beams of overlapping.
- In the event that the attic is planned to be used to store various garden accessories, then on top of the insulation on the ceiling beams, it is necessary to fasten the flooring from boards or plywood having a thickness of at least 10 mm.
- The final strokes of the interior decoration will be the installation of platbands on the windows and doors, ceiling and floor plinths and the closure of the corners with accessory rails.
An extension to the house
The last stages of the arrangement of the country house are assembly work on the veranda and on the porch.
If the veranda is left in advance on the frame on the foundation, then the board is laid on this space, for the floor covering (the material for open areas is used), the fencing is installed and the canopy is mounted.
If the foundation is raised high enough above the ground, then the porch is also attached.
Build a country house with your own hands - quite fulfilling the task, but without helpers, it will be quite difficult to do. Therefore, it is best to seek help to a knowledgeable master who has experience in such work, will always give a useful advice and will show how they are correctly mounted for certain nodes in the house design. You can "mobilize" relatives and acquaintances - it is possible that a knowledgeable person will also be among them.
Video: Construction of a country house carcass
Buy the country area is just the beginning. It must be planned, pick up the optimal house, develop the overall concept of its design. In this article we will consider a variety of projects of country houses. From the smallest on one room, to very accurate - per 100 squares of the useful area.
With a veranda and terrace
When choosing a planning of the country house, you often try to find a project with a veranda or terrace. A similar covered platform is good not only for recreation or outdoor trapes. In a rainy or hot day, a lot of things can be checked under a canopy that, because of the large amounts of garbage in the rooms you will not do.
On the general foundation
The projects of country houses with a veranda have a small area: the smallests have a size of 6 * 4 meters, and the veranda takes 2 meters along the long side, and the house itself is 4 * 4 meters or 16 square meters (taking into account the thickness of the walls and is less).
Another option is one room in which the place is assigned to several kitchen cabinets and the stove, there is a small dining table and there is a sleeping place. Such a layout is ideal for one person. It will be quite bad for themselves. In this variant, there is no bathroom, so it will have separately.

The layout of the cottage house of a small area (up to 40 meters) is quite simple: usually these are two rooms, the first of which is used as a kitchen and dining room at the same time. Most often it is a passing. The second room is residential. More or less comfortable accommodate here you can two beds. So projects of country houses with an attic 6 * 4 meters are designed for accommodation 1-2 people.

If the construction budget is strongly limited, considering the projects of country houses with a single roof. They are unusual for our camp, but the cost of the roof with a small area is much smaller. Just need to choose the right (taking into account the magnitude of the snow cover).

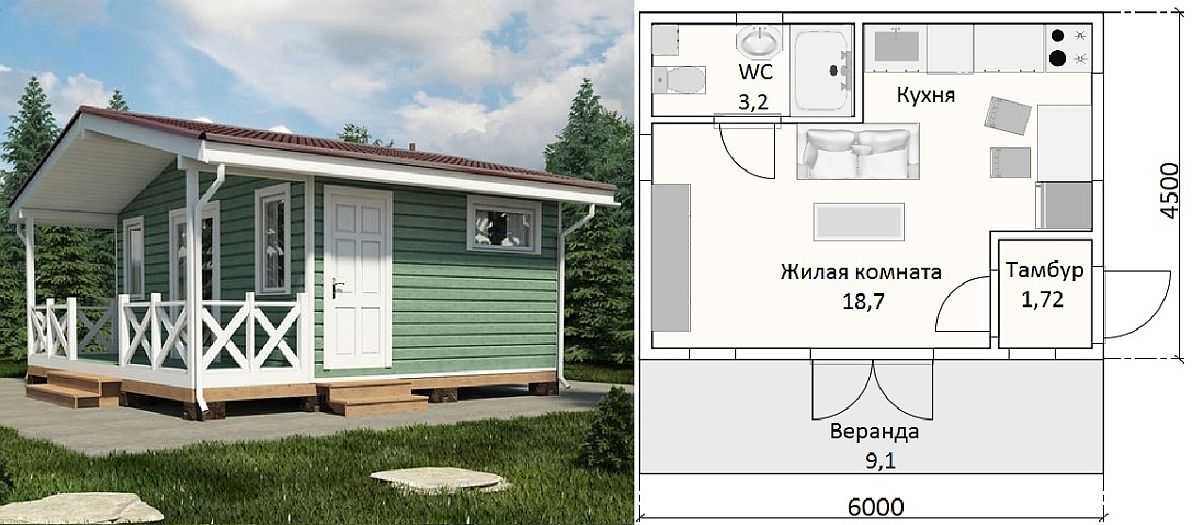
The country's cottage house is presented in the photo above. The project is interesting because the veranda is originally "winter", glazed. Most owners of open veranda come to the need to glare, and for a pleasant pastime in the air. In this project, the veranda is a continuation of the living room, but the partition can be installed here. In general, a comfortable and comfortable house with a traditional layout, all rooms are separate, there is a bathroom, a shattered corridor. All conditions for year-round residence.
On a separate foundation
Please note that the above projects of country houses with a veranda have a common foundation. It is reliable, since even with the spring wrecking soil will not be. But the cost of the foundation is significant. Therefore, such an approach is justified on complex soils, prone to bent. In normal soils, you can make a veranda on a separate, incoherent and lightweight (usually - column or pile) foundation. One such project is presented below.

In general, the veranda can be attached to any construction. It can be laid at the design stage, but can be attached after (as it happens very often).

Small country house 6 * 4.5 with a veranda on a separate foundation
The veranda may occupy one of the sides of the house, can cover two or even three sides. But there are options and with a small open platform (as in the photo above). The foundation in this case can be separate, but there will be no big savings. For example, in the above project "won" only 1.1 meters of "Basic Foundation.

We are so accustomed to the comfort that even in the country you do not want to have "convenience in the yard". For many, the main criterion of choice is the presence of a bathroom. Even the need does not scare them. Not all projects of cottage houses of a small area can boast such "excess", but in some bathroom (toilet and shower) is present.
With mansard
The idea to increase the living area at the expense comes often. It is believed that the costs of construction are not much increasing, since most of the superstructure is a modified roof. In fact, if the attic will be operated all year round, the difference in the price tag for a two-storey house and one-storey with an attic will be small. After all, it is necessary to consider that the area of \u200b\u200bthe indoors of the attic floor is significantly less, and the cost will be great, as it takes good heat, sound, vaporizolation.

Attic under the duplex roof
Really cheap will cost a country house with a summer attic. But at the same time it is necessary to take into account that on sunny days without insulation there will be too hot there, so that the thermal insulation is still necessary, but not so "serious" as for winter operation.

Really cheap will cost a country house with a summer attic. But at the same time it is necessary to take into account that on sunny days without insulation there will be too hot there, so the thermal insulation is still necessary, but not so "serious" as for winter operation.

The projects of country houses presented above are intended for seasonal visits. They provide only residential rooms. In the ground floor room you can organize a kitchenette.
Below is the layout of a small garden or dacha house of 5 5 meters with a selected kitchen. Pay attention to the fact that the porch is attached and on the plan it is not.

All these houses are designed as frame. With minor changes, these projects are suitable for homes from any other material. Only it will be necessary to take into account the thickness of the walls, choose the right foundation.

If desired, the covered veranda can be made open. Although, usually happens on the contrary. Buing an open, it is glazed or driven up to half the wall, they put single frames. If you want fresh air, the windows can always be opened, and the area can be left under the summer dining room or kitchen.
How to increase the area of \u200b\u200bthe attic floor
All projects of country houses with the attic floor are made under the duplex roof. It is good in the sense that the snow on such steep rods will not linger. The second plus is a simple rafter system. Minus - the small area of \u200b\u200bthe "full-fledged" room is on top. Too many ineffective spaces around the edges. There you can make cabinets, but for housing this area is unsuitable.

If it is important for you to increase the living area, the roof can be made of broken. It is more complicated in the device and more expensive, but the area of \u200b\u200bpremises on the attic floor is much larger.

Another way to increase the area - the walls are expelled above the level of the first floor. They say, build "one and a half flood". This option is good for cottages that are visited and in the cold season. The roof can be done as you like, but the large area of \u200b\u200bthe room is also obtained under the broken.

Example of "one-hour floor"
When choosing a project of a cottage house with an attic to a periodic visit, it is better to make a cold attic, and the overlapping should be insulated. On the stairs, which leads to the second floor, it is necessary to provide a door / cover, which will cut the upper tier. Otherwise, there will be a lot of fuel and time to leave the heating. In winter, people, usually, less, visits are short-lived. Preheat both floors for too long and expensive, so the decision is not bad.
Projects of two-storey country houses
The construction of a two-story house is not so expensive. The foundation still needs one, albeit more powerful, but its value increases not twice, but by 60% percent. The dimensions and insulation of the roof from the floors do not depend at all, so that there is no increase in investments. The costs of the walls are added - their area is twice as large, but in general, the cost of the square meter of the area is cheaper than in the construction of a similar one-storey housing. Therefore, many are looking for projects of two-storey cottages.

A project of a small two-story house for giving with a attached garage: living area of \u200b\u200b100 square meters. m, total 127 sq. M. m, garage for one car
The above project is designed for aerated concrete or ceramic building blocks. Suitable for stretched plots. A rendered garage is very convenient when used - from the garage, the Item can be found in the house. More Plus: This option saves a place on the plot, and it always has few in the country, whatever the magnitude of the plot you have.
In this embodiment, a spacious terrace is assumed from the back of the house. It does not include the total area of \u200b\u200bthe house. An interesting design makes the house unlike others: a large window on a century and a half, a cubic shape garage and a canopy in front of the house - do not affect the price tag too much, but they make the house unique.

Another dacha project for two floors with a bounted garage is presented above. This option is more suitable for square or wide areas. Construction stain in terms of - 10 * 10 meters, living area - 108 square meters. The unusual appearance of this house gives high windows of the second floor. The selection of finishing materials, a combination of light beige and brown, introduces its contribution. In general, an interesting project.

Non-standard species Two-storey house with a balcony that is looking through the entire building. From the back there is an extensive open terrace. The roof is four-page, which complicates the design, but gives the construction of a special color.
With Bay
For many, the cottage is associated with a bath. The bath, of course, can be built separately, but it is long and expensive. In the country house of medium sized, it is quite possible to take the room under the steam room. It is usually done with the entrance from the bathroom / bathroom, as water procedures are necessary. For true steambags, there should be no longer going to the street: so that you can quickly cool in the river or street pool.

The minimum size of the steam room is 2 * 2 meters, optimal - 3 * 3 Such rooms can be entered even in the house of a small area, but the number of living space will decrease. If the rooms still should be enough, you can consider the option with the attic floor. One of these examples in the photo below.

Pay attention to the layout. The first thing is to emphasize the attention: the stove is installed in such a way that it is to the neighboring room. In this case, this is a rest room. The option is not too good, as the entrance is far away. Wearing firewood will have through the room that is inconvenient and, usually, fraught with a large number of garbage.
Another disadvantage: in the given version there is no kitchen. For dachas, this is a solid flaw. The kitchen corner can be organized in a large room, placed on the bedroom exclusively at the top. Another layout is to make the kitchen in the current "flue / recreation room". Resting is more convenient in a large room. After taking the soul, it is convenient to go there.
Small and inexpensive
Small cottages are usually designed under the most inexpensive construction technologies. In our country, this is a frame technology and wooden houses. In about the same category of houses from porous construction blocks (). But they are still not so popular.

Dunchae's projects for framework technology
Little country houses are usually built by frame technology. , You can buy ready-made - prefabricated. These are two technologies that, with minimal cost and time costs, allow you to have a good country housing.

To optimize the budget of the construction of a country house, look for projects the foundation of which on the plan is a rectangle or square. The presence of any projections leads to the rise in the cost of a square meter. It is not enough that the costs of the foundation increase, the walls of the wall increase, and, it means that they are the costs of them. It turns out more than the roof - the harrowing system, more complex nodes.

Layout of the country house 6 * 4 with kitchen, toilet, summer veranda
Another point for those who plan to visit the cottage in the winter time. So that when walking there, the warm air did not "run out of the house, it is desirable to do with a tambour. If the area does not allow you to make it built-in, make an extension. It will reduce fuel consumption and time to warm the house.
Bar and log
One of the most common building materials in our mill: Bar and log. Plus, a small country house is erected very quickly. Minus - with a long shrinkage (from six months to a year, depending on the initial moisture of logs and climatic conditions). Until the end of the active shrinkage period, finishing works should not be drawn by the possibility of operation of the construction. It does not concern the surrounding log cabins (ready-made sets) or glued bar. But the price is solid (two times) for such options above.

Little cottage house from timber 4 * 4 - a very simple project
If we talk about the smallest summer cottages, then they have 4 sizes 4 by 4 meters. It simply does not make sense less. The layout in this case is quite simple: this is just one room. They can differ only orientation on the sides of light, quantity and rolling windows. More doors can be located in the middle or side. Everything. Options are over.
A little more in the area will be a house 6 * 4 meters. Here in the "pure" form we have about 22 squares of the area. Place 14-15 in the previous version. The layout is also not different in diversity, but you can already burn the kitchen zone.

If we talk about optimal expenses, then the above projects of country houses are not the best option. The fact is that bruschers or log daches are better to do 6 * 6 in terms of. The fact is that the standard length and timber, and logs - 6 meters. If the walls of your home are smaller, you need to or look for non-standard suitable length, or cut off unnecessary from the standard. Yes, non-standard is much less, but it will be necessary to search for it in different sawmills. Even on the largest sawmill, find the timber or logs of 4-5 meter long in sufficient to build quantities more than predica. So you have to "iron" all closely located. What will be the quality of the material to say difficult. Although, if you "do not burn" you can buy the same non-standard logs for several years, put them in stacks, bringing to operational humidity. In general, this is a good plan. That's just a lot of time requires a lot.
After you have purchased a small plot of six acres, it is extremely important to develop a house project and its location. At the same time, it is necessary to plan everything in the complex, since various types of landscape design require certain conditions for the choice of material to build a building.
If accommodation in the house in the cold season is not assumed, it makes sense to consider options with a small house of the house. This will significantly save the territory of the landing site or create a unique landscape design.
Before construction, it is important to explore all the main requirements for the construction of objects on the land plot:
- Buildings should be located no closer than five meters from the border of the site and three meters from the neighbors territory.
- Between your house and neighboring buildings, the distance should not exceed six meters.
- The sections of the site should be raised to the height of no more than one and a half meters.
- Toilet, cesspools can be located at a distance of not closer to fifteen meters from residential buildings or water sources (well, well).
What kind of house project to choose?
Before starting construction work, you need to decide on the size of the house. The most relevant size can be considered if the building will be located:
- Living room (or several rooms).
- Kitchen.
- Terrace (open or closed veranda).
Conditionally all projects of houses can be divided into three types:

Country house with a bath under one roof
Projects of houses with a bath mainly make in two versions. Each, of which must meet the Main Requirement - combining two buildings with different functions.
In the first version, the room for the steam room and the washing office are placed on the first floor, and the rest is located on the second.
When applying the second method, a bath is attached to the residential building. It can be placed directly next to the house or connect with it a small tambour.
Common between these methods is the presence of one roof.
It is important to understand that in the construction of such a structure, additional heat and waterproofing materials must be applied.
The undoubted advantage of such buildings should include the possibility of creating a unified communication system. This will allow the bathhouse all year round without having to carry water and firewood.
Dimensions of residential buildings
The smallest residential country buildings are 4 per 4 m, the houses are smaller than doing no sense. The layout in this version is very simple - one room.
From each other, such houses may differ only in the number of windows and the location in relation to the parties of light. Doors are preferably placed in the middle or from the end of the building. The area is about 16 square meters.
Built up the size of 6 x 3 m. It will be a little more, about 18 square meters. The layout can already include a place for cooking.
The above options are unlikely to be optimal. Bruce or log houses in size 6 x 3 m are much more in demand. It is explained simply - the length of the bar (logs) is six meters.
In addition, a small kitchen can already be designed in the house. In the summer house of 6 x 4 m. You can build a small tambour (or bathroom).
If we talk about residential buildings 6 x 4 m., It is quite realistic to place another room or living room.
Materials used for the construction of country houses and their durability
- Frame houses.
The most common way to build. According to statistics more than seventy percent of country houses frame or panel. Early quickly, for the country season. The minimum construction time, without finishing and installing the foundation, can be a month and a half.
The frame is squeezed from the inner and outer side inexpensive material (plywood, OSP or lining).
The insulation is stacked between the trimmed material. Advantages - the ability to hold and rebuild the design. Not bad option for price / quality ratio. Under the compliance with the construction and regular processing, special antiseptic compositions are rather durable.
- Houses from the cut.
The second prevalence method of construction. When buying a ready-made log (taking into account the time required to build the foundation), it is realistic to build a house for 3-4 months.
Important! The building will take about six months on the shrinkage.
Build a house can be independently, the design of the construction is not complicated. Like any construction of a tree, a house can be easily complete or re-posted. Durable, subject to processing by bioprotective materials. Environmentally, with proper operation, it may be a single decade.
Not bad option. True will require close attention to the assembly process. When fulfilling all the recommendations of professionals, the owner has the right to count on warm and reliable housing.
- Country houses from timber.
Very popular way. In construction, a solid, profiled timber is applied.
The assembly is carried out from the finished bars, so the period of construction will be 2-3 months. Taking into account the bookmark of the foundation. As in the case of the houses from the church, the time for shrinkage will be about six months. As a rule, houses are manufactured and collected by professionals.
If you ourselves decided to build such a house, the manufacturer's guarantee is not provided. Advantages - warm; reliable; do not require finish; the possibility of upgrading; durability; environmental friendliness; Beautiful appearance. Disadvantage - high cost.
- Brick projects.
Brick structures are not afraid of temperature differences and adverse natural factors (precipitation, strong wind). However, such a way has a number of shortcomings: brick - quite expensive building material; The process of building a house can take a long time. Dignity - the service life of the cottage from the brick can be several decades without special preventive measures.
Important! With the erection of such buildings, special attention should be paid to the optimal temperature regime - the increased humidity is invalid.
In addition, due to the essential mass of the brick, the construction of capital foundation is required. The best option is a monolithic base.
- Houses from gas silicate blocks.
The main reason for which such material is chosen is a low price. Cheaper bricks about twice.
Important! The blocks are fragile, so when transporting you need to be especially careful.
Used when erecting outdoor walls. The outer cover will be required, as the look of a naked house is not present. It is best to apply materials with high moisture resistance and deformation resistance. For example: siding or facing clinker brick.
Low price material. The mass of the block directly depends on the quality used in its manufacture of cement mortar. The maximum number of floors is 2-3.
Advantages - frost resistance; safety; Low thermal conductivity; simplicity in processing; acceptable sound insulation; The rapid exhibition.
Disadvantages:
- specific choice of funds for finishing, not all materials will be suitable;
- no possibility to screw the screws, since the blocks have a cellular structure;
- increased requirements for moisture insulation.
- Houses from Sibita.
Sibit is a type of aerated concrete. It is characterized by special strength, separately with its own properties resembles wood. The material is light, perfectly preserving heat. By thermal insulation properties exceeds bricks three times.
- low material strength;
- on partitions and walls, heavy cabinets and shelves should not be hung (there will be special fasteners).
Thus, it can be concluded that the most economical option is frame houses.
Approximate prices for country houses
When choosing an option with a frame or frame-paired house, an approximate price will be from 11 thousand rubles per square meter. Building a wooden house box will cost about 13,000 rubles. For one m2. The structure of foam concrete blocks will have to pay from 15 thousand rubles. For 1 m2. Brick house - 18000 / m2. Thus, knowing the total area of \u200b\u200bthe designed house, calculate the final cost of the construction of labor will not be. But these are only the cost of building walls. To this amount, it will be necessary to add funds to the foundation, insulation, the cost of laying the roof, the inner decoration of the premises.
In Moscow and the Moscow region, there are a huge number of proposals for the sale of ready-made country turnkey houses. Example: Domain with dimensions Width / Depth / Height - 6000/6000/3020 From glued timber Sold for 367,000 rubles.
The final value of the house depends on your preferences on the choice of additional options and may increase in two, and even three times.
Choosing foundation
- Foundation columnal - One of the most common. Consists of blurred posts in the land. The upper part, protruding, is aligned horizontally.
Poles must be installed at the corners of the building, under the walls and partitions. The distance between them is recommended to withstand 1-2.5 meters. Poles, as a rule, are exhibited from bricks or concrete blocks. It is used when building frame-shield structures, log cabins and timers.
- efficiency;
- speed of construction;
- applies only for light buildings;
- cannot be used on moving soils.
- Ribbon foundation Fully repeats the outlines of the house, and ensures the stability and reliability of the structure. It is a ribbon of reinforced concrete or brick. One part of such a foundation is in the ground, the other on the surface. This allows you to shut down the garage or cellar under the construction. But only in the case of the use of a bellped type of foundation. Conditionally, such a foundation is divided into finely swallowed (50-80 cm.) And beugoons (over 80 cm.).
Used in the construction of any type of cottage.
- reliability and durability;
- high bearing capacity;
- wide scope.
- relatively high price:
- labor consumption.

- clogged;
- printed;
- drill;
- screw.
They are driven or screwed into the soil until they should be disappeared into the dense layer of the Earth.
- Monolithic foundation - Reinforced base laid on a specially equipped cushion from gravel and sand. Suitable absolutely for any soil, will withstand the load from any country house. Lack only one is a high price.
The construction of the house at the cottage, like any construction, requires a competent organization of the process. Despite, as a rule, a small area of \u200b\u200bthe country house, the project is a necessary part of construction, which will optimize the costs of construction and avoid the "pitfalls" in the form of a breakdown of the deadlines, recalculation of building materials, and other surprises.
Features and composition of the project for giving
The main feature of a small country house is seasonal operation. At the same time, this time is often 5-6 months, so naturally the desire for the owner of the building to spend them with comfort and convenience. As a rule, the cottage plan includes the following premises:
- kitchen;
- hall (or living room);
- bedroom (one, less - two);
- bathroom.
Often, ready-made projects of country houses contain additional rooms and designs intended for rest - bath or sauna, swimming pool, fireplace. At the same time, as a rule, the project documentation does not provide for centralized heating, which is ineffective in seasonal use of the building. It is much more often used heating using a fireplace or with the help of popular and convenient electrical convectors equipped with automatic sensors and overheating protection.
Examples of country houses
Choose and buy a suitable option to a potential buyer will help a large amount of information:
- photos of buildings;
- cottage plans;
- detailed description of operational parameters;
- the list of designed structural solutions and building materials.
Even more simplifies the choice of a module that allows you to look at the selected houses in 3D format.
The use of modern technologies and materials allows you to achieve an original and attractive type of building at relatively low costs. Moreover, with financial constraints, you can buy a project of a small country house economy class, the construction of which will cost a reasonable price.
If no ready-made option satisfies the requests, the experienced workers of the Project House of the Architectural and Project Bureau will prepare an individual project, corresponding to tastes and wishes of the buyer. Creating a sketch and coordination with the customer is carried out within 3-10 days, the development of a full package of documents takes 15 business days.
The country house for relaxing lovers is often necessary not only for seasonal short-term residence, but also for a longer period.
Therefore, when choosing buildings in the country area, you need to carefully read all the modern offers in the construction market, think about the material and the functional purpose of the future at home.
It is necessary to immediately determine which communications will be needed in the house. It depends on what time it is planned to be carried out in the country.

Project of the country house
Typical projects
Offer construction companies. Projects are universal, they are turned "turnkey" and have all the necessary drawings. Construction risks for typical projects are minimal, and the cost is acceptable.

Individual projects
Ordered from developers or architects in case the layout, exterior and interior of the house must be unique. Such a project will be fully exclusive and developed under the customer. It will cost more, and its development will take longer.
Building material for giving
Lines in the building materials market for country houses tree. Behind him is a brick, stone and foam block. Closes a list of the most popular materials products framework. We will analyze their advantages and disadvantages.

Foam blocks
Pretty young material that is used for country construction not so long ago. Such houses are considered durable and comfortable for living.

The facing of such houses make decorative panels, which gives the dacha species solid and attractive.

The advantages of the material:
- affordable price;
- durability;
- fire stability;
- comfortable microclimate;
- resistance to climate features;
- the load of the structure on the foundation is low.

Disadvantages of material:
- the need for additional costs for the construction of the foundation;
- building time increased compared to the frame option.
Stone or brick
A good option for building a house for year-round residence. Care for such a construction will not require many investments, and it will serve for many years.

The advantages of the material:
- moisture resistance, resistance to temperature drops;
- excellent sound insulation qualities, heat capacity;
- durability, reliability and strength of the house.

Disadvantages for country construction:
- high cost of work with stone and brick;
- the cost of the material itself;
- the construction of even a small cottage house from stone will take a lot of time;
- the need to build a monolithic foundation;
- increased walls of walls.

The cottage from stone or brick will only suit those who are planning a rest for a long time.
Wood
The most popular material for the construction of country houses. They retain comfort and eco-friendly. Small buildings in one floor are most often built of wood. You can meet both houses with attic of wood (as well as full-fledged two-story buildings).
Advantages of houses from a tree:
- ecology, thermal insulation, sound insulation;
- pile-screw foundation for any soil;
- ratio price - quality (construction of cottage from wood cheaper than stone);
- a short construction time.

Wooden house is perfect for those building a cottage for short-term stay (for example, on the weekend).
Disadvantages:
- fire Danger (it is necessary to specifically process the material, which deprives its environmental properties);
- a fungus may appear on the tree (or rotting).

Foundations for wooden houses may be pile monolithic or columnar.
Frame country houses
A successful solution for country construction in many parameters. The frame house is erected very quickly.

It is enough to choose a project of such a house at a construction company, and a few days later this house will be produced in production. It will be brought to the section in the form of a constructor and will be erected in a matter of days.

The foundation for frame houses is made by pile, due to the fact that the weight of the house is small. The pile foundation also requires a very little time consumption and materials. What is very profitable for those who do not want to invest huge amounts in the construction of a country house.

Frame houses look very worthily, and at the final cost they cost much cheaper than the construction of a wooden house or brick.

Disadvantages:

The frame house is suitable only for seasonal accommodation (in the warm season). Production technology is designed for regions with a climate warmer than in Russia.

Some use insulation during construction, but the heat loss of the house will still be big. And the cost of heating such a house in the winter will be essential.

In the summer, severe heat in the frame house is also understood too. The walls are very hot, and in the premises it becomes very hot. It is necessary to install air conditioning.
The operation of the house will not be as cheap as its construction. Wall insulation does not allow the walls to skip the air.

Stock Foto Beautiful country houses


 Why you can not give icons
 Is it possible to give icons as a gift: Signs, the opinion of the Church
 A year ago left her husband, and now I do not know what to do