It is possible to hang and attach heavy shelves on the walls of plasterboard: the choice and installation of fasteners, methods and fastening options with their own hands. Fastening the shelves to the wall without apparent fasteners hiding fasteners on the shelf
The shelves in the interior of the modern room are performed by two main functions: become a comfortable stand for books, useful items or pleasant baubles, and also help to emphasize the original style. Not only the aesthetic component, but also the technical side, that is, the quality of products and the method of their fixation. We will try to figure out when it is necessary to use the traditional mounting of the shelves on the wall, and when - secret or unusual.
The modern room without shelves seems unfinished: often they are those stroke, which puts the point in the interior design. If you look into the catalog of furniture heads, you will notice that in addition to cabinets, beds and dressers there are necessarily present these miniature products. They are of different shapes, colors and size, but always correspond to a shared style.
Two in one: bright decor and convenient interior items
And external appeal, and functional qualities are largely dependent on durable and reliable fasteners for the shelves on the wall, so this article will be mostly devoted to metal corners, convenient for mounting brackets, cunning invisible hooks and studs.

Incomplete fastener does not distract attention from design
When buying ready-made furniture heads, fittings and fixation material are usually supplied complete, but often the desire to make the original decor with their own hands, and then it is important to choose the right fastening method.
It would seem that there is nothing easier than to score a couple of nails into the wall and hang a shelf on them with pre-attached "ears". But not everything is so simple. In addition to the most important task - to find the most appropriate place - you need to answer another number of questions: what nails, where exactly you need to attach the "ears", will such fasteners will withstand the weight of the design?

Beautiful metal corners "under the forging"
Consider the simplest option with corners. Suppose that we have an ordinary wood shelf - a simple horizontal product without decorative elements. Tool and material we select, guided by the following list:
- metal corner (2 or 3 pieces, depending on the length);
- ruler, pencil, construction roulette;
- laser level;
- drill and drill;
- self-tapping screw or dowel.
If the basis is wooden, instead of self-tapping screws, you can use ordinary nails.

One of the embodiments of the corner
Instruction:
- We choose the most successful place. Try to choose a plot located in reach - that is, not too high (the error of many love designers). It is not necessary to clutter the surface, previously reorganized (for example, by pictures or photos), it is better to choose a free space. We apply the product and look, whether it fits well in the interior. If everything suits - go to the next stage.
- Carefully consider the lower part of the board and try to choose places for fittings. A set of finished metal mounts for shelves to the wall can be bought at the building of building materials. We attach them to the bottom of the structure: with a small drill we drill small holes and self-testers fix metal elements.
- We make markup. Repel the shelf to the selected place, in the holes in the corners, we make a pencil mark, preferably in each hole.
- Drill drill holes at the base, trying to accurately get into the mark. For concrete slabs it is better to use a dowel.
- Attach the shelf in such a way that the holes in the corners and in the wall coincided. We twist the self-tapping screws, trying to be entered smoothly and smoothly. The test process is completed.
- We admire the result, put the toys, vases, books.

Decorative attachments are an additional decoration.
Construction tricks: secret fasteners
All sorts of metal corners for the shelves on the wall, comfortable brackets, the construction profile is appropriate only if they are competently selected and fully meet the stylistic features of the room. But sometimes technical details are not combined with the surrounding environment and have to go to the cunning - use one of the ways to fasten.

Decorative composition without unnecessary parts
There are several generally accepted options, with which dense adjoining and rigid fixation provide invisible elements. Consider the three most popular:
- hidden loops;
- wooden bar;
- metal rods.
The first method is the most popular. Hinged flat loops are attached to the back of the shelter, then hang the design to the in advance twisted screws. The main thing is to accurately measure the distance between the hinges, otherwise the extra holes "will give out" technical cunning and spoil the intention. For leveling horizontal, we recommend using the construction level.

The second method is to drive the base of the product to strong metal pins, implanted in a concrete slab or brickwork. The role of the pins can play pieces of fittings or steel threaded studs provided for this diameter. The harder product (along with potential filling), the more studs will have to be screwed into the wall. For guaranteed stability, the cross-section of fasteners for wooden shelves should not be less than 12 mm, the length depends on the conditions.
The third option is the installation of a bar with a square or rectangular cross section, which subsequently performs the function of the base. The masking will take place if the thickness of the bar and the thickness of the shelves hanging on it perfectly coincide. Connecting parts between the two surfaces are brazening - wooden pins. To enhance the strength before connecting parts, they are lubricated with glue.

Wall-mounted set of three different designs
If the project of your interior did not include the use of additional visible elements, rescue counted fittings.
Original Methods of Holding Shelves
Traditional ways are suitable for accommodation in the interior of simple, uncomplicated structures in the form of a single horizontal board or product resembling a glazed box. However, the fantasy of modern designers is so rich, which allows you to create amazing structures in the form of labyrinths, trees, flowers, snakes. Fasteners can be as unusual as shelving, although in some cases all the same secret loops or decorative corners are appropriate.
Consider several options, how can I roll the shelves to the wall, if not a completely ordinary project is selected for embodiment.
Non-standard interior solutions
Using the usual object - a wooden board with a thickness of 17-20 mm - you can create a unique design design. Scattered on the wall geometric shapes of different colors, a silhouette of a bat with painted wings, an angular branch of a tree, a huge spiral - support for interior accessories can take the most incredible incarnations.

Original composition from a multi-level shelf in the entire wall in a teenager room
Very simple, but an interesting solution is to create a family tree. The shelves-branches on both sides are attached to the vertically located panel - the trunk. The design is so simple that it can be built on its own in one evening. To match the subject, individual boards are painted in natural colors. Fastening material in both solutions remains invisible.

Easy and elegant composition of patterns of contrasting colors can decorate the kitchen, living room or bedroom. Pay attention to the fastener: laconic light corners do not spoil the overall picture, as they are successfully merged with the tone of wallpaper. The weight of the product is small, so hidden pins could be applied for installation.

Contrast composition
If you use decorative wooden stands, it turns out a hardest picture.
Option on leather belts
Sometimes the most amazing are simple solutions, and the pair of girlfriend can be a magnificent interior decoration. A leather belt is a leather belt as a fastening for a wooden shelf (ordinary gripped board). Production material is not necessarily genuine leather, it may be an artificial analogue or a wide textile tape. The main quality of the suspensions is strength.

Cozy retro composition using belts
Obviously, a horizontally located arcade board on the suspension, not yet fixed, will not be able to withstand a stack of heavy books and is not a reliable support for crystal souvenirs. Its appointment is to serve a decorative wall element, and you can arrange small souvenirs, accessories, light items.

Elements of fasteners for belts are a pair of long screws with plastic dowels, which will be at some distance above the original decor. The procedure looks like this:
- mobile board in the desired color, if you need to save the texture - cover with varnish;
- we prepare two old identical belts (or new purchased in the store);
- we fold the ends of each belt, hang, at a distance of 2-2.5 cm from the edge we drill small holes;
- with drill and hammer at a distance of 60-70 cm fix a dowel;
- krepim ends to dowels so that the belts in the form of loops hung down;
- we insert the board into the prepared loops, align horizontally.
It turned out a neat beautiful decorative stand. You can complicate the composition, building below or above another same tier.
Caution: Fragile Glass
Glass in the interior plays a special role. On the one hand, it is a reliable material that can withstand a lot of weight, on the other - fragile matter, which is easy to smash with one awkward movement. For shelves, specially tempered, especially durable glass, which is difficult to smash even with a hammer. It is not recommended to form parts yourself to form the parts of the necessary sizes, it is better to order cutting in the service processing service.

Decorative metal brackets for fastening glass shelves
This is surprising: transparent planes create the illusion of free, not cluttered space, so glass decor is often used in rooms with limited area. For fixing glass panels, special brackets made of metal and plastic with soft elastic gaskets from the inside are used.

Long metal spokes protrude as fasteners
To make an installation, first fix the brackets: Fresh dowel, in them insert the screws that are included with the bracket, not forgetting to wear the washer. We screw the brackets, check, are equally located relative to each other. Insert the shelf. Sometimes instead of the willed holders use even more curious elements - thin metal cables or long pins, resembling the needles.

Metal cables allow you to create a weightless, steaming in the air
Personal materials go
In the interior design, original solutions, creative ideas, fantastic embodiments seem to be ordinary projects are always appreciated. Using the usual fasteners, but replacing the traditional horizontal to any object from the environment, you can build an unusual composition, harmoniously fit into the common style.

Polypropylene Baguete
We will use the remnants of building materials, for example, trimming of the sewer pipes of a large cross section, which remained from the pipeline device in the country. Breeping the details of the same length on long studs or do without fastener without fastening: we are taking the pipe with a harness and install on the floor.

Cozy storage systems for plastic pipe shoes
Old accessories do not lose their relevance, over time, moving from the category of fashionable things into the category of vintage. It's time to remove the travelers with the antlesole and decorate with them one of the free walls - it will get a luxurious decorative composition with a note of nostalgia.

New life of old suitcases
Even from the cast material, if desired, create a masterpiece. Flashing boxes for fruits after cleaning, grinding and processing easily turn into wonderful shelves that are not ashamed to decorate a children's, hallway or bedroom.

Old Boxes - Retro Decor
Look around - perhaps your look will find an interesting thing that is bored in the corner, and the hands will turn it into an unusual wall decor. But do not forget about interesting solutions and for fastening the shelves on the wall: reinforced wooden brackets, forged openwork corners, barely noticeable stiletto, hidden pins.
Work with plasterboard: accurately and carefully
Drinking nails into wooden logs or punching the hole drill for dowels in a concrete or brick wall, we know exactly what fasteners will not let and serve as much time as it takes. But with plasterboard everything is more complicated. Comfortable, fast erected interior partitions are not a reliable basis for hanging the wall decor.

Shelves with backlit inside a plasterboard box
There are two ways to fasten the shelves to a plasterboard base. The first is intended for the lungs, small in terms of the volume of structures, the second - for heavy, sweature products.
To mount a light shelf, you should produce the usual technical procedure: carefully drill holes, trying not to open the material, screw the dowels, then screws. Reliability can be enhanced by special dowels - "umbrellas" or "butterflies".

Dowel-Butterfly Installation Scheme
Massive interior items are fixed differently. Their installation must be foreseen before the construction of the partition. In places where they will be located, you should install an additional vertical or horizontal metal profile or wooden bars to which the screws or bolts will be mounted.

Experts insist on anchor bolts, as they consider them most reliable for hanging heavy items.
Interesting videos contain useful information that will be useful to you during repair or improvement.
How to hang a hinge-acquired shelf in the store:
One of the ways of invisible fastening - Eccentrics:
Work with plasterboard:
As you can see, the variety of fasteners gives you a great opportunity to choose the shelves of all sorts of design. Knowing the secrets of hanging wall elements, you can independently decorate the room with a new interior item. If there will still be complications or questions - contact professionals that knows fastening.
With the growing popularity of the walls of the walls of plasterboard, the relevance of the problems associated with all sorts of wall objects and their fasteners increases.
How to hang the shelf on plasterboard
Often, in front of domestic masters there is a task, concluded that there is a need to hang on the wall of drywall lamp, hanger, shelf, or TV. But many of them are very justified fear that the wall from drilling and other manipulations will begin to roll and crumble. Accordingly, it is necessary to produce all work with caution, following the recommendations below.
Can I hang
A similar question with confidence can be responsible.
Provided that the plasterboard is glued either attached to the wall and all the requirements of the technology were complied, then the shelves should be hung on a similar wall or other objects similar in size and weight.
What weight can be maximally hang on plasterboard
 The maximum carrying capacity of plasterboard depends on a number of factors:
- material quality;
- reliability of fastening of plasterboard to the wall;
- dimensions and weight of loaded objects.
According to builders and manufacturers, the greatest weight, which is able to withstand drywall mounted on the wall, is 55 kilograms.

You should not focus on such a big figure in your planned work. As a rule, in most cases in practice, comfortable weight in some situations can be both 15 kg and five.
How to fix the shelf on a plasterboard wall
 In general, hang the shelf on plasterboard is a very difficult case that becomes real, subject to the proper approach. A competently organized and carried out workflow using the appropriate quality materials and the correct weight distribution are in this case the key to success.
You can test the shelves on a plasterboard with special dowels. Such fasteners can be different types, but one of their advantages is that when twisting in the wall, they begin to reveal, thereby forming sufficient emphasis and taking a significant part of the load.
What you need
 To hang the shelf on the wall of plasterboard it will take:
- tools for manual or mechanical creation of holes in the wall;
- dowel;
- screws;
- for heavy items, anchor bolts will be required;
- if necessary, a mixture for cementing is used.
Do not forget that during drilling a large amount of dust is formed, especially considering the composition of such material as plasterboard. It will be necessary to worry about protecting the room from dust, and more of individual means of protection during such work.
How to fix a locking moment (fastening)
After drilling holes for fastenings in them, dowels are inserted, which are coming by Mr.. After that, the dowel is satisfied with the screw, for example, with brackets or hooks.
How to hang heavy shelf on plasterboard wall
 Create a heavy shelf on a plasterboard wall by mounting to a metal frame using special fasteners. To do this, you will need to produce a whole list of works:
- The wall outlines the location of the fasteners.
- In the outlined places drill holes, but not only through plasterboard, but also directly through the profile.
- Dowels-butterflies are inserted into the resulting holes and screws are tightened with fasteners planned on them.
- It should not be too strongly tightening the screws, the main thing is that they give the opportunity to withstand the mass of the shelves and its pressure on the wall.
How to mount heavy things on a plasterboard wall
Heavy things require the maximum load distribution between all points of the support. Considering the moment that the plasterboard wall is not recommended to drill in large quantities, the fasteners should be the minimum number, but they must ensure maximum reliability.
 One of the most common attachment options are anchor bolts. Using this method The fastening allows you to provide a solid connection and the shelf will not break off.
To create such an attachment, you will need:
- Workers openings are drilled in the location of future fasteners.
- Now the in-depth holes are done in the monolithic bearing wall.
- The next stage of the anchor is breeding in drilled holes.
- Anchor bolts can be used as an attachment or additional brackets are installed on them.
 For small and easy items as an alternative, dowels are used. But this is permissible for those cases when plasterboard is glued, and is not held on the frame.
Despite the seeming brittleness of such material as plasterboard, it, with proper approach and compliance with all working conditions, demonstrates sufficient strength to hold most furniture items and other objects on the wall surface.
Useful video
For the organization of space in the premises, as well as to decorate the interior there is nothing better than shelves. Comfortable, functional, original form, they help conveniently arrange a lot of things and give rooms a more cozy view. Make the shelves on the wall with their own hands is not at all difficult, and you can use a wide variety of materials - wood, fiberboard, glass, slices of tin, Phaneur.


| Types of wall shelves | Description |
|---|---|
| Classic | This type of shelves is most common due to its simplicity, aesthetic appearance and convenience in the installation. They are a huge flight of fantasies: from simple square to creative asymmetric forms |
| Corner | This type of wall shelves is distinguished by the fastening method - is carried out on adjacent adjacent walls. Most often, they are mounted in the utility rooms and bathrooms. |
| Suspended | This original way to create a shelf involves fastening a simple design to the ceiling with cables or vertical racks. |
| Outdoor | This wall shelf is a design with an outdoor support. This type of product is especially relevant in the hallways, as well as large rooms, where you do not have to think about the loss of space |
| Open and closed shelves on the wall | Wall shelves can be designed, for example, with glass or without it |
Making a simple wooden shelf

Tree is the most convenient material for work. Wooden shelves are simple, complex shape, open and closed, vertical, horizontal and angular. Taking the basic option as the basis, you can assemble the shelf of several modules and give it the most incredible appearance. In order for the product for a long time, it should be properly choosing wood: the boards must be perfectly smooth, completely dry, without cracks, emptiness and mold traces.

In the process of assembly, you will need:
- hacksaw;
- drill;
- building level;
- pencil and ruler;
- boards with a thickness of 16 mm;
- morilka;
- wood varnish;
- schlifmashinka;
- self-tapping screws, brackets, dowels.
As an example, a simple rectangular shelf is 250 mm wide, 300 mm high and 1100 mm long.

Step 1. Marking
The boards are placed on the table and tolerate measurements from the drawing. The height of the side walls should be 268 mm, as they will be located between the upper and lower part: the height of the wall + the thickness of the board x 2 \u003d 300 mm.
Step 2. Cut Boards

If the markup accurately corresponds to the scheme, you can start cutting. It is best to use an electrolovka for this, then cuts are perfectly smooth and neat. There should be 2 long blanks and 2 short.
Step 3. Processing of blanks

Before proceeding with the assembly, each workpiece needs to be stolen, covered with a mourn and varnish. If the shelf is planned to simply paint, the workpieces are processed - and the service life increases, and the paint is smoother.
Step 4. Build Product

The lower board is placed on a flat surface. From the end of the workpiece retreating 8 mm and spend 2 smooth lines parallel to cuts. Now on these lines, you need to mark two points at a distance of 5 cm from the edge, and drill holes there under the self-tapping screw. With the top blank, they do the same. When all the holes are ready, side blanks are installed on the lower board and twist the screws. From above apply the second board and also fix the side walls with self-drawing.

At the end of the side walls, the brackets are fixed, the holes under the dowel drill in the wall, the screws are inserted and tightened so that they performed about 5 mm. Dowels must be located strictly horizontally, so before drilling is planned with a level. Now it remains only to push the brackets on the fasteners and hang the shelf. If you wish, the rear wall of the product can be scored by a piece of plywood, and in front of inserting glass.


In order for such a simple shelf to become more original, you can replace one side wall to replace the vulgar branch. To do this, choose a smooth branch with a diameter of about 7-8 cm with a smooth clean bark, scamped a piece of 28 cm long, cut off all side processes. Chock is treated with primer, dried and covered with varnish. Corah does not need to be removed. After drying the varnish, the blank is inserted between the upper and lower board and firmly fastened with self-draws.

Based on this drawing, you can make various variations of wall shelves. For example, reduce the length of up to 400 mm and produce a 3-4 block immediately. Then install them on each other in the chess and secure with the help of metal plates. Or just fasten them on the wall separately, placing a short distance from each other.

Often, to save place the shelves are made by corner, and they can be installed in both the inner and external corner.


Billets are made according to the scheme described above, only the upper and lower board consist of two elements, with cut at the angle of the ends. The process of manufacturing such a shelf is simple enough:
- halves of the top board are missing on the ends with glue and clamp with clamps;
- repeat the same actions with the bottom board;
- when the adhesive dry, all the blanks are covered with a mourn or ground;
- on the upper and lower billet, the fastening lines and holes are drilled;
- paste the side walls and fix them with self-draws.

| Wall-mounted materials | Advantages and disadvantages |
|---|---|
| Tree: Plywood, chipboard, MDF and others | With this material, it is relatively easy to work, it looks beautiful, naturally and effectively, its service life is quite large, especially if you pre-process |
| Plastic | This material is the most versatile, it can simulate both a tree and a stone, removing their shortcomings. |
| Metal | Such wall shelves will be very durable, reliable and durable, but in the classic interior they will fit with difficulty. In addition, corrosion can be a problem, so special processing and conditions will be required for metal products. |
| Glass | Transparent wall shelves will create an atmosphere of lightness and coziness in the house. Of course, make it with your own hands a glass design will be difficult, but if you, nevertheless, decide to independently do all the work, then with glass will have to work quite a long time and very carefully, especially if various cuts are planned in the shelves design |
Original shelves for books
Shelves of non-standard form are becoming increasingly demand, so if you wish, you can try to collect something original. For example, a bookshelf is used in the form of a simplified labyrinth.
For the manufacture you will need:
- cutting board with a thickness of 20 mm;
- carpentry glue;
- clamps;
- roulette;
- hacksaw;
- stuslo;
- sander;
- morilka;
- furniture screws, screws;
- decorative police holders.
If everything is necessary, you can start making the shelf.
Step 1. Marking
On the prepared boards with a pencil for a ruler, the cutting lines mark. Measurements should be transferred very carefully, since all horizontal parts have different lengths.
Step 2. Trimming blanks
The ends of each workpiece are cut at an angle of 45 or 90 degrees. The scheme indicates the first option, so the stub will need for dipping. It is very important to correctly install a stouch on the board so that the sections are symmetrical. If the ends should not be squeeed, fold the shelf will not work.
Step 3. Build Design
The ends of the parts are smeared with glue, tightly compressed and additionally fixed with furniture screws with a slot. Conventional self-tapping screws are not suitable. Each joint will require at least 2 screws. Both parts of the shelves are applied to the wall, exhibit in terms of the level and mark the attachment point pencil. After that, the holes are drilled under the dowel, screw the brackets to the shelf and hang design on the wall. Instead of brackets, the decorative pollocks "Pelican" are often used.


Hinged shelf on belts
If a decorative shelf is required for small items, the following option is perfect - a board hanging on the belts.


For the manufacture of the shelf it will be necessary:
- 2 edged boards 300x750 mm, 30 mm thick;
- 4 leather belt for 75 cm long;
- 4 long screws with plastic dowels;
- 4 short self-pressing;
- building level;
- line;
- sharp knife;
- drill.
Step 1. Preparation of belts
Belts should be perfectly smooth, so if necessary, they are cut by a knife. Each belt is folded in half, the ends pressed to the table, retreat from the edge of 2 cm and drill a trunk of a neat through hole. The same makes the remaining three.
Step 2. Fastening belts to the wall
On the wall using a level, two points are determined at a distance of 60 cm. Drill holes and plastic dowels are inserted. Folded in half the belt is applied to one of the holes and fix the long screw - it turns out a big loop on the wall. Nearby attach another such loop.
Step 3. Installing Shelves
In the loop, they focus a stinking board and align her horizontally. So that the shelf does not move, adjacent to the wall of the belt parts at the board itself are screwed with short screws. Now, under this shelf, one more one is suspended, repeating the above-described steps. As a result, it turns out a light and neat bunk shelf. If you wish, you can add another 1-2 tier.
For the manufacture of the shelves described above, it is not only a tree, but also to Paneur, as well as sheets of LDSP. The latter option is used most often because LDSP is low weight, high strength, practicality and durability. When assembling the shelves from this material, all sections are necessarily sealed with a melamine edge under the color of the sheet.


Making a glass shelf

Glass shelves fit harmoniously into any interior, and the installation process does not take much time. To work, you will need:
- strained glass;
- a hammer;
- electric drill;
- building level;
- aluminum profile;
- dowels;
- adhesive tape;
- line;
- pencil.
Not everyone knows how to cut the glass correctly, and therefore the cutting of the billets is better to order in the workshop. There will also be performed grinding and polishing the edges so that when installing the shelf does not cut down about sharp edges. Everything else can be done independently.

Step 1. Marking under the fasteners

The site of the wall, where the shelf will hang, must be as much as possible. With the help of the construction level on the wall, the horizontal line is carried out with a pencil. The lines mark the location of fasteners, drill holes.

Step 2. Installing Profiles


Aluminum profile is applied to the surface of the wall and check the matches of fasteners. Then stroke into the holes of the dowels, they are styled with one screw profile and level it horizontally. After that, the rest of the screws are twisted.


 Instead of drill insert screw bracket
  Screw the screw bracket
  Leave the screw bracket to perform from the wall

 Check the situation
  We have the shelves
 Step 3. Fastening Shelves
The rear edge of the glass shelf is closed with adhesive tape. You can use individual strips from the tape, having them there, where the glass will touch the screws of the screws. The shelf is inserted into the profile, the edges of the profile are closed with protective caps. If two shelves come into contact with the sides, their edges are fastened with metal fittings.
If there is free time and the desire of experimentation, you can create a very unusual shelves on the wall of girlfriend. For example, an angular shelf of plastic pipes look original. For its manufacture, you will need segments of sewer pipes and corner bits. The shelf wall is fastened with shuruses with dowels.


Old suitcases and diplomats can also become excellent wall shelves. To do this, they are cut into altitude to half, close the back of the plywood and fix on the wall with the help of screws or on the brackets.

Retractable boxes from unnecessary bedside tables will completely fit for the manufacture of shelves. To give them an elegant look, the boxes should be carefully taken, brew and paint in bright colors. Then they lean them with the rear wall to the surface, mark the fastening sites and drill holes for them. Even one such shelf looks very original, and the composition of 2-3 drawers will become a real decoration.


Video - shelves on the wall do it yourself
Interesting wood shelf. Master Class

It will take:
- Rope;
- Board with a thickness of at least 2 cm;
- 2 corners (mounts) for shelves;
- Steel washers;
- Lighter;
- Drill;
- Saw.


Today, any, even the most modern and fashionable designer does not apply the ability to use practical and stylish shelves when interior design. They will not only become an integral part of the future decor, and will also serve as an excellent stand for books (fastening for bookshelves), for photos and decorative products.
All available two types of fastening of shelves are available:
- standard method (with mounted brackets, corners, etc.);
- fastening the shelves to the wall without visible fasteners.
We will consider a more detailed method, since with standard performance it is difficult to achieve a combination of a future interior with a target design.

- Preparation for the fastener
- Detailed Fastening Instructions with Photo
Consider the process of fastening
- First of all, you need to evaluate how reliable the wall, where our regiment will be mounted directly. If this is a rapid wall, then it should be at least 25cm thick, and if you have a concrete wall, then from 10 cm, which will allow places not only decorative elements on the shelves.

1 - fastening element;
2 - mounting holes;
3 - metal rod;
4 - mounted bracket;
5 - shelf.
2. After that, we turn to the definition of the thickness of the future shelf.
To do this, you must know exactly what will be located on the shelf so that there are no defunctions and deformations. This check can be enough just to take an approximate thickness board and put the cargo on it.
- If the interior concept requires a thicker board, then in this case everything should be used according to the recommendations of your designer or the selected style.
- You will need to take into account the features of the mount, since the shelf thickness cannot be less than 3 cm. If books are located, it is better to use a thickness of 4.5 to 6 cm.
- The future shelf before processing will need to be good to soak.
How to install shelves to the wall without visible mounts
Step 1. Perform measurement distance between the holes.


Step 3. After that, on the resulting axis we apply our fastener and placing holes under it, which should be located on the horizontal line.


Step 5. After that, we clean all the holes from the residues of chips and dust and score wooden pegs or plugs under a dowel.

Step 6. After this, we take a dowel or screws and screw the fastening element to plugs or spicks.
Step 7. After that, we go to the installation of the shelf itself on the fastening elements. If the shelf sits not very tight, you can knock on it with a palm or rubber hammer for reliable fixation. It should be noted that it is necessary to knock on alternately to the left and right, so you eliminate the breakdown of the shelf, and it will evenly sit down on the fastening element.
(Last Updated on: 01/21/2018)
The shelves make our homes and the offices are much more convenient, because they can place a bunch of different small rubbish, put fragile and valuable items, add diversion and volume of a simple wall. However, the shelves often have one big minus - they spoil their fastener the whole picture, do not fit into the interior, visually take the design, etc. Therefore, in many cases, the hidden fastening of the shelf to the wall is practiced, in this case the usual wall shelf looks like a hanging in the air. Of course, such a solution is very, very attractive, but today there are still not everyone knows how to make such a fitting.
Preparation for hidden fastening shelves
Perform such a fastening is best enough until the sequence is generated before automatism. Otherwise, due to the omission of one point or another, all the work may go to the Nammark.
First of all, you need to make sure that the wall will endure the weight of the shelves and the objects placed on it. The main parameter for which such an assessment is performed is its thickness. If the walls are composed of 25-centimeter brickwork or 10-centimeter reinforced concrete slabs, then you can safely mount the hidden shelves with hidden fasteners. If the wall thickness is less than the specified values \u200b\u200bor if the mount is performed to the drywall cladding, then the installation of the regiment with hidden fasteners will also be possible, but the shelf can only be used for storing lightly small things.
Now it should be decided on the thickness of the shelf. You can do this without any complex calculations - just place the load of a certain mass on the shelf evenly and see how the shelf behaves. If it proceeds, then you need to make it thicker or reduce the planned load. In general, it is better to make the shelf thicker - an excess of thickness can be superfluous only in rare cases when it violates the concept of the interior, but too thin will make their use.
Shelf with hidden fastening (photo):


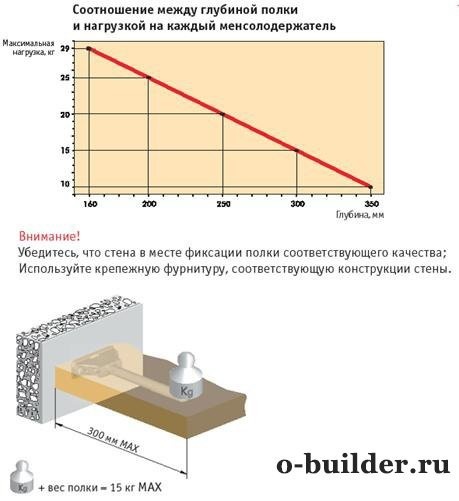
The depth of the shelf depends on the mass of stored on the shelf of things. The greater the mass, the less should be the depth. For example, if no more than 10 kg of cargo is placed on the shelf, then you can make a shelf with a depth of 35 cm. And if you want to store objects to 30 kg on the shelf, 10 for example, 10 cans of apple compote, then the shelf must be depth no more 15 cm. True, in this case, banks with compote do not fit.
Options used fasteners
Accessories for hidden fastening is presented today with many options, so choose and buy suitable will not be much labor.
The most popular option is special hidden loops, which are placed on the shelf surface pressed against the wall. Work with them is performed as follows:
- the gap between the central dots of the loops is measured;
- in this gap using the line and the level, the attachment points of the loop to the wall are placed;
- the walls are drilled in the wall, then they are clogged with a plug, and screws screw into the plug;
- screws must be screwed into the wall as close as possible, but not forgetting to leave spaces to hang the shelf;
- the loops are screwed to the back of the shelf, after which it is hung on the screws.
More reliable option is the use of metal pins:
- a line is conducted on the wall at the level of the shelf hanging and the width of the shelf;
- from the edges of the line, segments equal to the triple thickness of the shelves are retreated, holes for extreme pins are drilled at these points;
- there are central pins between extreme pins than heavier regiment, the more pins need;
- pins enter the body of the wall strictly perpendicular to the distance of about 10-15 cm, so this method is suitable only for houses with brick walls;
- the body of the shelf pins should be included in the depth of no less triple shelf thickness, but not more than 2/3 of its total depth.
Also, the hidden fastening of the shelf to the wall can be carried out in other ways, however, the above methods are the most common and reliable.
 Why you can not give icons
 Is it possible to give icons as a gift: Signs, the opinion of the Church
 A year ago left her husband, and now I do not know what to do