Installation of gas stove in the worktop. How to install the cooking panel in the table top with your own hands. Installing the electrical cooking panel: Fastening and connecting
The first and most important stages of installation work is marking. From the correctness and definition of calculations on which the hole for the cooking panel is cut, the outer attractiveness of the kitchen installation and the room as a whole depends.
When making calculations, it should be carefully checked the result, if one would be mistaken at least 1 cm, then it is possible to obtain a spoiled tabletop as a result, the value of which is not small.
Marking
The task of the installer is to place the panel strictly over the table, when taking into account that there is no width in width.
Marking can be carried out in two ways:
- Household version;
- Professional.
For a household method, the use of special tools is not required, the work is carried out on the eye. The panel is placed in the center of the tabletop and will be burned with a construction pencil. This method is not safe, there is a risk of damage to the kitchen headset.
The second option is suitable for patient collectors, a sufficient amount of time is spent on the calculation. This method minimizes the risk of error.
The process of work on the calculations is divided into steps:
- The process begins with the transfer of the interior borders of the bedside table, over which the cooking panel is required. The tabletop is drawn lines forming a rectangle;
- Then the central point of the available rectangle is calculated. It should be drawn by the coordinate system. A cross is noted, one of his line should be parallel from the front edge of the table top, and the second is perpendicular to the same basis as the first;
- The resulting coordinate system is used to measure the sizes of the shaped part. Here it is required to carefully measure the panel itself, given a small supply, it will allow installing strictly in the center;
- After squeezing, it is required to draw lines, four are obtained. As a result, a smooth rectangular figure is obtained, the countertop is prepared for the correct cutting of the seat.
Calculations are made, the cutting place is noted, then go to the next step, no less interesting.

How to cut hole
For the work on creating a boarding hole for the cooking panel, three tools options can be used:
- Drill;
- Lobzik;
- Milling machine.
To create an accurate and correct cut, it is better to use a manual milling mill, but it is hardly in the instruments of an ordinary person who is not associated with the assembly of furniture. The second option is a logsik, even if it is not available, the acquisition of this tool will not be difficult, its value is not high.
The drill always exists in the house, but its use for pulling the hole makes it difficult to subsequent installation of the cooking panel. The edge edge is irrigated - this requires additional work on the sealing of the hole. It takes this process enough time.


In order to cut the hole of the drill, you will need a drill in 8 mm, you can 10 mm. The principle of operation consists in drilling holes at a short distance. Inverting is carried out as long as they become a single slot.
It is important to understand that the work is carried out only with the internally part of the markup. Required under the carved piece to substitute the stool inside the table top itself, it will save the furniture in the intake and preservation when the cut-off rectangle falls.
Making a hole with the use of jigsaw is much easier, but you need a drill. With it, it is required to make one hole that will be the basis of work. Manually make the rubber can also be, but there is a danger of the inaccuracy of creating a slot. Lobzik The first incision can also be done, but this requires a certain experience with this tool.
The main thing to remember about precautions. For the cut part of the countertop, a safe fall is required - it will eliminate the possibility of damage to furniture.
After carrying out the cutting of the hole under the panel, the edges of the slot are treated with silicone. When moisture getting, a cooktop for a cooking panel can be deformed - this will lead to a damage of the appearance of the kitchen. The cut-off hole is more complicated to handle the hole, since the torn edges interfere with the correct application of the composition, it will take a sufficient amount of time to this process.

Installation and fastening equipment
The installation of the cooking panel in the table top has its own sequence, for proper independent work, the main thing is to comply with all the steps in order:
- The first stage is the connection of the gas hose to the panel - this will exclude subsequent installation problems. The hose has a cape, where the parenchite gasket is attached. Next, the nut is very well fixed with a threaded nozzle, it is located at the bottom of the cooking panel. To ensure the reliability of the connection, it is desirable to embroider the parenchy gasket using solidol;
- The second stage is the winding of the sealing tape. It should be fixed with some requirements. Typically, the sealing tape is a component of the hob, it is characterized by self-adhesive basis. Protective paper is moving away from the meak of the tape gradually - this will exclude the seal confusion. It is fixed around the perimeter of the hole on the front side of the couch. It is a prerequisite for the integrity of the seal, so at the corners it should simply turn a turn, eliminate the cut of the tape. Two ends are joined tightly to each other, excluding the appearance of the gap;
- Next, the cooking surface is installed in the treated hole. It is necessary to align the equipment so that it looks smoothly and beautiful. After centering the device, you can enjoy it. We look at how the tabletop looks like, under it in four corners it is necessary to fix the cooking surface using self-tapping and special plates. It should be delayed enough to eliminate the possibility of the appearance of the slots - this will provide a high level of safety when using a cooking surface.


Phased process of working with the gas panel
To carry out the process, it will be necessary to take a construction knife, it is very acute, so it is necessary to follow the safety regulations. The gasket, which was previously extruded, is very neatly cut off.
Next joins the other part of the gas hose, which goes to the pipe. Mandatory requirement is the installation of ancient crane. It is important to understand that the decision on independent work with the replacement of gas cranes requires the owner of the responsibility for working with gas equipment.
Here it is necessary to accurately follow the safety rules and work according to the prescribed requirement. If the gas testing company will find a violation in self-installation of the crane, then you have to pay a fine.
The last stage of installation work is to solve the issue of supplying power supply. A waterproof outlet is required that you want to install before installing the hob. If the equipment is gas, then additional devices will not need.
Video: Installation of the gas cooking panel
Distinctive features of the installation of the electrical panel
It is important to understand that the connection of the electrical installation option is better to entrust professionals. With an independent solution to this task, there is a danger to harm yourself. Modern panels operating from electricity are distinguished by way of operation and durability.
With the right installation of the equipment, it rarely fails. If the panel stopped working, then it is easy to disconnect for repair work. This will allow you to independently deliver the equipment into the workshop, which will save on the Wizard arrival.


Embedding of the electric surface begins with the connection according to the written scheme. It can be detected on the panel itself, only on the reverse side. With an independent connection, you need to be attentive. The tolerance of even the slightest error may cause wiring in the entire room. Incorrect connection threatens the lack of adjusting the comfort.
Some models have a separate wire, which should be supplied directly from the shield. In this case, it will not be necessary to have a socket and fork, and the connection is to connect the reserved wire to the panel.
Next, the equipment is required to flip and install in the worktop. This process is practically no different from the installation of the gas model. The main difference is not necessary to carry out work on the installation of the gas hose and the crane.
After completing all stages on the installation, the panel can be checked for errors. With a careful compliance with the propaned scheme, the device must be properly, and the main thing is to work durable.
Conclusion
Self installation of the cooking panel is a rather complicated process. But if you comply with all safety rules, take into account the nuances and carefully refer to work while connecting the stove to power (gas or electric), then it is possible to carry out installation, significantly saving money on the master of the wizard. If there are doubts about their own, then for security reasons, it is better to contact a specialist.
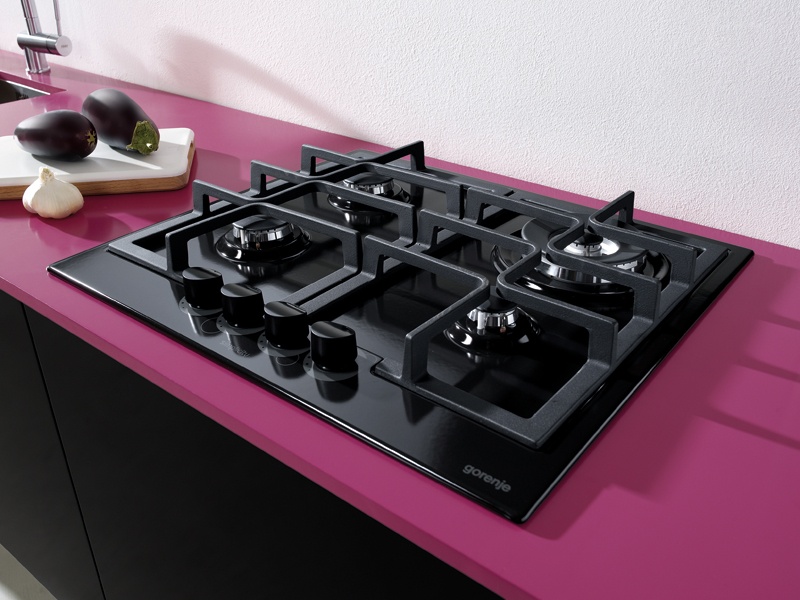
An integral kitchen attribute is a gas stove, followed by a husband in the perfect version and prepares breakfast to his wife. Almost popularity is gained not classic gas or electric stoves, but hobs. Their convenience consists in compactness and the possibility of a separate installation of the oven. But their installation at the worktop will make sweat of an inexperienced master. Is it possible to fix this module yourself and what will you need? This will be discussed in the article.
Varieties of cooking surfaces
All cooking surfaces can be divided into two large groups. Combines these groups of the power supply, in its role can perform:
- electricity;

In appearance, the cooking panels that are connected to the gas highway are practically no different from ordinary plates. An option for such modules can be an automatic start system that can be autonomous or dependent on electricity. In the first case, it is represented by a piezoelectric, which at the right moment gives a spark. The burners on gas surfaces may differ in size for greater use.
Electric cooking surfaces can be two types:
- classic;
- induction.

In the classic cooking surface, the robe is performed by a TEN or another heating element. Such a module is cheaper and does not differ special efficiency. Induction cooking surfaces are a dream of any modern hostess. The essence of the functioning of the product is to heat the product due to the electromagnetic field. At the same time, if you put a hand on a working burner, you won't feel anything. For the normal functioning of the product requires a metal pot with a thick bottom. At the same time, the material from which the dishes must necessarily must be magnetic. The installation process of each of these surfaces is very similar. The difference lies only in the need to connect the gas hose for the first place of the plate.
Tool for installation

The entire installation process does not take much time and requires a tool that may already have a homemade master arsenal. Among the main tool can be allocated:
- screwdriver or drill;
- electric jigsaw;
- roulette;
- marker or pencil;
- silicone sealant.
Additionally, the level or long metal ruler may need to make it easier to bring straight lines.
Preparatory stage

If we are talking about a cooking surface that feeds from the electrical network, then the preparatory stage will be to supply power. The average power consumption of such modules is within 3.2 kW. This means that the connection will be quite ordinary, but good outlet. If the socket has not been installed in advance, then you can purchase an overhead option, since it will be easier to mount and will not need an additional tool in the form of a perforator or a drill with a crown. The cable for such a socket must go directly from the distribution panel.

This step is made to provide such a powerful device a separate circuit breaker, which would control its operation. The nominal strength of the current to which the machine must be calculated is 16 amps. The best solution will be the installation of a differential automaton that is able to capture the slightest leaks. The socket is mounted slightly below the table top. This is not done for greater convenience of connection, but in order for it does not get moisture and fats when cooking. The socket must necessarily be grounded in case of short circuit.
Note! It is worth noting that the standard rosette withstands the load of 3.5 kW and the current strength of 16 amps.
Step-by-step instruction
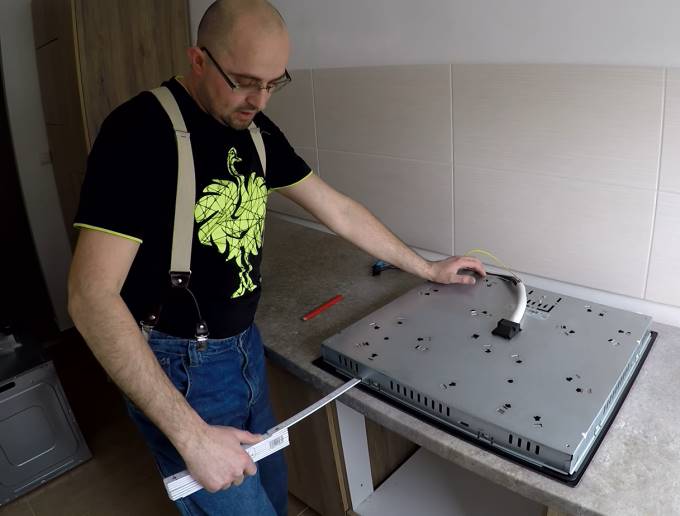
An important step during the installation of the cooking panel in the table top is markup. Usually, the manufacturer in the technical documentation, which comes complete with the cooking panel indicates which dimensions of the hole for installation must be. One option will be the manufacture of a pattern from cardboard, which can be used to draw the contour of the future hole. There is another option as you make markup, it is visible in the photo below.

It is necessary to place the cooking panel on the worktop, but turn it upside down. It will be a sample. It is necessary to arrange it on the place where immediate installation will be carried out. It is clearly seen in the photo that it is important to make a small gap from the edge of the table top to the cooking panel. It is usually about 5 cm. It is done so that the edge of the surface for cooking is not damaged from permanent interaction with it.

The next step, as shown in the photo, you must apply marking. To do this, the cooking panel is simply outlined in a pencil circle. Lines must be accurate so that they do not have to redraw several times, since it will only betray.
The photo shows that the cooking panel has a small protrusion, thanks to which its fixation is carried out in the hole. This protrusion has a certain size that needs to be considered. It is also important to designate on the contour of the future hole, as shown in the photo below.

At the same time it is necessary to make a small gap. If the protrusion has a length of 15 mm, then from the main line size of the cooking surface, it is necessary to retreat only 10 mm. The five millionth gap is required for the unimpeded installation of the cooking panel in the prepared hole.

After performing the markup for the cooking surface, it is necessary to prepare the holes so that it is easier to cut the necessary part. The holes are drilled by a drill or a screwdriver in four corners. In this case, it is necessary to ensure that the drill does not damage the facade or other elements of the kitchen headset. The diameter of the drill must be such that the sawing freely enters the hole.
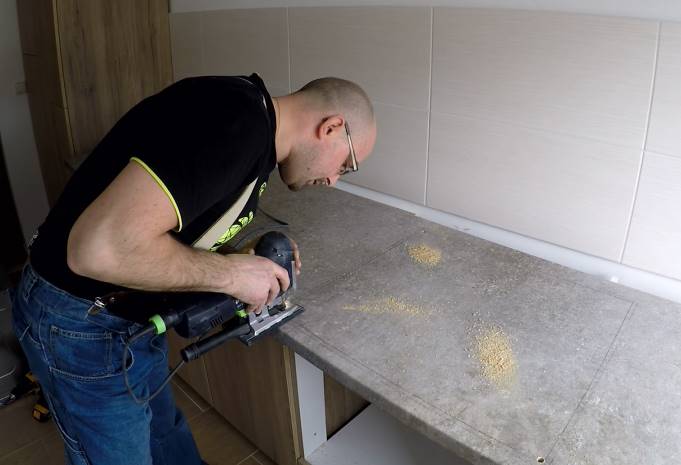
To continue the process of mounting the hob need a jigsaw. Its carrier is inserted into the prepared hole and the cut. It is important to remember that it is necessary to cut on the inner, and not on the outer line. If an error is allowed, then the surface simply fall into the hole without fixing.

In the process of work, it is necessary to remove the sawdust in a timely manner so that they do not overlap the cut line, since you can easily go away from it and hurt a tabletop. During the cut, it is necessary to ensure that the pail does not damage the wall of the lockers or their surface. Before passing the last direction, it is necessary to provide a tabletop sufficient support so that the pail does not bounce, and so that part of the countertop does not fall on the leg.

After the hole is ready, you can try using the cooking surface to make sure that it rises as it is necessary.

This process does not end. The countertop is most often made of chipboard. If moisture falls on it, then it will swell and deform. When cooking on the cooking panel, such an events is inevitable, so it is important to protect the place that lost the laminated layer. For this, a special sealant is applied to it, which is used when installing panels. It simultaneously acts and fixing the basis for the whole design. The layer should be sufficient to close all available places.

On the opposite side, the booster of the cooking surface is applied with a sealant, which will additionally fix the product on the worktop. After that, the panel is inserted into its place and neatly attached until the moment is not taking contact with the table top surface. The sealant, who performed, must be immediately removed, since after drying it will make it harder. It is important to check that the adjoining is the same throughout the surface. If this is not done, then at a pressure from a heavy pan, glass can burst.
Tip! If the cooking surface is glass, then it is important to be careful when pressed so that it does not burst.
This fixation does not end. Complete metal plates are supplied with the surface, as can be seen in the photo above. They must be screwed in such a way that they ensure the focus and prevented the ability to lift the panel over the table top. Video on the installation of a cooking surface can be viewed below.
Connecting to the network

Upon completion of the installation process, you can proceed to connect the electrical part. Most often, the cooking surfaces are supplied in a single-phase version, but there may be three-phase, which will be useful if the three phases come to the house or apartment. Usually the cooking surface has a built-in power cord. But if it is not, it will be necessary to buy it separately. To connect, you will need a wire with a PVS 3 × 4 marking. Each veins of this cable is designed for a nominal permanent load of 8 kW.

It is necessary for a short stock, which will exclude the overheating of the conductor. Wires are cleaned on both sides. With one mounted fork, which according to the current should correspond to the one that is specified for the cooking surface. If this does not observe, then it can just melt. The wire is nemonolitis, so it will be necessary to edit the veins with tips. Near the terminal bar, where the connection will be connected to the cooking surface is usually applied.

The Latin letter L is denoted by the cable for which the phase comes, the letter N denotes zero, there may be a third letter E, which denotes the location of the grounding wire. Most often, instead of a third letter, a drawing is applied, which denotes grounding. Each vein that is compressed by the tip is important to firmly fix the bolt. The service life will depend on the quality of the contact. If under the cooking surface there will be a windshield installation, then it is necessary to provide a separate outlet for it. The total power of the surface consumption and the cabinet is two times higher than the permissible single-phase socket.
Summary
As you can see the installation of the surface can be made independently without significant skills. While working it is necessary to comply with all safety precautions and safety measures. During drilling and operation, electric jigsaw before the eyes must necessarily have safety glasses that will be removed from flying widths. During the installation of sockets and connecting the electrical part, it is necessary to use tools that have dielectric handles that protect against electric shock. Before the start of work, it is necessary to de-energize the automatic, which is fixed behind the prepared wire in the kitchen.
Modern kitchen headsets allow you to independently install a gas, electrical or induction cooking panel. Such models can be operated as in conjunction with the oven, that is, dependent and separately, that is, be independent. Despite some difference in their designs, general rules that should be guided during the work, similar to all versions.
Preparation of the boardinglet
Marking
On how accurately the markup will be carried out, the appearance of the finished kitchen depends, and the error even half a centimeter will make it take a new countertop.
Markup can be carried out in two ways:
- put the device in place and circle marker;
- calculate and place the mounting place with an accuracy of a millimeter.
Despite the seeming simplicity and attractiveness of the first way, the chances of mistaken and apply a lot of markings.
Pre-fitting size
Much more reliable to place the installation location by careful calculations:
- On the surface of the table tops are applied borders of the internal space of the couch, which will be placed on the cooking panel. Thus, the place will be marked, within which work will be carried out. Marking must be applied with a pencil so that at the end of the work the line it was easy to erase. If the countertop does not allow you to apply well-visible lines, then paper malarious tape should be pasted onto its surface, and there is already a markup on it.
- It is necessary to find the future center of the hole in which the case will be installed. To do this, on the table top, the diagonal of the rectangle formed by the front and rear parts of the table top and the drawn borders of the couch.
- At the point of intersection of diagonals and the center of the cooking panel will be placed. Through it, you need to spend two straight lines: one parallel to the edge of the table top, the other is perpendicular.
- These directs need to be noted the dimensions of the embedded part of the case. They can be viewed in the technical documentation or to measure themselves. These sizes should be increased by 1-2 mm, so that it is later convenient to install the device.
- Through the applied marks, straight lines are conducted (in parallel and perpendicular to the edge of the table top). They form a rectangle, exactly the corresponding pluralible part of the case and located in the center of the countertop.
- It is necessary to control the minimum distance specified by the manufacturer in the technical documentation between the final markings and surrounding items.
- The resulting rectangle must be circled with a marker, and the extra lines erase so as not to be mistaken when cutting holes.

The placed rectangle corresponds to the size of the hob
Slashing of the planting hole
To cut the boarding place under the cooktop, you can use the following tools:
- milling machine;
- electrolovik;
- drill.
The highest quality cut is obtained when operating a milling machine. A slightly less high-quality cut makes an electric jigsaw with a small-scale saw.

For work, you can use a drill or an electrolovka
The order of cutting hole hole is as follows:
- In the corners of the marked rectangle (from the inside), drill holes with a drill of 8-10 mm.
- A pael with small teeth gently make a cut in the marked lines. The electrol-free housing can not be kept "weight", it should be tightly pressed to the tabletop.

The hole cuts through the outlined lines.
But not every farming there are convenient tools. It is much less beautiful, but, nevertheless, suitable for installation can be done using a regular drill.
The order of cutting of the planting hole with the help of a drill is:
- Holes 8-10 mm drill a hole along the planted line. They need to be drilled from the inside of the marks so that the drilled places come into contact with the cast cut-off line. Holes must be made as often as possible to cut a piece of the countertop can be easily broken.
- The coarse edges of the hole must be aligned by the marked line. To do this, you can use the rashpyme or shallow wood or metal saw. The resulting edges should be made as smooth as possible.
Attention! After the landing opening is done, you need to insert a cooking panel into it. The device must enter without effort and completely close the cut hole with its body.
Sealing the landing hole
The next step is sealing. It is necessary to protect the countertops from the fall of water while cleaning or cooking. The tabletop from a tree or a chipboard can fake and spoil.
Sealing is performed using acrylic sealant for plumbing works or nitrolaca. It must be carefully applied to a thin layer from the inside to the ends of the hole done. It is not necessary to apply a sealant to the top surface of the table top, there will be a special gasket in the form of a sealing tape, which is included with the panel.

Countertops ends are treated with silicone
Sealing tape sticker:
- An adhesive layer is applied to the sealing tape. It should not be removed at once, but dying gradually, as it is glued to the surface.
- The tape is glued along the perimeter of the seating opening of a single piece. At the corners, it is not cut, but simply pasted with a turn.
- The end and the beginning of the tape are joined, without flax and gap.
Some manufacturers are equipped with hob aluminum sealing panels. The installation instructions are contained in the documentation for the device.
Fastening panel
The mounting of the cooking panel is carried out as follows:
- The device is inserted into the seating hole and is centered so that the front side is parallel to the edge of the table top.
- From the inside the cabinet case is attached to the tabletop with special plates included in the package.
- Installation should be made in such a way that there are no gaps between the cooking surface and the worktop.
- The stationery knife is cut from the top of the excess seal.

The seal is cut off by a stationery knife
Connecting the installed hob
Electric panel
The connection point of the electrical cooking panel is desirable to provide for even the installation of the kitchen headset. The socket must meet all electrical safety requirements:
- have a ground line;
- the feeding copper cable must have a cross section of at least 4 square meters. mm.
In the posterior wall of the floor cabinet, opposite the power outlet, the hole is cut through such a size so that the hand can be easily inserted and remove the plug from the cooking panel.
Outlets installed for self-connection are two types:
- three-pin;
- four-contact.
If the plug is installed on the wiring panel, then it is enough to plug it into the outlet. The power cord should be such a length so that when the device is connected, it is not tightened.

Plugs and sockets for connecting cooking surfaces
For models sold without a fork, specific actions will be required:
- If the three-contact rosette, and in the wire there are four veins, then you will need to connect a two-phase model to a single-phase network. To do this, the cords connect wires with black and brown insulation. This connection is connected to the socket phase. Zero blue wires are connected to zero sockets, and green-yellow wire - with grounding. All connections must be securely extinguished.
- If the placement of the wires in the outlet is unknown, then with the help of a multimeter, it is necessary to determine the phase and zero. If necessary, they are changed in places in such a way that they match the wiring in the instrument fork.
Attention! By independently cutting the electrical cooking panel, it is necessary to provide a mandatory installation of individual RCOs and a protective machine. For example, for a socket in 16a, it is necessary to the UZO of at least 40a, and the automaton is at least 25a.
Induction panel
The induction panel is connected by the same general principles as the electric.
In many models there are no power cords, and only terminals are installed to attach an external cable.

Connection diagram is applied next to the terminal block
Connection in this case is carried out in the following order:
- The protective cover is removed from the rear of the device.
- The outer cable is skipped through the lid.
- The cord is connected to the terminal plate in accordance with the diagram attached to the panel.
- If a jumper connects zero and ground is installed - it must be deleted.
Gas panel
Household gas is a source of increased danger, therefore special requirements are presented to the kitchen room:
- The presence of ventilation exhaust.
- Air flow of at least 2 cubic meters. per hour for each kilowatt panel power.
- The distance to the wall is at least 130 mm.
- The supply gas hose must be placed in such a way as not to be subjected to excess heating and provide the possibility of a periodic inspection by the testing organization.

The cooking panel is connected by a flexible hose.
Attention! If the required requirements are not followed, the operating organization will not be allowed to operate the established gas panel.
The panel connection is carried out by a certified specialist in the following order:
- A sealing fum-tape is applied to the places of threaded connections.
- Paronite gaskets are inserted into the gas hose.
- The hose is attached to the cooking panel and the gas supply.
- The connections are checked for tightness with soap foam.
- The power cord is inserted into the moisture outlet.
To operate gas models, their acceptance of the serving organization responsible for these works in the area of \u200b\u200bresidence is necessary.
You can integrate the cooking panel into the kitchen headset on your own, conducting work carefully in accordance with the recommendations submitted.
In the layout of modern furniture furniture for the kitchen, a built-in electrical or gas stove is provided, the cooking surface and the oven is mounted separately. A built-in panel is a functionally completed product, which in principle can be used without a kitchen. This article will tell how to install an embedded cooking panel and connecting to the network with your own hands. The surface can be electrical, gas or combined, but the basic rules that should be guided during operation, the same for all versions.
Step-by-step installation instructions
Speaking of instruments, if the built-in panel is installed in a new headset, and the hole for mounting the housing in the table top has not yet done, it is necessary to have a drill and electric jig. To connect to the power supply, you will also need a screwdriver, passage, voltage pointer.
The first thing to take care is an electrical outlet 220 volts, which will include an embedded cooking surface. The choice of its location and installation must be performed before installing furniture. The kitchen plate except the panel includes a brass cabinet. If the first is placed without a closet, it can be enabled in one outlet. Set the electrical outlet below, which will be an embedded cookbard to eliminate the impact on it moisture and fat in the cooking process.

When the kitchen wall is completed, you can start work. You can install the embedded cooking surface by the following step by step instructions:
- Initially, it is necessary to determine the size of the mounting opening, which must be cut in the worktop. This information can be found in the manual that is supplied by the manufacturer. If the instruction is missing, you need to carefully measure the seats. It is not bad to make a cardboard layout on this dimensions (sometimes it is present in the kit), which then you need to install on the worktop and bring the pencil. It is necessary to ensure the gap between the planting parts of the case and the edges of the table from 1 to 2 millimeters.

- Carefully place the future hole. It will take a long line and pencil. Do not forget that the tabletop is made of pressed sawdust, and decorated with an artificial stone coating. For this reason, you should not cut the hole closer than 50 mm to the edge, since the thin parts of the table can collapse.
- Take care of the holes in the corners of the area of \u200b\u200bthe placed area, without going beyond its limits. We use for this purpose a drill 8 - 10 mm. In the process of drilling, it must be installed and retaining strictly perpendicular to the surface.

- We insert into an electric jigsaw cloth on a tree with small teeth to avoid the skills of the table top at the border of the slot. By inserting the cloth into one of the prepared holes, we carry out the incision on the markup, tightly pressing the jigsaw to the surface. After the end of the cut, we make sure that the built-in cooking panel is easily included in the landing place with a small gap. Otherwise, the edges of the hole should be trimmed.

- The end areas of the proposed slot are desirable to protect against moisture. For this purpose, the edges are treated with a sealant, as shown in the photo below. Then you can stick the seal in the kit.

- Now the built-in cooking panel is prepared for installation, after which it is installed and the connection. Gently insert it into the hole and the soft pressing of the hands asking until the protruding edges are completely adjacent to the surface of the countertop. Before this, you can apply a layer of silicone sealant to the surface, which the embedded cooking panel will then close. This will ensure the sealing of the connection. Pressing on the surface should be taken care, especially if it is glass. It is important that the embedded panel lay uniformly on the surface of the table top. Otherwise, installing a heavy pan can create an effort on a break.

- The last stage of installation is that the embedded panel is fixed using special fixing clamps included in the kit. Installing the clamps is made from below, after which the housing is fixed. Speaking surplus sealant, which was applied to the surface of the table top, you need to remove carefully. In case the oven under the cooking surface will be installed, there is a layer of thermal insulation between them.

The detailed process of installing the electrical cooking panel in the tabletop is demonstrated on the video lessons:
Connecting to the electrical stroke
To connect the embedded cooking surface to the network, it suffices to check the availability of voltage and connect the plug into the outlet. When preparing for installation, you must make sure that the cross-section of the wires corresponds to the connected electrical power, which the built-in panel has. Otherwise, it is necessary to carry out a separate line from the introductory shield to the stove. Then installing the socket may not be required. We talked about in more detail in a separate article, with which we highly recommend familiarizing yourself.
If you want to do repair in your kitchen, you can independently replace the stove on the cooking surface. Today, the modern and functional solution for each kitchen is the installation of a cooking panel in the tabletop with their own hands. In addition, you can make a combination that will consist of a brass cabinet and a cooking surface, so you do not lose anything at all. In this article we will tell in detail how to independently install the cooking surface in the worktop, without resorting to the help of specialists.
If you once had anything to do in my country or in the apartment repairs, or you were engaged in construction, it would be properly installed in the worktop correctly for you. It is enough to clearly measure its thickness and sizes when installing. Well, proceed.
In order to properly install the cooking panel independently, you need to know how to cut a hole in the table top. All the necessary dimensions are noted in the instructions in the diagram, do not invent anything new. So, you will speed up the process and significantly reduce the likely flaws when measuring. Measurements, it is possible to produce yourself, for this you need to put the hob of the bottom to the top, then learn the length and width of the surface around the sides.
Note that the instructions write minimally allowed indents from the edge of the table top. You can do the size of the indents a little more, since the narrow edges can be broken after a while. It is necessary to make marking on the surface of the table in accordance with the size and thickness of the hob. Here you will embed it. So that the lines remain visible and were noticeable on the surface of the dark color, you can glue the scotch bands from paper, and to transfer each line to them.
Then you need to drill the hole from which the neckline begins. Cutouts are made by electric jigsaw. In order for the edges of the cutout to be smooth and did not crumble at the edges, it is desirable to use the manual milling mill, and the rounding of the angles to make a radius mill, and it is necessary to grind each slice. The resulting sawdust, you can assemble a vacuum cleaner.
When complete the hole work, take the hob and make sure that you cut it correctly. If you carefully cut the hole, the surface with ease will pass into the resulting cutout. 
Seal and compact
Before installing, it is necessary to process cutlets with a silicone sealant or nitrolecom. So, you protect the surface of the table top from water, mud spots, swelling and extend its life. Also, the seal can also be used for installation, since it glues itself and performs the same role.
The self-adhesive sealant is located on top, the edges of the surface should lie on it. Also for seal, you can use aluminum tape, which, by the way, protects against temperature fluctuations. If the seal is high, the hole in the tabletop will serve you longer, it will not need to be replaced.
Also, the installation differs depending on the type of panel - there are gas and electric, plus by the individual characteristics of the attachment. Fastening details you can fix screws.
Today's electrical panels are very functional, with the right installation of the surface, they rarely fail, therefore, they do not need repair work. When the repair was still needed, the panel is quickly disconnected and independently belongs to the master or repair can be performed independently, so that you save your funds to call a specialist.
Before installing the cooking panel, put it on the worktop, turn over and connect the wires according to the scheme. The scheme you can find on the back of the panel, this is done for your convenience. It is necessary to take into account not only its size, but the thickness. When you install and connect yourself, then manifest attention. If the wires are incorrectly connected, then you cannot adjust the burners and their heating value.

In the case when there is a special shield wire for connecting a hob, then you will not need a rosette or fork. Just connect the panel to the wire. Connecting the induction cooking surface is carried out by the same principle.
When installing the gas cooking panel, you need to see the fastening type. Do not forget about the thickness and size of the hob. Then it must be installed, aligning the table top, and then consolidate. As a rule, in the kit there are brackets for fastening, they are located below. The electrical wire is activated in the outlet.

To connect the gas cooking panel with their own hands, it is necessary to carefully examine the safety rules. The gas overlap, after which the cooking panel is connected to the gas pipe to the gas pipe. Paronite gasket is mounted in the nut. Then turn on gas and burrows, check the hose connections so that there are no leaks. To do this, it is necessary to lake all the connection points if the foam does not have bubbles, there are no leaks, the installation is made correctly. In addition, gas analyzers are used to check.
If you do everything correctly, there should be no problems when installing the cooking panel. The main thing is that you are in no hurry and performing work qualitatively, considering all the nuances of the installation.
 Why you can not give icons
 Is it possible to give icons as a gift: Signs, the opinion of the Church
 A year ago left her husband, and now I do not know what to do