How to make a workbench for planing boards. How to collect a joiner's workbench with your own hands. Video - Workbench manufacturing process
For any economic man you need your equipped workplace for storing the tool and performing carpentry-fitting works. In this case, the vestic will simply become a necessary element of the workplace, and now we will tell you how to make a workbench on your own.
In contact with
Odnoklassniki.
Indeed, to buy it, you will need to post a considerable amount and, in addition, it is necessary to choose the desired size for your premises, it seems quite difficult task. But if you do it yourself, you can choose the desired workbench size up to centimeter.
What workbenches are there
The workbench is a desktop where the master produces manual work on the processing of wooden, metal and other parts. Independent workbenches are installed in the garage, in the country and even in the apartment. The workbench is equipped with various additional devices that may be needed when working, such as stops and vice. In addition, in the workbenches set the containers for storing various tools and even documentation. According to the type of work, carpentry, carpentry and plumbing workbenches are distinguished.
Vistak your hands video:
Carpentry workbench
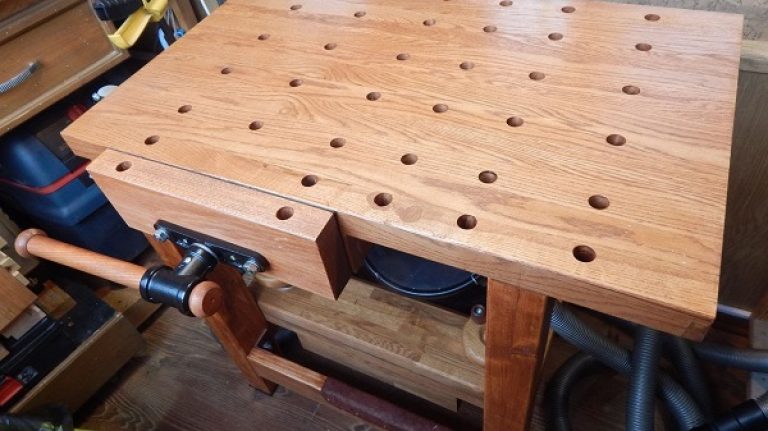
Standard joinery workbench has such a design. The main parts are the vertical stove and an exposure. The exposure looks like a rack (usually two), which are interconnected by wooden bars. The material of this table element is usually pine or other wood of soft breeds.
The vertical board or cover is made of solid wood, for example, oak, and has a thickness of up to 8 cm. The surface of the board is covered with oil. If you are going to collect workbenches with your own hands, then you need to know which additional devices need to be installed on the tabletop.
Note!
First of all, it must be vice located in front and used for fixing parts.
In the back it is necessary to make a deepening, for storing a small tool in it. At the edge of the brandy board there are holes in which wooden chiochk and metal combs are inserted. The standard workbench is mostly suitable for handmade, and if you want to use the power tools, then for this you need to choose a backplane with a large number of holes for the stops.

Floating workbench
Flooring workbench is a more powerful building. It has a metal frame to which the wooden cover is stacked with a thickness of up to 6 cm and covered with an iron sheet. The cover is edged with a trilateral side and on it, in most cases, plumbing vices are installed. The tabletop on such workbenks is made powerful so that it can withstand high shock loads, including sledgehammes.
The material is chosen as desired, but the most popular MDF with galvanized, which allows the worktop to protect the aggressive environment, such as gasoline, oil or solvents. In addition, such a tabletop is easily cleaned by contaminants. Merchant workbench is equipped with several advanced tool folding boxes.

Carpentry Vistak
Another type of such design is a carpenter's workbench. This workplace is intended for processing boards and has dimensions significantly exceeding two previous options. Its dimensions have a length of up to 6 m and the width of 1 m. On a carpenter, the stop is necessarily installed for the processing of the board. It has a cutout in the form of a triangle, to secure the board using wedges, and is used during the processing of its edges.
Manufacturing a building workbench
Let's figure it out how to make a joiner's workshop with your own hands. First, it is necessary to make a frame of bars, and between the legs, for strength, set the jumper and the kingu (connecting element, fastening the design). It is desirable that they are located at a distance of about 45 cm from the floor. Installation of the workbench frame takes place in this order. First you need to prepare the grooves, then we collect the design and scroll through the connection points with glue. Final fasteners are carried out using clamps.

Countertop for workbench
It is worth recalling that the manufacture of any design happens more quickly and efficiently if you have at least the easiest drawing of the joinery or part. Below we give the drawing of the table top, top view.
If the countertop is made of several boards, then it is necessary to ensure the absence of cracks between them, to avoid, when subsequent work, scoring a dust there. The size of the countertops should be more than 3-5 cm of the workbench itself, for more convenience tool cleaning. The countertop must be treated with grinding and covered with varnish. It will serve as protection against hitting the head of hand.
Installation of vice and creation of stops
After we installed the worktop, you need to mount the vice. To do this, on the working surface you need to cut a deepening so that you can put the vertical plate in one plane with the tabletop. We put a vice in the place where they will stand in the future, it is desirable that it was not an angle, and we make a bandwidth. Then screw the nuts.
Note!
The stops can be purchased in the store, and you can do it yourself.
Then we advise you to make their rectangular shape with the possibility of adjusting height. Holes under the stops are desirable to produce a length of 50% of the pricks. With such a situation, you can fix various blanks well. Video instructions for the manufacture of workbench can be viewed in our article.

Wooden workbench
Making a locksmith vestica
Let's look at how you can make a plumbing workbench with your own hands.
- Determine the height of the future table. For each person, it can be different, for example, if a man has an height of 180 cm, the height of the workbench is 90 cm. But still, it is necessary to focus only for the final decision.
- Do not forget that the drawings of the locksmith vestica drawn by you will be useful for a faster and high-quality assembly.
- For a locksmith workrist, the frame is best welded from the profile pipe and corners, but in the extreme case it can be done in the same way as a carpentry structure, from BRUSEV.
- In order for the construction to be the most durable, you need to put between the legs of the strut. Sometimes, instead of struts, a shelf is installed, into which in the subsequent can be folded tool, paints and varnishes or other necessary items.
- For the resistance of the design, you can attach legs to the floor. This will exclude the hint of the workbench when working.
- Build a tabletop from MDF and, if possible, galvanize. This will significantly increase its strength.
- If you want your workbench to be equipped with drawers, then put the rods under the upper bars, similar to those that are installed for the boxes in. Then you will have a storage place for small parts, screws and nails.
Folding workbench
There is another variety of workbenches that are used for both carpentry and plumbing works. This is a folding workbench. It is very convenient if there is no unnecessary area indoors. Working on it, it can always be folded and put it in an angle to expect the next work. In addition, it can be converted to the cottage in the folded state. Such a workbench consists of two parts: a removable brandy board and folding table. It is usually manufactured smaller than a stationary table.
Vistak your hands video:
In contact with
See inaccuracies, incomplete or wrong information? Do you know how to make an article better?
Want to offer photos on the topic?
Please help us make the site better! Leave the message and your contacts in the comments - we will contact you and make a publication better together!
Most home masters, who are the bulk of subscribers and visitors to our site, to some extent already solved the task of organizing their workplace, setting up comfortable workbenches in their workshops and on the balcony.
But there are those who look at home needlework, trying tooth this universal profession, which includes many specialties, becoming very useful for the family of the Hobby.
First of all, this article is for them, but maybe it will be useful and those who have already found themselves as self-relocine and, deciding with the main types of work, can with knowledge of the work of homemade workshop for workshop with their own hands.
Types of workshop workshops
The workbench is a table for various specialized work on the processing of different materials. Accordingly, depending on which material will have to work and what operations to carry out, the workbenches differ from each other with dimensions, configuration and manufacturing material. According to the type of material being processed, workbenches are divided into:
- carpentry;
- plumbing;
- combined.
Based on the design features, these types are added to them:
- universal;
- folding.
Folding versatile workbenches are produced by different firms with different list of functions, and a distinctive feature, first of all, is their mobility. Therefore, if you convert your homemade masters' experience outside of your apartment or the courtyard of your house, you can, or choose yourself a universal folding workbench of factory manufacturer, or, after analyzing a number of design features of a particular model, make it with your own hands.
But more massive workshops are suitable for the domestic workshop and three options are possible here:
- carpentry workbench with the possibility of performing a series of plumbing operations;
- plumbing workbench with the possibility of performing a number of joinery operations;
- combined workbench.
Immediately, we note that the last option is not the best solution, as it does not allow to fully perform and carpent, and plumbing types of work, but only relatively adapted for their production, so the first 2 options, in our opinion it is preferable. It is these options that we consider in the examples for self-making.
Making a simple brand workbench with your own hands
The simplest workshop for the domestic workshop will be a fairly powerful table with a small set of additional features: drawers, shelves T.P. For storage of the tool and reman.

Well, if there is a possibility of its minor transformation to perform work on metal or by wood, but about it below.
To create such a workbench, we take wooden bars 40x80 and cutting 4 legs: 2 pcs. 700 mm long, 2 pcs. 750 mm long and 2 lower jumpers with a length of 500 mm. For the 2-top jumpers of the same length, we used the 40x100 bar in the farm.

It will also go for the upper strapping of the base of our workbench in front, with a length of 1400 mm at the bottom and 1600 mm at the top. And behind, we use the cutting board of 40x150x1600, but we will need all long blanks later.
If you have a tool for the manufacture of thorns connections, use it as we did.

If not, then make them manually or you can connect items using an overhead metal fastener.
Collect side racks as shown in the photo below.

After that, you can start assembling the entire bed.
The central jumper inside the bed, made from the same 40x80 bar, fixed on small wooden brackets 40x40x180, except for hardening the design, performs the function of the stop for two bedside tables with drawers from old written tables that we decided to use in our workbench.

For the work surface of the workbench, we also used the existing laminated surface from the Fiberboard. We screwed a board on metal plates to the front edge, which will protect its edge from leading during operation. She will serve as the basis for attaching small plumbing with clamp

We carried out the fastening of the working surface to the bed on metal corners and got a fairly powerful workbench of general purpose for our home workshop.
Making a joinery of a workbench with a refinement for performing fitter work
If you are mostly working with a tree, then it will be logical to make a carpentry workbench and make some refinement of the design for plumbing operations.
The traditional joinery workshop for the workshop has a construction spent a construction, which has practically not undergone significant changes up to the present day. Its base is a massive bed on thickening connections, using drigs for suspended in case of drying, powerful (often typical) countertops with a swallowed tray for collecting chips and tools, and two clips for fastening blanks.

The dimensions of such a workbench are selected depending on the maximum length of the billets that will be processed on it. If you are going to make wooden doors yourself, then the length of the workbench should be at least 2.5 m, and the width of at least 0.8 m, otherwise your work will turn into a catguard. The workbench of my grandfather is the best carpenter in the district at least 50 km in all directions - was 3000x1000 and he said that it lacks centimeters 20 in width for the manufacture of large frames for the veranda.
Sizes of the school joinery of 1200 x 500 x 750. If the dimensions are arranged in terms of you, and you are ready to spend about 13 thousand rubles on it, then the height can be adjusted by screwing the bars of the corresponding sizes to the legs. But you can also consider alternative options.
Actually, these are variations on the same joinery workshop for a workshop with different materials for the table top, the presence or absence of boxes, shelves and various teaching mechanisms. Now in order:
1. We are made from a dry pine sawn timber 40-50 x 80-100 mm, having calculated height under its growth. If your workbench is installed in a room where there will be no sudden drops of moisture, then the connection of its elements can be performed in any convenient way, albeit with the use of fixing metal plates and corners.
2. The countertop can be made from ready-made glued wooden shields sold in most building supermarkets, or glue from planed bars with a thickness of at least 50 mm alone with the help of PVA glue, building a simple clamping device. It is important to remember that the upper side of the future workbench should be as smooth as possible. Also for the countertops you can use a thick-layer Phaneur, but her ends, it is still desirable to salary wooden slats from oak, beech or ash.
3. For fastening the clamping mechanisms, the bottom table tops of the workbench increases with bars of the corresponding sizes. Most popular such clamping devices:
- joiner's chassis screw with two guides of Czech production TR 24 * 5, 390/205 at the price of OK.3 thousand rubles.

Spanish vice carpentry piher, 150 mm cost approx. 2 thousand rubles;

You can also independently make some kind of their similarity, using a stud with a diameter of 14 - 16 mm, which of course such efforts as a vice will not give, but it will make your clamp exclusively economical and maintainable, due to its cheapness;

Or make an even simpler clamping device from the same studs, but due to the lack of guides, put 2 such clamps on some vice.

4. Holes for pegs, stops are done in two directions opposite the tisch's undercarb. It is also useful to make them all over the surface of the table top parallel to each other for confident fastening of overall products.

5. Bold the worktop table top to the base at powerful metal corners and, if you do not plan to move it, you attach it to the floor.
And with the first task of the version of the workbench described in this section of the article, you have successfully coped.
Now, several variants of fixtures for performing plumbing works on such a workbench.
- The easiest of them is to make a lining of steel 3 - 5 mm thick with the frame from the steel corner, stored separately from the workbench or attached to it on the loop and lowered to the worktop if necessary.
- The main attribute of the locksmith vestica is plumbing vice. In this case, we recommend using vice with fasteners that do not require passing through the worktop worktop.
You can certainly be fastened under the fasteners of the holes of the hole for the stops, but with a thick ligation to do without it. Also interesting is the option of fastening the plumbing verse directly on the table top of the joinery workbar with the help of a transitional stand and a powerful clamp.

And the lining at the same time do not do the entire area of \u200b\u200bthe workbench. Options - Weight, Choice for you.
Refinement of the locksmith to perform joinery
Often, especially if the farm has a car and a garage, the main workbench is a plumbing.

We will not consider the process of its manufacture in this article, but we will tell about simple ways to adapt to perform joinery work, especially since it is not difficult at all. For the full use of your lockable workbench as a carpentry, you will need to dismantle cleaned vice, and make some non-complex devices.
Consider them in more detail.
1. From the first figure below, we will be interested in the finalization of a locksmith workrier, first of all, the side stop (1), which is not difficult to make removable. And with the holes for the brazers (14) on the front end of the workbench (and it can be a solid removable design) and a suitable wedge, we will get a simple and reliable device for fastening the board to the workbench. You can simply make a wooden pad fixed with the plated clamps, with a set of billets and understand that the level of the working surface is raised on its thickness, which can be compensated for by the corresponding trap height at the workbench.

About the rear stop and there is nothing to say, it simply performs a supporting function for long billets.
2. You can make a planing chalkboard with a universal focus depicted on the second figure. Increasing the height of the stop (or by changing it depending on the height of the processed bar) and flexing from the bottom side of the bar for stopping the right edge of the workbench, we get the simplest device that turns the locksmith vestic to the joiner.

3. A slightly more complex lining with a fairly powerful option for securing the workpiece, it also allows you to solve this task. The only thing we would recommend in this case are also fastening the stop and thickness to choose at least 50-70 mm for a more reliable fastening of the front pegs and sufficiently blowing the lock and clamp.

Method of installation on the workbench of the last two fixtures for planing is shown in the diagram:

Dear readers, if you have any questions, ask them using the form below. We will be happy to communicate with you;)
The general principle of the development of materials processing materials from prehistoric times to the present day - how to do on inaccurate equipment parts for more accurate. And everything began from the workbench, its sobrases are found in the excavations of the settlement of the Stone Age. Build a workbench, and full, it is quite possible, it is quite possible, and this will not only save a significant amount, but also simplifies, make it easier to work and improve its result.
Three mistakes
Lovers, sometimes, judging by their designs, are very experienced, knowledgeable and diligent, sometimes make themselves workbenches, in which, figuratively speaking, you can spread the tank with a sledgehammer. Time and labor on them goes a lot, and the money is hardly less than a good corporate amateur workbench. Repeating in the design for its own use of industrial prototypes intended for intensive work in 3 shifts and static loads more than a ton, with a service life of 20 years - one of the typical errors of the development of the workbenches of its own design.

The second is disregarding vibrations. Not clearly felt by the "game" or "return", but a shallow shiver, significantly imperative work and reduces its quality. Especially strongly vibrations affect the workbenches on the metal bed.
Third - repeat carpentry or plumbing workbenches; Perhaps with some modifications under your hand. Meanwhile, the designs of workbenches for domestic / amateur works of a different character. There are workbenches more or less specialized or, on the contrary, universal, temporary from the primary materials, etc.
We will figure it out in this article how to make a workbench, taking into account these errors, First, simply and cheaper in a circle of the needs and / or passions of Cleells. Secondly, how to make a general purpose workbench or universal for special conditions of use - in a close garage, under the carpentry at a construction site from a girlfriend, home for shallow accurate work, children's.
About universal workbenks
Among the corporate products, sometimes very awesome, you can meet the "universal" workbenches in the form of a carbon monoxide with a lid without a tray, complete plumbing vice on a wooden pillow, and a clamp for their installation, like the fact that in the photo:

"Universal" workbench factory manufacture
This incorrect decision is not only because the wooden table top from the joinery work will deteriorate. The main thing is that there is bad - technological fluids used in the processing of metal - oil, kerosene, etc. impregnated with them becomes much more fuel. Self-ignition; Remember, in production it is strictly forbidden to accumulate the washed rag. The approach to the design of the countertops (boards, covers) of the universal workbench is needed different on the basis of what operation it is mainly used - thin or coarse, see below.
Working bench
In the West are widespread amateur / home workbenches with a set tabletop framed by a side. Drawings such a "working bench" are given in Fig. Under the locking, the cover is covered with a sheet with a thickness of 1.5-2 mm and put vice on the pillow.

The workbench bench well produces vibrations; You can make it from pine or ate. But the design is complex, with long materials and furniture to work on such a workbench is uncomfortable. Therefore, we will first look at how to make the most common carbuilder workbench, then garage and plumbing. Next, we will try to combine them into a universal workbench and see what you can think of special needs on this basis.
The composition of the workbench
The workbench "of our" type (conditionally, since it is impossible to accurately establish its origin) consists of:
- An exposure (in carpentry vestipers), or beds (in plumbing), ensuring the stability of the entire unit and ergonomics of the workplace.
- Covers, boxed or in the form of a tray that gives the workspace necessary hardness.
- Shelves; Perhaps with a tray, nests, and the stops on which operating operations are made.
- Apron on which the tool hangs. The apron is not a mandatory workbay of the workbench, it can hang on the wall or be replaced by a table, rack, etc.
Note: The size of the workbench in the height approx. 900 mm. Length and width are selected at the place of installation and the nature of the work within 1200-2500 and 350-1000 mm acc.
The cover with the shelf is most often performed at the same time, in detriment, and is called a lid, a vertical board or a worktop. To clean the vibrations, the shelf is always made on the basis of (bed, substrate) from the tree. In a plumbing workbench, the bed is covered with a steel sheet from 2 mm thick and can be made of coniferous wood. Its total strength is sufficient, and the steel tire protects the tree from local damage and the contact of the techniques. In the joiner's workbench, the bed of high-quality (without bitch, swees, and other defects) of solid fine-layer wood (oak, beech, housing, elm, walnut) serves simultaneously with a shelf, in the workbench for the house for its simplification not to the detriment of quality possible and 2 -Lelar design, see below.
The traditional exposure design, on the contrary, is collapsing from the same tree as the regiment of the joiner. It comes from the Masters-Shabashnikov of the Past, transported their equipment from the customer to the customer on the cart. It is from the bed / exposure and should begin to develop your workbench is not worse, but easier traditional.
Stanna: Metal or tree?
A stationary wooden workbench has an advantage of not only at a smaller cost and labor intensity. Tree, first, not plastic. The workbench on a wooden base can be broken, but if the wood is used is a weathered and impregnated, it will never come. Secondly, the tree perfectly extinguishes vibrations. Foundations of your buildings after all, not reinforced vibrating absorbing, like workshops at the factory? And the overall strength and sustainability of the home workbenka bed completely will ensure coniferous business wood of ordinary quality.

The design of the wooden window of the workbench from the board 120x40 is shown on the left in the figure. Permissible static load - 150 kgf; Dynamic vertical down for 1 C - 600 kgf. The angular racks (legs) are assembled on the 25x70 zigzag screws (snake) with an indentation from the edge 30 mm and a step of 100-120 mm. Bilateral fastening; Snakes on the other side of the package are conducted in a mirror reflection. Intermediate support beams are mounted with steel corners on self-drawing; Edge - pairs of self-tapping spikes of racks and, outside, corners.
If there is a ram 150x50 or (180 ... 200) x60 (180 ... 200) x60, the design can be simplified, as shown in the center in Fig. Beneficial ability will rise to 200/750 kgf. And from the bar of 150x150, 150x75 and (180 ... 200) x60, you can build a bed capable of incurring 450 kgf in the statics and 1200 in the dynamics, on the right in Fig.
Note: Any of these mills is suitable for both carpentry, and under the locksmith. Under the carpentry, they put a boxed cover on it (see below), and under the footer, the tray from the 60x60x4 corner with a welded 4-mm stripes above intermediate beams. The tray is placed on a wooden pillow and cover it with steel, also see below.
If there is no welding
A wholesale workbench, without the need for welding work for its manufacture, can be made according to the track. Fig. "Fishka" here in a tabletop, scored on a glue from a bar of 75x50 and bonded tie. If the pump is oak, then the permissible load is 400/1300 kgf. Corner racks - a ram 150x150; The rest is the ram 150x75.

Metal
It happens on the contrary: metal is more affordable wood, and there is welding. Then the table of workbench under load 100/300 kgf can be collected according to the drawing on the left in Fig. Materials - corner 35x35x3 and 20x20x2. Boxes - from galvanizing. The disadvantage is impossible to make opening at the bottom of the legs, the design will lose the ability to carry a dynamic load.

Under the load 200/600, a more convenient metal workbench according to the circuit on the right at the top of the proftrub 50x50 (angular racks), 30x30 (other vertical parts) and angle of 30x30x3 are suitable. The boarding pillow of the other workbench is only on only across (on the right below) from headboards (120 ... 150) x40.
Shelf - Steel 2 mm. The shelf is fixed to the pillow with screws of 4x (30 ... 35) in a pair from each edge of each board, and along the extreme boards - in step (60 ... 70) mm. Only in this version of the workbench will show a given bearing capacity.
These workbenches are already related to universal: under the carpentry, the lid turn over the wooden side up or fit, as described below. Flooring vice are installed on a wooden pillow, but they are fixed not clamp. In the pillow of the vice, the collet anchor under the M10-M14 bolt is rolled down, and the through hole is drilled under it in the lid. Under the head of the bolt is placed washer from 60x2. Such a solution is convenient because the vice is possible to use inexpensive inexpensive.
For joinery
The cover of the joiner's workbench, unlike the plumbing, is attached to an exposure tightly and is performed by a box, for overall stiffness. The optimal fastening option for an inadvertent workbench is steel corners and self-tapping screws. An exposure can be a steel bed of those described above.
How the carboard workbench of traditional type is arranged, shown on the pos. A rice; Accessories to it for pos. B. Vistar board (in this case, this separate device) is used to work with a long period. The emphasis in its groove is made from a snapped cutting board, see below. In the board, it is advisable to choke a longitudinal row of holes and attach it to the nests with bolts with conical heads wise. The traditional design of the joinery exposure is shown on the pos. G, but - see above.

The cover of the joinery is possible to reduce it, after performing a 2-layer, pos. B. Then high-quality solid wood boards will only be needed on the shelf. We put it out, putting the boards "clutches" of the annual layers alternately up and down, in order to avoid charging. The shelves flooring first split on PVA or joiner's glue, compressing a clamp or wrapped with a cord; put on the pillow on the same glue. The lid skirt is assembled separately on glue and through spikes (inserts on pos. C) and attached to the shelf Pillow with self-draws.
Visits for joinery
Alloyous carpentry vice, front and challenges, are currently almost completely ousted by vice with a metal screw clamp, pos. D; Their device is shown for pos. E. Some comments are needed here.
The first - under the head of the clamping screw you need to put 2-3 steel washers, otherwise it will quickly engage in a pillow (4x4x1 cm bodies). The second is if the nut is not registered and not purchased a shaped, then get a while at least for a set of taps under the carved. In this case, do not try for the smooth and smooth clamp to apply too thick screw; M12-M16 is quite enough.
The nut of the self-made clamping pair is welded on the base with a diameter of 60 mm or, square, from 70x70 mm. To draw it into the clamping pillow on it is necessary, so less likely that the nut is squeezed when clamping. But from welding, the thread will not lead ugly, you will not drive the bolt. The thread of the welded nut will need to pass by the tags in the full scheme, as when cutting: the first tap - the second - the third (if included in the car).
Note: The nut woaded on the base, before passing the thread, you need to learn from 2 hours, so that the residual deformations "lay".
Visits and carpentry for locksmiths
Things on a plumbing workbench are installed in the corner (see the insert in Fig.) So that as many of the dynamic loads as possible during metal processing accounted for vertically on the angular rack. The location of transverse beams and intermediate vertical stands of the workbench with stationary visits is desirable to make a little asymmetric, putting them with smaller intervals in the direction of an angle with vice. The installation of vice also leads from the angle:
- The collet anchor under the installation bolt is driven into a wooden angular rack, and a high nut or a threaded sleeve is screwed into a metal (mounting point 1 on the left below in Fig.);
- If the welded mounting assembly, takes place with a thread by ties, as in the homemade nut of joiner's vice, see above;
- Put vice temporarily to 1 bolt and on the place there are holes for fastening points 2, 3 and 4;
- Vice remove and drill through holes 2, 3 and 4;
- Put vice on bolts 1, 2 and 3;
- For fastening on a bolt 4, put under the cover (worktop), bodice from a wooden bar from 60x60 or proftrube from 40x40. It is not necessary to fix the bump, but it should be resting from under Niza to the upper frame (strapping) of the beds, but not in the worktop!
- Fasten the vice finally on the bolt 4.

Note: In the same way, stationary power tools, for example, are fixed emery.
Under the joinear
Merchant workbench can be accommodated for joinery, if drilled in a tabletop 2-4 pairs of holes for fixing the joinery stop (right and in the center in Fig.). In this case, the bottom surfaces of the stop screw the round bins; Tubes are well suited from plastic bottles, they withstand the landing of the battle many times.
Vistak for garage
The workbench in the garage cannot be made optimal in the ergonomics of the width of the workplace - the dimensions of the standard boxing 4x7 m with the car standing in it do not allow. For a long time, the width of the garage workbar at 510 mm has long been determined by trial and errors: and it is convenient to rotate between it and the hood is quite convenient, and you can work more or less. A narrow workbench under heavy load (for example, taken out for the bulkhead with a motor) turns out to be unstable, so it is made attached to the wall. Often - angular, it increases stability, but any vesticated workbench "takes off" is stronger than the workbench-table of the same design.

Diagram of the device of one section of the garage workbench is given in Fig. In this design, a witty method of additional quenching of vibrations is applied: cells of the lid frame and the bottom shelves of the far from the corner of the edge of different sizes. The accuracy of the installation is +/- 1 cm. With the same purpose, the lid and the lower shelf are made of 32 mm thick chipboard and the linoleum is shown instead of steel. For garage works, its resistance is sufficient; Replaced without difficulty.
Fastening to walls - self-tapping screws from 8 mm or bolts from M8 with a step of 250-350 mm. Blowing into a stone wall 70-80 mm; In a wooden 120-130 mm. Supplean dowels are put on the stone wall; Under the bolts - collet anchors.
More for garage
Another version of the garage workbench is already on the wall, and the wall, on the left in Fig. Mount it can only be on the stone walls. Topic 2-layer folding board; Each layer of plywood is 10-12 mm. We care for the machine with a stepped inner edge. Under the "milling" in this case it is understood as a boring mini-machine with a moving-turntable table and a clamp for the part. The design is convenient because the chips roll immediately to the floor.

If your car is something like Daewoo or Chery with a 3-cylinder engine, and the garage is very small, then it can be put in it a folding minor cabinet with a lifting table, right in rice; He will fit the house for fine work (electronics, accurate mechanics). The countertop is suspended on a piano loop, legs on cards. For folding, the legs are separated under the tabletop (it would be useful to tie them with a progress), and the countertop is lowered.
Note: For a close garage with a conventional city car, it may be optimal to be the folding workbench box, see the video below.
Video: Folding workbench box
Home Universal
Houses are engaged in smaller, but painstaking technical creativity: soldering, models, hourly, artistic drinking from plywood, etc. For small fine work, a universal workbench is suitable, the drawings of which and the devices to it are given in Fig. The durability of the working surface and its vibration absorption in this case is not as important as evenness, smoothness and some adhesion ("adhesiveness" of parts), so the table top is covered with linoleum. Locker tears to this workbench need small, with screw clamping fastening.

Oh plywood
Actually, it is undesirable to work with the metal "in rough" on the plywood. She is not bad "neighing." If the pillow of the locksmith boards is done still from plywood, then the frame should be glued to the ply (framing) too from plywood, see Fig. The upper (working side) is then desirable to cover first with a linoleum without lining, and on it put steel.

Establing shift
Another case when to make a vistatic board from plywood justified, this is a student workbench for a child. There are already pedagogical considerations playing the role: let it learn to feel the material and do not be too much in vain, but work neatly. With the same purpose of the Master of the past, the bad tool was deliberately given to students.

Workbenches at Dacha
When the country house or others. A lightweight wooden structure is still built, here it is not for the vertical wisdom, you need at least something, on which easy carpentry work. For such a case, you can learn the carpentry workbench for the giving of the girlfriend, on the left in the figure. The design is remarkable in that it is clearly incarnated by the principle: on bad equipment we make good things.

For subsequent work on the arrangement of cottages, a mini-workbacker will come in handy, right in Fig. With minimal consumption of material and maximum design, it is sufficient for conventional carpentry work in all respects, because The middle of the vertical board is underpecable pair of dies. If they put them on the bolts, the workbench will be folded and from the weekend to the weekend to stand in the storage room. For disassembly, after the release of the sub-vehicle, the struts together with them are removed, and the legs are separated under the board. Finally, for the cottage, inhabited constantly or all summer, with the master owner, by the way you have a more complex, but full-featured folding workbench, see the video below.
- Construction features
- Types of workbenks
- Material of manufacture
- Preparatory stage
- Tools and materials
- Assembly instructions
The workbench isolar, or turning, is a massive, steady, stationary or portable desktop. On it, manual or electrical equipment is treated with blanks of various caliber. To ensure reliable fixation of the instrument, the tabletop is supplied with technological holes.
Construction features
Workbenches for homemade workshops should be convenient to use, turn on the shelves, drawers. Design:
- carrier frame on four legs;
- tabletop of wood or metal sheet;
- bedside table (one or more) for storing devices, spare parts.
The bedside tables are installed along the edges of the working surface, are often supplied with shelves, drawers.
The garage or workshop where the joinery table will be installed, should have a socket to include a stationary rotary light of directional light. The lamp is usually fixed on the wall or directly on the working surface - the brandy board.
Types of workbenks
Tables are:
- carpentry,
- locksmith.
In the first case, the design consists of a metal or wooden frame and a wooden table top. Not suitable for processing metal blanks, when equipped with machine oil: Wooden workbench absorbs an oily liquid. In addition, the metal chips quickly leads the lid into disrepair.
The second option is a universal workbench. Its galvanized iron table is suitable for working with wood and metals. The design is more stable, worn, withstand enhanced pressure. It can be sharpening on it, grinding, cutting, cutting blanks. The workbench can be monolithic and folding. The drawing of the homemade workbench is presented in the image.

Material of manufacture
To make a homemade carpentry workbench, a edged board or sheet metal will be required. The metal table is more resistant to mechanical exposure, but it is difficult to collect it.
For the manufacture of a metal workbench, it is necessary to make a drawing with the size of individual elements. When assembling a workbench of folding or solid, a regular set of tools will need from the board.
Metallic sample heavy, wooden is not very hardy. You can combine these two materials in one product: make a desktop from a tree, a worktop to enhance a thin iron sheet.
Preparatory stage
First you need to determine the form and dimensions of the workbench, select the place of its installation. So that the workplace is always well lit, the light should fall on the left or straight. Often the sockets with the extension are mounted on the surface of the workbench.
The length of the table top should be sufficient for processing billets, placement of tools.
Optimal width parameters - 50-60 cm. One edge of the table is usually used for work with circular saw, other power tools. Therefore, there is fixed there a safety bar with a protrusion of 20-30 cm.
For the height of the workbench depends on the convenience when working. In order to determine this parameter, you need to get up straight, bend your hands in the elbows. The distance from the floor to the coils bent into the elbows is optimal for a stationary or folding workbench.

Tools and materials
Required:
- welding machine;
- an angular grinding machine with a sawing circle intended for cutting metal;
- drill, screwdriver;
- level, roulette
- welding machine, set of electrodes;
- electric jigsaw for plywood sawing.
Materials:
- Metal corner, strip steel 4 mm thick.
- Sheet steel 2 mm thick. From it are made guides for boxes, top coating countertops.
- Board wooden 50 mm thick, 25 cm wide for the working surface.
- Plywood with a thickness of 15 mm. Designed for boxes, walls of workbench.
- Fastening elements: metal screws, anchor bolts, screws.
- Two-millimeter pipe of the square section.
- Paint for painting wooden and metal surfaces.
From the edged boards, the countertop, shelves, strips of steel will be useful for the manufacture of edging sideboards.
Assembly instructions
For starts from a metal corner, 4 identical legs make. Supports in the upper part are connected by a similar corner using a welding machine. The design of 50 x 100 cm should be obtained. To provide an additional stiffness table at an altitude of 10-15 cm from the floor, slices are welded. Optionally, it is possible to provide racks that serve for the attachment for drawers, shelves.

Wooden boards must be put on the core, tightly fix with bolts, pre-equipping the metal frame and the boards themselves with the technological holes for fastening elements.
Wooden countertops do not withstand reinforced loads. To protect the galvanized iron suitable size. It is fixed on top of the boards with self-draws.
With cutting, metal edges are often covered by sowing. For safety, they are recommended to pollize the file.
For greater stability, the legs in the lower part can be provided with metal plates with holes for fasteners. It is also recommended to screw the workbench to the floor. On the side of the design adjacent to the wall, the metal screen is often installed. It is convenient to place a small tool on it.
The workbench is an indispensable attribute of any joinery workshop. It is a desktop used to instrumental processing of blanks, storing tools, materials, drawings and auxiliary devices.
In this article, we will look at the design and size of workbenches, we will offer an overview of the most popular factory models and imagine step-by-step instructions, following which you can make a homemade carpentry workbench.
1 Device and design of joinery workbenches
As for the Blacksmith, the main working tool is the molot of anvil, and in the joinery workshop, the main work element is the workshop. Such a desktop is universal, it simultaneously performs the place for cutting, processing and assembling parts of wood, storage of working tools and devices.
The basic part of the design of any workbench, regardless of how many operations on it will be performed, is the usual countertop of solid wood wood (Bech and Oak suitable). The thickness of the countertop should be 60-70 mm, while in the rear at its entire length, the longitudinal groove is cut for storing small tools. Large fixtures are stored in an expanded - shelf under the tabletop.

On the joinery workbench should necessarily be present, which are used to fix the processed billets. The functionality of the table is significantly expanding with holes for the installation of clamps, which are drilled along the edge of the inner contour of the table top.
The total height of the structure must be selected based on the growth of the wizard, it is usually varied within 70-80 cm. The width and length of the table tops are directly dependent on the size of the workshop or the garage, for a single desktop optimal is the length of 2 meters, width - in the region of 90 cm.
Stationary table can have weight up to 100 kilograms. If it is planned to make a folding workbench, then you will need to take care of its relief through the use of less thick wood. Foldable design assumes the possibility of unscrewing the table tops from the legs, while the legs themselves can be collapsible or telescopic.

The workshop is best spaced near the window, which will give the workplace. Natural lighting during the daytime. The presence of artificial lighting is mandatory, also near the countertop you need to place several outlets to connect the power tools.
1.1 Choosing Materials and Assembly
For the manufacture of the frame and the legs, the planed beam of 100 * 70 mm is good, for the table top it is best to take planed oak boards or a beech 4-5 cm thick. Remember that the thicker the boards are used, the hardest and more stable will be a carpentry workbench, which will have a positive way affecting the convenience of work.
The fasteners are selected on the basis of whether the table is stationary (nails and screws are used) or prefabricated (bolts and nuts). With the power tools for mounting work, you will need a drill, a bolgarian and a screwdriver, and the grinding machine will also be unnecessary, but you can do the usual brang .
The joiner's workbench is done in two stages - the frame assembly and the installation of the table top. When assembling the base, you need to try to get the most rigid frame, you can achieve this by placing the horizontal jumpers (at an altitude of 50-60 cm from the floor), which will continue to serve as a carrier element under the installation of the shelves.

You can connect the bars of the frame with each other with the help of bonding to the Schip-Groove system, but the most convenient to use metal corners and screws. Increase the reliability of the design, you can hardly screwing one of the horizontal jumpers to the wall, but this solution is applicable only in the manufacture of a stationary workbench.
After completing with the basis, you can move to the assembly of the second part - the table top. If the work surface consists of several boards, you need to dock them with each other as carefully so that moisture and dust do not accumulate in the cracks. The boards are connected to the 3rd bars (side and central), located under the tabletop. The sizes of the countertops should be so that its contours go beyond the base of 5-10 cm. Upon completion of the assembly, the tabletop is grinning and covered with oil, on the basis of it, it is easiest to fix it with steel corners.
Bold vice on the workbench is needed using bolts and nuts M12, while in the table tops it is predetermined to cut holes under the heads of the bolts. You can place vice in any place convenient for you, but not in the corner, since with a strong load he will fail.
The joiner's workbench also assumes the presence of stops that can be purchased already ready and secured with bolts, or do it yourself. Under the stops are cut out holes in the front of the table tops, in which the wooden bars are stacked in size. For a more reliable fixation, they can be made in the form expanding to the top peg.
1.2 Homemade workbench (video)
2 Selection of the workbench of the factory production
If there is no opportunity to make a homemade table workbench, it makes sense to pay attention to the products of factory production. In the budget price category, the best choice will be a UNIPRO 16900U desktop, which can be bought in less than 3 thousand rubles.
Unipro 16900U is an excellent metal workbench that is well suited for household amateur operation. The desktop has dimensions 520 * 300 mm, which allows you to process the blanks with a width of up to 265 mm. On the surface of the table top there is a vehicle, an inch and metric scale, sliding holders for blanks are also provided.

The Unipro 16900U model is designed for a total load of up to 100 kg, and the weight of the structure itself is 8 kg. With its compactness, the table is quite stable, its only disadvantage is complete bolts that are made of soft metal. Ownership reviews indicate that the bolt's cap is very easy to break the bat, so immediately after purchase it makes sense to replace the bolts for better.
If you need a professional workbench, we recommend paying attention to the Master Cut series from Wolfcraft (Germany). The ruler presents metal tables to which the manufacturer gives a warranty for a period of 10 years, which indicates their highest quality.
Wolfcraft offers the following model of carpentry workbenches:
- Wolfcraft Master Cut 1500 is a working area of \u200b\u200b78 * 50 cm, height 86 cm, withstands the load of 200 kg. Price 24 thousand rubles.
- Wolfcraft Master 700 is characterized by adjustable in the range of 78-95 cm high and a smaller table (68 * 39 cm). Designed for a load of up to 150 kg, the cost is 17 thousand.
- Wolfcraft Master Cut 200 is the most affordable model in the range of professional equipment (the price of 7 thousand). The tabletop for the workbench has dimensions of 30 * 44 cm, height - 80 cm. This is an excellent student table that can be considered as a universal workbench for household operation.

Also in the assortment of the German company presented joinery with drawers for storing tools - Wolfcraft Workshop. Their working surface is made of an array of beech with a thickness of 30 mm and is covered with galvanized steel sheet. The characteristic feature of the WorkShop series is modularity - the client is able to independently select the storage compartment configuration, combining the shelves offered in the catalog and drawers of different sizes at their discretion.
The total load that the Workshop system can withstand is 600 kg, while the maximum weight per box should not exceed 600 kg. The cost of such equipment directly depends on its configuration, prices begin from 40 thousand rubles.
 Why you can not give icons
 Is it possible to give icons as a gift: Signs, the opinion of the Church
 A year ago left her husband, and now I do not know what to do