How to correctly calculate the area of the hip roof. Hip roof rafter system: Hip roof rafter system calculator. How to find out the area of a pitched roof
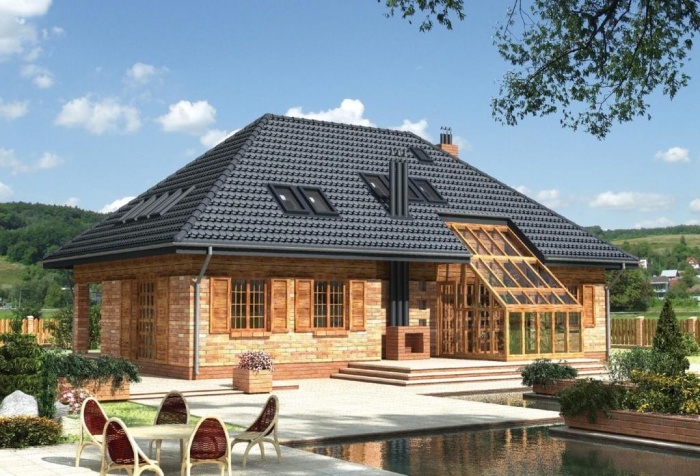
The most popular and most common roof structure for a house is undoubtedly the gable. But recently, the hip roof has also become widespread. It differs in that it is hipped, two slopes of which (called hips - hence the name), replace the gables of the traditional gable roof. She has a number of undoubted advantages and has several varieties. In addition, the hip roof has a relatively complex design and manufacturing technology, which makes preliminary calculations of the main parameters of the roof and the need for materials an important stage in preparation for direct construction.
Types of hip roofs
Before performing the calculation, you must clearly understand what should be the result. There are the following types of roof structures under consideration.
Classic hip roof
The classic hip roof of the house has 4 slopes, two of which are trapezoidal, and the other two are triangular. As mentioned above, triangular slopes, otherwise called hips, were the reason for the origin of the name of the type of roof in question. The main advantages of this design are its high reliability, functionality, as well as original and attractive appearance. The disadvantages include the relative structural and technological complexity, as well as the high cost of construction.
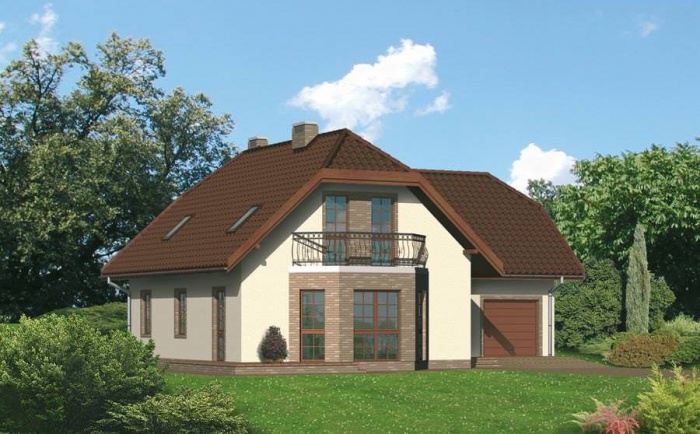
Half hip roof
It differs from the classic variety in that the hips, that is, triangular slopes, have a truncated shape. The semi-hip roof is characterized by excellent performance and an attractive and very interesting appearance. However, this type of roofing is one of the most structurally and technologically complex and expensive.
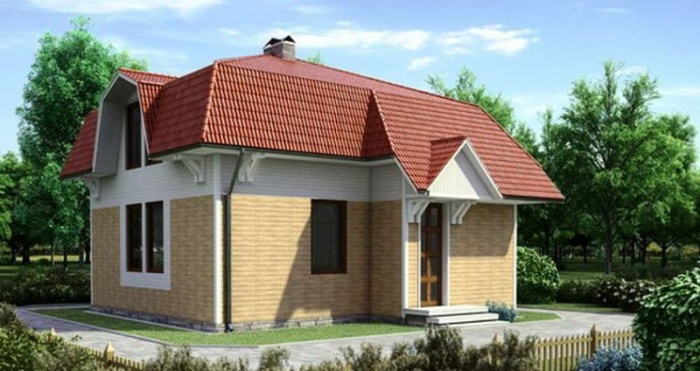
Hipped roof
A fairly popular version of the traditional hip roof, which differs from it in that all four or more slopes are triangular, converging at one point. The structure is crowned not by a horizontal ridge, but by a ridge knot located at the top of the pyramid, which is formed by the slopes. As a rule, it is used in the case of a square building, or an equilateral polygon-shaped structure.

Sloping roof
Another very attractive appearance of the roof of the house. It is characterized by the fact that all slopes have different sizes and shapes. The disadvantage is similar to a half-hip structure - the complexity of the design and manufacturing technology, as well as the high cost even against the background of other expensive varieties of the type of roof under consideration.
Hip roof structure
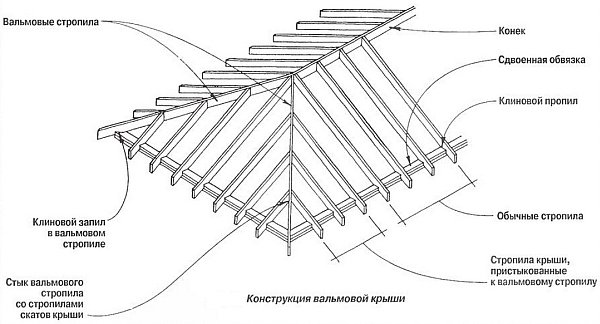
Another important issue that needs to be clarified before starting the calculation of the area and the need for materials is the design features of the roof, that is, the composition of the elements that will need to be calculated. Main structural elements:
- skate (ridge bar). Located on top of the structure in the center of the roof. It is one of the main supporting elements on which most of the rafter system is supported and adjoined;
- corner (slant) rafters. They are positioned in such a way that one end is attached to the edge of the building (or extends beyond it), and the other to the ridge. They take up most of the roof load, being, together with the ridge, the main type of load-bearing roof structures;
- central rafters. Form a rafter system extending along the entire length and height of the slopes from the ridge;
- hip (short) rafters. Form the rafter system of the hips. Usually only one rafter leg rests on the ridge, the rest are attached to the corner rafters.
Basic rules for calculating a hip roof
As noted above, the construction of a hip roof is quite complex. Therefore, it is necessary to develop a project and involve specialists to carry out the necessary calculations. Many years of experience of various builders have repeatedly proved that the desire to save insignificant funds on design and preliminary calculations leads, as a rule, to significantly larger losses during the construction phase.
But in the most extreme case, if savings are urgently needed, some of the drawings and elements can be performed and calculated independently. In particular, with your own hands it is quite possible to calculate the location of the subsequent installation of the ridge and other elements of the roofing rafter system.

Locating the ridge and rafters
To do this, you need to perform the following operations:
- mark the line of the central axis from the ends of the house at the level of the top of the cornice. Thus, the location of the ridge is determined;
- using a measuring ruler, located at one end on the marked line of the ridge beam, and with the other on the line of the side wall, the place of installation of conventional rafters is determined;
- then the length of the overhang is also determined using a measuring ruler, only the ruler at one end extends beyond the border of the outer wall;
- a similar procedure is performed along the entire length of the wall in question, and then for the three remaining walls.
Thus, the places for the subsequent installation of the ridge and all rafters will be obtained.

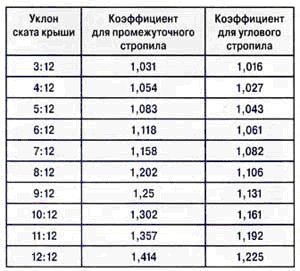
The table of coefficients, in which the ratios of the following indicators are indicated: the slope of the roof / length of the intermediate rafter / length of the corner rafter, can significantly simplify the calculations of the length of the elements of the rafter system.
Calculation of the area of the hip roof
After the location and dimensions of the rafter system have been determined, it is not particularly difficult to calculate the coverage area of the hip roof. To do this, it is divided into its constituent elements - slopes, for each of which its area is calculated, taking into account the overhangs. The formulas used in this are known from the school bench and are quite simple.
Then the received data are summarized. The result of the addition will be the total area of the hip roof with one significant refinement. From the figure obtained, it is necessary to subtract the area of the chimney pipes and windows located on the roof.
Calculation of the angle of inclination of the hip roof
When calculating the angle of inclination of the hip roof, it takes into account a fairly large number of indicators, in particular, the amount of precipitation, the level of wind and snow load, the purpose of the attic, the material of the roof covering, etc. Therefore, such calculations are best performed using specialized programs with the involvement of professional designers.
It should be noted that the angle ranges from 5 to 60 degrees.

All of the above applies to the simplest type of hip roof. The task of calculating the elements and material requirements is seriously complicated when additional architectural elements appear, for example, if there is a desire to decorate the house with a bay window. An example of calculating a roof with a bay window is shown in the video:
By analogy with the calculation of a roof with a bay window, calculations of other architectural elements are performed. It must be remembered that the example with a bay window is one of the simplest.
The following should be added. To simplify calculations, they often resort to using online calculators that help to complete some of the calculations. For example, as in this case:
Conclusion
Hip roof has a rather complex structure. Therefore, the best option for the calculation is to invite professional designers in order to prepare a full-fledged project containing all the necessary dimensions, specification of the need for materials, etc. If you want to save money, you can do some of the calculations yourself.
The first thing to do before starting to build a roof is to make accurate calculations. A detailed description of all connections and assemblies, an accurate drawing of the entire rafter system and the approval of this by an experienced person are required.
It sounds difficult, although in reality everything is simpler - no more difficult than a children's construction set, it is only important to do everything right. And, if you are looking for how to calculate the rafter system of a hip roof, you will find all the information you need here!
So, what is a hip roof rafter system? This is a four-slope design, i.e. one that has four planes. Such a roof is much more complicated than a gable roof, but it is stronger and more reliable in operation. And her appearance is recognized all over the world as one of the most successful and aesthetic.
Here are the main advantages of this design:
- Due to the triangular end slopes in the hip roof, conventional skylights can be installed.
- Due to the absence of a sharp protrusion, the hip roof has a higher resistance to various atmospheric phenomena.
- The hip roof is considered economical due to the fact that it does not have gables.
- Temporary deformations of such a roof are reduced to zero - all thanks to its special design.
- Insulation of such a roof is much easier than that of a gable roof (there are no problem gables).
- High resistance to wind loads of the terrain - due to the low angles of inclination.
- It is easier and easier to convert an attic space into a comfortable attic. And this is already a valuable increase in the living area of the house.
Of the shortcomings, we highlight the main one: the rafter system of a hip roof is more complicated than that of a conventional one, and therefore its installation will cost you more, although you will save on brickwork.
Types of hip roof construction
So, let's see what types and subtypes hip roofs are built today:
- Hip. This is a traditional hipped roof with triangular slopes on all end sides.
- The roof, in which the hip does not reach the eaves, is called half-hip.
- A hip roof is called a hip roof, in which identical triangles are connected together by one upper point. By the way, once upon a time in Russia they built just such roofs.
- A cruciform hip roof is a rarer type due to the high cost of execution and high labor intensity of work. Usually it is built on houses with complex layouts or separately only above the front doors.
Our scheme will help you to understand in more detail:
As we already said, if the hip does not reach the eaves, the roof is called half-hip. It is in these places that skylights are placed, which completely solves the problem of the need for inclined skylights. But in terms of complexity and cost of construction, a half-hipped roof is higher than others.
The simplest example of a hip roof (quite aesthetic, note) is a triangular roof. All slopes here are the same size, and all angles are equal. If this height and design suits you, then give preference to this particular option - you will avoid many pitfalls and nuances!
The only point: the hip roof in its classic version is bad in that it has no vertical planes and dormer or attic windows have to be placed on inclined walls. As a result, such elements become the most unprotected in terms of leakage during rain.
Hip roof architecture in detail
For the device of a specifically hip roof, experienced builders recommend taking rectangular beams from conifers, and reinforcing the stability of the entire system with additional steel elements. Indeed, in addition to the rafters themselves, in any case you will need the following building elements:
- The Mauerlat is the lower support for the rafters.
- A purlin is a beam that needs to be placed parallel to the Mauerlat as another additional support.
- Racks and struts are supporting elements for a structure with a so-called multi-span.
- Crossbars are special elements that help to cope with spacers (a common occurrence with improper installation).
- Sprengel is another additional element of the rafter support.
- Lezhen - a special support for struts and struts.
So, the building material has been purchased? Now put all the parts in a stack or dry them additionally. The main thing is to consider protection from rain.
How to avoid calculation errors?
Now let's avoid the very first and most annoying hip roof design mistake - the lack of measurements of the house itself. The problem is that even trained craftsmen manage to start work by drawing up a plan and drawing a roof, but they do not work with the base - the walls. But only at first glance it seems that the walls are perfectly even, everything is parallel to each other and the like, but in fact, even a completely new house is far from ideal. And then, already only during the construction process, certain errors are discovered that prevent the first supports from being installed correctly.
Therefore, first of all, before carrying out any calculations on the hip roof, we arm ourselves with a ruler and a level. We check the elevation marks, parallelism of the walls, diagonals (the correctness of rectangular walls) and draw up a measurement plan of the house. Let's say you are surprised at some inaccuracies. And now we decide how to fix what:
- We correct a slight error in parallelism with a Mauerlat.
- We correct the slight difference in the heights of different walls with gaskets.
- We correct significant differences with additional elements of the rafter system, which we must include in the calculations.
In addition, we recommend that you do not make a simple two-dimensional drawing of the roof, but create a volumetric model that will give you a clear idea of your hip roof. At first glance, you can understand whether you like the result or not. Redoing something is quite difficult. And modern computer programs, which are quite a lot, will help you with this.
If you are looking for a ready-made roof drawing that fits the required parameters, do not take too detailed drawings with Latin abbreviations and formulas: they are needed only by the master who can read them. And so that you have an idea of what exactly awaits you, we offer you a simple master class on the construction of a hip roof, where all the elements are clearly visible:


What data is required for construction?
Here are the parameters of the future roof you should know before you start building it:
- Roof slope angle, on each side of the hip slopes.
- The angle of inclination of the roof from the sides.
- The exact area of the entire roof surface
- The weight of the future roof and the exact load of the roofing material on the roof truss system.
- The length of the diagonal rafters.
- The cross-section of the rafters, taking into account the regional wind and snow loads, the pitch of the rafters and the weight of the roofing material.
- The required volume of all rafters in cubic meters.
You will need to know the area of the entire surface in order to purchase the required amount of roofing material and calculate its future weight in advance:

Next - the rafters. On hip roofs, the rafters are placed directed to the corners of the walls - to the inner and to the outer ones, and are called oblique or diagonal. The second ones are longer than the usual rafters, and the shortened ones are supported on them - the rafters. As a result, such rafters carry a load 1.5 times more than usual.

The length of the diagonal rafters is longer than the standard length, so they are made paired. Their advantage is that the double cross-section is designed for an increased load and, as a result, is a solid, uncut board. As a result, the constructive solutions for such a roof are quite simple. And in order to ensure the multi-span of the hip roof, one or two supports will need to be placed under the slant leg.
If you have already purchased scaffolding for the construction of the roof, then calculate the pitch of the rafters based on the section of the finished boards. If you have not purchased it yet, search now, before drawing up the project. After all, it is not uncommon for a project to be ready, but it turns out that good wood is obtained from the parameters that were not planned at all.

We bring to your attention a special free one.
What should be considered when calculating?
The hipped roof project is one of the most difficult. It is extremely important here not to be mistaken in the calculations, because the hip roof is a large number of very different elements, and each of them has an important function.
So, the slope of the hip roof usually varies from 5 to 60 °. Based on this, roofing material is chosen: roll coverings for small slopes and tiles for steep surfaces. But count right away that the greater the angle of inclination of such a roof, the more roofing material you will end up with. And the smaller the angle, the more solidly the frame will have to be built, because now a considerable load will go on it.
To make a final decision, you will have to consider all these factors:
- The total weight of the planned roofing material.
- Additional weight of waterproofing and insulation.
- Local climate features (check with your neighbors).
- The type of rafters and the presence of additional elements to maintain the strength of the roof.
- All devices and equipment that you are going to put on the roof.
It is important to take into account the wind and snow load so that your roof does not break through tons of snow and is not blown away by a dashing wind, and the weather conditions of a specific area will indicate what deformations of the rafter system are possible over the years (for example, dampness, sea air, etc. .).
Note that a hip roof usually has no problems with a wind load, but almost always with a snow one. The reason is that all the planes of the hip roof are inclined. Bad for the wind, but good for the snow.
Have you decided on a project? Did you do all the necessary calculations? Then get started!
Warning: Use of undefined constant WPLANG - assumed "WPLANG" (this will throw an Error in a future version of PHP) in /var/www/krysha-expert..php on line 2580
Warning: count (): Parameter must be an array or an object that implements Countable in /var/www/krysha-expert..php on line 1802
Hip roofs are classified as complex structures. Like any architectural element, they have their own strengths and weaknesses. In some regions of our country, such species are traditionally given preference, they are found most often.
It is impossible to make a correct calculation without understanding the subject itself. Each element plays a very important role, any errors have an extremely negative impact on the overall strength and stability of the system. Even small miscalculations can cause accidents. What parts does a hip roof consist of?

Table. Hip roof components
Roof element | Brief description and purpose |
|---|---|
| The largest in length and the most loaded elements of the rafter system. They are installed at the corners of the slopes, the wives are leaning on them. As a rule, they are made of paired rafters, due to this, the bearing capacity is increased. | |
| They are no different from the rafter legs of ordinary pitched roofs, most often they are boards of 50 × 150 mm. | |
| The hips are formed, the top rests on the nipple rafters, the heel on the Mauerlat. In order to reduce the load on the diagonal rafters, additional supports are installed. Depending on the specific features of the roof, the hangers can rely on a truss, corner braces, etc. |

When choosing a hip roof, you need to be aware of its advantages and disadvantages.
Design advantages:
- during construction, there is no need to take into account the direction of the prevailing winds, the roof has completely the same wind parameters from all sides;
- the roof is rigid, it can withstand significant snow and wind loads. The use of special elements makes it possible to overlap houses with a large area;
- does not have gables, which somewhat facilitates and reduces the amount of masonry work.

Flaws:
- requires a lot of lumber, this increases the estimated cost of the building;
- technological complexity. The process of erecting a roof with a hip has many individual nuances, such work can only be performed by very qualified builders;
- a large amount of unproductive waste of roofing materials. This is especially true of metal roofs - pieces cut off at corners have to be thrown away.

General algorithm of the calculator
There are many different calculators on the net, but they all follow the same scheme and use the same formulas. None of them can change the mathematical principles of calculations, the program includes generally accepted norms and formulas. At the output, users receive the parameters and the number of rafters, including those located diagonally. The length of the ridge is calculated, the volume of lumber for. If desired, you can calculate the number of roofing materials depending on their type, the footage of waterproofing materials, etc. The user must enter the initial data one by one, while using the recommended dimensions.
What formulas does the calculator use? Here are just a few of them.

The program will allow you to easily get all the necessary design parameters for a given type of roof. You do not need in-depth knowledge of how to calculate a hip roof, an algorithm developed by our designers will do it for you. It takes into account all the nuances that may arise during the design and construction of a roof.
The calculator for calculating the hip roof will allow you to competently plan the procurement and consumption of building materials, resolve all issues related to the reliability of the rafter system and the roof structure as a whole.
The specifics of the program
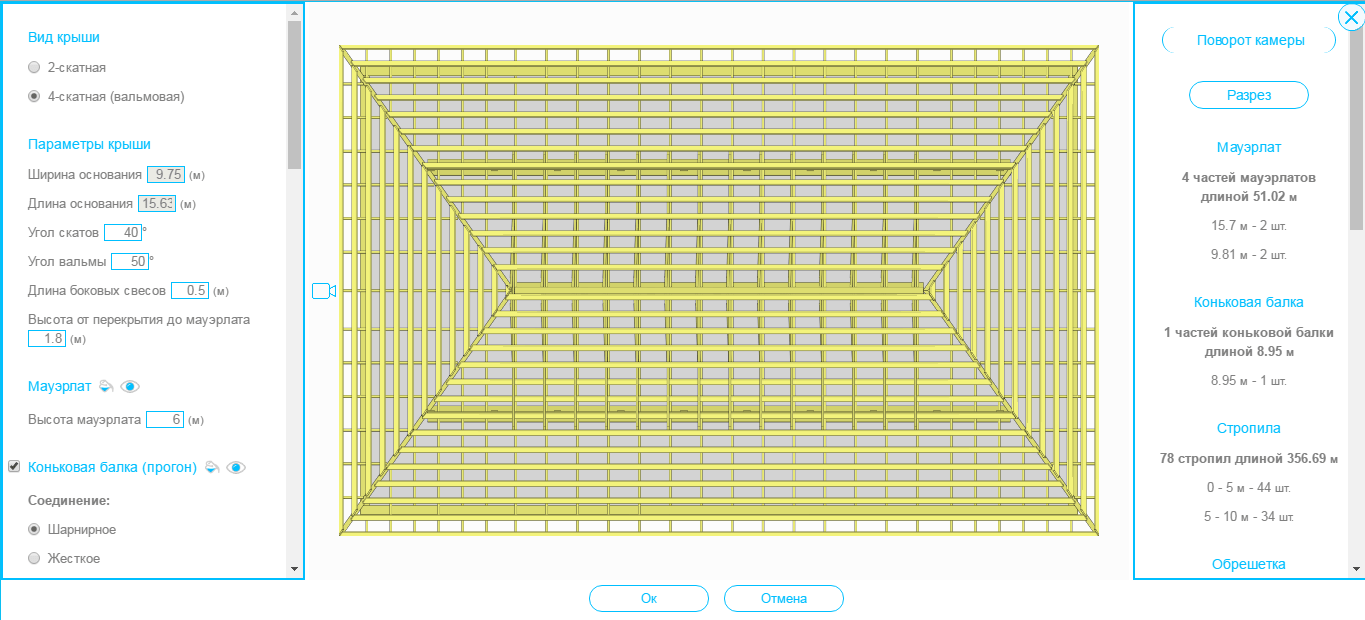
Our online calculator provides for the calculation of the rafter system of a hip roof, which has equal angles between the base of the roof and the side and end slopes. It is proposed to fill in certain fields with initial dimensions:
- Linear characteristics of the house - length, width, walls;
- Roof parameters - base width and length, desired height, overhang length;
- Data for calculating the rafters of a hip roof and lathing - width, thickness, and also a step;
- OSB sheet parameters - only for a soft type of roof;
- Roofing Sheets and Vapor Barrier Information - Overlap Amount, etc.
Explanations of the results of calculations of the hip roof
- Calculation of the rafter system of a hip roof with a detailed drawing of the entire structure in general (with designations) and final data :,
- Dimensions of all rafters of the hip roof separately (oblique, diagonal, etc.);
- Calculation of lathing and counter-lathing;
- Mauerlat calculation with a detailed final drawing;
- Calculation of the area of the hip roof.
The final volume of timber for rafters and lathing (volume of lumber);
Drawings of all types of rafter legs separately;
The layout of the rafters on the future roof with a mark for each type;
Drawings of the finished roof truss system from different sides;
Of course, an interactive 3D model of the hip roof for clarity.
The lengths of the side and hip rafters in the results and on the drawings are indicated taking into account the overhangs.
Now you do not need to think about how to calculate the area of the hip roof for purchasing the necessary building materials, all the necessary information is available in our website calculator. Save to bookmarks, share with friends, so that the useful tool is always at hand.
Calculation of the hip roof online will save time and money on the purchase of the necessary building materials, and get a detailed list of the sizes of the main units and elements for arranging the roof of your house.
Four-pitched roofs are the most popular option in modern private construction. Often, developers have a question: how to calculate the area of a hipped roof. This is necessary to determine the amount of roofing material, waterproofing and insulation.
Today, calculations can be made using computer programs designed for all types of roofs. This has its advantages: high accuracy, the ability to choose different design options, convenience. However, some builders choose to rely on their own wits, rather than spending money on what they can do on their own.
Before proceeding with the calculation of the roof area, a detailed plan should be drawn up, where all dimensions will be applied. Not a single roof element should be overlooked. In addition, already at the stage of designing a house, you should decide on the choice of roofing material, since the slope of the roof depends on this. The sharper the angle of inclination, the longer the roof slope. This means more material consumption. In addition, each roofing material is different. For example, profiled metal sheets require much more overlap during installation than, say, natural tiles. 
Having an accurate calculation of the roof area of a house, you can choose the most profitable roofing material, as well as insulation, steam and waterproofing.
Four-pitched roofs can vary in shape:
- directly hipped;
- half-hip;
- hip;
- four-slope gable.
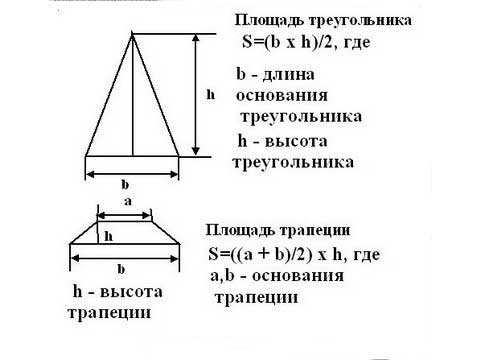
The easiest way to calculate are the areas of roofs, the slopes of which are regular trapezoids and triangles and do not have any kinks on the slopes.
However, in modern construction, hip roofs are increasingly being erected, with many slopes, the surface of which can consist not only of triangles and trapezoids, but also rhombuses, rectangles and other geometric shapes.
That is why, before starting the calculation of the hipped roof, it is advisable to refresh your knowledge of the course of school geometry.
Self-calculation of the gable roof area
As mentioned earlier, the first step is to draw up a complete roof plan. If there is no house project or the rafter system has already been installed, then the roof plan will have to be drawn up according to the existing frame. All you need is a tape measure and an angle. This tool measures all roof lines, from ridge to floor. If the roof is multi-level and consists of different heights, then in the drawing it is necessary to reflect where what is the height. It is also advisable to draw up a plan of the roof in the projection. This will help to most clearly present the picture. However, it is only necessary to draw up a roof projection if you have drawing skills.
Having drawn up a detailed drawing, it will not be difficult to decompose the roof into separate geometric constituent elements. This is necessary for more accurate calculations.
Remember that the size of the roof cannot be limited only by its perimeter. It is also necessary to add the length of the roof overhangs where it is supposed.
Rules that must be followed when calculating a hipped roof:
The simpler the shapes are, and the more parameters you know, the easier it will be to calculate.
- The length of one slope is determined by measuring the distance from the extreme line of the eaves to the ridge.
- Each roof slope is calculated as follows: the area of the figure is multiplied by the cosine of the angle at which this roofing element is located.
- If any slope is an irregular rectangle, it must be divided into regular geometric shapes. And also carry out the calculation of each separately.
- After the calculations of each element have been made separately, the obtained digital values are summed up.
Calculation example.

For example, we will give the calculation of the roof of a hipped roof.
Suppose that our hipped roof consists of the following elements: two regular trapezoids and two isosceles triangles. The roof slopes are at an angle of 30 °. The cosine of this angle is 0.87.
Trapezoidal slopes have the following parameters: one side 10 m, the other 7 m, height 3 m.
Triangular slopes: two sides 3.34 m, one side 7 m. The height of the triangle is 4.8 m.
Let's get down to calculations.
The area of the trapezoid is found as follows: we sum up the length of the horizontal sides, divide by 2, and multiply by the height. That is, in our case: S = (10 +7) / 2 x 3 = 25.5.
Do not forget that the resulting number must be multiplied by the cosine of the angle, in our case by 0.87. As a result, the area of the trapezoidal slope is 22.185. Rounding up, up to 22.5 meters.
The final stage is the summation of all areas: S = 22.5 × 2 + 14.7 × 2 = 74.4. Round up to 75.
Thus, the area of the hipped roof, in our case, will be equal to 75 m2.
In the calculation process, various small elements are not subtracted from the total area, such as: skylights, ventilation ducts, chimneys, parapets or skylights. Since their area is small, they do not entail special financial costs. In addition, it is quite possible to make a calculation error.
Calculation of roofing and other materials
After the calculation of the gable roof has been carried out, and the total area has been calculated, you can begin to calculate the required footage of the roofing material. The opinion is erroneous that the area of the roof drawing and the area of the required material are the same. The bottom line is that all elements of the roofing material must be overlapped. In addition, each roofing material has its own technical indicators of the size of the overlap. Accordingly, the costs of materials increase significantly.
When calculating the required amount of roofing material for a multi-level roof, it is advisable to seek help from a computer program. It will make calculations faster and more reliable.
But you can do the calculation of the required material for a simple roof yourself. This does not entail any particular difficulties.
Let's give an example of calculating the amount of slate for our four-pitched roof, the area of which we calculated earlier.
To do this, we need to make a proportion:
X - 15%, where S is the roof area, X is a margin equal to 15%.
After X is calculated, the resulting number must be added to the area S. As a result, the area of the required amount of material will be obtained.
Thus, in our case, the proportion will look like this:
X = 15 x 75/100 = 11.25. round up to 11.5.
11.5 + 75 = 86.25 (m2) - the area of the required roofing material.

In addition, when calculating the required material, it should be remembered that waste will invariably remain, they may require up to 20% of the material. That is, again, a proportion should be drawn up, where X is now the flow rate. We add the resulting result to the area.
It remains only to calculate the number of roofing sheets. To do this, the resulting total area of the entire roof should be divided by the area of one roofing sheet.
When erecting a complex roof, you should take a stock of material not 15%, but not less than 20%.
The calculation of soft roofs is carried out according to the same formulas as the calculation of slate. Consumption depends on the type of roofing material and the technology of its installation. The areas of valleys and skates are counted and ordered separately, since they are measured not in square meters, but in linear meters.
The length of the roofing sheets, determined by the height of the slope, is calculated by the dimensions of the roof of the house. As a rule, metal tiles are produced in lengths up to 8 meters. In this case, the thickness of the sheets ranges from 0.2 to 0.4 cm. As a result, long metal sheets bend very strongly. This can complicate the transportation process, as the sheets may break on the road. Therefore, when ordering metal tiles, take into account the area of the roof, roofing sheets, choose the most suitable dimensions. Also, take into account the qualifications of the workers who will be involved in the installation of the roof. Thus, with a roof area of up to 150 m? it is recommended to purchase roofing sheets up to 2 m long with a roof area of up to 250 m? roofing sheets up to 4 m long are preferable, with a roof area over 250 m? acquire sheets over 6 meters long. Metal sheets over 6 meters long are difficult to lay, as they bend very strongly. Experienced roofers must be hired to install them.
When transporting long roofing sheets, the loading, transportation and storage of the material should be monitored.
Since the material consumption is high on complex roofs. It is preferable to purchase piece material. The piece is a soft roofing material such as flexible bitumen shingles. Thus, waste is minimized due to the small size of the elements. But with proper calculation and a responsible approach, the installation of the roof can be carried out in such a way that high costs can be avoided.
We draw your attention to the fact that soft roofs require the organization of continuous sheathing, as well as additional installation costs. At the same time, prices for these types of coatings are much higher.
Thus, the calculation of the hipped roof allows you to timely calculate the upcoming costs for the purchase of roofing material, insulation and waterproofing.
 How to make a boiler with your own hands from improvised means?
 How to make a crossbow: throwing an office battle!
 What to do if neighbors steal electricity What to do if electricity is stolen from a house