The table from the logs do it yourself drawings. The table from the log is a reliable century-old furniture for the garden. Tools for the manufacture of garden furniture
Gazebo Place relax and feasts. Acquisition of a street table from plastic is not the best option. Wooden products are always worthy and thoroughly. The best option is the table from Breus, talk about the simplest version and details of its creation.
Table of table.
Before starting it is important to relate the parameters of the arbor with the dimensions of the future furniture. It is reasonable to use the preliminary drawing, with the markup of all parts. It will be more convenient to have a three-dimensional image of all parts. Be sure to start with the drawing of the finished table with the application of the size of the main parts. Be sure to specify the thickness in the places of compounds.
Preparation of logs
To implement the idea, it will be necessary to make the calculation of the flow of Breign. We need to take into account legs and all additional supports. If the designer thought implies a simple style, then an unknown log is used. For more civilial options, grinding is required by any available ways, including an ax and a planer.In any case, the surface should be without bark and aligned. The boron can be removed by a bit and a hammer, or an ax. For table tops, you will be required not to be torn, but soaked along the birch. If you don't do it on your own, use the services of the sawmills or try to cut the chainsaw.

By eliminating complexity, you can omit the creation of longitudinal grooves for fasteners. This will reduce the time for the assembly and will retain force. If you adhere to this option, you need to sharpen the selected part in the places of the compank. The width of the aligned plane in places of compounds for reliability is made massive, not less than 4 cm.
The spins of the ends of the lower and upper birings is made at the same angle of 45 degrees, this option looks much more interesting, although you can leave a straight angle. The edges should not be injured, must be smooth and processed with a file.

Next, according to the drawing, the holes are made under the reinforcement, its parameters can be any, so take the remnants that you have. Select the drill according to the reinforcement and drill the holes in the birings clearly at right angles. The distances need to be measured accurately, it will simplify the assembly, since when you bleach the holes should match. At the edges, we remove all the roughness, seeking smooth grinding. First we work the plane, then the skin, starting from No. 4, moving to smaller grain.
Build table assembly
Prepared brica assemble in accordance with the drawing. We start from the bottom log / base. It establishes the valve, and all elements with drilled holes on each other are consistently.When all parts are laid, excess / protruding reinforcement sprinkle. To strengthen use glue. Therefore, the design is disassembled, and we collect anew without a reinforcement pin, thoroughly obscuring the joints with glue. After this stage, carefully do the metal pin of the reinforcement through the laid, cursed brices. This gives sustainability and prevents inner swing / chatting. To the top hole with a pin, fill the glue until the internal space is completely filling.

Top table
The most common method for the countertop is the imposition on the legs of the logs, painted along. The complexity consists only in surface processing. It is necessary to shoot perfectly: to walk by the Rubankom, then apply sandpaper. Surface quality depends on the food when eating. All ribs are processed with a file, sharp corners and faces should not be. The speed of execution of such a task is solved when using a grinding nozzle, then all roughness and non-blood are easily eliminated.The last stage remains - varnish coating. The surface should not have garbage and dust. Covered at least two times. You can work with a brush, tampon, roller. After the final drying, the table is ready.

There is a second version of the countertops - the use of chipboard. The sheet is cut proportionately to the construction and attached to the basis of self-drawing. However, a similar surface without an additional support can be a meter per meter. The large area of \u200b\u200bchipboard will deform and "walk". If you are still more convenient to use this material, then on the long table you will have to make an additional overlap / support from the bar.
Here you can use a raw material, the only condition is a flat bar. The amount is selected in accordance with the product dimensions. By the way, strengthening from bars for the table top will give stiffness and in general will make the table more stable.
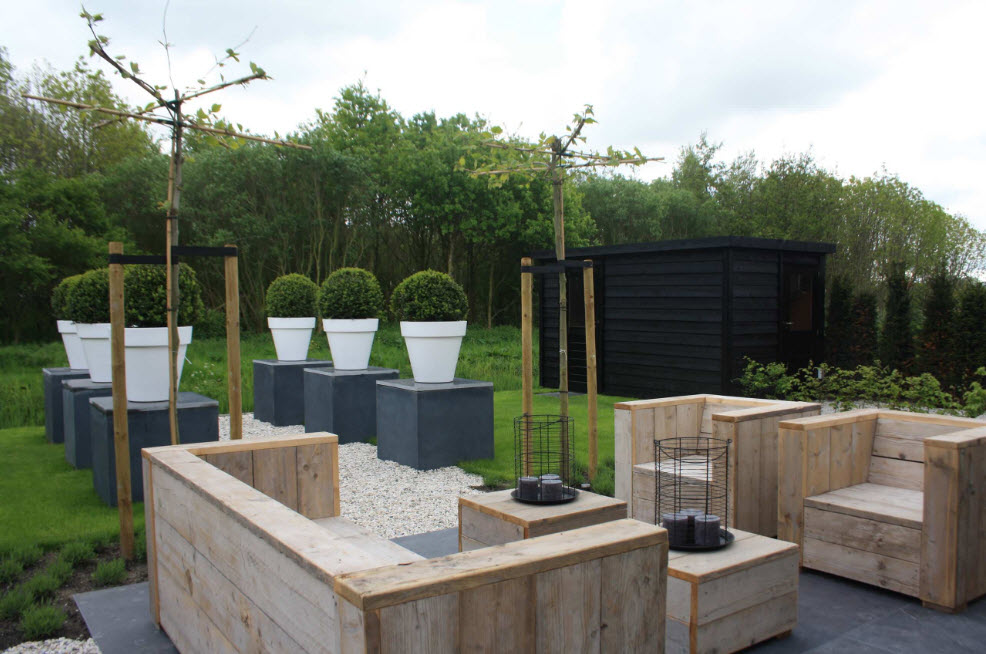
Each owner of a private house of urban or country type, a country or household plot is sooner or later facing the need to improve its territory. And we are not talking about breaking the beds and flower beds, planting trees and shrubs, but the arrangement of comfortable, but at the same time practical areas of recreation, preparation and consumption of food in the fresh air. It is difficult to imagine a landscaped site without garden furniture, that's just buying such not everyone affordable, and it is much more pleasant to sit on the shop, made with your own hands or dining in the fresh air at the table, whose execution did not cost you a penny. In this publication, we collected many options for garden furniture, which can be made with your own hands. Possessing only undergraduate materials, a small set of tools and a great desire to make your site comfortable, comfortable and aesthetic.

In order for a garden furniture to appear on your site, capable of becoming not only a reliable object of exterior, but also the reason for the pride of the owners and the envy of the neighbors and guests, it is not so much a lot - a throwing material, perfection, a little fantasy, labor and effort. In this article, you will find examples of manufacturing garden furniture from wood, building pallets, consumer goods, used.


Choose material for the execution of country furniture
In order to make the furniture made with their own hands, it was organically fit into the existing image of a country area or a private court, it is necessary to accommodate not only to the manufacturing process itself, but also the choice of material. The most versatile and at the same time a material is a natural tree in terms of processing. The advantage of wood is that it is able to fit perfectly into any stylistic direction in the design of the landscape. And it is possible to achieve this by the variety of execution options - from massive furniture made of logs to light and elegant products woven from the vine or rods.


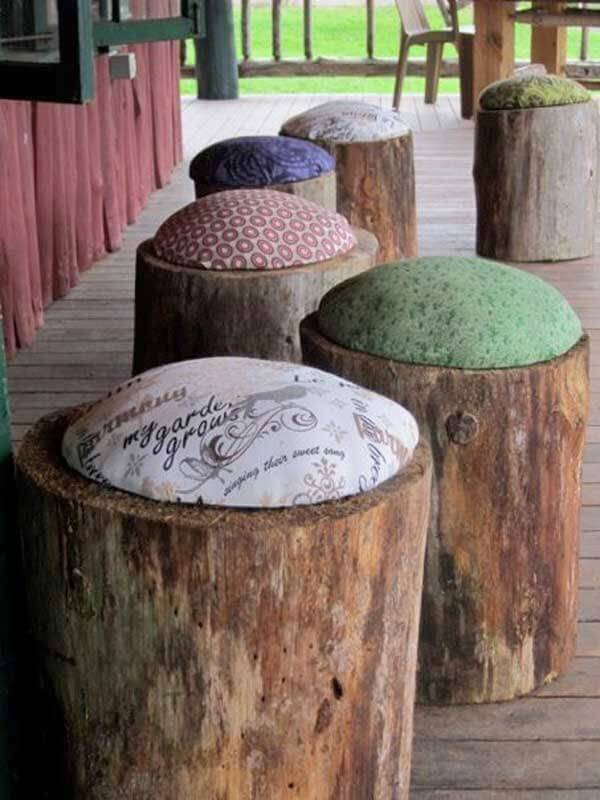
The advantage of wood to create furnishings with their own hands is that it has many manifestations. You can create a piece of furniture with minimal processing of material for the shortest possible time. For example, ordinary hemps can be turned into stools or small stand tables. It is enough just to take care that the surface of new objects of garden furniture is perfectly obstened and has become safe for use.

You can create garden furniture from branches and twigs ...

Or logs and a large bar ...

Shop and benches - an integral attribute of dacha life
Even a very small back courtyard needs garden furniture on which you can sit down to enjoy the fresh air, see the sunset or meet the dawn. Well, at the site of a large family or in the courtyard of hospitable hosts, where companies are going to, and it is necessary to take into account the possibility of seating several people.


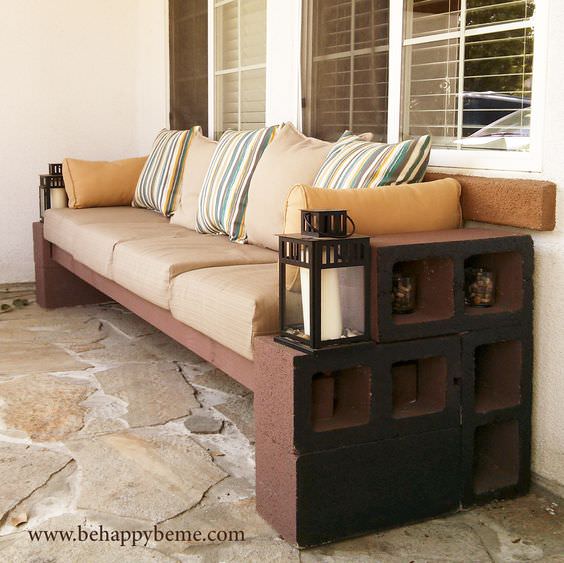
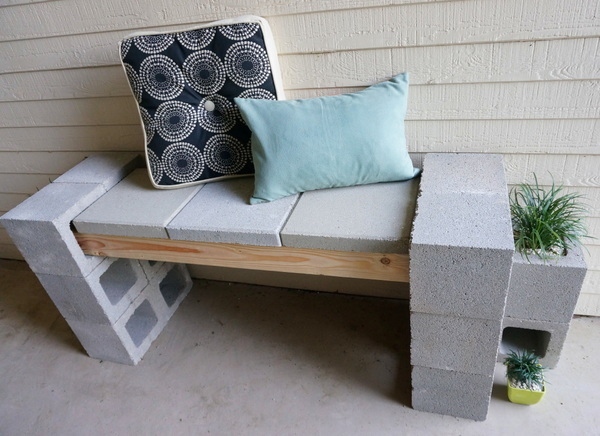
One of the easiest ways to create benches and benches is the use of a wooden bar and a slag block with square holes. Bench or shop is going as a constructor, you don't even need to use any tool or fastening solution, construction glue. The advantage of such structures is not only in the simplicity of installation, but also in portability - you can easily disassemble your piece of garden furniture and transfer to another place or folded its details in the barn to the new warm season.
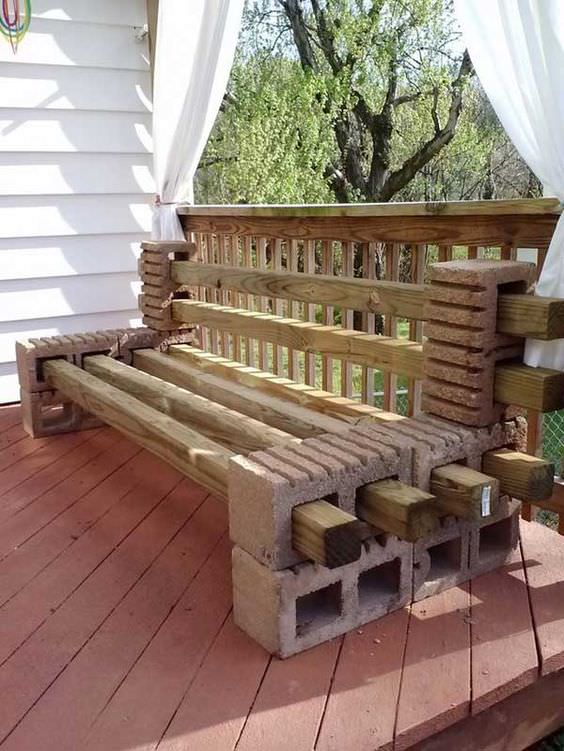
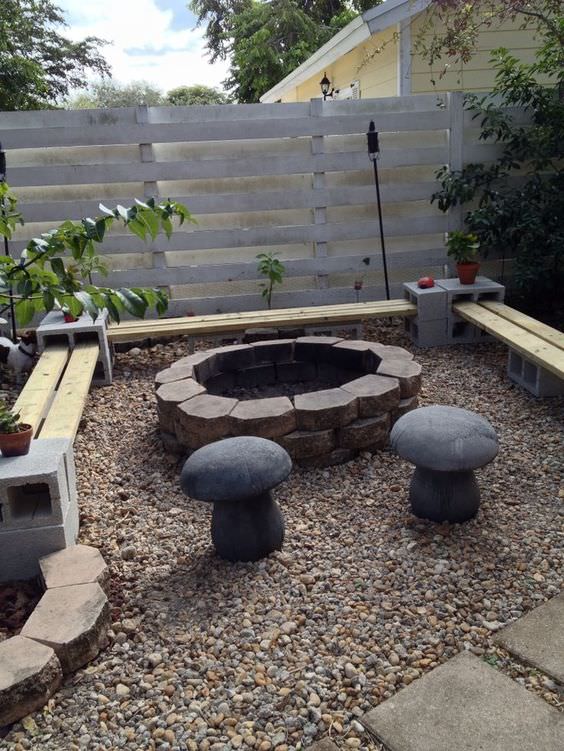

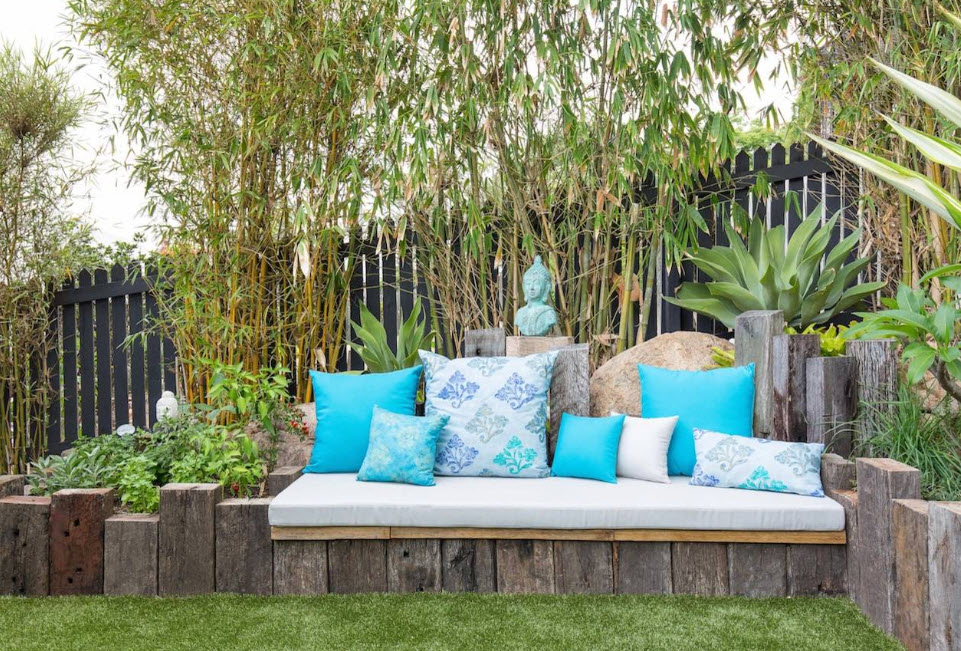
If we put soft seats and sofa pillows on the bench from the slag block and bar, then the usual solid garden shop turns into a comfortable, comfortable sofa.


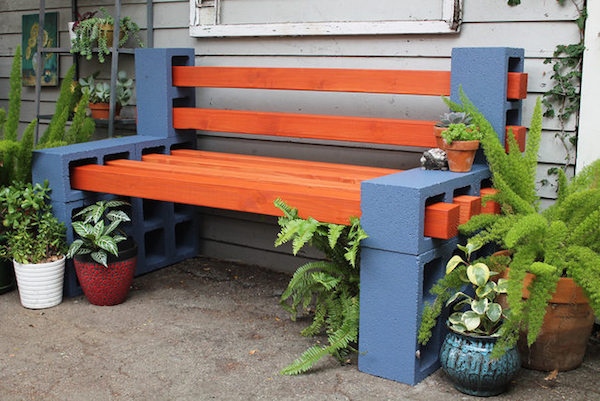
Combining the materials of the execution of garden furniture, you can increase strength and improve the appearance of products. For example, together with a tree in one or another modification, metal structures can be used, for example, parts of beds (backs, legs).

Outdoor dining area
In the fresh air, any dish seems tastier. Each owner of even a tiny back courtyard tries to create a situation in which it would be possible to arrange the scenes in the open air, even if we are talking about short breakfasts. Depending on the needs and size of your family, you can equip both a small zone for short meals and install a spacious dining table for receiving guests outdoors. It is noteworthy that both options can be carried out on their own.


One of the easiest, but at the same time practical ways to organize a dining group in the fresh air - the manufacture of a table, together with benches. The model presented in the photo will require the minimum amount of material, but it will be quite spacious. The only drawback of such a dining group is if you need to increase the number of people sitting at the table, then it will be possible to do it only on 2 places (you will need chairs or stools).

It is possible to equip a dining area or a segment for short scenes (breakfasts and middays) by type of bar counter. It is easy to make the help of building blocks and a wooden bar or boards. Only and stools to such a countertop need to pick up a bar with an appropriate height.

Recreation area on the country or household plot
Rest in the fresh air is associated with different things. For someone - these are sitting with friends and neighbors, for others - reading on a slightly swaying swing, other and at all sun beds are necessary for air baths. For all options for active and not very rest, you can make it easily furniture with your own hands, and also from the submitted means with minimal costs.


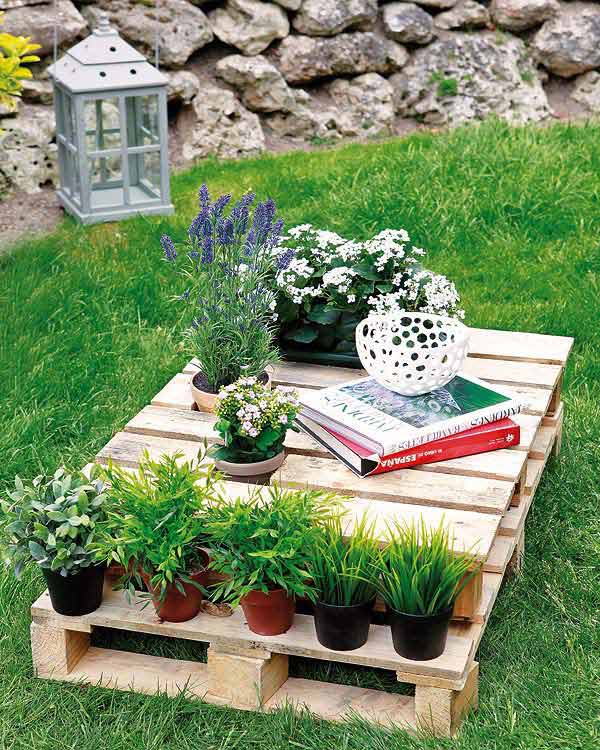
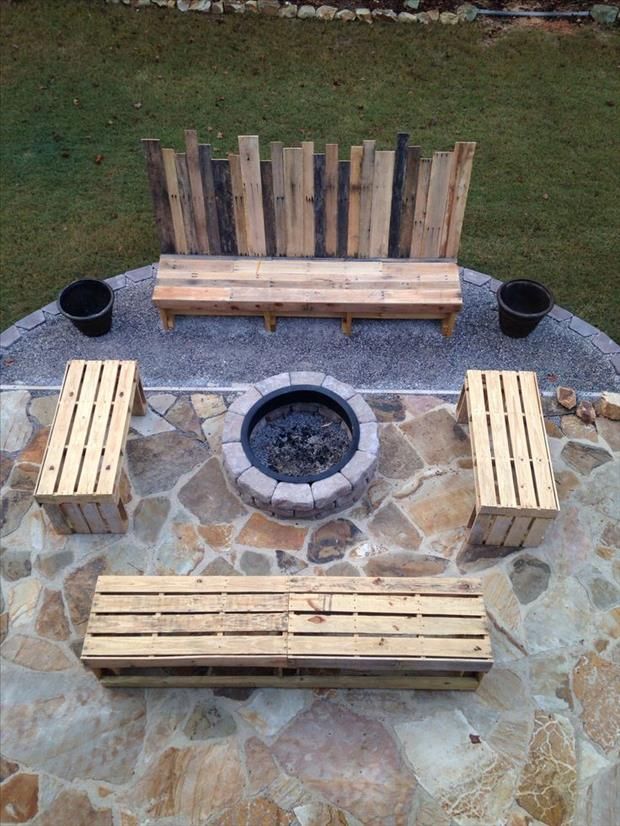
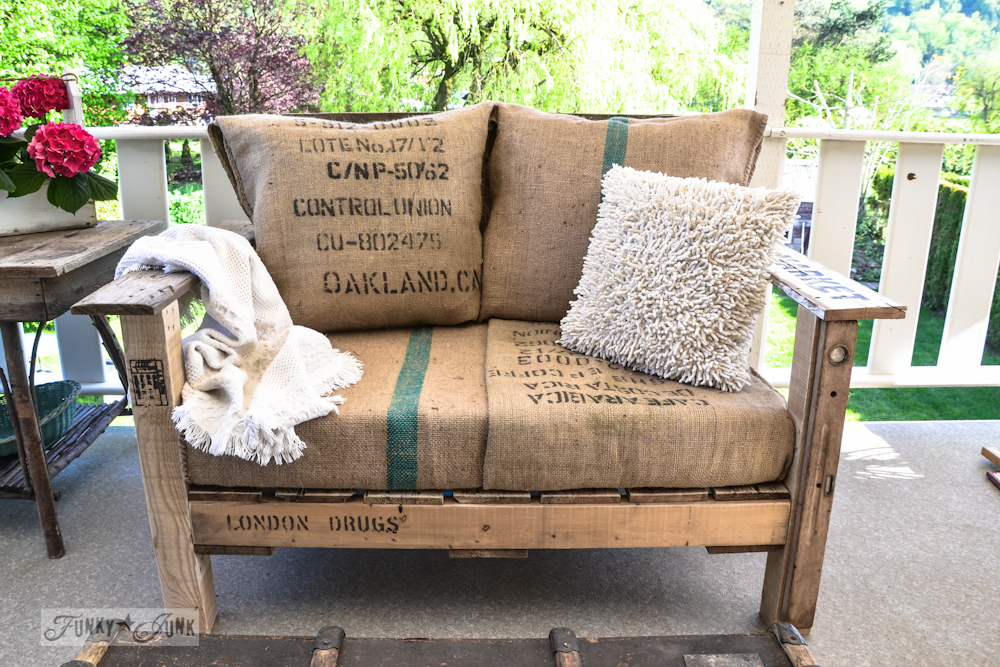
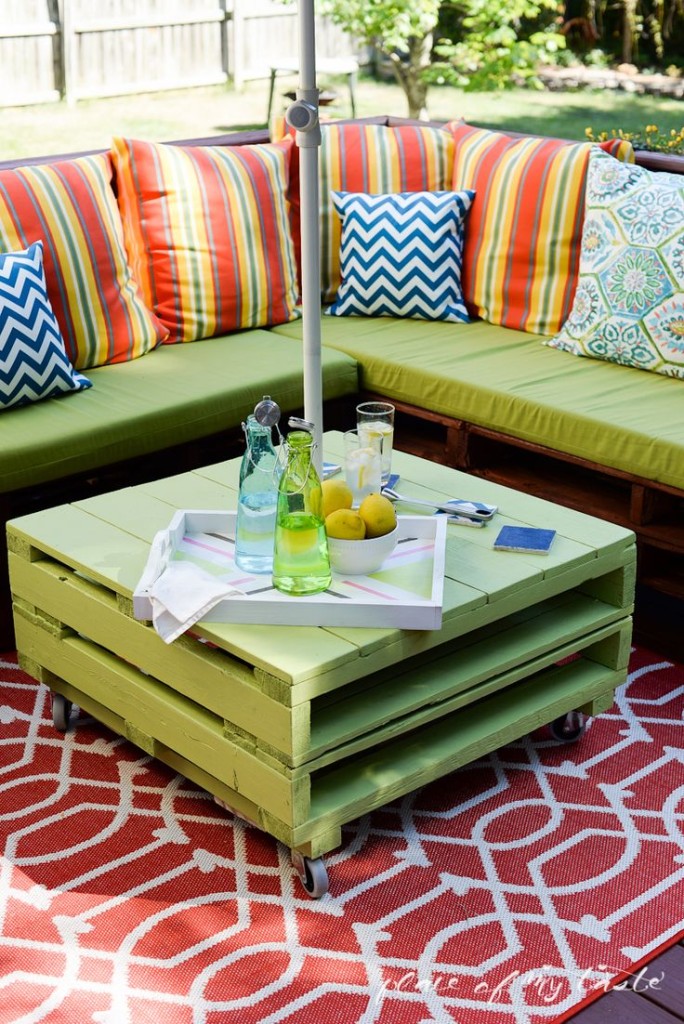
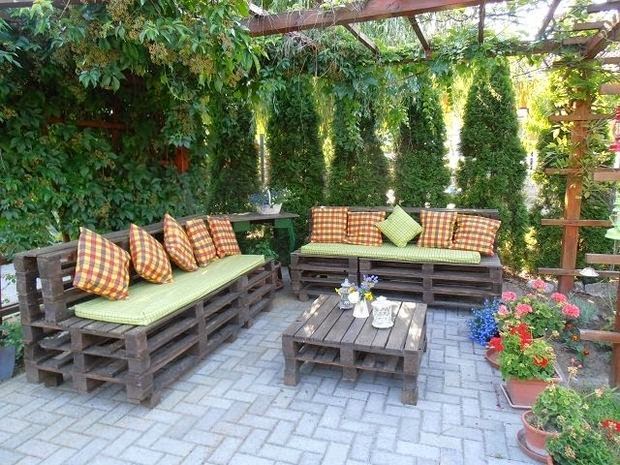
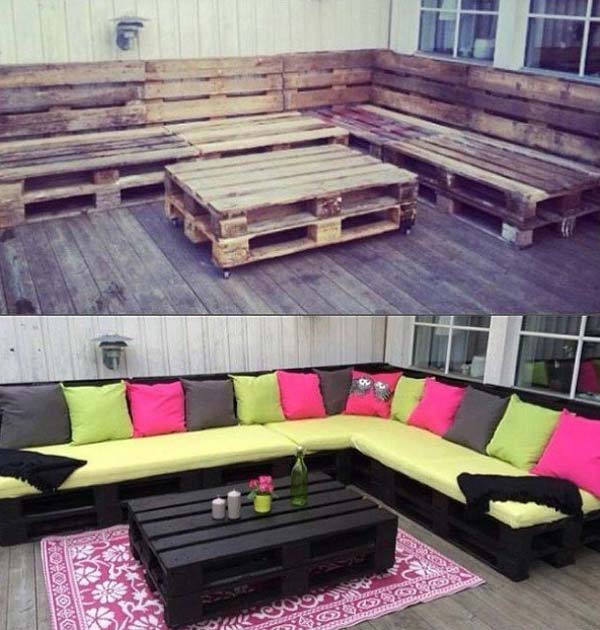
One of the most common ways to create garden furniture for recreation area is the use of building pallets or pallets. The advantage of such an assembly is its simplicity - wooden blocks are already formed in terms of future chairs and sofas. Well, even the owner of the cottage or any other land plot will be able to build a coffee table from the pallets that did not keep the hammer in his hands. Even building glue can be used to fasten the elements.

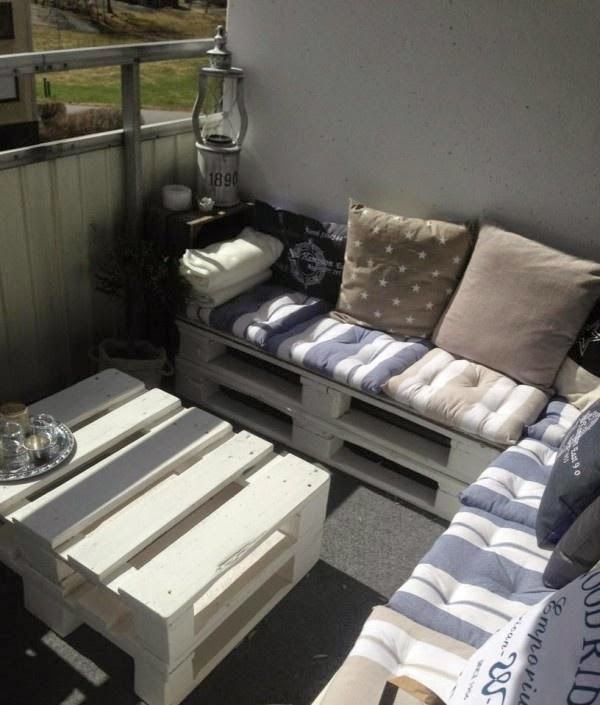

Another advantage of the use of construction flights for the manufacture of garden furniture is that it is possible to get the material at a very low price or at all for free, because we are talking about products that used. That's just it will be necessary to take care of the careful cleansing of surfaces, alignment and a small polishing, impregnating material with antiseptics against rotting.


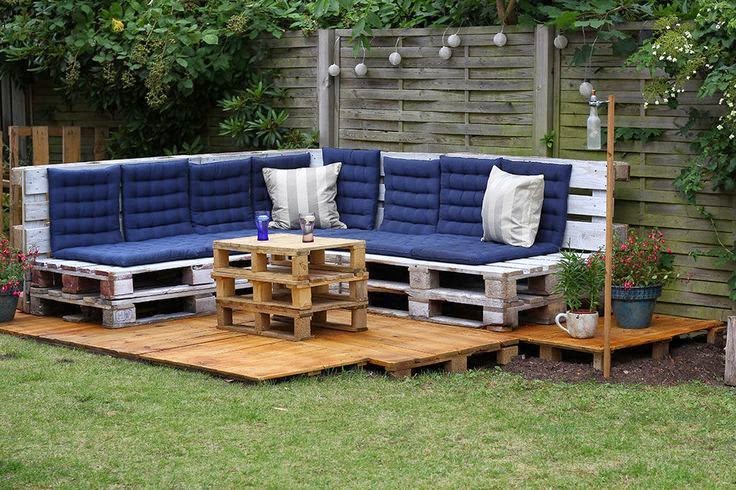
From building pallets, you can create whole compositions for the surrounding area in the fresh air. It can be a spacious corner complex, compiled by the type of sofa, comfortable chairs and a coffee table. It is enough to put soft pillows and seats in the chairs and sofas to arrange a living room atmosphere right on the summer or household plot ...


With the help of wooden pallets, you can equip the zone not only for recreation, but also sleep. Summer bed or just a layer of building Palettes with a mattress - an excellent opportunity to create a bedroom in the fresh air - take care only about the canopy above the sleeping place to protect against the sun.


From old pallets it is easy to build comfortable swings. You can bind them on the ropes or chains to the roof of the canopy and arbors, on the terrace or simply under a high splashing tree with thick branches.


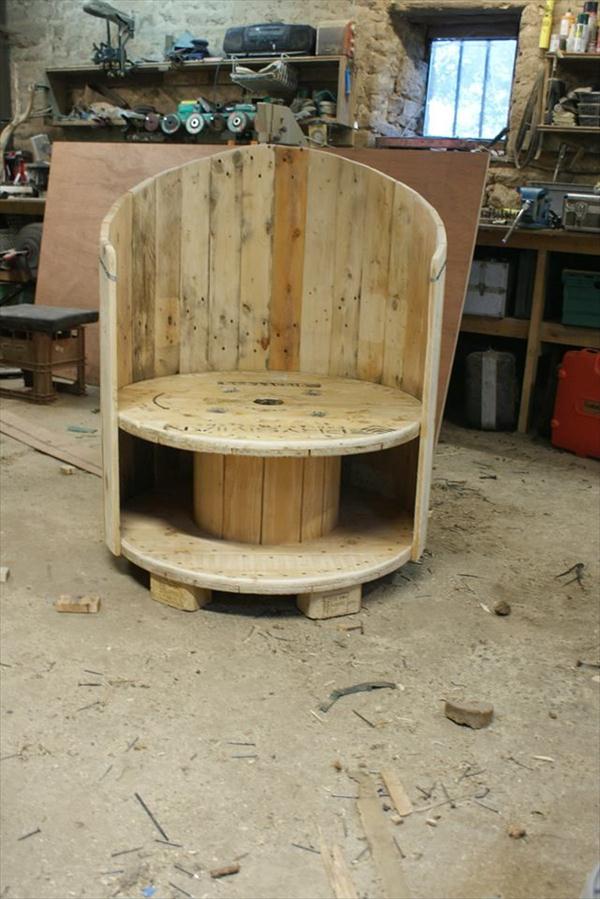
A little less popular, but at the same time a practical way to arrange the country's garden furniture - the use of building wooden coils. Of them you can make the chair ...
Dachini and owners of private houses do not know about how great to enjoy the singing of birds, the rigging of crickets or just a conversation with relatives and friends behind a beautiful table in a cozy arbor in the fresh air. And what could be more peaceful and dangerous than a romantic dinner with a loved one or just a cup of tea alone in this atmosphere?! ..
However, unfortunately, not all owners of such potentially pacifying arbors and relax sites can boast a convenient and durable table, which harmoniously complements the necessary situation: someone simply does not have a desire and time to engage in his purchase, and someone is limited in money, and someone is limited in money, and someone is limited in money, and someone is limited in money Therefore, the acquisition of a good table is not even thinking. But there is always a way out!
Did you have logs from the arbor? Then the question is resolved! Make a table of logs with your own hands.
So, we prepare.
Required materials and tools.
- Log, 30 cm in diameter. By the way, if it is an oak, the table from it will serve you of the order of the century.
- The impregnation for the tree (you can also use the veil) - is needed for the preservation of the tree and prevent it uploading it.
- Saw with an ax.
- Chisel and hammer.
- Chainsaw.
- Varnish for wood processing (in the completion of work).
The process of making a table from logs with their own hands.
- First of all, you should think about what exactly you want to see in your home, plot or gazebo. It is better to draw a sketch of the future table.
- Due to the fact that for the sawing of the logs along you, only your own strength is enough, find the panel and agree on their breakdown there.
- Start the processing of logs. To do this, he needs to cut down (preferably use chainsaw) logs into pieces of necessary devices.
- Next, clean the tree from the crust with the help of chisels or ax and hammer. This will prevent rotting and will preserve its beautiful appearance. However, it is possible to refrain from work alone with a hammer, otherwise leave a large number of unnecessary scubons on the tree, over which it will still be pretty "sweat", "killing" to this a lot of time.
- If necessary, handle log logs.
- Take the log on the sawing panel.
- It's time to assemble the table.
Build table from logs.
Wood assembly technology from logs with their own hands is quite simple:
- put the logs parallel to each other in a pre-prepared place for the table;
- drink the semicircular grooves in the center of the top of each log in such a way that in this deepening could lie log;
- connect the design of nails or screws;
- make the top of the tabletop from logs, sawed on the sawmill, flat side, putting them in already ready-made excuses;
- treat and impregnate the finished table.
Here is an article about how to make a bench from the logs with your own hands.
Table from logs do it yourself video
There is no way to do without garden furniture at the cottage. Be sure to be benches and a table for tea drinking and placement of guests.

Of course, the furniture is intended for each garden. Someone is suitable economical plastic option, and for others you need a set of furniture more expensive.
We offer furniture from a wooden material that you can do in the country yourself, with your own hands.

Garden furniture from logs do it yourself photo
If you pick up in the forest or near the section of the cut Wooden trunks, you can get unusual benches (see photo).

It is not difficult to do furniture from logs, while there are no costs for materials, such structures will be durable.

Collect the log in half, and you will have two benches that will be easier by weight and perfectly fit into the garden design.

We use hemp
If you did not find a log, use hemp from them.
Arrange the furniture site as on the photographic viewer. To accommodate such furniture, it is not necessary to have a large territory. Select a comfortable corner and arrange chairs-hemp and table in it.

Old boards for garden furniture
Old boards should not be thrown away.
It turns out the original garden furniture as in the photo.
Garden furniture with your own hands: 5 interesting ideas
A little crooked? Not trouble, this is unusual.

Such furniture is just suitable for accommodation in the country area and will look harmoniously.

It can be painted paint so that the material lasts longer.
The implementation of this idea is the simplicity of design.

Garden furniture from pallets do it yourself, photo


Furniture from branches and corping
This embodiment of furniture from branches and coriation is exclusive.
To create a design, no special costs and materials are required, it is worth only to show fantasy and skill. Whether such furniture is convenient, you can certainly argue, but it is no doubt distinguished by originality and unusual. Things and squigs, of course, need to search in the forest stitch.

We suggest considering the frequency of bizarre compositions.

Cable coil for table manufacture
It would seem that the coil from the cable is no longer needed, however, such an item will become an excellent option as furniture for the garden.
The main thing is to show creativity! It will turn out an unusual table that can be decorate with decorative elements or just paint waterproof paint.

We wish good luck and creative flight! Let the unusual dacha furniture, with their own hands, will complement your site of originality and exclusivity!

Make garden furniture with your own hands and earn
- We make a set of benches
- How to make chairs
- How to make a table and chairs from hemp
- Advice
You ask:
"Who can interest the topic, how to make garden furniture with your own hands?"
Probably, you do not know the story about the teacher of labor.
He was able to twist a fortune for three years.
The theme of all his classes was garden furniture with their own hands. He taught her children to do, and then sold their creations.
So why don't you repeat the success of the employer? Total then, you need to learn how to make furniture for the garden with your own hands, and then teach a couple more acquaintances and sell your products. You know how highly appreciated manual work.
The question remains:
"How to master the manufacture of garden furniture with your own hands?"
Since the work teacher already known to us is now resting on the bugs, we decided to teach you this ourselves.
- how to make a country set with benches
- how to make a cottage headset with chairs
- what instruments and materials for this will be required
- how to make a table and chairs from hemp, if you need homemade furniture for giving, but do not want to buy it and spend a lot of strength on her manufacture
- tips, thanks to which the manufacture of country furniture will be done without errors and easy
And what is the most pleasant, all this you can do, even if you have no drawings of furniture for giving.
True, it would be easier with them, but nothing terrible.
We immediately note that here it is tested only about how wooden country's furniture is done with their own hands, because it is such a product that uses the greatest demand.
Furniture for giving with their own hands - We make a set of benches with benches
What tools you need
- roulette, pencil and square
- wood strut 60-120 mm wide
- drill and drill
- electro saw and knife
- hammer and nails
- stacker and joinery glue
What materials you need
- cedar wood boards with dimensions 60x120 2.4 meters long - 22 pieces.
- cedar boards with dimensions 60x180 and 2.4 meters long - 2 pcs.
- stainless bolts with a length of 5 cm.
- threaded bolts for the entire length with a diameter of 0.8 cm. 3.5 cm long - 18 pcs.
- threaded bolts for the entire length with a diameter of 0.8 cm. and 14 cm long - 18 pcs.
- washers with a diameter of 0.8 cm. - 64 pcs.
- sealant and paint at will
The number of materials was calculated from the fact that the length of the table and benches will be 2.4 meters. If you want furniture of other sizes, then count the amount of material yourself.
We make countertop
The tabletop will be the length of equal length of the cedar board, and the width is the total width of all boards.
Shill the boards with joinery glue.
And when the glue dries, install five supports: two for each edge, where there will be legs, and one in the middle.
Plugs secure through the top of the table with screws.
Making legs
Since our legs will crossed out, you need to determine the length of the legs so that in the end the table had the necessary and convenient height.
To do this, it would be nice to make drawings of country furniture.
The legs will touch in the middle, so in the center of each gently and accurately cut the grooves. It will help you knife.
After that, make holes in the legs: where they will touch with each other and, where they will be attached to the supports.
With the help of bolts and washers fix the legs to the tabletop.
To the table not loosened and was more stable ...
Install the stiffness beams.
One end is attached to the legs into the place where they come into contact, and the second is to the central beam. For fastening, again use bolts.
We make benches
Benches are made on the same principle as the table. Only boards will be less (the width of the benches should be less than the width of the table) and the legs will be less than the length.
Furniture for the cottage "DIY" - we make a headset with chairs
Here you will definitely need to first prepare drawings of garden furniture.
Because if the table can be made according to the principle described above, then with chairs without a drawing will be complicated.
How to make the table you already know, so immediately proceed to the description, how to make chairs.
- To do this, make two side rails with a size of 53x13x86 cm and attach them to screws to the rear lower rail size 28x11x59 cm.
Garden furniture for cottages made with your own hands - Photo of successful homemade
At the resulting frame attach the base.
- Fold front legs with a size of 53x11x52 cm from the outside of the side of the side.
- And so that the back of the chair turns out a little tilt, the upper part of the rear legs should be slightly eager.
To do this, cut the upper part at an angle of 60-65 degrees. After that, also fasten them to side slats.
- Upper rear ray size 28x11x59 cm Crepping to the upper ends of the rear legs.
- We mark the center on the bottom and top of the rear rail and attach to it the board for the back size of 20x8x90 cm.
After that, the same boards are attached to the edges so that the distance between all the backing boards was the same.
- Make support for armrests 53x7x16.5 cm sizes and 53x13x71 cm armrests.
- Supports secure on the side of the front legs, and put the armrests from above.
The other end of the armrest is mounted on the side of the back legs.
And so that the furniture for the cottage or garden served as long as possible, polish it, paint (although if you like natural color, you can skip this item) and check out.
How to make a table and chairs from hemp
If a tree ceased to bear fruit, and you cut it, and now the penetrate spoils the appearance of the garden, do not hurry to harde it and throw a trunk of a tree - these are excellent materials for country furniture.
Find a few unnecessary boards or buy them.
Crerate them with glue. And then screw to the hemp.
The trunk will become a seating material. Cut it into a few logs of the desired height. And the logs are inserted into the ground.
That's ready for your garden furniture.
And to:
- do not knead the dirt after the rain, sprinkle gravel in this area
- it was possible to spend times on the street, even when it rains, in the middle of the table, make a hole where you will install a beach umbrella
- from your finished furniture, resin was not distinguished, mix the water with acetone (in proportion 1 part of acetone to 4 parts of the water) or acetone with caustic soda (in proportion 1 part of soda on 5 parts of acetone) and treat all logs and stump.
And finally ...
Tips to help you during the manufacture of country furniture
- If you are used to mount the seasons, you can make parallel holes for them with the help of stop segments.
Then, when you drill the second hole, the wanking, inserted in the first, grips tightly to the bar.
- If you legend the same bar to the workpiece horizontally, then you can drill holes, between which there should be a straight angle.
- If you need to remove a chamfer from the edges of round blanks, then do it like this: Fasten the two guide bar on the support plate in front of the end grinding circle.
- If you want the seat to be under the tilt towards the back of the back, then wedge linings on top of the side rail.
The linings must be such a thickness so that the front edge becomes above about 2 centimeters.
- Hats of all bolts must be recessed in wood.
So you do not scratch and not injure when you enjoy furniture. And all surfaces need to polish well in order not to catch the city.
- So that the wood does not rot, and the fungus did not form on it, treat it with an antiseptic, and then apply several layers of olifa.
- To the legs, in the part where they come into contact with the ground, bring the pieces of tin or duralumin. Then they will not rot because of moisture.
That's all. With the information received here, you will definitely be able to collect furniture for giving with your own hands without any problems.


If you like to relax in the country, do it to arrange it. In order not to buy the harsh, expensive sets of mass production, make the table of logs with their own hands. What could be better than natural materials and solid structures? Their massive view causes confidence and calm.
Of course, working with such a serious material, like logs, under the strength of strong men. But sometimes you can afford a small compromise - to order a breakdown of thick trunks from professionals who have the necessary experience and tools.
If you have completed the construction of a cozy arbor, then you have a logs. Boldly try for a new case - creating a table.
Materials and tools
Prepare everything you need to work:

- Prepare logs. Move the amount of working material with your plans. If the logs are missing, you will have to:
- limit to easier option - make a table on leg logs;
- do not give up ideas, but to purchase additional material.
- Clean the logs from the crust with the help of hammer and chisel.
- Process the purified material with a rubank. In the lower parts of the trunks, remove a small layer of wood, making the contact surface to smooth. Thus, the logs can be put on one another. The width of the cut must be at least 4-5 cm. The use of another method of laying is "in the bowl" - requires more work. In each upper log, the deepening of the semicircular shape is cut. Then the top log is laid on the lower. And in the first and in the second cases, you will need an additional fixation with screws, wrenches or reinforcement.

- Remove the base details of the neat shape of the ends. For this, the edges of the lower and top logs are 45 degrees. Continue this bend on the trunks to the center, making the intermediate elements in short. The shortest will turn out the central log.
- Be sure to treat the grinding machine sharp edges - it is necessary to make elements of the future table safe.
- Go to the preparation of holes for reinforcement. In the log, which will be located downstairs, is enough to drill only half of the thickness. In each log, located inside, you need to make several through holes at a distance of 30-40 cm. In the connecting logs, the holes must be coincided, and the drilling angle is 90 degrees. Make a job need a drill, the diameter of which is the same as the reinforcement you use.
- With the help of the plane, correct the irregularities, rough places. Carefully passion the surface of the details of the sandpaper. Start processing with abrasive skurt of large grain, for example, four, then use smaller.
Build the base of the table of logs
- Make the construction of the design reliable and durable will help fittings and glue. Insert the metal parts into the locking logs. Rods must accurately enter holes. If you look slightly, cut the same on the end of the metal fastening. Disassemble the design for the final connection.
- Fill the bottom hole with glue, then insert the reinforcement, on top of the end the following on the drawing of the log (we advise on the drawing and all the logs used, respectively, numbered).
- On the logs installed at the top (bars are in them), fill the holes with glue to the very edges.
Leave the resulting design. Glue should dry.
Assembly and installation of table top
As an option of the countertops, you can use the particle size of the size and form you want. It will need to attach screws to the top logs. This method is suitable for tables with surface area less than 100 cm. It significantly reduces the time spent, simplifies the process of work. But such a table will look much easier, and something heavy is not worth it for him.
If the area of \u200b\u200bthe table top is more than a square meter, it can be made from the LISP sheet. But in this case, install the material on the basis of additional bars (necessarily even). They are used as auxiliary material and do not need to be processed. The bars are nailed to the top logs of large nails or on the self-tapping screw. Moreover, the number of bars depends on the size of the table top. Chipboard, in turn, attached to this framework.
The organization of table tops from thick neat bars is more costly, but it can make the table natural and respectable. In addition, these boards will become an additional strengthening of a massive base of logs. Brusses for countertops must be dry and smooth. Additional processing should be carried out after installation.
- Correct the size and shape of the boards, bringing the parameters of the desired countertops. The material thickness should be at least 20 mm. Width can be arbitrary. Work with the application of a planer and emery paper or grinding machine.
- Attach the tabletop details to the legs in the contact places using glue and large screws.
Table ready. The last step is final processing.
- Remove the sharp and protruding file with a file or grinding. Align the surface of the table top, polish.
- After removing the chips and wood dust, cover the table by a veneer or other composition, which is able to strengthen the protective properties of wood.
- After drying, once again polish the surface, and proceed to the lacquer coating of the table. One layer of varnish will be quite enough.
Popular is the manufacture of tabletops of such tables from the saws collapsed in half. The complexity of this option is that to cut large trunks clearly in half a task not from the lungs. This is exactly the case when the appeal to a specialist is the most reasonable solution. After cutting on a round part of the logs, a slice is made or the connection "in the bowl" is applied. Additionally, the countertop is fixed to the legs with the help of self-tapping and glue. Next uses the finish finish script similar to the previous one.
The new table will be a favorite place of collecting a family and will unite you for many years. And also ... Having received such useful skills, now you will be able to make shop benches.
Rarely who purchases the logs initially in order to make the table. Usually, the material remains from other construction, such as a bath or arbor. Therefore, the cottage table from the log is always original, because its size and design are dictated by the number and view of the remaining raw materials, and on each site it looks different.
Make a table of logs, both simple and rounded, with your own hands is quite simple.
But, before starting work, you need to make sure that there is everything you need at hand. That's what you need:
- morilka, impregnation for wood;
- plane;
- epoxy adhesive;
- drill;
- ax;
- a hammer;
- nails and selflessness;
- sandpaper, the largest;
- armature, Isside rods, about 15-20 cm long;
- saw, both simple and chainsaw;
- bit;
- brushes;
- varnish to cover wooden surfaces.
Morilka, or any impregnation is necessary, because their use will raise from the bug wood, larvae, fungus and, in the future, will prevent the posting.

The preparatory process, as a result of which the log table appears on the site, includes two main stages:
- the very first thing is to clearly represent the future design and calculate whether it is enough to embody the building material, for which you will need to make a drawing;
- the second is the processing of logs, they cut them into pieces of the desired length and shape, cleaning from the crust, if necessary, and mandatory impregnation from all sides with a special means.
Installation
The assembly of the table, both from the rounded log, and from the usual, primarily depends on which furniture was conceived to do. But, in any case, there are several basic moments, the same, both for complex design designs and for completely elementary simple tables.
- The drilling of the holes for reinforcing rods is in a log that serves as the basis for future furniture, that is, in the lowest, the holes should not be through. There will be enough depth half of the thickness of the part, but in all the following elements they must be through.
- All holes must be 30 cm from each other, this is the most optimal distance that will ensure the strength of the entire design.
- All drilled holes must be tightly filled with epoxy glue, so that the rods do not hang out.
- Fastening the details of the parts must be well aligned, and are not too shredded, ideally within 5-6 cm, it will prevent possible cracks in the further operation of furniture.
How to make your table?
A hand-made log desk will serve for a very long time and will become a real reason to sit on a warm summer evening in nature, drink tea, talk or on the contrary, enjoy silence and peace.
The type of logs from which it can be made is not important, but it is much easier to design from the otilization than from wood spins covered with a crust. However, this is a matter of taste and individual vision of its own garden interior, although, made in a single style and from the same material of an ensemble from the bath, arbors, a dog booth, a well, houses and a garden table look very impressive.

Making such a table of logs is very simple. All work will be as follows:
- Decide on the size, based on the available materials and, taking into account the place where the furniture will be.
- Make the most detailed drawing with an indication of the dimensions, for which you need to produce all the necessary measurements. It will very simplify the work itself.
- Choose logs for legs, make segments with a specific length project, cut the angles with a slope on those parts on which they are provided, give the spilila chosen decorative shape and work out the veil.
Important: At this stage, when processing parts, it is necessary to numbered them, the numbering of each log should be in the drawing. This approach will significantly simplify and speed up the assembly.
- Split along the logs intended for the table top and the supporting plank, as to be soaked in any means, and the details of the future surface are also chopping carefully.
- On all the details, cut off and align the places of future mounts. For convenience, they can be labeled with a marker directly on the material.
- Prepare reinforcement rods or threaded rods. Each leg will have two metal rods, in length slightly exceeding the height of the structure itself.
- Drill holes for reinforcement mounts, the diameter of which should not be significantly wider than the rods themselves, and the lower parts cannot be drilled through.
- In the lower groove pour glue, insert the rods and leave everything to sleep. After the glue dries, you need to try to shake the reinforcement to make sure the fasteners density. Further, it should be gradually to strive the remaining details, giving drying glue.
- While the design dries and is going to prepare everything you need for the table top.
- The parts defined under the surface can be nails, you can fix the same on the reinforcement, if its decent piece remains on top. When choosing a way to install the "face" of the table with the help of self-tapping screws or nails, the protruding prucks must be cut off.
- You can additionally make the parts of the countertops below the rails.
- At the end, the finished private table must be covered with varnish.
Special attention is deserved countertop. Its appearance depends solely from the fancy of the master and can be completely any, not only in form, but also in content. For example, you can use fragments of ceramic tiles, and lay out a mosaic. Battle tiles are sold for the singer of penny in any large construction store. However, except for the tile, any materials can be used.
For example, perform a decorative panel from everything that comes at hand, and close the resulting picture with glass, be sure to consolidate it in the junction with a tree glue.

Or lay out a picture of dry leaves, closed on top of a glass panel for tabletops. There are no restrictions in the design of the facial part of the table, except, perhaps, practical feasibility and free time for creativity.
In how to make the table with your own hands there is nothing difficult, for this you will need only your own desire and quite a bit of patience and effort.
Of course, garden furniture can be performed personally not only from the logs, but also from all of all that falls at hand. But, made of the materials remaining after construction, the table will solve the problem of utilization of cropping and, with the correct elaboration of all parts, will serve not one decade, while inpatient is constantly in the garden.
 Why you can not give icons
 Is it possible to give icons as a gift: Signs, the opinion of the Church
 A year ago left her husband, and now I do not know what to do