Is it possible to lay tiles on wood. Tips on how to lay tiles on wood floors. If the floor rotted and only lags remained
Ceramic tiles are an excellent material for covering floors, especially in rooms with high humidity or with a high probability of liquid or other substances spilling onto the floor. Typical examples are bathroom, toilet, hallway, kitchen. Do not refuse to floor tiles in living quarters if the floor is equipped with a heating system.
But what about the owners of private housing, in which all the floors initially - wooden? A similar question may arise among the owners of apartments in old buildings, where the plank covering is mounted on logs. Is it possible to install tiles on a wooden floor?
You can immediately calm down those who are worried - this is a completely feasible operation that does not require a complete dismantling of the coating to the ground or concrete base, followed by pouring a thick concrete screed. True, you will have to work hard, since the success of such a reworking of the coating will mainly depend on the quality and strength of the wooden base.
Taking on the laying of tiles, if there is at least any, even the smallest, suspicions about the instability of the wooden base is the height of recklessness. This is explained simply:
- Wood is a material that is quite flexible and tends to take on its original configuration after deformation. But what is "forgivable" to a wooden floor (slight deflection, springing, etc.), totally unacceptable for ceramics. Each individual tile is very rigid, not bending. In the case of a "play" of the floor, it may simply crack.
- Another case is if, for example, small-format ceramic tiles. Cement-containing tile adhesive also does not like dynamic bending loads. It will certainly go with small cracks, begin to exfoliate, and the tile, even retaining its integrity, will simply move away from the base.
At the same time, one should not forget that the load on the coating will increase significantly - in addition to everything else, ceramic tiles themselves, mortars, and other possible structural elements of the created multi-layer "pie" of the floor have considerable weight. Thus, the wooden base must be guaranteed to be static. This is exactly what needs to be achieved at the first stage of work.
It is clear that the first step is always a thorough visual inspection, the application of effort on the most problematic areas of the wooden floor in order to identify its possible vibrations and sources of squeaks. If there are any, then there should be no questions at all - the coating must be thoroughly rebuilt and repaired, and not only in places of instability, since the reinforcement of the floor in one place does not guarantee that it will not appear in another. It is necessary to deal with the cause and eliminate it at the root.
Sometimes, after dismantling the floor, a "terrible" picture appears
Moreover, experienced craftsmen always advise, in all cases of laying tiles on a wooden base, to carry out a complete search. If a ceramic coating is planned, then one must think that it is for the long term, and not for a year or two. Where is the guarantee that the hidden floor with wooden flooring is a defect or the process of wood decomposition that has begun, which today does not manifest itself in any way, will not be revealed literally in a month or even a year, when the tile covering has already been completely laid? To carry out the repair, you will have to remove all the tiles, dismantle the wooden base - and all due to the fact that due diligence was not shown during the preparation. Isn't it better to be completely, 100% sure of the reliability and stability of the wooden floor before you start laying the tiles?
Let such a prospect not be particularly frightening - in comparison with the complete dismantling of the wooden floor and pouring a new concrete screed instead of it, this procedure is much simpler, requires much less labor and financial investments.
So, the usual scheme of a wooden floor is a plank covering mounted on logs. The logs themselves can be installed on a concrete base. Another option is that they are a double timber cladding system, with a subfloor and finish floor and a space between them that can be filled with thermal insulation material. With any type of floor revision, you will have to remove the boardwalk completely in order to open the joists for inspection, repair and leveling.
- If the condition of any of the logs causes even the slightest concern - there are cracks or areas with signs of wood decomposition, it must be unconditionally replaced.
- In the case when the distance between adjacent logs exceeds 500 mm, it will be necessary to install additional beams, otherwise even the thickest floorboard can bend in this place.
- Be sure to align the lag horizontally. If they are securely embedded, and there is no way to change the height of the supports, this can be achieved tweaking using a planer, or, conversely, building it up with a wooden plank.
- Of course, if there is a rough floor, it should be given a certain repair - replace dilapidated or cracked boards, eliminate possible distortions, squeaks, etc. When it is ready, both it and the logs are covered with a layer of dense waterproofing film.
- If it is already possible to get to the log and the subfloor, it is worth taking the opportunity and treating all the details with antiseptic and water-repellent compounds. You should not write off your unwillingness to carry out this procedure on the fact that such processing was carried out earlier, during the initial laying of the floor - the compositions are inexpensive, the process itself will not take much time, but the durability of the structure will certainly increase.
- Literally every board of the removed flooring is checked for integrity, the presence of weak areas, cracks, hammered and bent unnecessary nails, etc. All boards with significant defects should be disposed of and replaced with fresh ones.
- An important action that should not be forgotten is cleaning the boards of the finished floor from old paint layers in case the subsequent laying of tiles is planned directly on them. Creating a solid base for tiles involves working with a cleaned wood structure.
This cleaning can be done in several ways:
So, paint or varnish can be removed in advance by scraping or using abrasive materials - grinding and polishing machines, sandpaper or special attachments for a grinder or an electric drill.
Sometimes a chemical method of cleaning is used - washing off the paint with the help of solvents. However, this is not the best option, because organic solvents are actively absorbed into the wood, disrupting its natural qualities and for a long time reminding itself of an unpleasant, pungent odor.
The thermal method is widely used - using a building hair dryer or even a blowtorch. Under the influence of high temperatures, the paintwork either burns out, or melts to such a state that it is easy to remove it with an ordinary scraper (spatula).
- Before proceeding with the reverse installation of the floorboards, it is possible to think over additional floor insulation. Between the logs, you can fill in expanded clay, lay mineral wool mats or expanded polystyrene plates. Additional thermal insulation will never hurt anyone.
- The reverse planking of the boards on the joists is not carried out as a "solid", but leaving a gap of 3–5 mm between them is necessary so that the wooden floor under the tiles has the ability to "breathe" and to compensate for possible linear vibrations of the material. Another option is to drill through holes in the boards in any order. Be sure to leave a gap near the walls around the entire perimeter of the room, about 10 mm. Any remaining gaps can be slightly covered with adhesive tape or polyurethane foam.
- After the final installation of the floorboards on the logs using self-tapping screws, a thorough quality control of the coating is carried out again. If no shortcomings have been identified, you can proceed to preparing the base for laying ceramic tiles.
Several ways to prepare the substrate for laying tiles
So, we have received a repaired solid plank foundation. What should be done next to fully adapt it to the installation of ceramic tiles?
1. The tiles are supposed to be laid directly on top boards
- First, you need to create a thin but stable and reliable waterproofing layer. For this, the wooden floor is thickly treated with hot linseed oil, but this method is quite outdated, and also very unsafe, so it is better to use a latex impregnating compound. It is applied with a thick wide brush to the floorboards, which are immediately covered with a fine-mesh painting fiberglass mesh without waiting for the composition to dry.
- When the latex compound is completely dry, for reliability, the mesh should be fixed to the floor surface with galvanized self-tapping screws with wide heads.
- As a result, you will get a durable waterproofing coating, which, in addition, has certain reinforcing properties.
- Now it is tedious to achieve good adhesion of the tile adhesive to the resulting substrate. This can be done in this way. A solution is prepared, consisting of 2 parts large-fraction sand, 2 parts of silicate glue (often referred to as "liquid glass"), and one part of water. After thorough mixing, the resulting composition is evenly applied in a thin layer over the entire surface of the floor.
After complete drying, you will get a rough monolithic surface, completely ready for laying ceramic tiles.
Video: example of laying tiles directly on a plank floor
2. It is planned to pour a thin screed
- If you read the opinion of many experienced craftsmen, then some of them are categorically against laying tiles directly on a plank base. Their suggestion is to pour a small light screed over it.
- The initial process - impregnation of the floorboards with a waterproofing compound - does not change.
- Further, along the perimeter, a damper tape should be glued to prevent deformation and destruction of the screed near the walls.
- A system of beacons is installed, based on the screed thickness of about 30 mm. An additional thin metal or fiberglass mesh can be placed between the beacons.
- For the screed, you can use a standard base cement-sand mortar with fine seeded sand (1: 3), but it is better to use special dry building mixtures that contain fiberglass micro-reinforcement and plasticizers. Such a screed both matures faster and is more durable for such conditions. In addition, nothing prevents the use of the self-leveling compound pouring technology.
- After the screed has hardened and fully matured, it is treated with a primer, after which it can be considered ready for laying ceramic tiles.
3. The floorboards will be covered with plywood (chipboard, OSB)
If there is no desire to dissolve dirt by pouring a screed, the room does not belong to the category of high humidity, but it has a rather intense dynamic load, then the plank base can be covered with plywood sheets 10 mm thick. The thickness may be greater, but one should not forget that this is an extra load on the joists and floorboards. By the way, here you can save money on a floorboard - it is enough to lay it at intervals even up to 150-200 mm.
The work is carried out in following sequence:
- The plank base, after carrying out antiseptic impregnation, is covered with a waterproofing material. In the described case, this role can be played by waxed, waxed or bitumen-impregnated construction paper, or even an ordinary polyethylene film with a thickness of at least 200 microns.
- Plywood sheets are laid out in a ragged way, so that between them there is necessarily an expansion gap of 5 to 10 mm. A similar gap is left along the perimeter of the room along the walls.
- The next step is to create a waterproofing reinforcing layer and prepare the surface for tiling. Here, in behold exactly as described above for a plank floor: latex impregnation → painting net → sand-silicate treatment.
After that, you can proceed directly to laying the tiles.
4. Wooden floor closes gypsum fiber sheets (GVL)
This method is somewhat similar to the one described above (with plywood), but it also has its own characteristic features:
- As a rule, GVL are equipped with a locking part for mating adjacent sheets. In these places, they are connected with a special adhesive and self-tapping screws. The use of self-tapping screws around the entire perimeter of the GVL and in its center is not required.
- If the strength of the wooden base of the floor allows, and the operational features of the room require special reliability of the coating, GVL can be laid in two layers. In this case, the second must be oriented perpendicular to the first. The overlap of joints is not allowed.
An approximate diagram of the resulting "pie" with two layers of GVL
- The surface of the gypsum fiber board after treatment with a primer does not need any additional manipulations - it is ready for laying ceramic tiles.
The very process of laying tiles on a prepared wooden floor surface in principle, no different from conventional technology, which is discussed in detail. The only thing to pay attention to is the tile adhesive brand. It is best to choose a composition "for difficult surfaces", and for some adhesive mixtures, the instructions for use directly indicate the possibility of their use for laying tiles on a wooden base. Such a tile installation will be more reliable.
Tsugunov Anton Valerievich
Reading time: 5 minutes
The vast majority of apartments, especially those built during the Soviet period, were equipped with wooden floors. But for rooms with high operational load or high humidity - such as corridors, kitchens, bathrooms, showers, tile floors are more suitable. Ceramic tiles (tiles) are superior to wood in terms of durability and practicality. It is much easier to keep it perfectly clean. But will the tiles lay on the wood floor if you don't feel like taking it apart? Or is there no way to do this?
What are the problems of laying tiles on wood?
The installation of tiled floors requires a perfectly flat, fixed base. The tree, on the other hand, is sensitive to changes in the microclimate of the room: it swells with excessive humidity, dries and shrinks when used at high temperatures. Such a base is not suitable for tiles: it will crack or start to "walk". When using small tiles, cracks will go along the seams between the floor elements.
In turn, wood is also uncomfortable under the ceramic layer. Wooden parts, deprived of natural ventilation, will deteriorate much faster under the influence of dampness and microorganisms.
But modern materials and appropriate technologies make it possible to create an intermediate layer that allows laying tiles on a wooden floor.
Revision of the old coating
Before choosing the method of preparing the base for laying the tiles, it is necessary to conduct a thorough inspection. The sequence of future works will largely depend on the condition of the old floors.
Under no circumstances should it be installed on newly erected wooden floors. They should be given at least two to three years to shrink. So in new buildings, tiles cannot be laid on a tree. You have to either wait or completely dismantle the floors and construct a fundamentally different base, for example, a concrete screed.
It should be noted that the tile covering is laid for a very long time. Therefore, you need to be absolutely sure that the elements of the old coating will last no less. It makes no sense to start fussing with the tiles, if soon it will have to be opened due to rotten base elements.
Professionals insist on a complete re-assembly of old floors to find and replace all defective elements.
It is imperative to check the condition and distance between them. It should not exceed 50 cm, otherwise the base may not withstand the weight of tiles, glue and other materials.
Strong boards that have no visible defects can be used, but first you must free them from the old coating: paint or varnish. This can be done in different ways:
- Mechanical - clean the coating with an abrasive tool: sandpaper, grinder, grinder with a special nozzle.
- Thermal - heat up the paint with a building hair dryer. It will swell and can be easily removed with a spatula. Some craftsmen manage to use an ordinary blowtorch for these purposes, but one must remember about the possibility of fire.
- Chemical - remove varnish or paint using various reagents. But the tree, saturated with them, will emit unpleasant odors for a long time, so this method is used very rarely.
Preparation of the base
So, you should carefully disassemble the wooden floors, assess the condition of the log. Replace defective ones, add additional logs if necessary, securely fix and align them.
All elements of the wooden floor structure must be treated with an antiseptic. After it dries, you can update or replace the insulation. This can be a layer of expanded clay, rock wool slabs or another type of thermal insulation. When laying, the recommendations for the use of the selected material must be followed.
It is necessary to leave a space of 5 cm between the subfloor boards and the insulation to create natural ventilation.
When assembling the flooring back, you should not fill the boards closely, but leave a gap of several millimeters between them so that the tree can breathe. A gap of 10 cm is left between the floor and the walls. Then it can be sealed with polyurethane foam.
The course of further work depends on the chosen method of preparing the base. The main ones are a lightweight screed device, or polyurethane adhesives.
- A layer of mortar is applied to the floor surface, consisting of sand (2 parts), water glass (2 parts) and water. All components must be thoroughly mixed.
The tiles are fixed with two-component polyurethane adhesive. It retains its ductility after hardening, so that not only will it ensure a reliable fixing of the tiles, but also compensate for small vibrations of parts of the subfloor.
Lightweight screed
The idea behind this method is to create a solid and level base that is not connected to walls and wood floors. This floating structure will ensure the integrity of the tile flooring. The optimum thickness of the screed is 30 mm: a smaller one will not give sufficient strength to the base, a larger one will significantly increase the weight of the floor.
- A waterproofing layer is created. It can be rolled material: glassine, bitumen paper or even thick polyethylene. Waterproofing mastics or heated drying oil are often used. In this case, fiberglass painting mesh is used.
- A damper tape is glued along the perimeter of the room between the floor and the wall.
- A thin metal mesh is attached to the waterproofing layer with self-tapping screws.
- A screed with a height of 30 mm is poured.
You can use a regular solution of cement and sand, but it is better to use self-leveling mixtures: they dry much faster, and it is more convenient to work with them.
- After hardening, the screed is primed, and then the tiles are laid in the same way as on an ordinary concrete base.
Plywood base
Sheets of plywood are used to create a flat and solid base for the tiles. It is better to cut them into 4 parts. Laying is carried out observing the following recommendations:
- After impregnating the base with an antiseptic and laying the waterproofing layer, the plywood is fixed in a checkerboard pattern.
- An expansion gap of 5 mm is left between the individual elements. In the future, it can be sealed with a sealant or polyurethane foam.
Plywood is also susceptible to thermal expansion, which is why a compensating gap between individual sheets is needed. And also a gap of 10 mm wide is left around the entire perimeter of the room.
- The resulting surface is processed with a grinder along, across and obliquely. Then it is primed.
- A waterproofing layer is formed from latex impregnation, painting net and liquid glass solution.
- The tiles are fixed with polyurethane glue.
Plywood can be replaced with slabs of moisture resistant plasterboard or gypsum fiber. The technology will not be very different, but it is worth using components designed specifically for these materials.
Laying tiles
On wooden floors, tiles are laid in the same way as on a concrete base:
- Laying begins from the middle of the room or from the far corner opposite the entrance.
- For lightweight screed or gypsum boards, it is recommended to use cement-based adhesive mortars, on plywood or boards - two-component polyurethane glue.
Thanks to the assortment of colors, textures, patterns and other external characteristics, it can compete with almost any coating, but still the main quality of the tile is its durability, as well as good water-repellent and fire-resistant qualities.
Masonry features
It is stereotypically believed that tiles are most often used for kitchen or bathroom cladding. But more and more craftsmen are resorting to its use in living and working premises, and not just in the kitchen. One of the most difficult questions for a craftsman when working with tiles to replace the old floor is: is it safe to install ceramic tiles on a wooden floor and how effective is it?
Most tile manufacturers unanimously declare that their products should not be placed on wood, since a plank base does not guarantee rigidity and strength for the entire flooring structure.
If a sufficiently movable wooden floor begins to rot or the concrete screed on top of it begins to crack when the boards begin to sag, then the tile will also collapse and cracks form in the floor.
But to the delight of masters who are looking for new ways and are not afraid to experiment, today such techniques are becoming known in which laying tiles on a wooden floor becomes possible. Of course, the quality of the foundation preparation plays the most important role in this technique.
Preparing a wooden floor for tiles
At the very beginning of the work on laying a new floor on top of the old one, an important point is to correct those shortcomings and defects that the previous coating has. If we talk about tiles, then the key is the acquisition of a high level of strength and rigidity by a wooden base.

The preparation of the wooden floor is divided into stages:
- First, you need to completely sort out the entire wooden floor, remove boards that have flaws, cracks or rot. It is important to make sure that the frequency of installation of the joists corresponds to their bearing capacity, because together with the tiles, the weight of the floor can increase several times.
- After the floor is disassembled and sorted out, it is worth making sure that it is even. For this, a level is used to measure the horizontal lag. It is important for this check to leave a gap of 10 millimeters between the walls and the subfloor. These gaps will need to be insulated with polyurethane foam. In order to give resistance to the floor, expanded clay is used, which, moreover, will become a good sound insulator and increase the energy efficiency of the floor.
- Next, a wooden base is laid. These can be boards, if they are in good condition, as well as plywood, the thickness of which is at least 12 millimeters. This plywood is perfect as a base for a tiled floor and will support its weight.
- Lags and the rest of the rough floor must be treated with chemical impregnations that protect them from fungus and decay.
- Boards, as well as plywood, must be fixed, while providing for the presence of ventilation due to the gaps between them up to half a centimeter wide.
- On top of the rough base, waterproofing made of polyethylene film, parchment or bitumen is laid.
Installation of the base under the tiles

There are three ways to install the base under the tiles, each of which has its own technology:
- In the first case, a conventional screed is used, which is distinguished by its subtlety and lightness. To do this, use a metal mesh attached to the subfloor with self-tapping screws using beacons. After that, a cement screed is poured, the thickness of which is about 3 millimeters. It is also permissible to use a self-leveling screed.
- In the second case, a base made of polyurethane glue on a liquid glass base is used. It also forms good moisture insulation after drying. Such joints are suitable for laying tiles on top of a wooden floor, and withstand a lot of weight.
- In the third case, a cement-bonded particle board, moisture-resistant gypsum board or gypsum fiber are installed on the waterproofing. The third of these materials is more recommended because it has greater strength and ductility, as well as insulating properties. The flooring is attached to the rough flooring using self-tapping screws, while the seams of gypsum fiber and floor elements are avoided. The base seams are glued with special compounds. In some cases, you can use 2 layers of gypsum fiber. Further, the sheets or slabs are covered with a soil base until completely dry. This option is good when tiles are laid on a wooden floor in a wooden house.
Laying steps
After preparing the base for the tiles, you need to make sure that it is horizontal, which is checked using a building level. After that, you can put the tiles.
The installation steps are as follows:
- preparation;
- markup;
- glue;
- directly styling;
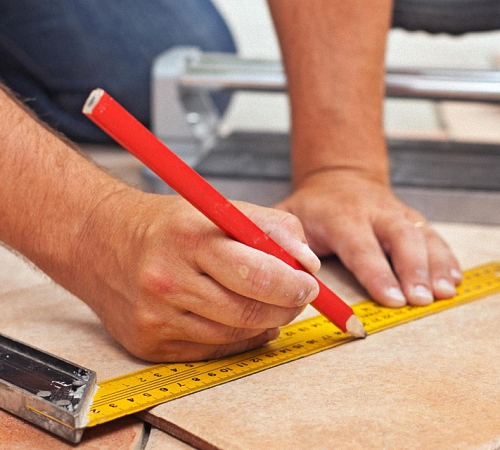
At the preparation stage, you need to correctly calculate the amount of material that will be used. Usually, up to 10% of the stock of tile area is taken into account, compared to the area of the entire room. The main thing is that at this stage it does not turn out that the purchased ceramic tiles are wall, and not floor: these two types of tiles are similar to each other, but the wall tiles are fragile and will not be suitable for flooring. It also has no anti-slip effect.
After that, the tiles are laid out over the entire area of the room in order to externally assess the appearance of the future floor, as well as to identify places for holes for pipes and other communications.
It is necessary to check if the height of the new floor allows opening the doors. Otherwise, you will have to change the height of the door, outweigh it on higher hinges before installing the tiles on the wooden floor.
It is important to get rid of the air in the tile; for this, it is soaked in water for 15 minutes. If the tile does not withstand this procedure and stains appear on it, then you just need to clean the lower surface of the tile with a damp brush.
Layout and preparation of glue
The markup should be done so that you have to use as few cut tiles as possible, placing them near the walls. When laying diagonally, you still have to cut a lot of tiles, and along the wall, laying is carried out, starting from the side of the room opposite to the entrance.
If the design solution assumes the presence of a special pattern, then you need to act in accordance with this plan, taking into account the need for communications, the optimal floor height and other preparatory nuances.
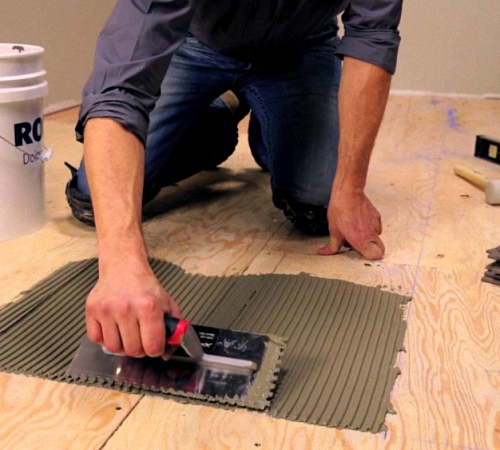
This is followed by the preparation of the glue. Tiles are laid on a wooden floor using a special cement glue. To prepare it, use the purchased dry powder, ordinary water in an amount that depends on the instructions, as well as a certain amount of plasticizers.
Since such mixtures usually have a short drying period (no more than 4 hours), the glue should be prepared in small portions and used immediately. For good styling and high-quality glue consistency, it is best to mix it with a construction mixer.
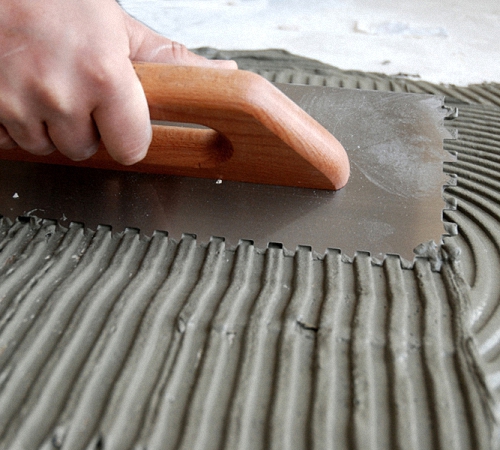
Apply the adhesive in even stripes using a notched trowel. Start applying in one of the corners, in the center of the room. For each tile size, it is worth choosing separate sizes of the trowel and its teeth. In this case, the teeth should have a value that is 30-40 times less than the width of the tile.
The glue dries in a short time (up to 15 minutes), so it should be applied on about one square meter of the area, after which the tiles are immediately applied.
Laying on a wooden floor

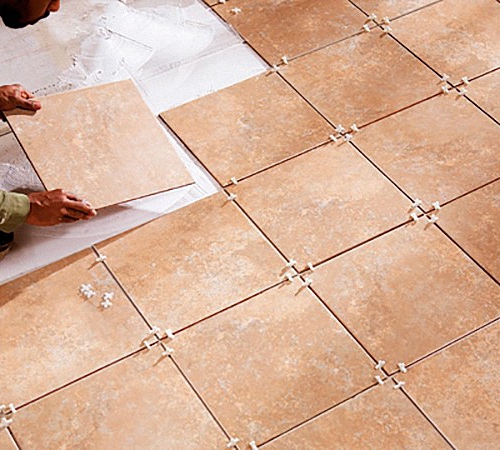
When laying tiles on a wooden floor, you need to press it against the glue using a rubber hammer and tighten the adhesion with light blows. Each section of the processed surface edges must be covered with tiles, after which the next square meter or area of the room is processed.
First, whole pieces of tiles are laid on the wooden floor, and only after that they begin to fill the free cells of the floor near the walls. The required tiles are cut with a special tile cutter.
After installation, the floor is cleaned with a rag, removing the remnants of the glue. Drying is expected for two days, after which suture joints are sealed. They are rubbed over with joints, which give the floor a more aesthetic appearance.
In order to apply the joint correctly, it must be applied with a rubber trowel in diagonal movements. All seams must be filled, after which the remains of the fugue are removed. After that, after half an hour, the fugue dries up and the floor must be wiped with a damp cloth, and after another hour - with flannel. This completes the tiled floor over the wood.
Thus, an absolutely identical to the usual tile, laid on a concrete screed, coating is obtained. It has sufficient strength if no mistakes were made when processing logs, plywood and boards. Treated wood will last long enough as a base under a tiled floor. Moreover, it will also provide good thermal insulation.
Thanks to the use of expanded clay and special compounds, impregnation of the wooden floor, it improves the quality of the tile coating, getting rid of its own shortcomings. This makes even the simplest floor a good base for laying floor tiles on wood.
Ceramic tiles are the best option for flooring. It is preferable to lay the tiles on a concrete base. However, if the floor in the room is made of wood, it can also be tiled. We will consider how to put tiles on a wooden floor further.
Is it possible to put tiles on a wooden floor: advantages and disadvantages
The only advantage of laying tiles on wood flooring is that there is no need for additional leveling of the floor before starting installation work. That is, there is no need to equip an additional screed and level the flooring.
However, this process has many disadvantages. First of all, the tile is notable for its instability to deformation processes on the floor, under their influence it can crack. The tree, in turn, increases in size at high humidity, and decreases at low temperatures. These linear movements can negatively affect the general condition of the floor after laying the tiles.

In addition, let us highlight several more factors that indicate the inexpediency of installing tiles on a wooden flooring:
- wood has a warm structure, and the tiles are cold, it is unwise to lay cold ceramic tiles on warm wood flooring;
- after laying the tiles on the tree, oxygen does not flow to it and the material begins to rot and decay;
- the service life of tiles and wood is not the same, the wood will last less than the tile, thereby reducing its service life;
- in the process of affecting the tile with linear movements, it begins to split;
- the wooden floor does not have static, which is so necessary during the installation of tiles.
Installing tiles on a wooden base indoors is often necessary if there is high humidity and the need for constant cleaning of the floor. This is true for such kitchens or bathrooms.
The main rule of high-quality laying of tiles on a wooden floor is to create a durable and practically immovable flooring. Before starting work, you should evaluate the individual characteristics of the room and choose the most optimal tile gluing technology. The quality of the resulting coating directly depends on the correct choice of this technology.

How to lay tile on wood floor
A wooden floor is a multi-layer sandwich made from lumber. There are several floor options that can be tiled:
- exclusively lagged flooring, on which the floor covering has been dismantled;
- covering the floor with plywood with moisture resistant characteristics or chipboard sheets, with or without logs;
- a wooden floor, on which there are practically no defects;
- wood flooring in need of renovation.
The type and further steps for laying the tiles depend on the condition of the floor on which the repair work is being carried out. The installation of tiles on a surface made of wood on each of the floors is carried out according to the same scheme, however, the order of preparatory work for all floor options differs among themselves.
As a result, after the preparatory work, you should get a flat and perfectly flat surface on which you can lay ceramic tiles.
If moisture-resistant plywood is laid on the logs on the floor, then it is necessary to initially equip a waterproofing layer on it, then a screed with additional reinforcement should be laid. After the screed has dried, the floor is covered with moisture-resistant glue and ceramic tiles are laid on it.
A double waterproofing is initially installed on the boardwalk installed on logs. Next, you should mount moisture-resistant plywood and a layer of polyurethane glue on the flooring. After that, tiles are laid on the floor.
These options described above are relevant for floor slabs. In the event that the floor is equipped on the first floor, then the procedure changes somewhat.
After the foundation slabs, a boardwalk is laid on the floor and a two-layer waterproofing is mandatory. After that, a cement screed is set up, covered with tile glue and directly by the tile itself.
It is possible to cover the floor with insulation, waterproofing, OSB, a sideboard, and then with glue and tiles.
How to lay floor tiles on a wooden floor
When studying the question of what to put on the wooden floor under the tiles, one should be guided by the individual characteristics of the room in which the repair work is being carried out.
The simplest and most technologically correct method of preparing a floor for tiling is leveling it. With its help, it is possible to form a stable rough coating, for the manufacture of which plywood with moisture-resistant characteristics or finishing materials of similar composition are used. In order to level the floor using the dry method, the following materials are used:
- there are ready-made sets of an adjustable floor, on which there are screw or plastic supports that allow the installation of a plywood sheet very quickly;
- making a lag system on a strong wooden flooring, followed by installation of board materials on it;
- installation of another plywood layer, on the existing one;
- fixing the material in the form of OSB using self-tapping screws on the already leveled flooring.
The dry preparation of the flooring for tile installation is completed by the installation of chipboard, plywood or similar materials. These materials have minimal linear movement, therefore, they reduce the risk of deformation of the tile during its operation.
To fix the tiles on such a flooring, a two-component polyurethane-based adhesive is used, which has a certain elasticity.
Before starting fixing ceramic products, plywood must be sanded at the seams. To seal the resulting joints, a sealant or glue is used, and a primer impregnation for wood is used for surface treatment.
Among the advantages of using this method of preparing a wooden floor include:
- the possibility of increasing the insulating properties by laying such heat-insulating materials as polystyrene, mineral wool or expanded clay;
- the presence of a minimum load on a wooden surface that does not have strength, such as a reinforced concrete base;
- high speed of production of a perfectly even coating, there are no technological breaks in the process of work, for example, for the drying of the screed.

However, the disadvantage of dry leveling is a decrease in the height of the ceiling in the room, the presence of a difference between the wall and the floor, for the decoration of which a threshold or step should be equipped.
Please note that the floor in the room to the ceramic tiles should be several centimeters lower than the floors in adjacent rooms. Since when the room is flooded with water, it will not get into other rooms. If the floor in a room with dry leveling is higher, then we recommend that you abandon this method.
How to properly lay tiles on a wooden floor
The second - an easier way to level wood flooring for gluing tiles is the method of arranging a wet screed. This method of pouring is relevant if the wooden surface does not have the required hardness to hold the tiles.
Please note that the screed on the wooden floor is cut off both from the walls of the room and from the underlying layer. That is, it is in some way reminiscent of a floating floor, which does not lend itself to the effect of temperature-expanding wood. In this case, it will be possible to achieve a perfectly flat flooring that does not lend itself to linear movements.
Initially, the wood floor needs to be repaired and rotten or old boards replaced with new ones. It is also advisable to grind it. After that, the floor is poured using a polymer-based leveler. In this case, the coating is pre-treated with a primer. If it is necessary to level the floor by more than ten millimeters, a polymer-based mesh should be glued to the flooring.
The optimum screed thickness for a wooden floor is three millimeters. Increasing this value is not desirable as the weight and pressure on the wood flooring increases.

In order to equip a screed on a wooden floor, follow these steps:
1. Dismantle the floor covering up to the timber. If there are suspicious and unreliable elements on the floor, replace them. If there is a step of more than 50 cm between the lags, it is necessary to take care of strengthening the system by installing additional bar supports. Use antiseptic impregnations to treat all floor parts.
2. The next stage is the assembly of the flooring for casting. For these purposes, you will need new or old boards, which are about 4 cm thick. Please note that a gap of about 10 mm is left between the boards. It is necessary to provide ventilation in the underground space. When the boards are stacked tightly, the ventilation holes are arranged in the flooring on their own.
3. Further, moisture-resistant plywood is installed in the transverse relation to the boards, the thickness of which is at least 1.2 cm. It is possible to use other types of boards of a pressed nature. The arrangement of the elements should resemble brickwork. To fix them, self-tapping screws are used, about 200 mm long. Provide a 30 mm gap between the sheets.
4. Further actions are related to the arrangement of waterproofing on the floor. For these purposes, waterproofing based on bitumen or paraffin is used. The option of using such waterproofing materials as parchment, glassine or high-density polyethylene is possible. To form a monolithic insulation layer, overlap the material and secure with tape. Waterproofing extends to the walls by 10-15 cm. They are also fixed to the wall with tape.
5. On the surface between the floor and the wall, a damper tape is laid, about 1 cm thick and 100 mm wide.
6. Next, the screed is set up directly, for the manufacture of which a leveling mixture or self-leveling compounds is used. In order to prepare such a solution on your own, you should combine sand, water glass in a ratio of 2 to 1. In addition, one part of water is added to this composition.
After the poured layer has hardened, the tiles are laid on a wood base. Using this method in the bathroom, wooden floors, how to lay tiles, is especially important.
You can also prepare a wooden floor for tiling by pouring a screed based on a mixture of sand and cement, reinforced with fiberglass. In this case, the layer thickness will be about 3 cm. The screed is grinded immediately after it is poured. To align such a screed, beacons are used. Further, the screed should gain power for three weeks, and after that it is covered with a primer.
Tile glue is prepared in portions. Since it is highly plastic and dries quickly. Excess glue is squeezed out by pressing on the tile. In order for the tile to fit snugly to the surface, hit it with a rubber mallet. After 24 hours from the moment of laying the tiles, the surface is treated with a jointer.
Recommendations on how to lay tiles on a wooden floor with your own hands
The last method for gluing tiles to wood flooring involves installing the tiles directly on the floor using a polyurethane-based adhesive. Which does not lend itself to the influence of movements from the thermal expansion of the tree.
The floor is preliminarily inspected for defects requiring repair. Further, the base is covered with moisture-resistant plywood. In order to improve the rigidity of the floor, the panels of moisture-resistant plywood are laid in two rows. However, the seams on the bottom row should not line up with the top row.
The base is also constructed as floating floors to compensate for the thermal expansion of the tree underneath. A sealant is used to fill the joints between the plates. We recommend using a universal primer for surface treatment.
Next, the tiles are glued to the base. Please note that diluting the two-component glue should be strictly following all the recommendations from the manufacturer. The slightest errors in this process will lead to a violation of the integrity of the coating.
The perimeter of the room is closed with a plinth laid on silicone. In no case should moisture seep through it to the lower areas of the floor.
How to lay vinyl tiles on wood floors
Initially, you should prepare the surface of the wooden base for laying tiles on it. For this, varnish or paint is removed from the coating, the floor is sanded. If cracks are present, they should be repaired. Next, the surface is primed. Moreover, all work is carried out at a temperature of 19 to 23 degrees.
When gluing tiles to the floor, you should determine the central part of the room and move away from it. The tiles are fixed to the floor surface with acrylic dispersion adhesive. The principle of its preparation is indicated in the instructions.
There are two options for laying tiles on a base - in the form of a pyramid or layering. Please note that small gaps are left on the surface between the wall and the floor, which are covered with a baseboard.
It is necessary to process the seams after two days from the moment the tiles are laid on the wooden base.
How to put tiles on a wooden floor video:
The process of laying tiles on wood floors has changed a lot in recent decades. If earlier tiles were laid on top of wood on cement mixed with sand, and such a mixture heavily loaded the wood base, today everything has become easier. Here is a step-by-step sequence of work for different options for the condition of the foundation. The amount of work and, of course, their cost depends on the quality of the foundation.
Laying tiles on a wooden floor - scheme
Case 1. If the wood floor is in good condition
We inspect and process the surface for the tiles - the base must be rigid. We check the boards, fix the floor, eliminating the creak. We treat the surface with a sanitary compound against mold.
We lay a waterproofing layer: PVC film or roofing material with bitumen.
The prepared surface is covered with gypsum fiber sheets. They are screwed to the floor with self-tapping screws. Further, directly laying the ceramics on the gypsum fiber board. Drywall must be moisture resistant. You need to lay it apart, then squeeze it with self-tapping screws around the perimeter, step 15 cm.
We glue the GVL at the joints with special glue, drill arbitrary holes for ventilation, prime the GVL (deep penetration primer) and let it dry.
On the finished surface we apply glue suitable for working with drywall and lay the tiles as on a regular surface.
Laying the tiles: preparing the tools, diluting the dry glue mixture. Now you need to choose the most illuminated corner and apply glue to a small area. Lay the tiles on top, not forgetting about the crosses, press it tightly to the surface. Tap the tiles with a rubber mallet to release excess glue. Check the horizontal laying level. After completing the work, wipe off the adhesive from the ceramic coating. The seams are rubbed in a couple of days when the solution dries. The crosses are first removed.

Case 2. How to lay tiles if there are only logs, and the floor is rotten
If the floor is rotten or the boards are worn out, you need to replace them and then put ceramics.
We remove the old top layer (linoleum, parquet board, etc.), remove the middle layer - chipboard (there may be DSP / plywood, meaning any coating), then we remove the plank surface with a nail puller, which is attached directly to the logs.
We check the load-bearing bars for integrity, cover them with a moisture-proof compound, set them according to the level. We lay a waterproofing layer (film, coating) between the lags, leaving allowances.
We pour expanded clay onto the covering between the logs, with a layer equal to the height of the log, fasten it on top of the board. This guarantees warmth and good sound insulation.
We attach the boards to self-tapping screws across the bars, be sure to remember about the gaps, on average, 5-10mm. Then we foame the cracks at the joints. We cover the base with a hydraulic support, lay the GVL, and then everything, as in the first case.

Case 3. A screed instead of an old wooden floor
This is the most expensive option for preparing the base for the tiles - read more here - floor screed with expanded clay. If it is possible to make a screed instead of the previous coating that has become unusable, then the sequence of actions is as follows:
we dismantle old materials down to the cement itself. We coat the joints of the walls and floors, covering them with sand-cement mortar.
we mark out the space, placing "beacons", we prime the concrete.
we fill the space to the very top of the beacons with a screed (it can be pure concrete, a sand-cement mixture is also used in a ratio: 1 to 3). One batch from 15 liters.
in the case when the screed is planned to be thick, the expanded clay is backfilled between the layers (the height can be up to two-thirds at the level indicated by the beacons). After a day and a half, clean the base so that the expanded clay on the surface does not interfere, and pour it again.
after 3 days, you need to prime the screed or use a self-leveling solution.

Case 4. There is a chipboard on a plank base, the floor surface can be used
Particleboard can become the basis for tiles if processed. For this:
The joint moments, where the wall and the DC-plate meet, are foamed.
The top of the slab must be primed or soaked twice with a special compound.
We treat the DC-plate with latex sealant, fixing the masking net there, and let it dry. Then we fix the mesh with self-tapping screws, ensuring a snug fit to the DC-plate.
It is necessary to cover the mesh with the composition: a part of water + a pair of parts of sand and a pair of parts of liquid glass.
This is followed by the usual laying of ceramics.
 Edith Piaf: biography, best songs, interesting facts, listen to the story of Edith Piaf
 Blackcurrant jelly
 How many times a day should an adult pee - pee?