The third hand assistant do it yourself. Necessary materials and tools
Bulk floors in 3D format can be decorating the room, but also contribute to the visual change in the settings of the room: the ceilings will seem above / lower, the space expands depending on the pattern. Make this design with your own hands is somewhat more complicated than the usual coating. But if technology adhere to technology, the result may be no worse than professionals.
What is the review of the characteristics
The bulk floor in the 3D format is created in stages. First laid the base, then it should be fixed on it or draw your own hands (invite an artist). The volume image can be made using the finish coating.
The thicker this layer, the stronger the 3D effect. Material for the base of bulk floors is used any (polymeric, mineral compositions). But the top layer must be transparent.
The main properties of such coatings:
- Strength;
- Aesthetic appeal;
- The impertness of the effects of aggressive media (acid, alkali), but this property is inherent in not all types of compositions for bulk floors;
- Versatility (3D coating is placed on different objects with any interior);
- Thermo and moisture resistance.
But if errors will be made in the manufacture, the bulk sex will lose its properties.
Preparation and calculation
First of all, it is necessary to determine the amount of materials. The cost consumption depends on its structure and components. This information is usually indicated on the mixture packaging. Also plays the role and thickness of the layer. To make a bulk floor in a 3D 3 mm thick format, an average will need 4 kg of composition per 1 kV. m.
 Concrete floor grinding with a special machine
It is necessary to prepare primer and adhesive composition, the last of which is useful if the drawing is printed on the vinyl canvas. In the case when the pattern is transferred directly to the base, acrylic paints and protective composition are harvested.
Drill, the rule, plastic niche is useful (it is mixed with the material), a spatula and a roller with a needle surface, a blistering for grinding. Self-leveling floor Immediately after the end of the work, you need to cover with a polyethylene film. After the polymerization of the upper layer, the shelter can be removed.
Step-by-step performance
For those cases when the installation makes it with their own hands, a step-by-step instruction has been created, which reveals the main nuances of manufacturing 3D coating. Works can be divided into several stages: preparation of concrete overlap, the pouring of the draft layer, the fastening of the pattern, forming the upper transparent layer, the finish finish with the protective composition.
How to prepare the surface?
First of all, you need to evaluate the condition of the flooring. If the surface is broken, is subject to destruction, it contains a plurality of chips, cracks, you need to completely remove such a coating with your own hands, which rouring the rough base. For reliability and in order to ensure the long-term service of bulk floors, the 3D surface is covered with waterproofing materials.
 Applying primer on the base. In the case of the presence on the basis of cracks and dents, they must be selected by epoxy fillers or cement.
Next, a cement solution is mixed, with which all the irregularities of the draft base will be hidden. After laying, the screed should be waited when the coating will dry completely. Then they make the surface correction with their own hands: small irregularities are removed by the grinding machine / grinder, the substantial potholes are filled with a solution.
To continue the installation of 3D floors, it is necessary to wait until this layer does not eat completely, it is usually given for about a month. The fact is that the coating applied to the wet screed will very quickly be collapsed.
Application of the first polymer layer
At this stage, you need to control the level of humidity (no more than 15%). This is done, again, in order to obtain high-quality coverage. The finished screed is covered with primer composition, after 5 hours you can install the first polymer layer with your own hands.
 Application of the base layer
The composition is mixed with a special mixer in small doses. If you immediately use the entire mixture for bulk 3D floors, it will quickly freeze and will be unsuitable for use.
In the work, the rule is commemorated with the material, as well as a needle roller. The main task of the second of the tools is the removal of air bubbles from the polymer layer. For surface control, a construction level is used. It is necessary to wait for the full polymerization of floors 5-7 days, which affects the composition of the composition and thickness of the layer.
How to fix the picture?
Make a 3D picture for laying on the floor with your own hands. And it is recommended to start working with it after a day after the installation of the first polymer layer was performed. If there are skills, 3D drawing is made with your own hands right on the coating. Otherwise, a pre-printed image is pasted.
 The substrate for the drawing can be used with vinyl film, banner fabrics with thermo printing. The image is glued with an adhesive composition or layer of primer
Size 3D can be more than the floor. The material is placed on the surface using the adhesive bond. It is necessary to control that there are no bubbles with air under the blade.
Pouring of the second polymer layer
To make this coating smooth, a rule is used, and to remove air you need to walk along the surface with a needle roller. Installation at this stage is performed in a similar way as when pouring the first layer of material. The difference lies in the thickness of the coating, and additionally, the top layer is made transparent.
 When the distribution of the composition across the entire area, the coating must be rolled out with a roller with needles: it will help remove air bubbles from the resulting surface.
The term of its polymerization varies from 1 to 3 weeks. Increase the strength quality of the coating can be covered with a finished polymer layer of polyethylene film.
Application of protective composition
3D Paul will serve longer if the top is covered with a varnish with certain properties (shockproof quality, anti-slip effect). The thickness of this layer is much less - 0.5 mm. The installation of the protective coating is also done to protect the 3D floors from fast abrasion.
Question price
Production of bulk coating will be quite expensive. To greater extent, they will be sprinkled by the owners of apartments, because the cost of finishing small areas is higher than large objects. So, 3D floors professionals do within the amount of 6,000 rubles / sq. M (for the room less than 10 square meters. m).
If the order is on the territory of more than 10 square meters. m, the coating will cost several times cheaper (2,800 rubles / sq. M). These are rates taking into account the materials used. It is clear that the independent production of 3D floors will fall out to a smaller amount.
Thus, the installation technology of multilayer outdoor design is quite complex. To simplify the task of arranging 3D of the floor, step-by-step instructions can be involved. The second stage of work is most important - the preparation of the foundation, as it is necessary to control the level of humidity not only air, but also a rough screed (installation is performed on a completely dry coating). 3D floors will serve longer if the three-layer design is applied a protective layer of material.
Watch the video: Creating a picture
On the eve of the celebration of the dear man's heart, I would like to make such a gift that I would impress and left pleasant memories. We offer to make volume postcards with your own hands, they are also called Pop-Up postcards. What are these wonderful postcards?! At first glance, these are ordinary postcards, opening that, in front of you, there is a surround figure or a whole composition! Such postcards will not leave anyone indifferent! Especially if they are copyrighted and keep the warmth of your hands!
Postcards with flowers inside with your own hands
Heart-shaped card with a surround flower can even make even a child:

You will come in handy
We do, both simple and complex creation technology.

The lush flower for the inner or outside of the postcard can be made of colored or even simple paper painted with watercolor paints or pastel shallow. Cut flowers can be used for this template:

Print the flower pattern, paint paints. We fold in accordance with the outlined lines of bend and glue the resulting flower to the basis of the postcard.

Undoubtedly please the beloved and such a magnificent and bright greeting card with flowers inside, made by their own hands.

How to do it tells in his master class ThejulianaHAPY.:
An option with gentle, pastel tones, flowers look very cute. Flower stamens do not make a lot of Labor!

The original master class in English, so for your convenience, we offer a brief translation of the process of creating this floral card.

Materials and tools Standard: Colored paper, cardboard, scissors, glue, plastic for imitation of glass in the window.
We take dense colored paper, fold it in half. In one half cut the square window.

We make a frame from color paper of another color. The glass for the window can be made of a protective film for the phone or transparent plastic. The resulting frame of the window is glued to the basis of the postcard. You can do and without "glass".


Insert into the hole
From the cardboard glue the flower pot, we glue it in the middle of the postcard on the fold line. The side sides of the received pot glue so that when closing the postcard, the pot has developed.


Next of the colored paper cut out green stems and all sorts of bright flowers: crocuses, hyacinths, daffodils and tulips. Perhaps your bouquet will not be spring, but a summer, which means that cornflowers will appear, chamomiles, pansies, and imp.


Insert flower pots
The height of flowers should be so that they are not sticking out of the postcard, and they were visible in the window!


The window can be decorated with a cozy curtain.

Original master class
By the same principle, you can make a postcard with flowers from felt or painted cotton disks. Additionally, insert along with the flowers is concise, but warm congratulations!

In addition to colors from a postcard can look out of balloons, asterisks, a bows.

How to make a panoramic floral card along with a congratulatory envelope shows in your master class Theworkshop.:
We take dense paper - the basis for our postcard. Create a rectangle in the center of the folding line card. The width of the rectangle is 3 cm, length - 7 cm.

By pink lines, we make cuts by a stationery knife. Then the resulting rectangle folds inside the postcard. The basis of the postcards attach to another sheet, b aboutto the size of the initial foundation.

Then make floral design: the flower pot, directly the flowers themselves, fluttering butterflies and grass. All this is combining and glued to the front of our postcard.


Original master class.
Using the same reception, you can make an original postcard-vase. Flowers in such vases you can also make your own hands from paper or other technicians.


We bring to your attention a master class on the manufacture of a very tender volume postcard, which will not only congratulate the belonging, but also perfectly fit into the interior, such as the children's room.

First we make a box-box. To do this, take a dense blue paper and cut out the template for the box out of it. The edges of the template we fold 4 times 5 mm on each side, forming the framework. We glue the resulting frames.

We glue on them with color or scrap paper in color suitable for your composition.

Next prepare the elements of the future composition. Bonding a balloon from paper circles. Mugs fold floors and glue together. The wax cord is inserted into the base of the basket and directly mugs forming the ball.

Cut the clouds from scrap-paper, and from the yellow paper Sunny. Insert the elements of the composition into the frame. The balloon is glued as follows: The base of the ball is glued to the volumetric tape, and the ball itself is on the glue. Clouds glue on the same principle: one on glue, second on volumetric tape.

Green trees make a simple napkin. First, it is cut, then we glue. On the right on the box we glue a tree made with a hole punch for scrapbooking. The last touch - in free places we glue serpentine, butterflies and a congratulatory inscription! On the bottom of the box we glue the ribbon with embroidery or lace. The original volume postcard is ready!

Original master class.
3D postcards in technique Kirigami
Kirigami - the art of cutting and folding figures and cards from paper. This is the main difference between Kirigami from other paper folding techniques and is emphasized in the title: "Kira" - cut, "Kami" - paper. The founder of this area is the Japanese architect Masahiro Chatani.

For the manufacture use sheets of paper or fine cardboard, which are caught and folded. Unlike traditional 3D postcards, these paper models are usually cut and folded from one sheet of paper. Most often we develop three-dimensional models of architecture buildings, geometric patterns and various everyday objects, etc.

It is better to start with a simple volume postcard with your own birthday. For example, using a thick paper of two contrasting colors, you can make a postcard-cake Birthday:

For its manufacture, use this template:

Using various templates, you can make postcard-cakes more comprehensive:


How to make cake kirigami tells in his master class Oksana.Hnativ:
Using this technique, you can cut various congratulatory inscriptions. Cake can be made and paint to your taste.

To create it, take this template:

From white relief paper, too, a spectacular postcard will be obtained:

By connecting two mirror parts "Current", cut from different sheets, you can make a whole bulk cake in the postcard!


Use the following template:

Options for creating volume postcards whole set! Cut and fold your paper masterpieces!
Volume cards in the scrapbooking technique
Scrapbooking is the art of decorating photo albums, but its techniques are very popular and when creating postcards.
Using the elements of Kirigami, in the technique of scrapbooking, you can also make a bulk card with your own hands. Cut and fold from the "Steps" scrap paper for the "pop-up" candles in the second half of the postcard. We glue the candles and stick the resulting blank on the basis of the postcard.

From scrap or colored paper you can make a simple, but original greeting card. The flame of the candle cut out and decorate the sequins, then glue on a 2-sided tape. We glue the second part of the candle with the help of glue. Congratulations can be born or glued to an elegant satin ribbon. Simple and original!

From the paper of other invoice, the postcard will look at quite differently)

Obtaining each element of postcard on each other, using the two-sided adhesive again, you can create such a bulk bright cake!

Consider the master class of Tatyana Sadomskaya on how easy it is to make a bulk gentle postcard in scrapbooking technique using ready-made pictures.

To create such a postcard Tatiana used:
- scrapBERRY'S SkrapBerry's "Favorite Pet"
- scissors
- tight cardboard
It is better to use scrap paper with a large number of thumbnails that can be cut from a solid sheet, as well as painted prints of stamps and chipboard.
Before creating a postcard you need to decide on its plot to choose the color of the Basics of the postcard and its "acting persons". In this case, paper with a calm beige printer is taken as the basis, composite parts of the plot are cut out of it: kittens, puppy, flowers, crown on the pillow.

Do not forget before starting this job to decide that you will be in the foreground, and what for him!
In our case, larger than the kitten we put on the fore, it will increase the feeling that he is closer than the kittens with a dog.

We make the necessary slits. It turns out such a design with "steps". On the resulting "steps" glue the leaflers of arbitrary size. These leaflets imitate a wooden fence.

Next, gradually glue our elements, ranging from the closest to the distant. We start with the foreground and glue a kitten. Its glue to beer cardboard, since it gives an additional volume and discards the shadow. In the same way, the principle can be glued and several other elements, such as globs and flowers. When the inner side is ready, we glue it to the bottom of the postcard.

Outside the same decorating a postcard with an elegant flower print.

For greater kind, postcard elements decorate sequins (use the glitter).
Original master class.
For inspiration, admire the masterpiece 3D postcard-cake:

Volume cards diorama
We present to your attention a master class on the manufacture of a 3D postcard - a small three-dimensional scene. On such a scene, each can arrange various bizarre figures and decorations)

For the manufacture of the postcard, we take 4 sheets of dense cardboard, in this case we take the cardboard of four shades of orange. You can choose colors to your taste.

On the sheets of cardboard with a pencil diameters contour frames and cut them out. Frame contour we make 1 cm wide.

From the remaining fragments of paper, we cut two strips, each of which is a size of 10 to 4 cm. It is distinguished by 4 parts of 1 cm. Cut all the angles of the resulting strips. We fold strips along the lines so that it turns out a paper zigzag. These pieces of zigzags will support diorama fragments. We glue zigzags to the frame from two sides.

We glue the second frame clearly along the other side of the zigzag.


The top of the zigzag must close one of the parties of the frame. The same must be done with the opposite side. Thus, the first scene of the diorama is ready!

In the same principle, we make the remaining frames of the diorama.
It is better to decorate each of the frames in advance (especially the last) than to try to squeeze the decor to the finished postcard.
The rear wall does not have to be solid, you can make a transparent diorama without the rear wall.

Decorate not only the "wall" of the diorama, but also every frame. Use more bulk decorations, such as beads, bows, feathers, ribbons, etc. So the postcard will seem more voluminous and it will strengthen the 3D effect!

Original master class.
The plot you can come up with absolutely any! Create your little theater!
For example, waiting for an associate!

Or balloon in fluffy clouds.

Bright glade with lupine and butterflies!

Birdhouse with birds and flowers:

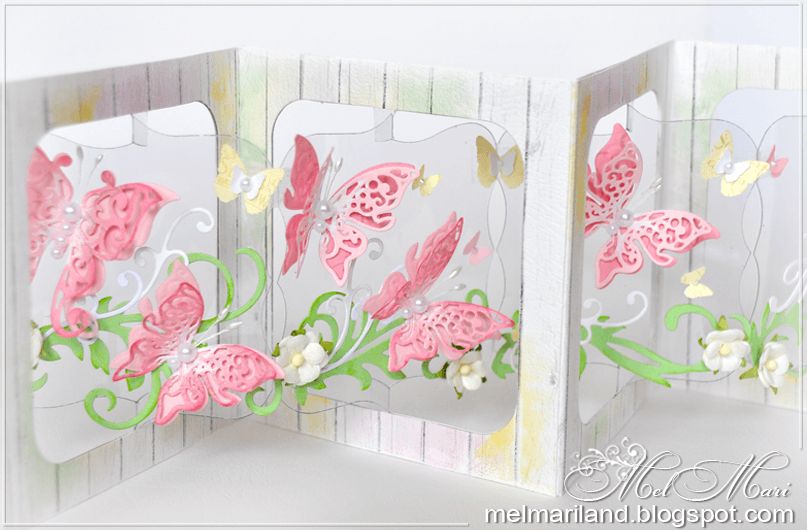
Accordion Postcard (Schemes and Templates)
Another kind of volumetric postcard is an accordion postcard.
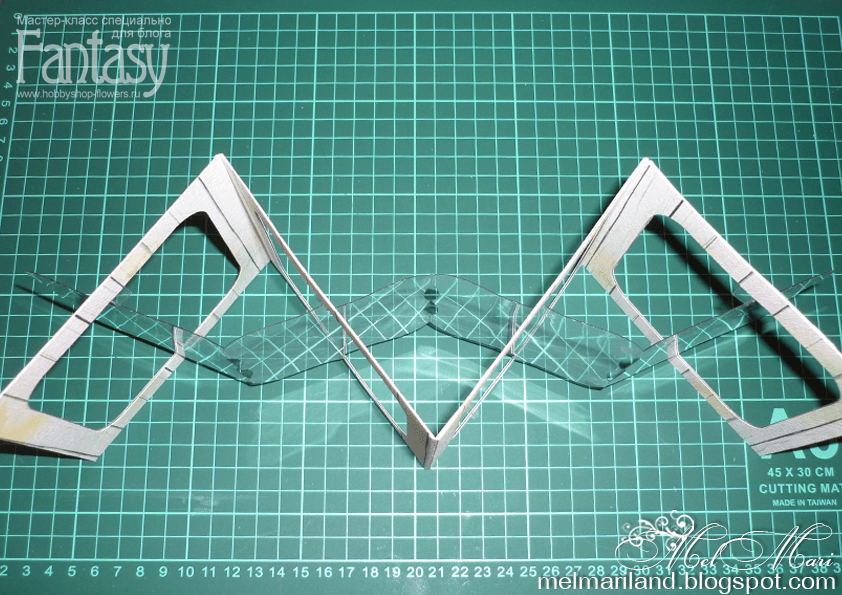
To create a similar postcard you will need: dense scrap paper for the base frame, cutting scrap-knife or stationery knife, transparent plastic for inner parts, stamens, semi-hemp, etc. Materials for decorating.
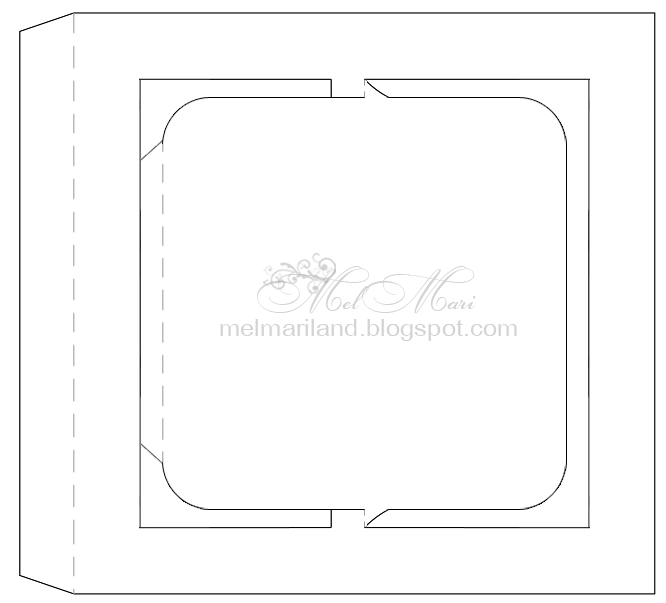
We take a pattern and make blanks for a postcard. From a dense scrap paper, cut 8 blanks for the base frame and 4 of the transparent plastic.

Blank of thick paper ...

... and transparent plastic
Plastic blanks are glued to the basis of paper. To make a postcard, we make a double bick of about 2 mm on external bends. The obtained 4 parts connect - glue with glue or use 2-sided tape. We glue the remaining 4 frames from the opposite side.


Now you can proceed to the very creative part of the Capture Creation - it is decorating! We glue to the plastic of fluttering butterflies and vituya greenery. Card ready!


Original master class
Different templates for the manufacture of the basics of such postcards See below:


Applying fantasy, you can create all sorts of options for such postcards. For example, with the predominance of children's themes. The number of component parts may vary.


Birds, flowers, butterflies - always very easily and air look at postcards!


Postcards for all occasions
We have already made sure that the postcards made with their own hands are original than those that you can just buy.
YOU'LL LIKE IT!
Let's give, and sometimes at all without reason! 🙂

In order to make a beautiful and modern interior in the room, you can apply different types as an outdoor coating (it can also be a massive board and parquet). But at present a very interesting and stylish option appeared - this is 3D gender. Make it yourself quite real. Therefore, if you want to know the answer to the question, how to make 3 years with your own hands, then the article article will tell you about it in full. Also in this article you can watch an interesting video on this topic.
What is 3D gender
This flooring is a liquid polymer mixture, which is poured on the floor surface. The result of this work is obtained by a layer with an attractive 3D pattern. After the layer completely freezes, a very rigid coating is created on the floor surface, which is not exposed to any external influence. It has excellent adhesion with the main basis of the floor. And in the event that you need to dismantle a layer of polymers, it will be separated from the floor with the concrete.
Many people believe that 3D sex is expensive pleasure, but it is not. Make 3D gender, possibly on your own. But when this work, it is necessary to use the advice of professionals in this area. Otherwise, you will not be able to fix it quickly and unpainted for yourself. A more reliable method is a clear execution of all necessary actions.

Paul device 3D
In order to make a beautiful three-dimensional layer, you must first prepare the following tools and materials. So, it will take for work:
- Raklya or Kelma necessary to apply a solution to the floor;
- Capacity for mixing in it mixtures and a building mixer;
- Roller with needle surface;
- A vacuum cleaner;
- Brushes;
- Scissors;
- Special ships with spikes;
- Main layer;
- Two-component mix for priming;
- Special composition designed to decorate the floor 3D;
- Protective varnish of a certain species for final application to the surface of the 3D floor (matte or glossy).
How to prepare the basis for 3D sex
In this publication, we are talking about how to build 3D floors with your own hands. There are step-by-step instructions and interesting advice. 3D Paul should not be laid on an unprepared base. Therefore, how to prepare the basis for the 3D gender we will talk below.
- In order to prepare the basis, you need to align the floor and, if possible, make all the cracks and potholes.
- After alignment, the floor surface must dry.
- Next, we produce her cleansing from dirt and dust.
The next stage in our work will cover the surface of the primer mixture. This procedure will not only help improve the quality of the application of the polymer layer, but will also increase the adhesiveness of the applied coating with concrete. The priming of the surface will help to give the base excellent characteristics.

The first layer is the basis - basic.
The very first layer of 3D of the floor serves as a base layer, thanks to which the necessary basis is created to perform the next work. The main thing is that only the good materials are used. They should be applied very carefully and carefully comply with all the technique of work performed. The temperature when applying the base layer should be at least 10 degrees, and humidity up to 55%. The base layer should be applied according to the previously made walls on the walls, so that the thickness of the layer corresponds to the norm. In order for the polymer layer to dry finally, it will take 7-8 days. But while the layer is not completely frozen, the decoration of the floor should not be performed.
Maybe you will find time in order to read the article of the site: how to make the walls of the walls with fliseline wallpaper
Creating a three-dimensional layer
In order to obtain a three-dimensional effect, all sorts of materials can be used. As a rule, several solutions can be used to decorate the floor surface, for example:
Use the floor surface in the form of a canvas. To create a decor, you must invite specialists in this area: artists and designers. With the help of paints, they will be able to create beautiful pictures on the surface of your floor. This work is not cheap, but the result will be very beautiful and spectacular. After the fill with a polymer transparent layer occurs, a real masterpiece of art will be obtained.
For the possibility of creating a three-dimensional effect, when performing work it is necessary to use special stencils. They can be purchased to order in special companies. After you have decided on choosing the necessary ornament, it is printed on the film of the desired size. The ornament can be chosen any: the bathroom most often use a drawing with fish, or seashells, and for the living rooms - all sorts of flowers, beautiful lawns or city panorama.
Before choosing an ornament, it should be remembered that its permission should be excellent in quality in order to make a clear and underestimated pattern.
And in order for the effect you need, the following materials are applied: beads, sequins, special chips, as well as pebbles and various bulk substances. Before creating this effect, you need to come up with a pattern. After that, starting it to apply to the surface of the floor with accuracy, using a special scheme.
In most cases, a combination of colored sections on the floor surface is used. This uses materials for filling a variety of color. Due to this, beautiful stripes and interesting ornaments of all sorts of geometric shapes are obtained. The surface of the base layer.
Drawing 3D drawing should be made on the dry surface of the base layer. For the film, some experts advise to apply a thin layer consisting of PVA glue so that the first cannot be shifted during the fill of the last polymer layer. This method is trusted to carry out specialists, since it will be very difficult to do this without any missing experience.

Finish coat
In order to make 3 d floors with your own hands, you need to work hard. In addition to the two layers of 3D, the floor needs an finish coating. The finishing coating of the polymer layer 3D is called a transparent layer, which is aligned with the spatula on the surface, in order to avoid the appearance of various air bubbles.
After laying on the surface of the floor of the film, they begin to engage in finish operations. To do this, use completely transparent two-component mixtures. They are applied in thickness equal to 3.5 -4mm. The application of the polymer layer must begin from a long corner. In this case, the mixture should be poured to the floor, gently distributing it with a needle roller. The application of this layer is necessary for the predetermined marks on the walls, applying with this construction level or body kit. When conducting data, you need to wear special shoes equipped with spikes. In the period when the coating dries up, it is not recommended to walk on it.
To fill the floors on their own, it is necessary to use the coating of a combined type, using a specific technology. First of all, it should be tried to make soft and smooth transitions between a variety of materials to obtain an elegant and harmonious species. After performing the fill of the floor surface, it is necessary to produce a groove at the junction of this coating drank, dimensions of 5 mm (width and height). This groove should be cleaned of garbage and dust and fill in a primer mixture. The latter must completely dry.
Next, it is necessary to fill the adjacent area with a color polymer layer, remove the tape and make the processing of the entire floor surface with a transparent polymer. After the end of this work, the floor covering should dry.
Polymer 3D coating should be treated with colorless varnish. It can be both matte and glossy or anti-slip. Layers in quantity must be in the amount of 2 pcs. Apply the polymer is needed using a roller. Next you need to give each layer to dry completely.

In order to make the floor with a 3D effect on its own, you must use the following tips:
- Before purchasing a dry mix, you need to stop your choice on a better material. When carrying out the desired calculation of the volume, it is necessary to take into account all future norms of consumption of the selected mixture. After that, it is necessary to add 6-10% of the mixture to these standards. This procedure is needed in order to perform the finished polymer composition to perform the layer coating work. Outdoor surface should be poured immediately. It is impossible to interrupt this work.
- In the process of manufacturing a polymer mixture by diluting it with water, you must perform all items described in the instructions. In the event of a violation of the equipment, the floor covering will be ugly.
- Figure tediously choose, focusing on your overall interior of the room. In this case, the 3D coating will be very elegant and attractive.
- When performing the fill, you need to follow the allotted time for drying, as well as comply with all the conditions specified in the manufacturer's instructions.
- In the process of applying each next layer, it is necessary to make sure that the semi lacks garbage and various foreign objects.

In fact, this question arises not only in those who are interested in modern types of repair of apartments. Indeed, when you first see with your own eyes, such a floor, unwittingly begin to think: how can I do and what kind of miracle is this? But, everything is in order. The answer to this and many other questions you will find in this article.
Pouring floors 3D look very spectacular
The use of bulk polymer floors is widely used in warehouse buildings, shopping and exhibition complexes, supermarkets, and even in garages, where increased requirements for wear resistance of the coating, lack of dust or sparks occur (this is extremely important in rooms with quick-flameable liquids and materials) . In addition, ordinary bulk floors in the above buildings look much better, compared with traditionally used coatings.
Currently, when repairing apartments and private houses, the most fashionable and popular designer solution of the finishing flooring is the use of bulk polymer 3D floors. Actually make bulk 3d floors do it yourself It is quite difficult and for these purposes it is better to invite specialists. But, with a certain approach, skills and those knowledge that will be outlined below, you can permanently risk and try.
Unlike conventional bulk floors, which are used in public, industrial and warehouse buildings, bulk decorative polyurethane 3D floors have their exceptional appearance, which creates an effect of a pseudo three-dimensional image.
This is achieved as follows. At first, any liked drawing is applied to the base layer, which is then covered with the finish polyurethane layer. The "depth" of the resulting 3D image depends only on the thickness of this transparent layer.
At the same time, the boundaries of fantasies are not limited to drawings. Inside the coating, you can make a special decorative layer made of various natural materials, such as colored sand or marble crumb. It all depends only on your preferences and taste.
If you still risked to do bulk Floors 3D do it yourself, in the process of work you will understand that it is not so difficult. The main thing to comply with the production technology of work and know some nuances.
Technology of liquid 3D device
In general, for those who are familiar with the technology of laying a conventional polymer bulk sex, there should be no difficulties, because for a three-dimensional effect device, you will need to learn only some nuances.
So, we give a list of stages of work:
- Preparation of the foundation
- primer base
- floor alignment
- Application of the base layer
- Application of an image or decor
- Application of the finish layer
- applying a protective layer
Preparation of the foundation
The base under the bulk sex will serve as a pre-made concrete or cement-sand screed. Preparation sequence as follows:
- we remove the influx, hillocks and irregularities with a screed by grinding machine, perforator or bit;
- detected cavities, cracks and potholes fill in cement-epoxy;
- Dust the surface of the industrial or ordinary vacuum cleaner (which is not sorry);
- We remove from the surface of oil spots (if any);
Primer base
Very important stage. The primer penetrates into the pores of concrete, fills them and contributes to the better adhesion of concrete and the material of the base layer.
Any suitable compositions can be used as a primer, for example, KNAUF Betokontakt, which is applied using a conventional flat brush or roller. After a while, the process must be repeated. After four hours it will be possible to start applying the base layer.
Important! The gap between the second priming and applying the base layer should not exceed one day!
Application of the base layer
So, all the preparatory work is behind. There is a turn of the design of your intended floor. The base layer serves as the basis before applying a pattern or decorative bulk sex from natural (artificial) materials. If you have conceived to use the decorative floor, it is very important at this stage to think about the background of the base layer.
As the base layer it is better to apply the polymer composition. Surveillance of the surface is performed using the rule and is checked by the level.
Important! Follow the smaller and absence of air bubbles. Failure to comply with this condition will reduce all your efforts!
Image or decor
At this stage, unfortunately, you will not save. The entire appearance will depend on the image quality or decorative layer. But there are two ways. If you have chosen the image, you can use the following solutions: Picture-self-keys, or directly drawing using acrylic paints, burning off under the action of ultraviolet rays.
Optimally (but rather expensive) hire an artist who will create a unique drawing, which certainly will not have anyone. But, if you have a certain talent, you can work yourself on your own and create one masterpiece that will be definitely proud of. Always profitable differ from those who did someone else.
The easiest and cheap option will be used as a drawing of banner tissue with thermal printing and vinyl film. At the same time, the drawing can be selected by itself (for example, on the Internet) and print on the appropriate carrier. Further pasting of the base layer will not be much difficulty.
Of course, not everyone has the desired equipment. Therefore, the image can be printed in any suitable printing house. However, do not forget to make the image somewhat more than required. After all, it is always easier to cut off the surplus than try to hide the places of gluing under the transparent layer of the finish coating.
Let's say several important words about the process of transferring such an image to the base layer.
First, it is necessary to perform the primer of the base layer using a brush or roller. The finishing polymer material, diluted in a ratio of 2: 1 with solvent 646, can be used as a primer, while 1 m 2 surfaces you will need about 300g material. For the polymerization of primer, it will take about a day.
Next, we take the printed image and gently stick on the base. Between the engineering base layer and self-taking, do not allow the formation of air bubbles. For this, the drawing carefully smooth and press it with a dry roller.
If you use a drawing based on banner tissue, it must be glued to the base of the thin layer of the finish polymer coating.
Important! If you use acrylic paints, before applying the finish layer, they must dry completely!
Application of the finish layer
At this stage, you must calculate the amount of transparent polymer spent on the finishing layer. Usually, the thickness of this layer is 3 mm (for greater "depths" of the bulk 3D floor can be increased this value). Consequently, on 1 m2 surface you will need about 4-5kg of transparent polymer.
The application of the finish layer will not require special labor costs. We need only accuracy and a sequence of work that includes the following order.
At first, with the help of a drill and a special nozzle mix the ingredients of the transparent polymer. Then the uniform layer and very gently pour the mixture to the pre-made drawing and in accordance with the technology, spilling over the surface.
For subsequent work, we will need a needle aerial roller. With it, we roll the entire layer until the air bubbles are completely removed. Rolling roller needs to continue until the initial thickening of the polymer mass (usually about 15-30min). Next, we cover the floor with a polyethylene film or foil. This is necessary for the acquisition of the necessary strength to the polymer. The time of complete solidification is directly proportional to the thickness of the layer.
Important! When moving and rolling the floor with roller, in no case go through the floor in ordinary shoes! Use only shoes with high spikes on the sole!
Application of the protective layer
That's almost everything. Only one simple action remains. When the polymerization of the transparent finish layer is completed, we apply a protective varnish of any manufacturer you like. The protective layer will provide additional protection against various damage and extends the service life.
Service and care for such floors is very simple. It does not absorb dirt and does not accumulate odors. The protective properties of almost all varnishes allow you to produce wet cleaning by any detergent.
We congratulate you. Bulk 3D floor do it yourself made! We sincerely hope that the stated material, if it does not make a superstacialist, then, at least, will help to fulfill all or most of the work with your own hands. Or maybe you really become truly excellent specialists?
And in the conclusion, I suggest you watch a video in which it is clearly represented how to make a bulk 3D floors with your own hands.
Bulk floor 3D
Bulk 3D floors
How to make bulk floors 3D or dolphins in your bathroom
3D 3D device technology technology
Let's learn how to do 3D floors with your own hands, because the process of manufacturing 3Ds of the floor is almost no different in its technology from the manufacture of bulk floors.
Already, 3D floors entered the ordinary, and many people do them in their apartments and homes not only for aesthetic beauty, but also for visual increase in space. 3D floor is an outdoor coating that does not have seams and consists of the main three layers: the base layer, the image, and the finishing layer. The image can be how the professional master is drawn and bought in the store.
Of course, to make yourself in the 3D floor room, you need to have iron patience, a good amount of money, and two weeks of time. But the main place in this every day to occupy your limitless fantasy. If you agree to all of the above sacrifices, I will tell you further: what tools and materials you will need.
Helpful information:
Tool
- Machine for grinding concrete floor.
- Mixer or drill - necessarily from 800 W power.
- Household vacuum cleaner.
- Several spatulas from 20 to 80 centimeters.
- Two rollers are needle and fur.
Materials
- Cement
- PVA-based solution. 1 liter of PVA per 10 liters of water.
- Decorated material, printed 3D image on high-quality vinyl films.
- If you want to paint the floor manually, you will need acrylic paints.
- Compound is a finished mixture based on epoxy resin.
After you have acquired all materials and tools, you need to thoroughly consider the stages of work and clearly visually submit that in the end you wish to get.
Cooking the basis for creating 3D floors
Flooring must be removed to a concrete base. If your base is soil, then pour the screed. You can pour such species like: Wet screed, semi-dry screed. In any way, to create 3D floors, the dry screed will not suit you.
From a concrete base, carefully remove all the dust and accumulated garbage. If there are oil or fatty spots on the screed, they must be removed. The primer is applied at least two times. This is done so that in the concrete there is no pore left, even the smallest. To this end, use a fur roller, to apply uniformly primer will be easier. Next, it is possible to continue only after one hundred percent and complete drying of the primer. Drying lasts from 12 to 24 hours.
Basic layer

The base layer will be a screed. It should be perfect and not to have cracks. If there are cracks in the screed, then. Otherwise, cracks can move on 3D gender. The base or screed must be pulled by a grinding machine.

If you plan to use some elements of small decor, such as sand, small pebbles, etc., be sure to determine the color gamut. It is the polymer that will serve in this case by the background.


Interestingly, you can continue the drawing of the 3D floor on the wall.
Apply an image for 3D floor

The easiest way is to order the desired image, which will be printed on a vinyl film or on a good banner fabric. When executing an order, check the print quality.
- The image should not contain bubbles.
- The size of the pictures should be slightly more than the size of your room, as it is always easier to cut, how to build up, and the extra seams will ugly look.


If you decide to apply a drawing with the help of paints, then be sure to invite the artist of the Professional. Paints must be polymer or acrylic. They are most suitable for creating 3D floors. Varnish can be applied only after the paint is completely dried. It is not necessary to hurry, otherwise, under the influence of liquid varnish, your drawing can be blurred and not clear.


If you have chosen a method of partial decoration of the picture with real elements that have emptiness, they must be sealed with polymer clay or gypsum. Before laying the decor, apply to the base of the first layer of the polymer and thoroughly ride it with a needle roller. The roller will remove all the available air from the polymer mixture so that bubbles are not formed. Immediately you need to form a picture while the polymer is still in liquid state.
Be sure to close the windows and doors during the work and after work to avoid dust entering or other small particles per polymer. Within two days, we expect a complete drying of the polymer. After pouring the second layer of polymer at least two millimeters. We take precautions against dust hitting and expecting complete drying of your future floor.
Fill the finishing layer

The finishing layer is an important element when creating 3D floors. It is very thin - the thickness of it must be up to 1 millimeter. For the finishing layer, it is better to purchase a ready-made compound mixture, which is based on epoxy glue and resin. You should not cook at once a large amount of the mixture, as it is very quickly thick, and it will be impossible to work with it. Toothed spatula evenly distribute the transparent mass at the top of the drawing and begin to ride the polymer with a needle roller thoroughly.

Only you will feel that the mixture began to thick, rolling immediately needs to be stopped. And act as you will close the entire drawing or the entire area of \u200b\u200bthe floor in the room until the transparent varnish. Do not allow for the finishing layer of dust or garbage. So that your floor is finally drying, you need to wait about a week. At the time of drying, you should not allow direct sunlight on the floor.
Nuances


The most difficult thing in all work is to prevent the appearance of bubbles in the finish layer. They can be formed due to excessive moisture of the previous coating, or if you do not comply with the dosage of components when mixing mixtures. Be sure to follow the instructions on the package from the manufacturer.
There are several ways to check the humidity of the coating, but I will describe one, since it is the easiest. After completely drying the next layer, cover the floor area with plastic film with a size of 2x3x or 3x3 and leave it for a day on the floor. If, after time, the spirgin appeared under the film, it means the humidity is quite high, or it is not completely dry. Be sure to check the new screed, as it is from her a large percentage of moisture.
3D floors are aesthetic decoration for each room in the apartment or in the house. They are environmentally friendly and very resistant to abrasion. So that all your efforts will cost your tools and efforts. That is why the manufacturer of 3D floors is not only an interesting occupation, but also fun for guests.
Tweet
Stamp
Like!
 Why you can not give icons
 Is it possible to give icons as a gift: Signs, the opinion of the Church
 A year ago left her husband, and now I do not know what to do