Projects of log cabins for baths: layout and features of wooden baths. Using the scheme of a log house in the manufacture and assembly General instructions for the manufacture of paws
The construction of wooden houses is becoming popular again. There are several reasons for this: there is some distrust of modern building materials, and their cost is too high for the average person. But in woodworking, modern technologies have made a real breakthrough, which significantly reduced the construction time of a log house from rounded timber.
In order for the log house to fit snugly to the foundation, it is necessary to start construction on the prepared foundation.
The fact is that in the recent past, carpenters performed all the operations to prepare a tree for each wreath of a log house independently. It would seem that such a simple matter could not cause any particular problems for builders. But this is only apparent simplicity. In reality, carpenters first removed the bark from the round timber, dried it, and only then carefully selected the logs by thickness and deflections. The top of the tree and its butt were alternated. The whole process was controlled using plumb lines. And there was no need to talk about the tightness of the fit of the logs to each other. Each log was measured many times, profiled (using an ax) and placed in its original position.
The blockhouse turned out to be reliable, but its construction was carried out too slowly. And now everything has become much easier: it is not necessary to invite a large number of carpenters to build a log house.
A set of tools and materials for construction

In a month, 2-3 people can do all the work, the main thing is to have a clear plan and a list of everything you need. A special processing technology makes the logs cylindrical along their entire length. And along the entire length of the log, an expansion groove is made. This technology of wood processing already eliminates the need for multiple "fit" of the logs to each other. It is a pleasure to work with such material. And only a few people can make a blockhouse, even those who do not have much experience. For construction they will need:
- galvanized scaffolding;
- log house project;
- axes;
- chisels and mallets;
- winch;
- strong cable or rope;
- ladders or lumber for the installation of scaffolding;
- chainsaw;
- drill;
- construction brackets;
- building level;
- construction helmet.
It is already worth starting the construction of a log house on a prepared foundation. Let them try to convince you that the finished log house from the manufacturer is not inferior to the log house made directly on the foundation, but you should not succumb to such advertising. Never will a transported log house fit so tightly to the foundation as the one that you build yourself.
Waterproofing and insulation

Before putting the first wreath, roofing material is laid on the foundation around the entire perimeter in 3-4 layers. Waterproofing for a log house is the main condition for its durability. For the first wreath, it is initially necessary to lay logs along the length of the house. Simply place the cross log on the first logs of the wreath and mark them against the edges of the cross log. The transverse log is removed, and a crown (landing) groove must be made on the longitudinal logs of the first wreath. Its profile may vary. All kinds of connections of logs inside the wreath are used in the construction of a log house. In the old days, a notch was made on both logs at the junction, and the logs were simply stacked. For reliability, they (logs) were interconnected with a wooden hairpin, and the cavities obtained with poor-quality organization of the joints were filled with moss or tow. Currently, such a connection of a wreath of a log house is also used, only modern thermal insulation materials are used instead of tow and moss.
Alternative connection types

Another type of joining of logs, which is popularly called the "Finnish corner", involves profiling the end parts of the logs at certain angles. At the same time, the corners are not always profiled according to the same scheme, therefore, without an accurate scheme (or an experienced construction manager), such a connection should not be resorted to. Better to come up with something simpler than spoil the material. The simplest (and most reliable) solution is to make a triangular depression in the lower logs (perpendicular to the trunk), and give the upper log a corresponding profile. The knot will turn out to be reliable and rigid. Such a knot has been known to carpenters since the times of Peter the Great and was used everywhere.
With the correct laying of the first wreath, the transverse log should be exactly half of its diameter higher than the longitudinal elements. Well, then the whole process of laying the logs will have to be repeated for each wreath.
The wreaths of the log house should be fastened together due to the previously obtained profiling and the longitudinal groove. Most carpenters do not consider this to be a sufficient measure and use anchors, dowels and ordinary steel staples for this purpose. The use of brackets allows you to obtain a perfectly even angle during construction and add additional rigidity to the structure.
Arrangement of a window and a doorway

Fastening the wreaths of the log house on the pins should be used near window and door openings. Here there is always the possibility that under the influence of the gravity of the entire log house, a certain log may "lead" to the side a little. It is possible to fix this, but you will have to raise the blockhouse, and this can greatly affect its density and integrity. To build a log house without further modifications and allow the dowels. Simply put, the logs near the aforementioned openings sit on hairpins. The distance between the pins should be from 30 to 40 cm. Additionally, the cuts of the logs in the openings are also attached to a wooden board. The fixing board is removed just before installing the door frame.
Ready-made industrial log cabins
In general, building a log house with your own hands is available to everyone. But you definitely cannot do without a certain amount of engineering thinking. It is much easier to assemble a log house with your own hands if you have purchased a typical construction project (or an individual project) along with all the components. Then all the construction of the house will resemble the constructor from the DIY store. You just have to disassemble all the logs by marking (for reliability, you can arrange all the parts in a certain order) and boldly take on the construction. You don't have to do specific profiling or trim parts. Just assemble the parts in accordance with the attached instructions and control the horizontalness of each wreath, as well as the verticality of the wall with a building level.
Drying, subsidence and installation of the roof

After the construction of a log house, unclean areas of the bark remain on the logs, which will begin to darken over time, so the log house must be sanded.
The blockhouse cannot be considered finished immediately after its assembly. And it is not advisable to build a roof either. Whatever moisture your material has, its additional drying is inevitable. The house will shrink in any case. It is easier to fix a blockhouse than to eliminate the roll of the roof, so there is no need to rush to install it. It is recommended to leave the frame to fully shrink and dry for at least a year. It’s clear that you don’t want to wait that long. Then you need to start building a log house in early spring (the foundation should be ready from the beginning of last autumn). In the summer, the log house will shrink a little, you will carry out additional heat and waterproofing, and you can erect a roof by the onset of cold weather. This is exactly how the construction was carried out in the old days.
Craftsmen believe that the best wooden house is obtained not from preforms that have been factory processed and profiled, but from round timber.
You can agree with this opinion if only because you will do every detail for yourself, so do not tolerate marriage at work. Every detail will be fitted so carefully that even the use of heat-insulating materials is practically not necessary. By the way, for these purposes, moss was used (and is used until now) not only because of the lack of other materials.
Biologists say that mosses independently resist the appearance of fungal diseases of wood. The symbiosis of wood and moss is also used in construction. Old building methods and secrets were good in everything. The only bad thing is that building a house in this way can take more than one year. And there are almost no craftsmen who understand a lot about the construction of a log house from round timber. And you personally do not have enough strength to comprehend the whole science of construction from start to finish.
During the construction of a wooden house, you must remember about safety measures and use personal protective equipment.
Often, people who live in an area with a commercially available round timber, the idea arises to build a house on their own: especially since almost all peasants owned this wisdom until quite recently, not knowing a word or reading, not owning the technology of construction. Building a log house with your own hands is not a great science, but it still requires a deep understanding of the process and the ability to adapt old carpentry technologies to new conditions.
Materials and tools for the construction of a log house
We are in a hurry to dissuade people who want to install a log house using modern power tools to save time. Unfortunately, the use of chainsaws and electric planers is not recommended, they can only be used for heavy work. Wood treated with power tools is more susceptible to mold and decay processes. For the construction of log cabins, a special carpentry kit is used.
For work, in addition to axes, you will need a standard plane (as well as a sherhebel plane for finishing work) and a scraper (for removing the bark), there is also a number of additional carpentry tools for cutting into a cup. An adze is used to cut a longitudinal groove - an ax with a rounded blade and an inverted hatchet. When processing wood with hand tools, wood pores are naturally clogged, as a result, a hand-chopped house will stand much longer.
Carpenter's ax and its features: where to order and how to make

A house made of round timber is cut by several types of axes, professional cutters order axes for felling houses on order from high-quality hardened steel. In the simplest version, we recommend stocking up with an ax for rough cutting, which, without the weight of the ax, should lead about 1.6 kg, have a sharpening angle of 25 degrees, for convenience, use the length of the ax 60 cm. And the second ax is used for fine cutting with higher accuracy, such the model will have a sharpening angle of 20 degrees, a mass of 0.9 kg and an ax up to 50 cm long.
Many artels in their work use a restoration-carpenter's ax, which was restored and made on the basis of ancient samples by A.V. Popov. There are many modifications made by Popov himself. Up to about 90% of felling joinery can be done with this tool. Popov's ax has a wedge-shaped shape, in fact, this ax is a half moon, since its tasks include not only cutting, but also removing chips during operation. This requirement is achieved with a specially shaped tool.
High-quality axes for felling log cabins are produced by a number of Russian forges. One of the most curious is ToporSib. In this artel, you can purchase all the necessary tools for felling a log house in the form of ready-made sets.
Selection and preparation of logs for the construction of a log house
For the construction of a log house, round timber is required. The thickness of the log house is selected based on the availability of materials. Usually, a round house is cut with its own hands from affordable and inexpensive materials. In Russian conditions, we are talking about pine round timber. There are 4 varieties of round timber available for sale, experts recommend the 2nd grade:
- 1st grade: butt part, no knots, used for high-quality woodwork;
- 2nd grade: assortment from the middle and butt part of the pine trunk, there are a small number of knots and cracks;
- 3rd grade: round timber with a large number of knots;
- Grade 4: wood with any defects, except for rot.
Pine for the construction of a log house is chosen for budgetary considerations, in addition, this wood is soft and pliable in processing, has a small number of knots, does not require additional processing, the trunk runout (difference in diameter) does not usually exceed 1 cm.Pine does not crack as much as spruce in processing, but has softness, therefore, for the lower logs that are closer to the ground, larch or oak is recommended. In this case, the cap can be made of pine, but its diameter should be 5-7 cm larger than the main log. In some cases, a high foundation can save from ground moisture.
For felling, only fresh wood is used; ideally, a log house is cut in the forest, where material can be picked up, and then transported to the installation site. Fresh material should be stored for no more than 2 weeks; for storage on a construction site, rounds are stacked in stacks. For northern regions with temperatures reaching -40C in winter, logs with a diameter of 21-24 cm are used, for the middle strip 15-18 cm is enough.
Project


When building a house, it is better to start with small forms of buildings, for example, to build a gazebo or a log-bath with a relaxation room and a bedroom. You can live in such a house until the construction of the main house, and then use it as a guest house. Usually a timber of the maximum length is ordered, while it is possible to make accurate calculations based on the availability of windows, doors, walls and select the logs at the sawmill according to the required size.
In order to successfully and quickly build a house for yourself, it is better to hire an artel, which is engaged in wood construction, at least for the summer. This will help you to understand the main points of manual felling of log cabins.
Foundation works: in the old days and now
The foundation for a wooden frame is made using tape technology or from stone. The higher the foundation, the better the timber will be protected from soil moisture. A round log house can be installed on a columnar and pile foundation. In the old days, the first rows of logs, the so-called uterine crown, were installed on stone ramparts, they were called ryazem. This solution made it possible to raise the house above the ground and secure it firmly.
We chop the log house with our own hands
Prepare accessories before starting work. First of all, the supports for holding the logs, the fixation of the round timber is ensured by the cut wedges. Next, you need to prepare the logs to size:
- when cutting a log house "in the paw", the logs are prepared according to the design dimensions of the house;
- when cutting "into the bowl" by 60 cm more.
Then, with the help of a scraper, the bark is removed from the trees, you can bring the log to a smooth state with a plane, but since the top layer of wood will be removed, you need to treat the log with an antiseptic solution or tar oil.


At the next stage, the cutting of the oblique crown is carried out using the cutting of the log. On the one hand, you should get a perfectly flat surface that will be in contact with the foundation. Further, a strapping is constructed, a felling is done without much difficulty with your own hands in a bowl, other technologies require skill.
Here is how a do-it-yourself frame is made video:
The algorithm for cutting a longitudinal groove can be different; professional craftsmen make it by hand. A small graphical instruction will help beginners.

The felling of a log house can be carried out in a bowl, as well as using a number of other methods, which are illustrated in the figure.

Please note that there is Russian and Canadian felling technology. The Canadian method of felling log cabins is better calculated for the shrinkage of the log and guarantees better thermal insulation.
Conclusion
Do-it-yourself felling is a very real goal, as a result of which you will become the owner of a beautiful and warm home. Construction of a wooden house will cost you relatively inexpensively, since labor-intensive processes will be carried out independently. The house will delight with its appearance, as well as create a healthy atmosphere inside due to the aroma of pine resins. The key advantage of this construction technology is the fact that you can cut a wooden house at any time of the year. When using high-quality old wood, such a house will last at least 100 years.
For many millennia, wooden houses have been used by people, and their popularity in the 21st century is completely reaching a new level. Before folding a round log house, you need to know a lot of things. There are many advantages to this kind of houses: environmental friendliness, design, it warms up easily and retains heat for a long time, breathes, thanks to which there is always fresh air inside.
Parameters for building a house from a bar.
Preparatory work
Tools and materials:
- roulette;
- shovel;
- sand;
- water;
- edged board;
- reinforcing rod;
- Bulgarian;
- welding machine;
- hammer with nails;
- gas-burner;
- roofing material.

Diagram of a log cup with a corner cut.
At the very beginning, a foundation is made under the log house, and its deepening may be minimal, but it will have to be raised high enough above the ground so that seasonal moisture does not destroy the wood. A shallow strip foundation is optimal, which does not require much effort and time.
To begin with, a trench is dug around the perimeter 35 cm deep and 40 cm wide, and at least 2 walls are formed inside to increase strength. After the required trench has been dug, it is necessary to align its walls and bottom part, due to which the poured solution will be highly reliable.
A 5 cm sand cushion is poured onto the bottom and poured with water. In the meantime, the water dries (2-3 days), you need to prepare the remaining elements.
Now the formwork should be made. It will require an edged board 25x150 mm, and the height of the boards will be 0.7 m. It is advisable to make the formwork for the entire building at once, so that later you do not have to fill it in parts. All fastenings of the boards are carried out on nails, since with screws you will have to spend 2-3 times more time so as not to split the boards.
A 10 mm ribbed rod goes to the reinforcing frame. In this case, the process looks standard:

Figure 1. Scheme of marking a log when cutting into a paw.
- 5 long parallel rods are laid out with a step of 10 cm.
- Rods of 60 cm are laid perpendicularly with a step of 30 cm.
- Each joint is fixed with electric arc welding.
- An identical grille is produced.
- With the help of rods of 25 cm, all parallel joints are combined into one system. It is advisable to carry out this step directly at the installation site, because the finished structure is far from always able to lift even 2 people, and not everyone can use the truck crane.
During manufacturing, you need to be careful so that the metal does not touch the formwork and sand. In order to raise the reinforcement above the sand, you need to use broken brick or special plastic stars. From above, you need to weld on rods with a step of 1 m in order to ensure a high-quality joint between round timber and concrete.
Now you can pour the concrete solution M300-350, then safely leave it to dry for 28 days. After this time, the formwork is dismantled, and all open areas of concrete are laid with roofing felt and burned with a gas burner. Steel rods also need to be waterproofed.
Primary activity
Tools and materials:
- axe;
- round timber;
- roulette;
- tow.

Figure 2. Scheme of connection in a paw with a thorn.
Now you can make a log house from round timber. There are only 2 cutting options that are especially popular: Russian and Canadian. Outwardly, the result is identical, but in practice the Canadian bowl (Fig. 1) is universal, since allows you to harvest wood in any season, and after shrinkage (up to 10 cm), no cracks appear. There are 2 ways of cutting - into a bowl and into a paw (Fig. 2), but because of its reliability, it is the bowl that is especially popular.
There is a small nuance, which not everyone adheres to, which is why the tree is sometimes judged negatively: you need to form all the elements with an ax, because in these places the likelihood of rotting decreases many times. In no case should you use the rounded versions, because during industrial processing, the protective layer is removed from the wood. The only plus of the rounded version is its thermal insulation, which is better than all analogues.
Glued laminated timber is an intermediate link, i.e. possesses intermediate strength characteristics, and at the same time average thermal insulation and weight. It differs in the way of joint - vertical. This method does not require cutting grooves along the edges, because it has a continuous groove along its entire length, into which the next similar specimen can be installed.

Diagram of the vertical section of the mezhventsov connection.
After the whole frame is done, you can start cutting down the doors and windows. Such a step is very unusual in modern realities, but it is he who will provide the ideal quality. For strength, you need to lay one log in the center.
The house is ready, the windows and doors are installed, the roof is covered, but it is necessary to finally distinguish between internal and external space. To do this, all the cracks with tow will be caulked in the log house. This process is carried out using an ordinary knife. Any finish is fixed on top, but in the first 3 years it is better to use something simple, because you need to watch the seams.
Additional aspects
Expanded clay serves as insulation for the floor, but you can use any other insulation if you wish. For expanded clay, waterproofing is initially laid on the ground, which will go to the walls, then there is a layer of insulation, and then waterproofing again, but with a downward bend. A screed is formed on top.
The stove inside the room is placed at a distance of at least 15 cm from the walls, but it is better in the old traditions in the center of the room. This precaution will allow you not to think about possible fires.
Before folding a log house, you need to know not only the quality of the wood, but also the felling time.
To be sure of the quality, it is better to take the simplest round logs of axial felling, which do not undergo special processing with a tool.
It is he who will last for several centuries, if done correctly.
Making a log house is not an easy but fascinating process. This manual for the construction of a log house will give complete information and answer most of the questions that may arise during work. Here you can find a breakdown of the points of all stages of construction, nuances and little tricks. The instruction will tell you what tools you need, introduce you to the terminology of carpenters.
Preparatory work
What tool should you get for building a log house with your own hands?
- Carpenter's ax. It should be comfortable, not very heavy, but not light either.
- Square.
- Chisel.
- Roulette.
- Marker or pencil.
- Plumb line.
- Hacksaw.
- Brace.
- Shovel.
- Non-stretch cord.
- Level.
- A line is a special marking tool, similar to a compass.
- "Baba" - a birch block with two brackets on the sides, used as a spacer.
- Chainsaw is not required, but it will significantly facilitate labor and time costs.
Carpenters use specific expressions in construction - professional language. Basic carpenter terminology:

- A blockhouse is a building of logs, without floors and a roof, the basic part of the house, its height depends on the number of crowns.
- A crown is a part in a blockhouse, consisting of logs that form a square or rectangle. At the corners they are connected by “locks”. The crown is divided into 3 types: window sill, window sill, above window sill. From the name it is clear where they are located.
- The crown is the first crown of the frame. Protects the bottom rail from rotting.
- The lower harness is the second crown in the frame, which is the main one. Lags are put into it.
- Lags - load-bearing for the floor. They reinforce the bottom harness.
- The closing crown is the first crown above the window.
- Top rail - a structure that is the basis for the roof. It consists of rafters and overhead rafters.
- The butt is a part of the trunk in a log house, which is located at the bottom of the tree. The opposite part is called the top.
The classic form is a round timber frame. This is the lining of the logs at a height. A log house from round timber requires great professionalism, it is easier to handle a log house on the ground, and use scaffolding to install it in the right place. The forests need to be made strong and comfortable. Working with a log house is dangerous, so you should not neglect the safety rules. In this manual, we will use the felling method with subsequent re-laying. It is much safer and more comfortable, you do not need to work at height. Its only drawback is the increase in construction time. The structure of the log house will be carried out in stages and parts: base, middle and upper part.
You need to understand that there are no perfect logs. They change their diameter along the entire length of the barrel. Therefore, it is necessary to change the tops and butts. When making edging, one crown will fit better against the other. The edge of the deck is cut off from one side and the other - the result is a plane.
Back to the table of contents
"Dovetail" and "paw" - the basic part of the castle
One of the first steps to take is logging.
Depending on the size, width, length and height, you will need a different number of logs.
Dovetail connection diagram.
Pine, spruce and other conifers are mainly used. Birch should never be used, it will rot quickly and is very difficult to process. After choosing a forest, you need to get rid of the bark and dry the forest.
It is necessary to select a place where construction will take place, while taking into account that it should be enough for all parts of the building. It is necessary to mark using a non-stretch cord.
Then you need to make a non-permanent foundation - linings. Their dimensions are 1 m long and 1/3 m in diameter. We install them near the corners of the building, which will provide the most uniform load on them. It is necessary to install the pads according to the level, with an error of up to 5 cm.
The next stage is the making of the edging. To do this, you need to choose where the future edging will be. Place this side up and secure the log with staples. Using a plumb line, draw vertical lines, which will become the edges of the edging. With the help of awls, you need to pull the cord from one end of the log to the other. This will draw the edge of the piping. Then you need to fix the log with the future edging up and, having made the cuts, start cutting the log, getting the edging. Then you need to mark the edging on the opposite side of the log and make another edging in the same way. Chainsaw cuts can be an alternative to notching.
Back to the table of contents
The process of making a log house
We take a log for the cap and make a piping, approximately 10 cm wide. With edging, he will lie on the lining. Then we cut down 60-75% of the log thickness, the length of which will be the same and will not exceed the maximum diameter of the log. At the end of the boob we put a point and from it we draw a line of “paws” with an extension towards the inside of the house. Then we put the “dummies” on the “paws” of the cross-beam runs, fix the structure with brackets and check if the size of the round timber has not been violated.
Connection diagram "foot with undercut".
And only after re-checking, we finally fix it with staples. Then we transfer the conjugation lines to the upper log from the lower one. This should be done while observing parallelism. On the runs, you need to cut out the middle block according to the same principle of transferring the lines.
The next in line is the “bottom harness”. "Dummies" are made on the logs of this harness. It is necessary to do so that there is a plane of the upper girders, with the help of a lining and a level, we achieve their horizontalness. The error should not exceed 3 cm.
The next step is to sample the groove. To do this, we make notches across the groove, crosswise with an ax. We make a notch with an ax along the groove, as a result we get a groove. We cut out the “paws” according to the scheme described above, and place the log on the base. We check the tightness of the fit, if necessary, remove and finish. When the frame fits in size, evenly spread the tow on the lower log and mount the log on top. We make and mount 3 transverse logs in the lower logs and make logs. We mount the lags, using the "woman".
Back to the table of contents
Installation of the 1st window sill crown
Let's start by marking the doorway. With the help of a dowel, we fix the logs, having previously applied the markings. Using a chisel, select a pocket for the dowel, going 1 cm deeper than the dowel itself. It is necessary to check the verticality of the corners using plumb lines. The finishing sill log should be placed on 2 dowels and tow should not be placed under it. When re-laying, it is necessary to observe the equivalence of the diagonals.
We carry out the installation of window crowns. The height of the window openings is from 110 to 130 cm. We fasten the "shorts" of the window crowns with dowels. By analogy, we do the work. In order not to get confused when shifting, it is necessary to draw a line at the corner of the log house.
We make the “cap” of the log house. We remove the upper crown above the window and begin to make the upper harness. The design includes two girders and rafters. At the end of the runs we make doodles, in the middle we need to make cheeks instead of doodles. With the help of shims and brackets, you need to achieve the horizontalness of the upper part of these runs. Cross girders should be installed, those in the middle should be equipped with a “dovetail”, others with a “paw”.
We make rafters. We take logs with a thickness of at least 15 cm and cut 2 edges on each (they must be parallel), except for one. We cut the untreated rafter into the deck using this attachment, as a result, its top should be horizontal. We cut the rafters into the upper girder, but not more than 25% of the diameter of the log. Hook the cord around the edges of the last rafters and align all the others. Using a chisel, make pocket legs under the rafter legs.
Manufacturing of rafters. Special accuracy is needed here, the strength of the roof depends on the rafters. The length of the rafter also depends on the angle of the roof. The presence of a large number of knots in the rafter is not allowed. At the base of the rafters, we cut out a spike and fold them in pairs. We adjust the spikes and pockets. We begin the re-laying of the rafters, while it is necessary to remember about the packing.


The strength and heat engineering of a wooden structure to a large extent depend on the type of corner cut. The builders of the old Slavic settlements did not keep secret the options for its manufacture. Thanks to their oral master classes, proven folk technologies were preserved. The carpentry tradition has been greatly enriched by foreign experience and the introduction of useful improvements. We have accumulated a significant baggage of knowledge. Now in wooden construction, various methods of cutting beams and logs are used, one of which will have to be used to build your own bathhouse.
Two "indigenous" families of cuttings
The fundamental criterion for dividing cutting methods into two large classes is the presence or absence of bypasses. This is how folk craftsmen called the remains of a log, and then a beam that extends at the ends beyond the contour of a wooden structure. Based on this indicator, in the technologies for the construction of log cabins, I distinguish two main felling schemes:
- "Into the bowl", according to which the corners are cut with the remainder... This is the most common method, which has a lot of variations of domestic and foreign origin. The disadvantage of the nodal bowls is the tangible consumption of not cheap material at all, plus excellent thermal insulation of the corner. And the buildings cut into a bowl look very impressive.
- "In the paw" or in a simple way "without a remainder"... According to it, the outline of the structure is lined up clearly according to the plan. With a material consumption equivalent to the previous technology, the internal dimensions of the structure are larger. The corners chopped into a paw require obligatory facing, otherwise they will be blown through and wet. Log buildings built without bypasses can be sheathed with clapboard, block house, plastered, faced with bricks or sandwich panels. Unlike options with bowls, all directions of finishing are applicable here, and sometimes recommended.
One of the fundamental rules is that all gussets must follow the same pattern. Since the cutting of the timber and the log-bearing walls was carried out according to the "into the bowl" scheme, then the partitions will need to be cut in exactly the same way. Immediately, we draw your attention to the fact that all existing methods are applicable for corner joints in log crowns. But a bath from a bar is cut mainly in the paw, but a number of bowl-shaped types are occasionally used.

Both classes of corner cuts are "overgrown" with an impressive number of subsidiary subspecies, differing in the complexity of manufacturing and heat engineering qualities. The choice of the best method is determined by:
- experience of the performer;
- climatic specificity of the area;
- preferred period for taking bath procedures.
To assemble the crowns of a summer cottage, operated only in the summer, the simplest cutting methods are suitable. Especially if the owner is going to build a bathhouse at his summer cottage on his own. A customer of a team of craftsmen who needs a warm building for year-round use should not deny themselves the choice of a complex technological scheme. Information about the differences and features of cuttings will help both the independent contractor and the zealous employer of builders, who is trying to spend money not in vain, to make a reasonable choice.

Cutting options with residue
The most accessible method for making a corner knot for a novice carpenter is the felling into a bowl, i.e. with the rest of the log at the end. In the "cup" class there are simple and super-complicated technologies. In wooden construction, it is important to understand: what is easier to cut will heat up and serve less. However, without carpentry skills and knowledge in this art, it is better not to tackle the manufacture of complex structural grooves.
Algorithm for making a simple bowl
For the production of felling into a simple cup in the log, two notches in the form of half-cylinders and a longitudinal inter-crown groove, called a lunar groove, are selected on the sides. All the grooves in the log are made from above, which is very convenient for the master, but not good for the walls. Moisture easily seeps into the openings to the sky and dust gets through the interfaces, which have lost their density due to shrinkage. Therefore, simple bowls need constant caulking.

The owner of the rounded material does not need to suffer with preliminary preparation. Calibrated logs have a uniform size, often with mounting slots already selected. Even the manufacture of corner grooves can be done by cylinder manufacturers if they receive an order and intelligible project documentation. The buyer of sawn wood will have to carry out processing: debarking, drying, choosing a longitudinal lunar furrow for reliable joining of the crowns, and then start cutting into the bowl.
The sequence of work on the manufacture of a simple bowl:
- Lay the debarked log in a suitable place for marking in the log house.
- If the longitudinal inter-crown groove has not yet been made, on the thin end of the lower log, in the upper part of which grooves are to be made, we draw a line equal to the width of the future groove.
- We spread the legs of the factory or home-made line to the width of the mounting groove to be marked.
- We attach the line with the legs to the humps of the log laid in the blockhouse and the upper brother being tried on to it, then we scratch the lines on the lower log with the sharp legs the exact profile of the upper element, "bordering" the log on all sides.
- Having completed the marking of the groove, we move the legs of the line to a distance equal to half of the average radius of the log laid on top.
- Let us again attach the legs of the drawing carpentry tool to the one being tried on and to the lower log lying across, in order to outline the half-cylinders of the future corner recesses.
- We will remove the upper element of the frame to be tried on, and on the lower log we will make cuts that do not reach the depth of the drawn grooves of 7-10 mm.
- Select the marked grooves with an ax and finish the surface with a scherhebel.
A method of making a corner joint based on the technique of felling a log house into a bowl with a spike is shown in the video:
There is not much difference in the sequence of actions. You can cut the groove first, then the corner grooves, or in the reverse order. The main thing is that all three structural components are precisely hewn out. You will have to pant for any: you will need to try on and cut off the excess, if the upper log does not "sit" in the frame. Therefore, there is no need to rush with the final selection to the scratched lines. It is advisable to gradually bring the finishing to mind, so as not to spoil the material with too large samples. In the old days, for the first time, the clean-cut mounting recesses were smeared with tar and the upper element was laid on it. The grubby marks indicated where else to hang.
Child bowl options
Cutting a log house into a bowl attracts inexperienced performers with its simplicity and relatively low labor costs. However, without additional locking elements, it does not keep heat well. For the construction of a summer bathhouse, this is quite acceptable. For the construction of a warmer building, it is better to supplement the castle unit with an undercut. The felling method will become more complicated, but the heating technology will improve.

The list of the closest "relatives" of the technology of cutting into a bowl includes:
- Felling in a hulk (aka in a hulp), which is a mirror image of the bowl. This method is also called Siberian felling. It differs in that the corner locks and the moon groove are simply turned upside down. The lower orientation of the recesses excludes the penetration of moisture and dust into the nodal junctions, due to which the insulation does not deteriorate and the frame does not get wet.
- Bowl with a ledge. It appeared as a result of the popular improvement of the methods for cutting and breaking, according to which felling is done either from above or from below the log. Cutting the bowl with a ledge allows you to position the longitudinal groove at the bottom, and the corner recesses at the top, or do the opposite. Because a log with an inter-row groove will need to be placed in the bowl, the configuration of the recess cannot still be semi-cylindrical. Therefore, a rounded protrusion appeared in the bowl, repeating the radius of the longitudinal mounting groove.
- Cutting into ocher. It consists in the formation of two equivalent rectangular cuttings on the upper and lower sides. The option is simpler than simple, but suitable only for the construction of outbuildings.
- Okhlop with an undercut. In order to optimize the strength and thermal insulation of the corner, an undercut is left in the bowl - this is an unselected quarter in the bowl on the inner side of the corner. For docking, you will also need a reciprocal notch in the mating log.
- Fat tail. It differs from a simple bowl by the presence of an additional spike in the groove, which increases the strength of the corner knot. The thorn is called a fat tail or darkness. He gave the name to the method and improved the thermal performance of the log wall. The wheelhouse can be oriented to the fat tail in both traditional directions. The bowl is initially cut to half its height, then a thorn is hewn out. The dimensions of the formed thorn are transferred to the mating log without any special tweaks: they are rolled onto the frame and mark with serifs where the reciprocal groove needs to be cut.
Two methods of cutting a log house into a hook are considered quite demanding in relation to the skill and experience of the performer. The first of them predetermines the cutting of half of the bowl, and the remaining, not hewn out half must clearly dock with the semicircular cutting of the mating log. The second technology resembles a bowl with an undercut, but at the same time the logs are cut by one edge, and the hewn side is turned into the structure. When chopping with a hook, the maximum power of the log is maintained, so the corners are warm and secure.

This is how a simple hook is cut:
Overseas cutting technologies with the remainder
Fundamentally, the Canadian and Swedish felling schemes are similar to the Siberian technique "in the hole". Only the corner grooves and recesses to them have a trapezoidal configuration rather than a rounded section. This is a great plus, because during shrinkage, the Slavic bowls expand, which is why they need periodic podkonopatka. After shrinkage, the Canadian and Swedish notch fits tightly on the log hewn under it. There are no gaps at all, and over the years, the docking also spontaneously thickens.
Their performance technique is different. The external ones can be distinguished by the logs of the "Canadian" log house partially hewn in the area of the castle and the pretty "Swedish" bypasses sharpened on six sides. Canadian technology has a nice simplified successor - saddle chopping.

An extremely demanding moment of all cut schemes with a remainder is precisely the length of the part of the log that protrudes beyond the contour of the structure. You cannot make a bypass too short, otherwise it will break off. So that the desire to save money does not lead to the emergency state of the log house, GOST number 30974-2002 clearly regulates the limiting distances: from the end of the log to the center of the cut-in bowl, there must be at least 1.4 of the diameter of the log being processed.

Video demonstration of Norwegian felling:
Cutting methods without residue
There are significantly fewer options for felling log cabins into the paw than methods with a bowl. The reason for their appearance was not economic considerations, but the desire to transform the wooden tower into a luxurious palace by decoration. The corners cut into the paw are much colder. The capillaries at the ends are open, therefore, it is strongly advised to sew up the outer side of the corner joints in the paw, at least with boards.
For the construction of a log house using the "in the paw" technique, a beam is suitable, a carriage - a log hewn into two vertical edges on opposite sides. Suitable cylindrical and ordinary round timber with vertical left and right edges - "blockheads". The length of the dummy, i.e. the length of the side run is equal to the largest diameter of the material used. The width of the dummy, i.e. the distance between the grooves is equal to 2/3 or 3/4 of the diameter of the top of the thinnest log in the purchased batch. It is something that must be first identified and "duped" as a standard for other logs, so that during the work it is not revealed that some of the material does not fit the size of the planned paw. By the way, dummies can be hewn out at once on all logs, and then start making paws of the selected type.

General instructions for making paws
The straight paw is the simplest scheme in the “paw” class, so you can try to make it yourself. She has all the lines of the upcoming teska strictly vertical and horizontal. To make the corner less blown out, the paw can be supplemented with an undercut by extruding this constructive addition from the inside of the corner. The most reliable connection in the class is considered to be an oblique foot, because the inclined planes do not allow the elements of the log house to turn out and carefully retain heat.
All variations are chopped in an equal sequence:
- The blockhead prepared for processing is again cut from the top and bottom. The depth of the folds should be equal to the width of the block. As a result, we get a parallelogram with one imaginary side and a square section turned towards us;
- We draw the end of the parallelogram into 8 equivalent horizontal parts.
- According to the selected paw type and tabular dimensions, mark and connect the points on the drawn plane;
- Mark the lines of future runways with the required slopes of the planes and undercuts, if it is decided that they should be;
- Carefully remove the surplus behind the markings and use the first finished paw to make a template for transferring the dimensions to the next logs.
There is no need to independently calculate the dimensions of the slanting paws, they are available in the tables. The craftsmen cut them slowly, meticulously. The lunar groove is scratched along the logs laid in the frame, pushing the legs of the line apart by the amount of the revealed gap.

Corner cuts in a bar
It is difficult to form a rounded connection in a bar, and it is not necessary, because methods have been developed for joining the bar crowns. On the basis of the paws, identical variants were created with very similar names: ocher, half-tree, fat tail.
However, the timber has its own, specific methods and types of corner joints with the use of inserted or sawn thorns in the material. The walls, according to the tradition of wooden architecture, are "pierced" with dowels - vertical wooden nails 25-30 cm in diameter and 0.8 times the height of the frame.

However, the timber has its own, specific methods and types of corner joints with the use of inserted or sawn thorns in the material. The walls, according to the tradition of wooden architecture, are "pierced" with dowels - vertical wooden nails 25-30 cm in diameter and a height equal to 0.8 of the height of the frame. It should be remembered that a vertical gap must be left between the elements of any joint in a cobbled and log house to compensate for the standard shrinkage following construction. In the bowls and paws, the maximum clearance is 0.5 cm, in the mounting longitudinal grooves 1.0 cm.

We have described the common, but far from all existing cuts schemes. The difference in the methods of their implementation and in heating technology will tell you which is better to prefer Good luck!
 How to make a boiler with your own hands from improvised means?
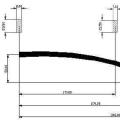 How to make a crossbow: throwing an office battle!
 What to do if neighbors steal electricity What to do if electricity is stolen from a house