Wooden hives for bees. How to build a bee hive with your own hands. Photos of beehives "kalinka" llc
Having decided to become a beekeeper and having decided on the breed of bees, you need to take care of creating comfortable living conditions for insects. Families grow, swarm and after a while they will have to be planted in new nests. Of course, you can buy ready-made structures, but they are not cheap, and buying a used one is fraught with contamination of the entire swarm. There is only one way out - to make a house yourself. How to make a hive for bees will be discussed in the article.
Before you make a bee hive yourself, you need to decide on its type. People began to be engaged in beekeeping since ancient times. Unsurprisingly, there are many different types of hives emerging today. 
Conventionally, all nests are divided into:
- Vertical (sun loungers). They are characterized by an enlarged top due to extensions. The most common options are the Dadant hive and the multi-hull house.
- Horizontal (risers). Build-up by frames is carried out parallel to the surface. This includes sun loungers from 24 frames and Ukrainian designs with perpendicular arrangement of frames.
Among all the varieties, the most popular are multi-hull structures, houses for 12, 10 frames and sun loungers.  The price depends on the design features, the size of the nest, the material of manufacture. On average, a finished hive costs about 2,000-4,000 rubles, and without frames. In addition to it, the beekeeper will also have to purchase a wax melter and a honey extractor. Therefore, homemade bee hives are a more profitable option for an apiary.
There are various hive systems. Such structures are made according to standard designs. Each typical project of a bee hive is developed by design institutes and is intended for keeping a bee swarm in different climatic zones. 
There are the following types of hives:
- Single body with removable bottom and 2 extensions.
- Lounger with an extension for 16 frames.
- Double-hull with detachable bottom.
- Single body with 2 magazine extensions.
- Lounger with an extension for 20 frames.
- Multi-hull.
- Double-hull with 2 extensions.
What is a hive made of?
To make a nest for a bee family with your own hands, you need to figure out what a bee hive consists of, what assembly schemes exist. Structurally, the house consists of a body, bottom, cover, frames and store extensions.
 The body is the main element. It contains frames for honeycombs. Outwardly, it looks quite simple: a box without a bottom and top, equipped with special holders for frames. On the front wall there is a notch - a hole in the hive for bees through which they fly in and out. The shape can be slit or round. The size is regulated by the liners. Close the entrance with a latch.
The bottom of the body is covered with a bottom. It can be tightly attached and removable. A store extension is intended for the installation of the half-frames. It is about half the height of the hive body. It is often used during the mass collection of honey. Sometimes several stores are placed on the body.
 Frames are subdivided into nested and sectional. The former are used to build honeycombs by bees. The latter are used to obtain honeycomb.
The nest should contain hive drinkers for bees and feeders. The feeder is designed for and in the fall, for the treatment with sugar syrup. There are intrahive and upper feeders.
Hives are square, low-wide and narrow-high in shape. In principle, the device of a hive for bees is quite simple, so everyone can make a nest for a swarm. Moreover, today there are many ready-made schemes and drawings, according to which hives are created. You can find them on the Internet, they are freely available. To do this, you need to enter the appropriate phrase in the search, for example "10 frame hives for bees - drawing", and a lot of resources with schemes will appear before your eyes.
What materials are suitable for making beehives?
Hives are made from different materials: wood, plywood, polyurethane, expanded polystyrene, polyurethane foam.
Each of them has its positive and negative aspects. Let's consider them in more detail.
Wood
 The classic nests are wooden. This material is very popular with insects, as it brings them closer to their natural habitat. Linden is the most common tree used to make bee hives. Aspen will do as well. The smell of hardwood is pleasant and the honey produced in such a house will not have any specific features. The advantage is that moisture will not accumulate in the structure. The only drawback of a wooden nest is that it needs to be insulated for the winter.
Recently, conifers are often used for beehives. For example, spruce, pine, fir. They are distinguished by high rates of heat saving and are cheaper than hardwood. Among the disadvantages can be called the accumulation of moisture in the house and the fact that honey acquires a specific smell of needles.
Plywood
 This material is characterized by environmental friendliness and durability. The plywood construction, covered with acrylic paint and insulated with expanded polystyrene, is several times superior to wood in some parameters. But such a house has poor moisture resistance and needs constant care.
Polyurethane foam
The main advantage of polyurethane foam (polyurethane) foam houses is their lightness. The house turns out to be very warm and the bees develop faster in it. The content of bees in PPU hives differs in many advantages. Honeycombs in such a house are reliably protected from moths. There is no need to fold dry.
Expanded polystyrene
 It is one of the modern materials for the production of beehives. Low cost. A house made of expanded polystyrene does not need insulation. The disadvantages include the fragility and fragility of the structure. Wood and plywood are more reliable in this regard. If the quality of the material is low, the quality of the honey also deteriorates.
What are the dimensions of a bee nest?
For the construction of a good quality house for a family of honey workers, it is necessary to correctly calculate the size of the structural details. The size of the bee hives depends on the size of the colony and the type of structure.
But there are universal values that apply to all types of bee nests:
- The distance between the mediastinums of the 2 frames, which are adjacent, is 3.75 cm.
- The diameter of the street is 1.25 cm.
- The distance between the bottom and the bottom bar of the frame is 2 cm.
- When installing an additional housing, the distance between the lower strips of the magazine frames and the upper bars of the nesting frames should be 1 cm.
- The distance between the back and front walls of the nest and the side strips of the frames is 0.75 cm.
How to make a Dadanov hive?
 The Dadant hive holds 10 to 12 frames. The frames can be bought ready-made. It is possible to make frames for bees and do it yourself. The nesting body is created in the form of a cube, usually coniferous wood is used, willow and linden are also suitable. All parts are produced according to the recommended dimensions and drawings. The cracks are sealed with putty.
First, you need to carefully process the tree. Then cut out the grooves that connect the walls of the housings. Planks are made in the size of 1.8x0.4 cm. Adhesives are used to connect the boards into 1 shield. All parts are assembled together with nails and glue. When the hive is ready, it is painted. After that, tap holes and small holes for ventilation are drilled.
How to paint a hive?
It is not difficult to make a hive according to a ready-made scheme, but difficulties often arise with painting. Many beekeepers are wondering which paint is best to paint the bee hive and in what color.
Painting gives reliability to the structure, protects it from moisture, rot, prevents the wood from drying out, and also makes the look of the house more attractive.
Color matching
 Consider what color experienced beekeepers recommend to paint bee hives. In fact, insects are color-blind. Therefore, so that they can calculate their home, the hive must be painted in different shades. Blue, white, cyan and yellow colors will make the nest look bright and visible.
Some beekeepers do not paint the hives at all, believing that honey workers will be able to overwinter and so. This is wrong, because wood is subject to negative environmental influences. Moisture seeping through cracks causes mold and rot, and this damages insects.
Selection of paint
 Consider what paint is best for bee hives. Either oil or acrylic is usually used. The first is preferable because it dries quickly and does not emit an unpleasant odor after drying. The composition is ideal for the outside of the building.
Acrylic paint is UV resistant and easy to apply. Does not disturb ventilation, it can be washed. Brightness lasts up to 10 years.
Thinking about how to paint bee hives, you can choose a silver paint. It is applied to the roof of the house and to the back wall. This protects the structure from overheating.
How is the preparation for winter going?
 At the beginning of autumn, the hives begin to prepare for winter. It is important to thoroughly insulate the house. in a multi-hive hive is somewhat more difficult than in other types of houses. The procedure requires taking into account a number of features. All 4 walls need to be insulated.
Weak colonies are transferred to a winter house for bees, in which the insects live until the onset of spring. Such a structure is erected from local building materials. Reed slabs, plates, adobe, limestone, slabs are suitable. All materials must be treated with antiseptic agents.
Adobe structures are the best option because they maintain normal humidity and temperature throughout the winter. Cement blocks should not be used. This stuff is cold.
 The room temperature should be between 0 and +3 degrees. It is advisable to install electric heating with automatic thermoregulation. If a temperature regulator is used for bees in winter, the temperature should be set at the level of the entrance not higher than +6 degrees. Air humidity should be 75-85%.
After the decision has been made to breed bees, it is necessary to acquire several families and take care of their home. The swarm is growing rapidly and as a result, new houses are needed. You can buy them, or you can make them yourself. Before starting work, you need to know all the subtleties of how to make a beehive yourself. There are many types of beehives and each has its own pros and cons. Before making a beehive with your own hands, the drawings are initially carefully studied.
Types of hives
Making beehives with your own hands is not difficult. Before starting work, you need to understand that the evidence varies in size, design and material.
By design, the hive is subdivided into:
- collapsible;
- non-separable.
Today, non-collapsible hives have become less popular. Most beekeepers use a DIY bee frame.
Frame houses are subdivided into:
- vertical;
- horizontal.
Horizontal or lounger, is a single-hull structure with a possible increase in different directions. This evidence is suitable for inexperienced beekeepers because of its ease of use. There is one drawback - they are large and heavy. The vertical structure consists of several buildings. Plus - lightweight and easy to move.
These two forms have more than one section, they are separated by a partition, which allows you to change the volume in different directions.
The most famous designs
Dadanovskiy beehive
One of the most popular designs that is installed in many apiaries. She received her love because of her ease of use and spaciousness. It can be made from wood with your own hands, and it consists of 12 frames, which can be supplemented if desired. In the summer and after enlarging the family, the hive can be enlarged with additional buildings.
Alpine
A multi-hive hive, built in the likeness of a hollow. Gained great popularity due to the similarity with the natural living conditions of wild bees.
This structure is ideal for places with limited space. It has no partitions or ventilation holes. Fresh air enters the hive through the notch.

Ruta
This dwelling is suitable for honey plants in warm regions, since due to regular rearrangements of buildings, the thermal effect inside the dwelling is disturbed. Ruta contains 6 cases with 10 frames.

Cassette
These hives have become popular due to the emergence of new bee diseases. This design has thin partitions, in this regard, the swarm creates a microclimate for itself.

Important! Constructed from natural material, impregnated with wax.
Ideal for inexperienced beekeepers. You can quickly make it yourself. They consist of 20 frames and insulated side walls, so honey plants survive the winter cold very well. The Ukrainian sunbed is easy to maintain.

Multi-hull, foldless
Thin-walled hive, wall thickness 20 mm. Suitable for regions with warm climates. The house has a lot of advantages - the buildings are light, easy to build with your own hands, very practical.
How to make evidence with your own hands step by step
The principle of operation is the same for all types. Before making a do-it-yourself bee hive, you need to know the exact dimensions. 20-frame horizontal bee hive, step by step instructions:
- We cut pieces from a board four cm wide. These pieces will serve as the front and back walls of the hive. Side, cut from a board three cm long.
- We assemble the structure so that all walls except the front are in contact with the bottom, and the front one rises from the bottom by one and a half cm.This distance will serve as a tap hole in the future. The corners are joined in a quarter and fastened with nails.
- We make a floor from a board with a thickness of 3.5 cm. The bottom should look like a shield.
- The ceilings are built from boards: L-47.8 cm, thickness - 1 cm.
- We construct the roof. It can be made flat, pitched or gable. This is the only piece that can be upholstered with a metal sheet.
- For the northern regions, the sunbed should be insulated on both sides.

DIY hive lounger for 20 frames
The lounger consists of a bottom, roof and walls. The frame is built from shields. Front part dimensions: 87x37. Rear wall height - 87x34. The length of the side shields is 44x49 cm.Bottom size: 84x54.5, thickness 3.5 cm.
You can make bee evidence with your own hands from:
- plywood;
- foam;
The ease of construction, with your own hands, lies in the fact that the foam is inexpensive and reliable. It is simple and profitable to build from this material. Before you build a bee hive with your own hands, you need to know the dimensions. The size of the future hive can be very diverse, it depends on the number of frames that will be there. To find out the width, you need to multiply the number of frames by 3.75. Length is calculated: frame length plus 1.4. The height is calculated: add the height of the frame to the height of the folds.
Step-by-step instruction:
- Initially, you should decide on the size and start construction in stages.
- On a sheet of foam, we apply stencils of the future house.
- Cut out the future walls and sand the corners with sandpaper.
- To fasten all the parts, we cut out the quarters and use nails and screws for the connection.
- The bottom is made of galvanized sheet metal.
- The roof must be flat or pitched. After fastening the roof, it is weighted down.
- The holes are standard.

After completing the construction of the hive, it is necessary to make a frame. They consist of: top, bottom and side bars. Made from dried, natural material.
Dimensions according to GOST:
- top and side - B-2.5 cm
- top rail - H-2 cm;
- bottom rail - B - from 1.5 to 2.5 cm;
- H - 1 cm;
- dimensions depend on the type of hive, dimensions according to GOST - 43.5x30.
(H-height; B-width; L-length)

Frame scheme
Frame
The central part of the hive is a four-walled box. It houses a bee's nest. As the bee colony grows, the bodies can be stacked on top of each other. By the number of buildings, houses are divided into: single, double-hull and multi-hull (from 3 or more). The wall thickness should be 35 mm. This size will help the swarm to winter well. The number of frames in the case can be from 16 to 24.
The parts prepared for the body are connected with nails or PVA glue. A cut is made in the lower part of the front wall: B-4cm, H-1cm. This slot will serve as the entrance and exit for the swarm. Also, at the bottom of the case, a hole is drilled for ventilation. The made body is treated on the outside with a water-repellent material and painted white.
Important! On the case, it is necessary to make recesses on the sides, 7mm below the top of the case. They will serve as handles for easy transportation from place to place.
Roof
The roof is made from a board 2 cm thick. From the prepared boards we make a structure in the form of a shield and, to prevent the board from rotting, we cover it with a tin sheet.
Important! When building a hive, the tin sheet is only used to cover the roof, it is not used for wall cladding.
Most beekeepers install a mesh on the top of the hive for extra ventilation when transporting the bee houses. It is also needed to isolate the swarm from the outside world.
Bottom
For regions with cold climates, the bottom is made of two layers of boards with insulation backfill. In the southern regions, insulation is not required, therefore, it is made from a single board.
The bottom is made of bars. The three side bars have standard dimensions - 57x6.5x3.5. The bars that will be installed in the rear are 44.5x6.5x3.5. In each bar, at a distance of 2 cm from the top edge, it is necessary to make puzzles. After all the details have been cut out, we proceed to assembling the parts of the structure. The bottom should be assembled with the letter "P". The grooves are necessary for the installation of the floor. The landing board is made of a 5 cm protruding bar, the front bar of the bottom.
The bottom, for convenience, should be removable and double-sided.

1. Left side wall. 2. Front top plank. 3. Arrival board (tap gate). 4. Inclined board arranged in a taphole. 5. Front lower bar of the tap hole. 6. Bar for fixing the bottom mesh. 7. Grid. 8. The middle bar of the back wall. 9. Bottom bar of the back wall. 10. Upper bar of the rear wall. 11. Planking the bottom. 12. Letkovy insert.
Sample toolkit
Before you start making a hive, you need to prepare the following tools:
- wooden hammer;
- awl;
- wire;
- pliers;
- nails and screws;
- measuring tape;
- hammer drill, welding machine and grinder;
- board 32x18, 12 mm plywood;
- insulation;
- a metal sheet;
- PVA, paint, brushes.
Blueprints
It is more convenient to use ready-made drawings.


Due to the large number of frames and bodies, it will be difficult for a novice beekeeper to make a multi-body hive.

This type of hive is a large, long box. The floor and roof fit snugly against the structure itself. Drawings of the manufactured structure:
When designing a multi-hull house, several rules must be followed:
- The bottom can be made by anyone. The removable bottom makes it much easier to care for insects.
- It is better to make the roof of the hive flat for more convenient transportation.
- Frames should be with side strips and have side bars.
- For a family of bees, it is necessary to make a feeder from a nomadic net.
- The roof is assembled after collecting the entire structure and after the stage of insulation.
The house should be warm, comfortable and airtight. Otherwise, the swarm will be sick, will not survive the winter cold and will not bear honey well.
Video
Beekeeping is impossible to imagine without a beehive. Such a house can accommodate a large number of bees and must be arranged correctly, which will allow you to receive a significant amount of such a valuable and tasty product as honey.
Purpose and arrangement of bee hives
Evidence Bee is an artificial dwelling made by man to house one or more honeybee colonies. Housing options for bees may differ depending on the system, but the general characteristics of high-quality and reliable hives are as follows:
- the presence of sufficient internal volume for the location of the honeycomb and storage of feed;
- full protection of honey bees from the negative effects of adverse weather conditions;
- ease of transportation;
- ease of work on the maintenance of the structure;
- the ability to easily and quickly change the internal volume in accordance with the needs;
- standard sizes allowing easy replacement of body parts and internal elements;
- made from high quality and environmentally friendly materials.

Inconsistency of the hive with any of the above parameters is unacceptable and negatively affects the entire beekeeping process.
Types of hives for bees: characteristics, advantages and disadvantages
Almost all types and varieties of evidence have both certain advantages, and some of the disadvantages due to design features.
| Characteristic | Advantages and disadvantages |
|
| Multihull | The design is presented at once by several lightweight cases with ten frames inside | Designs are intended for use exclusively in large beekeeping farms |
| Double-walled | Differs in the content of fourteen frames and a pair of store extensions, and the space between the walls is filled with thermal insulation | Ideal for beekeeping in regions with cold climates and sharp temperature changes |
| Alpine | Multi-tier design for one tray, no dividing grids and no vent | There is no need to carry out additional insulation for the winter, but it is often difficult to acquire bee packages and families |
| Dadanovsky | It can be presented in several modifications, but the most popular hive is given in ten and twelve frames. | The principle of maintenance of the structure is to periodically remove the honey frames without replacing the whole bodies. |
| Warre consists of a set of identical drawers, which are supplied with top bars-rulers | A peculiar folk design that allows honeybees to live in conditions very similar to natural |
|
| Japanese | The most notable difference is that such a house completely lacks frames and classic grooves for them. | Compact, completely simple to make with your own hands and the most practical structure. |
| The hive resembles a long chest and is characterized by a horizontal nest extension | Ease of service and no need to remove the upper case. It is possible to divide by a blind partition into a couple of sections |
|
| Kulikova | It is a set of twelve and fourteen nest frames designed for the device of the nest space | The design is designed for wandering and is maximally lightweight, and the principle of the device, like that of the dadan, consists in a nesting case with shops |
| Lupanova | Internal dimensions are 52x53 cm with a height of 58 cm, and the dimensions of the frame are 50x50 cm. | Sufficiently large double-walled and non-lifting structure. |
| Plywood | Double-skinned plywood construction with additional thermal insulation in the form of foam sheet | Sturdy and fairly simple, easy-to-use house for bee colonies is optimal for all novice beekeepers |
| The internal dimensions of the case are 31.5 x 31.5 cm with a height of 22 cm, and the dimensions of the frame are 30 x 21.8 cm | The advantage of using is the possibility of using the Dadan, USh-2 and Ukrainian frames |
|
| Northern | The nest body is double-walled, with a layer of foam, and the sliding bottom is represented by a plywood board | The most suitable house for accommodation of Central Russian boletus bees |
| The standard internal dimensions of the house are 38.4x33.5 cm, and the frame size is 36.4x10.6 cm | Modern, comfortable design that greatly facilitates the work of the beekeeper |
|
| The body measures 53x53 cm and consists of fourteen container frames, four in each. Frame dimensions 50x50 cm | The design is designed for keeping strong families up to 8 kg and placing inside the nest up to 100 kg of honey |
|
| Ukrainian | Sizes with a one-dimensional Dadanov frame, placed on its side. The volume is designed for 18-24 frames | The house is able to accommodate one colony with a nucleus or a couple of bee colonies, but is too bulky to transport |
| Monohull | Contains twelve frames and a store extension, therefore it is often used for low honey-bearing capacity | This design does not allow to build up very strong bee colonies, so the honey yield is low. |
| Double-hull | A design similar to a single-body evidence, having a second twelve frame box | Double-hull housing improves honey yield and prevents swarming |
Types of frames for beehives
The structural element of the bee hive is the base of honeycombs and for brood. The types of this key part of the collapsible hive can be different, but they allow you to control the health of the bee colony and extract excess honey. Structurally, all frames are divided into the following types:
- nesting;
- placed in the case;
- shop.
Typical frames that are suitable for most types of houses are especially popular and in demand among domestic beekeepers.
| Frame type | Outside width and height in cm | Honeycomb area on one side in sq. Cm | Honey capacity in kg |
| Female standard | |||
| Semi-frame standard | |||
| For multi-hive hives | |||
| For Ukrainian lounger |
How to make a simple beehive with your own hands: step by step instructions
Homemade hives are very popular with beekeepers. Self-production allows you to significantly save money and make the design optimal for placement in a personal apiary. Making a house for honey bees is not difficult at all, but you need to focus on well-designed drawings and use only high-quality materials.
Drawings of bee hives
It is most convenient to use ready-made drawings and diagrams for the manufacture of evidence, which are shared by experienced beekeepers. In this case, there is no need to carefully study the device of the hive, but it is enough to use the scheme for creating a standard design.

Required tools and materials
It is necessary to prepare dry, free from mold, knots and severe cracking, boards. Softwoods such as linden, willow and pine are best suited. The body is assembled from planks with healthy and captive knots, tightly intergrown with the wood. For manufacturing, you will need a standard carpentry tool.
Making a house
The body of the house is made of wood according to the following step-by-step instructions:
- the width of the body to be knocked together should be approximately 37.5-38.0 cm;
- on the front and rear walls at the upper edge, folds of 11 x 17 mm are made to insert frames;
- with a distance of 70 mm from the upper edge of the central part of the outer side, holes are made for carrying;
- an additional notch with a diameter of 25 mm for additional ventilation is drilled on the front wall;
- the standard thickness of the boards for the roof is 20 mm, but to prevent rotting, the outer part must be covered with sheet metal.
It is advisable to make the bottom removable and double-sided, making a U-shaped structure from the bars with a protruding front part.

How to make frames
For such a home-made construction of evidence, elements of standard sizes are suitable. The increased dimensions of the side strips in the upper part allow the part to be fixed as rigidly as possible inside the manufactured hive and prevent their displacement. The bottom planks must be exactly the same as the side planks.
The final stage
At the final stage, it is necessary to install the ready-made evidence in a place prepared in advance for placing the structure. The hive should not be in an open area, but if there is no other place, then it is necessary to provide the home of honey bees with high-quality shading using wooden mats or shields, which will prevent the risk of overheating of insects.
How to transplant bees into a new hive (video)
How much is the finished hive
Many people wonder how much a bee house and a bee colony with a hive cost. The cost of evidence can vary significantly depending on the type of construction and the material used to make it.
Buying a family of bees with a hive at the end of the summer season is much cheaper than in the spring. The region of purchase also affects the cost. In some areas of our country, the cost is an order of magnitude higher than in neighboring regions, but the average price of a high-quality construction most often varies within five to seven thousand rubles.

Housekeeping rules
With the onset of spring warming, after the air temperature is stably kept within 8-10 ° C, the evidence must be transferred from the winter house to a dry area protected from cold and gusty winds. During this period, you need to print and install the honeycomb frame and check the general condition of the internal elements and the case itself. Before sending bees for the winter, the quality of honey, as well as the amount of its reserves, is checked.
Beekeeping is a fun and very rewarding activity, and in order to keep honey bees correctly and get enough honey, you need to start by learning the theoretical basics and choosing the right insect house, as well as follow the advice and recommendations of experienced beekeepers.
How to expand a nest of bees (video)
Often, amateur beekeepers keeping 2-3 colonies of bees are faced with the problem of “overpopulation”. After all, bees begin to swarm, which means that the question of acquiring new hives arises. But what can be done in this case? Not everyone can afford to buy new ones, and used ones are also dangerous. After all, it is not known why they are sold and what diseases can be purchased with the "house". Then the thought arises - why not make a beehive with your own hands? Today we will try to figure out how difficult it is and what is required for this. Surely this information will be useful to those who are just thinking about beekeeping.
Read in the article
Beekeeping for beginners - where to start for an inexperienced beekeeper
The main thing is, of course, to understand whether a person can do this difficult job. After all, not everyone can do it due to physical indicators or health conditions. The first and most important requirement is that you are not allergic to bee stings. After all, some people do not tolerate even isolated cases. If a beginner beekeeper has such a strong reaction, then the path to the apiary has been ordered for him. You should also know that bee venom, entering the body, contributes to a sharp increase in blood pressure. That is why people with heart disease and hypertensive patients are strictly prohibited from engaging in such activities.
Now for the physical condition. Those who plan to take up beekeeping should understand that this is hard, everyday work. You will need to move hives, work on a honey extractor and much more. And do not think that this is a very profitable business that will start generating income from the very first season. After all, at first, high costs will be required for the bees themselves, hives, and additional buildings. And if there are no melliferous fields nearby, it will be necessary to transport the hives from place to place, negotiating with the owners of the meadows about building the apiary, resolving issues with its protection. This means that the first 2-3 years there is nothing to think about any slightest profit.

But if it has already been specifically decided to tackle this difficult task, then one of the primary costs can be minimized - to build bee hives with your own hands. True, this will require some knowledge and experience. But with the desire, care and accuracy, this is a completely doable job.
The device of a hive for bees: general information about what species they are
To understand how the hive works, you need to study all the information about them and figure out what this or that compartment is for. Many beekeepers, sometimes even hereditary ones, do not even know what is called. But this does not prevent them from doing what they love. However, beginners will have to understand this. After all, for construction, you need to be able to read the drawings of bee hives, and sometimes draw them yourself. Now we will analyze some of the types and try to understand which one is easier to build to begin with. Those who subsequently take up this business on a larger scale will eventually understand all types of bee houses. For now, let's start with the most common ones.
Dadan-Blatt hive: its description, device and some features of use in beekeeping
Initially, this hive bore the name of only one of its inventors - Charles Dadant. But its design, although it was quite successful, still required improvement. This is exactly what the Swiss beekeeper Blatt made, who added some innovations. But to this day, among beekeepers (perhaps for simplicity), the name "Dadant's hive" is applied to this bee house.
This design is practically not used in industrial honey collection, but among amateurs it is practically the most popular. The dimensions of the beehive are given for 12 frames, the drawing of which is shown in the image below, is 585 × 585 × 815 mm.
1 of 4


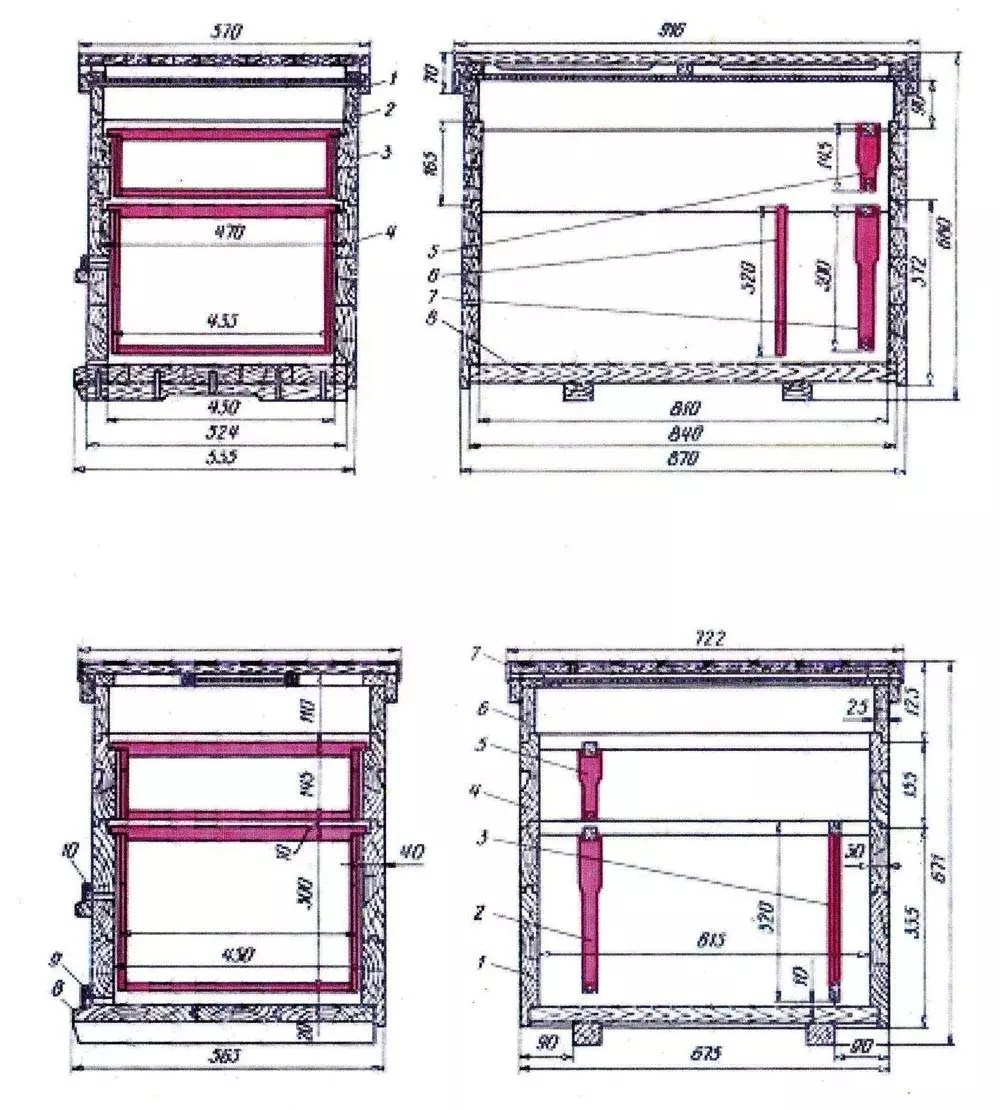
Important information! It doesn't matter what the hive is. It is important to make as many shops as possible. After all, this is the most important thing for honey workers. But fanaticism in this matter is also useless.
In fact, such a bee house is quite simple. In other words, the construction, if there are drawings in front of your eyes, of a Dadanov hive with your own hands, will not pose any particular problems.
What is the Langstroth Ruth hive and how it works
This design is also quite popular. And not only among amateurs, but also among industrial assemblers. It originates from the beginning of the nineteenth century. At that time, the first version was invented by the beekeeper Lorenzo Langstroth. However, it was somewhat inconvenient due to the fact that the bottom of the hive was not removable. This made cleaning and maintenance much more difficult. However, already at the end of the same century, the industrial beekeeper Amos Ruth slightly changed, and one might even say, simplified the design. And even today, his descendants own a company for the production of various devices for apiaries, making such beehives.
The main difference between such a bee house from the previous one is the lack of shops. In addition, the frames themselves are somewhat lower, although their widths are completely identical. Ruth's hive drawings can be easily found in the vastness of the network, therefore, it makes no sense to post them all here. Of course, for a general concept, we will present to the dear reader some of them below.
By themselves, the drawings of Langstroth's hives differ slightly from the structure of Ruth. But among beekeepers, the name of this design stuck with only one surname. By analogy with the Dadanovs, they were simply called Rutovs.
1 of 4


The horned beehive of Mikhail Palivoda - the most budgetary option
Although many of those who have been professionally engaged in beekeeping for a long time and speak of such a design with disdain, for a novice beekeeper, it can truly be a godsend. In addition to the fact that it is much easier to make it than the two previous options, it can also be done from almost any scraps.
Important information! When we say "any", we do not mean oiled or rotten wood. A bee will not live where there is a foreign, even the slightest smell. It is for this reason that experienced beekeepers collect hives with nails or screws and never use adhesives. And staining is used only outside the bee house.
As for the simplicity of manufacture, looking at the photos of the drawings of the horned hive presented by us, probably even a schoolboy can make it with his own hands.
1 of 3


It is also good news that almost all breeds of bees can live in such a house. But especially such a structure is to the liking of Buckfast and Carpathian. The famous Burzyan bee also feels quite well in it, but for some reason the beekeepers of Bashkiria have chosen other types of structures for themselves. Perhaps because these hives are kept small enough.
Alpine hive or construction according to the Roger Delon method
Quite a convenient design due to the fact that as the number of bees in the family increases, there is no need to rebuild a new hive. You just need to add inserts, raising it in height.
Roger Delon is a rather famous French scientist beekeeper who keeps apiaries in the Alps. Moreover, due to his design of hives, he does not have time to collect honey in the summer, and therefore he does it already in the winter.
The very design of the bee house is fundamentally different from all that were mentioned earlier, and not only in structure, but also in size. It is for this reason that the maintenance of such hives is not very convenient. It is quite difficult to find a suitable honey extractor for non-standard frames. But in terms of productivity, alpine hives outpace any others, even in a non-honey year.
It is also difficult to switch from ordinary bee houses to alpine ones - “it is difficult for new settlers to get used to another structure. For this reason, if a novice beekeeper, having considered all the options, settled on the Alpine one, then you should not start with something simple with the thought that over time it will be possible to change the design. It is better in this case to immediately build a hive according to Roger Delon's design.

Such designs have appeared relatively recently, but already now they have both supporters and opponents. At the same time, there are several times more of the latter than the former. The essence of the design is to save space by narrowing the distance between the frames. This is where the main bone of contention lies.
Experienced beekeepers claim that this will lead to the appearance of layers of propolis between the frames. As a result, they will be inoperative. At the same time, there is no reason not to trust the opinion of experts.

It also raises doubts about what is advised to do from such material as. Honestly, anyone who understands even a little about beekeeping will say that in such houses there can be no talk of any honey. The bees just won't live there.
Рchalyar: In the early 90s, one of my relatives decided to become a beekeeper. I don't remember where, like from Moscow, they sent him a brochure with drawings, descriptions and technology of keeping bees in a hive of an original design. The honey harvest in this hive was simply unprecedented. Work began to boil. I sawed the boards, from somewhere I dragged posters "Give ...", "Glory ...", "Long live ..." from and built 8 pieces. I also built a pavilion, though stationary, not on wheels. Why am I all this? Yes, just that hive and yours are the same. The height of the frame seems to be larger, or maybe not, I don't remember exactly. I must say that he is a guy with hands, everything was done soundly ...
More details at Beekeeper.info: http://www.pchelovod.info/index.php?showtopic=25251
We are not giving the full review, for anyone interested - you can read it in the source. For those who do not have a desire to go to the sites, we can say that in this review a person writes that now no one else lives in those hives. Well, sometimes there are stray bees, only not those that give honey, but those that live on and on from time to time.
Bee hive lounger and how it differs from other bee houses
If you ask such a question to professional beekeepers, you can hear completely different answers. And the point is not that some are right and others are not. It's just that its design can be different.

Looking at this hive, you can understand that it looks the same as the others, but at the same time it seems to be lying on its side. The lid also opens upwards, but it is the top wall. Outwardly, it resembles a chest. It was for this that he was called a lounger. The design of such a hive can be similar to any of the above. It can be both Rut's and Dadan's beehives.
Let's try to also refer to the reviews of professionals - and what do they think about the do-it-yourself sunbed hive?
Danichek: I can’t answer in the affirmative, because I don’t have experience in driving bees, for example, in multihulls, which means I can’t compare. Although, I remember that in his lectures Kashkovsky claims that in Siberia it was with the help of sun beds that beekeepers achieved record honey harvests both from one hive and from an apiary in general. In my opinion, the lounger most of all allows you to create a strong honey cake (which is what we strive for), to disturb the bees with examinations less (every examination, whether the beekeeper wants it or not, brings nervousness to the family, and for a couple of days the family gets out of its normal rhythm life) ...
More details on nn.ru: https://www.nn.ru/community/user/pchely/lezhak_na_20_ramok_plyusy_i_minusy.html
Beehive boa constrictor: why it is so fond of amateur beekeepers
The secret of the popularity of such hives is in their compactness and ease of both installation and maintenance. Outwardly, it is somewhat reminiscent of the Alpine, but much smaller in size. Although those who have been engaged in beekeeping for several years say that it will not be easy for a novice beekeeper to cope with such a hive. But, as you know, everything is learned in comparison, and according to those who are close to such a design, nothing prevents them from starting with such bee houses.
Making hives a boa constrictor with your own hands according to drawings is not difficult, we will present them to the dear reader for review below. If the provided is not enough, you can always find additional information on the net.


DIY beehive: step by step instructions with photo examples
Let us analyze, using the example of six actions, how to make a beehive with your own hands from boards:
| Photo example | Actions performed |
  | First of all, we align the pre-bonded "in the thorn" workpieces in a width of 250 mm. |
 | Now you need to align them along the lengths of 439 mm and 434 mm. |
 | Cut out the folds - top, bottom and side. |
 | This is how the finished parts should look like. Now it's up to the small thing - to put everything together. |
 | Approximately the same result should be obtained. |
Of course, it is impossible to show everything in the instructions, but in fact it is not necessary. After all, any beekeeper learns all his life, trying something of his own, and therefore you will never find two beekeepers who make hives in exactly the same way. And yet we suggest watching a video on making a beehive with your own hands according to drawings and sizes. We think that after this there will be no questions left .. Do not forget that in different types of houses it is performed in its own way.

You can insulate the building with both ordinary foam and (polyurethane foam). These materials are non-toxic and odorless.
Important! In no case should you insulate the hive from the inside. Otherwise, a situation will turn out in which, due to the wax, it will simply be impossible to pull out the frames.
Whenever possible, you should try to avoid sticking. As a last resort, you need to choose a composition that is odorless. You can use hot melt glue - it is neutral, non-toxic and the bees do not react to it.
The choice is very important. The best option might be aspen or linden. Conifers are also fine, but in this case, you need to be prepared for the fact that in the first year the honey will smell a slight, but tangible smell of resin.

Difficulties that may arise when building a house for bees
The main task in such work is the exact observance of all specified dimensions. And this is not just a whim of the one who came up with this or that hive. This is a necessity that has been tested over the years. Many people think that you can design and build a house for bees yourself according to your own invented dimensions, and then get honey no less than others. Will not work! It has already been said that if the distance between the frames is smaller, propolis will be formed between them by the bees and they will become inoperative. But what happens if you make the distance larger?
In this case, the bee decides that it is necessary to build intermediate combs and as a result, the first option is obtained - everything sticks together tightly. As for the height, there are practically no restrictions. But it should be remembered that you will have to transfer the hives, which becomes problematic with a large weight.

Vagrant, alien bees are also quite a problem. Often, it is with them that various diseases come and it is with such incidents that the degeneration of the breed begins. If we again cite the Burzyan bee as an example, then its degeneration in Bashkortostan has already become noticeable. And the reason for this is the frequent arrival of beekeepers from neighboring regions.
And of course, do not forget about feeding insects with sugar syrup during the winter. After all, the main part of the honey that they cooked for the cold period is taken from them. It is worth learning about all this in more detail before making the hive yourself and settling the first guests there.
If you think about it, the process of making a beehive with your own hands is a complicated business, but quite interesting and exciting.
Frames for a bee house - the nuances of their manufacture
Frames are the backbone of the hive. And a lot depends on the quality and their correct execution.
Important! No matter what material the bee house was built from, the frames should always be made of good wood - linden, aspen or apple tree. This will ensure that the honey tastes better. The wire brace must be made of stainless wire if it is not wood.

Summarizing
Everyone knows that honey is not only a sweet treat, but also an excellent medicine. And the quality of the final product depends on what the hives will be, how they will be equipped. This means that all responsibility for this lies on the shoulders of the beekeeper. Do not forget about this. Well, what type of bee house to choose is up to you, our dear reader.
If anyone has any questions, we will be happy to answer them in the discussion, and maybe even argue. Indeed, as you know, truth is born in a dispute. If you find an inaccuracy in the information provided by us, we will be grateful if you point it out.
And finally, a video on the topic of making frames.
Sooner or later, every beekeeper is faced with the need to expand his economy, because bee colonies grow, swarms, etc. A good way out of the situation is to make a beehive with your own hands.
Of course, in order to quickly solve the problem, the missing hive can be bought. But prices for new "housing" are high. Buying a used one is cheaper, but, firstly, you still need to find the right type of hive, and secondly, it is not known how long the old house will last and, thirdly, there is a potential threat to bees - you never know how insects could hurt their the former owner.
Primary requirements
The hive should serve not only as a good house for insects, but also to arrange the beekeeper, give him the opportunity to work quietly and effectively help the bee family.
Practice shows that when building it is important to take into account the following rules:
- Maximum simplicity of the device. This reduces the cost of the hives and allows the beekeeper to independently make, repair, etc.
- Capacity sufficient for the normal life of bees.
- The ability to reduce or increase the size of the nest in accordance with the strength of the family (a weak family cannot cope with heating a large nest).
- Providing warmth inside the hive.
- Creation of the necessary conditions for work, allowing you to quickly inspect, disassemble the nest, without crushing a single bee, without damaging a single honeycomb. To do this, the hive should open from above, and the frames should be easily removed through the top, without touching each other and with the walls of the house. Otherwise, the bees will glue them together with propolis, and then it will not be possible to remove them without jolts and shocks. And this, as a rule, is very irritating to insects.
- Convenient location of the entrance. So that nothing complicates the work of bees during the flight, it must be at the very bottom. So it will be easier for insects to take out litter and keep the dwelling clean, workers will be able to immediately get on an empty foundation and leave the prey they brought on it.
- The possibility of adjusting the size of the entrance, so that when attacked by bees of another colony, it could be narrowed or closed.
- Lightness, compactness and lightness. There should be no protruding parts.
- Convenience for cleaning bottoms. Detachable trays make this work quick and easy.
- Good ventilation. For insects, access to fresh air is important, so the frames inside the hive should be located to the tap hole with an edge (the so-called "cold drift").
- Adequate brood conditions - honeycomb frames should not be narrow or small.
- The store should be located closer to the baby so that the bees do not have to throw the worm.
In a small apiary, it is advisable to keep hives of the same type and size with standard frames. This will facilitate their maintenance, make it possible not to get confused with different frames, shops, etc.

Where to begin
Let's consider how to make a single-wall vertical type hive, the so-called "riser", for 12 standard frames (300x435 mm) and 12 half frames (145x435 mm) with a square body (450x450 mm) and a store extension, which is most suitable for beginner beekeepers. After that, you can safely take on sun loungers, multi-hull and other more complex designs.
Choice of materials
Recently, when arranging apiaries, non-traditional building materials for beekeeping are increasingly being used - polystyrene, various types of plastic (expanded polystyrene, technopor, etc.), bituminized paper slabs, chipboard and others. The best material continues to be wood. For the manufacture of a bee house, soft, porous and light tree species ( Pine, poplar, Linden, spruce, alder, willow, aspen) - they retain heat better, are easy to process.
Hardwoods (oak, maple, hornbeam, etc.) do not store heat, they quickly pass cold.
The material must be sound: straight-layered, without cracks, rot and knots. Moisture content - no more than 15% (achieved after 2-3 years of aging in a shed, under a canopy). Freshly sawn boards have a humidity of 40% and higher, so they must be dried initially by keeping them for 20-30 days in a warm, dry room.
Required tool
An important component of success is the availability of a job and a tool. The ideal option is a joiner's workbench for processing and assembling wooden parts. It can be replaced by a platform or goats with a board and additional equipment - clamps.
For work, you will need, first of all, an ordinary carpentry tool:
- saws for cutting boards and workpieces;
- planing tools (planer, jointer, etc.);
- tools for chiselling and stripping (chisels and chisels);
- drill, screwdriver and drills.
You will also need a hammer, ax, mallet, pliers, level, measuring tape, ruler, pliers, etc.

The big winners will be the owners of apiaries who have acquired their own professional equipment - a circular saw, a planer or thicknessing machine, a grinder. On the forums of beekeepers, you can see numerous photos and stories about devices that facilitate and simplify the process of making hives.
Making a beehive
The whole structure consists of separate parts (stand, bottom, body with frames, shop with half-frames, sub-roof, roof), and the parts, in turn, are made of parts. In order to make the right hive, it is extremely important to observe the accuracy of measurements. Usually, manufacturing begins with the preparation of parts for the walls of the case. Beekeepers, who consider it advisable to first "get their hands on" and master the basic techniques of working with wood, it is better to get down to business, coming up from the less critical part - processing the parts of the store.

Store extension
The design principle of the store is the same as that of the body, although its walls are half as much.

In the diagram: 1, 3 - front and back walls with frame seams; 2, 4 - side walls; 5 - recess for carrying; 6 - Demonstration of corner mates.
Part dimensions for 12-frame magazine extension:
The step-by-step order of work is as follows:
- cut boards to size. The planed surface can be checked using a metal ruler - attach it to the processed plane with an edge diagonally, across and along, look at the clearance. When skewed, cracks will be visible;
- trim parts to the specified parameters (530 and 492 mm);
- select from the entire length of the inner side of the walls frame folds (11x20 mm), lower folds (19x21 mm), and outside - upper folds (10x20 mm);
- make the upper folds of 10x20 mm (outside) at the side walls, and the lower folds of 10x21 mm - from the inside;
- cut a recess on the side walls for removal / carrying.

After folding is completed, the next step will be to prepare for the "knitting" of the walls of the store. To do this, it is necessary to select the end quarters in its front and rear walls across the wood fibers along the end edges.

All parts are ready and now you can start assembling. The boards are joined at the corners in a quarter and fastened with 2-3 nails or self-tapping screws (0.8-0.9 cm) at each corner. Many beekeepers coat the surfaces to be joined with glue (PVA, liquid nails, etc.) before assembling. Collect carefully, without distortions. The internal dimensions of the store should be 450x450 mm in length and width.

All stages of the manufacturing and assembly process of the store extension can be found in detail in the video presented:
Frame
The building is built of 4 walls: front (with an upper entrance, 0.8–10 cm long, 1 cm high), back and two side walls. Inside the case, along the upper edge of the front and rear walls, you should select a frame fold (20x11 mm), as well as the upper and lower folds in the same way as in the store extension. The folds will eliminate the through gaps and create a better connection with the body of other parts of the hive. The details of the socket are tied at the corners into end folds, which are selected in the front and rear walls. To prevent rainwater from entering the nest, a chamfer (5x5 mm) is made along the entire length of the edge of the outer upper fold.

In the diagram: 1 - front wall: a - upper part; b - lower part; 2 - side walls: a - upper part; b - lower part; 3 - back wall: a - upper part; b - lower part.
Details for the case:
| Name | Amount) | |||
| length | width | thickness | ||
| Front and back walls: | ||||
| Top part | 2 | 550/530 | 225/220 | 45/40 |
| Bottom part | 2 | 550/530 | 115/110 | 45/40 |
| Side walls: | ||||
| Top part | 2 | 512/492 | 115/110 | 45/40 |
| Bottom part | 2 | 512/492 | 225/220 | 45/40 |
Manufacturing of the case includes three stages:
Construction of shields... The finished walls should be 32 cm high. Such wide boards are rarely found, therefore, the base is usually assembled in the form of shields, consisting of two boards - a wide one and a narrower one, connected in length into a ridge and tongue. The joints in adjacent walls should be staggered so that wide boards overlap the ridges and grooves of adjacent walls. This will further enhance the strength of the nest.
The order of work is as follows:
- trim and trim parts to fit;
- in the upper parts, select the dowels (14 by 10 mm);
- in the lower ones, select the ridges (14 by 10 mm);
- glue the shields. Lubricate surfaces with ridges and grooves with glue (PVA, liquid nails, etc.), connect the workpieces in pairs, press the surfaces to be glued with a clamp and place in a warm place for drying.
Preparing shields... After drying, the boards are cut and trimmed according to the specified dimensions, the folds are selected (by analogy with the store).
Fastening shields to the body... Everything is done in the same order as when assembling the store. The walls of the case are fastened at the corners with nails (self-tapping screws) 80-90 mm long (6 pieces per corner).

In the video presented, you can get acquainted with how a glued shield is made without the need to remove the comb:
Roof and roof
On top of the body or store, a roof cover (insulation extension) is installed. Ceiling boards are laid inside it, an insulating cushion, top dressing, etc. are placed. The roof completes the structure.
Liner and roof details:
| Name | Amount) | Dimensions of raw / machined parts (mm) | ||
| length | width | thickness | ||
| Roof liner | ||||
| Front, back and side walls (top) | 4 | 552/532 | 105/100 | 25/20 |
| Ceiling planks | 6 | 508/488 | 85/80 | 20/15 |
| Nagel corner | 8 | 50/40 | 6 / diameter | 6/5 |
| Roof | ||||
| Front wall | 1 | 595/575 | 165/160 | 25/20 |
| Back wall | 1 | 595/575 | 85/80 | 25/20 |
| Side walls | 2 | 600/580 | 165/160 | 25/20 |
| Front rotating support bar | 2 | 147/142 | 75/70 | 25/20 |
| Rear longitudinal support bar | 1 | 555/535 | 23/20 | 25/20 |
| Rear vertical support bar | 2 | 55/50 | 23/20 | 25/20 |
| Ventilation flaps | 6 | 70/65 | 55/50 | 15/10 |
| Nagel corner | 8 | 50/40 | 6 / diameter | 6/5 |
| Roof board | 11 | 685/665 | 105/100 | 20/15 |
| Edge board | 2 | 685/665 | 55/50 | 20/15 |
The roof liner is constructed from 4 pieces of the same size. To make them, you need to perform the following work:
- process and trim parts to the required size;
- cut straight thorns (20x20x20 mm) at the ends of the blanks;
- grease the thorns and eyes of the thorns with glue, then assemble the structure and dry it;
- Drill holes (45 mm long, less than 5 mm in diameter) with a drill in the corners in the middle of the spike at each corner, grease the pins with glue and hammer into the sockets. This operation will increase the strength of the structure;
- cut the planks for the ceiling in accordance with the dimensions. They are placed over the frames of the nest or store extension (if used).

The roof is pitched. Its design includes piping and roofing. The slope is done from the front to the back. The roof is covered with boards, roofing iron or any other waterproof covering is placed on top. The roof construction process includes three stages:
- Making strapping. The front wall should be twice the height of the rear wall to create a slope along the top edge (about 7 degrees). To get such a slope in the workpieces for the side walls, you need to saw off one corner obliquely, along the line from the middle of their rear end edge to the top of the front one. To ventilate the under-roof space in the front and rear walls, cut 4 ventilation slots (200 mm long, 3 mm high) with an outward slope or drill holes with a diameter of 30-40 mm in the sidewalls. The assembly of the harness is carried out in the same way as the assembly of the roof cap - using straight studs (20x20x20 mm) and dowels.
- Processing and fixing support bars and ventilation flaps. It is necessary to nail the longitudinal support bar to the rear wall of the harness from the inside at a distance of 10 mm from its lower edge. In the corners, close to the longitudinal bar, attach additional vertical support bars. Movable rotating support strips are attached to the sidewalls inside the strapping in the corners near the front wall. They can be installed both vertically and horizontally, depending on which the roof of the roof can have not only an inclined, but also a horizontal position. Round ventilation openings should be barred from the inside with small nails or paper clips with an iron mesh with fine meshes (no more than 3 mm). Outside, the holes are covered with rotating oval flaps.
- Roof construction, roofing. To prevent rainwater from flowing into the hive, it should be done so that the two-layer roof protrudes slightly beyond the strapping - up to 4 cm. The base (first layer) is knocked down from six boards. Each of them is attached with 4 nails to the front and back walls of the harness, the outer boards are also nailed to the side walls. A second layer is laid on top of the lower layer, the outer one is roofing material or another layer of boards.

In the diagram: A - general view with the front wall and part of the roof taken away; B - internal view of the roof from below, where 1, 2 - front and rear walls of the strapping with ventilation slots; 3 - side walls of the strapping with round ventilation holes; 4 - front rotating support bars; 5 - rear longitudinal horizontal support bar; 6 - rear vertical support bars; 7 - ventilation flaps; 8 - roof.
From the following video, you can get an idea of the use of sheet aluminum as a roofing material:
Detachable bottom and landing board
Donje is constructed from strapping bars tied into spikes and flooring.
Sizes of parts for detachable floor and landing board:
| Name of parts | Number of parts (pieces) | Dimensions of raw / machined parts (mm) | ||
| length | width | thickness | ||
| Rear harness bar | 1 | 550/530 | 95/90 | 45/40 |
| Side rail | 2 | 550/530 | 95/90 | 45/40 |
| Front rail | 1 | 550/530 | 33/30 | 45/40 |
| Floor covering: back, middle and front part | 3 | 490/470 | 180/174 | 35/30 |
| Nagel corner | 6 | 50/40 | 6 / diameter | 6/5 |
| Arrival board | 1 | 550/530 | 85/80 | 25/20-10 |
The construction of a do-it-yourself hive bottom includes three stages:
- Construction of the piping. It is necessary to cut out four bars according to the specified parameters and make straight spikes at the ends: 40x40x10 mm. The sizes of the upper and lower thorns on the rear bar and the outer thorns on the front bar differ - 20 mm. Connect the bars into spikes with glue and dowels, dry. The internal dimensions of the resulting box should be 450x450 mm. For better fastening of the flooring, it is advisable to choose tongue piles (10x10 mm) in the side and rear bars from the inside.
- Floor decking construction. Three flooring boards are connected with glue to form a shield in a ridge and tongue (10x10 mm). After docking, clamp it with a clamp. After drying in the panel, you need to select the end folds (20 by 10 mm) and get ridges (10 by 10 mm). On the front board of the backboard, you need to chamfer half of its width (in front, its thickness should decrease to 20 mm).
- Assembling the bottom. The glued shield must be pushed into the grooves of the strapping made.
In the strapping from the outer (lower and upper) surfaces, it is recommended to choose folds - 20 by 10 mm for a more reliable installation of the bottom under the nest. Along the edges of the seam base, chamfer (5x5 mm) for water drainage.

In the drawing: 1 - back bar; 2 - side bars; 3 - front bar; 4 - dowel; 5, 6 - board boards; 7 - arrival board.
Arrival board (530 x 80 mm) - detachable. Its surface has a slope; for this, a chamfer is removed. As a result, the leading edge is 10 mm and the trailing edge 20 mm. The board is attached to the floor with wire dowels: it is necessary to drill parallel holes in the board and the backboard so that the dowels freely enter the slots.
After assembly, the new hive must be painted. The wooden body is painted on the outside, the bottom and roof on all sides.


Video
Tips for choosing materials and tools that will come in handy when building your first hive are shared by an experienced beekeeper in the following video:
We also offer you to learn more about the features of painting, which will help not only protect bee houses from negative atmospheric influences, but will also delight with its color for several years:
From varietal tomatoes you can get "your" seeds for sowing next year (if you really like the variety). And it is useless to do it with hybrid ones: the seeds will turn out, but they will carry the hereditary material not of the plant from which they were taken, but of its numerous “ancestors”.
Both humus and compost are rightfully the basis of organic farming. Their presence in the soil significantly increases the yield and improves the taste of vegetables and fruits. They are very similar in properties and appearance, but they should not be confused. Humus - rotted manure or bird droppings. Compost - rotted organic residues of various origins (spoiled food from the kitchen, tops, weeds, thin twigs). Humus is considered a better fertilizer, compost is more readily available.
It is believed that some vegetables and fruits (cucumbers, stalk celery, all varieties of cabbage, peppers, apples) have a "negative calorie content", that is, digesting more calories than they contain. In fact, the digestive process uses only 10-20% of the calories from food.
Oklahoma farmer Carl Burns has developed an unusual variety of colorful corn called Rainbow Corn. The grains on each ear are of different colors and shades: brown, pink, purple, blue, green, etc. This result was achieved through many years of selection of the most colored common varieties and their crossing.
Natural toxins are found in many plants; those that are grown in gardens and orchards are no exception. So, in the seeds of apples, apricots, peaches there is hydrocyanic (hydrocyanic) acid, and in the tops and peels of unripe nightshades (potatoes, eggplants, tomatoes) - solanine. But do not be afraid: their number is too small.
Convenient Android applications have been developed to help gardeners and gardeners. First of all, these are sowing (lunar, flower, etc.) calendars, thematic magazines, a selection of useful tips. With their help, you can choose a day favorable for planting each type of plants, determine the timing of their ripening and harvest on time.
In Australia, scientists have begun experiments to clone several grape varieties from colder regions. Climate warming, which is predicted for the next 50 years, will lead to their disappearance. Australian varieties have excellent characteristics for winemaking and are not susceptible to diseases common in Europe and America.
 Edith Piaf: biography, best songs, interesting facts, listen to the story of Edith Piaf
 Blackcurrant jelly
 How many times a day should an adult pee - pee?