The table may be console: do it yourself. Console with your own hands: Step-by-step instructions with description and photos, necessary materials, Construction Console table from plywood with their own hands
The console table is a shallow design with shelves and drawers or without them. Similar furnishing B.
In particular, it is intended for spacious premises, but in small rooms you can find her place. In the working office on such a stand you can position souvenirs, in the bathroom - cosmetic accessories, in the hall - decorative elements, in the bedroom - to use as a dressing table. They can also look like differently, for example, decorated with mosaic, to sign either run out of stone. Install consoles near the wall, they are ideal for zoning premises. This article will describe how to make a console table with your own hands.
Making a solid and massive console table with your own hands
The console table is performed with their own hands in several stages after purchasing all the necessary materials, fasteners and tools. The work process itself includes the following processes.
Production of legs
Since our table is quite volumetric, it will be needed massive and large legs. It is better to buy blanks in a shopping store.
Important! Of course, having a house of the machine can be made independently, but for this you will also need certain skills.
Preparation of boards:
- To arrange the upper and lower table, take a board with a length of 3 m, 20 cm wide, 10 cm thick.
- Cut it into parts using a disk saw. You must have four boards for the manufacture of a table long 150 cm.
- You will also need four boards with a length of 145 cm and a thickness of 10 cm. We will install them vertically on ready-made boards.
- At the edges, four squares need to be 10 cm.
Connecting table details
Take two square blanks with a width and length of 10 cm, on top to their ends to put a board with a length of 145 cm, screw them into the end with two screws. Repeat this manipulation again, take another two blanks to make the upper and lower part of the design.
Screwing legs:
- Put a 150 cm long on a board and a thickness of 10 cm three legs, measuring the points of their location.
- Screw them in these outlined points.
- Wooden plugs close the holes so that the result is an element that can stand on his legs.

The formation of the top:
- Back from the edge of 2.5 cm, put the resulting billet on top to the board and abundantly lubricate the joinery glue on both sides.
- Top on it put another board.
- The end blank is from below near the extreme legs to the right and on the left below the screws.
Production of the bottom
Repeat the procedure described above, with the bottom of the boards, so that it turned out the table ready for painting. It is better to additionally clean it with sandpaper.
Processing of finished design
Paint the table is the most acceptable way for yourself.
As a result of the work done, you will get a durable, original, stylish console table with your own hands. The master class given in this section will allow everything to fulfill clearly and without the help of professionals.
What are balasins and their varieties?
Previously, we reviewed how to make a console design with the help of finished legs purchased in the store, but it may look more attractive if you make support yourself. Next, we consider in detail how the balusters make the feet for the table. But first will understand what it is. Why exactly from the baluster?
The fact is that these carved columns have a very original form, thanks to which they used to be quite widely used in architecture from the ancient Romans and Greeks. Modern architecture does not require the presence of such jewelry, but, nevertheless, balasins are often used to arrange stairs, balconies and furniture items. By themselves, they are functional due to an unusual form. Depending on this parameter, the bassines are divided into three types:
- In the form of bodies of rotation. Outwardly, they resemble the right cylinder or random vase. They make them on lathes, thanks to this, each pillar has a finished look. This form is considered the most popular.
- Promotional. They make them from the boards, so they are mainly used in attics, that is, technical stairs. Decorate with through curly holes.
- Sculptural. Such balusters have a more complex arbitrary shape, in fact, so they are made solely manually either using a machine with a large number of axes.
Important! Today they produce them from a wide variety of materials - it can be stone, concrete, wood, polymeric formulations.
How to make your own hands a console for an entrance hall with bassines?
Now we learn how to make a table with legs from Balyasin do it yourself. The most important thing is to use an old plain table for this. Or just take an old worktop and buy beautiful legs from Balyasin.
Important! This is an excellent opportunity to save and get a new, high-quality, original decor element. Such furniture is ideal for narrow halls. You have little space in the corridor, you love miniature things, love a classic style? Then you will like this idea.
To work, you will need:
- Rectangular table or countertop.
- Two legs from Balyasin.
- Fabric segment 30 cm, 1.2 m wide.
- Aerosol adhesive for fabrics.
- Lobzik.
- Screwdriver.
- Scissors.
- Pencil.
- Roulette.
- Saws.
- Sandpaper.
- Metal corner.
- Malyary Scotch.
This console table is made with their own hands without legs or with them according to such a scheme:
- If you use the table to work, then select it in length into two parts. Take advantage of pencil marking and roulette. Edges Clean the emery paper in order to avoid scratches.
- Secure the legs from the baluster to the base on both sides.
- On the reverse side of our countertops, attach metal corners so that one is clearly located in the center, two others - along the edges.
- The edges of the table are solaried with a painted scotch. Prepare a piece of fabric, spray glue over the table surface.
- At the tabletop attach a fabric, while watching the bubbles not formed. The cloth remained around the edges.
- After the glue dries, remove the tape.
- The free part of our fastener is attached to the wall so that there are no gaps between the console and the wall.
What could be better than a beautiful convenient table? Maybe two such tables? Or the same table, but much more compact? As with your own hands, turn the most common table into a narrow console, and, with two legs. Or divide it into two and make a rack. Do you know?
How to make an elegant console from the most conventional table. From the sawn table, you can create a real exclusive. Surely you admired them in stores where prices are often "biting." But such a "piece instance" you can do. And it will come out much cheaper than the store version.
The most pleasant thing is that this table can be made absolutely of any high table. You can even take an old countertop and fasten the beautiful legs to it. And the ways to decorate this subject - abound.
◆ Master class number 1. ◆ Bedside table on two legs of a sawn table.
The old dining table will be required, wood paint and 2 bars.
1. Shorten the legs, because the (or bedside) table is usually lower than the dining.
2. Sleep the table is not necessary for the long part, but in short.
3. Especially spectacularly looks like a product painted in a bright color (brush or paint).
4. Sustainable position is fixed not by corners, but a pair of bars (about 1/2 long from the width of the already scaled countertop). They must be combined between themselves and fasten to the wall. Top "put on" a ready-made table bedside table.
◆ Master class # 2. ◆ Two consoles from one sawd round table.
One of them (yellow) became a console under the TV in the bedroom. The second (painted in blue color) serves as a bedside table in the hallway.
1. Take the old round table, remove the old paint or varnish, polish the irregularities. Apply primer.
2. Split the electric bissing table at 2 equal parts.
3. Collect the edges and paint in the colors that you like and fit the color palette of the room.


The process of guiding Marafaeta female estimation has always paid a mass of time. The attributes of this sacrament - lush boudures, furnished with massive wooden tremors with huge mirrors, were considered the holy of saints, where the ladies of the former eras spent most of their lives, waking up and tormented by the eternal question: "I am in the light of all beautiful?". Today, the beautiful floor is in the permanent zadietnote, when not what half a day in front of the mirror, but even five minutes to allocate on the makeup sometimes there is no possibility. It is logical that such a lifestyle imposed his mark on the "Lady" furniture: bulky tremors were transformed into small toilet tables, which absolutely will not be difficult to make it with their own hands, even from the wood array.
Especially if you choose the configuration and dimensions of furniture that require a minimum of material, financial investments and labor costs. If we are talking about something "sort of" - a toilet table with radial surfaces, sophisticated decor and carved legs, then not to all home masters it will be on the teeth: there are always ready-to-help professionals to help you.
Modern interior can not boast elegant and beautiful objects. Today, the laconic and functional furniture is most often selected for it.
But it was not always so. In the time of the kings and locks, each subject in the room was distinguished by the uniqueness and orphan elements.
It was in those days that the console table appeared in our understanding.
Of course, his analogue was used before, but in the XVII century, the King of France Louis XIV introduced fashion on the Baroque console tables, which can be seen in the pictures of many artists of the time.
And although the cantilever tables are associated with something old with us, they may look quite modern and will take their place in an apartment or house.
Content Articles
- Console table in the modern interior
Options for using a console table during his heyday was a bit. Most often he served as a beautiful stand under dear and exclusive things. By the same appointment, it can be used today.
In this case, a small console table is installed at the wall in the living room and not only supports beautiful accessories, but also serves as a spectacular addition.
In addition, if earlier the console table consisted only from the tabletop and legs, then in modern execution such a table can be supplemented with drawers or open shelves.
Therefore, the use of this object of furniture has become much larger.
It is organically a console table, which is beyond the back of the sofa, located in the middle of the room. It can be used as a bar rack or place there indoor flowers in beautiful pots.
Traditional was the installation of a console table in the hallway. In this room, such a table is complemented by a mirror or soft puffs.
Also, in addition to the console table in the corridor, you can hang hanger or put a basket for umbrellas.
Especially relevant looks like an interface for small vestives.
The console can be found in the bedroom, where it is used as a dressing table. This small table supplemented with a mirror and a suitable chair will make an element of femininity in the interior.
If you break your head How to arrange a room in a room that is used in a completely different purpose, then the console table can also help.
Complementing it with drawers, you will get a small one, but a separate convenient workplace, where you can sit at the computer or do the needlework. In the same quality, the console table can be placed on the loggia.
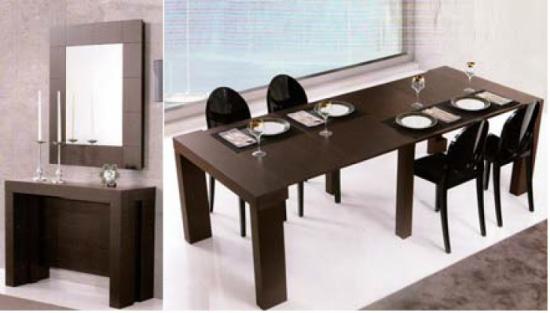
In small kitchens, the console table can replace the dining table.
There are models that are easily unfolded, increasing in size at times. And if in a folded state, it may well accommodate a couple of people to have a snack, then large guests can be taken in full-size at the table.
Console models depending on the functionality
There are a huge many design models of the console table. So it can be a table with carved legs in the Baroque style.
Instead of classic legs, a curly base may also be used as an animal. They can be mobile or attached to the wall.
Laconic console table with drawers located under the table top, it is convenient to use even as a small writing desk.
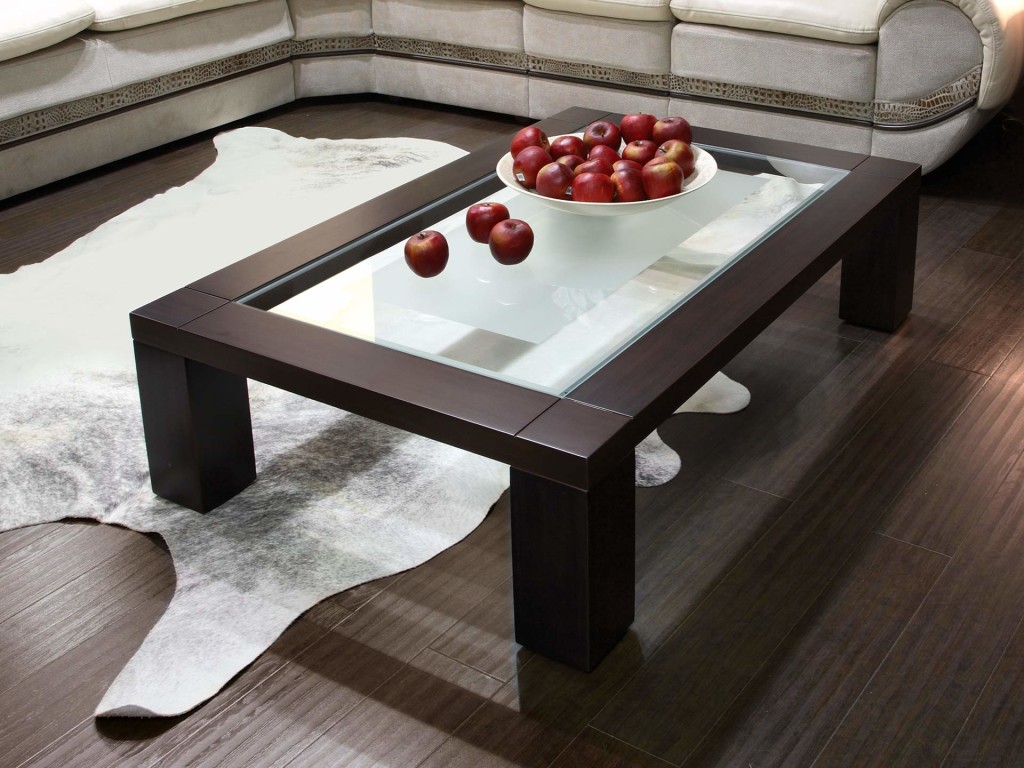
And if you put the console on the wheels, it will not only be easy to move from place to place, but also use in the living room as a coffee table.

But there are also cantilever tables - transformers. So a small console table from the magazine can, laid out, turn into a fairly large dining table.
The modern console table can be made of a variety of materials - wood, stone or plastic - which allows you to enter it in any interior.
And the ability to choose consoles with carved legs or straight lines gives a guarantee that you can pick up this piece of furniture in any style.
Stock Foto Console table in the interior

The desk of the head is more than just a worker ...
Table do it yourself - an amazing variety ...
Orthopedic chair - photo-tips on choosing ...
Dressing table with your own hands: sizes and drawings

Before you start making a dressing table with your own hands, you need to think over its overall dimensions, based on the space of the room, where future furniture will be located, and develop drawings. The height of the dressing table is standard and is 750 mm, but with a length and depth you can experiment. Definitely winning a dressing table, the sizes of which are within 800x400 mm or 1000x500 mm - the proportions are good both from aesthetic point of view, and to set a considerable amount of shelves and boxes.
In addition, the countertop with the above dimensions is convenient and spacious: on its surface you can freely put a couple of dozens of accessories to guid a beauty that did not fit in hidden storage areas.
As for the configuration, the makeup table can be: separate, donning or console. A separate table has a rigid construction from the tabletop and supports - sidewalls or 4 legs. The appropriate option is collected from the table top and two racks, partially carrier loads: such furniture is additionally attached to the wall plane. The console dressing table is hung on the wall using a mounting plank with hinges or relies on the decorative brackets. Of all these types of constructive performance, the most budget and rational for small premises is the console furniture: it does not occupy a significant area, and the material on its creation will not be so much.
Dressing table with your own hands: Detailing and assembly
Dressing table with your own hands with a console design - the optimal option. However, despite its attractiveness, because of the low capacity, many prefer to produce traditional separately standing furniture.

The most elementary frame for a single-standing dressing table with dimensions of 1000x500 mm is collected from five parts:
- table tops with a thickness of 35 mm, the edges of which should be treated with a manual milling;
- two sidewalls with a thickness of 20 mm with approximate dimensions of 720x440 mm;
- front strip that performs the functions of the Tsarga;
- rear wall.
All the above size of the table details may vary depending on the thickness of the purchased material. There are several available ways to build a dressing table with your own hands: on configmatics or ducks. The option with confirmates is simpler, but not very aesthetic plastic plugs will have to be engaged to mask fasteners. The assembly on the specks relates to professional methods, requires the accuracy of the manufacture of both the sewage itself and the response part - the excavation. The worktop will make it easier to attach to the frame of the table with the help of furniture corners.

The mirror canvas is recommended to book in the glass workshop, after preparing the surface under it and accurately scolokulving its dimensions. Attach the mirror to the wooden foundation plane you can on a special double-sided tape, designed for glasses, on liquid nails or using professional fastening accessories. Prepare for small difficulties at the stage of "reunification" of a toilet table with a mirror: for this, metal or wooden planks are usually used, with the help of which the slab with the glued web is attracted by self-draws to the rear wall. Fasteners need to choose such a length so that it does not pass through, damaging the front surface of the rear wall. When the base design of the table is ready, proceed to assembling boxes on all the same confirmates and fasten the guides.
A more simplified solution for organizing storage sites in the toilet table is a built-in bedside table. It is always much easier to install the shelves, fasten the loops and hang the doors than to mess with drawers that require a neat fit and time-consuming fasteners of the guides.
Selection of accessories in the manufacture of the dressing table do it yourself

Important bar, fitting completion - accessories: handles, loops, legs and various decorative elements. When choosing a "final chord" for a toilet table, as for any other furniture, it is necessary to strive to achieve the harmony of form, style and color solutions. Laconic aluminum or stainless steel handles are details for the design of the dressing table in a modern style, and the vesized elements from brass or "under the bronze" - for the product in the classic or rustic version.
The framing of the mirror is selected in the same stylistic key as fittings, although in the design of the modernist dressing table, the mirror canvas can be simply fixed on the rigid surface of the wood cooker without any kind. The console dressing table will look original if a straightforward design made by your own hands, you will complete the mirror frame made from a patterned baguette.
Dressing table made of wood is not the most difficult carpentry product from all possible, quite fulfilled with your own hands at home. If you do not wait for something over the original, then even with minimal skills, such simple furniture is quite forces for the "with hands" masters. An exclusive wooden product with a complex detail and decoration is, of course, paraffia is a profile workshop. Here you can order a toilet table of any configuration, made in any style, including exclusive
model or stylized old

Console table - Support for expensive things
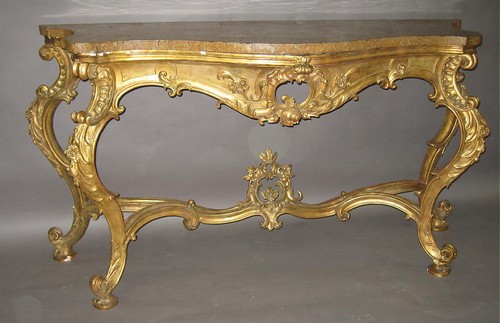
The heyday of the cantilever tables fell on the reign of the Sun King of Louis XIV, who lived in the XVII century. The XVII century entered the history of art as a Baroque age, which is inherent in the love of everything elegant and courageous. It was at that time that a fashion appeared to decorate the interiors with various expensive figurines, vases, bowls, paintings and mirrors in heavy frames, high candlesticks and other decorative accessories. Louis XIV was known to the world not only as the King of France, but also as a noble collector of objects that are distinguished by exquisite artistic performance. However, by collecting a truly huge collection of beautiful things, Louis XIV faced a problem - he could not find a decent support for his collection.
At this time, small console tables made of wood were particularly popular. Such tables were most often installed near the wall, and one or two curved legs served for them. Despite the fact that the console tables themselves looked very elegantly and stylish, Louis XIV considered that they were not luxurious enough to keep their favorite accessories on them. And then he asked the court wizard to perform several tables on his own project. According to Louis XIV, the legs of the console tables began to cover gold, and in some tables, the huge statues of animals were represented instead of her legs.
Since then, for a long time, the cantilever tables in the interior were a sign of luxury and accessories to the aristocracy. Now some tables from the collection of Louis XIV are decorated with museum halls. However, they can be seen not only in museums. Since those distant pores, they have been somewhat modified, but no longer lost their grace and perfection.


Console tables in modern interiors
If earlier this piece of furniture was extremely concise, in fact, it consisted only from the tabletop and legs, then the console table in a modern style can be equipped with drawers, couches and additional open shelves. Since the modern console is performed from any known materials - wood, plastic, glass, artificial or natural stone, etc., it becomes a harmonious object in the interior of each room.


Traditionally, the table of this type is used to arrange an entrance hall. By installing the console table in the hallway, you will get an excellent alternative to the usual furniture and the ability to free the space for other interior items. For example, depending on the material and design of the console, you can choose an elegant hanger, a basket for umbrellas, an ottoman or a stool. Some consoles for the hallway come complete with a mirror, which is a single ensemble with a table.


However, the territory of the cantilever table should not be limited only to the hallway. It can also become an excellent art object of the guest room, if, using an example of Louis XIV, store a variety of figurines and interior accessories on it. It is very interesting to the console in the interior of the living room, where the sofa is located in the middle of the room. Setting the table closely behind the sofa, you will get an additional zone that can be used as a bar counter rack or shelves for colors. Depending on the interior style of the living room, you can choose the most suitable and harmonious console. For example, wooden products on elegant legs perfectly complement the classic styles, and the light transparent table will not be ascended by the space of the living room in the style of minimalism.


Indispensable console and in the bedroom, because if it is equipped with drawers or shelves, it is convenient to use it as a dressing table. Particularly stylish in the interior of the bedroom will look a white toilet console table, which will immediately give it the place of grace and the mystery of the female Bouire.


Also, the use of a console table will become an excellent solution for the design of the working area in any room. Thanks to the compact sizes, the written such console will not take much space, but it will be convenient not only to store the office, but also work at the computer. If there is not enough space for the organization of the working area, pay attention to modern cantilever corner tables or transformer tables, which will fit even on the loggia.


In addition, the transformer table for the type of console is ideal for small kitchen premises. The design of this table allows you to supplement or expand its worktop. As a result, the dining console in the kitchen occupies a minimum of space, but if necessary, it becomes so spacious that it easily accommodates not only households, but also guests.


Unusual console table functionality
In addition to the design diversity, the models of modern consoles differ from each other and constructive characteristics. For example, the legs of some consoles can be equipped with rollers, thanks to which this product is convenient to use as a table for breakfast. Also, the console may be inserted, that is, attached close to the wall using special elements.
Despite the fact that the console table is, first of all, the display of designer beauty, it also has a fairly functional piece of furniture. Featuring a suitable model to your interior, you will be able to bring additional bright accents without much effort.
Dressers - Trend Seasonable Design and Space Solution - Bed-Clipping Corner Sofas - A Decent Supplement to Stylish Home Intelligence For Home - Classification of Different Speeds Sturning Equipment Furniture Fen Shui: Base of Comfort and Health
Types of consoles
The console table can be compared with the table, which is cut along. As for the number of legs, they can be both all four and one, and two. There are several types of consoles: a separate console. It is a narrow table that can be installed by the wall, in the sofa or even in the center of the room. Original models on the rollers offer furniture manufacturers. Such a console table can even be used as a table for breakfast. Power console table. This model is very reminiscent of a table, painted in half and has only two (sometimes one) legs. Typically, the dormitory console is screwed to the wall or lean to it. Wall console. This model is a shelf with a decorative leg, "hanging" above the floor. The main difference between such a shelf from the usual on the brackets is a stylish tabletop in the form of an oval or drops decorated with thread or overlays.
Cantilever tables from walnut array
 Watch this video on Youtube
Table Console Transformer
Furniture transformers will help to find the decision of the eternal problem of the lack of space. Perhaps the most vivid example of such a solution is a table of a transformer console. Their advantage is that they do not necessarily have to exist separately. Want - put from the wall not one, but two and even three such tables, and they, as if invisible (if not counting the track from mounting to the wall), will help save space and at the same time will look great in the interior! You have a very tiny kitchen, and there is not enough space even for a full dining table? No problem! Made of polymeric materials, the tables-console transformers are easy to use and durable. If necessary, they can easily disassemble them, freeing the place, and again collect, if you are waiting for the guests or want to arrange a large family dinner or dinner. Just unscrew the support leg and fastening bracket - ready! A separate question is the purpose of such tables. From here you can smoothly go to the requirements for manufacturing material, color solution and design. So, for example, the two table of the console transformer will look great in the High-tech interior, for example, with modular kitchen furniture. On this table, you can preserve vegetables and fruit, and dumplings sculpt, and stroke bedding. If you wear a special case on the table top table, it can be used as a cutting daughter and as a decorative panel on the wall. You can, for example, attach a calendar or poster to it. At the same time, such a table can serve as a dining table, and as an addition to it. And for family tea drinking, a transformer table is completely needed in the kitchen or living room.


As you can see, the use of tables of console-transformers in the interior is quite functional. Made of a valuable tree of wood, with side panels, one or two curved legs, inlay on the lid, such a table will be appropriate in the interior of the bedroom, office, living room, and at the same time will not cause any stylistic dissonance with his bright appearance. In the summer, the table-console-transformer can be used as a coffee table
in the interior of the living room or on the glazed balcony. Want to post T.
Console table from old chest
When an old chest appears in the house, as a rule, we throw it out. But creative hosts learned to give such furniture a new life with the help of several, not very complex, tricks. Moreover, they are so simple that even a novice master can cope with such a task.
And if you want to make such a thing alone, then for starters you need to increase the boxes from the chest, and all surfaces, carefully, handle the sandpaper.
Using panels for furniture or ordinary plywood, give the front of the boxes a more presentable look.
You can add the usual wooden frames from above (for example, photo frames).
At the same time, they must be connected by means of durable glue. Ideally, if, in the process of gluing, the framework will be attached to the clips for furniture. 
With the help of a nail supply, we attach the front parts of the boxes to their rest.
That's how the finished boxes will look in the future table.
At the same time, the upper boxes of the old chest should be thrown away, and instead they attach a piece of plywood or panels for furniture using self-drawing and glue.
To give a presentable view, the frame and the top of the table can be painted in white (you can use another shade).
At the finished boxes attach the handles.
Here is such a console table should turn out in the end.
Console Table of Boxes
Old dressers are not the only material from which you can create stylish furniture. For this, the most ordinary wooden boxes can be useful. A table of such primary means can successfully complement the interior of the living room and another room. In order to create it, you will need:
- 2 boxes of plywood;
- Boards for the manufacture of frame;
- Steady and strong board for top;
- Primer;
- Drill and screwdriver;
- Screws;
- Putty;
- High-quality wood glue;
- Circular;
- Clips for furniture;
- Paint.
To begin with, we are well polished boxes and cover their paint.
Then, with the help of circular, we cut the necessary parts and make the frame, as shown in the figure. All parts are combined with screws and glue.
After the design was quite sustainable, fill all the gaps and uneven places with putty.
We put boxes from above on the prepared frame and glue them with glue and clamps.
This is what the ready table looks like.
Also, from such boxes you can create a more simplified version.
Here you do not need to create a sophisticated framework for many. It is enough to simply connect several boxes with each other.
Wooden Console Table with Sliding Doors
It is very interesting to look such a version of the console, which can be created in different colors and stylistic solutions for one drawing.
All you need for this is:
- 2 boards with a length of 2.5 m, 5x25 cm;
- 2 boards with a length of 2.5 m, 2.5x25 cm;
- A sheet of plywood 0.7 cm thick for the rear wall of the console table;
- 3 2.5 m long boards, 2.5x5 cm;
- 4 2,5m boards, 2.5x10 cm;
- 6 2.5 m long boards, 2.5x7.6 cm;
- 2 Thick panels for furniture (1.9 cm) or plywood - 91.5 cm x 45 cm;
- Equipment for sliding doors;
- Bolts 6 * 35;
- Glue on wood;
- Primer;
- Paint;
- Wood putty.
- Instruments;
- Yardstick;
- Triangle line;
- Pencil;
- Safety glasses;
- Headphones to protect against noise;
- Drill;
- Furious saw with a laser line;
- Portable table saw with a stand;
- Naillight.
Main nuances in work:
- Make sure the workplace is free from garbage and other contaminants.
- Always measure the items after each step taken.
- Before connecting the bolts, you must first drill in the hole in the tree.
- Remove excess glue from areas that do not need to be salabing. The remaining dried glue will not allow the paint well to go.
- Observe care in your work. Especially when it comes to a circular, a nailstate, etc.
All sizes presented are exclusively indicative, and you can change them yourself using drawings as an example.
Billets:
Framework
5x7,5x213 cm 4 pieces;
5x7,5x45 cm 4 pieces;
5x7,5x36 cm 4 pieces;
Parties
2 Thick panels for furniture (1.9 cm) or plywood - 91.5 SH45 cm
Facial frame
5 pieces. - 2.5x10x91cm;
8 pcs. - 2.5x10cm and 45cm.
Shelves
2 pcs. - 2.5x20 cm;
2 pcs. - 2.5x10x220 cm.
Average police holders
5 pieces. - 2.5x5x36 cm;
5 pieces. - 2.5x5x45 cm;
Back wall
Plywood 0.7 x92 cm.
Lower finish
1 PC. - 2.5x5x230 cm. Both ends need to be cut off at an angle of 45 degrees, in the longest measuring point.
2 pcs. - 2.5x5x47 cm. One end must be cut off at an angle of 45 degrees in the longest measuring point.
Top finish
2 pcs. - 5x25x231 cm.
Doors, fitted 51x76 cm.
Step 1
Make 2 frames of 2 crossbars and three windows in the middle. All items must be fastened, and connect the connections and sneak.
Step 2.
On the sides, attach the side panels. They can either fasten them with bolts, and you can use nails and glue.
Step 3.
Making the front frame. We post all measured pieces, as shown in the picture. (All designations are indicated in inches). It turns out 2 rectangles 45 cm wide and 2 to 55 cm.
Step 4.
At the bottom put the board. One 20 cm width (closer to the front), the other is 25 cm. All nail with nails and glue well.
Step 5.
For greater stability, it is necessary on the bottom boards, from the reverse side to kill small strokes with an interval of 55 cm.
Step 6.
Similarly, as the bottom of the console, create an inner shelf. Also you nail at the bottom of the head. With the help of self-tapping and glue, we attach it to the inside of the future table.
Step 8.
Attach pieces of plywood to the rear. It can be both solid leaf and a few connected finished planks for furniture.
Step 9.
We strengthen the lower part of the table with the help of appropriate fine planks attached throughout the perimeter.
Step 10.
To the top of the console, screw and sample panels for furniture. This should be done in such a way that the top is wider than the bottom. And the upper part itself must hang over the bottom.
Step 11.
Install equipment for sliding doors.
Step 12.
Putty making all the necessary slots and hide irregularities. Let dry.
Then, sandpaper, rub the surface towards along the fibers.
We clean the surface, in the end we wipe with a damp cloth.
Fort the surface. If necessary, stain.
From these examples, it can be understood that an absolutely any thing can be created with your own hands. The main thing is to attach some effort to this and connect everything to the fantasy. And then the results obtained may surprise you.
Console tables
Console models are seated narrow tables. Like a bureau, but without extension from the boxes. Very organically fit into narrow corridors or in the bedroom as a desktop or toilet.
For the first few days after the new year's offensive, we rested, lying on the couch, went to the children's theater, watched the movies and read books. In general, rested. But before the New Year, we decided that in these long New Year's holidays we must make some kind of home project. They were chosen a console table for the sofa in the living room.
The project was intended economical, so do not judge strictly :) Again, this is the second piece of furniture, which we do with your own hands.
Therefore, after the start of the normal operation of the stores, we went to buy balusters, which will be our table legs. We have the best choice in St. Petersburg Balyasin for the most ordinary stairs in a metric at the Vyborg highway. All the pleasure cost us at 830 rubles for 6 Balyasin.

Furniture shield we bought in Maxidom, this is a regular pine, 18 mm thick. Balaasins 50 mm in diameter. For the project, we also bought 20 mm (thickness) board.

Well, one more our new acquisition is a circular saw. Sorry neighbors and thank you for your patience. :)
We have a little football legs, because The height of the balaasine is 900 mm, which is too even for the console table.

For assembly, we will use our favorite KREG again.

As with the help of Kreg, send the legs to the table, we spied in one of my favorite blogs - at Anna White.

The table will be from 6 balaasine total long 1800 mm (almost for the entire length of the sofa). Therefore, we collected it in parts. Here is one of the half:

The bottom shelf is attached to the table. Similarly to the tabletop:

More detailed plan How to do this. We again spied on Anna White blog. Thanks to her huge. Her blog is just a fold of useful information.

To strengthen the design and alignment, small jumpers made.

And here our table is already slowly acquiring a more or less finished look before it painting:

Somehow, the resulting gaps I simply smeared a ship for a tree:
The concept of the console table appeared during the reign of Louis Fourteenth. In those distant times, these interior items were very popular, no less demand they enjoy in our time. Console tables have a variety of design options, but they have one common feature: console, it means narrow. Such furniture is very convenient to use in small rooms, it does not take a lot of space and retreats from the wall nearby.
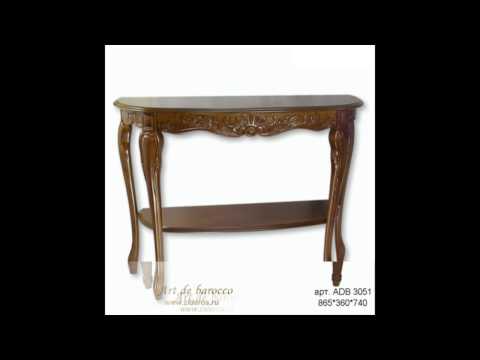
Console-narrow table on straight or curved legs suitable for different interiors

Decorative console decorated by carvings
We will not argue about the variations of models of console tables, because they have countless. Let's say about the scope of this interior item. The furniture looks great in the hallways and living rooms, acting as an alternative to the buffet.

The table console in the hallway has both decorative and practical importance

In the living room consoles replace the tables attached to sofas
You can turn this furniture in the semblance of a mini bar, or place a photo on it within. Original idea to use the console table in Bouda or for storing cosmetics.

Console modern table in the bedroom
In the hallway on the table store the keys, put a candlestick on it or a picture. And in the bedroom space on the console is allowed to hoisting "Dividi player" or TV.

Worn console table for figurines in the modern interior
If you have your own office, keep cigars on the table or beautiful figurines. And in the room of kids on this subject of the interior, put toys, put markers or boxes with designers.

White console table with drawers for different trifles

Console with boxes for children
We will tell about creating a console table with our own hands, is a simple, exciting occupation, it will help you to save perfectly. To do this, you will need to purchase some tools and stock accuracy and patience.
How to make a console table with your own hands from the old table

We saw the table into two parts in length
You can use the usual length of your time with the old table to create your masterpiece.

Fixed metal corners on the reverse side - in the center and edges

We glue the fabric to the tabletop in order to get the original console

Attach to the wall and get the original console to the hallway
Screw the desired part from the table and process it. The photo presents examples of such creations. If you want to create a masterpiece "from scratch", read on step by step guide to action.

The bedside table on two legs of the sawdust table is manufactured in the same way.

Console under TV in the bedroom and bedside table in the hallway from one table
Steps on the creation of the console table
Step 1. Make or buy legs. The console table is beautiful legs. Surely you do not have a suitable machine for pulling the curved balasine legs: it does not matter. Visit the construction store: you will find a variety of tables for tables for tables, and choose a suitable part.

Large and massive wood legs for console machine
Step 2. Cut the board. To create the upper and bottom of the table, use the three-meter board, the thickness of ten centimeters, width - 20. Cut the saw board. It will take four boards that have a length of 150 centimeters. Remove the details of the saw.

Cutting the board to make the top and bottom of the table
There are four planks for the table with a thickness of ten centimeters, length - 145. You will put them in a vertical position, attaching to the baked ears. Four squares will be placed from the edges, you will see in the picture.

4 boards for the top and bottom of the console table long 150 cm

Additional four boards 10 cm wide and long 145 cm for installation vertically and 4-square squares for 10 cm each side
Step 3. Connecting works. Take square parts that have a width of ten centimeters, and on their end part overlap the board one hundred forty five centimeters. Twist the design with screws. Similarly, repeating your actions, make the bottom and upper blanks for the future table.

We connect square elements and boards with a length of 145 cm, we make two blanks for the top and for the bottom of the table
Step 4. Do not forget about the legs. We take the legs purchased in advance and screw them up to a blackboard having a length of one hundred fifty centimeters. Before these works, do not forget to place the place where the legs are planned to be installed. Using the plugs, close the holes.

Screwing legs to points of placement
Step 5. Make the top of the table. Return two and a half centimeters from the edge and put the preparation design created earlier. Lubricate both sides with a joinery glue. Place the workpiece, you will get a similarity of a rectangular cake.

We form the top of the table with our billets

Over the workpiece again put the board and screw
Step 6. Lower part of the table. Since our table will have the same top and bottom, you will need to repeat the fifth step, as applied to the manufacture of the bottom of the future table. When you enroll all the work, you will have a real masterpiece that should be cleaned with the help of sandwich.

We repeat the same procedure with the bottom and get a ready-made console table
Decorate

Ready painted table in the interior of the living room
We advise just paint the resulting table. Now the widest range of various varnishes for wood is sold. For example, apply a walnut color coating on a table and take petroleum to lubricate the design after drying in paint. Last layer apply gray paint (when this coating will be filled, process the end items by sandpaper). As a result, you will get a shabby table with beautiful legs. Such a work of art is perfect for any living room or hallway. As you understood, make the table very simple.

Long console table with decorative elements in the interior
Video: Making a console table with your hands / DIY Making A Console Table
 Why you can not give icons
 Is it possible to give icons as a gift: Signs, the opinion of the Church
 A year ago left her husband, and now I do not know what to do