Close the pile foundation with your own hands. Facing the base of the pile foundation. How to separate the base of the house on the screw piles: decor options
Upon completion of the main stages of construction, the houses begin to finish the base of the pile-screw foundation. Decorative finish in the case of piles is even more necessary than if the tape base is used, since it not only adorns the house, but also performs a protective function. The screw foundation is open to all atmospheric influences, the wind blends under the house and water flows. This will affect not only comfort, but also on the durability of the screw structure, if the base of the house is not closed with trim.
Finishing can be carried out in two ways:
- installation of mounted base;
- erecting brick walls of the foundation.
The first way is much simpler - you only need to install decorative panels on a wooden or metal crate attached to the pile of or walls at home. In the second case, you will have to make a small concrete base. In addition to difficulty, options differ in price. The choice is also based on aesthetics of a material. Combines methods of finishing the base, even an inexperienced person will cope with the work.
Materials finishing hinged base
Hinged base has a number of advantages over brick:
- efficiency;
- high speed and simplicity of installation - even when working alone with a task, you can handle the day;
- the foundation is provided, thanks to which screw piles are protected from condensate.
For trimming base of pile foundation on attachments, various panel decorative materials apply. The question arises - which one is better to use?
Based Siding is the most common material of the finishing of the pile foundation. Its popularity is due to the cheap material, its high mechanical strength, resistance to moisture and temperature drops. Biological destruction (mold, rotting due to the defeat by bacteria, the eating rodents and insects) does not threaten this basement. In addition, there is a wide range of siding colors - from simple monochrome options to panels that imitate natural stone.
Plastic panels
Plastic panels can be made from different polymers - polystyrene foam, polyurethane foam and others. This allows them to give them almost any color, texture and shape. In addition, they can simultaneously perform the role of insulation.

Plastic is strong enough, immune to atmospheric and biological influences. Its use is an economical finishing option. However, they look somewhat cheap compared to siding and, moreover, a brick base.
Professor
Metal sheets of professional flooring are simple in processing, very durable and reliably protected from moisture and temperature fluctuations. Install them no less simply than other options for finishing materials. The only drawback is the narrowness of the scope of application. It is possible to persuade the foundation with some kind of wall finishing. To a wooden house, for example, such a base is not suitable.
You can also close the underground and cheaper materials - for example, slate or CSP sheets, decorated with stucco.
Technology installation of mounted trim base
Installation of the hinged base begins with the assembly of the crate. You can make it either from wooden plates or from a metal profile. In the first case, the framework elements are screwed to the steel brackets that need to be welded in advance to piles. The profile is welded directly to the parts of the screw foundation.

As a rule, the lamp is two parallel boards, one of which is attached directly under the wall of the house, and the second - at a distance of 150-200 mm from the ground. This distance may vary depending on the climatic conditions in the region. It is necessary to make it so that 50-70 mm remains from the edge of the decorative plates to the surface of the earth - it is necessary to compensate for the temperature expansion of the soil.
After installing parallel elements of the crate, you can install vertical rails or metal profile. This is done in cases where the base is too high to ensure greater structural strength. In this case, the installation step should be 400-450 mm.
On the perimeter of the house, a shallow trench of about 30 cm wide and covered with sand. Then the insulation material is mounted on the crate. Roll waterproofing is fixed on top of it, the end of which should be made in the sand. The edge of the roll is torn in the sand. Paving slabs are stacked over the sand. The whole design is called a breakfast and performs the role of a drainage system that protects the base from excess moisture.

If siding is selected as a finishing material, at the bottom of the base over the insulation, the starting profile is installed. The decorative panels are invested in it, which are then attached to the crate through thermal insulation using self-sufficiency. The corners of the design are strengthened with special profiles that come complete with siding. To protect the base from precipitation flowing along the walls, metal flows are installed on top of the finish.
Close down the base insertion should be guided by several rules:
- all wooden elements of the crates must be carefully processed by antiseptic and pre-combir impregnation;
- plates of decorative material must be installed with small gaps to ensure the ventilation of the space under the house;
- the drainage scene must be designed under a small house bias (no more than 5 °).
If, instead of siding, it was decided to close the foundation by plastic panels or sheets of corrugated, the material installation technology is somewhat simpler - the starting profile is not needed, the finish is attached directly to the crate. It is important to observe the gap between the lower edge of the finishes and the surface of the Earth.
Brick Cocol
The capital base of the brick provides not only a high aesthetics of the building, but also the solid and reliable protection of the underground space of the house. If necessary, such a base can be turned into a basement. However, the finish will cost much more than when mounting the mounted base, and the work will be more difficult.

There are two options for mounting the base of brickwork.
- On the ribbon of reinforced concrete. The ability to use this method depends on the features of the soil - if it is highly expanding when freezing, this option is not recommended.
- On a metal profile, which plays the role of shelves for bricks.
Installation in the first way is carried out in the following order.
- There is a trench around the perimeter of the building. Do not do it too deep, as the mass of the base is small.
- The walls of the trench are hidden by rolled waterproofing material.
- The trench forms a reinforcing blockage.
- Cement-sandy solution is poured.
- Construct brick. In each wall of the base, ventilation holes should be provided.
- Decorative laying finish is carried out - for this you can use plaster or any other material.
In the second case, the work will take a little less time and strength. Metal equestrian corner must be accepted to pile at an altitude of about 50-70 mm from the ground to ensure airport. The length of this profile can be equal to 6 or 12 m - it is possible to choose any depending on the length of the walls of the house. The thickness of the steel is selected under the height and mass of the base.

Thus, it is possible to close the pile-screw basement base in several ways. The choice of suitable is based on difficulty and high cost of work - to cope, however, you can in any case. Finishing the base will not only make the house more beautiful, but also will prolong the service life of the screw piles, so it is definitely worth doing it.
Finish the base of the pile-screw basement with their own hands
The decorative finish of the pile-screw foundation not only adorns the house, but also performs a protective function. Close the base can be in several ways.
The task is to finish the starting construction of a log house for year-round accommodation. By the time of the start of cooperation with Romshan, we had a flooded 6x8 base from blocks on a concrete slab with poor waterproofing, on which the old log house was 6x6 (transported from another site) with an inaccurate ...
made roof. It was necessary to repair the driveway, the rafting roof system, waterproofing the base, install the drainage system and storm sewer around the house, mounted a frost-resistant septic tank of 3 wells, install the water supply system (the well was already), ventilation, prepare the street entrance to the base, build a terrace, to strive All outside the simulation of the bar, fully insulate the first and second floor, install windows on the first floor and terrace, carry out the first floor finish (finishing the base, the second floor and the terrace left for later), separate the bathroom with tiles and install a warm floor, a shower cabin and Toilet, install a cast-iron oven with chimney and thermal insulation, install inlets and interior doors, mount a cross-cutting staircase / 1st floor / 2nd floor, pour formwork around the house, paint the house outside and inside, start electricity and put a wiring inside the house, install the kitchen. In short, a lot of things had to be done to live quietly already in this winter. The brigade began to work in mid-July, by mid-September all works were completed (2 months). Roshovan regularly personally controlled his employees, there was more often at the facility than I helped with the purchase of building materials, and also helped to correct those shortcomings that were allowed by the previous brigade. At the facility, in a neighboring old house, at the time of work, my mother lived, which remained completely satisfied with the Brigade of Rowlovna, it was very pleasant and neat guys, we did not have any linguistic problems. Cleaning the construction site was carried out regularly. Small alterations were performed quickly and without unnecessary conversations. At the cost of work, everything was clearly as agreed. Rovshan is very carefully and disciplined leads all paper work, intermediate acts, additional. Agreements, consideration of expenses and transmitted funds. It was more difficult with the estimation of building materials, it was not possible to calculate everything in advance, and we spent much more than planned. I write a review a month after the end of all works, the house is used for the entire coil, from the shortcomings - specialists who then installed uninterrupted food say, not very carefully wiring electric in the house is made. Otherwise, the flight is normal, although the main test of the house is waiting for the winter and especially in the spring, when the snow melts and the drainage system will come into active work. In the spring I will write an addition to the review (if it allows prof.ru).
Screw piles to create lasting, high-quality and durable foundations are becoming increasingly popular. However, after the end of the construction of the building, many happy owners of the new house are lost in guess, as correct and beautifully fulfill the finish of such a base.
In this article, illustrated photos, detailed instructions are given, as with their own hands, finishing the base of the house on the piles. Guided by the recommendations of experienced and professional builders, masters of their case, you can create a really beautiful and unusual facing.
A variety of materials for finishing the foundation of the structure
The modern building market is filled with a variety of building materials that can be successfully used to solve the task.
If you have a pile foundation - the trim of the base can be performed by the following industrial products:
- siding;
- sheet slate;
- asbestos cement plates;
- clapboard;
- professional flooring;
- other diverse finishing panels.
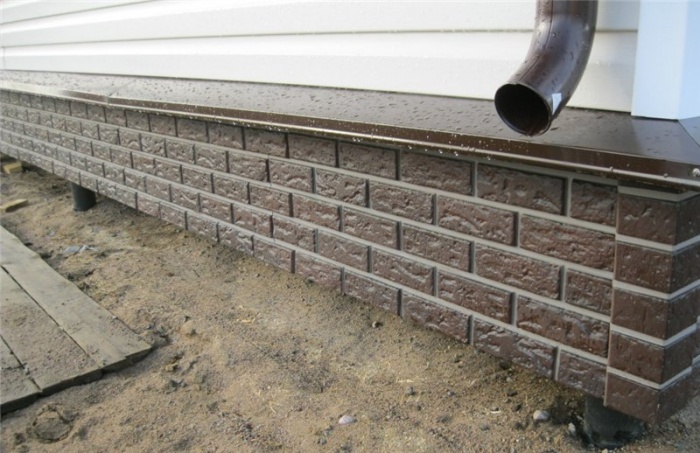
Also quite common is the use of decorative bricks.
It should be noted that the finishing panels are in great demand and popularity among builders who know well how to separate the base of the house on the piles.
This is due to the following factors:
- a variety of structure of such products;
- their ease;
- simplicity of installation, which, by the forces, do even inexperienced person.

Today we will look at two options for facing work - mounted panels and decorative bricks. What method of choosing, to solve you - it all depends on your personal preferences and the attitude towards one or another material.
Creation of mounted socle
It will noted that the trim of the base of the house on the screw piles can be successfully performed by any finishing panels mentioned above. Fortunately, their price is relatively low, and therefore the final estimate of work will be acceptable.
Basic advantages of mounted finish
The various options for finishing the base of the house on the screw piles by mounted panels has a number of indisputable advantages.
- Economy - According to experts, the arrangement of the mounted base requires three times less financial costs than the creation of a familiar belt base under the house.
- Convenience and easy installation - For example, if the size of your home is 6 per meters, then two people will cope with the task for ten hours.
- Optimal protection against dampness - Fresh air freely comes into the underground space, and therefore in winter and autumn, when the level of humidity increases, mold is not formed under the house.
- Highest aesthetics - A variety of materials allows you to create a surprisingly accurate imitation:
- tree, etc.

Stages of finishing work by mounted panels
So, if the question is, than to separate the base of the house on the screw piles already solved for you, and you chose the finishing panels, let's consider the sequence of work.
First you need to create a crate:
- on piles are welded or fastened by means of self-tapping guides - either wooden or from metal profile;
- if you decide to choose a tree, then in this case it is worth using a board pre-impregnated with an antiseptic, which will prevent its rotting and damage to the bugs;
- if the choice was made in favor of metal products, the profiled tube with dimensions 40 is best suited.
After the size of the house will be fixed around the perimeter of the house, you can proceed to the sake of panels.
Council. Before proceeding to hanging the plates, part of the soil with which they will touch, you should wake up with sand to the depth of forty centimeters, but you can and more.
When installing, drive the corners and separate parts as much as possible that it will serve as a guarantee of durability and aesthetics of the finish.

If the soil is unnecessary pumped, then it is recommended to leave between the soil and panels a short distance - this will avoid damage to the finish. To the house did not penetrate small animals, the holes should be closed with a shallow mesh.
Facing through bricks
This method is more time-consuming and costly, since in addition to the use of decorative bricks, you need to pour out a small-breeding ribbon foundation throughout the perimeter at home, to which the masonry will be performed.
The main advantages of a brick finish
Naturally, this type of finishing also has certain advantages that should be said about.
- High strength - such a base is maximally protected from mechanical damage.
- Protection against penetration into cold underground.
- The ability to create a basement.
- A high level of aestheticism is naturally if you have been chosen a beautiful, stylish decorative brick.
Disadvantages of brick finish
However, there are certain disadvantages that can also be silent:
- the inability to create such a bunching soil;
- the inability to create such a finish in homes built on areas with a strong height difference;
- pretty high cost compared to hinged basement.
Stages of finishing work with decorative brick
At the first stage, it is necessary to pour fine-breeding foundation between pouring. After the solution is driving and gaining strength, it is possible to place the brick laying, handling the openings for the beads.

Council. The outstands need to be created in the base of the hinged panels.
They are necessary for good ventilation of the underground.
So that rodents do not penetrate them, other livelihood, including domestic cats, the outstands are closed with a small grid.
If you have been styling not decorative, but ordinary brick, then in this case it is worth providing an additional finish that increase aesthetics. For this you can use conventional plaster.

In conclusion
Screw piles are an excellent method to reduce the estimate of the construction of the house, but do not lower its operational characteristics. (See also article.) And using one of the above methods of cladding the base, make the structure and incredibly beautiful and attractive.
In the video presented in this article, you will find additional information on this topic.
The pile foundation is a fairly common phenomenon in our country with its unstable soil type at a greater area. It is uncomplicated on installation and does not require much extinguishing costs.
But the appearance of the finished foundation with the house on it is not distinguished by special decorativeness. It does not affect the quality of operation, but from aesthetic point of view it is better to close the pile. This can be done in various ways and using different materials, as the construction market offers a huge range of finishing materials. This article will feature the main types of finishes of the pile foundation, and the technology of installation of finishing materials will be presented.
Features of the house on the pile screw foundation
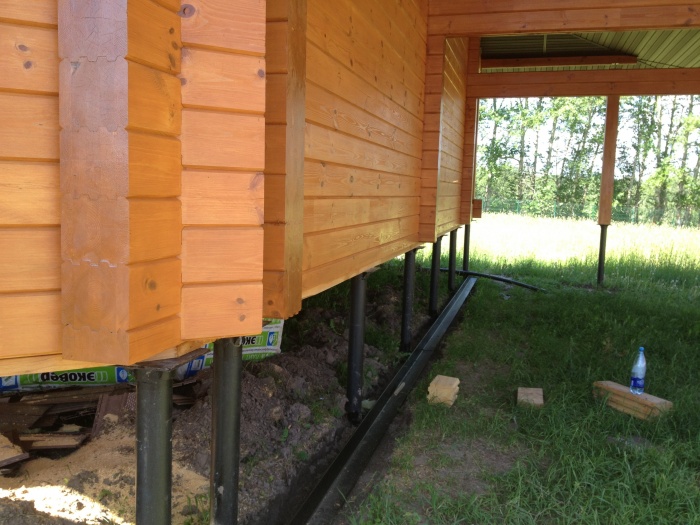
The building, the basis of which are piles, can be erected much faster than similar on the concrete foundation, since the pile does not need time for frozen and set the fortress. Screw piles may have a thread along the entire length or only at the end, but this does not change their function - the transfer of the structure of the structure to a more dense soil. There are also piles with blades at the end. They have one advantage, in front of the other two species - the possibility of sealing the soil around itself.
The advantages of the house on the pile screw foundation are:
- Easy mounting
- Ability to equip the base on any soil
- Low cost relative to other types of foundations
- Ability to build a house even on a very relief area
- Opportunity to carry out work in winter
- Destruction excluded due to ground movements
But, finishing the base of the pile-screw foundation is obligatory, which will be discussed further.

Variety of the basement of the pile foundation
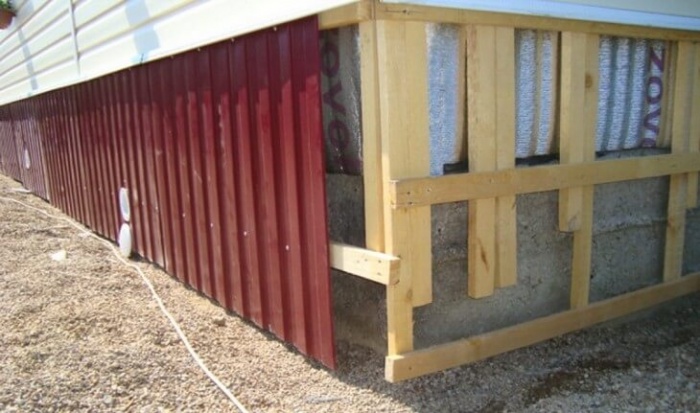
It does not matter, from which material will be made to finish the base of the house on the pile foundation, you need to take care in advance to build a crate. The best material for the crate will be a profile tube, which will not only simplify the installation of the finishing material, but also will connect all the piles with each other.
Important! If the cutting is mounted wooden, it must be impregnated with special solutions and is coated with several layers of primer mixture.
Depending on the height of the base and the selected material, you need to calculate the number of horizontal beams on the crate. The minimum number is three, but if the base is above 1 meter, then it may be necessary to install additional.
Ground Siding
This modern material is currently the most popular for finishing the base is not only a pile house, but also structures on other types of foundation. The advantages of this material are:

Facing brick
This method refers to a difficult construction and one of the most expensive for a screw foundation. In addition, it is impossible to fulfill the masonry without skills with your own hands, so you will also have to pay a professional builder who will carry out installation.
Tip! In order for the laying to be the most reliable, it must be associated with the pile base. To do this, there are several metal pins on each pile, which in the masonry process is immutted into it.

The advantages of such a finish are:
- Brick prevents freezing at home.
- Brick facing type does not need to repair or restored after several years.
- Brickwork contributes to strengthening the pile design of the house.
- Such a base is ready for long-term operation.
But there are a few minuses that I would also like to clarify:
- High cost material and installation work.
- Installation of brickwork is made for too long.
- There is no possibility to choose exactly the color and texture that you need. The range is limited.
Flat slate
At the moment, this is not the most popular way to finish the foundation, in addition, slate is dangerous to human health, as it contains a large amount of asbestos in its composition. Advantages of this material are a bit:
- It is possible to independently install due to the simplicity of technology.
- Long exploitation.
- Resistance to rotting and environmental impacts.
The main disadvantages of this material are:
- The fragility of the material that often leads to its destruction.
- The cost is higher than that of alternative more modern finishing options.
- Limit of choice.
- The complexity of consolidation on the pile foundation.
Professor
This roofing material is now used everywhere and truly became universal. Works on its device on the base of the pile foundation can be made independently for a relatively short period of time using the minimum set of tools.
The advantages of using a profile for finishing the basement:
- Lack of additional load on the foundation due to light weight sheets.
- A variety of color scheme.
- Relatively low cost.
- No additional processing is needed.
Professor, despite all the advantages, has a number of minuses that sometimes stop from its use:
- Instability to mechanical damage that can lead to damage to the outer layer and corrosion.
- In those places where the professional flooring is in contact with the soil possible its rapid rot.
- During the service life, the appearance of the material is lost - it burns out and stops glistening.
Installation of mounted foundation
Hinged foundation is just the same finish that closes the airspace between the house and the soil. It is necessary in order to limit the outlet of the heat from the house through the floor, to eliminate the foundation under the house of various animals, it is allowed to make the differences in atmospheric pressure, humidity and temperature, thereby creating the right microclimate under the house, which is positively affected by the state of piles.
Montaja technology
The first stage in creating a mounted foundation is to create a crate. As mentioned earlier, it should be made of metal or wood. In the case of the use of metal guides, they are welded to piles in advance marked places, and wooden are screwed onto the screws.
After the presence is ready to hang panels. For this, any sheet material is used from that list, which was presented before or some other, depending on the desire of the owner of the house.
Important! Before closing the base of the house, you need to pour sand with sand, in which the material comes into contact with the soil, layer from 4 to 7 cm.
In the process of installation, when it comes to an angle, you need to mount panels so that the angle is direct and smooth. This process is called the information of the corners.
After the material is mounted throughout the perimeter, you can move to the finishing finish, or rather the fastening of good items, such as corners, drippers and other additional accessories. These elements will give the base the finished and accuracy.
Conclusion
The house on the screw piles refers to the buildings that, after construction work, additional actions are needed on the decoration of the base. Of course, it is not necessary to do this, but the external after the finish finish will become more presentable. In addition to the appearance, the trim of the base will give a lot of positive effects. Making the installation of finishing material on the base is possible independently, unless it is not brickwork. A huge range of materials will help to stop their choice based on the ongoing characteristics, appearance and cost.
The pile foundation is radically different from the monolithic or tape structure. Its peculiarity is that the pile heads are not accumulated in the ground, but are an overnight part of the foundation.
And no matter what kind of piles was used - the point does not change. To give the facade a pleasant appearance, the space that is formed between the surface of the soil and the base of the house needs to be closed.
About how the cladding of the pile foundation is made with their own hands, we will tell you in this article.
If the house is erected by a brick or block, the pile field is usually crowned with reinforced concrete woodcase. The base under wooden and frame-panel houses is a steel channel, or a timber.
So:
- Such a kind of foundation is chosen if the soil on which is planned to put the house, pumped, or, on the contrary, is too dense. Either the area from time to time is subjected to seasonal flooding.
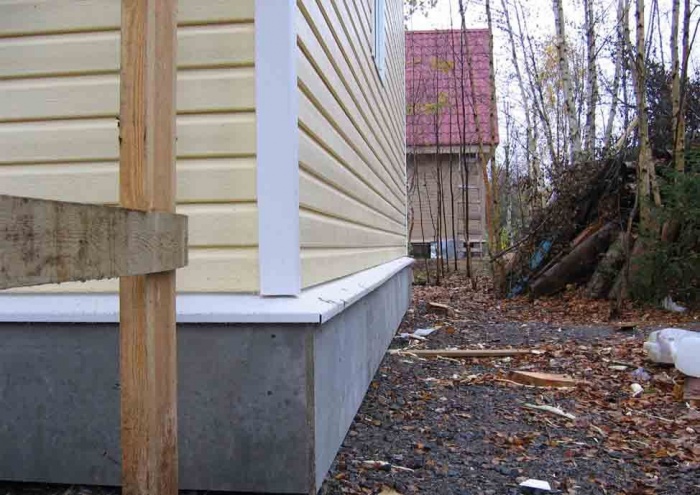
- But the main criterion of choice is the price of a structure that significantly saves the construction budget. Indeed, in this case, it is possible to save not only at the foundation itself (see the foundation of the foundation of a wooden house or on rotten foundation the house will not stand), but also on the construction of the basement walls, setting up the so-called false base.
- Its essence lies in the fact that the basement is masked by any sheet material. Facing the foundation should close not only the discovery between the house and the earth, but also the visible part of the Turks.
Types of facing
If we consider that there are not only residential buildings on the screw piles, but also various housekeeping: baths, sheds, taking room, then close the space under them can be the easiest and most cheap way.
So:
- For example, asbetic sheets are used for the fake-base device, or as we used to call them "flat slate". Fasten it with special bolts and slate nails.
Of course, the appearance of such a "base" will be unprepared, which for a shed, in principle, is normal. - But the facing of the pile-screw foundation of the residential building should be beautiful, and in this flat slate can also help us. After all, it is an excellent basis for mounting tiles.
And the tile can be taken at least cement-sand, although clinker, at least from natural stone. - In this way, you will get an excellent appearance of the base part of the house. Such a finish can be produced and on the surface of cement-chipboard.
This material is even more durable than slate, more lung and easy to install. CSPs can be cut and sawing, drilling, edged with nails and screws. - They do not have such a property as the fragility inherent in asbetic sheets. In the photo from below, we present the scheme of the device of a false base and the scene of the house.
And if you still look at the video, then you can easily cope with the task.

- OSB plates can be used as a base under the tile. Unlike CSP, the binding basis in the production of this material are polymer resins.
This fact makes the plates in immune to humidity, they do not even need to be primed in front of the tile sticker. OSP plates are so strong that they are used and constructively, for example, in frame-panel houses. - If you want to most easily simplify the process of cladding the pile foundation, while having received a high-quality imitation of stone or brick, the easiest way to use base fibro-cement or polypropylene panels. And in general, you can use any kind of siding and composite panels.
- Alternatively, facing brick can be used to create a decorative base wall. Masonry in Polkirpich for this is quite enough.
- In cases where the above-ground part of the pile foundation is only 30-40 cm, this type of facing is practically not used. Whether it is, when in the space between the base of the house and the soil, you can equip a full-fledged basement.

In this case, brick walls do not decorative, but ordinary, in a half brick, and even with insulation. On this topic, there are exhaustive information on our site, and now we are talking about the False Cole Device.
Packing panels
Since any panels are mounted on the frame, from its installation and you need to start. In the simplest version, 40 * 100 boards are used for its installation, or 40 * 40 bars.
The size of the elements of the root, and the amount of its belts will depend on the height of the base and the weight of the panels:
- First, the board is folded along the base of the future base, and make a marker markup opposite each pile on them. For these marks will be drilled under fasteners.

- Fixed elements of the dohes will be 8 * 55 mm bolts, you can slightly longer. To make fixation as much as possible, when installing it is necessary to use a metal punched metal.
- Bolts are inserted into the holes, one of them is put on the ribbon, and on top of the washer. Then nuts nut. The length of the tape segment must correspond to the mounting step.
- The board is pressed against the patch, the free end of the tape is crushed, and put it on the second bolt. The full tightening of the nuts is made after the position of the elements of the roasting will be adjusted by level.
- The protruding angular boards cut the flush with the end of the neighboring board, and are connected using metal corners. Further everything is simple.
- All panels are equipped with a special fastener edge. It can be attached to a wooden doomle of them even nails. For free circulation of air, in the trim, it is necessary to make holes-produced.

Well, each type of panels is fixed in different ways. It depends on their design.
Usually, when purchasing goods, the instructions are attached and the instructions and installation problems do not occur.
 Why you can not give icons
 Is it possible to give icons as a gift: Signs, the opinion of the Church
 A year ago left her husband, and now I do not know what to do