Frame bath with a naked mansard. Design and construction of frame baths with an attic date of installation and all works
Bath - a trump card at any dacha, in the courtyard of a private or country house. Even those who go to bathe irregularly, but consider such a pastime as rest, and they agree: its own bathhouse is great. In addition, it is not so difficult to build it, as it seems at first glance, thanks to modern ways and materials. The classic log house will require certain skills for the assembly, but the frame wooden bath in the yard will look no worse, and it is possible to build it with your own hands literally in a few days.
Content
We design a bath 6x6 with an attic: layout
The first thing to take care to the start of all works and the procurement of materials is to prepare the project of the future building. Ideally, this should be referred to from specialists, as professionals will quickly make up a project that will have a number of benefits to homemade:
- long use of the bath is provided by qualified loading calculations on the frame;
- proper selection of materials depending on their weight and operational properties;
- professional compilation of the estimates (avoid material overwhelms, but also do not have to buy);
- trouble-free registration of baths in cadastral documents;
- raising the price of the house / cottage together with the bath when selling.
You can order professional documentation in the Bureau and companies that are engaged in frame buildings, or when buying a finished set of materials for the baths of the desired size. In the latter case, you will immediately have everything you need to start assembly.
Note! It is not necessary to choose only from the finished projects available in specific bureaus. Experts can make a project of Bani 6 by 6 with an attic or without taking into account all your requirements. Deviations from the standard plan, of course, will affect the price of the project, but the result will delight you for many years.
In principle, the project - it only sounds so officially, and in fact it is possible to plan the room so that in the construction process there is no desire to remake everything, replace the already purchased material to others. An important point in frame construction is to correctly calculate the load on the support structure. If you succeed, then you will cope with the other aspects of the design.
If you decide on independent calculations, keep in mind that:
- the load on the ground from such a bath is small, therefore the foundation makes a low-profile belt;
- the frame for a bath with a quick way of installation in standard projects is collected in increments of 95-100 centimeters;
- the main material for the assembly is the board 15x5 or a ram 10x10 or 10x5 centimeters;
Note! With an independent choice of wood for construction, carefully check its humidity. Wood with a moisture content of more than 20% with a high probability will lead during operation, and deformation can be so strong that the full substitution of the material will be required.
- planning Bath 6x6 with an attic should take into account the placement of pair, washing branches, locker rooms and the pre-bankers on the first floor;
- the size of the washing and steam offices comes from the intended number of vacationers;
- washing, the steam room and the pre-banker are separated by frame partitions from the main material of the bath + insulation and vaporizolation;
- safety requirements suggest the placement of the Kamenka stove not in a steam room or washing, but in the pre-banker;
- the attachment to the attic is made from the pre-banner;
- if desired on the attic, you can put a terrace or veranda.
How to assemble a frame bath 6x6 m with naked mansard
The easiest way will be done if you purchased the ready-made "constructor". In this case, each element is already selected and extinct with professionals, and a very accurate step-by-step instruction is attached to the whole set.
If the building from the beginning and to the end is supposed to be done with your own hands, then after the completion of the project and choosing a place for construction, you can proceed to the preparation of all necessary materials.

You will need:
- edged board 50x120;
- square standard ram 120x120;
- unedged board and timber timing;
- bar 40x75;
- lining, siding or other light finishing material for walls;
- cement mortar;
- roofing material;
- ruberoid;
- minvata;
- ceramzit;
- fasteners.
Consider a step by step process of assembling a frame bath 6x6 meters:
Step 1. Prepare a place. The highlighted platform is aligned, placed under construction.

Step 2. On the perimeter of the markup, the foundation of the ribbon type is set. It should be remembered that it must pass both under the outer walls and under the supporting partitions.
Step 3. From the bars, rafters and transfers are mounted frame (only four frames). The frames are attached to the strapping in the earth above the waterproofing layer.


Step 4. To the treated and fading, the wall components are fastened with anchor bolts.
Step 5. Installation foam you need to print all arising joints to avoid the production of the building.
Step 6. A rafter system and a doom will be built on the frame.
Step 7. The slabs are mounted (for example, OSB), which is laid out thermal insulation.
Step 8. The roof is attached to the rafters.

Step 9. All internal partitions are installed.
Step 10. The septum near the oven needs to be chopped by a heat-resistant brick.

Step 11. Interior decoration: Minvata is laid in the walls, vaporizolation and they are sewn with clapboard; On the floor, clamzit is poured and stealing, after which the floor is also sewn by boards.
Step 12. If necessary, the exterior decoration of the bath siding or clapboard is performed.

After the frame bath 6 is 6 meters collected, you can start designing the interior, installation of equipment and try out the results of your work.
Classical bath 6x6 with a mansard With excellent planning at an inexpensive price - the dream of any person who owns the land plot. Therefore, many lovers of dacha rest immediately for the cottage acquire themselves the excellent Russian bath. The layout of this bath includes a toilet.
The company offers its customers to buy classic Russian baths of any size with finishing and without it. Bruce Baths turnkey from the company SK Domostroy is the best that can be found in the country construction market today. By the ratio of "price / quality" buildings from the SK Domostroy
Why are the projects of baths 6x6 with a turnkey attic from the SC domostroy so cheap?
Do not think that inexpensive price bani project 6x6 with attic It suggests that they are poor quality or collected in violation of technology.
Such a low price is due to the fact that the SC Domostroy has its own sawmill. This reduces the price to very low values. As practice shows, the cost of the bath in the SC domostroy is 15% lower than that of the nearest competitors.
In addition, the assembly of log cabins is carried out by teams of professional masters who can cope with the work of any complexity in the shortest possible time.
If there is a country area with a cottage and relatives or friends come often, a small bath 6x6 with an attic will ensure excellent wasting and replace the guest house.
Sometimes we are uncontrollably attacked the sea, plunge into azure wave, and sometimes for some reason everyone would give out to be treated in the real Russian bath. Such a building can be both in the country area, occupying a small space for 6 acres, as well as among many other buildings of the farm. At the same time, it is not necessary to build a large complex similar to the Roman terms, quite enough if it is. Why is there a living room in the underproof space? Everything is simple - if there is no cottage at the cottage, such an addition will become quite comfortable housing.
However, the assignments of the attic can be invented a lot and in the event that you have a completely comfortable country-distance house. In particular, in the winter, being well pubed, you are unlikely to want to return to the house, even if not on the snowdrifts, but at careful paths. Therefore, in the attic room, you can simply equip one or even two cozy rooms with a small kitchen and a bathroom in which you can sleep well. In extreme cases, these rooms will replace the house for guests. If there is already already available, think about accommodation at the top of the billiard room, combined with a rest room, setting the area below the most necessary premises.
The classic steamer has long been a small building with a pre-banner folded from logs. In the attic, as a rule, brooms and bauds were stored. Today, it has changed constructively, however, far from everyone knows how to bathe with a birch broom, and therefore prefer to wash with soap, that after warming up in steam room, too good. However, the baths themselves today are often built often from whole logs and not even from a bar, but from ceramic or silicate bricks, from slag blocks. However, there is an option that for many will become a golden middle - a skeleton bath 6x6 with an attic will replace the house-log house with a steam room, which is much more complicated.
Let's compare the advantages and disadvantages of both types of construction. Let's start with a log of resinous wood. First of all, such a bath easily tolerates the effect of a steam deposited by a wet film on the walls. Among other things, the logs, as well as the bar, "breathe", or, in other words, passes the air, so in such a building it is always easier to breathe. As for thermal insulation, the attic to insulation is still necessary, since the thicknesses of the logs even with well-by-lawy junctions between the crowns are still not enough to protect against winter frosts. Yes, and the steam room does not put under the inner trim insulation to heat it faster and cheaper.
The frame of the bath is advantageous primarily by the speed of the construction, because it does not give a shrinkage, unlike a cut, which means it is not necessary to wait for a year and a half until the crowns do not fully sleep. Yes, and build the frame is much easier, even one person is able to cope with a small design, while the logs alone alone do not forces alone. In addition, a set of a finished building is much cheaper than cylindered lumber, and if it is built yourself, it is direct savings. As for durability and reliability, with the correct assembly, the skeleton bath 6 to 6 with the attic hens no less than the log building, and it will be much warmer.
Since space is limited, we will consider all possible options. Let's start with the pre-banner, without which it is impossible, he plays a role and hay, and, often, changing rooms, and you can exist in the same room in the same room. It is also convenient to place a staircase on the attic floor, where it is also worth it to make a small tambour if there are two rooms at least two. In the event that the rest room will be at the top, the entire bottom floor should be placed under the room, without which the bath can not do.
Suppose immediately follows the pre-banker will be washing, in which it is best to install a shower cabin with a deep pallet equipped with the latest technology. You can, of course, make a small pool, or put it with a home alternative - jacuzzi. Further, if all the premises are one after another, the "Anfilad" of the pair rooms will complete, in which several tiers of the shelves will be able to accommodate up to six people. The furnace portal with such a layout is more appropriate to bring to the washing, adapting a small locker to storing wood or coal, if the firebox is not gas.
It is possible another planning of the bath 6x6 with an attic, when the premises go to two rows, for example, in front of the entrance door from the corner pregnant, there is an entrance to the rest room, and on the side of the two doors to the toilet in the next corner of the building and the washing. Next, from the washer traditionally go to the pair, but in this case the furnace door is more logical to place in the room in which it will be and. Here, by analogy with the living room, you can equip the kitchen, and the attic floor will be faded with a pair of bedrooms and toilet.
As a rule, the instruction is always included in the bundle of bearing elements, however, before purchasing it, you should know with what will have to face. That is why further a brief description of the stages of work is proposed. Despite the fact that any construction begins with the foundation, the fill of the base is determined, since the bath 6 is 6 meters with an attic can be installed on any: monolithic, ribbon or column. The main thing is to prepare the perfect horizontal platform, which can be done using a level. If the clay or sandy soil is saturated with moisture, it is better to use screw piles that do not require aligning the place of development.
Waterproofing fees on the foundation for the foundation, and the strapping board is already fitting on it, which is attached to the wedge anchor bolts in increasing no more than 60 centimeters.. Before final fixation is necessary with a roulette to check the accuracy of the geometry of the strapping belt in accordance with the project plan. The liner is stacked on the liner (fastening brackets of the furniture stapler), and the wall panels are tightered every 30 centimeters on top of it in a checker manner, starting from the angle. The first frame element is fixed in a vertical position by temporary pink. Between the panels connected by the same plumbing bolts with the above step, the strips of the linen can be laid.
The main rule assembly rule: the ordinary wall panel is attached first to the neighboring (at the beginning of work - to the angular) with a preliminary fixation of three clamps, and only then fastens to the strapping.
So that there are no distillates of walls, every two or three panels are installed. Upon completion of the installation of the side panels on top of them, the lane is launching a strip of the flap of a furniture stapler (targeted by the braces of a furniture stapler), which is attached to the upper strapping board. We definitely check everything for compliance with the geometry of the project plan. Then, after preliminary marking, we begin to fix with reinforced steel corners and profiles of the rafting farms, starting with the front-line, fixing them with pins. Interlayed beams are installed in the intervals.
Bath price with insulation 150mm min. cotton wool and finish 392t.r.
Bath price with insulation 150mm min. cotton wool, finish and foundation 452t.r.
Bath price with insulation 150mm min. cotton, finish, foundation, electrician, plumbing and water supply 509t.r.
Standard warming 150mm wall, 200mm roof basalt min. Watts, Max. 250mm.
Project price for self-assembly 7,5t.r. Download estimate and read
If for some reason you do not want or can not build a house on our project yourself, then we can do it all for you, and inexpensive and in the shortest possible time, Read more about prices and advantages of turnkey construction, read in the section "Price Full construction ".
Floor frame 2 floors (residential attic).
Download, Project KD-73 Bath with an attic of 0.44 MB (PDF) \u003e\u003e\u003e detailed description.Drawings of the frame bath 6x6m 72m / kV - large, but inexpensive and comfortable frame bath with a warm attic. The first bath with the second floor from our collection of projects, such a bath you can build on or our own, and quite quickly, the bath can be used both for summer holidays and to leaving the nature in the spring and autumn, and if you wish and in the winter period of vacations and vacation. The bathhouse has everything you need for a comfortable stay in it at any time of the year and can be used as a basic or guest house. If you wish to the bath, you can add a terrace or faith from Prokka KD-172.
The bath finishes can be changed to your preferences, according to the project: Outdoor finishing OSB and internal finishing of GLC and lining in the bath are included in the project's cost. The project is also included in the project price, insulation 150mm min. Wats (possibly up to 250mm), wiring and installation products, water supply automation, sewage with plumbing installed.
First floor 36 m 2: The ceiling height is 2.5m, a rest room is 12.5 m 2, a bath is 8.5 m 2, s / y 4,6m 2, an entrance hall of 5.5 m 2, a height of a skate is 7.4 m.
Second floor 36 m 2: Ceiling height 2.5m, Bedroom 10m 2, Bedroom Children's 10m 2, Hall 3m 2, 3m 2 wardrobe.
To enlarge the pictures, click on it.

Options for appearance:
any finish is possible

High-rise marks:

Foundation for this house:
according to the project MZLF 50B x \u200b\u200b40sh.
piles (screw, burbilling, etc.) 15 pcs. 
The average value of such a house, above our 4 times.
Order of the project
In order to place an order, select the type of foundation and other possible options, then click the "Order Project" button. In the form that opens, specify your email correctly and other necessary data. If the order is issued correctly, then immediately after processing the order by our specialist, the order confirmation will be processed to the mail with the refinement and payment options.
Project KD-73
Tape (MZLF) piles
Project price 7,5t.r.
(A set of working circuits and nodes: frame house, foundation, electrical engineering, estimate, etc.)
Order a project
Frequent customer issues:
What if you need to change something in the project you like?
Bath with an attic is one of the best solutions of country buildings, it allows not only to take water procedures, but also use the premises as a summer cottage. A project was chosen in a perimeter of 6 × 6 meters, we believe that such a bath will satisfy developers both at the price and comfort.
Bath in frame design, during the selection of materials and technologies, we tried to minimize financial losses while compliance with optimal quality.
| Building element | Illustration | Description |
|---|---|---|
| Foundation. |
| The fine-breed ribbon reinforced, the depth of the tape is ≈0.8 m, the sand pillow is a thickness of ≈30 cm, height in the base of 50 cm, width 40 cm. This option of foundation can be set for all climatic zones. You can simplify it a little taking into account the specific physical characteristics of soils and weather conditions. |
| Bearing structures. |
| For top and bottom strapping and floor beams, use 50 × 150 mm boards, for rafters of 50 × 200 mm boards. |
| Internal partitions bath. |
| The inner partitions of the bath are triggered by clapboard, attic partitions are trimmed with plates of drywall. |
| Doors and windows. |
| Doors and windows of fiberglass, there is an opportunity - it is better to make wooden. |
| The second floor leads a swivel marching staircase, manufacturing material - natural boards. | |
| Roof. |
| Roofing from Ondulina, but you can also take a bitumen tile. We do not advise metal roof - too much noise during shower. |
| Insulation. |
| For insulation, glass gamble was used, the thickness of the insulation layer is 150 mm. Steam and waterproofing of the baths are made using foil. |


Description of the project Bani with an attic
The bath has a recreation room with an area of \u200b\u200b12.5 m2, the bathroom is 4.6 m2, the hallway is 5.5 m2 and the steam room with a wetting 8.5 m2. The height of all rooms is 2.5 meters. As you can see, the area and list of rooms allow you to simultaneously be in the bath four and more people, while everyone will feel quite comfortable. And the bathroom can be used by vacationers in the attic.
On the second floor of the attic, he has two bedrooms with an area of \u200b\u200b10 m2 each, changing room and a hall of 3 m2. Exit to the second floor along the Marsemey Rotary Stair of the tree. The roof is a two-tie, the rafter system is made using vertical backups (grandmothers). The backups will be hidden in the interior partitions of the attic.

Stages of construction work
As can be seen from the project, the bath must have a plumbing and sewer system. These features should be taken into account during the choice of the location of the object, pre-think methods for building engineering communications. At the same time, the requirements of construction standards and rules should be taken into account.
Foundation


Before starting construction, you need to prepare a platform: remove the fertile layer of the Earth and make a layout. As we have already spoken, our foundation will be a ribbon finely manifold reinforced. In the tape you need to provide holes for ventilation and engineering systems.


Step 1. Make marking on the ground according to the foundation plan.

Make the marking of the tape of the foundation. To do this, take wooden pegs around the perimeter of the structure, check the dimensions and angles. Corners Check by measuring diagonals, the scatter in the values \u200b\u200bof diagonals should not exceed 2 ÷ 3 cm, this error can be easily corrected during the construction of the frame. The playground should be as smooth as possible. The width of the foundation 40 centimeters. If the ground on the site is dense - you should not make the inner formwork, you can dig the same width as the plan.
Ribbon foundation with your own hands - markup
If the lands are sandy - increase the trench width at least twenty centimeters on each side to set the formwork.

 Formwork - Scheme
Decide the issue with the disposal of the Earth. There are two options: to dissolve it under the entire bath or take out to another place. It is difficult to give specific advice here, it all depends on the peculiarities of the site landscape. In some cases, it is advisable to make a subtype of the converged places, in other cases it is better to leave the land under the bath.


At the same time, determine the location of the fundament under the oven and a small septic tank for collecting water under steam room and waters. Small septic tanks are better located in the maximum proximity to the foundation belt.

Step 2. From the construction reinforcement of the periodic profile Ø 8 ÷ 10 mm. Tie a metal frame for reinforcing concrete.
It is very important: the frame must be filled with a layer of concrete with a thickness of at least five centimeters with a thickness of concrete. Otherwise, thin concrete from stress can give cracks and in these places will significantly deteriorate the indicators of the foundation.
From the Earth, the frame can be pulled off with ordinary stones, ate the grid fell over the side - between it and the formwork insert the stones of the corresponding thickness.

Prices for fittings
armature
Video - reinforcement and formwork of fine-breeding belt foundation
Step 3. Drop the trench with a depth of 80 centimeters, put on the bottom of the sand with a thickness of up to 30 cm, align and confuse it. The sand pillow will compensate for the lifting / lowering of the Earth during the freezing of the soil. Lower the reinforcing grid in the trench. If you have to make a formwork for an earthen ribbon, it is advisable to make it immediately for the entire height of the foundation (above the ground for 50 centimeters). Much attention is paid to fastening the formwork, one must withstand the weight of concrete and not to change its linearity.

Step 4. Pour concrete evenly throughout the perimeter. The perfect option is the whole foundation flooding in one day. Does not work? Then do not allow large drops around the altitude of concrete, align it. The next day, continue the fill. Under the level, align the top, at the corners of the bath, the foundation height cannot be different on more than a centimeter.


Step 5.. Let the time concrete grab. If the weather is very hot - abundantly water him every morning with water. Concrete exposure time at least two weeks. Do not rush to remove the formwork, do not risk the strength of the foundation.
Step 6. Carefully remove the formwork, cover the ribbon of the foundation with two layers of the runnerdoor, press it with stones and leave in this state for no time.


During this time, clean the sawn timber from the remnants of concrete and dirt - they will all be useful during the construction of the bath. Prepare materials for construction, leaving the missing.
And one more important work. We chose a more "modern" version of the bath with the attic, in it provided for the dressing room. Of course, it is possible to use the street toilet, but today it is already considered obscene, especially for those who chose a pretty expensive version of the bath. Construction of a comfortable toilet will increase the total cost of the object just a few percent, this is a minor amount. Due to the fact that we have not considered the topic of the toilet room, we will stop in detail on it.


Prices for cement M400
cement M400.
Construction of the sewer system
The sewer system consists of pipelines and septic. Earthworks are more profitable to produce simultaneously with the foundations - there is a tool, and "helpers", and the sand from the foundation remained. In addition, you can simultaneously perform all work on the improvement of the territory.

Step 1. Determine the location of the septica, take into account the rules of SNiP 2.04.03-85. During the selection of the installation site, the septica is trying to make the site with a slight bias. If it does not work, not a problem, the slope of the pipes will make trenches.

File for free download - Construction rates and rules. Sewage. External networks and facilities.
Step 2. Cut the septic thread from the bath to the place of installation, check the horizontal water level. Technical requirements are recommended to make a slope of sewer pipes up to 3 ". One PROMILL - a height difference of 1 cm per meter, you need a bias of approximately three centimeters per meter pipe.
Step 3. Drop the trench. How to check the slope? At the beginning, at the end of the trench, heat the pegs, mark the level of the horizon. Measure the depth of the trench from the level of the horizon (not from the surface of the Earth!), It must be within the recommended values.


If you plan to use the toilet room only in the summer - the depth of the pipes does not matter. But we do not recommend going in such a "easy way", over time, it is possible to install a bath heating and use it all year round, and this will require the use of a toilet completely in another mode. It is better to immediately lay the sewage to the depth of freezing, it is not a little difficult to complicate the work, but then it will not have to redo anything.
Step 4. Dock the pit under the septic tank.


Practical advice. Do not buy expensive industrial septicities. For a family of four people, it is enough to use an ordinary two-toll barrel, it will have to clean it at least ten years.


And this is with constant use of the toilet room, and what to talk about the bath? In the barbell around the perimeter and at the bottom, do the holes for draining the liquid fraction. For your information - to form one centimeter of the soil you need about a hundred years. During this time, the pumping vegetation forms a layer of solid humus of the specified thickness. The same time frame is needed for sewer fractions, and the height of the barrels is greater than a meter.
Step 5. Put a small sand layer on the bottom of the trench, it will definitely stay after the foundation. Sand is needed only in order to make a more uniform load on the bottom of the plastic pipe. Put the pipe, connect it with a barrel.

Step 6. If there are no stones in the ground - you can fall asleep a trench if there are stones - you will have to protect the pipe with sand. Make for the septicity any lid.


And one more remark. Do not believe in all fairy tales on the forums that a large slope of the sewer pipe will be the cause of its grain. Did you see a river somewhere with a rapid flow and or or fixed bottom? While you were engaged in sewage, the foundation was completely "prepared" to further construction work.


Prices for septicch
Construction of the carcass

Frames will be made from 50 × 150 mm boards, insulation - mineral wool. The room with steam room and wave need carefully isolate, you can use modern nonwovens, polyethylene film or aluminum foil. Cleaning - natural lining, OSP plates or glued plywood. We have calculations for one materials, but you can take others in accordance with your preferences. The construction technology does not change from this, but the cost will help increase / mind to suffer significantly.
Step 1. Make the bottom strapping of 50 × 150 mm boards. The boards are stacked on the waterproofing layer. The boards have a standard length of six meters, respectively, anywhere, except the corners, do not need to be connected. In the corners, make a connection in Polterev. You can fix it with impudent, nails or screws. Immediately put the floor beams, the distance between them up to 80 centimeters, you can apply 50 × 150 or 50 × 100 boards for beams. Specific values \u200b\u200bdepend on what loads will be calculated by the floor.
| Name of work | Photo |
|---|---|
| Waterproofing foundation |
|
|
|
| Angular connection of the bottom strapping |
Longitudinal connection "in Polterev"
|
| Floors - Installation Lag |
|


Step 2. Apply markup locations location and doorways. Marking is made in size of window and door boxes, leave a gap in 2 ÷ 3 centimeters to facilitate installation. These slots are then close.


 In the photo - openings in a frame wall
Step 3. Prepare vertical racks over all corners of the building, check their length and install on top strapping. With the help of a water level, check the height again, if necessary, fir the supports. At the bottom you can fix them with metal corners, at a height temporarily strengthen them with side spacers.


Step 4. Tensioning rope between them and put all the other racks. Temporarily fix the position of the cutting boards. Do not forget about the windows and doors.
 Drinks must rest in something rigid to ensure normal sustainability. The most correct option - at the top of it in the strapping, down to the floor

 Drive (in the corners for fixing racks)
Step 5. Make upper strapping from 50 × 150 mm boards, check out the position again and firmly fix the design. For fastening, you can use the same metal corners. To increase the stability of the design it is very desirable to make oblique stops from the boards in several places. Time work will take a little, and the whole design will become more reliable.

Top strapping - Photo


Step 6.. Install the beams of overlapping the second floor, make them the layout of the location of windows and doors. Further, all operations are similar to those described above. Immediately the temporary floor of the attic, it will make it much easier for the installation of the rafter system.


Roof construction
Mansard requires a thorough approach to the arrangement of the roof. It should be not only warm (it goes without saying), but also sustainable. In addition, vertical racks under rare legs (grandmas) should be positioned in such places so that later they can hide in the skin of indigestion interior partitions. The roof is two-screwed under Ondulin. How to do it?
Step 1. On the ground from the boards, make a pattern of rafting legs. Pay attention to the angle of the slope.


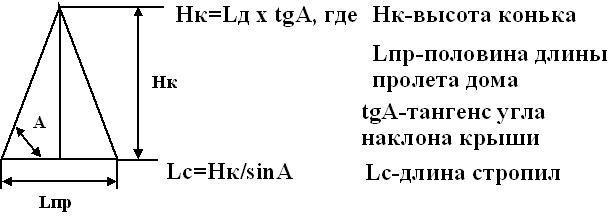
Another way to determine the corner of the roof of the roof is in determining the ratio between the height of the overlap to the skate and a half overlap width
Too much angle of the slope will require a significant increase in financial costs, and too small angle will reduce the height of the attic room.


Start the size and position of the template on the entire length of the bath, if necessary, adjust its parameters. At the same time, make tags for drinking stubborn sites raftered into the upper strapping. Very important: rafters should be located above vertical racks.
Step 2. Collect the entire set of rafters on the ground, serve them on the top of the bath. Install two extreme rafter legs, pull on the skate thread, check again all sizes and spatial position. Lock your legs.


Step 3. In turn, set all the rafters, temporarily boil them from the bottom of the cutting boards. Check their position and secure securely.
Step 4. You can proceed to the crate. As a roofing cover, we chose Ondulin, it does not differ in great physical stability. Ontulin needs to be attached to the crate of 20 × 50 mm, the distance between the rails, calculate yourself based on the four on each sheet. Could not give exact tips - various manufacturers change linear sheets of sheets.


Step 5. Roofing. Due to the fact that the attic roof is insulated with mineral wool, you need to make every effort to prevent its wetting. Under ondulin should be placed by water protection, the material choose any, the main reliability. Watercard need to lay up, overlapping a rows of at least ten centimeters.

Make marking of the Ondulin series, if the experience of the production of roofing works is not enough - we advise you to repel on the hydropocryment through a series of the installation line of the following sheets. Bring the rope with blue, it does not take a lot of time, and work will accelerate significantly.
Install plums, snowstores, hobbies and other valor elements of the drain system, use special nails for mounting ondulin.

 Exact Exposure Mounting Instructions Onduline - Warranty Your Success

Step 6. At this stage it is better to install mansard windows. This is a pretty "fashionable and comfortable", but "dear and complex" element of the attic. There is a desire - install, during the work of the work strictly follow the manufacturer's instructions. There is no insulation of the insulation work easier, the installation will be better and safe. We chose the project easier, to illuminate the windows of the windows are installed in the front. One in the middle of the hallway of the attic and one for each bedroom on the sides.

Step 7. Warming roof. Mineral wool thickness should be at least 15 cm if it is planned to use the premises in the winter period of time and up to 10 centimeters if you are planning a summer attitude of the attic. It is necessary to make a steam protection of the insulation, you can use modern rolled materials or an ordinary polyethylene film. The main thing - pairs should not be condensed onto the cotton, it is fraught not only by the decrease in the heat-saving characteristics. Moisture very negatively affects all wooden structures in contact with cotton.
Wall insulationWorks should be started with the outside of the bath - you need to protect it faster from atmospheric precipitation. Getting to insulation only in dry warm weather, the mineral wool should not fall under the rain. The thickness of the insulation is within 15 cm, battle wooden shelves between vertical racks (do not forget about the windows and doors!), Cash it tightly, does not leave cracks and skips.

External walls can be coated with various materials, from cheap profiled sheets and to expensive natural lining. What you choose - your business. The main thing is not to forget to make waterproofing for insulation. Before starting the upholstery of the walls, it and doors must already be installed. For decorative openings, decorative platbands need to be concerned. Once again, we emphasize - work very carefully, the hitting of atmospheric moisture under the external trim should be completely excluded.

The inner walls are squeezed by the same technology, only instead of the insulation hydraulic protection, you need to make a steam protection. Particular attention is paid to the steam room, in it the most difficult conditions for building structures.
Floors
Two floors should be done - for the pair and for other rooms and attic.
On the first floor there are big problems. The fact is that during the wash a large amount of warm water will fall into the underground space. Production will not be able to instantly ventilate space, steam inevitably rises up and condensed on all building structures. There is a high probability that the insulation under the floor in the recreation room, the hallway and the bathroom will absorb moisture with all the extremely negative consequences.
We offer several solution solutions:
- even during the construction of foundations, it is possible to completely extinguish the room by steam room using an ordinary concrete tape around the perimeter of the steam room. It is quite laborious and long, but reliably;
- use foam as insulation. It is not afraid of moisture, but there are certain security issues for health care;
- do not insulate the floors on the first floor of the bath. They can be used with modern carpeted coatings, use thicker genital boards, etc.
Choose a decision on your own, while take into account the maximum number of existing factors.
In the pair, it is necessary to drain the water, the floor makes from t-shirt or ordinary cutting boards. Make a small bias (approximately 2 ÷ 3 °) floor in the steam room, install the lattice for receiving water. In other rooms, the floors are put on the usual technology.


Ceiling
Again the problem with the steam room. In this room, steamproof the insulation must be performed especially carefully. To protect the insulation, we recommend using two material at the same time. First, protect the mineral wool with an ordinary polyethylene film, now you can buy it with one broad piece, which will allow you to close the ceiling without seams. She should have a penny, and you will sleep calmly. On top of it you need to nail and aluminum foil. Foil joints Mix with silicate glue, and then stuck in a special or ordinary scotch. The fact is that the tape under the influence of steam and high temperature quite quickly loses the properties of the adhesion, and the silicate glue will be an additional insurance.


If the pair was an ordinary attic, then such precautions would be superfluous. In the case of the presence of an attic room, it is better to be restored at the stage of construction of the bath, than to make an expensive overhaul with the replacement of supporting structures.
Oven inland walls
The first floor of the bath is better to see the natural lining. Let this option relate to "budget", but in all the indicators natural lining leaves far behind all other modern materials. The lining should be attached to wooden slats 20 × 50 mm, the distance between the rails is 40 ÷ 50 centimeters. How to make a clapboard?
Step 1. Make overlap on the wall, check it for large irregularities.
Step 2. Two vertical rails on the extreme sides of the room, pull the rope between them and all the others are installed. If problems arise - substitute the lining or a little lining the wall.

Step 3. Check the wall dimensions. It can have different height indicators in the corners of the room, it means that the last lining should be trimmed at an angle. Our advice: Cut the last (top), and the first (bottom) lining - near the floor it will be inconsistent.
Step 4. Nail the lining with small cloves with a length of no more than two centimeters, keep the nail at an angle, enter it into the wagon grooves.

Step 5. Repeat the specified operations on all walls of the room.
It is very important: in the pair, do not forget to make steam protection. It is extremely desirable to perform a double, but you can do and only aluminum foil.
Step 6. Pribe ceiling (baguettes) and sex plinths, at the corners, install decorative profile wooden rails. Baguette in the corners need to be stored, but not always the rooting angle is exactly 90 °. For driving at right angles in stores there are special adjustments. If you do not have it, then it is not difficult to do it yourself.

And what to do if the angles of the rooms do not have 90 °, how to make the place of connecting the plinths or baguette smooth and beautiful?
- Cover the ends of the plinths strictly at an angle of 90 °. The fact is that during transport or manufacturing these angles may violate.
- Attach the plinth to the same wall and press the ceiling tightly, the plinth must move into the adjacent wall. Mitten on the edge of the plinth on the ceiling line slightly longer than the width of the plinth.
- Make the same operation and near the other wall. There will be two lines on the ceiling, at the point of their preventive it should be the beginning of the cut, in the center of the corner of the wall, the end. In turn on each side, apply the plinth, draw the cut line and cut off it.
This simple method will allow tightly connect the elements of the decor on the walls with different angles. If you do not have the practice of doing such operations, we advise you to practice in segments, and only then take a whole element. All the same, the gaps remained - not a problem, make them putty. Just keep in mind that any putty professional master will notice.

Prices for wooden plinth
wooden plinth
Video - trimming baguette or plinths
Installing windows and doors
We advise you to use plastic windows and doors, they look quite well even in the bath. During installation, do not forget to leave the gap a few centimeters on the shrinkage. The frame bath does not have a big shrinkage, minor sizes can occur only as a result of dried wooden structures. Next, you can start installing the stove, bringing the bathroom to the mind, the finishing of the walls, the grinding of the floor, etc.
Video - windows in a frame house
Video - Frame sauna in two floors
 Why you can not give icons
 Is it possible to give icons as a gift: Signs, the opinion of the Church
 A year ago left her husband, and now I do not know what to do