Building a house on a tree
Buing a house on a tree in the garden, you will simultaneously instill with your children love for nature. Of course, a tree house should have a floor who will serve as a support frame. The house on the tree has an open platform for which you can climb along the fixed staircase or on the rope staircase.
Safety technique
Provide a reliable design of your house on a tree.
Pay enough time.
The accurate way of construction depends on the situation in your garden, but you can use these step-by-step instructions as a manual.
You can choose materials from various wood species.
Necessary materials
Boards, wooden beams, roof tiles or corrugated sheet.
Select tree
Check if you need permission
Before you start, check if it is not necessary to get a special permit for the construction of a house on a tree. If necessary, contact your urban council and check if there are any local directives, laws or other rules that may affect the construction of a tree on a tree (for example, height limitations). In some cases, it is necessary to apply for permission before starting building a house. In addition, there may be restrictions if the trees are protected by law in the garden.
It is also recommended to talk with your neighbors; This will help prevent their complaints and keep friendly relations. The house on the tree may worsen the view from the windows of their homes, or from it it will be possible to look into their rooms and disrupt their privacy. You must also contact the insurance company to make sure that the tree house enters your property guarantee. If this is not, any types of losses or damage caused by a house on a tree will not be provided with insurance coverage.
Choosing a suitable place
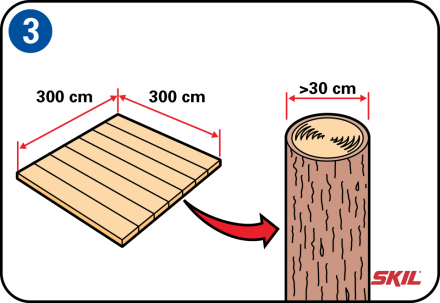
After selecting the most suitable tree, you can make a decision, what type of house you want to build. To build a standard house on a 3 x 3 meter, select a barrel with a diameter of at least 30 cm. The diameter can be calculated by measuring the length of the circumference of the trunk of the tape measure in the place in which you decide to build a house. Then divide the measurement result by the number π (3.14) to get the diameter. It is also important to pre-check how the base of the house will be located on the tree. Carefully check the places where you need to make cuts in the trunk and branches. Leave quite a large free space around the tree trunk. The thickness of the support beams depends on the specific situation and the size of the platform.
Supports house on wood
There are several ways with which you can fix the house on a tree with a support. Regardless of the way you choose, remember that the tree will swing from the wind. Therefore, make sure the house will not be damaged as a result of this movement.
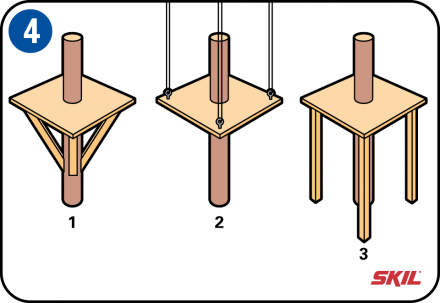
You can choose different ways to attach a house:1) fastening screws to the tree
This means that the support beams of the platform are mounted on the spot directly to the tree trunk. This is the most common way to fasten the platform supports. But this way is likely to damage the tree, although you can minimize this danger, if you use the right materials.2) "Floating" method
In this embodiment, the tree house is suspended on durable high branches with ropes, cables or chains. However, this method is not suitable for all types of trees that can be selected for installing a heavy house. For example, it is ideal only for fastening the platform, but without severe fence.3) Using support pillars
The support poles are launched into the ground next to the tree and do not attach directly to the tree itself. Around the platform you need to leave a large enough space so that the tree can freely sway from the wind. When using this method, the likelihood of damage to the tree is minimal.Access to a house on a tree
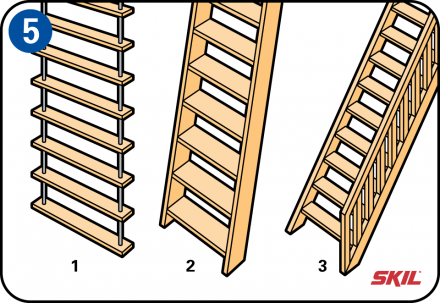
Before you begin to build a house on a tree, you need to decide how you will be closed into it. First of all, remember the safety of children! Access tool in the tree should be durable and safe.
There are several different designs:1) Rope Staircase
You can make such a staircase from the rope and several short steps attached to the rope one under the other and descending down straight to the ground. You need to get used to the use of the rope ladder, and when you upgrade it, you can feel instability and tenting.2) Fixed staircase
This is the standard staircase you can buy in different stores. It provides a quick and easy way to lift into a tree house.3) Fixed stairs
Fixed stairs - the safest way to lift into the house. If you decide to use a fixed staircase, it is recommended to add railing or handrails in the lateral part of the stairs for additional security.Obstacles

Do you need to build a house so that the branches go through it, or better cut them into them? Obstacles can affect the design of your house on the tree. It is often difficult to have a change in the design, if we take into account the asymmetric shape of the tree. But after completion you will look at your design with great satisfaction!
Safety in the first place
Before you begin to build a house on a tree, remember that the possibility of falling is the most serious danger. You can take the following measures to reduce this danger:
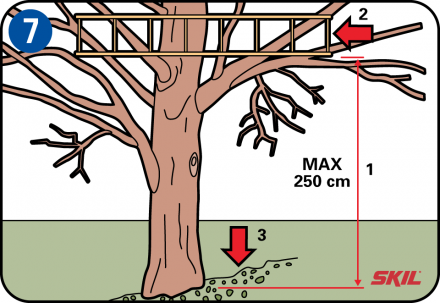
1) Do not install the house too high
Too high house location is dangerous for children who will enjoy them. Therefore, do not install the platform above 1.5-2.5 meters.2) Install the protective fence or railing around the platform perimeter
The protective fence or railing along the perimeter of the platform will prevent the decline in children. The protective fence or railing around the platform perimeter should be height from 70 to 90 cm, the distance between vertical racks should be from 10 to 15 cm.3) Create a soft surface on the ground under the house
You can lay soft natural materials, such as chips, on the surface of the earth under the house. In itself, it will not prevent the fall, but will provide a soft landing!Mounting points
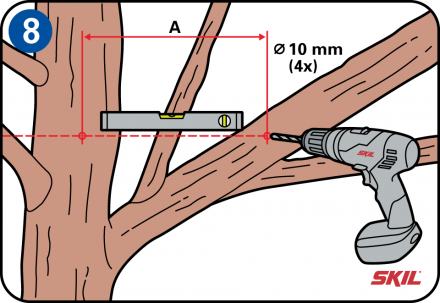
A tree with V-shaped branches gives an additional durable support for the house, since it turns out four attachment points instead of two. Drill holes at four points of attachment on opposite branches. Use the drill with a diameter of 10 mm and make sure that the holes are arranged horizontally and at the same height (A). If the mounting holes are not aligned, the platform will not be located horizontally.
Support beams
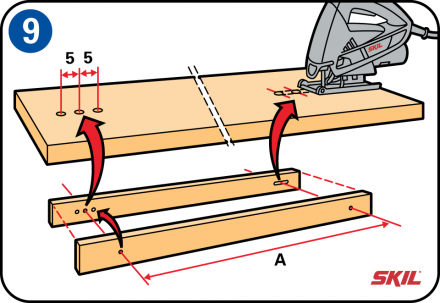
Measure the distance between the fastening holes on both sides of the tree branches and mark this distance (a) on two supporting beams. Make sure that this distance is equally on the left and right side of the support beams. Starting from this reference point, liage the line 5 cm long on the left and right (total length 10 cm) and mark the ends of this line. Make the same thing from the other end of the beam. Drill two holes with a diameter of 12 mm on both sides of the marked ends of the drawn line. After that, the jigsaw drink the groove of 12 mm wide between two drilled holes.
This groove is necessary that the tree can swing freely during the wind, not splitting the trunk of the tree and does not damage the platform.
Support beams (continued)
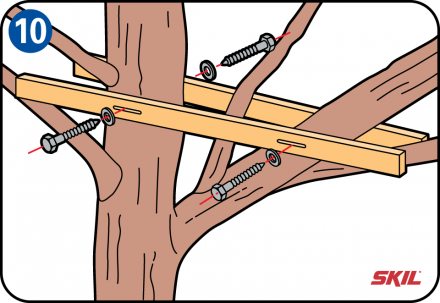
Attach the two supporting beams to the tree on the marked height, using 4 turnkey screws (screw screws with hexagon heads) with a diameter of 12 mm and a length of 200 mm. Install the washers between screws and support beams. Repeat these steps on another supporting beam from the opposite side of the tree trunk. Make sure that the support beams are at the same altitude and are parallel to each other. Pre-drill mounting holes, you will prevent the splitting of the tree trunk and branches, as well as supporting beams. If your house has a relatively big total mass, it is necessary to use thicker and strong supporting beams.
Cross beams
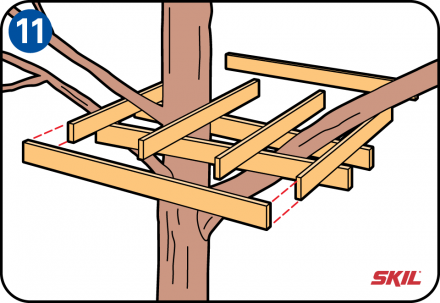
Set 4 transverse beams with a size of 50 x 150 mm, placing them at equal distances and parallel to each other. Attach these transverse beams with screws of 80 mm long, designed for wood stoves. Then attach two beams with a size of 50 x 150 mm to the ends of four transverse beams using a screwing screws with a length of 80 mm for wood plates.
Note:
The platform must be located at a right angle relative to two supporting beams, since otherwise floor boards will not be located directly when you install them at a later stage.Box beam brackets

Attach the platform to transverse beams using 8 beam brackets. Make sure that the entire design is located strictly horizontally and all the beams are installed in right corners to each other. Attach 4 beam support bracket from two sides of the platform.
Support beams under the platform
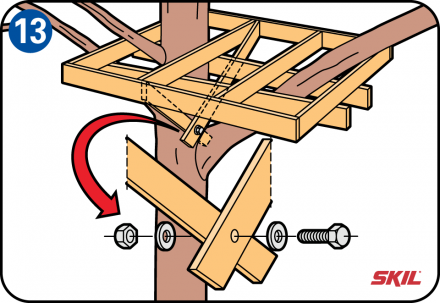
The platform is still a bit unstable, but we will fasten it with two supporting beams of 30 x 100 mm. These beams are fixed using two brackets attached to the upper side of the platform. Attach the lower sides of the support beams to the tree branches.
Dispose the upper parts of the support beams in the angle of approximately 45 °, depending on the specific configuration. Attach the support beams to the inner part of the platform, again using two beam support bracket. While two superimposed support beams together at the bottom with a M8 bolt 100 mm long or a threaded rod. Install the washers between the support beams and bolts.
Fastening outdoor houseboard

Check if you need to make cuts in floor boards so that they carefully repeated the contour of the trunk and branches of the tree. Leave the distance of 10 mm between the boards. If necessary, with the help of the jigsaw, drink round holes in places where the barrel and branches should pass through the floor. Secure the ends of the outdoor boards, at least two screws. Use a stepladder or an appropriate staircase for this work and perform finishing floor processing so that there are no burrs in it.
Perimeter performance
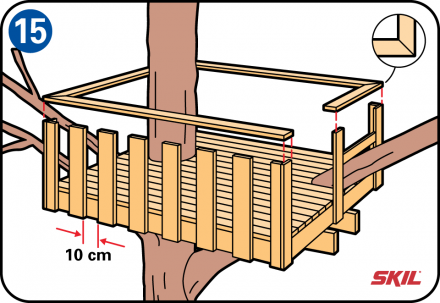
Install the vertical backups of 80 cm long in each corner of the platform to create a perimeter fence. Make the corners of the fence using two wooden vehicles measuring 60 x 10 mm. If desired, you can use thicker wood, but remember that the total mass has a big impact on stability. Install these wooden bars on the ground with the help of screws, screwed from the sides. Attach the handrails made of 60 x 10 mm wooden bars, at the top of these vertical backups. Drink the handrails exactly in size and at an angle of 45 ° (see the inserted image in the circle in the figure, showing the detailed compound scheme). After that, set the railing to the place on top of the vertical backups, then the vertical racks with an interval of approximately 10 cm between them. Install these racks on the ground with secret screws for wood plates. Remember that safety is of paramount importance, especially when there is (small) children!
Fixed stairs
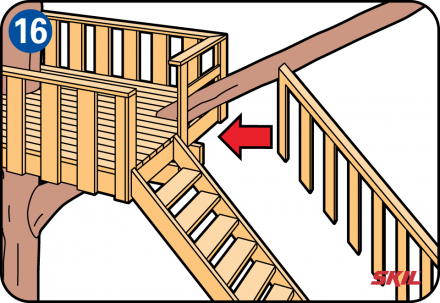
Durable fixed staircase is attached to the side of the platform. The safe setting angle of the staircase for the platform at an altitude of 2.5 meters will be provided if the lower part of the staircase is located at a distance from 1.35 to 1.80 meters from its top. Make a staircase with vertical backups of 50 x 10 mm and steps with a size of 50 x 12 mm. You need to choose the width and length of the stairs depending on the specific configuration. Set the steps to the vertical backups at equal distances and check where it is necessary to fix each step. You can arrive the bars of screws to the vertical backups, so that they will lead to the steps towards them. Or you can make grooves in vertical backups with a depth of 25 or 30 mm and then insert the steps with force in these grooves. Screw the vertical backups and steps of the required length and install them in place with glue and screws.
Three Wall House
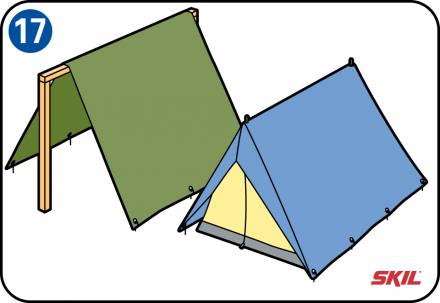
The houses on the tree are of different designs, for example, in the form of three walls and roof made from corrugated sheet. But you can also make a roof simply from a durable plastic sheet with a support on wooden beams or install a small tent on the platform.
A-shaped frame
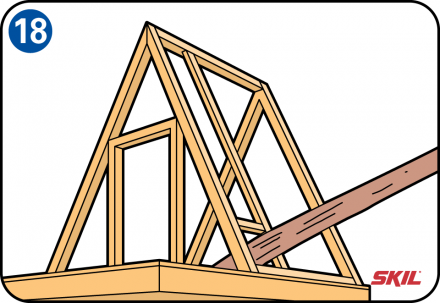
We will make a house based on the A-shaped frame with a slope of 60 °.
You can make such a house with the backups that we used before.
It is necessary to choose height and width so that they match your specific configuration. If one of the branches should go through the roof, it is necessary to install an additional beam with a transverse beam.Waterproof roof
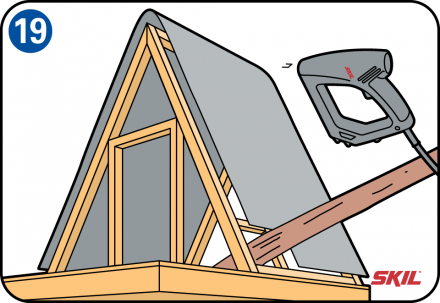
To make the roof of your house on a tree fully waterproof, attach a thick polymer film to a-shaped frame before attaching roofing tiles or a roof plank.
Completion of the construction of a house on a tree
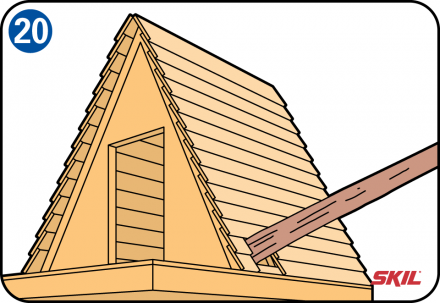
Commit the first roofing planks into place on top of the A-shaped frame and then insert other planks to them. Make roofing plates to seed with screws so that they overlap each other. Cut the front and rear walls according to the desired size, with windows (if necessary), and arrive their screws into the appropriate places on the A-shaped frame. Pre-drill the holes for the screws and use concealing head screws to get a smooth appearance.
PROMPT!
If you want a house on a tree to withstand adverse weather conditions, or just want to make it more attractive, you can use not only simple varnish, but also to cover it with a layer of tung oil (Chinese wood oil). It is unseated and protects wood. Such oil uses professionals, and it is one of the best natural coatings on sale. In addition, you can consider the coloring of the house of the house in the same color as your home!
 Facade design of a country house: a variety of stylistic directions
 Wooden ceilings - 25 interior examples
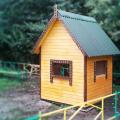 How to make a children's game lick with your own hands