Installing an acrylic pallet. How to install a soul tray: Practical tips of plumbers to home masters. What material is better - metal, ceramics or acrylic
Little bathroom? Or just prefer shower bath? If at least one of these questions you nodded with your head, it means that this article will be interesting to you. Here we will talk about how to install a shower tray in your bathroom.
However, not all at once. Know the installation technique is important, but before we will understand in the types of pallets and in other important nuances.
Types of pallets. We make the right choice
Pallets are quite diverse. Color, material, depth, shapes and sizes - all these parameters differ between models. If the pallet is already purchased - excellent. But if you are only at the stage of choice, we will try to help not make a mistake.
Differences in shape and sizes
In total, 4 main forms of shower pallets can be distinguished:
- Square (with sizes of faces up to 130 cm);
- Rectangular pallets have a minimum size of 70x80 cm;
- Semicircular - 80x80, 90x90;
- Pentighed - 100x100 cm.
In addition to the form, the pallets differ in depth. This can be purchased by plumbing with a depth of just 4.5 cm. The maximum indicator is 18 cm.
Dimensions are not all. You can learn more about purchasing in more detail. However, it is worth considering the area of \u200b\u200bthe bathroom. But it's not worth forget about the comfort. If small sizes are confused, and the minimum depth causes discomfort, it is better not to save and choose a more overall pallet.
Production Material Differences
Materials for the manufacture of shower pallets is sufficient. The mains are: acrylic, ceramics, cast iron, steel and even marble. What to choose yourself? The answer to the question lies in another question. Quality or appearance. The fact is that some materials are more durable, other annally in the design decision. Therefore, it should be declared that it is more important for you. Or you can combine both qualities. But here there is a problem in the financial plan.
The best option will be the pallet from marble. For external parameters and strength, none of the above options will be compared. However, this financial plan affects this. The cost of the pallet is high compared to other models, so not everyone can afford it.
If you bet on strength, then do not take care of cast iron and steel models. The first also have an attractive appearance, which, alas, you will not say about the second version.
Acrylic and ceramic pallets have an excellent appearance. However, compared with plumbing from other materials - more fragile. Despite this, the acrylic pallets are bought most often. Many do not confuse the fact that even under the weight of a person, they already begged and can crack. Justice to note that this can be avoided. This is done by pre-installing a special stand for the pallet. It is interesting to know how to do it? We read on.
Basics of mounting acrylic pallet
Since we touched on the topic of the installation of acrylic pallets, we will not deviate from the course and immediately understand the installation technique.

First of all it is necessary to decide with the pallet stand. It can be installed on the floor, and after adjusting the legs. However, it is better to mount a brick stand that will provide support from below. So the pallet will stand more confident, and do not have to wait for the day when the coating is bursting.
The main stages of the installation
You have already understood the brick substrate. But we will analyze everything from the very beginning. It is worth noting that further instructions applies to all pallets, and not just acrylic. So, let's go.
We have already discussed pallets and how they should be chosen. However, there is another nuance that lies in the drain holes. They are usually located below, but there are options when the holes are shifted. This is also not necessary to forget during the choice of the pallet.
When the bottom for the shower was delivered, you can move to the main work. The most needed is to make marking. To do this, put the pallet in the selected place and supply it to the marker. We also do not forget to specify the place of plum. Try to prevent errors in the markup, so that there is no problem further.
After that, remove the pallet, disconnect the wastewall to the part, which is connected to the main sewer pipe. Do not forget that the location of the hole must coincide with the previously applied markup.
Now take the pallet again and try it in accordance with the markup. If the hole is perfect, you can continue to fix pipes. Remember that their joints should be well sealed. In conclusion, the pallet itself is installed.
Advice
Disputes on how to install the pallet - exactly or with a small bias, probably never run out. In fact, there is no special difference. And if the essence of the perfectionist was played in you, and you wish that the pallet stands perfectly smoothly - stock water level. But if you thought necessary, set the bottom of the soul with a slight bias, be sure to take care of additional strength.
Remember, we talked about how it is important to establish bricks for an acrylic pallet? If not, lift the page a little higher. So, besides support, they serve as a sound insulation coating for your neighbors. Water that will fight the pallet will be incredibly audible from the inhabitants of the lower apartment. If you do not want them to know the schedule of your hiking in the shower, or just want to save other people's nerve cells, the sound insulation is needed. However, it may be not only bricks. Now you can buy modern materials that best copes with their task.
Want to visually expand the pallet? Having placed it with a brick, to cover ceramic tiles from above. Why ceramic? It best tolerate the high level of moisture. In addition, the tile is better installed with a slight bias towards the pallet. So water will not stay on it.
We make pallet with their own hands
Often say that you have golden hands? Then, maybe try to make a shower pallet with your own hands? What are the advantages of this method?

- You can choose any shape and size;
- At the same time somehow save;
- And once again make sure your hands are really gold.
However, think again before switching to business. After all, the work is really not of the lungs. Did not change his mind? Great, start.
To begin with, we define and install the place of the runoff, the height of which should be at least 20 cm from the floor. However, do not rush to fix it. You will definitely make it, but a little later, when you spend all the calculations and make sure they are correct. After that, you can fix stock. This is obvious, but still remind. The stock must go to the main sewer.
There is still a lot of dusty and difficult work that can damage stock. To prevent this, it should be covered with a metal pipe, which is suitable in diameter and attach the clamps to the floor. Next you need to create a platform for the future pallet. To do this, all over the perimeter are laying out bricks that should be pledged by a concrete tie. By the way, it should be about 7 cm below the level of the drain, since there will be several more layers from above. Of which they will be made, learn quite soon.
So, while your screed dries, do not waste time. Think over what should be a side of the pallet and whether the step is needed under the seat. All this can also be made of bricks, and ultimately separate the ceramic tiles.
Finishing work
When the screed and composition for bricks are dried, it is possible to carry out the primer with a special waterproofing composition. Now the design is almost ready. It remains only to put it with ceramic tiles. It is worth choosing according to the common style of the room.
Shower pallet ready. When everything is driving, you can try it into action.
As you can see, install the shower pallet you can in various ways. And it is not necessary to start buying this plumbing. However, it will be purchased or made by their own pallet, it depends only on you. The main thing is to fully fulfill all installation procedures, and then you will enjoy stay in the shower for a long time.
Video: how to install a shower tray
A shower cabin without a pallet is not always comfortable in the apartment, so it is worth picking a bath, because it is easy to install it with your own hands. What pallets are better suitable for the shower?
To deal with how to make a shower cabin with your own hands, you need to explore all possible options. This also applies to the design, the choice of the water removal system, and the selection of materials for the construction and decoration of the walls, as well as internal arrangement. Since the number of combinations of all these elements is very large, then at the exit we can get something unique, and whether it is not a reason for the pride of this engineer and designer.
So, the shower cabin is constructed by approximately this scenario:
- Choosing a shower design;
- Installation of the pallet;
- A floor with a slope;
- Cabin partition device;
- Selecting internal equipment.
Cabins made independently can be equipped with a shower tray bought in the appropriate store, or equipped with an inclined floor, through which water flows towards the drain hole. If in the first case everything is clear, the inclined floor device will require some additional knowledge from you. If you do not have enough work skills with concrete, then it is better to stop at the purchase of a finished pallet, the benefit of such pallets are produced in a huge assortment and are not so expensive.
Shower provides for a fence made by manually. Well, if there is a suitable niche for its device, in this case it will only be left to install special doors, or to do with curtains.
When the bathroom area allows you to install the cabin without prejudice to comfort, the partitions can be performed in a common style with the rest of the room, which will profitably affect the overall atmosphere and comfortably.
In addition, it is necessary to measure the bathroom room, determine the places where the pipes for feeding and removing water will be laid, provide for the ability to set the light. It is also necessary to decide in advance with the type of mixer, or it can be a shower column with additional options, such as hydromassage.
Setting the pallet

If you decide not to experience a fate and buy a finished pallet, then for its installation you need to prepare a flat pad, it is desirable to arrange a concrete tie on the floor of the bathroom, pre-laying waterproofing material. This is necessary in case of an accident and the subsequent repair of the water-feling system. Before installing the pallet to the attached rack, you need to bring the pipe to remove the water, and install the siphon. Pay attention to the height of the installation of the pallet in advance, it will help choose a suitable siphon. The installation of the shower tray should be made using a long construction level. To simplify the sealing of the joint of the wall and the pallet, it is recommended to make a small deepening in the wall to pull the edge edge into it. Perform a cladding with ceramic tiles or other material better after mounting the pallet.
Device of inclined floor

If you decide to give up the purchase of a finished shower pallet, you can independently build a cabin with inclined floor. With dimensions and shape, in this case, nothing will limit you.
The main complexity associated with a shower cabin with an inclined floor is the need to raise the floor level to such an extent that water can drain independently into the sewer system. To do this, you can post on the perimeter of the shower. To this end, you can use brick or foam concrete. The latter is more convenient to process and give it rounded shapes. Borf must match the shape of the shower. Next, you must bring the sewer pipe and install the ladder. Use siphons intended for installation in the pallet should not be problems with its cleaning. The ladder is set lower than the height of the sides to ensure the required slope, which should be 3-4 centimeters. Channels for pipes can be arranged in the wall. Such channels are cut through the perforator, and after installation they are closed with concrete solution. Also on sale appeared ready-made sets of water-felled channels with traps.

After mounting the channels and lads, you can begin to fill the inclined floor. For these works, a concrete solution is used with the addition of silicate adhesive. When pouring, it is necessary to consider that the lattice of the lace must be in a closer with an inclined floor, so it is necessary to leave a gap on the thickness of the facing material. The final surface must be quite smooth, so that when the cladding did not have to drop the protruding places.
After working with inclined floor is finished, you can start laying the facing tiles. Since such gender is not a flat surface, it is more convenient to make it small ceramic tiles that are sold in the form of a ready-made mosair on a special substrate. For laying, use special waterproof glue.
Cabin partition device

For the device of enclosing items, you can use various materials and combinations thereof. The frame is better to erect from the metal profile, but if you stopped on a tree, it is necessary to dry it well and treat with a special protective composition, to avoid rotting processes, larch has the best waterproof properties. For the device of the walls, many prefer to use such a material as plasterboard, but we recommend to stay on the drywater plates, they do not contain cardboard, as a result of which more moisture resistant.
From drying plates, you can build the seat and shelves, which subsequently bind the same material as partitions. Facing work must be made by the same waterproof glue.
It is not bad for partitions, made of glass blocks. They are produced in a variety of colors, and some contain various decorative elements, such as: vegetable compositions, sinks or starfish.
As a cheap alternative, polycarbonate or plastic panels can be used. These materials do not need to decorated, it is enough to simply fasten into the sinks to the frame.
It is very important to ensure good tightness between the pallet and partitions, for this use a special sealant. When working with such a sealant, use its excess amount, unnecessary can be removed by a soft spatula or cut off with a knife after complete drying.
For the arrangement of entering the shower cabin, you can use simple curtains that are suspended on the barbell using rings. The lower ends of such curtains are usually inside the pallet, so that the water falling on them does not flow out. If you want to see a tougher design at this place, then there are ready-made sets of special hermetic doors. Such doors can be swollen or sliding. The last is convenient because in the open position do not occupy a lot of space. If you decide to install in your shower hydromassage, the usual blinds do not suit you.
In the case when the ceiling of the bathroom is too high to bring partitions under it, the ceiling device is needed on the shower cabin. For this, the plastic panels are best suitable for the frame. In such a ceiling, it is convenient to mount additional lighting and extractor.
Tag Cloud:
shower cabin without pallet with their own hands
Acrylic shower tray destroys around steam generator nozzles. Two years ago, Acryl was already cleaning, but now the cracks appeared on a larger area.
Last time you were explained that the Chinese steam generator gives too hot couples for acrylic, although the pallet itself is very good.
I will reoper once again, but now it is necessary to think what to do with the ferry.
Chinese acrylic pallet cracked, proceeds.
From the hot water plastic was deformed and dug from fiberglass.
The reinforcing layer is all in holes, so sawdust under the bottom rotted. Now the bottom is very bad, so it cracks even more. Need to do a new bottom.
Cracks and chips at the bottom of the acrylic bath. Put a glossy magazine so that the photo can be seen in the photo. What and how can you do?
The crack goes along the frame chaserler. So the bottom is weak. Skoli is nonsense. It will have to strengthen the bottom. Bath color is understandable and in stock. For the day we can cope. It will be firmly and quite beautiful.
Aqua Joy AJ-A-120A L (size 120x80x215). Country manufacturer when we bought, then wrote that it
Kaliningrad, although, most likely, China. On the bottom of the pallet, two thin parallel cracks are about 35 cm long each.
Water from them does not proceed to the floor. It seems to me if you come between cracks, then in this place the bottom begins down. But it is difficult for me to understand, on a convex or concave part of the bottom relief (the bottom of the bottom is shown in the bottom) this place is accounted for.
After the formation of the crack, the cabin began to creak strongly, when you are in it, but after a while in the process of washing the wash almost ceases.
Under the bottom of the pallet are incremented by ribbiness from chipboard.
In theory, there should be a solid stove of chipboard, and not pieces. Savings on sawdust. Plastic is very thin and grows, works on a break along the ribbon rib.
Acrylic has already cracked, and a polyester putty with fiberglass under it has not yet managed to break. Therefore, it does not happen. In the process of washing, the reinforcing layer wet and creaks smaller. We need to strengthen the bottom well. Under the bottom something to do is meaningless, only if you build an additional support. We will work with the front side. It seems that it turns out to be done very firmly and almost imperceptibly. How many hours will have to work exactly difficult to say, but in one day we will put together.
I have a pallet stream on the Serena SE-12013G shower cabin high pallet, 90x90, rounded.
Apparently, the bundle of acrylic, and maybe a break (pushing when pressed). There is a small crack from the inside and outside (but a little in different places, not through). The pallet dugs. How much will it cost to repair, and is it possible to repair, or is it necessary to change the pallet?
Judging by the description of the Chinese acrylic pallet, broke through the weight of a person.
Since the cracks on the pallet and under it are in different places, it means that plastic has been deformed and dug from a polyester resin with fiberglass. The strength of the trough has decreased at times.
How to install a shower cabin with your own hands
It is necessary to strengthen it if possible from two sides. The cost of the work will be slightly higher than the minimum cost of the order.
Acrylic shower tray crackled and flows.
A little snacks. What can be done?
An ordinary Chinese grayish chlipsky pallet, so I quit.
It is necessary to strengthen the place where the hole, and at the same time, and all the bottom. You can and left below. Color to choose not a problem.
I broke the pallet in the "zone of the first step", the crack length is 1.5-2 cm, it is necessary for the entire length of the "pillows" (at the pallet of the poultry surface, squares).
From the bottom in this place, one of the beams of the attachment of the attachment takes place, at the end of which legs are installed. And if you look at the pallet from the bottom - there was a bundle acrylic (I think it seems) to the right of the crack, the brown divorces are visible, through which water dugs (assembled and dug).
But they are not through. I send photos. From the inside the pallet to me plumbing smeared with something like a liquid rubber, I don't know exactly, but I distinguish, if you pull, easily. The pallet itself
high, quarter of a circle, 90x90cm. Is it possible to repair the pallet? What time frame can this be done?
The frame profile of the frame almost does not touch the bath.
Under the pallet is not for the strength of the chipboard plate. There is only fiberglass, which has walked safely. Acrylic was sprayed from polyester resin.
The pallet flows, since acrylic and fiberglass are torn. We'll have to work under the pallet and in the pallet.
For a day we will manage. It turns out beautifully.
Tell me - how much the repair of the bath will cost - see through damage to the photo - temporarily shoved with scotch. Sizes are approximately: 30 * 5 mm. A mobile door fell.
In the photo, there is no cracks around the holes.
The complexity of repair depends on it. In any case, you can fix it. It turns out more beautiful if you can reach the hole with your hand outside.
Shower cabin installed in the beauty salon. I would like to update the coverage that would look good.
The photo shows the destruction from chemistry under the water intake hole and on the nozzles, most likely there are cracks there.
Near the acrylic steam generator is painted with hot steam and possibly aromatic oil. At the bottom of the shower pallet crack. Sawdust under the plastic swollen and in those places where the frame profiles are located, acrylic rust. It seems that this Chinese pallet to repair the meaning is not enough, it will not work beautifully.
Hello!
We sell shower cabins in retail, which have independently imported from China. In the process of transportation damaged some pallets - approximately 20 pallets, (scratches, cracks and chips). Would you like to offer you to repair / renovate our pallets (for further sale)?
On Chinese pallets to reliably close the cracks so that it is not visible at all, it is impossible.
Low pressure shower fixation. One of the eternal questions that every person meets in his life is a choice of a bath or soul.
Currently, low-level shower can be considered one of the most hygienic and practical options. Instructions for installing the cabin will help you cope with all possible problems.
When installing this format in the bathroom, you can reduce water consumption in water procedures, in addition, you do not spend a lot of time when you are lounged in the bathroom and relax.
One of the most important problems is the height of the pallet side. Depending on what owners at home.
Low range souls are those that have a side height of 0.5-1 cm. For all people, this height is convenient. If, however, the elderly or small children live in a house or house, it is important that the cabin is as convenient for all family members.
Shower cabins with low palettes are a modern and aesthetic option.
You can easily step on the bottom to take advantage of the shower.
Benefits of a low pallet
The use of low-pressure shower has many positive sides:
- all models are sorted by models, so they fit perfectly into any interior and become more alive;
- The shower for low temperatures is ideal for a small room, its installation does not take much time;
- models of this type are very diverse, fully complement the interior and are ideal;
- Due to the low palette and the presence of a dense door, water on the floor does not fall apart, and the interior is very simple;
- Taking water in the bathroom, it is very convenient to accompany a child or help older people.
However, the installation of a cab with a low spectrum of defects.
weak sides
Low pallets disadvantages include the following:
- such models do not always have good tightness, so you need to install curtains or doors;
- Low parties do not give the opportunity to collect water to buy a child. You will also not be able to use a storage tank of various types of products;
- the tray is very slowly heated, so many people can cause discomfort.
Low range rainfall variety
Shower cabins vary depending on the materials from which they are made, and depending on the type, form and presence of certain functions.
How to install a shower with a palette with your own hands
Pallets are often made of cast iron, steel, dispute or acrylic:
- cast iron is a material that is not only heavy, but also very expensive. Significantly maintains heat compared to steel and acrylic;
- steel tray is more "loud", it can also bend under the weight of man;
- many people prefer acrylic because it softens the sound of water, it is more durable and has different color solutions;
- a quarrel is a very interesting material that combines the advantages of acrylic and the beauty of the stone product.
If desired, the shower cabin can be made of natural stone for individual order.
If the sizes of your bath allow you to buy a large cabin, you can choose a model with a seated seat.
In some low concentration souls, you can use flavors, musical accompaniment. In such models there is a touch screen that allows you to switch the mode.
Shower cabins with sliding doors are very popular.
But if there is enough space in the bathroom, you can set the model with a turntable.
Corner models of a low-class shower cabin are an excellent option for very small bathrooms.
In addition, if you want to install such a device, you do not need to have special skills - it is very important to simply approach this issue responsibly and familiarize yourself with the standing scheme of stands.
Installing a shower cable
When buying a shower, consider the options for your bathroom.
Do not forget that the choice of cast-iron pallets will be a good solution, because they are durable and easy to use.
If you bought a simple model with low lighting, you can watch video installation instructions on the Internet. Here you can find out which tools you need to install the structure.
The installation of a shower product can be conditionally divided into the following steps:
- installing a siphon, which means that the placement is below the bottom of the shower.
The lower part refers to the installation site, the example and drain are described. When it moves into an estimated area, a low siphon is installed.
The cabin is then fixed, and the pallet is immersed and compressed;
- The installation of walls begins with assembling locks or frames, as well as from a vertical stand. After that, the fabric is inserted into the recesses and are fixed with rubber parts. For the strength of the wall screw the screws. With the help of self-tapping screws and fasteners, the profile is perfectly welcing.
If you want to more tightly close the closed storm cable screen, you need to connect the canvas with the frame brackets, then pull it and lubricate parts of the profile;
- door installation. The fabric door is attached to the upper and lower part through specially prepared holes.
First, the doors are connected to the rollers at the top, and then the buttons are used to align. On the suspended canvas at the top is mounted on the lower rollers of the spring. It completes the installation process.
If you are confident in your abilities, you cannot invite professionals to install the shower and do everything yourself using special drawings.
Installing a low-range cabin is not a complex process, but requires certain skills. If you are careful and pay attention to the details, you will get a shower that will satisfy your strength and safety.
Differences in the installation with a deep bowl are not so great, so you should not have any problems.
Strengthening high pallets of shower cabinsShower cabins are available with low and high pallets, and high are quite high above the floor, which will allow you to set drain even if the receiving nozzle is located above the usual one. How to install a shower tray with your own handsThe high pallet resembles a bath of small sizes, it is possible to pour water and small children in it, they can swim in it. In such pallets, the drain is equipped with a special device, when you click on which, the valve closes the drain and the pallet is filled with water. The first models of cheap cabins had thin-walled pallets and in the latest models for rigidity, the pallet is enhanced by wooden slats, charged into the structure of the pallet, and the pallet itself is placed on a metal frame of a square, hollow pipe. There are structures where the metal base is already flooded in the pallet. However, any design can be strengthened by yourself if you have a weight of about 100kg. As a rule, such people prefer the cabins in size 80x120, where the pallets are more spacious, but inexpensive Chinese pallets are not tightly adjacent to the metal frame and at least the frame and are screwed to the pallet of the screws (screws are screwed into the wooden bruises). We offer to find additional lining, and the best of all formed unjecting to pour seals or by mounting foam, and it is possible to fill it all the bottom, then the pallet will not only be more durable, but also improves its noise isolation. It is important to remember that foam increases in the amount after its release. N Most importantly, given the fact that the carrier metal frame is made with a very thin-walled pipe, strengthen it installing along or cross, a 40mm thick board, which will support a metal frame and pallet. This board will rely on the floor supporting the frame and pallet, and for the implementation of adjustments, thick long screws are screwed into the board as additional supports (70x10) with a hex cap. |
|
|
Any use of materials is possible only if you actively refer to Vnegorodov.ru! |
![]()
Let's start with the advantages and minuses of such products as deep pallets for shower cabins. It would seem why to take additional costs by buying this kind of product? Do they have advantages over lower and budgetary counterparts? Of course, there is.
Photo of the shower, perfectly suitable for installation in the bath  Shower cabin in the bath
First, the presence of a deep pallet contributes to a more intensive warming up of the inner space of the shower cabin. Materials used for the manufacture of shower pallets are mostly characterized by excellent thermal conductivity indicators, rather quickly heated and long retain the heat (with rare exception). In view of this, in the cab with a deep pallet, it will be as warm as possible and in general, comfortable.
Secondly, the deep pallet can be adapted under the bath, albeit completely small. To do this, it is enough to close the drain and dial water into the pallet. It is comfortable to relax, lying in a capacity of up to 1 m2, of course, it will not be possible, but it's nice to spend time in a sitting position work perfectly. Yes, and a children's bath with a cabin with a deep pallet, you do not need to buy - an extra plus in favor of families with children.
Water treatments in the shower cabin with a deep pallet Deep pallet - a beautiful replacement of a small bath
Along with this, deep shower pallets have their weaknesses. As noted, on the purchase of such a product, with other things being equal, you will have to highlight more money than to purchase a design that is characterized by a modest depth.
In addition to additional financial expenses, it is also worth noting the following disadvantages of the option under consideration:
- design. The lack is extremely subjective. For most users, low shower pallets look more stylish and neat than deep tanks with high sidelights. Otherwise, this moment remains exclusively at the discretion of the owner - if he likes the high pallet and the presence of such a design, at the same time, does not spoil the interior of the room, you can safely buy and install the closed cabin.
the presence of a high "threshold". Wanting to get into the shower, the user will have to constantly stop through the high side of the shower pallet. Young and healthy citizens this moment is usually not bothering, but children and people aged may experience a number of inconvenience. The problem is solved by attaching to the pallet of a special step. Usually these simple devices are sold in the same place where the shower cabins themselves;
Step with handrail
With information on existing forms and materials of the manufacture of shower pallets and walls of the cabin, additional features and other important associated nuances, you can familiarize yourself with.
Next, you can familiarize yourself with the instruction on self-installing shower with dimensions of 90x90 cm with a deep pallet. The information received will allow you to abandon third-party services or to control the correctness of the work and its final quality.
Pallet as the necessary element of the shower-cabin
One of the main parts of any shower cabin is pallet. Its main purpose is the collection and removal of dirty water through the drain system. Features of the pallet mounting directly depend on its shape - angular, rectangular, round, oval.
Depending on the height of the side, the pallet may be shallow (flat) or deep, resembling a bath.
Due to the low height of the side of the flat products, comfort is significantly increased when using the booth, since it is not necessary to overplay through a high obstacle. However, such pallets require an effective water drain system, since they cannot accommodate a large amount of fluid.
Pallet bath. In contrast to the previous model, this pallet is deep enough, which makes it possible not to worry about the speed of water removal. Some models involve using them as a small bath.
 Deep pallet-bath. If you wish, you can sit down, and a small growth person or a child can even take a full-fledged bath.
When buying a shower, first of all, it is necessary to pay attention not to the number of functions and appearance, but to the pallet of the product, since increased requirements are imposed on this element. The high-quality pallet must withstand a larger load, and with the maximum allowable weight of the user, do not crack, do not ferment and not deform
Pallets for shower cabins are made from different materials - expensive and cheap, high-quality and not very.
For example, faience. All the well-known material used in the manufacture of toilet bowls. The pallet from the faience is completely hygienic, it is easy to wash and withstands a lot of weight.
 Fauyans disadvantage - a strong "knife" of the material: the pallet surface may be damaged even from falling, for example, glass glass
Artificial stone - reliable and durable material, beautiful and hygienic, but expensive. But enameled pallets for shower cabins are cheap and durable. Of the disadvantages, it is only necessary to note the deviation of the enamel (however, the enamel coating can be easily restored or replaced with acrylic), as well as the roar of falling water on the metal surface of the pallet.
Pallets from acrylic enjoy the greatest popularity. The acrylic surface does not absorb dirt at all, instantly warms up, does not darken over time.
 Scratches on acrylic are completely invisible - this is an important point, since the pallets are often scratched when a shower cabin is going to do it, especially for the first time
The lack of acrylic pallets is inconvenience in installation, as it is required to install a special framework. As such, an aluminum design with adjusting screws is used, with which you can choose the desired height of the pallet.
Subtleties of self-mounting shower corner

Soul flaps are matte and transparent, and also differ in the method of operation
Start the construction process is necessary from the workpiece of the place under the shower corner. Still, it needs to be prepared. Set the level of the perfect plane. Indicate for yourself that will lie at the base of the bathing space. Often it is an acquired pallet on durable legs, however, its frame can be unreliable, because for additional stiffness make a substrate from bricks, and so as not to scratch the bottom, the rubber rug is stacked.
Next, the sewage laying is thought out if it has not been done in advance. If the bottom is unlucky, a small podium is constructed, which provides a gap for the location of the siphon or corrugated tube. When all the conditions are made: the drain tube of the corner is lowered into the sewer system through a special rubber gasket. The bottom is fixed and sealing with a junction with a wall, it will help to avoid the accumulation of dampness and fungus.
Next, an aluminum frame is installed, their connections with walls and the base is also better to enjoy. After checking all fixings. If aluminum bar must be fixed to the tile surface, the holes are previously drilled in it, then the installation is fixed with self-drawers placed in a dowel.
Mounting pallet for shower corner
Usually, a homemade corner for the shower cabin is not equipped with a roof, therefore immediately proceed to the installation of the door. We appeal to them very carefully, so as not to damage and not scratch. At the edges of the panels we stick seals, then put the rollers on the frame for which the sash will move. If necessary, the wheels are regulated to ensure the ease of movement.
Hanger note! Be sure after all connecting works, problem areas need to be lubricated with silicone, to avoid corrosion formation.
The final stroke in the arrangement of the corner with the pallet is considered to install the handles on the door and hiding the lumen between the floor and the pallet, if any. In the case when transparent flaps were acquired, in the future you can apply a picture.
How to install a shower corner
1. We begin assembly work. Select the place in advance where to install the pallet, we use the level. Adjust and set everything right. Screw legs collapse nuts. The main task is to stronly fix the pallet to the adjacent wall.
Corrugated pipe that should go from the siphon is supplied to the fan. Connections at the bottom of the pallet are most durable. When the pallet was put up and combined the drain, the design is subject to testing. The check is performed like this: fill in the pallet slightly water and look like it merges. If you find leakage, the connections are additionally fixed to eliminate flow. 
2. The next step is to fasten the walls of the shower. The guide at the bottom is placed on the pallet and is strengthened by moisture-resistant high-quality sealant. At the edES, racks from the bottom guide are vertically installed. They need to be attached to the walls. Exhibit racks strictly vertically according to the level. After that, you need to mark holes for drilling. Work tool in the cafée, try very carefully. Insert plastic dowels into the resulting holes. From the side of the frame adjacent to the wall, it is recommended to apply silicone so that in the future water between the wall and the frame does not fall out. After that, attach the rack on the marking and tighten the screws. 
3. You need to insert sheets into vertical racks and secure self-drawers. The lower guide is pre-treated at the stuck sealant, attach to the wall. Then install all the lips of the fence, proceed to the assembly of the top guide. The fixing is made by the same scheme as on the bottom - self-pressing. 
4. Go to the jamming of the glass on the shower corners. Performing work with elements of watershed glass, be extremely neat, because this material has fragility. On all the doors of the corners to the guides, install special rollers. 
The door will fall into place, but it needs to be adjusted. The sash must acquire the correct interface to the maximum so that water does not flow through it. The door is exhibited at exactly. At the top and bottom of the gaps are eliminated. You need to open or close the door without an effort. Its movement should be smooth and easy. When the door is installed, you need to secure accessories.
5. The final step is to carry out adhesive protection in the place of the seams. The long-term exploitation of shower corners depends on the quality of the sealant. Before applying the composition, the contaminated surface is cleared. Apply the glue, wait a while for final drying. Then the place of the jack is checked with the soul. If water did not appear on the surface, it means that the work is made correctly. When the appearance of heights on problem areas, they are dried, and sealing is renewed.

How to choose a shower corner with a pallet: materials, location, installation
5 (100%) 2 votes
Wall shower
The next stage, the bottom guide for the door is stacked on the pallet, it is a semicircle.

The lower guide must be placed on a moisture-proof sealant, sticking it to the shower tray.
From the bottom guide on each side to the wall, vertical racks are applied to which the glass wall will be fastened using the level of the rack is set strictly vertically and placed spaces under the opening.

In the tile, the marked holes are drilled , Inside which plastic dowels are inserted.

In place of adjustment to the wall on the racks, moisture-proof sealant is applied, the racks are installed and attracted to the wall with the help of self-samples.

The glass walls of the cabin are dressed on the installed racks, then the wall is fixed on the rack using self-tapping screws. Also, the bottom guide of the doors is connected to the wall with the wall, and the sealant is pre-applied to their joint. After installing both walls and their connections with the bottom guide for doors, the upper guide for sliding doors is installed at the top. The upper guide is attached on the principle of the lower with the help of self-tapping screws.

Pallet for the shower with your own hands with
You can equip the basis for the shower at all without a pallet - more precisely, make it yourself, and not buy in the store. The complexity of this work is much higher, but you are not limited to the size of the man-made soul. If you are not sure where to start repairs in the apartment - boldly choose the bathroom. Who coped well with the arrangement of the plumbing room, the rooms with attic and corridors are definitely not terrible.
Pallet for the shower with your own hands - a step-by-step scheme
Step 1: Waterproofing and sewage
The location of the homemade cabin is necessary to expose waterproofing to the height of about 30 cm. For this, the sealant, fibroresina or other compositions are used, the choice of which is more than wide. The sewer tube is displayed in the very center of the homemade pallet, it is easier to run stock. All sewage elements must be carefully sampled and tested for the absence of leaks before installation. The output sewer nozzle must perform over the base floor level by 12-15 cm. Do not forget to carefully clog the pipe so that the construction trash or other foreign objects do not get inside.
Step 2: Put the barrier
By setting the pallet for the shower with your own hands, on its perimeter, lay a barrier from bricks. The barrier line must match the walls of the future cab. The height of the brick perimeter is at least 5 cm more than the level of the plot sewage pipe. The sharp brick angles are unacceptable, so you have to work with a solution and gently smooth them. The solution is prepared by moisture-resistant and durable, it is possible to knead it in the medium-sized tank with a trowel and spatulas without attracting a shovel - large volumes of cementing are not planned. When the solution is substituted, the ratio of cement and sand 1: 1 is maintained, with the obligatory addition of liquid glass for water-repellent qualities.
Step 3: Pour Paul
Filling the floor under homemade pallet is performed in three stages. First, with the help of a self-leveling cement mixture, the base fill is made - even, from the wall to the wall, the thickness of about 5-8 cm. After its drying, the entire surface is treated with waterproofing - Firebul, Deoprof etc., you can two layers.
When the waterproofing layer is dry, a solution of tile glue and cement mortar is mixed. It is imposed by concentric circles, gradually raising the level of the drain hole. Work is painstaking. It is necessary to withstand the same radius of curvature, the rude transition under the trim does not hide. Cement surface must be carefully lost, getting rid of roughness and miniature steps.
Step 4: Finish finish
The cement floor finish with a bias is best done with a mosaic. Small mosaic elements will be able to hide irregularities and look great for many years. A special glass mosaic for baths has anti-slip properties and does not lose the original colors all the time of operation. Of course, lay out the mosaic much more difficult than the tile on the porch, but no one promised that the fully homemade pallet for the soul will become an easy repair walk.
The man-made tray for the exclusive shower is ready. Yes, almost forgotten - before installing the shower tray, be sure to change the plastic plum on steel or brass! Even if the plastic comes in the kit, and the manufacturer paints its incredible strength. According to the pallet, it is customary to walk and shift from foot to the leg - so that only brass or steel and the load will withstand, and it is easier to clean them as needed.
Stock Foto Set of soul pallet, stop55.com
In the photo - how to install a shower tray, archiproducts.com
In the photo - the pallet for the shower do it yourself, etotdom.com
In the photo - installation of a shower pallet with their own hands, stroy-aqua.com
In the photo - installation of a soul pallet, stroy-aqua.com
Choosing a shower corner with a pallet
Shower cabins are sold in various stores that provide this category of goods - plumbing shops, various construction stores, as well as huge hypermarkets. Shower corners differ in size, shape and material from which they are made.
When choosing an corner, you should decide what size and form you would like a shower angle, and from which material should be made of the pallet. In which place of the bathroom, it will be located - it will be very good if all these details are thinking in advance so that in the future it is not encountered with difficulties.
When buying a shower corner, it is not necessary to acquire the cabin and the pallet that comes in the kit. Almost all plumbing stores offer separately various variations of pallets and separate all sorts and designs of shower corners.
If you acquire these components separately, it should be remembered that the pallet and the cabin of different manufacturers are not always suitable for each other. Therefore, it is recommended to buy these parts at the same time in one store. Or you need to have accurate parameters and the size of the seating places of that product that was purchased earlier.
What are the curtains
The second most important element is the curtains of the cabin, which can be swollen and spreading. Swing doors require more space
They are single-handed and bivalves.
As for the sliding curtains, they have from two to six sash, which are held due to the rubber magnetic tape. The curtains move on the rollers hidden inside the shower frame. High-quality curtains should open and close almost silently.
 Corner shower cabin with sliding doors. In addition to models with transparent plastic (glass) there are options with matte curtains
Shutters for shower cabins are made of polystyrene or high-quality kalen glass. Polystyrene products are fairly cheap and have a small weight, but they quickly lose transparency, there are divorces on them. Glass curtains are expensive high-quality products.
 Swinging doors from Kalenoy Matte glass. With their manufacture, a specially treated safe glass is used, which even the automotive
Water and dirt is very easily flushed from the surface of the glass, as it does not absorb anything and does not fuss over the years. You can also buy cabin with curtains from classic transparent, tinted, colored and rough glass.
Advantages of a shower corner
To such a device, as a shower corner inherent in the following advantages:
- Compactness. Due to the fact that the shower corner is installed in a vertical position, it will not take a lot of space. Thus, elements such as washing machine, sink, basket for washing, toilet and other elements can easily fit in the bathroom, without which you can not imagine the bathroom.
- Affordable price. The price depends on the manufacturer, dimensions, electronic functions that can be inherent in a shower corner as well as the quality of the material.
- Simple installation. Installation of shower is performed literally in a few hours. It all depends on the skills of the wizard and the presence of the tool. The owners of the apartments that decided to establish a shower, but never did anything like that, may not worry, because almost anyone can cope with such a task.
What to pay attention to the selection of a shower corner
Sheets for fencing are manufactured using safe glass. Their thickness must be 4 - 8 mm. The surface is always covered by a special antifungal layer. This allows you to make cleaning the corners easier and faster.
The feature of the type of glass, the color range of the profile or shape of the loop does not become a barrier - you can choose them to your taste. Available is an economical option when shower corners have fencing that are made of special plastic.

Plastic shower corner
Shower corners consist of a pallet, a siphon, a frame with doors and accessories. There is a free-free corner or a cab with an in-depth pallet. It is made for families with minors, when the hygiene room allows you to select only a corner without a bath.

Shower Corner Device
Most high-strength corners Suitable for the rhythm of the life of young people when you have to bathe a child in a deep showerful pallet. It is quite safe, and, important, is considered an economical option in comparison with the bathroom.
Shower corner with high pallet
Low pallet shower corners More suitable for the elderly, as they will climb through high boards will be more difficult for them.
Low pallet shower corner
The greater the pallet, the more convenient and more comfortable will be the adoption of the soul. It is better to pick up the size of the pallet under the full family member. The most optimal is the size of the pallet in 80x80 cm.
If your hygiene room is small, you can install Open shower corners (without ceiling and parts of the walls) with a free entrance or glass created specifically for such baths. They will cost much cheaper than the booths. Install such corners is easy, so the assembly will take a little time.

Outdoor shower
If there is a place in the bathroom, or the room finishes may be damaged from excessive humidity, you can install Closed shower cabins- with roofs and own walls from all sides.
Closed shower cabin.
Purchase a shower corner, given the existing water jet pressure in the apartment. Prices of shower corners depend on the quality of the material from which the pallet is made.
Installing Door
 From the inside, we screw on the screw of 12 mm rubber limiters for the door.
 We screw to the handle doors. Outside the cap on the handles should be below. If the screw is spinning, insert a plastic insert into the hole. It will suit the trim of a cross for tiles.
From the side of the handles we wear magnetic moldings on the doors. On the rest of the parties - M-shaped moldings of the shelf outside.
We put on the doors rollers with rollers outside. Rollers with the button are attached to the bottom of the doors (the button should look up). Adjusting screws on top rollers should look down.
Let the doors on the top rollers. To start the bottom, click on the buttons.
Check the smoothness of the door stroke and the density of the adjoining. Doors should not independently open from any position. The adjoining is adjustable using screws on the upper rollers.
Installation Guide
The main stages of the installation are already listed.
It remains only to consider them in more detail and pay special attention to small but important details.
Installing the pallet, sewage connection
Installing shower corners with your own hands you need to start using the installation and connecting the pallet to the sewer pipe. We will consider optimal in terms of labor option - when the pallet is raised above the floor and the pipes are placed in the resulting gap.
The instructions for performing work will look like this:
- the pallet itself first trys, the position of the drain hole is noted;
- next, the sewer corrugation is attached to the sewer tube, the other end of its end with the help of a cape harvested to the siphon;
- after that, the siphon is already attached to the pallet itself installed in the angle. It is checked by the level of the horizontal of the pallet and, if necessary, its position is adjusted using a thread leg;

On the photo is visible to the mounted siphon
Note!
Special attention should be paid to the joint of the side of the pallet and walls, these places need to be thoroughly wrapped with a sealant.
If this is not done, then dampness, mold and fungus under the pallet are guaranteed.
- after that, it remains only to consolidate the panels hiding the gap from the floor.

Instead of decorative panels, you can lay out sides of bricks
At this stage, the main problems most often arise with how to sew the shower corner. For this, the usual silicone sealant is suitable for this, you should not try to find a miracle composition, the main thing is that it is necessary to ensure the rigidity of the pallet, it should not be bothering any millimeter.
It is precisely this most often the reason for recycling space under it. Even if the deflection is 1-2 mm, the edge of the pallet is easily separated from the layer of the frozen sealant, and water without problems is seeping into the resulting gap.
If the stiffness of the factory frame is not enough, then under the pallet you can always put the usual brick (on top of putting a piece of rubber, so as not to scratch the sanitary pribor).

Checking the rigidity of the frame
If, despite all the efforts to seal the shower corner in the bathroom, the dampness, shaggy and fungus can not be outlined, the reason should be sought in bad ventilation. Of course, it is necessary to check the tightness of the joints.
Setting the walls
Much depends on the design of the corner:
- if the bathroom is tiled, then the walls of the bathroom itself can appear as the rear wall role. In this case, the installation is very simple - it is enough to consolidate metal profiles and insert glass or plastic in them;
- but the shower corner with the rear wall will require a little more effort, the rear opaque walls will be installed.
Note!
Shower angles with rear wall can be installed in wooden houses.
Also, they can also be placed not only in the corner of the room, but also a little distance from the walls of the room.

Option of a shower corner with the back wall
As for how to properly install a shower corner, the order of installation remains the same, in the case of placement at the wall you need:
- install metal profiles on the wall and on the floor. Naturally, the verticality of the location is checked before installation, then the holes and the profile on the dowel is mounted on the wall;

Pallet installed, profiles are fixed
Note!
For the tightness of the shower angle, the shake of the profile and the walls must be missed with a sealant.

Joints thoroughly laughing sealant
- next, glass walls are simply inserted into profiles. Formally rubber gaskets, should ensure sufficient tightness, but it will not be superfluous and additionally missed them with silicone. In this case, the water will definitely not fall into the gap between the glass and the gasket;
Insufficient tightness of the joints may result in such a result.
- you can also advise on top of the glass sheet to additionally fix the metal jumper to the opposite wall, which will increase the rigidity of the structure. On this, the question is how to assemble a shower area can be considered closed.
For shower angles that do not adjoin the walls of the bathroom, the order of action remains the same except that profiles do not need to be attached to the wall. The frame is simply going, and then the walls are mounted.
Final details
After you installed and secured the pallet and the frame of the future shower corner, it should be started to install the glass walls and the doors of the cabin. Pre-inserted holes on the glass door drilled by the manufacturer in glass doors. Insert guide rollers and holders. All these components are included in the set of a set of shower corner.
Decorative inserts-panels are put on the glass edges of the solid walls, and rubber seals are dressed on the sides of the doors, which make a shower corner with hermetic at closed doors. The edges of the glasses are recommended to be pre-grated with soap solution - it will provide easier installation of rubber seals. Door flaps check for ease and opening accuracy.
After a fully completed installation, it is necessary to process all seams and connections outside once again outside. Do not handle silicone seams on the inside of the shower corner, because condensate may be formed in the remaining voids due to temperature difference. This moisture from condensate will contribute to the formation of mold on the shuts of a shower corner.
In conclusion, a faucet with a mixer and various shower accessories (shelves, hooks, etc.) is installed.
After all this, it is necessary to give the time that silicone is finally drying and can enjoy the shower installed in your new paradise.
Installing Screen
 Install the screen to the place, pinched by wedges. If the pipes do not set the screen, make cutout with a fine saw.
  I exhibit the screen and get along the floor with a pencil.
Remove the screen, and make tags in front of the brackets.  We adjust the brackets with the help of the coated from the markup on the floor, minus 2 mm. The lower edge of the bracket must be set with a gap from the floor 2 cm.
  Tighten the nuts.
Install the screen by installing the wedges below.  Align and drill holes opposite the labels, retreating from the floor of 5 cm.
  We screw the screen to brackets on decorative screws.
We check that the ceiling is tightly adjacent to the upper arc. If necessary, we proceed with a sealant compound and press the cargo or spacers.
When silicone dries, shedding the cockpit, check the working capacity of the leek and the switch.
Installation of the shower - this is a fairly simple procedure, subject to the instructions and knowledge of the Azov sanitary work. If you have never dealt with plumbing, installation work is better to trust specialists.
Installation of reinforced water collections
Regardless of the configuration of the container for collecting and removing the water supplied to the hydromassage box, the assembly of such a design provides for the preparation of the base for the installation.
Preparation includes the production of works aimed at leveling the surface of the floor and walls in the installation zone. In addition, all the necessary actions to create efficient waterproofing are performed. The sewer line for removing water is placed and output.
 Preparation of a place where the installation of the collection and removal of water hydromassage box is supposed. In this case, the option with the foundation made by yourself
The plum line connects to the point previously prepared and derived at the place of installation, or to the already existing bathroom drain system through a corrugated extension agent and tee.
In the latter case, it is necessary to comply with the difference in lines of lines in levels so that water drainage can be carried out freely. The desired drop value is achieved when assembling a shower tray to install it to the required height. For the construction of a drain into the sewer, the following tools and materials will be required:
- corrugated pipe (D \u003d 40 -50 mm);
- siphon Plumbing;
- tape sealing fluoroplastic (FMU);
- building level;
- set of locksmith tools.
Plumbing siphon and part of the corrugated pipe are mounted on the pallet housing even before installing it to the prepared place. It is necessary to observe the accuracy of the installation of the siphon in full compliance with the attached instruction.
The position of the gaskets, the tightening of the fastener rings should ensure reliable tightness. It is recommended to check the insulation of the connections, close the outgoing end of the corrugations and fill the siphon with a small amount of water. If the flow is not detected, you can safely collect the system.
Features of the mounting of the shower-hydrobox
In closed shower cabins and hydrobocks after installing the pallet, it is necessary to collect a panel covering the wall. It has mounting holes, which are pre-installed all the "rows" - nozzles, holders, soaps, seats, speakers, lamps, etc. Form and sizes at the bottom are different, so it is difficult to make a mistake. It is desirable for all "planting holes" to miss a sealant: it will later drip less.
Especially it is worth staying on installing nozzles. In addition to the installation of the sprayers themselves, they must be combined between the sections of the hose. It puts on the nozzles on the nozzles, is delayed by clamps. All this is going on the scheme available in the manual.
Particular attention to the fact that the tips of the nozzles were integer and the clamps are well tightened. It will not be superfluous and here to miss every seat with a sealant (and under the nozzle and under the hoses)
Connection of the nozzles of the shower cabin from the back
The wall with connected accessories put in a special groove. The connection site is also pre-labeled sealant. Cold, hot water connects, you can check the system performance.
After setting the walls, the lid is collected. There is usually a tropical shower, maybe lamp. When they are installed, you can also use the sealant - it is noteworthy where the water will fall ... a hose is put on the shower nozzle that is delayed by clamps. Conductors are connected to the lamp conclusions, the connection location is carefully insulated, you can several successively worm shrink tubes.
The assembled cover is installed on the wall. The junction place is again lubricated by a sealant. While the sealant is not frozen, the collected frame of the doors is installed. When the doors are installed - depends on the model. In some cases, they need to be installed before installation, in some - after. All joints are sealed.
In detail the assembly of the shower-hydrobox shower is shown in this video. There are no comments, but the sequence of actions is clear.
How to collect a shower cabin, hope, understandable. Models and modifications are very much, but the main problem nodes tried to describe. If you missed something, write in the comments - the article will add))
Installing a shower corner with a pallet
First of all, you need to install the pallet, however, due to the fact that most pallets do not go bundled with mounting devices, you will have to make them yourself. To assemble such a frame, iron corners and a pipe with a diameter of 30-40 mm are most often used. These details you have to cut and weld among themselves. There is another variant of attachment of the pallet - this is an installation on bricks and cement-sandy solution. The installed pallet should not be fused on its basis, it should fit tightly to the base.

We proceed to the installation of the drain system. The process of installing the siphon to the base occurs even before the control setting of the pallet to the frame. You should think in advance how the siphon repair will be carried out in the future, because sooner or later it can clog out. Install a small ventilation window, thanks to which you can repair in the future. After installing the siphon, check whether it misses water. To do this, you need to dial several liters of water and osmat the drain system into the pallet.
Also, pay attention to the fact that there is a good contact of the tile with a pallet, and all the slots were sealed with a sealant.

Now you can start installing panels. First of all, you need to assemble the cab of the cab. Next, it is necessary to fix the lower guide, this can be done with the help of sealant. How to install vertical racks? To do this, you need to use a plumb and level, so you can make the exact angle of inclination. In places of attachment to the marker, draw the points in which you will drill a hole for the dowels. Using a drill and a special tile drill, make holes in the wall.
 Tip! During the drilling of the tile, the drill or perforator do not turn on the blow, otherwise the tile is equipped and flying away from the wall.
Before you secure the racks to the surface of the walls, it is good to smear their inner side of the sealant, thanks to this you reach the best adhesion. Next, using the screws, secure the vertical guide rack. After all the above operations, you can safely begin to install the glass. However, making this work, be extremely careful because you can easily injure or damage the glass. Glass should get into all the mechanisms manufactured by the plant, only after that it can function normally. However, in order for the doors to close normally, without coming into contact with other elements of the shower corner, they must be adjusted. This procedure is performed according to the attached instructions for the corner.

The last stage in the assembly of the corner is the fastening of doors and sealing fittings. It is necessary to take care that all the gaps and from the inside are highly sealed. The sealant is applied only after cleaning the surface and its degreasing. Sealing is carried out both near the tile and on the pallet. It can be said that the sealing of the slots between the pallet and the tile is one of the most responsible works in the installation of a shower corner.

Additional on how to install a shower corner you can find out by reviewing this video:
Mounting process
In the process of installing a shower pallet, the following operations are followed:
- After unpacking the pallet and removal of the protective film, it should be turned over to the bottom, putting on a pre-prepared tight cardboard. It will save the product from random scratches.
- To the bottom side of the acrylic pallet with the help of self-tapping screws, you need to attach a metal framework, which will continue to rely on the entire surface, because the bottom under the weight is able to fade. It is necessary to make it so that there is no gap between the frame and the shower tray.
- Long legs-studs are neatly screwed through the holes of the frame into the seats until the stop. The level of the feet of the legs is checked.
- The pallet turn over and put on the legs. They are plastic support brackets for attaching the pallet screen.
- Adjust the horizontal of the installed pallet. You can do this by changing the height of the legs on which it is worth it. To set the desired pallet inclination level, the legs can be made different in length. After adjustment, their position is fixed using locking screws.
- The next step will be the installation of a siphon. To do this, through a waste hole at the bottom of the pallet, connect the upper and lower parts of the siphon. The place of the joint from above and below is compacted by gaskets, lubricated silicone. It is additionally necessary to process all the docks of the siphon parts. The drain hose connected to the pallet is displayed in the sewer stock.
- Be sure to check the tightness by pouring water into the pallet. In case of detection of leaks, re-process the place of the joint sealant.
- At the final stage, a screen is fixed on the pallet using brackets.
Installation of ceramic shower pallet
Unlike an acrylic plumbing product under a rigid ceramic shower, there is no free space, it is put on the floor. Therefore, no support is required. But when it is installed, it is not easy to ensure access to the drain pipe. It is possible to solve this problem as follows:
- In the floor under the drain hole cut a niche, into which the siphon will go under the floor.
- To ensure free access to the pipe cut a small segment of the floor at the edge of the pallet. A removable panel is made of the cut slicer.
- Paul under the pallet should be covered with adhesive composition in two layers.
- Securing the siphon on the drain hole, the pallet must be put on glue.
- After the solution is completely dry, through the removable panel in the semiphone, connect with a drain pipe.
- The place of adjoining the pallet to the wall to handle sealant.
- When installing a shower pallet from ceramics in a wooden house, it is better to use a rubberoid or polyethylene film for insulation of the walls.
Finally, it is worth recalling that the process of installing a shower tray in each case may differ somewhat depending on the design features of the product. Therefore, before installing the design, you need to carefully examine the attached instructions.
Instead of imprisonment
Presented installation options are far from the only one. There are dozens of installation methods. In particular, many of them instead of bricks provide styling under the bottom of foamed or extruded polystyrene. Some put the pallet directly to the floor, in settlement that the sewage pipe in the right place goes vertically down.
Finally, many pallets have wonderful legs, so no foundation is required at all. This is the most successful installation option, and it does not interfere with supplement the caliper system with a traditional sheet of foam. Side faces, if necessary, are separated by any material, including mosaic tiles.
The main thing is that the pallet can be removed at any time to carry out repair work. Polymer sewage pipes are not eternal. Sometimes they can crack. This is a whole problem - when you do not know what to pour neighbors. Because modern repair is expensive.
Tile or mosaic
In many cases, the lining of the side surfaces is required to hide the mounting bases. One of the most convenient options for solving the problem is the use of mosaic tiles on a plastic or glass basis.
A layer of glue is applied to the base using a toothed spatula. After pressing the tiles of the excess glue, you need to immediately eliminate.
With the help of a mosaic, any uneven surfaces can be bred, because It is easily cut by construction scissors or a knife due to a paper base.
It does not matter, you use tile or mosaic, all seams need to be sealed. It especially makes sense when you decide to build a pallet on your own
 The space between the pallet and the floor can be closed using a mosaic or tiled cladding. Mosaic fragments are flexible and allow you to qualitatively and quickly implacing the sidewalls or the entire pallet if you build it yourself
When forming seams, use cross. After cladding, you need to sweep the seams using waterproof grout and rubber spatula. Then removal of grouts are removed and everything is rubbed into the tissue. After everything gets dry, you need to wash the tile.
What do you need
To install a shower corner of any design, a specific set of materials and tools will be required. The list includes:
- electrode with a set of drills of different diameter;
- screwdrivers, flat and crusades;
- hammer and chisel - if there is a need to dismantle old coatings;
- building level;
- fasteners, which are required to include nuts and dowels;
- pipes and fittings for sawing sewage;
- cement and sand for the device screed. If you wish, you can buy a mixture of "liquid floor";
- waterproof sealant (usually takes silicone).
The rest of the set is selected in accordance with a specific intent: pallet or bricks with a solution; tile, if sides are laid out or replacement of wall coating and floor; Insulating design - glass doors with frame or curtain with a barbell.
 How to equip the drain
Installation of lateral walls
We remove the protective film from the top of the pallet, but the bottom is still protected.
 Move the pallet from one wall and set there an opaque wall.
  We connect the holes in the pallet with the corner and screw the screws 35 mm (without much effort).
  We carry out the marker along the corner and celebrate the holes.
 Remove the partition and apply silicone layer with a thickness of 5 mm.
  We establish the partition back and remove the excess silicone. Next, I will not write about the removal of surplus, remove them immediately after pressing parts.

 Make a pallet with a partition to the wall and try on the center panel to understand whether an additional lining is needed.
  We apply silicone at the shake of the side wall and the central panel.
  We associate them with screws of 10 mm.
 We try forward a fixed transparent partition. Scarp metal profile should be downstairs.
If everything converges, siliconym profile and install the partition. The top edge exhibit in the wall with the wall. From the upper external side in the profile, drill a hole with a diameter of 3 mm and pull the septum with the wall with screws. That's how it looks in practice.Install the upper and bottom profile. Rounded parts are sent to each other, the top profile is wider than the lower. Under the bottom apply silicone.
Installing a shower pallet from ceramics
Attention! Installation of any ceramic pallet must be performed extremely gently. The product is very fragile and can be easily damaged or split even with a weak impact either falling a heavy item! . A distinctive feature of ceramic models is that under this design there is no free space, which means there are no additional supports and can be installed immediately on the floor covering
This is convenient because any manipulations of strengthening the design are excluded, but there is a deficiency - difficulties arise in ensuring access to the plum and all other communications.
A distinctive feature of the ceramics models is that there is no free space under this design, which means there are no additional supports and can be installed immediately on the floor covering. This is convenient because any manipulations of strengthening the design are excluded, but there is a deficiency - difficulties arise in ensuring access to the plum and all other communications.
Order of work:
- the markup is indicated - with the help of a marker / pencil, the future location of the plum is designated and the boundaries are drawn around the perimeter of the structure;
- the drain hole is equipped (it is important that it is as close as possible to the suspended drain pipe) - part of the floor, where the siphon will stand in the future, is neatly cut with an electric bike;
siphon connects to a pipe through a revision hatch
- it provides unhindered access to sewer communications - not far from the existing carved cutting there is another small removal in the floor, so that the floor part is beyond the designs of the structure and the possibility of paving the siphon and the pipe grid under the floor;
- a small removable observation panel is made of a sliced \u200b\u200bslicer of the outdoor coating with an electrollized panel, and PVA glue, pre-diluted with a small amount of water, is applied to the location of the pallet in two layers;
- siphon is connected to the plum;
- the pallet is fixed with a solution, while the horizontal position is observed;
- when the solution is completely dry, the siphon is neatly connected to the pipe through the viewing panel;
- all connections are carefully sealed with silicone sealant.
Installing a shower corner
Product installation steps provide:
- Mounting pallet;
- Fastening racks and guides;
- Installing lateral walls and hanging doors.
Installing a shower pallet
The first step in assembling the soul is the mounting of the pallet, which can be carried out in two ways:
- On legs;
- Fastening to the floor.

Photo: Installing a shower pallet
Installation on the legs involves the placement of the base in a pre-prepared angular space with the subsequent adjustment of the height of the legs in accordance with the level. Next, the screw fasteners are fixed using nuts, the previously connected corrugated tube is attached to the siphon with the help of a cape nut. After that, the siphon is fastened to the pallet, which is placed in the corner of the room. Next, the position of the pallet relative to the horizontal plane is checked on the waterpaste and the adjustment is carried out if necessary.
When you connect, attention should be paid to the reliability of the connection to the details to avoid leaks in the future. To check tightness, it is necessary to submit a small amount of water
If the liquid passes into the hole and the connection location do not flow, you need to check whether the floor section is needed over which the unit is located. If everything is in order, the connection is performed correctly, and you can continue the assembly.
Mounting the pallet to the floor provides for the placement of the base in a predetermined recess with the subsequent fixing of the construction of the concrete tie. This installation option is considered time consuming, but guarantees reliability.
Special attention should be paid to the pallet rigidity, for example, acrylic structures are more susceptible to flexibility, so they should be additionally strengthened at the bottom, using bricks, mounting foam or penplex.
After mounting the pallet, the bottom guide is set, which is fastened after processing the fastening surface with silicone sealant.
Installation of racks and guides
After fixing the lower guide and drying the sealing silicone layer, you can move to the fastening of vertical racks. Vertical racks are attached from the bottom guide and pass up the wall direction. Installation requires special markup of the mounting holes, the position of which is determined using the construction Waterpas.

Photo: Installation of racks and guides
To drill the surface, lined with ceramic tiles, drill with a drill for ceramics, a perforator paired with a drill along concrete. Installation technology provides for the drilling of the preliminary markup holes. The depth of the opening should be 8 mm. Plastic dowels are clogged into the obtained holes, the vertical guide racks are processed with silicone and connect with the wall with self-tapping screws.
The order of attachment of the upper guide is carried out in the same order. The elements are connected to vertical racks and are attached to the surface of the ceiling with the help of sealant and screws.
Fastening the side walls and door hitch
The lateral walls are inserted into the finished frame from the guides, which are fixed by self-draws. After this walls are connected to the lower guide, and the coaching of the connecting seams is carried out between them.

Photo: Fastening of walls and doors
Next, installation of doors, which may have a plastic or glass foundation. It is necessary to take into account the swollen or sliding principle of operation. When working with glass surfaces, it is necessary to comply with the safety technique in order not to damage the fragile base and does not injure yourself. To do this, you need to avoid shocks, do not push the glass to the concave, do not hold on to the accessories so that the glass is not split.
After the design of the design doors is performed, in which the door rollers are inserted into the grooves of the guides. Next, adjustment and debugging of the positions of the doors is carried out, which should be smoothly moved, tightly contact with each other, do not have gaps and lumen.
In the conclusion of the installation, fasteners of the fittings are carried out.
What is the difference between shower corner from the cabin
The modern market offers many species of shower cabins, which, in general, are divided into two types: open and closed. The last type is called so because such a model is closed from all sides: it has walls, floor, ceiling. In essence, this is a small separate room for the adoption of water procedures.
As mentioned above, such cabins can have a set of different interesting functions for massage, relaxation, and the like. In general, the equipment brings a considerable share of the comfort of the hosts, especially this is important for those who love water treatments.
Of course, no minuses did not cost. The following flaws are inherent in closed cabins:
- a complex installation procedure, especially in the case of the presence of the most additional functions. In principle, you can buy equipment already collected and not bother with connecting each element. But it often happens that such a model in the assembled form simply does not take place at the bathroom door. As a rule, the case still ends with a call to the wizard, which collects the cabin directly in the bathroom;
- cost. Plumber is generally distinguished by considerable prices, and when it comes to not just about the supply of water, but also about comfort, it may turn out at all. And the more functions, the more expensive the model is that naturally. On the other hand, they usually serve for a long time, and pleasure deliver mass;
- dimensions. The major dimensions referred to in the first paragraph may be a critical factor in the case when it comes to a typical bathroom in a conventional apartment building. What to say about the notorious combined bathrooms in Khrushchev, where it is generally difficult to turn around. Such a cabin simply will not fit.

If all of the listed flaws are especially the last - they have great importance for you, then here it will come to the aid of a shower corner. It is easily mounted, it costs it inexpensively, and most importantly - it takes much less space than closed models.
In fact, the main equipment of such equipment consists of a pallet and doors. In the role of the side walls protrude adjacent walls itself. Thus, you turn out an angle in which the shower equipment is placed, the pallet is mounted, and all this is closed by the door and, partly, panels.
There is no ceiling in such angle, so various "beams" like a tropical soul here, of course, do not put. But the production of work is greatly simplified. And such equipment in any case will bring with you convenience and comfort, regardless of where it is: at least in the city apartment, even in a wooden house.
So that the installation procedure has passed easily and without problems, we suggest read the installation instructions below the installation of a regular shower corner with your own hand. Also, the article is attached video, looking, which, you will additionally enrich the knowledge margin. So, proceed.
Preparation of the room
Installation with pallet with your own hands begins with checking the geometry of the walls and floor of the room. This verification will require a level, plumb and corner. With a clear bias, it is aligned with the help of a mortar or ready-made bulk mixtures.
The curvature of the walls is checked with a level and plumb, and the alignment is made by construction plaster or moisture-resistant plasterboard plates. To prevent moisture penetration, building structures are treated with a special primer. A tile is perfectly suitable as a finishing material of the floor and walls in a room with a shower corner. It looks well laid very well and at the same time perfectly protects the carrying structures from the penetration of moisture. Very rarely, plastic or aluminum panels are used as a finishing material for wall decoration.
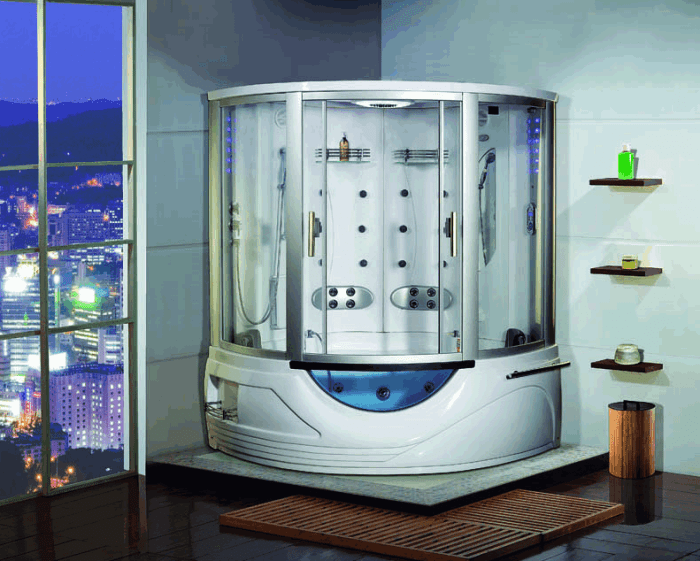 We prepare the room for the shower cabin: labeled the walls of the wall and gender
How to choose a shower corner
Shower corners are performed from safe braid or plastic, the first option is more expensive, but more reliable, stronger and more stable to mechanical damage.
Doors shower there are sliding and swinging. Firstwith the help of rollers placed on additional profiles, are bred to the sides. Shifting door flaps can reach quantity up to four. In this case, the scenery of a shower corner is the most durable. Sliding doors Preferably in small-sized apartments and shower rooms, as practically do not occupy space. The main disadvantage of such doors is the increased complexity of their installation.

Shower corner with sliding doors
Large sales of sliding doors and functionality brought them into leaders. However, if there is enough space in the bathroom, you can set options with swing doorhaving two sash. Externally, the option is a traditional door. It opens out.

Shower Corner with Swing Doors
Practical with the available cost is the option of folding hoists, having 2 or 4 sash, opening and inside, and outward. The loops mounted on the doors are considered reliable, and will serve for a long time compared to the built-in rollers in sliding flaps.

Shower door harmonica
Choosing options for doors with rollers, remember important recommendations:
- It is recommended to choose metal rollers - this material is the most reliable. Plastic goods will quickly come into disrepair, they are erased.
- The door before buying is recommended to shake a little. Do not acquire an unstable door that rushes. Once she can just fall out of the cab.

Sliding door rollers of shower corner
Frame The shower corners are always performed from lightweight material. Standardly apply reliable aluminum. Sometimes in cheap models, plastic is used to be painted or chromed. Aluminum frame, naturally, will serve longer.

Shower corner frame
Choice stekol The color scheme is provided with a huge assortment for every taste. In the market, you can find a glass on the shower - matte, with patterns, tinted, etc. High-quality shower corners are equipped with tempered glass. It is durable, does not change the color and the most qualitative.

Glasses of shower corners are presented in various colors
If it happened and the glass broke, then nothing terrible will happen. It crumbles on small safe balls - it will not bring an injury to anyone, your child will not be lit. As for plastic, he will begin to more from time to time, and later the divorces will appear.
Most manufacturers in the manufacture use modern high technologies and apply an anti-plate coating layer on shower fences. This composition makes it possible to practically do not delay the remnants of water (or lime), which are instantly rolled into the pallet. The glass is easily cleaned by dirt.
Equipping a house under the bath, you need to purchase accessories for soul. A wide range of shower corners for pleasure and convenience, buyers offer manufacturers. It is necessary to choose a high-quality mixer or shower headset (rack with watering can).

Reliable brands of Germany, Italy, Czech Republic, Finland are considered the best for the shower cabin. They are going to easily like a constructor. Each item is purchased separately, with the calculation that they will function with each other. The most cheap is the Chinese plumbing. It is convenient for the fact that they are immediately sold with a complete complete set. Invited Plumbing will arrange a shower corner in a few hours.
If you have been equipped with a multifunction cabin, then in such a shower corner you can use thermotherapy, hydromassage, in Turkish bath, listen to radio programs, take chromatherapy and other. Such showers look in modern attractive. Cabin parameters affect the mood of the owner. However, it will be worth all this pleasure.
Multifunctional shower
The booths, as mentioned above, it is recommended to purchase at least 80 x 80 cm. It can be an exception to the rounded cabin - you can purchase its smaller parameters. Specialists indicate such a requirement, because certain movements are carried out in the shower, hands, legs move. In other corners with a rectangular (or square) cabin in size for less than 80 cm it is impossible to turn.
Types of shower cabins
Before moving directly to the description of the assembly process, briefly consider the main types of shower rooms available, and the main criteria for their choice.
Shower corner (or a simple shower) is a simple design of the pallet and curtains. Instead of walls that are characteristic of a full shower, the walls of the room are used. There is no ceiling at a shower corner. The main advantages are cheap and compact.
 Shower Corner - One of the most simple, comfortable and cheap models of shower cabins, takes a minimum of space and is suitable for self-installation.
More "tricky" models have a roof and walls. Dear multifunctional units have a rich technical equipment: Turkish bath or shower Charcot, aromatherapy steam mode, different types of hydromassage, additional modes, various backlights.
 Dear shower model with hydromassage function, backlight and deep pallet. Requires not only a sufficient place for installation, but also the necessary pressure in the plumbing
Management of such cabins is carried out by a complex electronic system. Before buying an expensive cabin equipped with a hydromassage function, it is first necessary to find out the level of water pressure in the pipes.
Combined shower cabins are a kind of compromise for lovers to take a bath with hydromassage and have a full-fledged shower room at home. Combined models features original and stylish design - they are often positioned on the market as a home spa centers. You can choose a model of any shape that is most suitable for dimensions and layout of your bathroom: round, square, oval, polygonal, etc.
For a small bathroom, the corner cabin is best suited, which does not take up much space. Corner cabins are very popular with the owners of standard planning apartments, so manufacturers produce a large number of models in a wide variety of price categories.
For long-term operation of the shower cabin, it is necessary to correctly install the shower tray. The technology of performance must be accompanied by competent installation of all parts of the design. In this article we describe the features of the installation of a shower tray in accordance with the rules and recommendations of specialists.
Types of pallets
Shower is an excellent supplement to the bathroom, which saves free space indoors. The method of installing a dial for a shower cabin must be installed in compliance with safety. Installation options depend on the type of pallets and fastening technology to a certain material. However, it is important to remember that not all pallets can be installed independently, but in some cases, you need to seek help from specialists.

Shower pallets are distinguished by the type of material from which they are made. So, distinguish the following types of structures:
- cast iron products;
- pallets from marble and ceramics;
- steel products;
- acrylic pallets.
The most durable and reliable are products from marble, however, their cost is quite high, therefore, not everyone can afford such acquisition. Pallets from ceramics are also roads and have excellent decorative properties, but too sensitive to different damage.
An accessible option is considered to install a shower pallet from acrylic materials. For installation of the structure, it is necessary to build a special framework, which would support the pallet, because such products have the property to fake under weight. Special fastening legs are added to the kit, as well as reinforcement parts, which ensure the strength and reliability of the future installation. For example, cast-iron pallets are the cheapest among other types of products. The peculiarity of such pallets is in durability and reliability, which is indicated by the material used.

Aspects of the installation of the pallet
The cost of a shower cabin depends on the diversity of the functionality of the product. For example, shower with hydromassage, telephone, light and other effects will have a high cost. It is important to take into account the payment of the work for the installation of the entire design. With your own hands, you can easily install acrylic or steel products.
In the process of installing, it is important to remember to align the surface under the shower for the vertical position of the legs. Design assembly technology can be seen in the instructions for the product. They indicate the features of the installation of plastic or metal products, as well as tips on connecting the sewer system to the shower cabin. The pallets can be installed on the support elements from plastic, which can be replaced with bricks.
It's important to know! To insulate the pallet for shower, as well as, for the sealing of all emptiness, it is necessary to use the installation foam in the works. However, this method will be able to complicate the implementation of dismantling work or repair. To check the correct installation of shower pallets, it is necessary to get into it with extreme caution, after which you will determine the stability and reliability of the design.
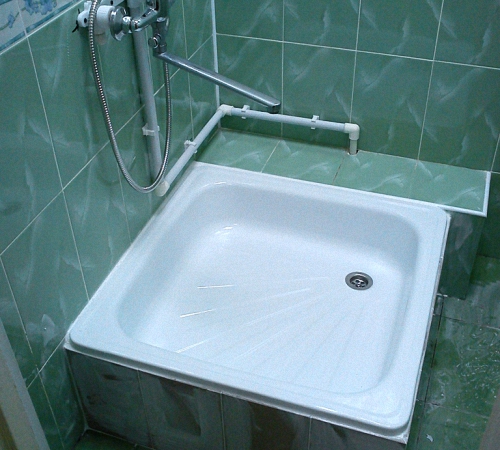
Installation of an acrylic pallet with your own hands: Features of work
The main disadvantage of acrylic products is distinguished by the absence of support under the central part of the pallet. Thus, the surface may be damaged from the careless movement. This will cause damage to the installation and damage to the body of a person as a result of a fragment.
Therefore, when installing an acrylic pallet, it is important to adhere to the sequence.
Preparatory work
During repair work in the bathroom, special attention is paid to connecting the sewer system and water supply. The shower cabin must be connected to several systems that are supplying and removing water, as well as electricity wiring. At the same time, the last part should have high resistance to dampness and water exposure.
To mount a shower tray for shower, you need to buy high-quality pipes and other products to avoid leakage in the future. After installing all communication systems for the bathroom, it is important to check everything thoroughly, especially the flow of water and the operation of the sewer. All pipe holes are closed with temporary plugs at the time of installation work.
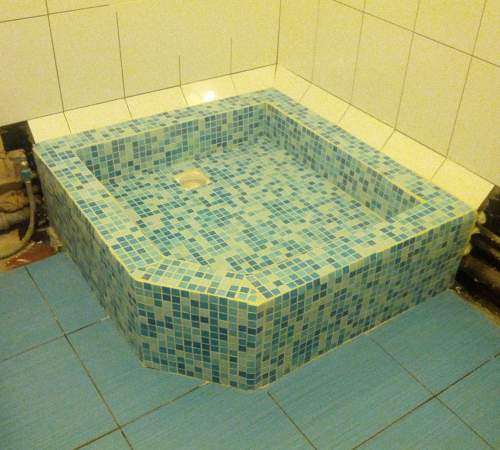
Installation process
All pallets when installing it is important to level strictly vertically. This is due to the need for the right runoff into the sewer, only under the condition of the perfectly smooth installation of the product in a horizontal position. This will provide from the formation of puddle in the shower. To install the pallet, it is important to make an even base from a tile or ceramics.
In order to correctly mount the pallet, you need to fix the central part of the product, while the horizontal structure should not be disturbed. To simplify work, they paint the contour throughout the perimeter of the pallet to set the exact position of the product. After that, you can start connecting sewage pipes and other elements.
Strengthening the shower pallet
For the strength of establishing shower pallets, it is necessary to measure the distance between the product and the floor. Initially, it is important to leave the space for the sewage so that in the future it was possible to clean or replace the waste pipe. Additional details of the support can be bricks or steel pipes, which depends on the parameters of the structure.
On the pipes or bricks on top of the rubber, after that, the supports need to tightly tight under the base of the pallet from acrylic. After that, you can connect communication systems.

Detailed instructions for installing pallets for shower
Before starting the installation work, you need to prepare the necessary tool. For installation, you will need such materials:
- tape FUM;
- sealant or special glue;
- double on the sewer network;
- if the set does not have a siphon, then you need to buy it in any plumbing store.
1. The pallet with legs must be aligned in a horizontal position. For this, the legs are separately unscrewed and fixed in special locking screws. If you have purchased a booth without support, then the floor is necessary to pour cement mortar. The level of base must correspond to the floor position in the bathroom. After that, they start assembling and finish, with the use of ceramic tiles or other products.
2. Fix the pallet from the wall of the wall is important with the use of adhesives. The junctions and points of the bond must be additionally sealing. All work should be carried out carefully to avoid further water flowing between the wall and the design. Double is attached to the sewer system, if there are other types of connection, the tee is installed.
3. All parts and locations of the pallet connection must be thoroughly sealed to avoid water leakage and destruction of the pallet.

4. The pallet is important to set up the layout of the sewage pipe. It is needed for further access to subjects of communication for their repair or dismantling in the event of a breakdown or damage.
5. In conclusion, it is necessary to check all the places of attachment. Also check the flow and removal of water. If there are leaks in some areas, then all the connections are more thoroughly tighten. If necessary, carry out additional insulation.
Features of installing other types of pallets
The pallet for a cheap cabin can be installed in different ways, for example, on a brick base, plastic supports or metal frame. Technology Working depends on the characteristics of the product and the materials from which it is manufactured.
For a pallet from ceramics, you do not need to install supports or other racks, because the design is mounted directly to the smooth floor. The assembly lumen in this case will not be, so it is important to high quality and professionally pave all communication systems. For repair work or to replace sewage parts, the pallet will be removed. Answering the question: how to install a shower tray without legs of ceramics, you need to attach the product with glue or cement mixture for tiles. Lastly, set the drain hole.
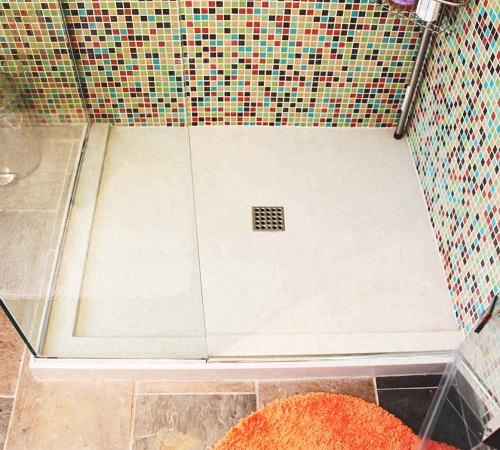
For installation of steel or cast iron products, you need to apply more reliable elements of supports that are bricks. Initially, the edges of the pallet installation boundaries are installed on the floor. After that, they prepare a mortar from cement and make masonry from bricks. The height of the masonry must correspond to the parameters of the pallet and have the same form. The pallet should not touch the floor to have the ability to establish a communication system.
After three days, after drying the cement solution, you need to install a tray. On top of the masonry you need to apply a layer of cement, then attach the product and align in a horizontal position. To the drain system you need to attach the hose. The tile, decorative panels, mosaic and other finishing options are used as facing materials. It is necessary to make the completion of the installed structure.
Unlike the installation of a low shower tray for other products, you need to use a metal or plastic framework, which is why the installation process becomes simple. The process of performing work is to equalize the legs, the installation of the pallet and fixing the drain hole.
At the end of the installation it is necessary to check the stability of the structure. If the pallet is stagged or scraps, then you need to make additional supporting elements as brickwork or attaching pipes from steel.
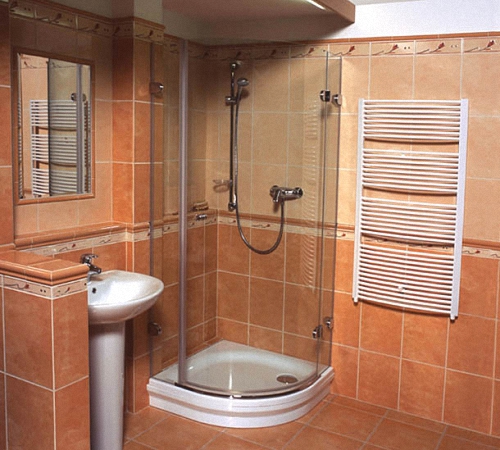
The process of making a pallet with your own hands
Install the pallet with your own hands is quite possible without buying similar products in plumbing stores. The main thing is to adhere to the rules and the detailed instructions for performing work. The form of the base under the shower cabin can be different, you can also use different materials for finishing, creating your own design design. The work process has such a sequence:
1. First, we indicate the place of the drain and installation of the drain system. The surface of the base under the shower pan is coated with a waterproofing layer, and the height of the wall coating should be 30 cm.
2. On the perimeter of the structure, a barrier of bricks is installed, the height of which should be more than 5 cm above the plug hole. Next, the pouring of the screed, which should be below the drain point by 6 cm.
3. After pouring the screed and brickwork, the barrier is covered with a layer of isolation. The fill of adhesives or cement mortar is carried out by a slight bias toward the drain system. The technology of applying the mixture begins from the edge and shifts to the center. It is important that there are no steep angles of inclination, as it forms significant and non-accurant transitions.
4. At the end of the work, the surface is frozen by different materials, such as ceramic tiles, mosaic and other products at the discretion of the hosts.

Features of the installation of sides for a shower pallet
After determining the features of the installation of a shower tray, the video of which is presented at the end of the article, you can begin the construction of the side. If the pallet has a greater height, then you need to build one or more steps for the shower. The masonry can be made of bricks with a formwork, however, the type of material used does not matter, because the surface will be covered with tiles.
After laying steps and removal of formwork, the surface of the side is important to cover with a primer and a layer of waterproofing. After that, the processed and correctly erected design can be coated with finishing materials. It is important that the shade and type of finishing corresponded to the appearance of the shower cabin and the style of the bathroom. The walls behind the pallet is important to separate the tiles if they are not treated with waterproof materials. In the quality of the tile glue, you need to choose waterproof products without a silicone additive, as it darkens from time to time and spoils the appearance of the shower.

To set up a shower cabin in the apartment, it is better to seek help from specialists. This will make it possible to correctly distribute the load on the base, as well as pave all communication systems. It is easier to install such a construction in a private house or in the country where there is no danger of flooding the lower floors of the house. In the process of performing work, all parts and elements are firmly and securely bore to extend the life of the pallet for the shower cabin.
Shower boards enjoy well-deserved popularity. Each owner dreams that just a bought new cabin will delight his many years, not causing any trouble in the form of the neighbors flooded from below. Such a condition can be respected only under one condition - the pallet for the shower cabin must be installed according to all the rules of professional installation. It is worth considering in detail how to set the pallet for the shower to serve it for many years.
Types of pallet designs
Incorrect installation of the pallet over time leads to its gradual destruction and, as a result, the complete failure.
Note! When mounting a pallet, which rises above the floor, the installation of an additional step is desirable. This is necessary not only to make the rise in the shower cabinet as convenient as possible, but also for security purposes.
If all installation is performed correctly and according to the instructions, the shower cabin will delight all family members for a long time and leave the neighbors with dry.
 Why you can not give icons
 Is it possible to give icons as a gift: Signs, the opinion of the Church
 A year ago left her husband, and now I do not know what to do