How to install the rain sensor in the car. Rain sensor - what it is, how it works, how to install. Skatch for a project with alarm
Already originally equipped with such a useful device as a rain sensor. Thanks to it, wipers work in automatic mode, as soon as the rain begins, it turns on, eliminating the driver's task. Many motorists who have no such system are wondering if it is possible to establish such a system yourself? Answer yes, of course you can, and this will be discussed in this article.
Such sensors can even be equipped with vases, for example, VAZ 2110.
Features of the rain sensors
When the wipers work when the first position is turned on, the rain sensor is watching the speed of the movement of janitors. In this case, it is precisely the intensity of purification of glasses. The stronger the rain will go, the more active the wipers will work. If the rain will quote, the wipers will slow down. As for position 2 and 3, in this case the wipers will work exclusively at a given speed.
It is important that the glass cleaning system can be controlled manually. For example, if the sensor is installed on the passenger side, then when the driver is contaminated from the driver side, the sensor may not identify pollution, and the wipens will not turn on. Or it happens that in dry weather, the sensor is triggered by frightened from getting into the glass of beetles or leaves. In this regard, it must be able to completely turn off the wipers or include them if necessary.
Materials and tools for connecting:
- rain sensor suitable brand;
- glue;
- self-tapping screw;
- Wires;
- Screwdriver, keys and other tools.

The process of connecting the rain sensor:
Step one. Installing the RS-22 type sensor
The entire author considers two types of sensors, these are RS-22 foreign production, as well as a DDA sensor for domestic production.
How to install a RS-22 sensor:
1. It is necessary to glue the rain sensor holder to the windshield.
2. In the sensor housing, you need to apply a special gel that will reduce the refractive index of two working zones.
3. The base of the sensor housing is fixed to the base using self-press.
4. At the final stage, we check that there are no bubbles between the working area of \u200b\u200bthe sensor and glass.


Step second. Connecting the RS-22 sensor
Now you can proceed to connect the electrical part. The sensor connects to the switch mode switch.
1. The blue sensor wire connects to the car body, it is minus.
2. The red sensor wire must be connected to the contact with the "I" designation, and the standard yellow with a green strip is turned off.
3. Now the yellow wire from the sensor must be connected to a yellow wire with a green strip.
4. Well, finally, the black wire is connected to the block, this is the contact "53", for this it uses a blue wire.

In order for the device to start working correctly, first need to be calibrated depending on the sensitivity and bandwidth of the glass. The sensitivity is adjusted in such a way that the sensor is triggered with the desired degree of contamination or glasses wetting. To learn more about how such a sensor works, it is possible from its instructions.
Step Three. Features of the DDA sensor connectivity
The rain sensor of domestic production is significantly different from the RS-22 sensor. The most important thing is that it can be noted is the lowest possible sensor, simplicity of installation and the ability to connect without interference in the main wiring of the car. Also, the system can be adjusted depending on how speed car drives. The faster the car drives, the faster the wipers work, because at the same time the glass is polluted faster. DDA-25 type sensor models are installed on Kalina, as well as in Lada Priora. DDA-15 difference only in the location of the contacts on the relay.
Another sensor has the ability to select a mode, it can work to deal with rain, snow, and in standard mode.
How to install a DDA sensor
1. First, you need to glue the sensor holder.
2. In the next step, it is necessary to disassemble the car mounted block and pull out a standard janitor management relay. In his place, then the DDA is simply installed.
3. On the front windshield stand on the left it will be necessary to pave the wires.
4. At the final stage, you must configure the sensitivity of the sensor.


You can get acquainted in more detail how to connect the sensor, you can on video.
If the shower is overtaken on the road, then when driving it is uncomfortable, dangerous. For this purpose, automatic sensors, ensuring the triggering of cleaning brushes located on the car's glass. It turns out that the windshield wipers are turned on without additional pressing of sensors, buttons. A similar automatic system can be installed on the machine. Consider the principle of operation of the mechanism.
How to install the rain sensor.
The control sensor is placed inside the car's cabin, right on the windshield. It turns out that it is located in the zone of car janitors. At the site where we plan to set this sensor should not be observed.
The system in automatic mode allows this instrument to constantly scan the surface of the glass, using IR radiation, it "makes conclusions". This signal, reflected from the device on the glass, provides an electronic signal to the power supply. As a result, wipers, if necessary, are included. Recent innovative developments allow you to adjust the speed of moving brushes. It must be remembered that the sensor performs the surface scanning only when the jannors are turned on. We put in the first position of wiper, now they will function independently. Installation can be trusted by a specialist.
Other functions of the automatic regulator.
The wipers are included on the 2nd, then the third modes can be controlled by the elements in the manual version. Sensor Do not include in sunny weather, because the glare on the glass can be perceived by the equipment like rain. The device can react to sand, fine pebbles, flies on the windshield. 
 We attach the sensor on the windshield, then the special protective gel is applied - it provides smooth operation of the mechanism. The gel will reduce the coefficient required for the refraction process of light. As a result, 2 workers' zones are formed. If you fix the first zone of the case to the holder, then the second - screw the screws.
The working area should not have air bubbles. The procedure is completed, it remains to run this system. Blue wires exhibit as a mass, it takes it on the car body. To securely function, it is necessary to clearly fix the wire. Red wire join the contact switch, connect with a yellow wire (with a green strip). There remains the wire of the black color to contact the number 53.


Now we carry out the sensor calibration.
All installation is regulated, according to the light transmittance parameters of the glass, we reveal the levels of sensitivity. After the first rain, we will set all the shortcomings, the reaction threshold.
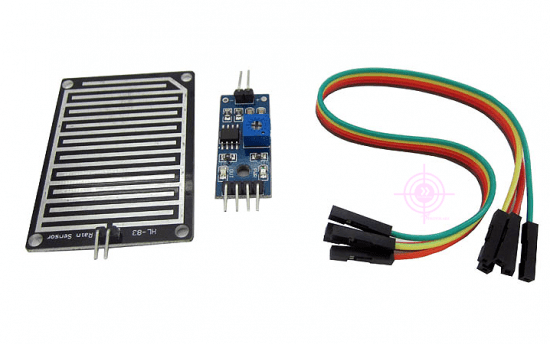
In some amateur projects related to the monitoring of the state of weather conditions or, for example, with the cultivation of plants in open conditions, it is useful to know whether it rains at the moment or not. Since many radio amateurs are using the Arduino board as a precipitating board, then for these purposes a special droplet / rain sensor has been developed, without any problems connected to Arduino. The simple Arduino project presented in this material will allow you to turn on the audio alarm when the droplets / rain sensor is triggered.
The rain sensor consists of a touch plate and fees with a LM393 comparator. In addition to digital output, the sensor has an analog output, so the Arduino microcontroller can read analog readings in the voltage range from 0 to 5 V or value from 0 to 1023 after ADC.
If the sensor's sensor board is in a dry state, the analog output of the module is 5 V. in case of rain drops on the plate, connecting the conductions of the board between themselves, the analog output varies from 5 V to 0 V, depending on the amount of moisture on the plate. In this way, the sensor tells us a strong or weak rain. Arduino will turn on the alarm after a certain rain intensity and some delay, which will be defined in the code. This will avoid false positives. In this case, the trigger threshold is 300, and the delay of 30 seconds.
Below is the Skatch for Arduino, which allows you to turn on the alarm connected to the digital port 8, when registering the rain sensor.
INT RAINSENSEPIN \u003d 0; // Analog input 0 for the INT AlertPin \u003d 8 sensor signal; // Digital Output 8 - for INT CURCOUNTER \u003d 0 signaling; // Counter - incremented to 1 every second after the SETUP (Serial.begin (9600) sensor (9600); Pinmode (Rainsensepin, Input);) void loop () (int rainsensepin ); Serial.printLN (RainsenseReading); // To monitor the Delay Serial Port (250); // Short IF Delay (Curcounter\u003e \u003d 30) (// End of the DigitalWrite Time Delay (Alertpin, High); // Alarm Trigger) // If the rain is no longer, reset the IF counter (rainsensereading<300){ curCounter++; } else if (rainSenseReading >300) (// If the rain intensity does not exceed the DigitalWrite threshold (alertpin, low); // Do not turn on the alarm curcounter \u003d 0; // reset the meter to 0) Delay (1000); )
When it rains (and Arduino detects it) The output D8 goes into a high logical level. This output can be connected to sound alarm (piezosomeru) or switch (electromagnetic relay). The output connection circuit is shown below.
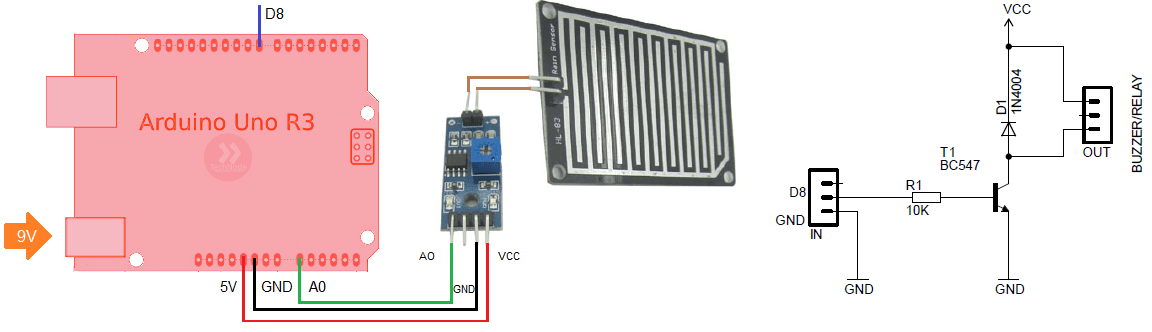
In this case, the ARDUINO power supply is supplied from an external source 9 V, the activation scheme of the buzzer / relay can be powered from 5-12 V. The voltage source of the VCC must be approached both by voltage and over the current for this scheme.
Thus, the creation of a project in which, using the Arduino board, you can register the presence or absence of rain or falling droplets from a source of fluid, is not a complex occupation. The droplets / rain sensor for Arduino is quite common, it is inexpensive and easy to use. Ultimately, it can be done by himself.
Modern vehicles have a complex design, which in addition to various advanced nodes, aggregates and mechanisms, is represented by a large number of useful additions, among which the rain sensor. However, there are various contradictory rumors in circles of car owners. Some argue that this device does not bear any benefit and is only necessary to increase the cost of the car. According to others, the presence of this option is no less benefit than from the ABS system. Let's try to figure out, you need or not set the rain sensor for the car,
Construction and Functional Features
It is worth noting that the rain sensor that appeared not so long ago was installed solely on the car premium class. However, in the future, he has already become the useful addition, which appeared on the vehicles of the middle and budget categories. In addition, on sale you can find various modifications of this device, which are independently installed on any machine. Now install the rain sensor can every car enthusiast.
How it works
How does the rain sensor work? Its scheme is represented by a sensitive element that responds to atmospheric precipitates, falling on the windshield, after which the automatic switching on the wipers is carried out. Most of the models of vehicles have a multifunctional rain sensor, that is, in addition to the inclusion of car janitors, still manages the work of the side windows closers and closes the hatch.
If such a system is installed on the car, comfortably increases comfort when managing in rainy or snowy weather, because the driver no longer need to independently include wipers and choose the optimal mode of their work. This will make electronics.
The basis of the functioning of the sensor is the principle of refraction of IR radiation at the moment when rain or snow drops on the windshield. Thanks to this feature, the rain sensor in the car is located on the inside of the windshield, therefore, it is completely excluded from the contact with water. The device circuit consists of an electronic control system and the actuator (relay), which runs the electric motors of janitors, and, depending on the intensity of precipitation, corrects their operation. 
The design of the control system is represented by sensitive photocell and LEDs, which radiated infrared during the sensor during operation. Next, IR radiation passes through the glass, and when it is clean and dry, its most is reflected from the surface and is captured by the photocell. To equalize the refractive index on its working area, a special gel is applied. But as soon as moisture gets on the glass, the radiation begins to dissipate. Based on these changes, the sensor photo-element submits the corresponding signals of the control system, which on the basis of the laid algorithms launches the glasses cleaners and corrects them.
Note that most devices are available not customizable, that is, they react to changing weather conditions with the receipt. But still, the rain sensor has more advantages:
- reduces the driver's fatigue and increases comfort when driving through the vehicle during atmospheric precipitation;
- increases safety on the road due to the fact that the driver does not have to be interrupted on switching the mode of operation of wipers;
- significantly prolongs the operational resource of the janitor mechanism.
How the rain sensor is included in the work
The device begins to work when the wiper wiper on the first position is turned on, further, depending on the intensity of the precipitation, the control unit selects the optimal mode of the janitor's operation. The remaining positions of glasses cleaners remain unchanged.
In any case, it is not necessary to turn off manual janitor's management, because it is impossible to completely exclude the occurrence of a non-standard situation. For example, randomly falling on the windshield spray puddles after the rain, which did not catch the working element of the sensor, or the need to clean the glass from dust or bird litter.
To exclude false triggering of the sensor in dry weather, it is necessary to turn it off, as the cleaners brushes can damage the dry windshield.

Independent installation of rain sensor on auto
You can set this useful accessory to any vehicle. In the case when the car is still under warranty, before mounting it, you must select a universal customizable model that completely eliminates interference with the electrical network. Otherwise, the warranty will be automatically excluded. When buying a sensor, a detailed installation scheme, elements of the sensor, gel and mounting glue be included in its package.
Installing the rain sensor on the car is carried out in the following sequence:
- A special gel is applied to the working surface of the sensor, due to which the refractive index of infrared radiation of LEDs is aligned.
- With the help of an incoming mounting glue, the optical part is attached to the inside of the windshield.
- The device management system is located in the mounting unit of the car instead of the switches relay (during installation, the main thing is not to be mistaken with the position and labeling of the key).
- The optical part and control system are connected by wires that are masked in the liquefit.
- The end is the necessary sensitivity.
In case of breakdown, the replacement of the rain sensor is carried out in the reverse order. But it is necessary to know that on foreign cars, the optical part of the accessory is mounted directly in the glass and it will not work independently.
Independent manufacture of rain sensor
Most motorists are interested in the question, how to make a rain sensor with their own hands? Initially, it is necessary to determine the type of the device being manufactured, thoroughly know its principle of operation and choose the corresponding details scheme. With the acquisition of elements for self-making, in principle, there should be no problems. However, in addition to them, a special optical gel is needed, without which the sensor will work incorrectly.
The most common type with independent manufacture is optical. Its detailed diagram and details can be found on the Internet. A more difficult for repetition under the conditions of a home workshop is the structure of the second type - moisture maker, but it has a high accuracy of work.
In this article we learn how you can use the Arduino leak sensor. Such sensors are often called differently: a rain sensor, moisture, droplets, leaks. In this case, it is almost always in mind the same sensor, as a rule, made in the form of a finished module. The sensor is easily connected to Arduino, the sketch for working with such sensors is simple, the price is not high. An ideal option for simple projects on Arduino Uno, Mega, Nano.
The leakage sensor and rain in Arduino projects allows you to determine the appearance of moisture drops and respond to it in time, for example, including an alert. Such systems are actively used in the agrarian industry, in the automotive industry, and in other daily spheres of our life. In this article, we will look at work with a ready-made module that can be easily purchased in any specialized online stores.
The sensor module consists of two parts:
- "Touch" drop detection fee. She tracks the amount of moisture that fell into her. In fact, the sensor is a simple variable resistor closed by water in different places, which causes resistance change.
- The second part of the sensor is a dual comparator (as a rule, LM393, but options for LM293 and LM193 are possible). Its main task is to convert the value from the sensor to an analog signal from 0 to 5 volts.
The market there are options for sensors both with a sampled sensor and a comparator and composed on one panel.
The sensor is powered by a voltage of 5 V, which can be easily started with any Arduino board. As a rule, two outputs are available at the sensor module:
- Analog. The value obtained by the controller will vary from 0 to 1023. Where is 0 - everything flooded or there is a shower, the sensor is very wet, 1023 - dry weather, dry sensor (in some sensors there are opposite values, 1023 - Maximum humidity, 0 - maximum dryness) .
- Digital. It gives high (5V) or low voltage in case of exceeding a certain threshold. The response threshold level is adjustable using a trim resistor.
Connecting the leakage sensor and rain to Arduino
To connect the sensor to Arduino, the board itself will need (UNO, MEGA, NANO, or any other) and the sensor itself. If you want to check the intensity of precipitation, it is recommended to locate the sensor is not horizontally, and at some angle, so that the drip drops are down. 
Connecting a module of the leakage sensor module to Arduino:
- VCC (power input) - must match the connected arduino circuit for voltage and current. That is, in this case, 5V;
- GND - grounding;
- AO - analog output;
- DO - digital output.
Analog output is attached to analog microcontroller pine, for example, A1. Digital output, respectively connects to one of the digital pins. Voltage can be submitted from the output of 5V Arduino boards, the land is connected to the ground.
When connecting the leakage sensors in real projects, it is necessary to provide for the protection of the electronic part of the module from moisture ingress!
Sample Sketch
#Define pin_analog_Rain_Sensor A1 // Analog input for the leakage sensor and rain sensor signal #define pin_digital_rain_sensor 5 // Digital input for the leakage sensor signal and rain SETUP () (serial.begin (9600);) void loop () (int sensorvalue \u003d analogread (Pin_analog_rain_sensor); // Read the data from the analog port serial.print ("Analog Value:"); serial.printLN (SENSORVALUE); // Display analog value in the monitor of the port_digitalue \u003d digitalread (PIN_DIGITAL_RAIN_SENSOR); // Read data from digital Serial.print port ("Digital Value:"); serial.printLN (SENSORVALUE); // Display digital value in the Delay port monitor (1000); // Delay between measurements)In this Sketch, we simply read the values \u200b\u200bfrom the sensor and display them into the port monitor. Spend an experiment and check how the value is changed when you touch the sensor with a wet or dry hand. Pooze the sensor - it rained or appeared leakage, wiped the dry cloth - the rain is over.
Example of a rain alarm project
Consider an example using sound alarm in the form of a connected zero on digital output D6. If you wish, you can connect the relay instead of alarm and perform various operations with the opening of the network. In the Sketch received data, we will transfer to the port monitor by the UAR interface.
Skatch for a project with alarm
The following is a test code that activates the beep on the already mentioned above digital output 6, with a time delay, in order to exclude false responses when the water is accidentally entering the sensor. The work is implemented through a variable that is updated every second and performs the threshold - CURCOUNTER. The alarm is driven when the value transmitted from the sensor becomes less than 300. The delay between the moisture detection and the triggering of the sound signal is slightly over 30 seconds.
#define pin_rain_sensor a1 // Analog input for the leakage and rain sensor signal #define Pin_alert 6 // digital output for the #define max_counter 30 signaling // threshold value for #define alert_level 300 counter // threshold value for an int curcounter \u003d 0 meter; // Counter for collecting "Statistics", which increases by 1 every second after the SETUP (9600) sensor (9600) sensor (9600); Pinmode (PIN_RAINT, OUTPUT); PINMODE (PIN_RAIN_SENSOR, INPUT); // You can not specify Because the default value) void loop () (int sensorvalue \u003d analogread (pin_rain_sensor); serial.printLN (SensorValue); // Display the value in the Delay port monitors (300); // short delay // If you have accumulated enough Basins to enable IF alarm (CURCOUNTER\u003e \u003d MAX_COUNTER) (DIGITALWRITE (PIN_ALERT, HIGH); // Alarm triggered curcounter \u003d max_counter; // Protection against variable overflow) // Determine the level of humidity IF (SensorValue< ALERT_LEVEL){ // В очередной раз убедились, что все влажно, увеличиваем счетчик curCounter++; }else { // Интенсивность дождя не превышает порога digitalWrite(PIN_ALERT, LOW); // Выключаем сигнализацию curCounter = 0; // Обнуляем счетчик } delay(1000); // Задержка между измерениями }
Summarizing
Rain and leakage sensor You can use in Arduino to create devices that react to the appearance of humidity in the form of droplets. Among the advantages of the considered module, it is possible to note its simplicity, convenience and low cost. The sensor connects very easily - using analog or digital outputs. To get the value in the Sketch, the standard Analogread (or Digitalread for digital Pina) is used. Using the obtained values, you can enable the alarm or other external devices using the relay.
 Why you can not give icons
 Is it possible to give icons as a gift: Signs, the opinion of the Church
 A year ago left her husband, and now I do not know what to do