Venetian plaster Application technique on the walls. Venetian plaster: Application technology, video. Art Venetian Plaster
Venetian plaster under marble allows you to make a room beautiful, original and unusual, add luxury. With the help of it, you can embody all your fantasies associated with the hot Mediterranean sea, the Renaissance, antiquity epoch. This is a wonderful finishing material, which every day becomes only more popular.
This material is known to people for a long time, since the time of ancient Rome. After all, it was then that only marble was mainly used as a building material. Waste from trimming marble, including crumb, spoiled blocks and even dust, also found use in construction, namely as a finishing material. A similar "marble" in its external characteristics practically did not differ from natural stone, but it was much easier to work with him and more convenient than with huge one-piece marbleders.
Venetian plaster visually practically does not differ from natural marble
Venetian is greatly popular today. This is due to many reasons, among the main of which the following can be distinguished:
- 1. The material refers to the category is environmentally friendly, so its use will not cause any harm to children nor adults.
- 2. Plastering perfectly hides irregularities and surface defects due to the unusual image texture.
- 3. Preparatory work before applying does not differ in duration and complexity, everything happens as quickly as possible and simple.
- 4. Plaster prevents the appearance of cracks on the wall, and also not deformed by the very time.
- 5. On the plaster you can apply hydrophobic wax, which allows it to use it even in rooms with high levels of humidity.
- 6. Walls with this type of finish are easily repaired and new repairs.
The only negative, who beats off the desire for some people to separate the Wall of Venetian, is to be in its value. The price is very high, especially if you add to her payment for services involved in finishing. If you are going to fulfill all the work on your own, then you will be able to save a decent amount on it.
To make the Venetian plaster on their own, it is necessary to study this material in more detail, especially its composition. As a basis, as in ancient times, a mixture obtained from granite, natural marble and quartz sand is performed. In essence, a special difference between the materials that were used by the Romans and modern people are practically no. The only important difference lies in the binder substance - now strong and reliable synthetic additives are now used, whereas the ordinary harated lime took earlier.
Stores offer various ready-made mixtures with the following components:
- water emulsion
- marble flour
- acrylic additives
- artificial dyes.
Plaster allows you to separate the walls in the rooms in absolutely any color gamns, which realistically imitate natural stone. Naturally, those in demand are precisely those that mimic marble, since the room in this case acquires a luxurious and rich species.

You can create a simulation of natural stone in various colors
Venetian plaster made with his own hands, it turns out colorless and almost completely colorless, because the dyes are added at the very last stage, before applying to the wall. Unlike shopping plaster, where the dye is already an integral part of the mixture. Due to the transparency, the owners of an apartment or private house get the opportunity to achieve the effect of the game of light on the wall surface.
Separate mixtures with matte and glossy surface. These effects are achieved by various methods, it all depends on wax. For example, to obtain the effect of the glossy wall, the treated surface is smoothed by tools, after which special wax is applied. Due to friction, which polymerizes the upper layers, the wall acquires a glossy surface. If you need to get a matte wall, then for these purposes, it is necessary to apply wax for this very thin layer for its complete absorption into the surface structure.
Venetian finishing plaster is perfectly suitable not only for concrete walls, but also for bricks, wooden panels, and even drywall.Due to the huge number of color shades, you can easily choose a plaster, which perfectly fit into any type of interior.
Work should be prepared and acquired all the necessary tools and materials. This will avoid the need to be distracted from applying and running to the store to buy the missing thing. We may need the following tools:
- spatulas
- rag
- roller
- sponge
- skister №220 and №120
- roulette or long line
- building level
- malyan Scotch
- pure water
- polishing machine with various waxing nozzles
- plaster
- trowel
- capacities for mixing the finished mixture and clean water
- drill with a nozzle for mixing mixtures or a building mixer

For applying need a spatula
Spatulas are recommended to buy various sizes, which is useful to us when applied patterns. This is done as follows: the greatest need to work with the main layer, while the rest are ideal for drawing drawings and patterns. Suede mittens, if you have such, they are also perfectly suitable for working with plaster, since they can polish the resulting images.
Preparation of plaster at home
Now you can proceed directly to the preparation of the solution. Most professionals recommend buying a ready-made mixture in specialized stores. This is the perfect option for ordinary people. In this case, the preparation process is simplified to the impossibility. In accordance with the instructions attached to Venetianka, pour clean water to the container and add a dry mixture with the observance of the required proportions. Then, by means of a mixer or drill with a nozzle stir up to the desired gauge solution.
The water temperature should not be below 10 degrees, otherwise the mixture components will dissolve much longer than their term.
As a result, it should be a solution to its density and viscosity resembling homemade sour cream. If the purchased mixture does not contain dyes, you will only need to add the selected dye by continuing the mixer to mix the solution until the required shade is obtained. After that, you can proceed to work directly with the surface.
If you are an expert in this area, you can independently prepare a solution from scratch. To do this, it is necessary to mix in the correct proportions of stone dust (malachite, quartz, marble), acrylic additives and at the end of adding a dye. Without professional skills, it is not necessary to do here, so it should be resorted to this method only if you are 100% confident in our own forces and skills.
In itself, plastering walls is already part of the preparatory work, because the task of plastering in this case is to hide defects and the shortcomings of the walls. However, Venetian plaster in this case is a mansion. The fact is that before applying this material, the surface is also required to prepare. Otherwise, after drying, irregularities and cracks can come.

Apply on dry and smooth walls
The technology of applying venetian plaster provides for work exclusively with dry and smooth walls. After leveling the wall, it is necessary to thoroughly prohibit it, preferably in several layers. For these purposes, it is recommended to acquire acrylic soils, vinyl paints or soils containing quartz fillers in their composition. In this case, the Venetian woman perfectly will be perfectly on the projected surface, and to process it in the future in order to create drawings and patterns will be as simple as possible.
A feature of application of this type of finishing material is that it is applied with a plurality of layers, very thin, which consist of chaotic spots of the solution. When applied, the effect of color stretching can be achieved, the essence of which is to apply a mixture with different layer thickness. As a result, it turns out a peculiar change in the color shade in the stain. The combination of similar smooth spots, located on several layers, create an illusion of the deep surface structure.
To give a special shine and gloss, you can make a small amount of solution containing a shallow marble crumb. The first two layers are laid out exactly from such a mixture. In addition to the wonderful appearance, marble crumb provides a solid grip with the surface of the wall. For work here will require a spatula with a wide base. When these layers dried, that is, after 6 o'clock, you can take smaller spatulas to apply decorative lusted layers, at the expense of which the beautiful original texture of the pattern is obtained.

Applied by many thin layers
- 1. First we apply a facing putty to the surface, after which we leave the wall for 6-8 hours so that the material is completely dry.
- 2. Now goes a layer of primer. Here it is necessary to take into account that it is necessary to breed a mixture with water in terms of 1: 7. The two layers of primer will be enough for the Venetian plaster to look excellently and retained all its aesthetic properties for a long time.
- 3. Applying Venetian plaster starts from the top corner. As in the case of putty, the material is superimposed with light movements down and a little to the side. The difference lies only that the putty is applied evenly, while the venetian mixture should be placed on the wall unevenly.
- 4. It should be remembered that when adding a dye at the mixing stage, the slightest miscalculation can lead to the fact that it will be necessary to impose new additional layers of venetian to hide the resulting defects.
- 5. The first layers are performed by a wide spatula, a spatula or grater is flooded for the rest. Folding occurs with short arcuate strokes.
- 6. After each smear, small influx of the mixture remains, which must be accessed by performing straight movements of the spatula at an angle to its line. Alternately flashes and accelerating the plaster, treat approximately one square meter.
- 7. Once again, carefully check the processed area, if necessary, achieve the movement in arbitrary directions, the layer of plaster is as thin as possible.
- 8. Now we return to the Great Spatula, which will need to burn venetian from the bottom up and vice versa with a little crossed strokes.
- 9. Using a grater, it is necessary to finally polish the surface of the wall. Holding a tool at an angle of 10 degrees, with strong presses we carry out the finish polishing of the wall.
- 10. Exactly the same actions are performed at all other areas of the surface. When small obstacles appear, for example, sockets, polishing and smoothing is carried out by a small spatula or short grater. Movements occur from the outlet in the direction of the separated area.
- 11. Finally, we note that so far the material is not completely dry, you can fix any defects that have arisen, including change the structure of the pattern, reduce or increase the layer thickness and so on. After drying, the majority of such operations will be unavailable.
Features of applying a solution - how to do everything at the highest level
With Venetian plaster, you can achieve the effect of real marble stone. The finish of this material can be used in almost all rooms and on all types of coatings, including chipboard plates, metal surfaces, reinforced concrete walls. You can distinguish several features of working with Venetian, knowing about which you will be much easier to work with this stucco.
For example, to work with metal surfaces, additional treatment with solutions, including alkyd or epoxy, will be required. This is necessary to prevent the manifestations of signs of corrosion and the destruction of the metal. If this important point is missed, then over time the rust will come even through the marble finish.
It should be noted that some specialists apply not only tools like a spatula or grater to apply material on the walls, but also devices such as compressors with hopper. The only condition when working with a hopper is required for the presence of a second person who will be involved in the smoothing of the solution by Kelma, while the first is busy directly with the hopper.
Thanks to this method, you can perform all the work significantly faster. The lack is also obvious - to apply the Venetian plaster extremely with their own hands will not work, it will be necessary to attract one more person to finish. And in the case of a call to the wizard, you will need to pay for the services of the second specialist.
At the end of all works, it is recommended to apply a thin layer of wax on the back surface, gently polishing it. The wall as a result will acquire a matte or glossy effect. In addition, wax has moisture-proof properties, so in the bathrooms and kitchens wax is almost a prerequisite for the execution of finishing works. But it should be borne in mind that when applied in large volumes after a certain period, there are darkens, so it's not worth the wax too much.
When the selection of the finishing coating falls on the plaster, it is not difficult to get lost in the wealth of choice. Modern trademarks try to attract the attention of the buyer with an unusual material. Against the background of other analogues, Venetian plaster stands out.

Features
Venetian plaster is a finishing material in the form of plastering with an unusual effect. In fact, this material is designed for the interior decoration of residential premises and less frequently non-residential type. The composition is characterized by fine-grainedness. The texture is characterized by tenderness and softness, it is elastic and convenient to work.
Modern plastering material is known since the times of ancient Rome. The remains of building materials based on marble, including dust, crumb, found their use as a new raw material. According to the properties and external characteristics, such a material was not inferior to mramor. At the same time, it was easier to work with him, because his weight was significantly lower than marble layers.

The plaster material includes granite, quartz sand and marble. The smaller inclusion, the better the plaster.As a binder component, modern trademarks use elastic, durable and reliable synthetic additives. Ready-made mixtures may contain water or latex emulsion, artificial pigments and acrylic-based additives. Some types of raw materials may have a plaster. Often, the use of this mixture is characterized by the realism of the stone surface.

From a practical point of view, Venetian plaster is a worthy alternative to other plasters of plastering. It is better painting or plain grounds, and also looks more interesting to traditional wallpapers. The weight used is suitable exclusively for the finish layer, it is not intended to align the base. Venetian plaster is expensive, aligning the walls and ceiling overlaps is unprofitable.

Such a plaster composition is suitable for surfaces of different types. It can be used for concrete, brick, wooden and plasterboard bases. Depending on the variety, the texture of the material may be matte or glossy. The effect is explained by the smoothing of the surface and friction with the polymerization of the upper layers.
It matters the correctness of the application of special wax.

Advantages and disadvantages
It is impossible not to note the advantages of Venetian plaster. This will allow to understand its demand and basic qualities.
- She is aesthetically attractive. Such a coating looks beautiful, stylish, modern.
- Such a finish is easy to apply. Working with a soft texture is nice. Due to high viscosity, it goes well on a prepared basis.
- This is a texture finish. Even with a small surface relief, it makes the interior background design special, volumetric.
- To facilitate the work and creating effect, a special finished mixture with this effect is provided.
- Venetian stucco refers to environmental materials. It can be used in the dwelling of allergies.

- Due to the unusual texture of the drawing, it can hide minor irregularities of the walls. However, the layer of application should not be greater.
- At the expense of the components, it strengthens the foundation. Over time, it will not crack or peel from the plane. During operation, the deformation of the plastering mass is excluded.
- The coating is resistant to ultraviolet. You can not be afraid that over time it will become fad.
- At such a coating can be applied hydrophobic wax. This will allow the operation of Venetian plaster in premises with an increased moisture degree.
- Regardless of the thickness and texture of the applied layer, this finish has thermal insulation properties. Due to it, the amount of heat loss will be reduced.
- It is compatible with dyes of different colors. You can make a multifaceted effect using different colors for finishing taking into account your own taste preferences.
- This material is combined with other finishing of wall surfaces and ceiling. Venetian plaster is compatible with wallpaper, wall panels, tensioning film, plasterboard, laminate, painting.

To reveal a complete picture of the qualities of Venetian plaster, it is impossible not to say about its disadvantages.
- It is demanding in compliance with the technology of application. If you ignore this fact, the coating will not be durable.
- The correctness of the pattern depends on the experience of the wizard or using a special tool.
- Quality material is expensive. This is especially noticeable when buying a branded raw material for finishing all walls of the room.
- Not everyone can independently perform such a finish. However, the challenge of a specialist will cost expensive, so often you have to master the unusual design.

How to cook with your own hands?
If you buy a ready-made material, I don't want to either have a purchase of pocket, you should prepare a plaster mix at home. This process is at all easy and implies the use of affordable components. All components can be bought in a construction store. When complying with the necessary proportions of each inclusion, the composition will have the same properties as the factory analogue.
In order to make his own hands, Venetian plaster was as much as possible to the factory, the components are better to choose natural origin.

The texture and shade can be chosen individually for any interior. Fortunately, a transparent or white type of source material allows.
It is possible to make Venetian from dry hazed lime, stone fine-phrase crumb, a color thank and natural wax. Instead of lime, you can use a conventional putty. For the completeness of the effect you need to buy natural wax. If his purchase does not fit into the budget, the wax can be replaced with a water lacquer.


It is worth considering several ways based on different recipes.
- It is possible to mix the sample sand (3 hours) with a gypsum putty (3 h), a construction mixture based on plaster (1 h), add water temperature water to consistency of thick sour cream.
- No less successful with the use of primer. It is bred by water approximately halfway, a gypsum putty is added. Consistency is similar to the previous recipe.
- The factory composition can be made of marble crumbs, pigment, powdered putty and water. Water is added only after the dry components are involved, the shade coincides with the desired one.
- You can mix marble, malachite, quartz crumb with a special putty, add a haired lime and a kel. Then add water. The ratio of additives and putty should be approximately 1: 4 (1 h of all additives for 4 hours of putty).


As you can see, simple components are required for the material. Make it yourself can each.
It is worth paying attention to the full master class, which includes a detailed description of each step of execution.
Consumption per 1 m²
The use of textured Venetian plaster has no rigid flow standards. This is due from different thickness of the applied layer, the possibility of marriage, the depth of the relief, the consistency of the mixture and the way it is applied. Depending on this, the consumption of material can be increased by 2 times compared to conventional plaster. Calculations rarely coincide with real quantities. In fact, you will have to add to the declared value of at least 10-15%.

Manufacturers declare that 1 m² will leave 1 to 2 kg. The consumption of options based on quartz crumb is about 2 kg per 1 m². The mass based on aqueous dispersions is consumed in the region of 2.5 kg per m². Plaster based on marble, granite, malachite is more economical (1 kg per m²).
Instruments
The process of creating and applying a plaster mix with the Venetian effect implies use of instruments and devices such as:
- plastic containers for kneading plaster;
- construction mixer with a special nozzle;
- rules and Cologves with a wide working web;
- plaster heater;
- paint Scotch;
- fine-grained skin;
- soft sponge.

To simplify the performance of the effect of Venetian, you can buy a special spatula. In addition, it is impossible to lose sight of the formation of dust. It takes work clothes, as well as a respirator, gloves. If, in addition to the basic coating, the accent pattern is meant or other decoration of the coating, it is worth adding brushes to a standard set, a small trowel. In this case, it all depends on the artistic skills of the master.

Often the surfaces decorated with Venetian plaster with different effects are decorated with special motifs. They can be practically imperceptible on a general background or embossed, resembling sculpture elements. In both cases, the selection of such a decor will need a kel.
To stylize, its color should be related main coating tone. In other cases, the use of pigments of different shades with subsequent varnishing is allowed.


How to apply?
The use of any type of plaster material is subject to the general rules of preparation. It should be stopped in detail at each stage of the technology, considering step-by-step instructions. This will minimize the possibility of marriage.

Preparation of the foundation
Training technology includes several stages.
- Remove of furnishing details. After the method of creating Venetian and bought its components, all furniture is made out of the premises. Do not leave it even when it is planned to decorate one wall or a certain part of it. In the process of finishing work, not avoiding the formation of construction dust. Regardless of the efforts and accuracy of the wizard, it will fall away everywhere.
- Removing the old coating. It should be removed the old coating, remove the paint. If you remove the wallpaper, it is necessary to first twist them with water with a spray gun. This will minimize the amount of dust and will remove the old cloth in large fragments. If there are fat spots, they are not masked, and scrape from the surface. The same is done in case of detection of significant contaminants.
- Prepare the basis for starting material. Conduct a visual inspection of the base for the finishing. Before disguise the problem areas, it is necessary to get rid of the bugs and sprinkling areas. From the bottom, you remove everything that does badly. Such a basis will not be able to keep the plaster material for a long time. After stripping, the surface is wiping with a semi-dry sponge. This is necessary in order for the layer of the starting mixture to have greater adhesion.

- Basic priming. At this stage, the foundation can be projected. To do this, use primer with a large penetrating ability. Especially it is appropriate in cases of porous and cellular overlaps, which speaks the shocklessness of the walls or the ceiling. Preferably use white soil. This will allow you to see where he is already applied.
- Masking defects.After the primary processing of the base of the primer layer and its total polymerization, the starting solution of sour cream-like consistency is applied to the surface. They do not deceive all the walls: the task of the composition is masking chips, pits and chosel. The cooler material should not be large, because it will lose durability.
- Skuring.After the starting plaster is driving, it is supplied with the skin (sandwich). Work is in the respirator. At the end of grinding from the surface of the walls, either the ceiling remove the remains of plaster dust. To do this, the surface passes a semi-dry sponge.
- Repeated ground.So that the finish was as long as possible, the layer of starting material is treated with a transparent primer. Due to the high penetrating ability, it will build all the layers, including the final Venetian coating. In addition, it will connect dust and missed microcracks, will make the base structure of homogeneous. After drying it on the surface, a crystal lattice is formed, which will keep the finishing material.


Technique of applying Venetian
The technology of applying venetian plaster provides for the initial application of the composition at the overlap. The layer should not exceed 4 mm. It should be applied extremely quickly, otherwise the plaster will begin to be captured. It will cause marriage and visual difference in relief and drawing. To correct such a defect will be problematic, as the drawing is applied to a single touch.


To make a 100% high-quality coating, the basic (starting) material is trying to spawn into the main tone, which is selected for design. This will exclude transmission of the base of the wall or ceiling. Unlike other varieties for the Venetian plaster, 2 or even 3 kneading the color of different degrees of intensity are breeding. It turns out bright, transitional and dark color.


They are applied to the base by Celma with small portions, alternating among themselves or in chaotic order. At the same time, it should be smoothed them among themselves. Do it need it quickly. You can use a special celma for Venetian plaster. To obtain a gloss effect, light polishing is needed. At this stage of finishing works, varnish or wax will be useful.


Effects
Knowing the basic techniques of applying venetian plaster, it is possible to diversify such registration by means of girlfriend and tools. For example, tone transitions will be more interesting if you use an old crumpled newspaper.
So that the mass does not stick to it, it should be closed with a food film. In this case, there is no need to customize the drawing: so even more interesting will be the decor.


The figure is not created immediately after applying plastering on the wall or ceiling. It is necessary to align it and only after that begin to decorate. It should pass at least a few minutes, otherwise, instead of forming the relief, you can lubricate from the surface of the mass.An excellent solution will be the use of crumpled coarse polyethylene. If you want the drawing to repeat, such polyethylene on the painting roller should be fixed.

For decoration, you can use a round rigid sponge for washing dishes. However, you should not make too deep relief with it. Much more interesting will look a hint of an unusual form. Sometimes it makes sense to arrange a relief on the principle of technology "fur coat", taking advantage of a roller with a short pile.
Imprint depth in this case will have to remove grinding. But the effect of shades transitions will be quite interesting.

In addition, it is possible to recreate the effect of surface cracking (cracker) using a special varnish. Someone like imitation of stone blocks or rock structure (Marseille wax). Due to the shade transitions, this decor will be particularly harmonious in the interior of the dwelling. Sometimes the picture technology implies the applied film to the surface of the surface for a day. You can use different devices, including rollers wrapped with mesh, clothes rope, textiles, and even relief wallpaper. In some cases, Venetian plaster is applied in a few finest layers.

So that the coating from homemade plaster holds for a long time and rejoiced aesthetic attractiveness, you can note a few simple recommendations.
Choose material for finishing the walls is not easy. It is necessary that it is beautiful, practical, durable and, preferably inexpensive. Venetian plaster answers almost all of these requirements. It is beautiful - it looks like natural marble, it is practical - the surface covered with wax can be repeatedly washed, it is durable - if it does not scratch it specifically, it is not damaged, it can be applied on any surfaces - smooth, curvilinear. Just perfect finishing material. But, as usual there is "but". She is expensive. This is the first minus. The second is difficult to apply it with your own hands. Rather, it is easy to apply, difficult without experience to get a beautiful surface. But you can try or hire a wizard. But before entering into a contract, ask customer contacts. If you succeed - see the results of the work yourself, or call and ask about impressions.
What is Venetian plaster and its composition
If the wall in appearance resembles a marble surface, but there are no seams on it, it is separated by Venetian plaster. This finishing material was invented a century ago in ancient Rome. When someone came up with mixing marble dust and haired lime. It turned out an elastic composition that looked at the walls as natural marble. Natural dyes were added to the mixture for a clearer drawing.
The most popular was clay. The walls had reddish or pinkish (depending on the color of clay) divorces, which gave trim a large similarity with natural marble. So that the coating was durable, the plastered surface was covered with a layer of wax, which was then polished. The walls were not distinguished from marble. Only the seams were not.
And only a century later, in the Renaissance, Venetian plaster appeared in Venice, where it began to be used instead of marble plates. The technique of its application was not simple, but work with Venetian plaster is much easier than fitting and grinding marble plates. Therefore, this type of finish has become very popular. She was finished with walls, ceilings, columns in palaces. The decoration was beautiful and durable, weakly reacted to changes in humidity and temperature, which in the conditions of high humidity of Venetian channels led to the clarification of this material. Contributed to popularity and the fact that marble dust is brought easier, and it costs it cheaper. The remaining components were added mined. The fame of the most beautiful finishing material was distributed by merchants quickly, and called its Venetian plaster. Since then, it happened.

The composition of the Venetian plaster described above is marble dust, harated lime and coloring additives - used so far. Absolutely natural finish. But there are compounds in which synthetic dyes (acrylic) add or instead of lime use modern binders. There may still be juice of rubber trees, widespread granite. All or some additives are contained - depends on the manufacturer, but this material is also called Venetian plaster, since the main component is marble dust - it remains all the same.
Application technology
The application of Venetian plaster with their own hands is a difficult matter. The problem is that this is a creative process and methods of applying mass. From various movements, different surfaces are obtained. Without experience to predict that you will succeed. Find out what movement will lead to what result, you can only experimentally, that is, you must try. But. Venetian plaster is completely expensive, so the experience is expensive. Although, learns somehow necessary ...

The only thing that can be advised is to launch a piece of plywood with an area of \u200b\u200bat least 1 square, and better than 2, pollute, cover with primer and try to apply venetian plaster on this surface, exhausted technique. It is not recommended to start immediately to the finish. Most likely, you will have to remove everything and redo it, which is hurt, expensive, long. If you are lucky, you can get on dealers who are taught working with Venetian plaster. They provide material and stand for work, show how to do. But it rarely happens.
Preparatory work
The basis for which the Venetian plaster is applied must be perfectly smooth. It is pre-covered and level up to absolute smoothness. Use latex putty. If you apply the composition on the uneven wall, it will only emphasize the disadvantages and increase the consumption of Venetian. You can solve the base layer, but this leveling will be very expensive.

The smooth wall is covered with primer deep penetration. Preferably in two layers. It will provide good adhesion finishes, remove dust, which remains after grinding plaster, will prevent the development of fungi. After the wall can be started.
Stirring and caller
Venetian plaster in buckets are sold, the view has a pasty. The basic option is white, a coller is added to obtain color, for different effects there are decorative additives - pearl, sparkles, etc. You can smoniate the composition in the store or yourself.
For self-tapping, you will need a drill with a nozzle for mixing. In some cases, Venetian plaster is covered with a layer of water - to prevent its drying. In this case, before use or with the toll, the water is drained. Then, with the help of a drill nozzle, the composition is stirred to a homogeneous state. And only after that the dye poured into the mass, mix a few minutes (5-10) with a drill and nozzle.

With stirring, be careful: the composition is often not painted near the walls of the bucket. After driving the nozzle, take a clean wooden bar of a small cross section, spend it along the walls. Most likely, there are places where the dye did not hit. Spend the bar several times, along the walls, having achieved the walls to have painted material. Re-mix the composition of the composition before receiving a homogeneous color. This procedure can be repeated again - for greater confidence. There is another nuance: some manufacturers are recommended after staining wait 12 hours.
With self-caller, it is necessary to remember that in some formulations when drying, the color changes (not all). Therefore, to determine the future color it is necessary to make samples: to apply a couple of smears and wait until it dry. According to the results or add a dye, or - non-car composition.
Also remember that with a manual caller, it will not be possible to repeat the same color. The new batch will be different. Therefore, the material is necessary in more quantity than expected consumption: it is better to remain better than it is not enough.
Rules for applying layers
Layers when applying venetian plaster can be from two to a dozen. It all depends on the desired result. And the compliance of the "desired result" and valid is the case, just experience.

This beauty can be made with your own hands ... If you take care
The layers are applied in different ways, but each of them is spilled and grinding to smoothness, everyone must be given to dry. And only after applying and drying the latter, the surface can be covered with wax - bees or synthetic. Depending on the type of wax, either a glossy surface (bee wax), or matte (on a synthetic basis). The walls covered with a synthetic protective composition become also water and moisture-resistant, so if you want to separate the walls in the bathroom by Venetian plaster, take the wax synthetic.
Base
The first layer is the base. It is applied evenly, according to the rules for applying ordinary plaster - it is necessary to be smooth. It can be written, it is possible - no. It depends on what background you want to have - white or color. If there are 2-3 layers of the material, it will be shifted through them. If layers 5 and more, most likely, it will not be visible (again depends on the type of composition).

Second and subsequent
The second layer of Venetian plaster, and all subsequent, applied by chaotic strokes. The composition is taken on a flexible thin metal spatula or special Venetian culma. The composition is imposed on the edge of the spatula / celma, small strokes in different directions are applied to the wall. At the same time, we must try so that it is not visible to the trail from the first touch of the surface tool. The subsequent smear, as if it closes, lubricates this place. Moreover, it is not necessary to achieve uniformity. The whole essence is in the chaoticness of trends, forms, lines, bends. Also as well as in natural marble.

Applying the second layer - chaotic or in one direction - depends on the desire
It dries the Venetian plaster 1-10 hours - depending, the composition, producer, temperature and humidity. Look at the packaging. After drying, the surface is maintained with dry cell. At the same time, all the differences are burned, which remained after applying the layer. The following layer is applied on the cleaned surface, dries, loads. And so as long as you do not get the desired result. And the result is usually such - through thin layers, darker bands are transmitted in those places where, when applied, the composition is more tight. The depth and brightness with which the bands "shine" depends on the amount of layers applied.
Finishing
The last layer of Venetian plaster is necessarily a thin metal spatula. The technique is called "on the SDIR" and the layer is almost transparent. The spatula takes a little composition, applied on the wall, tightly pressing the blade collect composition from the wall back. In this case, a very thin layer of material remains on the wall. Here at this stage you have to try to the surface was flat. Small irregularities will be removed during the grout, but it is necessary to try.

This is a tool for applying Venetian plaster - Special Cologma
Ironing
The latter thin layer of Venetian plaster is not to the end. After 20-50 minutes begin the surface of the surface. Please note that some formulations need to be bled into small areas. Printed to Venetian plaster on a small area (about half of the square meter), lost. Other manufacturers allow a larger period of time. I just need to look at the package or ask manufacturers.
The process of iron is the grout of a dry clean metal surface. We take clean, without reservoirs, scratches or other defects Venetian culma and circular motions smooth the surface. The process appears in the process, shine appears, gradually Venetian plaster acquires "depth" and lamination, which is distinguished by natural marble.

With the iron of the Venetian plaster, it is necessary to closely make sure that scratches are not formed, moving. To do this, there should be no grades on Kelma, grades, etc. Also, it is necessary to iron the wall with the plane of the Quelma, not hurt by its edges. We proceed at one time a small area when the drawing sticks out on it, moving to another site, not forgetting to pay attention to the boundaries of two sites.
Imprint Venetian plaster can be the last stage. In such a state, you can leave the walls or ceiling in the rooms. For corridors, baths, kitchens, a protective coating of wax is required.
Application of wax
Wax is applied after the Venetian plaster is completely dry. For confidence, it is better to wait a day. The wax is applied with a wide spatula with a thin layer "On the Sadir". A thick layer begins to flap over time and peeling, therefore we leave on the wall at least.

About 30-50 minutes after applying, start polishing wax. For this, a fearful nozzle on a drill or a grinder is suitable. The pile of nozzles should be short and soft, should not be poured. Turns exhibiting no more than 3000 rpm. With higher speed, wax is erased, and not polished. Polishing lasts until you get the desired degree of shine (depends on the type of wax).

Full drying of wax - about two weeks. After all this time, you can wipe / wash / rub. If it comes to the bathroom, it is better not to exploit it too (if possible).
Several application techniques
On their own stuffing the bumps with the case with Venetian plaster - the case is expensive. At the same time, understand the description that and how to do it is almost impossible, as the strokes are not clear, the phrase "in chaotic order" exactly does not explain anything, because there is no full chaos. There is some kind of order or bias of applying. So, so that it was easier to find your way, we will tell you at what angle to bring strokes in each layer. So it is the likelihood that after a pair of samples "on the plywood", the independently laid venetian plaster will make you.

The first method: the drawing is not too bright, it is not very clear, smooth lines, without sudden transitions. Apply layers like this:

A good option with a good effect. Not too heavy equipment gives the hope that the Venetian plaster will look normally even if it applied a novice without skills. But pre-test everything on the "plywood".
The second method: with a color base, multidirectional strokes in each layer. The procedure for applying is:

This method is also not bad if you manage to master the multidirectional movements. At the same time, do not forget that the smears should be thin. In general, try.
Venetian plaster: video lessons on application techniques
The use of Venetian plaster in the interior decoration allows you to create an original interior design. It has a number of benefits that distinguish it from other finishing materials. Venetian plaster does not crack, does not dug, does not change its painting. The appearance of the finished coating resembles natural marble. The composition can be used where ordinary plasters are not suitable. In this article, we will consider in detail the composition, application and various technologies for applying venetian plaster with their own hands, and at the end you are waiting for a step-by-step instruction from our reader
Tools for applying venetian plaster
For applying the composition, plaster cells and spatulas will be needed. They can be used to apply wax to the surface of plaster, as well as for grinding intermediate layers. Spatulas need to take different sizes. The main layer is applied using a large spatula, and the drawing is created by a small or medium spatula. Also required suede mittens, which will subsequently be polished by the finished surface. Depending on the scale of work, the appropriate number of plaster and kel will need. The kel can be any coloring.


Composition of Venetian plaster
Venetian plaster consists of the finest suspensions of natural materials, such as marble, plaster and lime. Acrylic and harated lime are used as a binder. Which option is better - to say it is impossible. Newbie in the decoration is unlikely to be able to distinguish one material from the other. As for professionals: Some say that only harated lime allows you to get "that very" result, the second is stuffed that acrylic components give the mass of the best plasticity, which in general affects the increase in the technological finishes.
In addition to standard components, the mixture may include the smallest pearl particles. Their presence allows you to make a finished surface similar to silk. For this reason, the combination of "wet silk" is added to such Venetian plasters. From different points of the room, the same coating will look different. A little video on this topic.
The appearance of the finished wall depends on the technique of applying. Using the special technique of movement of the spatula, the finishers seek the appearance of interesting patterns repeating the texture of natural stones. The surface may have a pearl hue, which is achieved by entering special impurities to plaster.
Features of the most affordable plaster Optimist Elite
Given the low cost comparable, we will discuss the properties of Venetian plaster optimist. We will try to avoid advertising this material, briefly describing the characteristics specified by the manufacturer. Products are implemented in plastic buckets of 3.5, 7 or 15 kg. The optimal conditions of use imply air temperature in the work room in the range from 5 to 35 degrees of heat. For applying, a standard set of tools is used: Steel Kelma, a pair of spatulas, a polishing machine with a soft nozzle. Drying layer of standard thickness - about a day.


Approximate value:
- 3.5 kg - 750 rubles.
- 7 kg - 1350 rubles.
- 15 kg - 2750 rubles.
- at the first stage, a thin layer of plaster is applied to the surface, trying to create some kind of drawing at this stage. The layer is given to dry about an hour;
- to get rid of small flams, the dried surface is slightly grinding with a large spatula - smoothed to align it;
- apply the second layer on the same technique as the first;
- the last layer of decorative plaster is applied with a spatula, because The coating should turn out to be translucent and thin - to give it greater depth. The work is postponed for half an hour to dry out the material, after which the wall is smoothed by a spatula. For dry premises, the work is over;
- if it is supposed to use the plaster optimist for the walls of a wet room (toilet, bathroom, kitchen), then the final stage of the work will be surface treatment with wax and subsequent polishing until gloss
On the video below you can more clearly familiarize yourself with the method of using this material.
Application technology
Application technology is complex. If you have any questions, it is better to go to master classes that are often arranged in branded shops selling decorative plaster.
First of all, it is necessary to pay attention to the large spatula, the edges of which should be rounded, thanks to which you can close the plaster in the wall. The spatula should not have mechanical damage and defects. Before you start laying plaster, the wall is covered with a special primer. The wall should be perfectly smooth, otherwise the plaster simply will not hold. The first layer of plaster is thoroughly tamped and smoothed, after which he needs to let dry. If, after drying on the surface of plaster, irregularities remained, they can be easily removed using cells.
Layer per layer
After 6-8 hours, the next layer of plaster is applied, on top of which the finishing layer is already applied. The marble pattern, characteristic of Venetian plaster, is created due to smears with small spatulas. In this case, the layer color should differ from the previous one. As soon as the pattern is ready, it must be polished with a large spatula or trowel. Depending on the used grinding techniques, the finished surface can be a glossy or matte. It is necessary to work with the material quickly, since the composition dries quickly and becomes less plastic. By stirring the plaster and the kel, attention should be paid to the number of the finished solution - due to the dense styling, they begin to quickly hurt hands, and the solution itself quickly freezes.
Protection of wax
On top of the last layer of Venetian plaster, a wax protective coating, a gloss and water-repellent property, is applied. It should not be applied too much wax, since after drying it can darken and spoil the appearance. As soon as the wax freeze, it can be additionally polished by a suede veasome. After 20-25 days in the plaster, carbonization processes will end, it will become more durable, after which it can be washed.


Externally, the finished wall will look as if it is made of natural marble. An additional effect of similarity gives a wax coating. You can separate the Venetian plaster not only the walls, but also the various arches, as well as door pasons. In the next repair, the plaster is not necessary - it can be painted with paints, as well as glue the wallpaper.
Visual examples of finishing (video)
As they say, it is better to see once than hear a hundred times. Therefore, we suggest you familiarize yourself with several interesting stock footage. On the video below the example of application of acrylic Venetian plaster.
And here you can familiarize yourself with the same author's methodology for applying Venetian. The material is long, but the number of valuable tips in it rolls.
Another interesting technique of work. As a result, the surface is covered with decorative cracks. About the stucco under the old days, read here.
Relatively simple way to apply the composition. In our opinion, it is more suitable for trimming a bathroom or toilet.
DIY, or additional motivation
Above, we led the approximate value of the material for finishing one "square" wall. If you decide to experiment, then independent work will cost you only your own time. In the worst case - also nerves. But intending to pay to third-party specialists, you need to be prepared for increasing costs of 600 and more rubles per square meter. In Moscow and St. Petersburg - more expensive, in the regions appetite finishers more modest. But still you need to understand that a professional master only for his work will take from 1000 rubles. for each square. m. Finishes by Venetian plaster. The cost will grow as you increase your requests and the complexity of the work (the height of the walls, the quality and geometry of the surface). Cheap and beautiful will not work.
This can be understood by reviews.
Those who ventured the independent decoration of the walls of the Venetian plaster, mark a greater complexity of work. Therefore, you should not rush out of extremes to extremes - try to start working in the "test mode": we take a sheet of plywood or fiberboard an area of \u200b\u200bat least 1 kV. m. And try to transform it. With this approach, you can try several techniques and choose the optimal one.
Oh kolovka.
If you decide to compose a mixture yourself, then carefully calculate the required amount of material - when re-kneading to guess the color will not work. How many plaster need? It is better to know about it yourself, making test strokes on a square meter of the test surface. Trust data written on the package is not worthwhile - the consumption of the material is determined by the technique of its application.
As for the tinting, there is another nuance here. Do not rush to pour large volumes of coloring composition, do it gradually, seeking uniform mixing of the mixture and subsequently adjusting the saturation of the color. This approach will take more time, but above the chances of getting what you need.
A few more nuances
It is best to work together in a conveyor mode: one causes the composition on the wall, the second gives the spot the desired shape. So faster and more efficient, especially if you consider that the trimming of Venetian plaster is even a purely physically complex process. Not to mention the creative side.
Be prepared for the fact that the end result will manifest only at the final stages of work. This is exactly the case when it is not worth especially planning the appearance of the surface. When applying the mixture, it is recommended to periodically move away from the wall and examine everything with a canvas as a whole to understand where to move on.
Well, as for feedback on the specific types of plaster, then in 90% of cases are advertising. Therefore, their informativeness was questioned.
Update: Personal Experience
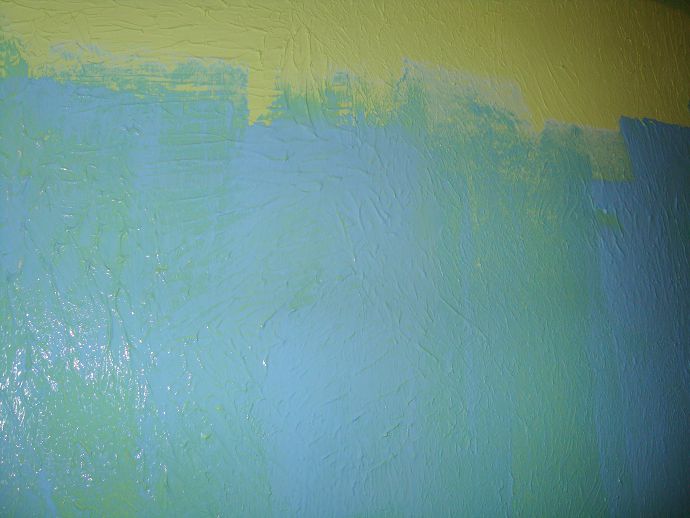
One of our readers as part of our offer sent a photo report on the application of Venetian plaster. We look and admire
In order to separate the walls of Venetian plaster, it will be necessary:
- Venetian plaster and contrasting kel. The tone of the kola can be chosen to your liking, it will only be overlooked by places and will not become the main color. In our example, this is the "green apple" color.
- Water-emulsion paint and a kel suitable for her tinting. In our example, this is a blue concentrate, when adding which we got the desired blue tint.
- Acrylic varnish for final wall covering, it will help to give shine, make walls resistant to pollution. In addition, this coverage will be easy for you to wash and clean.
- Putty and primer to prepare walls under the stucco.
- Auxiliary tools - spatulas, special structural roller, grid for grouting, etc.

First stage - Preparation of walls. They are putty in advance to a smooth state, then treated with primer. The plaster must be cooled to the desired color shade. When taking, consider that after drying, the surface becomes a little lighter (like many mixtures), so the tone should be created brighter. 
We are proceeding. First we take a little mixture on the edge of the spatula, trying to evenly distribute the composition along the edge of the tool.

Apply the plaster with a thin layer (approximately 3 mm) and evenly distribute over the surface. Apply from the bottom up: with this method, the plaster does not spread along the wall and does not eat on the floor.
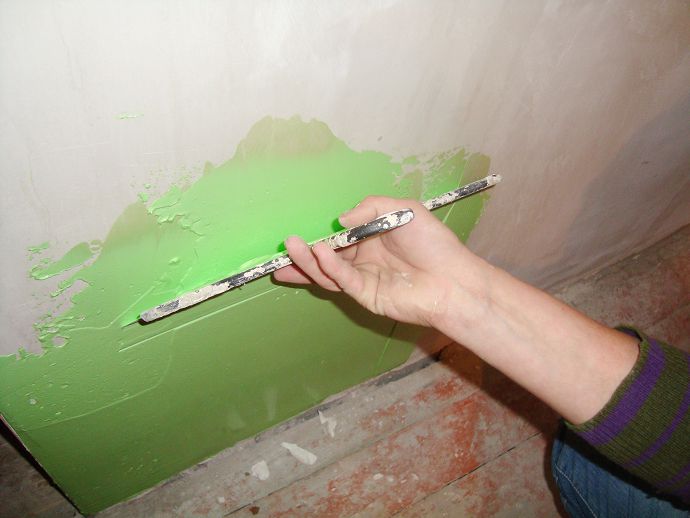
After applying onto the walls, the layer of plaster is aligned with a spatula in all directions. For one reception, it should not cover the sections of more than 1.5-2 square meters.

When applying plaster, carefully go around the sockets and switches.

After applying the Venetian to a small area (1-2 sq.m.), it is necessary, without waiting for drying, to make the coating texture, for which a special structural roller is applied. Raming the roller is needed with the same pressure so that the texture is uniform.

First, carefully treat the edge of the wall - the surface from the angle or door opening. Try to spend the roller on the wall from the bottom up only once, then the texture will be large and interesting.
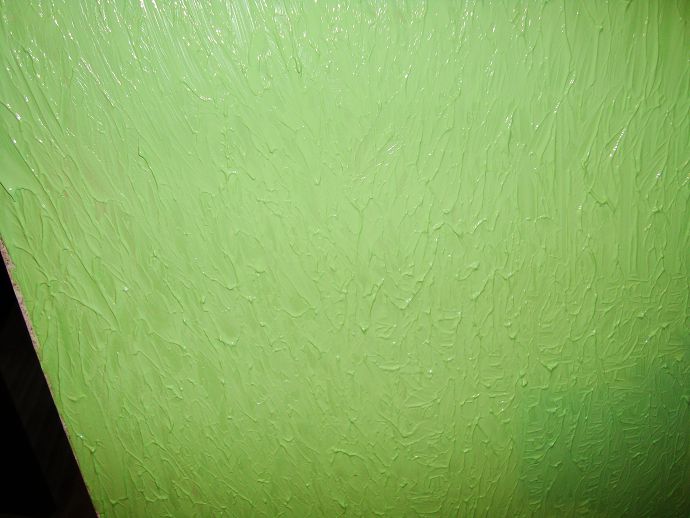
When the first part of the wall is processed, you can proceed to the next section. The peculiarity of the texture roller is that you spend them in one site, the smallest the texture fragments on the surface are obtained, so you should not cover the new section of the brass with already ready. A small gap, which sometimes forms between sectors is easy to roll with roller and turn into a homogeneous structure.


Gradually, cover the entire surface of the walls and let it dry. Duration of drying depends on temperature and humidity. In the room with medium humidity and temperature of 20 ° C, the plaster will completely dry in 15-20 hours.
The next stage is the coating of water-emulsion paint. When choosing a color for the second layer, you can stay on contrasting colors (as in this example) or pick up adjacent tones of plaster and paint. To select the color you can help the color circle: it is believed that the harmonious combinations are neighboring colors in the circle, or vice versa, opposite.
To get a blue color to white paint, you need to add a bit of a blue kaper and mix well to a homogeneous state.

With the help of a soft roller, paint all the walls with a layer of water-level paint.
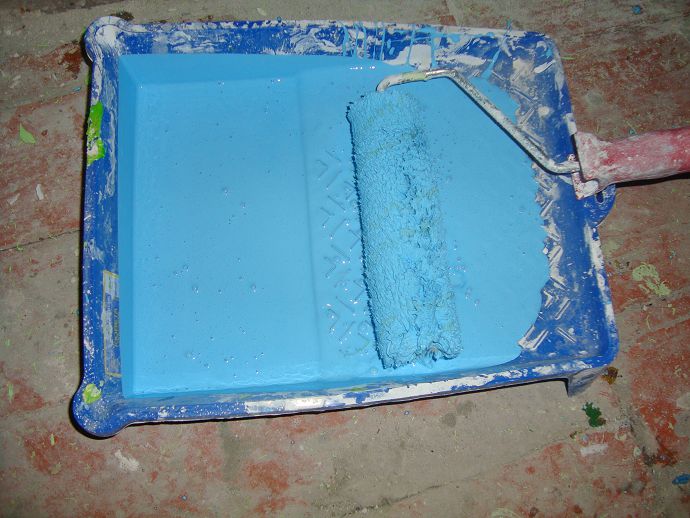
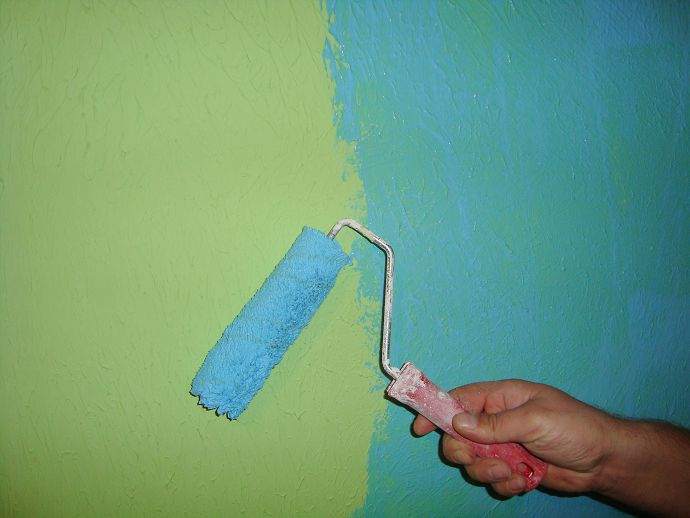
It is necessary to paint the surface of the walls into one layer, but the paint should be laid with a dense layer. To do this, abundantly wet the roller in the paint so that the coating thickness is sufficient.
The order of paint can be any, i.e. You can first paint the lower part of all the walls, and then start painting at the height.
Modern building materials help to create a variety of interiors, with the help of them it is easy to implement specifically set tasks. So, for example, to turn the usual model apartment into a luxury palace allows the application of Venetian plaster. The technology of creating the original coverage is extremely simple. You can master it if you wish it yourself. There are several ways to apply decorative coverage. It makes sense to get acquainted with each of them. Then it will be easier to choose the most suitable option and produce repair in the apartment with your own hands.
How to apply venetian plaster
Before starting to work, it is important to take into account one circumstance: different ways of applying to the walls of Venetian plaster helps to form a different decorative effect. The basis of the technology is the same stages of work, and only the finishing layer can be performed taking into account existing expectations.
What is Venetian plaster? This is a multilayer coating that helps imitate the surfaces created by different natural materials. It is possible to create a natural marble effect on the wall, the walls of the farm Mazanka, a cork tree, a complex texture volume. The color of the new coating is created using a koller. The finishing layer is often additionally processed with wax or pearl. These components help to strengthen the decorative component and make interiors exclusive.
So that the new finish served for a long time, it is important to observe all the technological stages. This will help a step-by-step instruction telling how Venetian plaster is applied.
Preparation of the surface.

In order for multi-layer coating in the future, it does not crack and do not face the walls before decorating you need to carefully prepare. The order of work is:
- First, carefully dismantle the former decoration.
- Walls are cleaned with a spatula.
- Then climbed.
- Shit.
- Processed by sandpaper.
- Ground.
Note! Wall alignment helps save on the flow rate of the finishing decorative coating.
Today, Venetian plaster is quite expensive, ignoring the need for pre-working with the surface leads to the fact that the consumption of multilayer plaster increases three times.
Cutting of Venetian plaster

Venetian plaster itself has a white color. If you need to give it a color shades, a color is applied - special coloring additives. They are simply added to the ready-made dilution solution, after which the mixture is thoroughly stated using a construction mixer. Stir the color evenly without it manually can not be possible: it will be difficult to achieve a homogeneous color mass.
Application on the walls of Venetian plaster

Any Venetian plaster helps to create or imitate the cut of natural stones or any other natural materials. Create this or that effect helps a certain technique for the execution of the finish layer.
Marble effect

The marble effect is as follows:
- With the help of a wide spatula and squeezed movements, the first layer is applied.
- Ten minutes later, a special Kelma is taken in the hands and the necessary relief is formed with it.
- Two hours after that, the second layer is applied to the wall. It is made by a wide spatula. It is laid out a multicolored composition, stirred to homogeneous mass. What colors to create a marble pattern should be used, tell video lessons published in the article. Multicolored mass is applied to the raid first layer with stretching movements. At the same time, Venetian should go to bed in different directions. Following five minutes after the end of the work, the applied plaster is aligned with cells.
- The applied layers should dry during the day, then the new coating is polished with a special grinding machine, and then polished with a stainless steel spatula. Strengthening the decorative effect helps the applying wax on the marble Venetian plaster.
See in more detail all stages of creating a marble effect helps the following video.
Effect of classical Venetian

The effect of classical venetianship is somewhat different. For its formation it will be necessary to put several layers of textured putty on the wall (from three to five). In this case, each layer has its own color or shade.
Note!Since twice repeat the selected combination of colors is not possible even by professional decorators, it is important to pre-prepare all the necessary volume of Venetian plaster, and in different tanks, we divorce different colors.
The order of work is as follows:
- The first layer is applied with arbitrary strokes with a wide spatula.
- Ten minutes later, the necessary relief is formed by Kielma.
- After two hours, convex scallops are cut by the same tool and the first layer is aligned.
- The second layer, like all subsequent, is applied by the same technology after complete drying of the first layer.
- At the very end, the surface is grouped using fur fabric. To impart brilliance, Venetian plaster is treated with wax.
Demonstration lessons of application helps to visually see how classical Venetian plaster is implemented.
The effect of cork tree

The method of creating the effect of cork tree is quite difficult. But, if desired, you can master it. If it is necessary to draw on the walls of the Venetian plaster without a master with their own hands, it is important to really evaluate howling the potential. Otherwise, any remake will be very expensive.
- The effect of creating the imitation of the cork tree begins with the selection of the desired colors. As a rule, there are several of them: brown, coffee with milk, gold, bright burgundy. The first layer is applied with a mixture of these colors (note - they do not need to be mixed for homogeneous mass).
- The first layer of Venetian plaster is applied quite thick.
- The secret to creating the effect of a cork tree is to apply the forced drying of the Venetian. Therefore, immediately after applying, we take the construction hairdryer and dry them the first thick layer of coating. The nozzle of the hair dryer at the same time is close, then removed to the distance.
- When exposed to heat, Venetian plaster cracks. It is cracks that help imitate the surface of the cork pattern.
- After the hairdryer is treated with a hairdryer, the wall surface is left for drying. Finally, Venetian plaster dries in two days.
- After the labeled time, the second layer is applied. It uses water-dispersion materials. They appear in another color (it is better to choose bronze or gold). Apply a thin layer.
The surface dries the day, then the grinding machine is processed. Only after that the finished Venetian plaster with the effect of cork tree is processed with wax (it is necessary to apply it with a soft cloth). The following videos clearly demonstrates the above description.
Texture cover

Today, Venetian plaster allows you to apply a special factory layer on the wall surface, which also looks very decorative. But it is performed somewhat differently than the technology described above.
- The walls after alignment are impregnated first with the primer of deep penetration, and then after drying it is processed by a shelter primer. Repeated surface treatment helps to increase the adhesive properties of the base. Such impregnation dries over one and a half hours, after which it is possible to start laying the solution of Venetian plaster.
- The application of the material is made not with a spatula, but roller. It allows you to form a thin layer. It dries over two hours, after which the surface is processed with a spatula. The main task is to remove the sharp protrusions of the frozen layer.
- After the first layer is driving, you can arm a celma. It is formed by a relief similar to a collection of small islands. The thickness of the second layer should not exceed one millimeter. It dries a hill surface for five hours.
- In the hands again we take the spatula and we clean the protruding details.
- Venetian plaster in which a special finishing varnish is noticed as the finishing layer.
- The final stage is the performance of iron - processing using a special celma. This operation helps to decide the metal glitter.

And this video will allow you to see how you can create a wet silk effect with the help of Venetian plaster
.
Conclusion
As you can see, Venetian plaster is quite a fatty material, the technology of application of which is easy to master on their own. Different application methods help solve different design tasks.
 Why you can not give icons
 Is it possible to give icons as a gift: Signs, the opinion of the Church
 A year ago left her husband, and now I do not know what to do