Installation of plasterboard partitions. A simple way to install a partition made of tongue-and-groove plates. Slabs or block
Tongue slabs are rectangular gypsum parallelepipeds designed for the construction of internal non-bearing partitions in rooms with varying degrees of humidity. Distinguish between hollow and full-bodied versions of their execution.
KNAUF tongue-and-groove plates
One of the most famous gypsum plaster manufacturers is the German concern KNAUF. The brand's products are available in three standard sizes: 667x500x80, 667x500x100 and 900x300x80.
Material of tongue-and-groove plates
The basis for the production of KNAUF tongue-and-groove plates is a gypsum binder of two grades: G-4 or D-5. The material does not support combustion and does not contain toxic components, which allows its use in hospitals and kindergartens. It does not conduct electric current and is resistant to sudden changes in temperature conditions. A high degree of vapor permeability is characteristic of all plaster products. The material lends itself well to mechanical processing and does not have a specific smell.
installation of partitions made of tongue-and-groove plates. Photo
Technical description of KNAUF boards
The KNAUF tongue-and-groove plate has the form of a rectangular parallelepiped, in the design of which a special high-precision tongue-and-groove connection is provided. The finished product has the following technical characteristics for all standard sizes:

Installation of partitions with KNAUF slab
Do-it-yourself partition from tongue-and-groove slabs. Video instruction
Partitions made of KNAUF tongue-and-groove plates are constructed according to the constructor's method, by precisely connecting the groove on the support side and the ridge on the butting side, with gluing the abutting surfaces. The glue mixture can be used for gluing drywall " Perlfix", Manufactured by the KNAUF concern. Installation of tongue-and-groove plates is carried out with exact observance of the rows in the vertical as well as horizontal planes.
Work on the erection of partitions should be carried out after the end of the production of the load-bearing elements of the room, but before laying the finished floors. This period coincides with indoor finishing work, mainly during the cold season. Temperature indoors should not be lower than +5 ° С. Humidity should correspond to dry or normal conditions. Before use, the stoves must be acclimatized, that is, adapted to indoor conditions. To do this, they must lie inside for at least 4 hours.
The permissible length of the partition is 6 m, and the height is 3.6 m. If it is necessary to erect a longer or higher partition, it is composed of separate fragments, each of which has a separate attachment to the supporting structures using a special frame.
Volma tongue-and-groove slabs (solid)
Volma's solid slabs are in the form of rectangular parallelepipeds with a groove-comb system, made using injection molding technology. The main purpose is the construction of internal partitions in rooms with three types of humidity according to SNiP II-3-79. The composition of moisture-resistant boards includes hydrophobic additives and special plasticizers. The moisture resistant version has a characteristic green color.
The material of the plate does not support combustion, and does not contain substances harmful to the human body. They are highly soundproof and odorless. 
installation of walls from Volma tongue-and-groove slabs. Photo
Technical characteristics of Volma slabs
The surface of the slab and the geometric precision of the structure exclude plastering work when finishing the premises. A solid slab is produced in one standard size - 667x500x80. The weight of one slab is 28 kg.
Volma tongue-and-groove slabs (hollow)
For the construction of partitions requiring a reduction in the load on the base of the floor, hollow Volma gypsum boards are provided. Their main application is the installation of indoor structures in modern panel houses. This is due to the maximum load that the floor slabs can withstand. Like their solid counterparts, slabs can be standard and moisture resistant. The standard size remains the same: 667X500X80 mm. Often, a hollow slab is used for cladding outside the room. The weight of a standard hollow slab is 20 kg, a moisture-resistant slab - 22 kg. Material properties of hollow slabs are similar to their solid counterpart. 
Installation of partitions from Volma slabs
Installation of a partition made of Volm tongue-and-groove plates is carried out by precise alignment of grooves and ridges on parallelepipeds, followed by gluing them. As an adhesive mixture for Volma tongue-and-groove plates, any glue for gluing drywall is used, including the one recommended by the manufacturer " Volma-montage". Installation of the partition structure is carried out in the following order:
The partition is made of Volm tongue-and-groove slabs. Video instruction


Electrical installation in tongue-and-groove plates
The wiring in the tongue-and-groove plates is carried out by laying wires in pre-made strobes. The depth of laying the strobe has a limitation: it should not exceed 40 mm with a slab thickness of 80 mm, and 50 mm with a slab width of 100 mm. The wires are fixed with alabaster or drywall glue. Also, the mounting slots for the undercutters must not exceed the depth indicated. Their arrangement is possible in a mirror image on both sides of the partition into a through hole. But in this way the sound-absorbing properties of the structure are lost. For additional insulation of electrical wiring in tongue-and-groove plates, corrugated tubes are used.

installation technology of tongue-and-groove plates. Photo
Wall decoration from tongue-and-groove slabs
Like any other construction surface, partitions made of tongue-and-groove plates provide for all types of construction and finishing works. The advantage of such a partition is the absence of additional filler manipulations prior to decorating. The finishing of the tongue-and-groove partition includes: surface painting, laying of ceramic tiles and natural stone and wallpapering.
Laying ceramic tiles on tongue-and-groove walls
The process of laying ceramic tiles on gypsum board is similar to gluing tiles on drywall:

Due to the moisture-absorbing properties of gypsum, the finished surface should not be disturbed for three days.
Gluing wallpaper on walls made of tongue-and-groove plates
Before gluing the wallpaper to the tongue-and-groove partition, you should carry out small finishing Painting works... This can be the application of a thin layer of finished plaster, for example, “ Rotband". Or covering the surface with a layer of fine-grained finishing putty. Before applying the putty, the surface is treated with a deep penetration primer. After the putty has dried, the surface is ready for wallpapering. It is not necessary to treat the base with soil. Wallpaper gluing on partitions made of tongue-and-groove plates is carried out according to the standard procedure, with the application of glue both to the wallpaper and to the base of the surface to be glued.

Wall painting of tongue-and-groove slabs
The tongue-and-groove plate is also painted after finishing the surface. fine-grained putty... After the finishing layer has dried, it is carefully rubbed with a fine sanding mesh under the light of a building lamp. This is necessary to avoid irregularities and roughness invisible to the eye. The surface to be painted should be primed and allowed to dry. Thereafter, one or more coats of paint can be applied as needed.
Before any kind of finishing of the tongue-and-groove partition, it must be thoroughly cleaned and treated with a primer.
tongue-and-groove plates do-it-yourself installation. Video
Gypsum tongue-and-groove plate (GWP) is a building material specially designed for interior partitions of an apartment and a house. It is hard to imagine that all interior partitions in the apartment will be without doors. In this article, we will see how to correctly make a doorway in the PGP partition.
Hello! In the last article, I talked about how partitions are mounted from GWP tongue-and-groove plates. In this article, we will see how to correctly make a doorway in the PGP partition.
Partition GWP
- Let me remind you that gypsum tongue-and-groove slabs are produced by Knauf and Volma. These are the most popular manufacturers of such plates.
- Plates PGP are distinguished by ease of installation, ease of cutting and standardization of sizes.
- Slabs are available in two sizes (length (L) × width (B)): 667 × 500 mm, 80 or 100 mm thick and 900 × 300 mm, 80 mm thick.
- Let me also remind you that GWP slabs are laid with a groove up or down, with elastic or rigid abutments and with offset rows. Gypsum glue is used for the installation of the GWP; fastening brackets are used to strengthen the structures.
Read the articles about all this:
In addition to the memories, such a scheme for installing a partition made of gypsum boards PGP. You can download the instructions at the link at the end of the article..
Installation diagram of the PGP partition
Doorway in the PGP partition - general rules
Technologically, there are two options for the device of the doorway in the interior partition of the PGP:
1. Option 1. You know the design location of the door and assemble the GWP partition, taking into account this location of the door; 1. Option 2. If the doorway has a height of a quarter of the height of the partition (or less), and the area of the door is not more than 10% of the area of the partition, then the doorway under the door can be cut into the finished solid partition.
Since Option No. 2 is practically impossible in an apartment, then further we will consider only Option No. 1: the device of a doorway during the installation of a partition from GWP plates.
The principle of installation of plates in the opening
First, let's pay attention to the installation of the upper plates above the doorway. They are installed as follows.
1. If the width of the door is not more than 900 mm, when the upper level of the opening is reached, a supporting structure made of boards is installed. Planks 1 support plank 2. It is important that after the installation is completed and the glue has dried, all supporting docks are removed.
Temporary supporting structure of the PGP partition opening
1. If the width of the door or just the doorway is more than 900 mm, usually 1300-1500 m, a permanent supporting element is installed at the upper level of the opening. The element rests on the baffle and will constantly support the top plates of the baffle. A supporting element is made of a channel (40 × 95 × 40 × 2.0), angles, less often reinforcement. This support element is not removed after the partition has been installed.Three options for the device of a doorway in a plasterboard partition
The three considered options for the device of the doorway are approximately the same and differ only in the location of the opening relative to the enclosing structures.
Scheme 1. The opening is located close to the edge of the partition.


Scheme 2. The opening was hit so that the part of the slabs in contact with the door turns out to be narrow (C 2).


Scheme 3. Wide doorway. In a wide PGP doorway, the top of the opening is reinforced with a channel or corners.


Fastening the door frame to the PGP partition
The door frame is fastened to the finished partition using self-drilling screws SDT 5–5.5 × 137. A layer of sound-insulating material is installed between the box and the end of the partition (required).

The tongue-and-groove partitions provide a stable, even surface. They are a good alternative to plasterboard walls, are easy to install and low cost. Thanks to the tongue-and-groove connection system, the joints between the elements become invisible. Due to this, you can omit the stage of putty, immediately prime and proceed with the finishing.
Types of partitions
Partitions made of tongue-and-groove plates, depending on the material of manufacture, are divided into:
- Silicate ones are made on the basis of quicklime and water with the addition of quartz sand. The mixture is pressed and kept in an autoclave. They do not burn and have high sound insulation performance. In comparison with gypsum types, such structures are more durable and resistant to moisture.
- GWP partitions are made on the basis of gypsum with the addition of plasticizers. They are divided into moisture resistant (green) and moisture resistant. The device of such partitions can be performed in any room, including children's rooms. Gypsum is environmentally friendly, non-flammable, and has good sound insulation.

They are made hollow and monolithic. Hollow material is lightweight, but it will not be possible to hang massive shelves, lamps, etc. on it. Solid ones are capable of withstanding heavy loads.
Installation of plates for partitions is carried out after the construction of all load-bearing structures, but before laying the sub-floor and before the start of finishing work.
DIY installation
Installation of partitions from tongue-and-groove slabs is performed by hand or with the assistance of professional builders. The material has high thermal insulation, so it can be installed not only inside the room, but also right next to cold walls in contact with the street.
The technology for installing tongue-and-groove partitions is quite simple. The main thing is to set the structure on a level and tightly fix the elements to each other.
If it is necessary to hide communications without a groove device, use the technology of double partitions. The downside is that they take up 2x the space.
At subzero temperatures, installation is performed using frost-resistant adhesives.
Tools
All the necessary tools and materials must be prepared in advance so as not to be distracted by the trip to the store for missing copies in the process of performing the work.
It is necessary to assemble such devices for the installation of interior partitions from tongue-and-groove plates:
- felt seal;
- tongue-and-groove plates;
- damper tape, twine;
- cement, sand, gypsum for solution preparation;
- special glue for tongue-and-groove plates or tile glue;
- primer;
- building level, tape measure;
- pencil, ruler;
- fasteners: self-tapping screws, anchors, staples;
- rubber mallet, spatula, hacksaw;
- drill, screwdriver, construction mixer.
Consumables should be selected in accordance with the recommendations of the tongue-and-groove manufacturer.
Preparatory work
When the installation of tongue-and-groove partitions is carried out in a new house, you need to check the location of the floor and ceiling according to the horizontal level. The protruding parts of the surface are cleaned by grinding. Cracks and depressions are filled with cement-sand mortar.
The floor and ceiling must be prepared so that the tongue-and-groove plates fit snugly against them. Before the device of partitions, all surfaces that will come into contact with them are treated with a primer.
When installing partitions during ongoing repairs, markings are made on the floor, ceiling, walls. Mark with a line the location of the partition. All finishing materials are removed from the surfaces a few millimeters wider than the markings show. The sturdy ceramic tiles do not need to be dismantled.
A string is pulled at a height of 30 cm from the floor, which will indicate the level of the partition. Along the line of contact of the partition with the surfaces, a damper seal is glued: a felt impregnated with bitumen or a cork substrate. The width should correspond to the thickness of the board.
Erection of the first row
The location of the entire structure will depend on the correct installation of the first row. Here is information on how to make a partition from tongue-and-groove blocks.
Step-by-step installation instructions:
- For tongue-and-groove plates, which will be located in the first row, the lower ridges are cut off with a hacksaw.
- Glue is applied to the vertical and horizontal parts of the sealing material.
- A perforated bracket is brought to that part of the groove of the plate, which will adjoin the wall, so that the fasteners protrude a few centimeters.
- Fix the bracket to the wall using dowels or self-tapping screws.
- Install the slab upside down, press it tightly against the wall and floor, check that it is level, tap it with a rubber mallet.
- From the side of the installation of the next plate, a bracket is inserted into the groove, attached with dowels to the floor.
- After the adhesive has set, the next plate is installed, and it is fixed with a bracket to the floor.
- Each subsequent block is mounted after the glue has set on the previous one.

On the side joints, the adhesive is applied so that the distance between the plates does not exceed 2 mm. The protruding excess glue is immediately wiped off; after hardening, it will be problematic to remove the drips.
When erecting walls from GWP, maximum attention is paid to the installation of the first row. The reliability and appearance of the entire structure will depend on the quality of its installation.
Erection of the remaining rows
The second and subsequent rows are mounted with an offset of the seams. The first slab of the second row is sawn in half. The row starts with half a block. On the cuts of the tongue-and-groove blocks adjacent to the wall, brackets are fixed.
The adhesive composition is diluted so that it turns out to be more liquid than that used for the first row. The adhesive is applied to the bottom and side joints of each board. Using this technology, the entire wall is assembled.
Be sure to check the horizontal and vertical levels after installing each block.
Installing the last row
According to the technology, an expansion gap of 2 mm should remain between the ceiling and the blocks of the upper row.
In the upper grooves of the last row, staples are fixed to the glue. Install the block and screw the bracket to the ceiling using dowels. If the slab is larger than the remaining distance, it is cut to size.
After the glue has hardened, the seam between the ceiling and the wall is blown out with polyurethane foam. When it hardens, the excess is cut off with a knife.
Installation technology of partitions with a doorway
When a doorway is provided in the design of the partition, you need to think about how to strengthen the rows that will be located above the opening.
If only one row of slabs will be located above the opening with a width of up to 800 mm, then it is permissible to mount them on top of the door frame or temporary support.
In the case when the opening is wider than 800 mm or several rows will be laid above it, you will need a reliable jumper made of a thick wooden beam with a section of 50 x 50 mm or a metal channel 35.
Partitions made of PPG with the arrangement of the doorway are mounted using a technology similar to the construction of a solid wall. The difference is that when the markings are made, the location of the opening is noted, the wall is divided.
Lintels above the doorway:
- When the row reaches the upper level of the opening, cutouts about 50 mm deep are made in the blocks on both sides. The width of the cut is equal to the thickness of the bar or channel.
- Lubricate the blocks with glue and insert a jumper.
- After the adhesive has hardened, the upper rows of blocks are mounted.

If an interior door is planned to be installed in the partition, the box under it can be mounted both at the stage of wall construction and subsequently.
Strengthening the corners
So that the outer corners are at 90 degrees and do not collapse under mechanical stress, they are strengthened with a 3 x 3 cm perforated corner.
Corner fixing instructions:
- With the help of a spatula, putty is applied to the surface of the corner, the steel corner is pressed against it. Press it along the entire length.
- If the length is not enough, take another bar and overlap by 3 cm.
- Apply a layer of putty on top with an angled spatula.
Serpyanka tape is laid in the inner corners. If it is without a self-adhesive base, it is fixed using the same technology as the perforated corner.
Remove the protective layer from the self-adhesive serpyanka and stick it along the entire length of the corner.
Electrical wiring in partitions
After the baffle has been installed, it may be necessary to install an outlet or switches. For the device of hidden wiring, the location of the elements of the electrical system is noted, a strobe is made for wires and holes for boxes.
Technological cavities inside hollow partitions made of gypsum tongue-and-groove plates can be used for laying electrical wiring. To make it more convenient to lay wires in horizontal channels, blind holes are made on the side.
Stretching wires, connecting sockets, switches. Close up the holes with putty.
The distance between the strobes should not be less than 10 cm.
Wall decoration from tongue-and-groove slabs
Like any material, tongue-and-groove walls need finishing. Materials for its construction are chosen depending on the functional purpose of the premises.
It is appropriate to lay ceramic tiles in the kitchen and bathroom. For the living room and bedroom, finishing with decorative plaster, wallpaper, painting with water-based paints is suitable.
Painting
Before painting, the surface is putty with fine-grained compounds, which make it possible to obtain a perfectly smooth surface. After drying, rub the surface with a fine sanding mesh. Apply a primer in two layers.
Prepare the paint, the desired shade is obtained by adding colors.
Start staining. The paint is applied with a roller, making sure that the layer is uniform. It may be necessary to apply several coats of paint.
Wallpapering
Cover the surface with a primer, apply a thin layer of plaster or putty.
Wallpaper decoration is carried out according to the usual scheme. Dilute the glue, cut off a strip of wallpaper of the required length. Apply glue to the wallpaper and wall. Apply a strip, smooth with a rubber roller, expelling air bubbles.
When decorating with wallpaper, there should be no drafts in the room.
Laying tiles
Finishing with ceramic tiles does not require preliminary surface preparation.
Tile laying instructions:
- the surface of the partition is cleaned of construction debris;
- the protrusions are cleaned with sandpaper;
- depressions, cracks are filled with cement mortar;
- for better adhesion of materials, the wall is covered with two layers of primer;
- perform the laying of tiles.
Since the gypsum surface absorbs water, the surface after the installation of the tiles is not touched for 3-5 days.
How to mount grooved blocks, you can watch the video:
The partition of tongue-and-groove plates is assembled very easily and is a reliable structure. The finishing of such a surface can be done with any materials you like.
The tongue-and-groove plate is a gypsum rectangle with grooves and ridges along the perimeter. The advantages of a GWP partition in comparison with a brick partition is the speed of installation, which does not require the skill of a bricklayer. The vertical surface of the wall, thanks to the grooves / ridges, will be almost perfect, excluding subsequent plastering. There is also no need to mix a large volume of masonry mortar. One bag of Knauf plaster mix is enough for an average partition of 20 squares. So let's get started.
Layout of the first row of an interior partition made of PGP
The most time consuming is a breakdown of the dimensions of the future partition, marking of openings and scrupulous alignment of the first row, taking into account the horizontal and vertical.
First, we prepare all the plates for the first row. We lay out the blocks on a dry one along the entire length of the wall, check the dimensions, draw a single common line at the base of the slabs along the length with a marker, use a laser level.
The slab is placed with the ridge up, respectively, the groove in the lower part of the slab is cut with a pickaxe to the base, then it is sanded with a plane for stability.

The part of the slabs marked with a dotted line is removed.
Partition masonry
If the floor surface is not even or there is no floor screed at all, it is more expedient to level the first row by placing the blocks on a cement-sand mortar, since the gypsum mixture quickly sets. It is better to mix the gypsum mixture (glue) in small quantities for a maximum of 5-10 slabs.
The consistency of the glue, like thick sour cream, is applied with a spatula in a thin layer (no more than 5 mm) along the vertical and horizontal edges of the slab with a quick movement, wiping the glue towards you with the plane of the spatula. Seal the seams by gently tapping the plate with a rubber mallet. With squeezed glue, we seal the seams and cover up minor chips and cracks.
If we start laying the partition with a whole slab, then half will go the next row for dressing the seams.
Be sure to fasten through the row with self-tapping screws to the outer wall and connect the partition of tongue-and-groove plates with galvanized fastening corners.

The corner is placed for rigidity along the edge of the slab, sinking into the groove using a chisel or a hacksaw. We fix the corner with the next row.
Do not forget to control the verticality and horizon of each slab with a level, if necessary, adjust the slab or upset, using a bar and a rubber mallet.

Gypsum boards are malleable and sawed with an ordinary hacksaw when you need halves, quarters, pieces for doorways, corners or beacons.

Working with a hacksaw will be enough, therefore, so as not to bother yourself with endless sawing, I advise you to make a 1.5-2 cm cut on both sides. Put the slab with a cut on the edge of a stack of slabs or a goat, and lifting it up, holding it, release it without effort. If necessary, the fracture is sanded with a plane.
As the partition is being erected, we block the doorway instead of a lintel with a bar with a thickness close to the width of the slab. We attach the block to the PGP obliquely with self-tapping screws.
Doorway device
Depending on the size of the door and the unfolding of the corners, it is not always possible to make an opening from GWP. Sometimes it is necessary to use other materials to adjust the size of the doorway without compromising the area of the room.

In this case, a brick was used, installed "on the priest" on a cement mortar. The ends of each brick are connected by a large nail driven into the slab and fixed with the next brick. Additional rigidity of the structure will be given by the subsequent puttying of the partition with a fiberglass mesh.
Above the lintel, to facilitate the construction, drywall finishing will go.
To facilitate the process of arranging the opening and if the door can be positioned arbitrarily, then we build a solid wall, and then, after a day or two, we cut the opening with a saber jigsaw, focusing on the dressing seams.
We are completing the construction of a partition of tongue-and-groove slabs with the last row under the ceiling. We saw the blocks of the last row lengthwise by 1-1.5 cm less than the required height for foaming with polyurethane foam.
Conclusion
On the Internet, opinions are divided on the GWP partitions. In my opinion, the benefits for the customer are obvious. Subject to the accuracy of the breakdown of the first row, the presence of your own desire, patience and a partner, the partition of tongue-and-groove plates can be erected quickly without much effort with your own hands.
Partitions from GWP are used for redevelopment of premises or delineation of apartments in new buildings. They are distinguished by a flat surface, ease of installation and budget cost. The blocks are connected using a tongue-and-groove system, the seams on the finished structure are minimal. This makes it possible not to putty, but to immediately cover the wall with a primer and decorate it.
Tongue slabs for partitions are rectangular elements with longitudinal grooves and projections (ridges) at the joints necessary for a strong and seamless bond. Their standard dimensions are 667x500x80 mm, the thickness can be 100 mm.
There are tongue-and-groove slabs for large partitions, from floor to ceiling.
Their installation takes place very quickly, but you cannot cope with it on your own - due to the large weight of the building elements, a whole team is engaged in the installation.

Types of tongue-and-groove blocks for interior partitions, depending on the material of manufacture:
| View | Preparation method | Positive traits |
| Gypsum boards | Made of gypsum with plasticizing additives. Gypsum blocks for partitions are divided into moisture resistant (green) and those whose moisture permeability is high. | Approved for installation in children's rooms. Another plus of gypsum blocks is ease of processing. Gypsum blocks are sawn at any angle - you can create structures of various shapes and configurations from gypsum elements. |
| Silicate blocks | From quicklime and water with the addition of quartz sand using an autoclave. | They have significant soundproofing qualities. They are resistant, in comparison with gypsum, to the action of moisture, have greater strength and durability. |
GWP partitions can be solid and hollow. The latter weigh less (22 kg compared to 28 for monolithic ones), but do not withstand hanging massive household items.
Advantages of PGP partitions
The general advantages of a partition made of gypsum or silicone tongue-and-groove plates are:

The use of hollow core slabs reduces the load on the substructure.

The main plus of such building elements: installation of tongue-and-groove partitions is not difficult. The finished structure does not require any special finishing work. It is not necessary to plaster the wall, it is enough to cover with a primer and decorate.

Installation of partitions from PGP
The device of partition elements made of gypsum or silicate in an apartment begins after the construction of the supporting parts, but before laying the sub-floor and starting painting and plastering works.
Installation of a partition made of standard-sized tongue-and-groove plates takes only two to three days. This is due to the convenient tongue-and-groove system and the absence of the need for additional reinforcement.
When joining, any deviations along the planes are excluded, which allows you to assemble a flat wall in a short time without even a millimeter error.
If you need to hide communications, special grooves are made in full-bodied blocks. The hollow wires and pipes can be laid in the inner cavity. If the construction of partitions from GWP does not imply slitting, the double wall method is used. But they "eat up" twice as much space.

Materials and tools
To build a partition from tongue-and-groove plates, you will need the following set of tools:
- roulette;
- electric drill;
- mallet;
- construction level;
- putty knife;
- hand saw;
- ruler, pencil;
- screwdriver;
- mixer for mixing glue.

Of the materials, you will need the blocks themselves, a cork or felt sealant, an edge tape, rope, glue, and a primer. We also need fasteners: screws, dowel-nails, fixing brackets - straight suspensions or corners.

Preparatory work
The erection of a partition created from tongue-and-groove blocks requires some preparation. First of all, you need to check the compliance of the floor and ceiling horizontal levels, and make sure that the tongue-and-groove slabs adjoin them closely: grind outstanding irregularities, fill cracked areas and grooves with a solution of cement and sand.

The blocks are brought into the room no later than 24 hours before installation, so that the material “adapts”, that is, has the required humidity and temperature.
For the construction of the wall, gypsum-based acrylic glue is used.
But it is very expensive, so many replace it with ordinary tile glue or a mortar of cement and sand in a 1: 3 ratio with the addition of polyvinyl acetate glue. If everything is mixed thoroughly, a rather plastic and finely dispersed mixture comes out, easily applied with a spatula. It is easier to lay masonry with mortar, since its setting time is longer than that of gypsum glue.

Before the construction of interior partitions, all areas of surfaces in contact with them are primed and marked according to a previously created drawing.

Laying tongue-and-groove blocks
It is not difficult to assemble a partition of tongue-and-groove plates with your own hands. The main thing is not to violate the technology during the construction of a bulkhead from GWP.

Installation instructions for tongue-and-groove partitions - step-by-step instructions:

If the structure of the false wall requires an opening for the door, it is necessary to fix the blocks located on top. When installing one row of blocks above an opening up to 0.8 m wide, they can be mounted on a door frame or a non-permanent wooden lintel.
If the width is more than 0.8 m or it is necessary to lay several rows, it will be necessary to install a lintel for tongue-and-groove plates made of wooden blocks or a metal channel.
It is mounted on glue in specially made cuts with a depth of about 5 cm in corner blocks. After the solution has dried, the upper rows of plates are installed.

After the completion of the work, the tongue-and-groove partitions must be primed. Especially if tongue-and-groove gypsum boards were used. The primer ensures adhesion of the decorative layer and avoids the appearance of surface defects.

Any type of wallpaper and painting is suitable for decoration. It is better to finish the kitchen and bathroom with tiles or plastic panels. For the living room, nursery, bedroom, wallpaper or decorative plaster is often chosen.

 How to make a boiler with your own hands from improvised means?
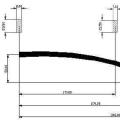 How to make a crossbow: throwing an office battle!
 What to do if neighbors steal electricity What to do if electricity is stolen from a house