Scheme masonry oven is simple. How to fold the oven with your own hands - it is not so difficult, as it seems. Which solution to use for masonry
Cookies include kitchen stoves of various designs. They are different sizes and serve only for cooking. Connect kitchen furnaces to indigenous or nasadny tubes.
Brick kitchen stoves
Kitchen plates in their design can be divided into ordinary, medium difficulty and complex.
A simple kitchen cooker has a fiber and configuration door, a grate grid and a smoke valve. It is the simplest of all household stoves.
Kitchen plates of medium difficulty have an oven, and a compound and a hot water box. The ovens are made of black steel with a thickness of at least 1 mm, and the water-heating boxes are from galvanized steel. The housing of the hotlery box is made of black steel with a thickness of at least 1 mm. The thicker steel, the more durable the devices.
Furnace with two-nodescoat and oven
In a simple kitchen cooker, hot flue gases from the fuel can be sent under the cast-iron plate, and then through the hole under the pipe is discharged into the smoke pipe.
In the rest of the kitchen stoves, hot flue gases are sent under the cast-iron slab and further, dropping, warm the walls of the oven or one wall of the hot water box, and then discharge into the pipe, while warming up the bottom wall of the oven, the bottom and other wall of the hot water box.
The above-mentioned kitchen stoves do not have a cooking chamber, so pairs and smell are highlighted during cooking in the room, which adversely affects the room microclimate. This article provides drawings of cuts and co-plate coils of an improved design, in which the cooking chamber is provided connected to the pipe with a ventilation channel overlapped by ventilation valve.
Simple kitchen stove
A simple kitchen stove has dimensions, mm: 1160x510x630 (without foundation, i.e. without two rows of brickwork on the floor).
The following materials are needed to masonry the kitchen stove:
- brick red - 120 pcs.;
- red clay - 50 kg;
- sand - 40 kg;
- grate grille - 28 × 25 cm;
- fake-up door - 25 × 21 cm;
- door confused - 25 × 14 cm;
- cast iron plate for two burners - 70 × 40 cm;
- stovetage (corner 30x30x4 mm) -3.5 m;
- sheet of roofing steel under the stove - 1160 × 510 mm;
- felt construction - 1 kg;
One live shop can fold a simple kitchen plate for 3 hours (not counting the masonry of the chimney), additionally, 1.5 hours are required for the material and the preparation of the grinding solution. For the construction of the chimney, additional time is necessary: \u200b\u200bdepending on its height, it is necessary to calculate the time from Half an hour calculation on 1 m pipe masonry (when laying pipes in a quarter of bricks).
The heat transfer of a simple kitchen plate with a biennial cooking is about 0.7-0.8 kW (660-700 kcal / h).
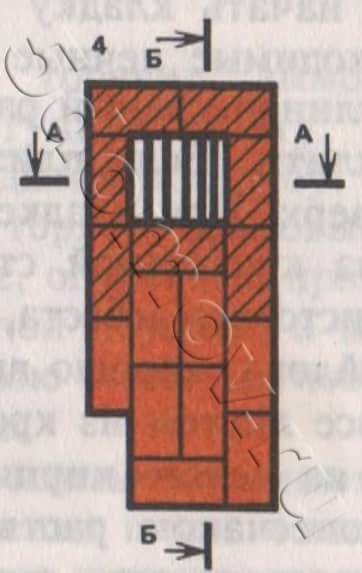
Figure below shows the vertical and horizontal cuts of a simple kitchen plate. Next will be given the drawings of the masonry in the ranks (spokes). From the cuts and drawings of masonry in the ranks it is clear that the laying of a simple kitchen plate does not represent difficulties.

Sections of a simple kitchen furnace: A - facade; b - cut A-A (longitudinal vertical cut of the furnace); B - section B-B (transverse vertical section). Designations: 1-fuel; 2 - ashnon chamber; 3 - grate and grate; 4 - smoke valve; 5 - cast iron stove (flooring).
Before starting the masonry of a simple kitchen oven, you should purchase the necessary furnaces.
Preparing the grinding solution, proceed to the laying of a simple kitchen plate. If the plate is put on the foundation, then align it up. When laying the plates on the wooden floor it is necessary to cut a sheet of roofing steel in the size of the plate. On the floor, put a layer of sheet asbestos, and in its absence - two layers of building felt, well-membered in the grinding solution, cover everything with a sheet of roofing steel and nail to the floor. Then, from a whole brick, make a platform into two rows of masonry on the grinding solution. After that, it is embarked on the laying of the plate from the first row strictly in the orders.
First row Putting, following the rules of dressing of seams from selected whole bricks, as indicated in the figure below. Completed masonry is checked for rectangles.

The first row of a simple kitchen oven
During masonry second row it is satisfied attended, install a pensive door, which is fixed to the masonry with the help of a furnace wire. The temporarily configuration door in front can be maintained by bricks, which are stacked with a stack on the floor in front of the subepent door. The bottom of the coil chamber is 380 × 250 mm.

Second row of the kitchen oven
Third row It looks like the previous one, however, you should teach the seams well.

Third row
Fourth row It covers the subdivine door, while only the hole of the ashtop chamber is 250 × 250 mm in size, which is placed in a grate grid. If possible, masonry from the fourth row is desirable to carry out from refractory brick, as shown in the figure below.
Masonry fourth row. Shaded bricks are refractory. The arrows indicate the directions of movement of hot flue gases in the heating furnace.
Fifth row Forms 510 × 250 mm under the fifthlist. The brick adjacent to the grate to the grate grid is shy, to form an inclined plane, along which the fuel will roll onto the grate of the grid (see the section B-B C O A-A). When laying this row, you need to install a flue door, after attaching the paws from roofing with rivets.

Fifth stove masonry
Sixth row locked the same as the previous one, but should be tied up with seams.

Masonry of the sixth row of oven
Seventh row Put according to the figure below. This is close to the chimney under the stove, which connects the fuel pipe with the chimney.

Seventh row of the furnace
Eighth row Perform strictly horizontally, this next to overlap the flue door. On the eighth row laid out with a thin layer of the grinding solution, they laid a cast-iron slab. Cast iron factory manufacturing plates from the bottom side have protrusions, or rigidity ribs that retreat 15 mm from the edges of the plates.

The eighth row of the furnace
The internal dimensions of the masonry of the eighth row should be such that the stove with their fins freely enters and had a gap on all directions of at least 5 mm, designed to expand the metal when heated it. If you do not observe this, then the cast-iron stove, expanding, destroy the oven layer. So that the masonry was durable, on the eighth row, lay the strapping from angular steel. The frame is desirable to cover with refractory varnish, which protects steel from rust.
After masonry ninth row With the help of a thin layer of the grinding solution, the smoke valve is installed. This row is the final, then the smoke pipe is underway.
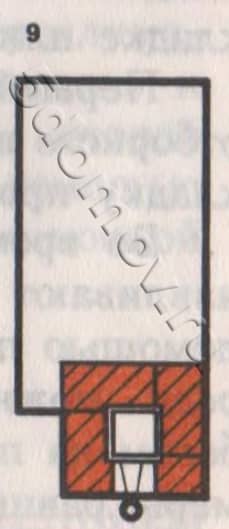
Completing a row of a simple kitchen oven
The kitchen stove works as follows. The flue gases from the pop-up fall under the cast-iron slab, then through the hole under the pipe through the smoke valve is discharged into the smoke tube.
In the kitchen cooker, the clean hole is not provided, since it is possible to clean the chimney through the hole under the pipe where it is easy to shove the hand through the cast iron plate.

Example of masonry of the hob
First, in the kitchen cooker, the cooker is installed on the same level with a grasp grille. In the slab, flue gases are constantly maintained in the chimney high temperature, as a result of which it is not necessary to put the large thickness fuel on the grate grille. Secondly, with such an installation of the furnace door, the distance from the grate grid to the cast iron plate will be equal only 280 mm, which makes it possible even with a small fuel consumption quickly cook food.
After the end of the masonry of the furnace, it is necessary to dry it, opening the flue and configuration doors and the valve in the pipe.
The longer the oven is dried, the stronger the masonry. Kitchen stove can be dried with small trials, but after testing floors, the valve in the pipe and the confusion door must be left open.
After complete drying, the kitchen stove is plastered with a mulling solution with a subsequent whitewash.
Outdoor finish, it is better to produce as follows: After the masonry of the eighth row and the installation of the cast-iron stove, as well as before installing the strapping from the corner steel, the kitchen plate is littered from all sides into the case of roofing (can be used galvanized steel). Pre-cut the corresponding holes in the sizes of the furnace and subdivine doors. Floor case is fixed with a plinth that is naked around the plate. The outer surface of the case is purified and covered with a chicken varnish that is well withstanding high temperature.
Before the furnace door, the surface sheet is nails with nails after 50 mm from each other. If the plinth was nailed earlier, then the prestituct sheet should be beatened to the plinth.
Kitchen stove with oven
The kitchen stove with oven has dimensions, mm: 1290x640x560 (without foundation, i.e. without two rows of brickwork on the floor).
For masonry of the kitchen plate with oven, the following materials are needed:
- red brick - 140 pcs.;
- red clay - 60 kg;
- sand - 50 kg;
- grate grille - 26 × 25 cm;
- fake-up door - 25 × 21 cm;
- door confused - 14 × 25 cm;
- clear doors 130 × 140 mm - 2 pcs.;
- pig-iron plate of five composite plates with a size of 53 × 18 cm with two burners;
- smoking catch - 130 × 130 mm;
- oven - 45x31x28 cm;
- slab strapping (30x30x4 mm corner) - 4 m;
- the prestituct sheet of roofing steel - 500 × 700 mm;
- sheet of roofing steel under the stove - 1290 × 640 mm;
- felt construction - 1.2 kg;
- metal camp for collecting ash in the Kolnikova chamber - 350x230x100 mm.
One live shop can fold this furnace for 3-4 hours, in addition to the belief of the material and the preparation of the grinding solution, about 2 hours are required. The heat transfer of the plate with two-time cooking is about 0.8 kW (770 kcal / h). Figure below shows a general view, longitudinal and transverse cuts of the kitchen plate with an oven. Next will be given pictures-co-orders of each row. The masonry of the kitchen plate with oven also does not represent difficulties and looks like a laying of a simple kitchen plate, but here you have to install the oven and the clean doors.

Kitchen stove with oven: a - general view; b - cuts of aa, b-b (vertical cuts), B-B, Mr. (horizontal cuts). Designations: 1 - Solnic chamber; 2 - grate grille; 3 - fuel; 4 - cast iron stove; 5 - oven; 6 - smoke valve; 7 - cooker; 8 - a confusion door; 9 - Clean holes.
When laying the plate on an independent foundation before starting work, it is equalized to the top of the layer of the grinding solution.
When installing the slab on the floor before the start of the first row masonry, it is necessary to carry out the same works as when laying a simple kitchen plate.
Masonch first row made from selected whole brick, strictly adhering to the rules of dressing of seams. The length of the kitchen plate should correspond to the length of five bricks, the width is 2.5 bricks. With the help of the cord check the equality of diagonals.

Masonry of the first row of the kitchen stove with oven
Second row lay out, strictly following the order. Here we leave the coil chamber with a size of 380 × 250 mm, installed and fasten the subepent door, the clean holes are left on the rear wall (the width of the holes should be equal to the width of the brick, i.e. 12 cm). With the ability to establish the cleft doors with a size of 130 × 140 mm. At the extreme from the ashpan chamber of the clean hole laid a brick on the edge, as shown on the laying coach. For better attachment of the oven in the middle of its place, it is placed on the side of the brick on the edge.

Masonry of the second row of plates
Third row It looks like the previous one, only the seam dressing rule should be observed.

Masonry of the third row of plates
Fourth row Overlapping configuration and cleaner doors. After the end of the fourth-row masonry on the fine layer of the grinding solution on a pre-marked place is installed an oven. After that, the grille is installed. By the same next to the edge brick, the chimney into the smoke tube is overlapped.

Masonry fourth row stove with oven
During masonry fifth row Install and fasten the flue door, the brick before installing the grille is shred in order for the fuel in the combustion process gradually rolled into a grate grid.

Stove fifth masonry
Sixth row Looks like the fifth.

Masonry of the sixth row of plates
Seventh row lay out in order. The resulting channel of the chimney from the front side is laid by three bricks, as a result of which the inner size of the channel formed under the flue pipe will be 130 × 130 mm. In the image of this row, the oven shows a steam pipe with a diameter of 10 mm and a length of 160 mm, which connects the oven with the rising channel. This pipe is designed to remove steam and smell.

Laying seventh row of plates with oven. The arrows indicate the directions of movement of hot flue gases in the heating furnace.
Eighth row
Perform strictly horizontally by level. This is nearby overlapping the oven and flue door. The upper wall of the oven is deprived by a layer of clay solution with a thickness of up to 10-
15 mm, which will protect the oven from fast exercise.

Masonry of the eighth row of a brick oven (before installing the cast iron plate)
In this case, it is necessary that the distance between the top of the clay coating and the cast-iron plate was at least 70 mm. Thereafter, they are installed on a thin layer of the grinding solution a cast-iron plate and an angular steel squeeze.

The eighth row of a brick oven (after installing the cast iron plate)
After masonry ninth row Only the masonry of the vertical channel remains. The ninth row is put according to the image below.

Ninth a number of stove
After masonry tenth rows Install the smoke valve.

The tenth of the furnace
Masonry eleventh row Begin the smoke tube. Further laying of the pipe does not represent difficulties.

Final row of oven (chimney masonry is not taken into account)
Kitchen stove with oven works like this. From the fuel, flue gases are sent under the cast-iron slab, from where they, heating the oven from behind on both sides, are lowered under the oven and are directed to the hole under the smoke. Lifting up the vertical channel, they enter the smoke tube through the smoke valve and are removed into the atmosphere.
Kitchen stove with oven and hot water box
For masonry of the kitchen plate with an oven and water-heated box of 1290 × 640 mm, the same materials are needed as for the previous stove. Additionally, it should be purchased a water-type 510x280x120 mm in size.
Figure below shows a general view, a horizontal section of a-A and a vertical section of the B-B plates.

Kitchen stove with oven and hot water box: A - general view; b - cuts. Definitions: 1 - fuel; 2 - cast iron stove; 3 oven; 4 - Water Box; 5 - smoke valve; 6 - ashpical chamber; 7 - corner steel strapping
The kitchen plate with an oven and a hot water box is put in the same order as the kitchen stove with an oven. The only difference is that after laying the third row instead of a partition brick on the edge between the oven and the vertical channel, the water-heating box is installed in the case. The height of the water-heating box should correspond to the height of four rows of brick masonry plastics. The rest of the laying is completely similar to the masonry of the kitchen plate with an oven.
Kitchen stove with oven and water-heated box of improved design
In the kitchen stoves in the countryside are preparing not only food for people, but also boil the feed for livestock, boiling underwear when washing. During the firebox to the room there is a lot of steam and strangers are distinguished. Because of this, the humidity of air indoors increases, which adversely affects its microclimate. Therefore, to remove strangers and steam in the kitchen stoves it is desirable to provide a cooking chamber, which is connected to a flue tube with a ventilation channel. In the ventilation channel you need to install ventilation valve.
Installing a two-dimensional door in a cooking chamber allows you to save food in it hot for a long time and thus prevent its zaking.

Cooking chamber in a brick oven
The pop-up and pondered (the coil chamber) outside closed with appropriate doors. The top surface of the brass cabinet is protected from hot gases with a layer of clay solution with a thickness of 10-12 cm. Kitchen slab from the fourth to the ninth row is desirable to put out refractory bricks (especially the fifth).

An example of the overlapping of ash bar
Kitchen stove up to a ninth row of masonry It is advisable to make from sheet steel, and to enhance its strength after mounting the frame on the grinding solution, set the cutting of the corner steel. Since the mass of such a plate will be more than one ton, it is installed on an independent foundation.
If the device is not possible, the floor must be strengthened with additional beams, which are mounted on brick columns. Instead of brick columns, you can apply poles from solid rock logs, reinforced concrete poles, iron pipes with a cross section of at least 180-200 mm.
In the kitchen plate of the improved design there is a "direct" stroke. During the long-term firebox, the plate is possible evaporation of water in the water-heating box. To stop this, it is necessary to add some cold water into it and open the "direct" stroke. In this case, flue gases from under the cast iron slabs do not fall down, and immediately go to the smoke pipe. As a result, the water-heating box ceases to warm up, the evaporation of water in it stops.

Example of a "direct" stroke
For the convenience of cleaning the coil chamber from the ash in it, a special box of roofing steel 350x230x100 mm is installed. This prevents pollution of the room when cleaning the ash-shepheric chamber from ash.
The kitchen plate of such a design has the following advantages compared with the previous kitchen stove with an oven and a hot water box:
- during cooking in the room there are no couples and extraneous smells that are removed into the atmosphere through the ventilation hole;
- food cooked on the stove in the cooking chamber is saved by a hot long time and does not waste during the day;
- with the help of the "direct" stroke gate, it is possible to cook food, without having warmed the hot water box and thereby prevents the further evaporation of the water in it.
Figure below shows a general view of the kitchen stove in front, there are drawings of slab cuts in the most difficult places. Drawings of masonry in the rows will be further, and they give an exhaustive idea of \u200b\u200bthe internal device of the slab. Using coaches and drawings in the rows, you can fold the slab yourself, without the help of the binder.

Kitchen stove with an oven and water-heated box of improved design: A - facade; b - cuts Aa-A, BB, B - cuts in-B, Mr., Dr., E-e. Definitions: 1 - a pensive door; 2 - cooker; 3 oven; 4 - the door of the cooking chamber; 5 - smoke valve; 6 - ventilation valve; 7 - the "direct" stroke label; 8 - Water Box; 9 - Cute holes; 10 - cast iron stove.
The kitchen stove with an oven and a water-heating box of an improved design has dimensions, mm: 1290x640x1330.
The following materials are needed for masonry:
- red brick - 250 pcs.;
- brick refractory - 80 pcs.;
- red clay - 180 kg;
- sand - 90 kg;
- door coil - 250 × 210 mm;
- door confused - 250 × 140 mm;
- grille grate - 280 × 250 mm;
- wardrobe oven 250x280x450 mm;
- cast iron plate with two burners - 700 × 400 mm;
- water Box - 250x140x510 mm;
- foremost sheet - 500 × 700 mm;
- steel strip size 400x250x6 mm;
- the door to the cooking chamber - 750x350x5 mm;
- steel Angle for strapping plate size 30x30x3 mm - 4.1 m;
- steel bandage for overlapping a hob size 450x45x4 mm - 4 pcs.
The kitchen plate can be added to one bubble for 18-20 hours, for the preparation of a solution and a material belief, an additional 6 h is required.
To fold the slab with a furnace on the left side, you need to consider drawings with the help of a mirror assigned to the refrigeration.
The kitchen plate is laid out as follows. Masonch first row Produced by the foundation erected to the floor level. The first row determines the main sizes of the plate. The length of the plate is equal to the length of the laying of five bricks on the grinding solution, and the width is a length of 2.5 bricks.

The first row of an improved kitchen plate with an oven and hot water box
During masonry second row Two cleaner doors and a confusion door are installed in front. They are fixed to the masonry with the help of a furnace wire.

Masonry of the second row of the furnace; 1 - a subelevant door, 9 - cleaner holes.
Masonch third rows They produce according to the coach, it looks like a previous row. After masonry, the third row is installed a water-heating box.

Masonry of the third row of the furnace; 11 - steel sheet with a thickness of 3 mm.
Topial fourth row Putting from refractory bricks, with its absence sorted first-alternate red bricks. The fourth row overlaps the clean holes and the confusion door, forming the beginning of the submission. After the masonry of the fourth row, the grille and oven are installed.

Fourth stove
Masonry fifth row no difficulties. The brick adjacent from behind the grate of the grille is half shred to form an inclined plane.

Masonry of the fifth row of the furnace; 3 oven.
Before masonry sixth row prepare a flue door, for which the rivets are attached from above and bottom, which should be longer than the coaching door in both directions by 10 cm. For greater strength, the ends of the strip steel are screwed to the stove, the ends of which are close in the masonry. The door is installed on the grinding solution, pre-wolving the asbestos fiber frame of the flue door.

Masonry of the sixth row
Masonry seventh row fasten the base of the coil door.

Laying seventh row
Eighth row Overlapping water box.

Masonry of the eighth row
Ninth rivers overlaps the flue door and oven. The top of the oven is protected from a layer of a clay solution with a thickness of 10-12 mm. This series is preferably putting completely from refractory brick.

Laying of the ninth row
After the end of the masonry of the ninth row above the fifth, the cast-iron plate is installed on the grinding solution. A large plate burner is placed over the fuel. Next to the main stove is added extra, made of steel sheet of 400x200x6 mm. After that, they laid the corner steel to which the lower frame of the door of the cooking chamber is welded. For the strength, the corner steel is desirable to tie through the special holes in it a stove wire, which is fixed to the masonry.

Installation of pig-iron plates on the ninth row; 12 - steel sheet with a thickness of 6 mm; 13 - Corner steel.
Tenth row Put from an ordinary red brick. On the right side, leave the window to clean the channel "direct" stroke. Part of the bricks that overlap the stove, beolate the blades before masonry so that in the event that the slab can be easily replaced with it.

Laying of the tenth row
Masonry eleventh row It does not represent difficulties, you only need to follow the rules of dressing of seams.

Eleventh stove
Twelfth overlaps the cleaning window.

The twelfth row of the furnace
After masonry t.rynignant On the grinding solution, the "direct" stroke valve is installed.

Thirteenth stoves; 6 - Ventilation valve.
Masonry fourteenth row Must match the level of the upper door frame to the cooking chamber. Next to the upper door frame to the cooking chamber, an angular steel is 45x45x800 mm in size.

Fourteenth row of the furnace
Fifteenth row Overlaps the door to the cooking chamber.

Fifteenth Furnaces
Sixteenth row Overlaps the channel "direct" stroke.

Masonry of the sixteenth row of kitchen oven
Masonry seventeenth row Provides a ventilation channel for disgusting odor and steam from the cooking chamber.

Masonry of the seventeenth row of the kitchen oven
After grapete eighteenth row Over the cooking chamber, four cuts of strip steel with a size of 4x45x500 mm for overlapping a cooking chamber are installed.

Masonry of the eighteenth row of kitchen oven
Nineteenth row overlaps the cooking chamber. After the end of the masonry of this series, install ventilation valve.

Decorating a nineteenth row of a kitchen furnace; 6 - Ventilation valve.
Masonry twentieth and twenty first The series does not represent difficulties, only should be good to tie the seams.

Masonry of a twentieth row of a kitchen oven

Masonment twenty first row
Masonry twenty Second row Reduces the size of the chimney, it will be 130 × 130 mm.

Laying twenty second row
Twenty-third and twenty fourth rows put according to my friend.

Twenty-third stoves

Twenty fourth rows
After masonry twenty fifth row install the smoke valve, which is simultaneously adjusting.

Masonry twenty fifth row of furnace; 5 - smoke valve.
Masonry twenty-sixth rows begin the smoke tube. The masonry of the chimney does not represent difficulties.

Masonry of the final series (not counting the chimney)
After the end of the masonry of the furnace before it is coating, chimneys from fallen residues and rubble through the cleft holes are purified. Holes for cleaning after that laid brick halves on the grinding solution.
When installing the clean doors, they are tightly closed, the looseness is lubricated with mensing solution.
After that, the slab can be dried in two ways: opening the movement and configuration doors and valves or small trial fireboxes. After a complete drying, the slab is placed with ancading solution, and after drying the plaster produce a two-time blotch. Before the flue door, a pre-floor sheet is nourished.
Brick cooking oven with your own hands: Step-by-step instruction of masonry + photo
The house will cost cheaper than the installation of a stone stove with their own hands, since the cost of the stone is higher than the brick. If there is no desire to build a brick stove or there is no experience, you can install an iron furnace, for example, bourgeois. At the same time, installing a brick oven is not too difficult, as it seems at first glance, the most important thing is to have a certain proportion of patience. The preparatory stage of construction provides a foundation device.
The foundation for the furnace should be laid separately from the foundation for the room.
This is necessary to prevent the deformation of the furnace foundation from the main as a result of raising the bunched soil under the structure. Next, the furnace is erected using a red full-scale brick.
What tools and materials should be adding brick ovens

Figure 1. Brick furnace friend.
Prepare a solution for masonry can be in a special container. In any case, you should have a building level at hand for smooth masonry, as each row should have a flat surface. Among the main materials for the preparation of the furnace to the masonry should be allocated:
- sand;
- clay;
- red full-length brick;
- ruberoid;
- grille of the grate;
- pipe;
- wood;
- gravel;
- cement.
Before masonry, the furnace should prepare a carefully designed constructing scheme of a brick furnace, for example, as shown in the figure (Fig. 1). Next immediately begin with the preparation of a masonry solution. Do not use concrete. It is usually the clay is extracted from the depth of half a meter, then it is cleared so that it does not contain impurities with stones. The solution should be prepared using pure sand.

Figure 2. Sequence of actions when laying bricks: A - spoonful row; B - Tychka row.
Clay must be softened before its use. To do this, it is placed in the water for two or three days so that it soften. In the process of preparation, the clay solution is constantly stirred by adding sand into it. Sand with clay can be taken in equal proportions, that is, 1/1.
If the solution is prepared qualitatively, it is homogeneous without different pebbles and lumps. The quality of the solution should firmly ensure an acceptable level of reliability of the furnace, its strength. If you prepare a large volume of the solution at once, then in the absence of need to use it, it loses its beneficial properties, so the masonry solution is prepared several times during the masonry process.
For high-quality masonry, the furnaces necessarily make pre-laying of bricks, which allows you to check the quality of the first row on a separate foundation. All work should be based on the circuit of the designed furnace design. Careful use of the solution allows you to gently smear each seam.
Back to the category
How to start building a plate of the foundation for a brick furnace

Figure 3. Types of brick masonry.
A thoroughly designed oven on the appropriate drawing is laid out on a separately erected foundation, as noted above. The principle of the installation plate of the foundation should be the same as for the main building. Fill the foundation begins with the preparation of the pit below the depth of which the soil freezing begins, it can be about 1 meter.
You can float the bottom of the bottom, using wet sand, laying on it a layer of broken brick or stone. The size of this layer should be in a height of 15 cm, and the crushed stone falls over it. To create a removable formwork, specially cooked boards are used, incomplete. Formwork should be made durable, as it should withstand the fill with concrete. The quality level of concrete fill will be decisive for the reliability of the entire structure.
After 2 or 3 days from the frozen concrete pouring, the formwork is removed, and its surface is covered with tar, as well as rubberoid. All layers of these materials should maximize reliable waterproofing of the foundation plate. The remaining space between the foundation and the soil should be covered with sand with a grain of a large fraction or a layer of gravel.
Back to the category
How to make a brick oven in the house do it yourself correctly

Figure 4. Laying chimney.
Tips for laying a brick furnace.
The principle of masonry furnace can be based on the following algorithm of actions:
- Foundation Plate Device.
- Subject device.
- Laying furnaces in the ranks in accordance with the search scheme.
- The grille device of the grate.
- Fit bricks.
- The device of the furnace door.
Among the recommendations for masonry, the furnace in the house can be distinguished by a number of major. For example, mount a grate in the furnace follows without its stop in the inner walls of the stove, otherwise, when heated, the lattice expands and deforms the wall laying. The foundation of the furnace is necessarily satisfied with waterproofing. The base of the foundation should perform at a distance of at least 10 cm. A suitable subflower is usually a certain space on the front outer wall of the furnace equipped with a storage hole for storing inventory.

Making rows of bricks, necessarily carefully customize them to each other, so that there is no formation of gaps between bricks (Fig. 2), since they should reliably overlap the smoke canal from the back wall of the furnace. When making clay cracks, they will still be processed not at the proper level.
Bricks shift from pondered by 3 cm in the side, and the left side of the left bar is 1.5 cm forward. The tank door is usually wound in all places of contacts into two layers asbestos cord. Fasten the flue door with three layers of galvanized wire. Avoiding the formation of gaps in brickwork will help the use of high quality bricks.
Bricks before laying must be moistened with water, and they are placed on the foundation without a solution to create a sample. It will help check the quality of the masonry of the corners of the brick and the walls of the future design of the furnace. All corners and walls make straight and smooth, for which the construction level is used.
The comfort of the country house built away from gas supply networks is unthinkable without stove. In the cold season, she gives us a pleasant warmth, eliminating air from dampness.
The market today offers buyers all sorts of metal "bourgeoque". Despite this, many subsidiaries prefer the classic version of the heating furnace made of bricks. Its advantages are obvious: due to high weight, she accumulates a lot of heat and gives it for a long time, a good warming room.
The service life of the brick design significantly exceeds the metallic resource. The minimum costs of materials and simplicity are attracted to a simple furnace for giving the attention of homemade craftsmen.
Testing yourself in the role of the cook you will help our article. In it, we will look at several options for simple wood stoves and give practical recommendations on their laying.
You will make sure that there is nothing complicated in the drawings of these designs. Having learned to read the "spokes" - brick layout schemes, you can construct a full-fledged heat generating device with your own hands.
How to fold the most simple brick oven?
First you need to decide what you want to get from the future stove. If you only need to pump rooms, and for cooking you use a balloon gas or electricity, then choose the option without a stove and oven. He who loves a soft healing heat chooses the option with a laying.
For regular thermal processing of a large number of products and feed for pets, the simplest furnace with a cooking surface will be just right.
We will look at three examples of stoves with step-by-step manual on their laying:
- Simple direct-flow;
- With a hob;
- Heating.
Let's just say that from a simple design, devoid of gas revolutions, it is impossible to wait for high heat transfer. For this reason, such furnaces put in garages and other small rooms with an area of \u200b\u200bno more than 16 m2.
We will look at this option so that the newcomers get the first simple lesson of practical laying.

River heating design is designed for heating a small room
Under such a stove, you do not need a powerful foundation. Sweeping a large rubbing with a layer of 15-20 cm, the bay of its cement mortar and aligning the surface in terms of the level, in a couple of days you can begin to the masonry.
Furnace dimensions in terms: width 2 bricks (51 cm), depth 2.5 brick (64 cm). Since there is no configuration chamber in it, then the holes for air intake are drilled directly in the coil door.

The sixth row overlaps the door of the heat chamber. The top view helps better understand the method of brick layout.
Coachings in such a design are simple. The main condition during operation is to observe the dressing of the seams so that the upper brick closes the seam between the two lower.
On the eighth row, the fuel is coat, using for this half and the "three-hardater" - ¾ from the whole brick. The exit from the furnace is thus obtained by a cross section of 1 brick (125x250 mm).

The next row (ninth) lay out the same way as the seventh using a whole brick.
After that, the brick tier put the rib flush with the inner face of the lower row. The new tier is placed on the plaffer, using two whole bricks and four "three-hardater". In this way, the smoke canal is again coated in order to delay gases and raise the heat transfer.

On the next tier, the stones are put on the edge. In the middle of the smoke canal put bricks. In this way, the oven raise another five rows (one tier on the edge and brick in the middle, the other tier is plafhmy).

The remaining four tiers are plashed. The last two rows of masonry smoke canal are waged to the size of 12x12 cm (Pollipich). At this level, the oven put a smoke valve. From above, the steel pipe is inserted into it.

Stove
In the simplest embodiment, such structures are small dimensions (width 2, and the depth of 3 bricks is 78x53 cm). Nevertheless, even on such a limited area can be placed one-connecting plate.
Work argues when there is everything you need at hand.
Therefore, buy the following materials in advance and accessories:
- Full-time red brick - 107 pcs;
- Substive door - 1 pc;
- Grate grid - 1 pc;
- Single-mounted cast-iron stove - 1 pc;
- Machine door - 1 pc;
- Pipe valve - 1 pc.
Fireproof brick for firewood oven is not needed. His purchase is an extra spending of money. But red should choose carefully, rejecting the cracked and uneven.
Preparation of solution
The masonry mixture is made by stirring four parts of clay with one part of the water and adding eight parts of the sainted sand to them. Normal consistency is simply determined: the solution easily slides from the trinity, without leaving the flows on it. When laying, he should not flow out of the seams.
The volume of the solution is determined, focusing on the amount of brick. With the optimal thickness of the seam (3-5 mm) one bucket is enough for 50 pieces.
Prepare a masonry mixture, you can proceed to the base tab. His width is made by 10 cm more oven width. The height of the foundation is chosen such that the bottom of the first row of bricks was at the floor level.

Exemplary sample stove
If the underground is deep enough (50-60 cm), then do not dig a pit under the foundation. It is enough to make a formwork on the soil in size in terms of 76 x (51 + 10cm). At its bottom there are two layers of rubberoid to protect against moisture. Setting the concrete, he is given a week for a set of strength after which they get to the masonry.
The dimensions of the furnace we are considered with the hob - 3 x 1.5 bricks (76x39 cm).
Council of the Master: Every new brick tier lay out without a solution (dry). After adjusting the bricks in size, you can start the laying.
The first row is put on a layer of the clay solution (4-5 mm). Aligning the base on the level, lay out the second, leaving a place for a pensive door.
Before mounting the door, you need to screw the soft wire and lay its ends in the seams for better fixation.

In the frame of the cast iron door there are four wire holes serving for fixing in masonry
To compensate for the thermal expansion of the metal, there is a gap between the door and brick. Before installing its frame is wetted with a wet asbestos cord.
The masonry of the third row lead, overlapping the seams of the second. At this level, a grate grille is installed in the fuel.

Scheme of coaches from 1 to 8 row
The fourth row put on the edge, observing the dressing of the seams, and form the walls of the coil chamber. Behind it will be the first and only smoke turnover (see the cut A-A in Scheme No. 2). To clean its bottom in the rear wall without a solution, they put the so-called misunderstanding brick, periodically removed to remove ash. Inside the chimney make two supports from brick pieces to describe the inner partition.
The stones of the fifth row put the plafhmy, leaving a place for a flue door. In the back of the furnace on my friend we see the walls of two smoke channels. Their surface during operation should be thoroughly cleaned with a wet rag from clay seams. This is an important condition for ensuring good traction.
Helpful advice! Focusing on the drawings of orders, do not forget to look at two cuts of the stove. They will help you better present her design and not mistaken when laying a brick.

Scheme spokes from 9 to 11 row
Having lifted to the masonry to the eighth row, overlap the flue door, having laid the wire in the seam fixing its frame. At the same level in the back of the fuel chamber, they put a brick with a bevelled end - a smoke tooth. It improves thermal returns, preventing the rapid flow of flue gases into the pipe.
Having finished the ninth row, on it on the clay solution laid asbestos cord. It is necessary to seal the joints of the cast-iron stove and brick. On the tenth row, the fuel is overlapped with a hob.
At the eleventh in the pipe, the smoke valve is installed. Its along the contour is also sealing asbestos, moistened in clay.
12 and 13 row - the formation of the walls of the pipe. After their completion on the furnace, they put a lightweight sheet of sheet metal, deposited on the roof.
Heating stove
Now let's see how to fold your hands with a brick oven designed for heating a small country house.

Exemplary prototypes of the heating furnace version under consideration for the country house
Its dimensions:
- width - 2 bricks (51 cm);
- depth - 3.5 bricks (90 cm);
- height - 2 meters 38 cm.
For construction, the following materials and accessories will be required:
- Red full-length brick - 390 pcs;
- Clay - 9 buckets;
- Sand - 18 buckets;
- Grate grille (25x40 cm) - 1 pc;
- Coil door (20x30 cm) - 1 pc;
- Paddy door (14x20 cm) - 1pc;
- Clear door (14x20 cm) - 1pc;
- Latch -1 pcs;
- Final steel sheet (50x70 cm) - 1 pc;
- Ruberoid for waterproofing (100x60 cm) - 1 pc.
Sequence of work
The first row is the base of the furnace. It should be postponed especially carefully, checking the horizontality using the level.
Corners - the most difficult part for beginners. In order for them to be smooth, we recommend right to install four template racks at the edges of the masonry. They can be made of planed boards, knocking them in pairs at right angles.
By installing such a "formwork" from the floor to the ceiling, you can easily output perfect corners.

Homemade Corner Masonry Template
On the second row from the end of the furnace, two bricks are stacked with a bevelled face overlooking the ash chamber. The masonry of the third row begins with the installation of a pensive door fixed with the wire in the seams of lateral bricks.

Scheme of dealers from 1 to 10 and transverse sections of the heating furnace
4 and 5 rows continue the formation of the walls of the ash chamber. The sixth next to the laying of the fuel chamber walls and put in it a grate grid.
At the level of 7 and 8 rows, mount the flue door. In the back of the chamber they put beveled bricks that serve to improve traction. The ninth is overlapped by the door of the fuel.
From 10 to 16, the fuel cell laying and the vertical chimney canal are underway. At the seventeenth to the furnace, they put the worn door.

18-30 row form smoking channels. They need to lay out the most precisely as possible, pouring the inner walls with a wet rag.
31- 32 rows form a set, overlapping the furnace.
33 and 34 form a chimney.
Having finished the masonry, the furnace is left for a week with open doors and a pipe for drying. After that, make a test furnace, burning small portions of the chips, branches or straw.
Despite the modern abundance of heating and kitchen equipment, very many owners do not represent a private house without a furnace - and it is absolutely correct. Even if it is planned to create an autonomous heating system, the furnace will also be alike. For example, in order to save in the spring or autumn period, when the full heating is no longer needed, but also you do not want to breed in the house. Protoping the stove once a day or two days, in the premises you can maintain the optimal balance of adhesion and heat.
Folding the furnace with your own hands a step-by-step instruction of which has intricate configurations - for the beginner will be quite difficult. Therefore, if there is no experience in a cooking case, it is better to choose the available friend's friend in which it will simply figure out.
When choosing a model, it is necessary to take into account not only the simplicity of the scheme, but also heat transfer and the functionality of the furnace, since there are furnaces in which not all functions are provided. The heat transfer is chosen depending on the area, which should heat the heating structure.
There are quite a lot of furnace furnaces, as experienced cooks, working on one of them, make their own adjustments to its design, and due to this new and new variants of the heating device appear. And to stay on one of the types of furnaces, you need to know which they are on functionality.
Prices for chammatory brick for masonry furnaces
chamotte brick
Types of brick stoves
There are t.the rex basic species are heating and cooking, cooking and simply heating without additional embedded elements.
- The heating and cooking furnace can have not only a cooking plate, but the oven and a water heating tank, as well as a drying niche. In addition, such a structure can heat one or two rooms of a specific area.

Such furnaces are often embedded in the wall, turning the hob and the furnace in the direction of the kitchen, and the rear wall - in the living room. Thus, the furnace performs till function - it works as a partition, it prepares food on it, and it gives dry heat into the bedroom or living room.
- Operate only for heating, and most often have a compact size. This furnace is installed in order to maintain the balance of VL Agi and heat in the house in the autumn or in the spring, when it is too early to turn on autonomous heating or not yet included central.
This furnace is well installed, for example, in the country, in the event that there is a device where you can cook food. If the power supply in the country village is often disconnected, it is better to choose a building with a hob.
- The cooking version of the furnace can serve for heating, if you need to heat a small area. The device is perfect for a cottage house or for a small structure for permanent residence.
Having such a furnace and firewood, you can not worry about the fact that the house will be cold and raw, and the family will remain without dinner or hot tea when the electricity or gas is disconnected.
It should be noted that any of the types of furnace can be compact or massive. The choice of the size of the furnace structure depends on the area of \u200b\u200bthe house or room, as well as the place that is assigned to build.
Choosing a place to install the furnace
Choosing a place to build a furnace, you need to provide for nuances that are important not only to create comfortable operating conditions, but also for reasons of fire safety. Especially important to think about location Furnaces in the already built house, as the chimney pipe should not stumble upon it on the bays of the attic overlap or on the rafting legs of the roof.
The stove is installed at the inner bearing wall, in the middle of the room or embed it into the wall located inside the house.
- It is not recommended to build a furnace near the outer wall, as it will quickly get out, and the efficiency of its use will significantly decrease.
- In the middle of the big room, the furnace is set in the event that it is necessary to divide the room into two zones. Moreover, with a beautiful decorative trim, it will decorate the house and can become one of the elements to the interior that will emphasize a certain style.
- Embedding the oven to the partition between the rooms, it is necessary to provide for its insulation from the combustible wall materials using heat-resistant sheets of asbestos or special drywall.
- The place allocated for the furnace should be greater than its base at 120 ÷ 150 mm in each direction, since the foundation perimeter always slightly exceeds the size of the furnace.
- In order to easily determine the sizes, you need to choose the model to which the order scheme is attached.
When the model is selected and the installation location defines, you can proceed to the acquisition of materials and prepare all the necessary tools. The number and assortment of materials for each of the models is selected individually, but the tools used during the masonry are always the same.
Working Tools
For the construction process, the following devices and tools will be needed:

A) Kirk is used to dry and split the brick.
B) The oven hammer has the same functions as Kirk, but, in addition, it is convenient for them to remove the dried mortar.
C) The rule is used to align concrete on the surface of the foundation. It is often made independently of the perfectly smooth outdoor board.
D) Wooden blade is used for rubbing and stirring of the clay solution.
E) the level is the necessary tool, as it will help to withstand the evenness of the rows, both in the horizontal and vertical direction.
E) Bread from the urine is used to remove sand and hardened mortar from the inner surfaces.
G) Pliers are used to bite and fold steel wire when installing and fixing cast-iron elements of the structure.
H) The chimney lead is used for marking when finishing the furnace with tiles.
And) Stukolz - cut pipe used for fitting tiles.
K) Chettail rod for marking.
L) The rashpil is used to wipe the lumps and removing the influx on the finished masonry.
M) The building angle is necessary to remove internal and external angles by 90 degrees.
H) The plumb is used to check the vertical walls.
O) Rubber hammer is used to run into a row of bricks.
P) Chisel is needed to parse old masonry and brick splitting.
P) Trusks or Kelma are used to remove the surplus of the solution and impose it into the rows of bricks during masonry.
C) the extension will be needed if the furnace is not facing the finishing material, and the seams between the rows will neatly decorate.
In addition, two tanks for mortar and water will be needed, as well as sieve for sand, if the solution is made independently.

The masonry of the upper rows will be easier if there is a "goats"
For the convenience of working, it is necessary to have a frame that is different called "goats". It is convenient to stand on them, conducting a masonry at an altitude, especially since the work platform size provides for a place to install a container with a solution.
Forehead Foundation
- The foundation for the furnace is usually laid together with the overall basis for the entire structure, but they should not be interconnected, since during deformation or shrinkage, one of them can damage the other.
- If the furnace will be built in the foundation already built on the tape or biscuit, which has a wooden floor, then the coating will have to open and build the basis for the furnace from the soil.
- If a compact model of the furnace is chosen, and under the house there is a slab foundation, then the heating structure can be erected directly on it by making a waterproofing gasket.

If the foundation sune-Taki will have to be equipped with "from scratch", it must be remembered that it should have the same shape as the founding of the furnace, but to act beyond its limits by 120 ÷ 150 mm in each of the parties.
- On wooden the floor is placed The outline of the foundation is cut on the markup part of the board coating.
- Further, in the soil the underground rotates the damned size, a depth of 450 ÷ 500 mm.
- The ground at the bottom of the pit is good tamples, and the sandy befelling is made, which is wetted with water and also tamper to thickness in 80 ÷ 100 mm.

Potted under the chimney foundation with a sandy-gravel "pillow"
- After that, around the perimeter of the pit it is possible to lay a runneroid, which will perform the function of waterproofing and formwork, if it is temporarily strengthened by boards or bricks. After the concrete solution is frozen, the formwork with the foundation is removed.
Instead of runneroid, you can use formwork from boards, closed from the inside with a polyethylene web.
Immediately it should be noted that it is better if the concrete base under the furnace will rise above the floor at 70 ÷ 100 mm. In this way, you can save a brick and simplify the docking of the floor surface and the side walls of the foundation.
- From above sand is covered with a layer of crushed stone of the same thickness and is also well compacted.
- The next step on the bottom of the recovery is a reinforcement grid made of metal wire or finished grid. The elements of the lattice between themselves are connected by a twist from the wire.

Foundation reinforcement - option
- The first layer of solution is poured into the prepared kittle. It may consist of rubble, sand and cement - 1: 2: 1 or gravel and cement 3: 1. This layer should occupy approximately ⅓ the filled space.
- After filling the first layer, immediately knead and poured the second, consisting of sand and cement in proportions 3: 1.
The second layer is poured into such a height so that 50 mm remains to the top, which will be required for the upper aligning foundation SH OA.
If necessary, for the upper layer of concrete, the formwork can be expanded, and then on top of the flooded solution to lay a reinforcement grid having cells at 70 ÷ 80 mm.

- Then the last upper layer of the solution is poured and aligned with the rule.
The foundation is left to ripen concrete by 27 ÷ 30 days. It is advisable to make it daily with water and close with a plastic film, it will help make concrete more monolithic and durable.

On the finished foundation, after removal of the formwork, two or three layers of rubberoid, which will protect the brick masonry of the furnace from the capillary moisture coming from the soil or from the underground.
After that, you can move to the main work - masonry furnace.
Several recommendations for masonry work
- Before starting the brick laying on the solution, the entire structure rises from the brick dry, but each of the rows should be laid out strictly in accordance with the order scheme.
Pre-masonry Drying experienced cooks advise to spend all the masters who are first taken for the construction of the furnace. This event is necessary in order to understand the location of all internal channels and do not make rude mistakes when fitting bricks in each of the series.
To carry out the masonry, you need to be worse with wooden slats, which will determine the thickness of the seam between bricks. Usually their thickness is 5-7 mm. The same rail will be used in the main masonry, carried out with the solution. Such a "calibration" of the seam thickness is especially necessary if the masonry is done "under the extection", and must be flawless.
This process of PR is not inhaling, thoughtfully, as it is very important to understand how smoke will be discharged from the furnace, and how it will fall into the chimney pipe.
- Having lifted a dry design before starting the pipe laying, she carefully disassemble. If you simultaneously fit bricks in size, then each row can be folded into a separate stack, putting a row number on the bricks with a marker and a place in it.
- Performing basic masonry, each of the series also first lays out dry, and then, after thorough fitting of all parts, mounted on the solution.
- When the main laying is made, two dimensional rails are stacked on the edges of the previous row to withstand the exact seam thickness. The solution is then applied with a layer of 10 ÷ 12 mm. The brick is placed on top of the solution, pressed, and, if necessary, begged with a rubber hammer until the brick is stored in a measuring rack. The extra protested solution is selected by a trowel.

- Rakes are pulled out of the masonry after mounting the third ÷ fourth row above them, and then used again. Therefore, you need to prepare several pairs of these auxiliary elements.
- Capturing the rails, the seams are neatly filled with a solution and immediately "expand".
- Conducting the laying on the solution, each of the series is verified using a construction level to comply with horizontal and vertical planes.
Compliance with these nuances will help simplify the process of the construction of any furnace, avoid "fatal" errors that can lead to the need to rewar throughout the work.
Heating and cooking furnace with drying chamber of the structure of Yu. Proskurin
As mentioned above, there are a large number of different stove models. In this publication, one of the compact and functional options will be considered, which can be installed in a small house, as it does not take a lot of space, but it is capable of driving a room at 16 ÷ 17 m².
The design of the furnace Y. Proskurin is a two-speed heating and cooking option equipped with a single-mounted stove and a drying chamber designed for drying vegetables and fruits, healing herbs, mushrooms, and the like.

If desired, the drying cabinet can be installed in the niche of the oven chamber.
The furnace has dimensions (excluding the height of the chimney pipe) 750 × 630 × 2070 mm. Its heat transfer is 1700 kcal / h. The design provides for two modes of operation - summer and winter, which is very important for fuel economy, and to be able to heat the stove and cook food, do not touch all Designs in the summer.
List of essential materials
In order to build such a heating structure, the following materials will be needed:
| Name of materials and elements | Quantity (pcs.) | Sizes of elements (mm) |
|---|---|---|
| Red brick M-200 (excluding pipe masonry) | 281 ÷ 285. | - |
| Chamotte brick refractory brand sh-8 | 82 ÷ 85. | - |
| Opening door | 1 | 210 × 250. |
| Doors for cleaning channels | 2 | 140 × 140. |
| Door for confused | 1 | 140 × 250. |
| Summer stroke valve for chimney | 1 | 130 × 130. |
| Flashing | 1 | 130 × 130. |
| Hob | 1 | 130 × 130. |
| Colonnik | 1 | 200 × 300. |
| Single-mounted cooking panel | 1 | 410 × 340. |
| Steel band | 1 | 40 × 260 × 5 |
| 1 | 40 × 350 × 5 | |
| 1 | 40 × 360 × 5 | |
| Steel corner | 1 | 40 × 40 × 635 |
| 3 | 40 × 40 × 510 | |
| 4 | 40 × 40 × 350 | |
| Roofing iron | 1 | 380 × 310. |
| Foremost sheet metal | 1 | 500 × 700. |
In addition, it will take clay, sand, cement, crushed stone, gravel, mergel, and a bladder box, if it is decided, instead of a drying niche to install the oven.
Scheme-delegation of the construction of the furnace design of Y. Proskurin
| Illustration | BRIEF DESCRIPTION Valued operation |
|---|---|
 | The first row is laid out with a solid plane with compliance with bricks. It is very important to put this series perfectly in all respects, since the quality of the masonry of the entire design will depend on it. |
 | In the second row, a pensive (ash) camera and the base of two vertical channels is formed. On the same row, the doors of the pensive and the cleaner cameras are installed. |
 | On metal doors there are special ears in which steel wire segments are tightened - they will then be mixed in the seams between bricks. Temporarily, to complete consolidation, the doors are supported by bricks from one or two sides. |
 | The third row continues the formation of a pensive chamber and the lower part of the vertical channels. At the same time, fastening from two sides of the installed door. |
 | On the fourth row, the doors of the pensive and clearance cameras are completely overlapped. The total camera of vertical channels is divided into two, so instead of a large hole, two, having a size of the length of the brick, and the width of the Pollipich are formed. |
 | The fifth row is completely laid out with chamoten brick. Over the ash chamber, a hole with a landing place for a grate grid is formed. For this, part of the brick cuts out, from the side that it must be rotated to the hole above the subdivinal chamber. |
 | On the same row is mounted and grate. It is planted on a clay solution or laid freely, without a solution. There should be a distance of 4-5 mm between it and brick. |
 | On the sixth row, the formation of a flue chamber and vertical channels continues. |
 | In addition, the flipper is installed on the same row, the frame of which, before installation, it is necessary to wind up or set asbestos, which, when heated metal, will give it an opportunity to expand without voltage and damage. |
 | The seventh and eighth rows are laid out according to the coach, they continue to form the formation of fireboxes and vertical channels. |
 | On the ninth row, the cooler door is overlapped by brick. Moreover, to remove the load from the ceiling from the door, the side and third of the edge of the bricks are stated on the one hand, and between them is installed with a brick, shy on both sides. |
 | On the tenth row there is a combination of the fuel chamber and the first vertical channel - this is done in order for the hot smoke from the furnace to be sent to this generated hole. For smoothness of the course of smoke, protruding the angle of solid brick, which protects the second vertical channel, is cut. |
 | On the eleventh row, the masonry goes according to the scheme, except that on the edges of bricks framing the flue chamber, cuts are made, which will form a deepening for mounting a single-mating hob. |
 | Then, on the same row on sections made on bricks, asbestos stripes are stacked, and the plate panel is mounted. From the formation of a cooking niche is installed steel corner. |
 | 12 A row is laid out of red bricks, and in the future all the laying goes out of it. Two vertical channels are drawn up again, and there is a niche around the hob. |
 | 13 row is placed according to the scheme, but in the front of the first vertical channel, a place is formed to install a summer-winter stroke gauge. After that, a valve is mounted on the clay-sandy solution. |
 | From 14 to 17 a row, the laying is performed according to one principle - the cooking niche and channels are formed. |
 | On the 18th row of steel corners there is a floating niches. One of them is mounted on the edge of a niche, the second - at a brick distance from the first, and the third pressed to the second back side. This is done in order to conveniently carry out the laying of the next row. |
 | A cooking niche is completely overlapped in 19, with the exception of the formation of the hole of the steam channel and the place to install the valve. To do this, the bricks make cutouts in which the valve is mounted. |
 | 20 row is laid out according to the scheme. It continues the formation of two vertical channels and steaming. Moreover, if you carefully look at, you can see that one of the bricks forming the first vertical channel is shy. |
 | On the 21st row there is a combination of the first vertical channel and steaming with the help of the left-handed space. In this row, almost all bricks are put only on the walls of the perimeter of the structure. Only the second vertical channel is protected. |
 | In the same row, the resulting cavity is overlapped with metal stripes, which are stacked by the scheme shown in Figure. |
 | Further, a roofing sheet is laid on steel strips, with which the chimney hole is organized, located in the opposite side of the steaming. |
 | On the 22nd row, the masonry is made on top of the roofing sheet. The chimney hole is left and the two holes of vertical channels. In a place where the drying niche will be formed, the segment is stacked, which will protect the brick on the edge of the chamber from damage and make the edge of the niche more neat. |
 | 23 row - a drying chamber is formed, and its rear wall is made of bricks installed on the side. He burns down the camera from the opening of the chimney channel. |
 | The walls of the drying chamber, chimney and two vertical channels are formed on the 24 row. |
 | 25 row - work continues according to the scheme. The second brick of the rear wall of the chamber is installed in the same way as the first. |
 | On the 26th row, preparations for the combination of two vertical channels are preparing, so the internal bricks in both holes are raised at a low angle. |
 | 27 A row - masonry combine the first and second channel. For them, a common worn door is installed. The rest of the work goes according to the scheme. |
 | On the 28th row there is overlapping the drying chamber with three sections of the corners along the same principle, as the overlap of a cooking niche was made. Vertical channels are combined into one wide, and the cleft door is fixed by side bricks. |
 | On 29, the drying chamber and vertical channels are completely overlapped. The opening of the chimney canal is left, which is placed with bricks with cut-out planting grooves for chimney valve. After laying a row, a frame with a valve is installed on the clay-sandy solution. |
 | On the 30th row, the entire surface of the furnace is completely overlapped. Only a chimney hole is left, which must be sized in the Pollipich. |
 | 31-32 row - the formation of a chimney begins. |
This figure shows an oven in the context. The scheme shows all the internal channels for which the heated air will circulate.
Brick laying with your own hands for heating at home and summer cottagesBuild a furnace for a brick house with your own hands, quite under the nearest bricklayer. Due to the abundance and availability of information, it is enough just to choose a suitable design with a friend and a detailed description of all stages of work, to be patient and make the laying gently and carefully. Consider in detail how to build a stove with your own bricks.
The furnace begins with the foundation
Even a small brick oven with her own hands laid out in the country or in a bath, weighs more tons. Therefore, it is not necessary to put it on the floor, but on your own foundation.
The upper cut of the foundation coincides with the level of roughing. You need to pay special attention to the fact that the upper plane was perfectly horizontal. This will avoid clutch skeur and will greatly simplify the work of the liver.
For the foundation for waterproofing, two layers of rubberoid, pergamine or durable construction film are stacked. On top of the waterproofing, the steel sheet and the layer of the heat insulator is laid (so that the heat does not go to the foundation). For the entire "pie" for a future brick furnace, with your own hands, bricks of the first layer of laying are laid.
Cooking for chimpled
In contrast to the usual wall, the brick stove is not built on the cement, but on the clay-sandy solution. The compositions of solutions for chamotte and ceramic brick are very different.
The solution for chamotal brick is prepared on the basis of white kaolin or chamoite mergel. Minerals are characterized by high refractority and withstand temperatures above 1500 degrees. A dry masonry mixture for the preparation of a refractory masonry solution is usually acquired in retail chains.
The solution for ceramic brick is prepared on the basis of the usual clay, which can be found in its locality. Clay for furnaces is also sold in many building supermarkets.
On 100 pcs. Bricks will need about 40 kg of clay. The proportions of clay and sand are determined by testing rasters. This is done as follows:
- The clay on the day is soaked in cold water.
- The chambers are separated by 5 parts and each is added a quarter, half, three quarters or an equal weight of the sand, respectively.
- All the resulting samples are mixed again until complete homogeneousness and give it to stand 3-4 hours, so that the surplus is moisture.
We carry out test samples:
- roll over in sausages with a thickness of 1-1.5 cm and turn around around any round item with a diameter of 5 cm.
- In the case when cracks were formed on the sample more than 2 mm - the solution is not suitable.
- With the depth of cracks up to 2 mm - the solution is suitable for those parts of the furnace, where the heating temperature does not exceed 300 degrees.
- If the surface of the sample did not crack or covered with a small mesh - this solution is quite suitable to make the furnace with their own hands.
Since the cost of sand is much lower than the cost of good chimney clay, the essence of samples is reduced to the determination of the maximum possible fraction of the filler in the solution.
Brick oven for home with her hands video
Brick masonry technology
The furnace scheme provided below differs by its simplicity and very high availability of repetition at a high percentage of a successful result. A brick oven with your own hands has small sizes and is suitable as a heat source for one room or a small garden house. The area, allocated to the furnace - only 0.4 square meters. m. On the construction there is a very small amount of brick, so the weight it is very small.
The stove laying begins with the first row. To ensure an ideally horizontal plane under the brick, you can pour a thin layer of river mock or mountain sand. The sand will smooth the difference in bricks thickness, and at the same time will perform the function of an additional heat insulator.
Basics of the choice of building material
The thickness of the solution between bricks should be 2-3 mm. Thicker seams quickly sharpen. For masonry you need to choose the most even bricks with the same dimensions - as irregularities cannot be compensated with a solution!
On the second row we install the door pissed. To compensate for thermal extensions, it is turned around the perimeter asbestos cord. Fastening the door is carried out with steel wire fixed in the masonry. So that the wire does not interfere - the grooves are cut into the brick under it.
The third row is already laid out of chamotte brick. Copyright is put on it already after graspting clay.
The laying of the fourth row stoves is stacked on the edge. If the grinders do not fit into the free space - the brick must be trimmed at the place, ensuring the gaps of 3 mm from all sides.
When laying a brick furnace, it is important to know!
The rear "misunderstand" brick is placed without a solution. It is needed to clean the channels.
On the fifth row, similar to the infancy, the flue door is installed. The fifth row is laid out the plastics, and these protruding bricks play the role of an outdoor heat exchanger.
The seventh - the ninth rows laid out again the plafhmy. Over the ninth row, a cast-iron cooking surface is stacked. For laying between metal and bricks also use asbestos or fiberglass cord.
Applying cord for masonry sealing
Without a sealing cord, smoke will fall into the room, and the clay solution will quickly get out of the thermal expansion of the cast-iron stove.
The last three rows form a place to install a light chimney. In the penultimate row installed metal valve. It should also be separated from the stone asbestos cord.
After a complete drying of the masonry, the buildings are removed from the channel, the construction trash is removed from the channel. To the sand from under the stove, it is naked - the plinth is nourished along its perimeter.
Brick furnaces for giving video
Choose pipes for chimney
The chimney for this stove will serve any metal or asbestos-cement tube with a channel of about 200 square meters. cm, which corresponds to 11.5 cm diameter for round sections. The height of the top cutting of the pipe above the level of the cooler of the cooler chamber is not less than 4 m. The height of the part protruding over the roof is at least half a meter. If the furnace smokes at the first launches - the pipe can be increasing by 25-50 cm.
Brick furnace finish
Finned masonry, with their own hands, is described outside with a simple chalk whitewash or thin plaster. As a binder, you can add fatty milk into the water. And the ordinary blueboard will help to prevent the protrusion of the yellowness.
If you decide how to fold a higher level furnace - choose one of the available options for it:
- looking for decorative facade bricks or furnaces;
- outdoor metal screen;
- decorative extinguishing or coloring of seams with heat-resistant paint.
The laying of brick and tiles should be provided in advance, since in the construction process, the outer elements are tied up with masonry. This work requires great experience and it is better to trust professional burns. The metal screen is better to install not close, but at some distance from the body of the furnace. Then he will play the role of the air convector, which will significantly increase the heating rate of the room.
Outcome
Knowing how to build a furnace in the house with your own hands, you can provide accessible heating any small room. The accumulated experience in the first construction will be the basis for further improving this sought-after skill.
 Why you can not give icons
 Is it possible to give icons as a gift: Signs, the opinion of the Church
 A year ago left her husband, and now I do not know what to do