We make unusual garden figures from concrete with their own hands. Figures made of concrete crafts from cement with their own hands the most interesting
Become a designer of your site, realize your talents and make sure that every corner of the garden is filled with warmth and comfort - here is the dream of many dachensons. I will try to help you protort this dream into life. Let's see what interesting crafts can make each of us. For this collection, I collected a lot of different options. There are simple works for beginners. But there are more complex. This is my gift for those who already know how and wants to grow in mastery further.
First of all, a few words about the solution itself and about the designs of it:
- It is necessary that the concrete brand is M400 and above.
- Gypsum solution can be mixed with moisture-resistant additives.
- Water take only clean, drinking or boiled. This is reflected on the elasticity of the material and on the strength of the structure.
- Complex structures should have a framework.
- For heavy gardens, the base is needed (as a substrate for a cake) and / or foundation.
- The top of the design is covered with protective paints or varnishes.
- In plaster for the strength of the product, you can add glue or cement.
- The sand is often added to the concrete to increase the strength of the crafts.
- Concrete solution for consistency should be as sour cream or a little bit, depending on which design solution is prepared.
- Gypsum solution is made of the same consistency as concrete. If there is cement as part of a gypsum solution, then cement and gypsum should be taken in the proportion of 5 to 1. Plus 1st.L. PVA glue. The consistency of the solution must be dense.
And now you can go to the crafts themselves!
Is everything ingenious just? Here we confirm this truth in this section. Here are new season. Among them:
Concrete flower bed boots. To do this, it will only be necessary to "dip" into the solution of the old shoes that you were going to throw out for dissent.
Input "mats" with brushes for cleaning shoes.

Palms. We use them like vases or drinkers for birds. To do this, the glove is filled with a solution, tie and put in a bowl, press the second mission from above.

When concrete freezes, remove gloves and Sadim succulents.

Candlesticks Roses, which are poured into silicone confectionery forms. To make a recess for the candle - insert the egg.

Garden figures we will make a couple of minutes (not counting time for pouring and decor). We need a gypsum solution and a soft toy for this.

Suspended porridge we make with a bathing cap. Pour into it a solution. And so that an induction in order formed, we press the bowl and fix it in this position by the cargo.

Stool or mini table will be ready for the IMG! You only need to dissolve the solution in a bowl with a smooth bottom. Lower in a bowl of 3-4 wooden sticks (legs) and fix them with tape to the complete pouring of the solution.

Kashpo from a towel. Just dip the towel into the cement mortar and put on the form.

Then we take out the basis and stain with an aerosol.

Interesting texture will turn out if the shape is fastened by a package with bubbles in which the technique is packaged.

And what only the candlesticks are not! And made in small packages with a zip-fastener, and with lace, and even using bags from coffee.
In the zip package, we pour the mixture, we close the fastener, we put the candle on top and fix the scotch. When concrete freezes the package. Candlestick is ready.

Here for example in a glass with lace.

And how do you concrete or gypsum letters. You can in the garden to make an inscription summer or love or other. For the foundations, make a shape of cardboard and gluculate it with a scotch, so that the concrete does not dilute the cardboard.

More ideas on the channel.
Fountain. It can be made of several layers from concrete, round and square and two intermediate parts, poured with glasses. The size of the formation should decrease: large, medium and small. Each layer with supports from pipes and bottles is given a form.

The design connects, the water supply mechanism is mounted by pump. Everything! You can amaze familiar and friends!

Details in the video:
Feet-hands. The idea is very simple: hands are made with gloves, legs - with boot. Legs and hands cheese into the soil, as if someone became so carried away, which was buried in the ground.

As you can see, a lot of ideas. Some of them are relevant for several seasons and do not think to stop being "fashionable."
Workshops and Ideas for Garden from Cement for beginners
I'll tell you about a very simple design. Immediately I will say that we make the caterpillar. But we will make it in 2 versions.
The first way.
From dry cement, we make 2 piles.

We lay out a solution strip of a solution with a width of 17-18 cm on these bugs.
With the help of a round bowl, we do round the circles along the entire length of this strip and cut out them with a spatula.

Some of the circles are 1,5-liter bottles on some of the circles.
We form around the jokes of the dome.

The same dome, only whole, without holes from the can, form on other circles.
Second
In stockings pour a solution. To make it easy to do, insert the ring into the opening of the stocking (you can cut it out of the plastic tube).
We post our "snake" and form "balls". We tighten the rope of stockings every 17-18 cm.

We put the dry solution or half the ring from the pipe so that the caterpillar is crawling.

Both of our designs must dry and harden. From the first pull the bottle.
We make balls from the solution. It is the eyes and paws of the caterpillars.
Collect the blanks first with basic white paint. And then in green. Paws and eyes make orange.

I fall asleep the holes at the first part of the earth and landfall.
Now these insects can be sent to the garden! T Let it be the only caterpillars on our site!
 By https://youtu.be/gpvs-jkqmqi.
 Kashpo cat do it yourself from cement and gypsum for the garden do it yourself
Think, this cat is very difficult done and you are not able to you? Oaky! I will show you how easy it is to create!
Cut the bottom of the canister. Finding into this part 4 wooden legs from below and 2 from above, where the head and tail will be.
So that cement is well fixed on the basis of using a construction painting grid. Sold by such sticky stripes.
We stir the tight solution and apply it to the surface of the canister and wooden legs.

Apply the shape of the tummy, legs, tail and head.

On my head, we make ears, "cheeks", eyes.
Drink a cat. We apply a finishing layer with liquid cement to align the surface.

After drying is well grinding. We raise!
I stopped at the most pleasant moment! You yourself can choose which cat you will have: red, black, striped! Do not forget about cunning green eyes !!!
 By https://youtu.be/qe9tl3wa0uq
 Decorations for the cottage from cement and gypsum
What can you decorate our cottages? Here are a few ideas.
Huge decorative kashpo.

Lace baskets moistened in yarn solution. But you can take ready-made crocheted products and mix them in concrete.

Kashpo from a terry towel. The texture of this product is very interesting!

Concrete columns. From can be used for pots with flowers or as stands.
Ladybugs. How easy they are made. Need to do the sphere. From half the ball, create a form for a semicircle. Place these spheres on the support. And when the upper layer of the solution is grabbing (but does not harden), you need to decorate the blanks with red, white and black pieces of ceramics, creating the shape of God's cow.

Cats, lions, fish and other animals.

Unusual kashpo, posted from rectangular concrete blanks. You need to lay out such a kashpo. In a checker, around the bottle.
As you can see, it is not difficult to make designs from concrete, and special materials and skill are not needed for this.
Garden decor from rags and cement stages
In fact, this is the same kashpo. But I think, and as an element of decor, this work can be considered.
For the foundation, you can take a bucket, bite it into the croke.

We mix the solution. 2 pieces of sand, 1 part of cement, 1 tbsp. Liquid soap and water. Welcome cloth in concrete. "Wear" fabric to the base.

Edges raise and fix the wire. To round the edges to round, put the bottles in the folding places. So form flower petals.

Let us freeze. Several times lubricate the workpiece with a solution until complete hardening.

Remove from the base and dislike the solution inside.

Now you can be taken for staining. We make a green chashelistic (outer side of the workpiece) and a red bud (inside the workpiece).
As for me, several such "colors", and bright flowerba is ready!
 By https://youtu.be/awqqsscfz8o.
 I can not show this work! Very healthy is a basket.
Cement mix with water.

The solution is wetted in the solution and put on the basis - the bowl of the middle depths, so that it looks like a basket.

The fabric break on the strips of 10-15 cm. Welcome strips these in concrete. Twist them and fix them around the side of our foundation.

We pay special attention to the top basket. We make on top of 2 layers of stripes.

When the workpiece will dry well, paint it into black.
We apply a brown paint brush brush brush, but I don't try to scroll through all the curls, the light color makes the pattern more textured.
The basket is ready, and it can be used as mini-flower!

But there are completely unexpected decisions.

For example, wrapped with a cloth moistened in cement mortar, mannequin. In the folds of "fabric" to plant moss.

Garden dwarf from cement and stockhing with their own hands
For the same principle, mushrooms are made. In addition to the solution and stockhing we need a rope.
Stockings are wetted with a liquid solution. I fall asleep into it. Fill stockings a little less than half.

We pull out the bottom of the stocking together with the solution and tie the "bullshit". So we do down on both sides of the stocking.
The third "shishche" bandage slightly above the first two, between them.

Now we drag the rope sock where the solution ends.
Fill out the rest of the stock rug and again, only half. Tearing the rope.
Excessively cutting off, leaving only 5-10 cm.
Now form a gnome. The lower "shishchiki" is the legs. Sit on them our little man.
Shishchka in the middle - nose. And above it, straight sharpened on the eyes - the hat of the man.
We are straightening and form. Let dry and harden the solution. Several times we cover the gnomes with a solution of plaster and cement so that the figure does not quickly dry, otherwise it dries on top, and inside the mass will be still "movable" and unstable.

Color the gnomes of white paint, and then with colored waterproof paints.
 By https://youtu.be/jy-gjo92-kg.
 How to make a leaf from cement for the garden do it yourself
Large leaf as a drinking bowl for flowers is simply necessary in our garden! But the caspo from the sheet is pretty!
For the manufacture of a vase you will need:
- Cement 1 Ear
- Sand 2 parts
- Water to thick confusion
- Sheet of Lopuha
- Enamel paint or in a can
To make it, we have to find a huge sheet of burdock.
Apply a layer of concrete on it and give the shape of a sheet, rounding it. It is convenient to do at the very beginning, laying out a sheet in a bowl so that the edges of the sheet are raised. Or putting on a slide of sand, solution or land.

Well dry the product and remove the sheet.
If you do on the street, it is better to cover the products with a wet rag until it is completely dry. So it will be durable and not cracking.

Then you can paint and paint the sheet.

Now you can use it as you want! More in the video of the author
Cement and fabric vases
I have already talked about a cass drink from a towel. But now I will show very unusual kashpo from rags. What are they unusual? They are made in different versions:
- Round
- Rectangular
- Giving any other form

We prepare the solution (4 parts of cement + 2 parts of plaster + water to creamy state). It is convenient to first wash your hands, and then mix the mixer.

How to make a round product:it is necessary to simply moisten the tissue in the solution and throw it on an inverted vessel, a bowl or a vase. The form should be covered by the cell. For the strength of the design, 3-4 layers of fabric can be made.

Beautifully will look at the finished product, if you take the wet layers of tissue with a rope, and cut the edges of the fabric.

Rectangular product It turns out on the same principle, only the cloth moistened in solution to the rectangular plastic vase.
Harding blanks are released from the base.

Wash and seal with a liquid cement solution so that the pot has become durable.

Now you need to enhance the edges and sides. Make holes at the bottom of Kashpo. 1-2 times can be mixed in water.

We decorate the vases of paint, cover with varnish. You can use cement figures in molds: flowers and leaves. They are glued to hot glue.

Fill over the pumps with soil and plant succulents.
 Author https://youtu.be/xscegqeexio.
 Of course, other flowers can be placed in such a kashpo!
But there is such a simple option when the finished hat is wetted in solution. It is not necessary to give her particularly form, just put on a bowl or a suitable soccer ball. Do not forget to wear it first the Craca, so as not to spoil the ball.

We stretch the cap, we add cement slightly in the right places, align and leave to stick.

We take out the ball and decorate rags, closed in cement.

Color and take a flower into it.
 Author https://youtu.be/tqgkltseqce.
At the expense of the balls of ideas countless! For example, you can make dense balls or lacy, textured and not too smooth, not too balls. And now I'll show it all!
Openwork.
We need:
- solution;
- rope, torn to thin strips Fabric or yarn;
- the basis: the ball, the balloon (it is better to take a babalx, it is a denser ball).
How to do.
Mix the rope in solution.

Wrap a ball and give to completely dry.

Run the ball.

A source
Ball from leaves.
First we will make a lot of blanks. How to make a leaf, I already wrote above. To do this, apply the cement layer on the sheet.

That's just our leaves are small. And in order to give them a form, we must apply and secure the adhesive tape sheets to the base.

Now you can apply concrete to the surface of the leaves.

After that, give the design to dry and remove the base and leaves.

A source
Whole.
Fill with a layer with a solution. If the ceiling is divided into 2 halves, well, then you can use it repeatedly.

If it is not divided, there will be a plane carefully smash to remove the ball.
A source
Instead of the slap, the ball will fit. Such balls will be interesting to decorate with pieces of tiles, buttons, etc.
So, we will need:
- cement
- sand
- rubber ball
- shopper
We wash the solution: cement (1 part) + sand (3 parts) + water. Cut the hole in the ball, allowing the passage for a small blade. Fill the ball with a solution. We are waiting for the hardening 24-48 hours and remove the "skirt" of the ball.

Remove the ball completely, squeak the surface.

And decorated at will or leave as it is.

Hollow. Such balls are made using balloons and bandage (cloths) dipped in concrete solution (or plaster). Rags cut into strips.

Then we look with rags. For convenience, put the ball on the jug.

If you want a ball vase, then we stick out not to the end, if a completely closed ball, then we glue half, we wait when it gets dry, turn over and continue to glue.
When hardening, piercing the ball and take it out. Fill all the irregularities of the cement. Okrew the surface after solidification.

Strike at will.
A source
Frog, Hedgehog, Cement Cat
Such a frog will be able to make a baby! Mix 2 pieces of sand + 1 piece of cement + 1 spoon of PVA + 1 spoon of detergent for dishes. These additives increase the strength of the concrete and give it elasticity. Sculpt becomes much easier. The solution should be sufficiently thick.

Fill the ball with water with water and glue it with gauze dipped in cement. It turns out a reinforced ball with a hole from above. We attach loup-eyed eyes from half-graded cement, draw a smile. Our frog is ready!
But what a cute cat!
Mix 2 pieces of sand + 1 piece of cement + 1 spoon of PVA + 1 spoon of detergent for dishes. These additives increase the strength of the concrete and give it elasticity. The solution should be sufficiently thick.
Separately, in the bowl, cement mix with water and dip in this solution with a cotton fabric towel.

On the bucket we put on a towel in the cement. Without towels, concrete slides on the bucket.

From a thick cement mass, like from plasticine, we begin to sculpt the cat - we throw the layers on the rag and form a figure.

We enjoy the ears with wire.

For the eye, we use glass pebbles with painted with pricked pupils, fix them on PVA glue 5.

I carry the muzzle.

Toothpick draw a mustache and dots on the face.

We leave for 24 hours to set.
The internal part is filled with a cloth moistened in a solution of water and cement. And close the bottom of the sand and cement.

We proceed with sandpaper and soil.

Coloring acrylic colors and coated with acrylic varnish on 1 layer, then with a varnish "Zapon" by 2 layers.
Rush "Zapon" can sometimes eat acrylic paint, so first it is recommended to cover acrylic.
Here is such a cute cat turned out. You can leave it in gray, but my cat will live on a kindergarten area, so it will be so bright! I wish you beautiful and interesting works! Good luck!
 By https://youtu.be/ianuxfb2dak
 And the hedgehog will still be faster!
Fill the package, or rather its angle. It is a spout of the hedgehog! Package for amenities I wear on the bucket, so that the angle is at the bottom.

Put the package to the container, so that the spout lay, fill the hedgehog torso.

So that the hedgehog is not broken, put the locksters. When the part of the bag was filled, form directly through the nose package and hedgehogs.

Needles are carpet. Cut out the part of the carpet, we make cuttings - cutouts, so that the carpet is not shaking.

And glue it to the frozen billet.
 Author https://youtu.be/rpa8xcdowro
Well, what is the cottage without mushrooms?)) Let's do them! Another busy idea for garden decoration is a mushroom made of concrete. I offer you a master class on making fungi. Maybe seduce, do the garden sculpture? And how to decorate these mushrooms, you already decide for yourself.
For the caps, we will need bowls, plates. For legs - cones or vases.

Mix the cement with water to the consistency of thick sour cream. It is better to pour cement to water. As a plasticizer, you can add a spoonful of liquid soap or shampoo.

The form is lubricating than you mostly: it is possible to dilute with water or detergent like Fairi to dilute with water. And you can be clinging the cell phone - a very interesting effect is obtained.

For the leg into the cone we fall asleep sand, so that the consequence is a flat top of the desired diameter. And pour cement mortar.

For the cap - fuel plaster or concrete into the bowl. When the solution grabs a little, insert the mushroom into the middle.

After the fill, the form will slide a bit to fill the space evenly, release the air and make a smooth top.
The leg is fixed with bricks so that it stands exactly until the concrete hardens.

As a form for the leg, a cup from under sour cream can be used.

If you want to get a beautiful hat, then use wavy plates or the scope of the package or plasticine in the right places.

These mushrooms are obtained.
 By https://youtu.be/q15ki_10p7k.
 There is another option - the first thing is poured with a hat, stick, bottle or high vase insert into it. Then cover the leg with a thick solution. The mushroom can be decorated and make an aman or champignon from it!
But another option without forms. We make a hole in the ground, cover it with leaves and pour a thick concrete, which gives a beautiful, corrugated surface.

And the leg here is offered to reinitive nails. Insert nails or screws in cement, we wear a glass from above without the bottom.

Fill it with a glass of cement and insert 3 more screws so that it is convenient for them to fix the mushroom in the garden.
When it freezes, remove the sheet and a glass and stain with acrylic paints. Top hats orange, low yellow.
Then, when the paint dries the top of the hats coated with a bitumen varnish. White spirit remove the excess varnish.
Bottom Hats and leg in some places Tinging a bitumen varnish. When dried with acrylic varnish.
As a result, we get a beautiful, similar to the oil mushroom.
Video selection of cool ideas and master classes.
How do you know ideas? Noted for themselves some model with which you will start your country creativity? Breasting your works and be sure to tell friends about this article!
Deciding to decorate your household plot, many decide to acquire garden sculptures. Having bought a couple of interesting specimens, a few gnomes, hedgehogs and a hare, wakes up a desire to do something with their own hands. For these purposes, it is not necessary to buy expensive molds. You can make figurines with the help of remedies. We invite you to start your creative activity with mushrooms, which can be made.
So you will need:
Sand;
Cement;
Glue for laying Ceresit tile, moment or other brands;
Rubber ball (you can take old unnecessary or buy the cheapest);
Plastic 2-liter bottle of soda or beer.
Metal rod or fittings.
Rubber ball cut into two parts. Next, take a bucket and smear the sand into it. In the sand, we make a recess and install a halp of the rubber ball in it. If the ball is easy to put on the ground, then on the top of the future mushroom cap will be a ugly fold-dent.

Now it's time to make a concrete mix. To do this, you need to take sand, cement and glue for laying tiles or glue for reinforcing or gluing polystyrene foam plates. The glue is necessary in order for the mixture to be more plastic and durable, and in the future did not give crack. The proportion is as follows: 1/2 sand, 1/4 glue and 1/4 cement. When you add water, you should not pour too much, because the consistency should not be too liquid.

Fill out the half of the rubber ball to the edges of the resulting mixture of concrete and recall. We take a plastic bottle cut off from two edges and drown it in the center of one centimeter into a filled ball. Insert the reinforcement so that it connects the bottle (the feet of the mushroom) and the half of the ball (the mushroom hat). It's time to fill the concrete mixture from the plastic bottle of the cylinder.
After all, you need to give a product to dry.

The rubber ball can be removed the next day so that the mushroom hat is dry faster, and the feet of the mushroom should be in a plastic cylinder for at least three days. After this period, it is necessary to take a building knife and cut the plastic cylinder, freeing the feet of the fungus. Now it is necessary that the liberated leg of the fungus is in the open state, he dried well.

Here it is necessary to make a small explanation. When the ball takes off, the mushroom hat will already keep well the form, but it will be still damp and fuel to make some adjustments. With a spatula, it is recommended a little round edge of a mushroom hat. If there are minor voids on the surface in a hat in a hat or leg, they should be filled with mortar. After the mushrooms dry well and supplement, it must be opened with a primer. Primer protects mushrooms from various weather phenomena, and in addition, it will be the magnificent basis for further staining.

Different materials can be used as colors: paint in cans, oil paint, acrylic paint, etc. If you want your fungal glitter in the sun, then you can open it with a layer of varnish after staining. Mushrooms can be painted in various ways. If you make a red hat and on it white circles, then you will get very interesting, fabulous amanita. If the mushroom hat is brown, then the boringe will turn out. If you want something unusual, then you can let the mushroom hat with a can with a gold paint. And if you liked the idea with an amicer, you can paint the mushroom hat in red, and in the store for creativity to buy glass pebbles of white and stick them with glue.
Homemade stones for the garden.
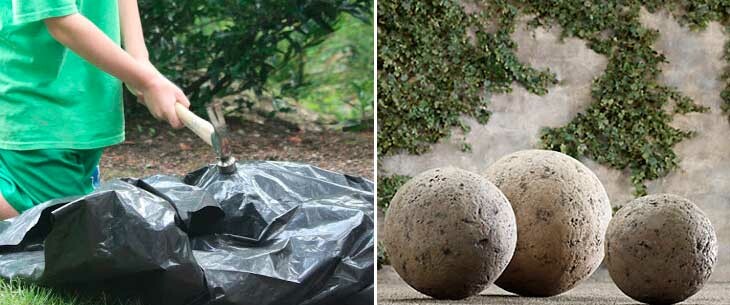
If you do not want to create a full-fledged stone garden on your site, but there is a desire to diversify the landscape, throwing a couple of interesting stones into the corner, I suggest a simple, but a worthy decision - make stones yourself.
1. Determine the size and number of stones you need. To select the selected size, select a container. You can use the usual plastic pelvis.
2. Pour sand into the container and unlock it so as to obtain an oval shape. If you want to make a stone of irregular shape, pour a little water in the sand so that it does not face.

3. Cover the sand with a large piece of polyethylene. Better if it is transparent. So it will be easier to control the formation of stone.
4. To obtain the effect of old, not artificial stone, put on the bottom of the moss. To give decorative, you can add pebbles, glass elements and in general everything that will suit you in your rocarium. After the completion of the work, all this will be a vertex of the created stone.

6. Fall asleep in shape, bend the edges of polyethylene and tie. It remains to wait until your stone order and attribute it to the prepared place.

If you want to get a huge stone, I advise you to make a stone hollow, to save cement. Rissing the solution across the form thick 5-10 cm, depending on the size, pour into the middle of the sand and wrap in the same way with polyethylene. After sand can be deleted. It is also useful to make big stones on the place where you will install them and in a cardboard box. When the stone is ready, you only have to break the box, polyethylene and turn the stone.
And I also remembered that the cement makes moss, it can be gratened with kefir.
(19
estimates, average: 4,05
out of 5)
 Garden figures made of concrete Or gypsum is becoming increasingly popular. Each owner of the country area or country mansion can become a sculptor and designer, it suffices to awaken this talent.
Today, most parks And the gardens are decorated with plaster or concrete sculptures. Crafts from concrete are installed both in the center of the plot and in secluded quiet corners. There are many companies that can make for you any sculpture under the order or sell a ready-made sample. However, it is always much more interesting to perform garden sculptures from concrete with their own hands, putting creativity and a particle of your soul in them.
These works will not require large financial investments, it is possible to make them from cement or gypsum. A distinctive feature is durable. You can give products a variety of forms and color.
 Before proceeding to the manufacture of garden figures, it is necessary to accurately determine its purpose. This moment is very important because it depends on it, what materials will be required to perform the sculpture.
So to fulfill concrete products With your own hands, you will need:
- Aluminum wire to perform the framework of the future product.
- Concrete solution or a mixture of water, sand and cement from the calculation three parts of cement And one part of the sand.
- To increase the plasticity of the solution, you can add to it PVA glue.
- It is possible to increase the moisture resistance of the solution with liquid nails.
- Putty knife.
- Polyethylene film.
- A small sprayer filled with clean water.
- Plastic pelvis.
All materials are better prepared in advance.
How to prepare a solution
 To prepare a concrete solution, take 3 parts of the cement and mixed with 1 part of the sand. All this is thoroughly mixed and water is gradually small in the mixture. The amount of water should be less than 2 times the amount of cement. It is possible to knead the solution Just as the dough knead. As mentioned above, you can add liquid nails and plow glue to the mixture to improve the quality and longevity of the product.
To check the quality and availability of the resulting solution, you can take a small lump and squeeze it into the palm. Then in the resulting mass make a deepening. If water appeared in the center of the yamer, you should add a little cement. If the lump begins to crumble, add more water to the mixture.
Gallery: Garden Figures from Concrete (25 photos)


Making a molding method
This method is one of the easiest and most affordable for making Crafts from Cement. Even a novice sculptor will be fully able to perform a fungus or God's cow, a turtle or a ball. To the resulting workpiece will be left to add only a few parts, and then paint it - And the charming decoration for your yard or garden is.
Mushroom
 Mushroom made of concrete - This is the simplest and affordable beggar. You can make a white fungus or amanome - it all depends on the color and shape. Concrete consistency should resemble the oil under room temperature - not liquid, but enough plastic so that something rounded can be made. It is best to deal with such creativity in the summer.
The sequence of action in the manufacture should be as follows:
- To make a hat - in the sand is deepening with a deep bowl.
- On the bottom of the recess you can put a sheet of burdock, Then the surface of the hat will remind the real one.
- To enhance the hat, in its center is inserted armature or a piece of wire.
- The leg can be done using a rubberoid or linoleum. It needs to be collapsed into the tube, which is filled with concrete solution.
- Both parts need to dry, and then combine with a solution and a piece of fittings.
The finished product should dry for 3-4 days, after which it can be painted.
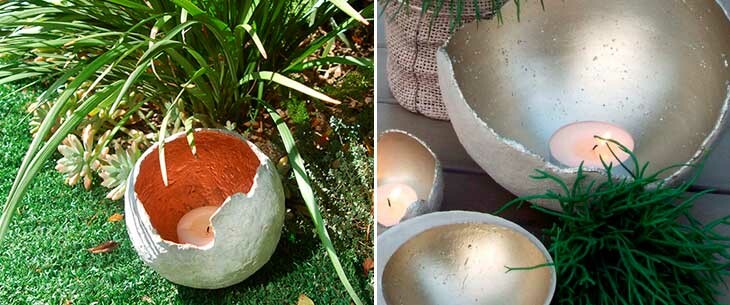
Hemispheres
 Figures made of plaster or semiference concrete - it is one of the most simple in the manufacture of jewelry for yard or garden. This one can be all kinds of turtles, hedgehogs, ladybugs, etc.
For their manufacture, you can use any capacity of suitable form - bowl, basque, having a rubber ball. Behind the absence, nothing will be used and just a fossa in the sand, the bottom of which will be assessed by newspapers. The resulting form is poured with cement and wait for its drying. The resulting hemisphere can be used to perform some features.
 A very original decoration can be made in the following way: Medical rubber gloves are filled with a solution and are located in such a way that they hold something. It can be a pot that they will later support. Give the concrete to frozen and carefully remove the remains of rubber gloves. Obtained hands filled land Or support flower pot.
Artificial boulders
 If you have no large boulders at your hand, but there is a desire to arrange a plot in this way, should not be desirable and overpay a significant amount for the import on plot of natural boulders. It is much easier to make the imitation of large stones from concrete. These decorations will be hollow and relatively light.
Boulder framework can be form from assembling foam. You can take advantage of a large number of paper, it is pretenuating its combing. The resulting conglomerate is wrapped with a plaster mesh and a solution is applied from above with a spatula. It is not necessary to make a stone absolutely smooth - so you can lose the similarity with natural boulder. The resulting product is covered film and retribute to dry.
Frame concrete sculptures
 If you already have a certain skill in working with concrete figures, you can try to create a decoration more. Frame sculptures require defined artistic and sculptor skills and good spatial imagination. With the help of carcasses from fittings, you can create the most unusual and complex jewelry - up to fabulous locks.
Before making making, it is necessary to make an outline of the future product from a flexible wire. The accuracy of the execution of the frame directly affects on the final type of product.
If the product is planned to be monolithic, the solution is applied directly on the frame. In the manufacture of hollow samples, the framework is wrapped with a construction grid and the prepared solution is applied from above.
First apply the first layer of cement, the field of which is beginning to form a general view of the composition. Applying the second and third layer, form smaller decorative elements. At the end of the product, they give dry, after which they cover the paint of the necessary colors.
Materials and tools for frame sculpture
For the manufacture of a skeleton sculpture from concrete, you may need:
- Concrete solution.
- Rabita grid or aluminum wire for the manufacture of a frame.
- Polyethylene film.
- Polyfoam to facilitate the weight of the product.
- Old unnecessary tanks - buckets, basins, plastic bottles, etc. This will create more easy figures.
- Putty knife.
- Water sprayer.
- Paint for the coating is best to use paints for outdoor facade works.
- Rubber medical gloves.
- Protective face mask from dust and evaporation.
- To process the finished product, it will take a saw with diamond circles.
Questions of general stylistics
 If you approach the question ineptly - you can spoil the whole type of garden plot. To avoid this - we recommend using the advice of specialists. Getting Started with the selection of a garden sculpture from concrete, first it is worth drawing a plan of your site and place the alleged decoration figures on it. For each figure it is very important to pick up or create an appropriate background that will emphasize its beauty.
- Small products are best arranged in open areas. Next to the garden paths, reservoirs or flower beds. You can arrange them close to the hedge.
- If you plan to make a large sculpture, it will be great to look at the fountains or high shrubs.
- The image of concrete must harmoniously fit into the general style of the style of your garden or the country area. If the site is decorated romantic and seated with flowers - monophonic figures of people or plant compositions will be very appropriate.
- Garden in a rustic style can be decorated with decorative features of animals or folk elements.
So that their concrete figures are excellent quality and very durable, it is necessary to properly select the cement brand. Making a manufacturing, be sure to remember the safety technique. It is recommended to use rubber gloves and a mask closing the nose and mouth from dust and evaporation of chemicals.
Concrete or cement solution can be used not only as a building material, including both excellent material for the implementation of creative ideas - the manufacture of garden-park sculptures.
What will be required for manufacture?
In order to decorate its incoming territory, the garden or landscape design with concrete sculptures is not required special education, special equipment and special skills. It will be necessary - desire, spatial thinking, the ability to work with concrete and the feeling of beautiful. It may take the ability to work with the welding machine.
Depending on the acupuncture technology, the following materials and tools will be required:
- Capacity for kneading a solution or concrete mixer;
- Shant tool: shovels, spatula, trowel;
- Steel or aluminum wire;
- Pliers and nippers;
- Portland cement M400 (white or gray), sand, water, plasticizer for concrete (for example, detergent of Fairi or PVA glue);
- Polyethylene film;
- Plastic construction grid;
- Paint and primer for external work "on concrete";
- Filling Molds (Options for manufacturing sculptures using fill in forms).
Options and technologies
Before you begin to knead the material, you should decide on the type of sculpture manufacturing technology. It depends on the form and size of the product. Simple sculptures such as: mushrooms, koloboki, figures in the form of spheres or hemisphere can be made using the fill technology in forms, complex "realistic" sculptures in the form of animals, colors, trees, birds, cartoons on people and other similar products are made in more complex - Frame technology. A relatively small figures can be cut from concrete manually by analogy with plasticine.

Frame technology
This is one of the most complex technologies that provides for the production of a frame of a future sculpture from steel or aluminum wire. There are no standard recipes here, except for the recommendations of use as the basis of any suitable unnecessary things: boxes, wood, rags, etc.
The frame can be made of aluminum wire by knitting, from steel wire with welding metol, or a combined method - welding the base of the sculpture and mating of its individual elements.
If the sculpture is planned as a hollow (preferred option), the frame is very neat and thoroughly covered with a construction grid. In the manufacture of a hollow figure, the expensive components of concrete will not only save, but there is no need to order load-lifting devices to move and install permanently.

Application of the solution on the frame is made by layers, spatula and trowel. Each new layer is applied after the beginning of setting the previous layer. After the last layer is applied, and the concrete will grab, but will not dry, the defects of the sculpture should be corrected (influx, drums, burrs, etc.). This can be made with a spatula, knife or large sandpaper.
Fill technology in finished forms
Technology provides for the purchase or manufacture of special forms by analogy with the construction formwork. For example, for filling the mushroom cap, you can use a bowl, a basin or a half of the ball lined with a plastic film, and for the leg - a plastic bottle, which is cut after the concrete after setting and removed.

In the manufacture of a form, the absence of large slots should be ensured through which the solution is possible. Also in order to save concrete inside the form, you can put a plastic bottle, or fill the space with unnecessary rags.
Concrete solution preparation technology for pouring sculptures
- Sand sieves and mixed with cement in a 3: 1 ratio. Choosing between white and gray portland cement should be borne in mind that the paints applied to the white cement will look brighter, rich and natural. At the same time, white cement is much more expensive than the usual "gray" binder;
- A clean water and a plasticizer in the proportion of 200 ml of liquid on the cement bag of 50 kg are added to the obtained homogeneous mixture in small portions. Stirring to homogeneous mass is performed. Control of the consistency "thick sour cream". If the concrete is too thick - add water and mix again.
After receiving the consistency of thick sour cream, the solution is ready for applying to a frame or a shell form.
 Why you can not give icons
 Is it possible to give icons as a gift: Signs, the opinion of the Church
 A year ago left her husband, and now I do not know what to do