Make yourself - two-level ceilings from plasterboard. How to make a two-level plasterboard ceiling: markup, installation of the first and second level frame, installation of sheets how to make a suspended two-level plasterboard ceiling
When you look at such an impressive ceiling construction, only experienced specialists are able to cope with such complex architecture, only experienced specialists are capable of handling: the triumph of nonlinearity, the inventive zonal illumination, skillfully underlined accents in the visual appearance of the room. In fact, everything comes out much easier: make such a two-level ceiling made of drywall, with their own hands, it is quite forces to everyone. Of course, this will take time, patience, relevant tools and materials. And also - our step-by-step instruction, revealing all the secrets of successful and high-quality installation of a two-level ceiling, even never seen drywall in the eyes of a person.
General characteristics and selection of material

Plasterboard - compressed gypsum canvas, decorated in a sheet and wrapped with a facing cardboard.
It is successfully used in construction and finishing for more than 100 years, although the peak of popularity was released only today. The reason for such late appeals to a very convenient and inexpensive finishing material lies on the surface: the active development of the entire industry - and as a result of this, an excellent offer on the market, which makes it possible to choose drywall sheets of the necessary characteristics and color solutions.
- "Breathable" material;
- environmentally safe;
- does not relate to the flammable;
- supports normal humidity in the room for humans.


The main disadvantage of plasterboard sheets is enough weak moisture resistance. Moreover, there are sheets of GLC with the "pumping" indicator of moisture resistance - they go, as a rule, in green or blue color - but even in this case, plasterboard is not recommended for use in the outdoor. In addition, it is afraid of minus temperatures and differs fragility.

The range of use of drywall is wide, but the ceilings take a key place in it.
Buy the desired material in order to make a two-level ceiling of drywall with your own hands, only in words seems to be an elementary business. First you need to find out which of its existing species is best suited specifically for your repair. This functional intended place is determined:
- what is the level of humidity;
- how big is the level of fire danger;
- the frequency of temperature differences;
- bottom and upper temperature threshold.
How to choose plasterboard sheets correctly in order to make a two-level ceiling of plasterboard with your own hands, you will tell you our table, in which, opposite each type of drywall, a recommendation is given under the terms of use.
| Type of plasterboard | Color | Purpose |
| Normal GLC | Grey | For interior decorations in rooms with normal and low moisture mode |
| Moisture-resistant G Clacv | Green | For interior decorations in rooms with dry, normal, wet and wet humidity modes |
| With increased resistance to the exposure to open fire GKLO | Gray / Pink | For interior decoration in fire hazardous rooms |
| Moisture-resistant with increased open flame resistance G Clevo | Green | For interior decoration in fire hazardous rooms with high humidity |

Also, when selecting a material for mounting a two-level ceiling, pay attention to the following points:
- dimensions (most often 250 cm long and 120 cm in width);
- type of side edge (straight, drowning, semicircular, rounded);
- sheet thickness (no more than 9.5 mm).

The specified dimensions are standard, but you can always order the manufacture of sheets under the order. In this case, you have to wait, but to perform the installation of a two-level ceiling will be much more convenient and easier. As for the choice of type side edge, on purely practical considerations, the choice of a semicircular or drown edge looks optimal: less need to spend time for post-processing.

Most Popular Manufacturers:
- Knauf (Germany);
- Gyproc (Finland);
- LAFARGE (France);
- Rigips (Austria);
- OJSC "GIPS" (Russia).


Required tools and materials

The purchase of just such a plasterboard would not be restored if you want to make a two-level ceiling of plasterboard correctly. After all, to secure the acquired sheets will need to build first frameYes, no one has canceled the finishing treatment. Let's look at the tools that can be boldly to call "Mast Hev" for the installation of a two-level ceiling:
- scissors for metal;
- screwdriver with a brown;
- knife;
- hacksaw;
- corolnic;
- roulette;
- laser level;
- spatulas;
- protective gloves;
- protective glasses;
- pencil;
- passatia;
- painting thread;
- mounting tape-serpentine;
- ladder.


In the video below, the experienced master very convincingly talks about why each of the tools mentioned by us is also needed in the work on the installation of a two-level ceiling, like fuel for the full functioning of your car.
And, of course, consumables, without which your tools will not be able to prove their usefulness:
- uD guide profile;
- ceiling profile CD;
- crab connectors;
- ceiling suspensions straight or spring (with a distance from the concrete base by more than 120 mm);
- extension cords for the profile (where the width of the room is greater than the usual length of the profile);
- dowels;
- self-tapping screws 25-35 mm;
- primer;
- putty;
- paint mesh.


Very interesting video, which will help correctly pick up separate consumables for mounting a two-level ceiling from the list above.
pay attention to profile size And their purpose - in the image below.

Counting the number of required consumables

- leists Glk - the width of the room is divided by the length of the sheet, add to the resulting number 5% - the required supply - and round up to an integer, add the amount that is necessary for the use of the second level;
- guide profiles - Again in the calculation we take the width of the room, as well as the length of the profile, after dividing the first number to the second and subsequent rounding, we obtain an integer the number of items you need.

In order to accurately determine the number of one or other consumables for mounting a two-level ceiling, in particular, self-tapping, remember that each fixed "crab" is required not less than 8 sams , and each assembly of the ceiling suspension needs in 6 self-proof . Also remember both the step that is observed when installing the crate for the two-level ceiling. It is minimum 50 centimeters .


Preparation of premises and concrete base

- remove the remains of the previous finishing material from the concrete ceilings: be sure to clean it from the raised plaster and treat the antiseptic to prevent the occurrence of fungus or mold;
- if there are cracks on the basis, then close them using a cement-based putty, and after booty;
- acquired sheets of HCL to adapt to the temperature regime of the room, withstand for several days - the best if they are in this horizontal position;
- try to easily free the room - remove the furniture, and if it is impossible to do it because of its dimensions, then cover the film to protect;
- compliance with safety - the priority that you always need to adhere to, so adjust your workplace for yourself to achieve the maximum level of comfort, prepare safety glasses, gloves, check the proportion of the stepladder.


And, of course, without additional assistance, it is not necessary to do here, so you agree in advance with someone - otherwise the two-level ceiling of the plasterboard will be installed with your own hands very problematic.


Room marking

The first action that you must do is to correctly post a room so that in the future you can build a smooth and reliable frame for a two-level ceiling. To do this, you will need a pencil, painting thread, laser level. If you decide to make a two-level ceiling of plasterboard with your own hands, then at this stage there must be a compiled project with a clear marking levels. All you have is to transfer ideas from paper on a draft ceiling.
- determine the height of the room in 4 angles, if the results are different - it happens very often - take an angle with the smallest height as a starting point and make a mark on it;
- with the help of a laser level, we make similar marks in the other three angles and a paint thread that beat the line around the perimeter of the whole room;
- your markup is ready.


It is best to immediately perform marking and for the next level - so you have the opportunity to know exactly how much material you need, as well as perform the work much faster. Decide how the two-level ceiling will look like:
- linear;
- arcuate;
- ragged.

After that, apply on the basic base of the two-level ceiling line to highlight the second level.

Mounting 1st level frame

- we establish the UD profiles guides - they are fixed on the wall at the level that you noted by painting thread, with an optimal step of fastening in 60 centimeters;
- the point marked on the base base is fixing the ceiling suspensions with the same recommended step in 60 centimeters;
- insert the harvested ceiling CD profile and securely fix the suspension;
- as a result, you should get such a simple, but very practical frame;
- in order for he not to ask, we use the "crab" connectors - the design will be much more stable.

The entire process of mounting the first-level frame for a two-level ceiling of plasterboard with their own hands is below the photo.


Leaflery of 1-wing carcass

Getting started at the most interesting and important. Although, in principle, all stages of installation are equally important, but there are already well viewed contours of our future base of the two-level ceiling.
- fixing drywall on profiles using a screwdriver and screws, their caps should go deep, but not excessive - to eliminate damage to the material;
- the correct sequence is the first sheet from the angle, on the opposite side - the following;
observe the movement step - no more than 15 cm;
- in the location of the lamps, make the necessary holes in advance and stretch the wiring;
- at the location of the second level of the ceiling, the plasterboard is not necessary, however, remember that it should come to it about 10-15 centimeters.


Installation of 2nd-level carcass

- we apply on drywall lines that will help to properly place UD profiles;
- we perform the fixation of the pre-rounded UD profile on the wall and on the ceiling - to give it the desired form it is necessary to make notches;
- cut off the desired fragments of the CD profile and insert a smooth side into an already mounted UD profile, fix them in increments of 50-60 cm for linear segments and 20-30 cm for rounded;
- if some pieces are repeated, then you should close their UD profile.


Plasterboard Cover 2nd System

Most often, the two-level ceiling of the drywall, if you do it with your own hands, causes difficulties at the second level of the second level. In many ways, due to the fact that the material needs to give roundness to fix the arched construction. Despite the seeming simplicity of related manipulations, sad cases of damage are very often arising. To do this, to exclude such an annoying opportunity, it is necessary to make notches on the sheet itself - only carefully, so as not to damage the front part, covered with cardboard.

- complex arches require tedious segmentation - cutting into a number of fragments and their subsequent installation to the profile;
- do not forget to make holes for lamps, if these are planned to be used, and to withdraw the wiring.


Finish finish ceiling

So we got to the final part of the mounting of the two-level ceiling of the drywall do it yourself. The finish finish will not cause you any difficulty: this is a fairly simple stage, designed to make the mounted ceilings as possible as possible and spectacular.
- we put the seams with sickle;
- we take a narrow spatula and put a putty along each ribbon ribbon;
- thoroughly smear the putty all the tapping screws so that after it was not visible to rust on their hats;
- process the entire surface of the primer;
- we carry out the finish decoration - whitewashed, painting.


As a result, you must have a beautiful two-level ceiling with a harmoniously performed arch or with a complex geometry with a majority of truncated fragments. Didn't you dream about it, starting this tedious (or not very?) Installation?


Collection video installation and finishing

It is better to study the features of the installation and, accordingly, make a two-level ceiling of plasterboard with their own hands will correctly help some of the video below.
Photo gallery of the most popular options

Take a look at what kind of cute options are when people are taken to make a two-level ceiling of drywall with their own hands - and responsibly, creatively suitable for their work.


Conclusion
Of course, make a two-level ceiling made of drywall with their own hands seems to be some man. In comparison with conventional single-level ceilings, a two-level design requires much greater time costs and a certain patience, because it is necessary to work not only with simple linear boxes, but also with interesting arcuate construction (read the instructions for installing single-level plasterboard ceilings in the article: "
The ceiling is the most visible part of the interior of any room. If all flaws of flooring and walls can be hidden by furniture, carpets, tapestries and other objects, then the ceiling is always in sight. That is why when planning it is paid to a lot of attention. The era of a simple alignment of the ceiling by plastering and plaque mixes has long passed, is now relevant to more complex structures that give a unique view of the room, create a comfortable zonal backlight, beat all the strengths and hide the lack of interior. And many it may seem that the creation of such a ceiling is the case of the highest level professionals. The task of this article to debunk this myth and convince the reader in the fact that a two-level ceiling of plasterboard will be able to make any normal owner.
A little about plasterboard
Many mistakenly believe that drywall in our country appeared in the early 90s of the XXVEK, when Western building materials became available and "hung" to the Russian market. Few people know what was invented and patented drywall was still in the XIX century, and large industrial production was established in 1917. Skeptics may argue that during the time of the USSR, nothing was known about drywall, but stubborn facts talk about a friend - this material was successfully applied by Soviet builders, however, it was called differently - dry plaster. It was not available to everyone and was not applied in civil engineering facilities, therefore such an erroneous judgment.

But now everything has changed and plasterboard can buy each, it is in any construction store. Moreover, the entire range of components is attached to it: profiles, connecting elements, fasteners, materials for sealing joints and much more. But the main thing is that in open access are all technologies for working with plasterboard, manufacturers do not hide it at all. And not at all, not necessarily contact "super" specialists. It can better understand himself and make sure that this is in principle there is nothing difficult. The main thing is to follow the recommendations that have been developed on the basis of the experience of many decades. But let's go about everything in order.
How is the plasterboard?
In the title of this unique building material, its structure is hidden. The basis of this building material is a gypsum web of a rectangular size, which is saved on all sides with a facing cardboard.

Gypsum is a natural mineral that has a number of unique and useful qualities:
- The pH of the gypsum is very close to the human body.
- Production of gypsum-based products does not cause harm to the environment.
- Gypsum is a non-combustible material.
- Gypsum products contribute to maintaining a normal level of humidity, as they say in everyday life, this material is able to "breathe".
The main disadvantages of gypsum, which limits the use of building materials based on it is insufficient moisture resistance and fragility. Therefore, standard plasterboard does not apply outside the premises, and only special sheets that have a special labeling are used in rooms with high humidity.
Types of plasterboard
Plasterboard sheets, depending on the place of their use and the presence of the desired properties there are different nomenclature. About which there are plasterboard sheets are described in the following table. At the same time, the nomenclature of the leading manufacturer of building materials is shown as an example - the world famous company Knauf.
| Picture | Name | Cardboard color | Marking color | Application area |
|---|---|---|---|---|
 | Plasterboard ordinary () | Grey | Blue | For interior decoration of premises with normal and dry humidity modes |
 | Plasterboard moisture resistant () | Green | Blue | Sheets have a reduced (no more than 10%) water absorption. Applied in rooms with dry, normal, idle and wet moisture modes |
| Plasterboard with increased resistance to exposure of open fire () | Gray or pink | Red | They have greater resistance to the effects of fire. Apply in fire hazardous premises | |
 | Plasterboard moisture resistant with increased open flame resistance () | Green | Red | Combines the properties of the GCCV and GKLO. Used in fire-hazardous rooms with high humidity |
From the table, it can be concluded that the use of one or other plasterboard sheets determines the moisture mode in the rooms, as well as the level of fire danger. What are the humidity modes of buildings, depending on the air temperature, is shown in the following table.

Knauf engineers depending on the designation of the premises developed recommendations on the use of various types of plasterboard sheets.

Plasterboard sheets are rectangular sheets that have different sizes of thickness, widths and lengths. The main geometric dimensions, as well as the mass of 1 m 2 sheet shown in the following table.

Most often on sale there are plasterboard sheets having 2500 mm in length and 1200 mm wide. The remaining sizes are usually made by the manufacturer by order. In addition to the geometric dimensions, plasterboard sheets have another important indicator - the side of the side edge. If the end edges are simply cut under the right angle of a sheet with a bare gypsum core, then the side edges for the convenience of the joints of the joints can have a different profile, and they are placed with cardboard. Types of edges of plasterboard sheets (GLC) are shown in the table.
| Picture | Edge type | Designation | Application |
|---|---|---|---|
| Straight edge | PC / Vr. | It is used in two-layer designs from GOC, when not required by the junction of the lower layer joints | |
| Drown edge | MC / AK. | Requires an embarrassment of the GLC reinforcing ribbon and putty type "Knauf-Fumen" | |
| Semicircular with front side edge | PLC / HRK. | Sealing the seam without a reinforcing tape with a putty type "Knauf-Uniflot" | |
| Semicircular and drowning with front side edge | Pluk / Hrak. | Seaming seam with putty "Knauf-Fumen" with a reinforcing ribbon, and "Knauf Uniflot" - without reinforcing tape | |
| Rounded edge | ZK / RK. | Installation of GCL followed by plastering |
In the decoration of ceiling and wall structures, the use of GLCs with a thin and semicircular edge (Pluk) is most often found, which reduces the technological chain of the finishing finish, and this is a rapid process and significantly reduces it.
Profiles and fasteners for plasterboard systems
Naturally, the plasterboard sheets themselves are very rarely attached directly to the walls and even more so for such a responsible design as the ceiling. Frames are harvested for fastening, and there are already plasterboard sheets with special fastening elements. At first glance it may seem that the construction of plasterboard structures includes a huge range of components and fasteners, but in fact everything is much easier. Consider which profiles are used to arrange the framework of duplex ceilings.
| Picture | Name, Designation, Rus / English | Description and appointment |
|---|---|---|
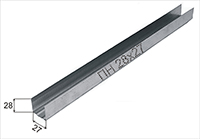 | Profile Guide Ceiling Mon 28 * 27 / UD 28 * 27 | It is made of galvanized steel with a thickness of 0.4, 0.5 or 0.6 mm. Standard length 3000 or 4000 mm. Designed for sharing with PP 60 * 27 / CD 60 * 27 profile for arrangement of metal frames ceiling and wall cladding |
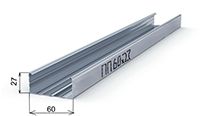 | Profile Ceiling PP 60 * 27 / CD 60 * 27 | The ceiling profile is the basis for forming a metal ceiling frame from GCL. Can be used for cladding GLC walls. Released with a thickness of 0.4.0.6 m and standard 3000 and 4000 mm long |
 | Profile guide rack pn 50 * 40, 75 * 40, 100, 40 / UW 50 * 40, 75 * 40, 100 * 40 | It is made of galvanized steel with a thickness of 0.4, 0.5, 0.6 mm. Standard length 3000 or 4000 mm. Used in conjunction with PS / CW profiles of the corresponding dimensions in the manufacture of partition frames, but can be used in some particularly responsible places of the suspended ceiling design (mainly Mon 50 * 40 / UW 50 * 40) |
 | Profile racking PS 50 * 50, 75 * 50, 100 * 50 / CW 50 * 50, 75 * 50, 100 * 50 | The basis for the formation of partitions with the corresponding Mon-profiles, but can also be used in the ceiling frames (PS / CW 50 * 50) |
Can be equipped in rooms where high humidity will be affected or aggressive chemical compounds. That is why profiles are made of galvanized steel, which is less susceptible to corrosive processes. The thickness is best to choose 0.6 mm, as these profiles provide better stiffness of the structure. It is allowed to use profiles made of galvanized steel 0.4 or 0.5 mm, but only in those places where it is required, for example, to make short jumpers, auxiliary elements and more. Bearing elements of the ceiling should be made only by a 0.6 mm profile. The length of the profile (3000 or 4000 mm) is chosen on the basis of the geometry of the room. The main rule is where it is possible to use one-piece profile segments.
Manufacturers of plasterboard sheets and components to them additionally provides for the possibility of using wooden bars with a cross section of 50 * 30 mm or 50 * 50 mm. In this case, it is necessary to choose the wood of coniferous rocks with humidity of not more than 12%, while all the bars before installation must be prepared by antiseptics and antipirens. But in the creation of complex ceilings, especially involving curvilinear elements, it is best to use metal profiles for the following reasons:
- Metal profile has anti-corrosion protection, does not require additional processing.
- Metal profiles are easily processed by an affordable tool, with their help to easily create any, even the most complex design of a multi-level ceiling.
- Manufacturers of plasterboard systems have developed various technical documentation for the installation of structures with a detailed explanation of each stage and drawings. All this information is in open access.
- Metallic profiles are available at any building store and sold at a reasonable price.
In addition to profiles in plasterboard systems, other elements are used for mounting and fastening frames to building structures. These elements there are a great set, but we will consider only what the two-level ceiling of plasterboard in the following table.
| Picture | Name | Appointment and application |
|---|---|---|
| Elements for fixing the main and bearing profiles among themselves | ||
 | Ceiling PP 60 * 27 / CD 60 * 27 Profile Connector Single Level (Crab) | It is made of galvanized steel 0.5-0.9 mm. Designed for compounding profiles of PP 60 * 27 / CD 60 * 27 in one level at a right angle. Overall dimensions: 148 * 148 * 18 mm. The compound is performed using metal screws |
 | Control Connector PP 60 * 27 / CD 60 * 27 Duplex | Designed for compounding profiles of PP 60 * 27 / CD 60 * 27 at different levels at right angles. It is used mainly in the designs of "floating" ceilings, that is, not related to the walls. Overall dimensions 58 * 45 mm, thickness 0.5-0.9 mm are made of galvanized steel. In duplex ceilings are rarely applied |
 | Universal single-level contact connector PP 60 * 27 / CD 60 * 27 | Allows T-shaped to connect PP 60 * 27 / CD 60 * 27 profiles both at a right angle, and at an angle to 45 °. It also allows the longitudinal connection of profiles with an angle to 30 °. Additionally, mounted on the carrying base. Dimensions 215 * 53 mm, thickness 0.5-0.9 mm. It is very rare, since there is a lot of alternative ways to connect profiles |
 | Extension Profiles PP 60 * 27 / CD 60 * 27 | It is made of galvanized steel thickness from 0.5 to 0.9 mm. It is used for longitudinal connection of PP 60 * 27 / CD 60 * 27 profiles. The extensionist reliably connects two profiles without loss of strength. Metal screws are used for fastening |
| Elements for fastening profiles (wooden bars) to carrying base | ||
 | Suspension straight for PP 60 * 27 / CD 60 * 27 profiles | Designed for fastening the ceiling PP 60 * 27 / CD 60 * 27 profiles to the bearing base: the ceiling or walls, with the help of appropriate dowels or anchors. It is made of galvanized steel thickness from 0.5 to 0.9 mm. Overall dimensions 60 * 30 * 125 mm. For fastening wooden bars, direct suspensions 50 * 30 * 125 mm are produced, but they are extremely rarely used. The bearing capacity of direct suspension - 40 kg |
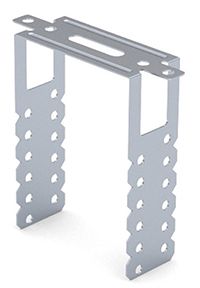
 | Suspension Anchor for profiles of PP 60 * 27 / CD 60 * 27 | It is made of galvanized steel with a thickness of 0.9 mm. It is intended for fastening profiles of PP 60 * 27 / CD 60 * 27 to the bearing base - the ceiling, if the distance from it to the profiles exceeds 120 mm. Carrier suspension capacity of 25 kg. Applied paired with suspension |
 | Anchor suspension thrust | Applied paired with anchor suspension. It is made of galvanized steel wire with a diameter of 3 or 4 mm. Released in different lengths - from 150 to 3000 mm. Fastened through the ear to the ceiling, and the lower part is fixed in the spring plate of anchor suspension |
In fact, in the range of manufacturers of plasterboard systems there are also other elements that allow you to simplify the installation technology. These are special arched profiles, and various types of connectors, but as practice shows, they are extremely rarely used, there are practically no on sale. Therefore, the authors of this article decided to care the attention of the readers of our portal and tell only what is widely used.

When choosing profiles and connectors, it is necessary to trust only known manufacturers and conscientious sellers. Unfortunately, the market is simply flooded by cheap fake profiles for drywall, as well as other components. In the table, we had no wonder the thickness of the profile, since this indicator indicates the required strength. But on sale you can see profiles not only 0.7 mm, but also 0.6, 0.5 and even 0.4 mm, and with the appearance of the inexperienced consumer will not be able to distinguish between the trick. Moreover, sometimes counterfeit products look more advantageous. That is why it is worth buying components for plasterboard systems of only well-known manufacturers, the leader of which is the company "KNAUF". We will not be able to invite a specialist who will help make the right choice. Of course, the original profiles are more expensive than others, but the reliability of the plasterboard ceiling will be at the height.
Fasteners for plasterboard systems
In order to assemble a metal or wooden frame for a drywall ceiling, as well as secure the GLCs exist special fasteners. Usually in the markets and in stores, together with profiles and drywall, sales consultants always advise the necessary hardware, but still the future owner of a two-level ceiling of drywall will be worth to know which fastener must be applied.
First of all, it should be noted that almost all elements should have anti-corrosion treatment. Most often, the fasteners have a phosphated coating with subsequent sinking or electrochanging coating. This avoids corrosion, and also allows staining, putty without prior preparation. Experienced plasterboard installers certainly remember the times when they had to pre-paint the caps of ordinary self-tapping screws so that the rust stains did not appear in the future. Now, fortunately, all fasteners for GKL, commercially available, have the necessary coating and do not require special preparation for the final finish.
Elements for fastening frames for carrier bases
Consider first the fastening elements used to fasten the frames to the bearing bases and the compounds of metal parts with each other.
| Picture | Name | Designation, dimensions | Purpose |
|---|---|---|---|
 | Screw self-tapping with sharp end | LN9, LN11 (length 9 or 11 mm), PH2 slot type | To connect metal parts of the frame with each other without a pre-drill with a profile thickness up to 0.7 mm |
 | Screw self-tapping with an exterminating end | TN9, TN11 (length 9 or 11 mm), Slot Ph2 | To connect metal parts with a profile thickness from 0.7 to 2.2 mm without prior drill |
| Dowel for hollow structures | Molly, with a diameter of 11 mm - length 49-77 mm, with a diameter of 13 mm - length 51-79 mm, Slot Ph2 | For fastening PN / CW profile, PN / UW and attachment equipment to sheet or hollow structures | |
| Dowel Nylonovy | Nat, diameter 6, 8, 10, 12, 14 mm, length 30, 40, 50, 60, 70 mm | For fixing guide profiles Mon 28 * 27 / UD 8 * 27 to solid wall structures | |
| Dowel multifunctional nylon | YLT, diameter 6 mm, length 35, 40, 50, 70 mm, diameter 8 mm, length 80 mm | For mounting profile Mon 28 * 27 / UD28 * 27, both solid and to the hollow wall structures | |
 | Dowel Anchor Plastics (Dowel-Nail) | LYT, PDG, PDGN, diameter 6, 8 mm, length 80 mm | For mounting profiles of Mon 28 * 27 / UD 28 * 27 to carrying construction structures. It also applies to fastening direct suspensions to the ceiling. |
| Dowel Anchor Metal (Metal Dowel Nail) | Zn, diameter 6 mm, length 40 or 49 mm | For fastening straight and anchor suspensions to carrying structures | |
 | Dowel for hollow structures with tip-drill | DRA, diameter 13-15 mm, Length 28 mm | For fastening attachments to GLC. Does not require pre-drilling. It is used in conjunction with a screw diameter of 4-5 mm |
| Dowel for hollow designs without tip-drill | Driva, diameter 13-15 mm, Length 23 mm | Purpose like DRA. Requires pre-drilling | |
 | Sealing tape for metal profiles | Knauf-DichunSband, width 30, 50, 70, 95 mm, thickness 3 mm, in one roll 30 m | For dense interface of metal profiles and suspensions with supporting construction structures, as well as to ensure sound insulation |
A few words should be said about the feasibility of using the sealing tape, because it is possible, put your hand on the heart, to say that in most cases it does not apply, referring to unnecessaryness. And very in vain. What is this tape for?
- It is almost impossible to find the perfectly flat surface of the walls so that the monitoring profile of Mon 28 * 27 / UD 28 * 27 without gaps lay down to the wall in the entire length. Ribbon allows you to compensate for small irregularities and ensure a dense fastening of the profile to the supporting structures.
- The tight fit and the material of the tape itself provide increased friction, which increases the mechanical strength of the connection.
- The tape provides a blow-sound insulation of the metal frame from the walls and the ceiling. In building structures, especially in reinforced concrete, acoustic waves are very well propagated from various sources: drilling and rolling works, loud music, movement and drop of heavy items, steps, temperature deformations and others. If the design of the frame will fall into the resonance with these acoustic waves, this is fraught with the appearance of cracks in the ceiling decoration, and sometimes the destruction of the frame. The sealing tape reduces such harmful effects on the frame and GKK.
The technology of the work of work, the recommended materials applied along with the tests for various types of loads and the impacts are developing the teams of high-class engineers of the manufacturer. It is not impossible to trust them, but it doesn't make any sense to individual installers. The arguments of the type - "I did this a hundred times," the technical documentation should be given away. Only in this case can we hope that the design of the ceiling will last long.
Elements for fastening GLC to frame
It is time to consider the elements used in the mounting of plasterboard sheets to a metal (wooden) frame. Traditionally imagine them in the most understandable tabloid.
| Picture | Name | Designation, dimensions | Purpose |
|---|---|---|---|
| Self-tapping screw with a secret head and sharp end | TN, standard lengths: 25, 35, 45, 55, 65, 75 mm. Slot Ph2. | For fastening plasterboard sheets to metal frames (with frequent carvings) or to wooden (with a wide thread). Profile thickness up to 0.7 mm. Move from steel, have phosphatated coating | |
 | Screw self-tapping with a secret head and driving end | TB, standard lengths: 25, 35, 45, 55, 65, 75 mm. Slot Ph2. | For fastening GLC to metal frames with a profile thickness from 0.7 to 2.2 mm. Do not require pre-drill. Have phosphatated or electrochannel coating |
In order for the mount to be reliable, it is necessary to choose the length of the self-reserves. The manufacturer recommends using the following procedure:
- For a single-layer covering of GLCs along a wooden frame, it should be made that the length of the self-press should exceed the sheet thickness of at least 20 mm. For example, a wooden frame is trimmed by G Clac thick 12.5 mm. Accordingly, the length of the self-press should be at least 12.5 + 20 \u003d 32.5 mm. The nearest size is TN35 With a wide thread for wood.
- For a two-layer clamping of GLCs along a wooden frame The length of the self-press must exceed the total value of the trim to the same 20 mm for example, the wooden frame is sized with two layers of G Clac on 12.5 mm each, it means that the length of the self-press is not less than 12,5+12,5+20=45 . Suitable TN45. With a wide thread.
- For a single-layer plating of a metal frame, in addition to the thickness of the GCC, the thickness of the profile (or profiles) is also taken into account. Self-timber must exceed the total thickness of 10 mm. For example, a metal frame thickness 0.6 mm Cleansing G Clac 12.5 mm. So the length of the TN self-press should be 12.5 + 0,6 + 10 \u003d 23.1 mm. Best fits TN25.
- For a two-layer covering of GLCs in a metal frame, the total thickness of the trim, the thickness of the profile is taken into account. The length of the self-press should exceed them also by 10 mm. For example, a two-layer plating from G Clac 12,5 mm by enhanced metal frame thickness 0.9 mm. In this case, the length of the self-press must be at least 12.5 + 12.5 + 0.9 + 10 \u003d 35.9 mm. Since the reinforced profile is more thick 0.7 mmthen apply the screws TB. (with an exterminating end) and long 45 mm.
Video: Self-tapping screws for drywall and profile
Tool for working with plasterboard systems
For assembling frames, fastening them to the supporting walls of walls and ceilings, the covering of GLCs will need a certain set of tool. The presence of some necessarily, and others - it is very desirable, and the third are designed to facilitate the technological process with large volumes of installation work, therefore, they are used by professionals and are very rarely available in the arsenal of the average domestic master. We list the toolkit, indicate the purpose, the obligation or the desirability of the application. All these data the team of authors of the article decided to put in the table, which is very convenient for readers of our portal.
| Picture | Tool name | Purpose and description |
|---|---|---|
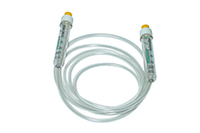 | Level pipe water (Waterpas). Length 5-10 m (depending on the size of the room) | For marking horizontal lines. Application must. |
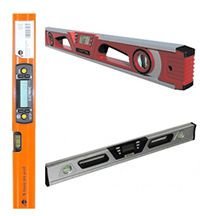 | Bubble level level. Length from 0.4 to 2 m (preferably have several different sizes) | For markup and control horizontal and vertical. For mounting metal frames, it is desirable to have magnetic clamps at the level. Application must. |
 | Marking cord (chop, greasy) with painting powder | For marking of straight lines (horizontal and vertical) on the walls and ceiling. Application is very desirable, since the cord greatly simplifies marking |
 | Roulette 5 or 10 meter | For measurement and markup of the room, GLC and metal profiles. |
 | Metal drawer | For marking metal profiles. Application is desirable. |
 | Construction Pencils and Markers | For marking of building structures, GLCs and profiles. Mandatory to use |
 | Construction kitchenage | For markup and installation of profiles and GLC. Application required |
 | Rule construction (desirable to have different sizes of 1500 mm and 2500 mm) | For marking, cutting GLC, control the correctness of the installation. Application required |
 | Laser level (level) with a builder of horizontal and vertical planes. Preferably with a fixing device on magnets | For markup and control the correctness of the installation. Application is very desirable, especially with large amounts of work. In good construction stores are given |
 | Network or rechargeable screwdriver | For assembling frames and plating GLC. The screwdriver must have a torque limiter, a smooth move, an instant brake, light weight. Preferably network screwdrivers, as they have compact dimensions and light weight. Application required |
 | Nozzles (bits) to a screwdriver with a slot PH2. | For mounting frames and plating their GLC. Preferably choose bits with depth limiter so that the screws do not break through the GCL |
 | Punch of the network with a set of drills with a diameter of 6, 8, 10, 12 mm | For mounting guide profiles and suspensions to walls and ceiling. The main selection criterion is an easy and convenient tool, as a lot of work will be performed on top. Application required |
 | Electric network drill with a set of rolled metal and crowns of various diameters | For pre-drill holes in a metal or wooden frame, as well as in GCL to install dowels, lamps and other elements. Drill must have a variable speed, reverse, be easy and convenient |
 | Corner grinding machine (USM, Bulgarian) with a cutting disc on metal | To cut metal profiles. It is best suited by the ESM under the discs 115 or 125 mm. Application desirable |
 | Electrolovka with a tree filling | To cut the wooden framework elements. It is possible to cut the plasterboard on the curve. Application is preferably, but not necessarily |
 | Electronics for metal | For cutting metal profiles in a large volume. Application optional |
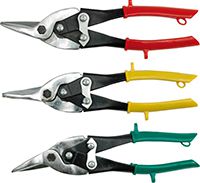 | Manual Scissors for Metal (Straight, Right or Left) | For cutting metal profiles. Application required |
 | Passatii | To work with the metal frame of the ceiling. Application required |
 | Set of screwdrivers of different lengths with a slot PH2 | To work with the frame in hard-to-reach places for the screwdriver and cheating TN or TB screws to the desired depth. Application required |
 | Knife construction segment with a set of replaceable blades width 18 mm | For rectilinear Cutting GLC, cutting edges, soles removal. The knife must have a metal clip and a reliable screw lock. Application required |
 | Knife saw on plasterboard | For curvilinear GLC cut. Application required |
 | Plancock for plasterboard | To prepare the edges, removing the champers. Application required |
 | Hammer 200-300 g carpentry | To work with a metal profile, driving a dowel. Application required |
 | Craftsman for plasterboard profiles | For fastening metal parts of the frame with each other without the use of screws. Application is preferably, but not necessarily |
 | Mounting belt for tool | To place the tool and fasteners on the belt, which is very convenient to work at the height using a stepladder or landfills |
Video: Tool of plasterboard
Safety regulations and protection equipment when working with plasterboard
When working with drywall structures, a variety of diverse tools is used - electrical and manual, various types of building materials, primers and paints are used. Working with the ceiling is made at the height, which does not exclude the fall. All of the above obliges to observe simple, but necessary safety regulations.
- The entire power tool must have good power cords, without damage to isolation. Any twists and wrapped cords are not allowed. The tool housings must be without cracks, dents, and the ventilation openings should not be closed.
- If extension cords are used, they should also be absolutely integer. The plugs of the power tool must be tightly into electrical extension connections.
- In rooms, where the level of humidity is more than 80% of the operation of the power tool is unacceptable.
- Power tools can be released from hand only after its complete stop. This is especially true of the USM (Bulgarians). After use, the cord is always turned off from the outlet.
- There should be dense clothing on working with plasterboard, without protruding details. It is best if a special working overalls are used. Long hair should be selected for a headdress: takes or golk.

- Hand brushes must be protected by special work gloves. Despite some loss of tactile sensitivity, it is necessary to develop a good habit - to work always in gloves. Sharp edges of the cut profiles are capable of cutting hands to bone.
- When drilling and drilling walls and ceiling, fitting, drilling and grinding, a large number of cement and gypsum dust is formed capable of getting into the eyes and respiratory organs. Therefore, it is necessary to apply protection tools: glasses and respirator.
- When working at height, it is necessary to use only special construction stepladers and peaks. The use of kitchen stools, tables and other items are unacceptable.

- At the venue of the work should not be foreign people, especially children and domestic animals.
- The construction of the ceiling construction of plasterboard should be carried out only with a partner.
To preserve the tool, it should be cleaned after work with a soft brush from dust, in no case wipe the wet cloth or wash under the jet of water (except for spatulas and brushes). If the tool is not needed at the place of work, it should be laid in the case and, if possible, is taken out of the room.
Metal Frame Mounting Methods
The success of the mounting of the plasterboard ceiling depends largely on whether the framework is assembled. It is he who is a peculiar "skeleton" on which the whole design is fixed, so when it is assembling it is necessary to follow all the recommendations of the manufacturer. Recommendations on the selection of components and fasteners, we gave readers of our portal earlier, and the connection methods will consider in this section. At the same time, the authors of the article besides the methods recommended by manufacturers, will lead an example and alternative methods that do not reduce the strength of the structure, but can strongly reduce the cost of the finished ceiling.
Fastening the guide profiles to the carrying construction structures
As mentioned earlier, PN 28 * 27 / UD 28 * 27 is used as guide profiles in the ceiling systems, and in some cases, the profile of Mon 50 * 40 / UW 50 * 40 is allowed to use the profile of Mon 50 * 40 / UW 50 * 40. These profiles can be attached to the walls - with the help of a corresponding dowel and to the ceiling - anchors (dowel nails). The mounting step to the smooth base of the walls is no more than 400 mm, and to the ceiling - 250 mm. It is better not to regret a penny dowel and put on the walls, too, with a step of 250 mm. In profiles of well-known manufacturers, there are already pre-drilled holes with a diameter of 8 mm in a step of 250 mm, and if they are not, it is better to drill in advance drill with the corresponding drill. Experienced masters can when installing the profile, immediately sleep with a hole in the hole and in the profile, and in the supporting structure, but those who make the ceiling from HCL for the first time better not experiment, but to make it right.
To attach the mon-profile to the walls follows:
- If there are no holes in the profile for the dowels, they need to be drilled by an electric drill with a 8 mm drill. At the same time, from the edges of the opening profile must be at a distance of no more than 50 mm, and the step between them is 250-400 mm (depends on the smoothness of the wall).
- The profile is applied to the wall by the bottom edge to the preloaded line, the adjustment density is checked. If necessary, cuts are made in the side walls of the profile, so that the adjacent is the most dense.
- A sealing tape of the corresponding width is pasted on the mechanical part of the mon-profile.
- The profile is applied to the wall, combined with the line of marking. It dries a hole exceeding the length of a dowel for 10 mm at the beginning of the profile, then a dowel is inserted into it, then in the middle and then at the end. The adjustment density is checked and these areas are recorded by a screw (dowel-nail). Then all other parts of the profile are being worked and fixed.
- Anchor dowel-nail is usually clogged with a sharp part of the hammer. Those who have no appropriate skill, it is quite acceptable to twist a dowel-nail with a screwdriver. It will not affect the connection strength.
For fastening direct sections of Mon-profile to reinforced concrete ceiling:
- Installation is carried out similarly to the walls to the walls, only metal anchor-wedges (dowel-nails) are used as fasteners.
- Practice shows that in most cases in ceiling structures, it is permissible to use a dowel-anchors of plastic diameter 6mm and a length of 80 mm. If the hole falls on the void in the stove, then you need to apply a dowel for hollow structures.
- The mounting step on the ceiling should not exceed 250 mm.
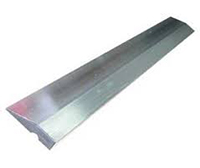
- If any curvilinear design is conceived on the ceiling or walls, then, accordingly, this curvature should be curved and guide profile. Manufacturers offer special profiles in their assortment for arches and curvilinear structures, but in most cases such elements are difficult to find on sale, and they stand unreasonably expensive, which is explained by a more complex manufacturing process. That is why most masters independently configure the guide profile under the desired surface. For this you need:
- On the carrier base (ceiling or wall) there is a markup of the future curvilinear surface.
- Scissors for metal or grinding (USM) are made cuts of side surfaces and end with a step of 3 to 10 cm (depending on the radius of curvature).
- Then the profile bends and is attached to the bearing base on each bend segment. It takes a lot of fasteners, this work is quite complex, but for the desired result it will still have to perform.

In this process, it is important to understand the principle of formation of direct or curvilinear surfaces, then any, even the most courageous ideas for creating drywall structures will be easily implemented.
plasterboard
Fastening guide and carrier profiles
From the very names of the guide profile, it follows its purpose - to give the direction of the future plane of the drywall design, and the bulk of the weight of the weight is already performing other profiles - carriers. In most cases, PP 60 * 27 / CD 60 * 27 profiles are performed in the ceiling systems. If the guide profile Mon 50 * 40 / UW 50 * 40 is used in particularly loaded places, then the carrier will be PS 50 * 50 / UD 50 * 50.
Mounting with self-tapping
The carrier profile is inserted into the corresponding guide and fastens in most cases with a self-tapping screw for Metal LN9, LN11, TB9, TB11. These self-tapping screws are called "bugs", "fleas", "seeds". The length of the self-press is determined by the total thickness of the connected profiles. In most cases, a length of 9 mm (LN9, TB9) is sufficient (LN9, TB9), but what kind of screws are used - with a drilling or sharp tip, - disputes among professional installers have not subsided for many years. The manufacturer recommends applying self-eases with a sharp end with a profile thickness up to 0.7 mm. In ceiling plasterboard systems, there are very rare profiles over this indicator, so the authors of the article recommend using such screws (LN9, LN11), although in this case, TB9, TB11 is quite appropriate.

Very often, sellers consultants are equipped with buyers by self-drawing with a drilling tip, but based on the experience of plasterboard installers, the authors of the article recommend using LN9, LN11. Why? It is noted that when screwing out a self-tier with a drilling tip, the probability of turning it at an unregulated moment at the screwdriver is much higher. This is explained by the fact that the drilling tip makes a hole in the metal profile a much larger diameter than the acute end of LB9, LB11. That is why turning will occur with a much smaller torque, which can negatively affect the strength of the framework of the framework. In turn, the sharp tip of the LN9, LN11 pierces the metal and the thread turns are very tightly "worsted" by the profile, and it is so good so much that not all the torque limiter at the screwdriver will work and can literally turn hands from the assembly. Therefore, before starting work on installation, the limiter should be adjusted, and it is better to do it with an experimental way.

Spinning of self-tapping screws in a metal profile requires a certain skill. Beginner installers very often, the screws fly out of the bits, which is often accompanied by censorship and obscene vocabulary. In order to correctly twist the self-tapping screw, it must be positioned strictly perpendicular to the fastened parts, the drilling should be started with small revolutions with a certain pressure force. After the screw is drilled or poverty, the force is reduced, since the thread will already work and the self-touch will go "like oil". Usually after a pair of hours of work and the enonal number of fallen screws, the necessary skills are already produced.
A very important question is the choice of the correct bits for the screwdriver. It is not necessary to regret money on it, only high-quality products with a corresponding pH2 slot should be purchased and the magnetic retainer. Cheap Nunes The products from the Middle Kingdom will serve at best one day, and a high-quality bit can serve not one year, provided that the torque limiter will be configured correctly, which is also called the ratchet.
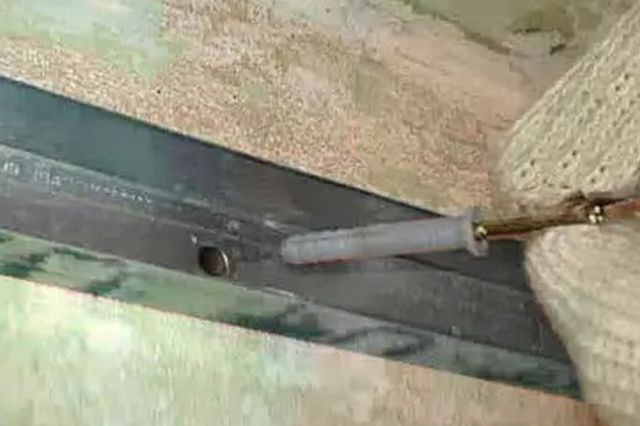
Mounting with a bar
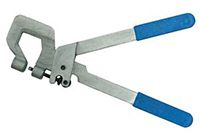
There is another very good way to fasten the plasterboard profiles among themselves - this is the use of the rod. This tool with a solid alloy brisk (PUNSON) smokes and rejects the walls of the fastened profiles, which provides a fairly strong compound, no less durable than self-draws. The use of such a method gives certain advantages:
- Mounting goes much faster than with self-drawing.
- The use of the rod ensures the necessary mechanical strength of the compound, such unpleasant phenomena are excluded as turning the screws.
- If a large amount of work is planned, the flower can pay off at one facility due to savings on self-drawing.
- The cruiseman leaves a flat surface of the profile, which facilitates the installation of plasterboard.
- The leaflers make holes at one distance from the edges of the profile, so pre-marking is not required.

Working this tool is very simple:
- Exhibited fastened profiles.
- Broken handles are bred.
- The working hook is starting between bonded profiles. Punson must be perpendicular to the walls.
- The instrument handles are sharply reduced together to a characteristic click.
- The handles are bred and all operations are repeated in a new place.
There are many types of rigs, different manufacturers, different quality. For one-time work, you can choose an inexpensive model, and if there are many work on the construction of framework, it is better to choose a more professional model, for example, the company "Knauf" or Stanley. The main thing when choosing is to try it in practice, connecting exactly the types of the profile that work is planned. For mounting the ceiling frame, a lot of work is made at the height, so it is better to choose a compact model with which it will be convenient to work with one hand.
Fastening support profiles for building structures
The main supporting profile in plasterboard ceilings is PP 60 * 27 / CD 60 * 27. In order for the weight from the ceiling to be distributed to building structures - the ceiling and partially walls, the carrier profiles must have reliable fasteners. What are the fasteners?
Fastening with direct suspension
The main method of fastening the profile of PP 60 * 27 / CD 60 * 27 to the ceiling, if the distance from the plane of the ceiling to the bottom plane of the profile does not exceed 120 mm - is the use of direct suspension, which has already been described earlier. For fastening it is necessary:
- On a predetermined axial line of the profile, the position of the suspension is determined, it is applied to the place in the deployed form, the places of attachment are scheduled (at least two).
- The distance between adjacent suspensions on one profile should be no more than 50 cm.
- Holes under fasteners drilled with a drum of 6 mm. Depth should be 10 mm more than a dowel length or a wedge anchor.
- The suspension is applied, right through it in the holes anchor-wedge or dowel nails are inserted.
- Anchor wedges (dowel nails) are clogged with a hammer.

- Suspension foot bend down.
- The profile is exhibited by level (laser level, stretched cord).
- Through the side holes of the suspension, the profile is fastened with the LN9, LN11 or LB9, LB11, with each side of two.
- Speakers down the paws of the suspension bend upstairs.

- In the literal suspension there are several holes for fastening to carrying structures. This is an oblong hole in the center, two holes at a distance of 46 mm and two more at a distance of 78 mm, located already behind the fifth line (they are also called "ears"). It is clearly visible in the picture. Opinions about what exactly the fasteners are completely different, but experience shows that it is most appropriate to be attached to those holes that are located at a distance of 46 mm, since in this case, during the vertical load, the suspension practically does not change its position.

- In some hard-to-reach places, it is more convenient to mount "behind the ears", but in this case it is necessary after mounting to the ceiling bend the paws under 90 ° and delay them under some effort down so that all the gaps that will inevitably appear under the ceiling load have already been released.
Mounting with anchor suspension
If the distance from the plane of the ceiling to the bottom of the profile is more than 120 mm, it is no longer able to do without an anchor suspension, which consists of two parts: the suspension itself and the traction of the corresponding length itself. Installation of such suspension is extremely simple, we describe it step by step.
lED lamp
- At the axial line of the profile pre-laced on the ceiling, markers are made of fastening of suspensions. At the same time, the distance between adjacent suspensions should be no more than 50 cm, and from the wall to the nearest suspension - no more than 25 cm.
- In the outlined places, the perforator is drilled by a hole with a diameter of 6 mm and a depth of 50 mm.
- A suspension thrust is applied to the bored hole, a metal dowel of a nail (anchor-wedge) is inserted through it, which is then clogged with a hammer.
- The suspension thrust is rejected down 90 °, while it is necessary to position it so that it is on the axial line marked on the ceiling.
- Anchor suspension is planted on the craving, for this, press the spring paws, the thrust is set, the suspension is set to the desired position, and then the legs are squeezed. If there are too long ends of thrust, they are simply raised upwards by passatages, leaving the needed length for adjustment. Too long ends it is better to cut with a grinder, and it is better to do it in advance.
- Similarly, all suspensions for the carrier profile are mounted.
- The mounting part of the suspensions will start inside the profile and is fixed in it using a spring retainer or by turning (depending on the suspension design).
- Squeezing the spring paws and moving the suspension by traction, the required level is set to a pre-stretched cord or. This operation is done for all PP 60 * 27 / CD 60 * 27 profile suspensions.
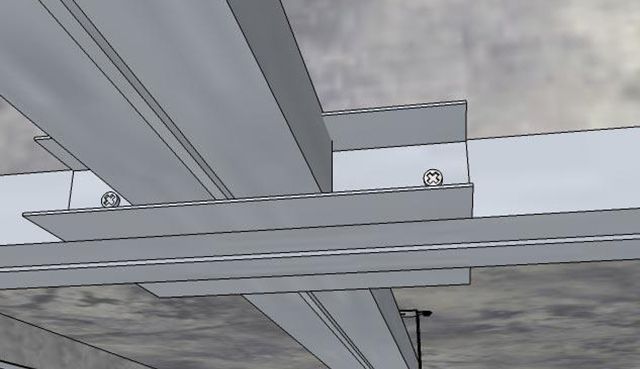
 All ceiling design "suspended" on anchor suspension, which allows you to hide behind the ceiling engineering communications
 Alternative methods for fastening carrier profiles
There are cases when when arranging the ceiling of plasterboard was incorrectly made by the calculation of components and purchased suspensions are not suitable in size or they simply ended. Naturally, during work I really do not want to be distracted to buy the suspensions, and the available shops can be very far away. When assembling a metal frame, there are always quite a few trimming of various profiles, of which it is quite possible to build homemade suspension. Consider some of the most common options.
- Extension of straight suspension. It is used when the standard length of 120 mm is not enough, and the anchor suspension is not available. In this case, a direct suspension beads can be attached by two screws on each side of the paw from another suspension.
- Another output is to insert a piece of ceiling profile of PP 60 * 27 / CD 60 * 27 between suspension and legs from another suspension. The ceiling profile plays the role of a kind of extension cord.

- In the third method, the profile of Mon 28 * 27 / UD 28 * 27 are made of 90 ° corners, which are attached to one side to the anchor to the ceiling, and the other, longer side, to the mounted profile of PP 60 * 27 / CD 60 * 27. Plasterboard installers are called their "boots". Naturally, the boot should be two - on both sides of the profile.
- The fourth method involves good possession of metal scissors from the profile of PP 60 * 27 / CD 60 * 27, the suspension is cut, including "ears" for mounting to the ceiling and foot mounting to the supporting profile.
The Internet is replete with the assurances of "experienced installers" that homemade suspensions are not inferior and even exceed industrially made. But the team of authors of the article considers it necessary to warn readers of our portal from the rampant and widespread use of homemade suspensions and recommends that the manufacturer recommends. And that's why:
- Industrially made suspensions are calculated for a certain load: 40 kg for direct and 25 for anchor, which will ensure the desired strength of the ceiling. Homemade suspensions cannot guarantee resistance to such loads.
- The suspensions from the known producers have a thickness of 0.9 mm, while the maximum thickness of the profile used for independent manufacture of the fastening elements is 0.7 mm (and most often 0.6, 0.5 or even 0.4 mm). Naturally, the strength of such products will be significantly lower.
- Extended suspensions have a greater number of fasteners, which reduces the reliability of the design.
Based on the foregoing arguments, it is still to apply regular fasteners. It is allowed to use independently manufactured suspensions, but only in those places where a minor load accounts for carrier profiles, for example, in short (up to 50 cm) jumpers, auxiliary elements and other unloaded areas.
Connection of carrier profiles among themselves
To form a good metal frame of plasterboard ceiling, in addition to reliable mounting to building structures, it is also necessary to fasten the bearing profiles of PP 60 * 27 / CD 60 * 27 with each other. Previously, the types of connectors were already considered, now it is time to consider how to use them.
Extension of profiles of PP 60 * 27 /CD 60 * 27
In retail chains, they are mainly represented by these profiles in 3 or 4 meters long, which in most cases it happens enough to create any ceiling design using one-piece pieces of profiles, and this is, in principle, you should always try to do. Very rarely, but there are situations when this length is not enough, so the profile must be lengthened. This can be done both with the help of regular connectors and alternative ways.
Application of PP 60 * 27 / Profile ExtensionsCD 60 * 27
As practice shows, it is best to use a regular profile extension, which is always on sale, has a penny price and provides the desired connection strength. How to apply it?
- It is best when the connection of profiles is made by factory cuts - they are the most even and provide a high-quality junction. In extreme cases, it is possible to make a sharp with a barrage at a pre-markup and then clean the burishes with a file.
- The extension is inserted into one of the profiles inside to the limiters that are in the side parts. Then the passage of the profile is bent.
- Another profile is attracted to another part of the extension, and is similar to the passage.
- The connected profiles are put on a flat surface, the location of the dock is strengthened with metal screws, which should be copped and the profile and extension. It is recommended to screw in 4 screws on each side.
- When installing the elongated profile on the ceiling, the connection location is additionally insured by straight or anchor suspensions at a distance of 10 cm with each of the sides, and this must be done regardless of the location of the main suspensions.

Alternative methods for elongation of profiles of PP 60 * 27 /CD 60 * 27
If the profile extension belongs should not be at hand, it can be independently made by himself. Strength, truth. It will be somewhat lower, but subject to the insure the location of the suspension, this method is quite applicable.
- 10 cm of the profile of PP 60 * 27 / CD 60 * 27 is cut.
- Scissors for metal or grinding from this segment are cut off the upper curved sides.
- Passatias are aligned to the sides, the lower part is given a concave profile, like a regular extension.
- Similarly, a label is made to the marker made in the middle of the manufactured part of the marker, which will accomplish the place of the joint.
- Next, the connection goes the same as in the previous case.
You can do without intermediate items. Then it is necessary at one end from the connected profiles to cut off on both sides of the curved flights for a length of 10 cm, then insert one profile in another, align on a flat surface and bore with self-draws - by 4 on each side. But such a connection is less reliable due to the short part of the profile there is no rigidity rib.
Ways to eliminate profiles are visually presented on video.
Video: Profile Extension
Connection of profiles of PP 60 * 27 /CD 60 * 27 at an angle in the same level
Connection with the help of "crab"
The main method of such a compound of profiles is a compound at an angle of 90 ° and in most cases it is used. For this, there is a special connector, called the "crab". Connect with its profiles extremely easy:
- On the main carrier profiles of PP 60 * 27 / CD 60 * 27, the axes of the axes of the stuck profiles are made. Most often, the jumpers between the main profiles are made every 50-60 cm.
- The crab is inserted into the main carrier profile until it clicks when the spring legs go beyond the profile side.
- Moving the profile connector, combine the center of the crab with a marker.
- At the crab, the mustes are bent on the main profile and the screws are wrapped through the holes - two on each side, thus, the crab is fixed on the main profile.
- On another neighboring basic profile, with which the first profile will be shrinkable using jumpers, similar to the crab installation operations are made.
- Between crabs on adjacent support profiles, the necessary length of the lintel profile is measured. For example, the distance between the axes of the neighboring profiles is 600 mm, the profile width of PP 60 * 27 / CD 60 * 27 - 60 mm. It turns out that the length of the jumper profile must be 600 mm-30 mm-30 mm \u003d 540 mm. In order for the profile not to enter too tightly, and had a gap, it is cut with a length of 10 mm less: 540 mm-10 mm \u003d 530 mm.
- Cuts profile jumper of the desired length. Special attention should be paid to the quality of the edges. If necessary, their geometry is corrected by pliers, and the burrs spilulate with a file. Excellent cutting quality gives Bulgarian or electric scissors for metal.
- The jumper profile is inserted into the crabs on the main profiles, snaps down with the legs and is fixed with self-pressing through the pre-concealed mustaches.
- The operation is repeated at all places where profiles are required.
There are situations when it is required to connect two PP 60 * 27 / CD 60 * 27 profile not at a right angle, but under another or ended "crabs", but you do not want to distract from the installation process. Therefore, it is worth considering other connection methods.
Video: Connection "crab" profiles
Alternative Profile Connection Methods
Of course, it is preferable to use such profile connectors that recommended manufacturers of components for plasterboard systems. However, many years of installation experience suggests that alternative methods are not inferior to the strength recommended. We describe one of the most common.
In the process of mounting the frame, the waste of profiles inevitably remains inevitably, in particular, Mon 28 * 27 / UD 28 * 27, which can be used for a single-level connection of PP 60 * 27 / CD 60 * 27 as a cruciform at right angles and T-shaped under direct An angle, and also under any arbitrary angle (there are such situations in complex ceilings). It should be noted that the described method gives the strength of the design is no worse than with "crabs", and much better, in the case of acquiring counterfeit connectors.
- On supporting profiles, marks of the axes of the jumpers profiles are made. We remind you that the distance between the jumpers should not be more than 600 mm.
- From the remnants of the profile of Mon 28 * 27 / UD 28 * 27 cuts of 10 cm. In their middle the mark is made.
- To the side shelf of the profile of PP 60 * 27 / CD 60 * 27, a segment of the profile of PN 28 * 27 / UD 28 * 27 is applied, while the designated labels are combined, and the lower edges of the profiles are set at one level.
- Metal self-pressing (TN9 or LN9) segment is attached to the main profile. The distance from the edge of the segment to the place of attachment is 10 mm. For these purposes, it is quite possible to use the rod.
- In all scheduled places on the main carrier profiles, the segments of segments from the guide profile are made as described above.
- The jumpers from the PP 60 * 27 / CD 60 * 27 profile are cut, and their length should be 10 mm less than the distance between the main profiles. It greatly facilitates the installation, the design of the frame will not cut.
- The jumpers are inserted into the outlined places, the axial line is combined with a label on the carrier profile. The mount is made with a self-tapping screw (TN9 or LN9) or a bug. One point of attachment is quite enough, since the main load falls on carrier profiles, and the subsequent covering of drywall will give the design even greater rigidity.
 Such a connection of ceiling profiles in one level is practically not inferior by the strength of "crab"
 Obviously, to connect profiles at an angle of operation, the operation is performed in the same way as described above. The only difference is that jumpers will be cut under the necessary angle, which is easy to place, applying a profile to the place of fastening. You can, of course, use a standard universal single-level connector from Knauf, but practice shows that they are used extremely rare, therefore it is very difficult to find them on sale.
There are still other alternative methods for connecting profiles at an angle at one level. To do this, the end of the profile of PP 60 * 27 / CD 60 * 27 is separated by metal scissors as shown in the figure. This method is widely used, but readers do not advise the readers of the authors of our portal, as the strength of the structure is much reduced because the lateral bents of the shelves are inevitably cut off, which give the profile the desired rigidity. In addition, there is an increased flow rate of a more expensive profile of PP 60 * 27 / CD 60 * 27, and the resulting trimming is no longer suitable for anything, but trimming Mon 28 * 27 / UD 28 * 27 will always find the use of waste from them almost will not be.

Arrangement of a two-level ceiling of plasterboard
Finally came the moment to move towards practical actions and start equipping a unique and unique ceiling with your own hands. For the convenience of perception and a complete understanding of the process, the team of authors of the article divided this process into several stages.
Determination of the design of the ceiling
Surprisingly, this question is one of the most complex in the arrangement of multi-level ceilings, because there is no lack of drywall and all components, you can find high-class masters or technically flawlessly perform the installation of the ceiling structure yourself, but the wrong selected design can be reduced to no effort. Therefore, the question of choosing the right design is paramount and everything should start with it. Therefore, at this stage, you can attract a good specialist in this area, which, unfortunately, a minority. Another good way will be the study of already implemented projects on the Internet, which there is just the sea and the choice of the most suitable for specific conditions. In turn, the team of authors of this article will give several advice.
- A multi-level plasterboard ceiling in addition to the decorative function also performs engineering: in space between building structures there can be electrical wiring and low-current systems, lamps, ventilation systems and air conditioning, drawing ducts in kitchens and bathrooms and more. In no case, the design should not harm engineering systems, but must warm peacefully in favor of the first. For example, in favor of the design of the designer, the duct kitchen hood is forced to make many turns that increase the resistance to the air flow, and, it means, reduce efficiency and increase noise.

- The design of the ceiling from GCL should not exist separately from the interior of the entire room. On the contrary, he must emphasize all his details: the location of upholstered furniture, tables and cabinets, combined flooring, the presence of various important parts of the interior: Bar rack, vases with flowers, a large aquarium, televisions and others.
- Modern design involves conciseness, strict geometry, symmetry and functionality. The era of foster forms, many curves of lines, tiers of tiers and unreasonable harmony of the harmony solutions of self-taught designers passed.

- In most residential fund of Russia, the height of the ceilings is an average of 2.5 meters, so it should be remembered that the space is not infinite - the smaller the two-level design "Eat" precious centimeters - the better, but you should consider the diameters of the air ducts, the dimensions of the installed lamps and other equipment should be taken into account. Usually the first level, if there are no built-in luminaires, is mounted at a distance of 5-7 cm from the ceiling, and the second 10-20 cm.
- The best lighting is a combination of directional and scattered light. The best place to install point lamps is the second level of the plasterboard ceiling, and the main source of multiple lighting (chandeliers) is a geometric center of the room or a certain zone located on the first (topmost) ceiling level.
- Rectangular forms of multi-level ceilings (including with rounded corners) are suitable for visual narrowing or expansion of rooms; Forms of a circle or ellipse emphasize the center of the room or the center of a certain area in a large room; Many lines curves are permissible only in a dynamic interior combining several styles, but not in the classics.
- Most often, the second (lower) level, where point lights are embedded, they are mounted around the perimeter of the room, and the first level is located in the center. In this case, the second level is called either a box or border. It can have both smooth edges and curly, and rounded, and others.

- If the second level is also placed in the center of the first level, which is sometimes justified from the point of view of design, then this item is called the island. For example, in a large kitchen, the working surface is located in the center, respectively, the island is made on the ceiling, where the duct of the hood and the backlight is hidden.
 Example "Islands" in modern kitchen
 - In the two-tier ceilings, the backlight (LED ribbon or duralite) is very easily implemented, which gives the interior mystery and intimacy. Especially well illumination manifests itself in the bedrooms.
- When designing a ceiling, various lighting scenarios should be considered, which can change the mood from a noisy party with friends, to spiritual gatherings with close people and recreation for watching your favorite movie. The abundance of modern light instruments and control devices will help you easily implement it. Then the multi-level ceiling of plasterboard implements all its capabilities.
Also, one should not forget that in the same apartment or house there should be no room, "living" on individual laws, which differ from others. All rooms should harmonize each other and, despite some differences, the overall interior design concept should be maintained anyway. If, of course, we are talking about an apartment or house, and not about the entertainment institution.
At what stage of repair or construction is made a two-level ceiling?
Creating a multi-level ceiling of drywall is not a separate operation, but is included in the complex of work on construction and repair, and in the final part - at the stage of final finishing. When can I start these works?
- First, all building processes should be completed on the construction of walls, partitions and overlaps.
- Secondly, all engineering systems should be carried out, the layout of the ceiling lighting system can be made after the framework of the framework.
- Thirdly, windows must be inserted.
- Fourthly, all "wet" processes must be completed: the arrangement of the floor screed, plaster walls and slopes. The room must be prepared for final finish.
- And finally, the indoor moisture should not exceed 75%, and the air temperature should not be lower than + 16 ° C.
In the final finishing of the premises, the principle acts - it starts from the ceiling, goes onto the walls and ends with floors. That is, at first the design of the ceiling, the covering of plasterboard, seal the joints, and then putting the ceiling and walls that can be combined into one process so that these very dusty works are not stretched in time.
Preparatory work
After the ceiling design was chosen and agreed with all stakeholders, you can already begin the implementation of the selected ceiling in a particular room. But for this it is necessary to draw a plan of the room, which is later to draw the ceiling scheme.
Measurement of the room, drawing up a plan
In numerous articles on construction and repair, both in journals and on the Internet - plans of the premises are ideal rectangles or other proper geometric shapes on which any ideas of owners and designers are very easily implemented. But at the end of the work it turns out that the room was far from the ideal, which has affected those geometric shapes from drywall.
Human vision has a unique property - without measuring anything, it still immediately estimates that some lines are not parallel, the surfaces are not horizontal, the circle or ellipse is non-ideal, and the curve or wave line does not obey the natural laws of harmony. From this, all the impression of the perfect and beautiful ceiling can immediately go to no. Therefore, it is necessary to measure the room, drawing up the drawing and markup correctly. We describe how to do this, but for this it is worth remembering the school course of geometry. All stages of markup in terms are shown in the figure. All measurements need to be conducted in millimeters, as accepted worldwide.

- First of all, it is necessary to find a geometric room of the room, which is always at the intersection of diagonals. To do this, the paint cord is stretched out of the corner, and the two diagonals are "fought". In this place, you can immediately spin a dowel or self-tapping screw, depending on the material of the ceiling.
- The diagonals are measured and these values \u200b\u200bare written. In the figure, it segments D1D3 and D2D4. If their length is equal, then the owner can be congratulated - he has an ideal rectangular form in terms of plan, and if not, then it is a trapezoid or just a quadrangle.
- The length of short walls is measured, and their middle (points H1 and H2) are located, between which the cord is stretched. If the cord gets on the geometric center, then the line is immediately fought off, if not, it shifts on the deflection value and dismissed with a painting cord.
- Similar operation is performed with long walls, the V1V segment is fought off
- Now it is necessary to build perpendicular to the H1H2 line. For this, it is not necessary to use a square, which also has its own error, and it is better to apply the method of geometric constructions. On diagonals, equal segments of OD1, OD2, OD3, OD4 are noted from the center. It is best if they won't reach the corners of 10-15 cm to simplify the markup.
- Points d1, d2, d3, d4 are connected and the end is obtained by a rectangle (according to the equality of diagonals), from which the entire further markup and construction of the framework will "dance".
- On a sheet of millimeter paper (better A3 format) placed plan. To do this, on a scale (1:50 or 1:25), the horizontal line is drawn up on which the center is denoted.
- On the ceiling, the distances OH1, OH1, OH2, OH2 are measured and postponed on the selected scale on paper.
- From points H1 and H2, perpendicular direct, on which the segments of H1D1, H1D2, H2D3, H2D4 are deposited, which should be equal.
- From the center, direct through the d1, d2, d3, d4 points are diagonally. We are laying on the scale previously measured on the ceiling segment OD1, OD2, OD3, OD4.
- We connect the d1, d2, d3, d4 d1, d2, d2, d2, D, we get an external rectangle - this is the true geometry of the room, and the inner is the correct geometry that even the most demanding human look will be taken correctly.
Everything, the plan of the room is ready, now the task of the host independently or with the help of specialists to enter the selected design into a particular room. It is recommended to note the future pencil on the plan to note the future placement of furniture on a scale reflecting its true dimensions, as this can strongly affect the design of the ceiling. Of course, it is best to take advantage of computer 3D visualization programs, but people with a rich imagination will be enough to lie on the floor and, holding a plan on the elongated hands before your eyes, represent the future ceiling.
Determination of the ceiling level, revision of its surface
The plane of any ceiling must be strictly horizontal, however, the plates or monolithic floors even in new homes are not always, unfortunately, meet this requirement. Therefore, it is necessary to "repel" the horizontal level and check the ceiling plane. How it's done?
- On one of the walls, a horizontal mark of a pencil or marker is made to the corner at a distance of 10-20 cm from the ceiling.
- With a water level (Waterpas) or a laser level, this mark is transferred to other places - 2-3 marks on each wall. When using Waterpas, it is necessary to ensure that there are no bubbles in the tube, and it has not been located near the heating devices.

- The painting cord exhibited by marks, horizontal lines on all walls are littered - we obtain a horizontal plane.
- The distance in the corners is measured and in the middle of each of the walls from the line to the ceiling plane and their difference is estimated.
- If the difference in the distance is the units of millimeters (up to 5), then such a ceiling can serve as the first level of the bunk design, and all the flaws will be sprinkled with splock.
- If the difference ranges from 5 mm to 5 cm, then irregularities can be fixed with a ceiling plaster with a reinforcing grid, and only then it will act as a first level.
- If the difference is more than 5 cm (it happens) - there is no way without covering this "disgrace" with a suspension design.
In addition to the plane, it is necessary to check the quality of the surface, which will continue to be shuffled, putty or hide the suspended ceiling. What options can and what solutions can be accepted?
- In the apartment or house the ceiling is bitty (painted) by plaster. In this case, it is necessary to wash off whitening, and the old plaster repel to the base. After that, put a shock and sharpen. This is an extremely laborious and troublesome process, so the best way out will cover such a ceiling completely behind the suspension design.
- If there are wooden floors in the old houses, the ceilings should definitely hide the ceilings, especially since the height of the ceilings in such housing is usually from 2.7 to 3 meters and is possible without prejudice to the height of the room "get roasting" in the creation of any plasterboard design.

- If the ceiling has a solid base, plastered, and all communications have already been carried out, then it is possible to simply scratch it and use it as a first level.
- If the ceiling is a naked concrete plate, which often happens in just built houses, it will still have to plaster and put it on or hide behind the suspension structure, which will further hide all communications.
As can be seen from the foregoing, in most cases, both levels of the ceiling are beneficial to make from GLC, since the plaster and spacing of the surface with a preliminary removal of the old finish will be at a price not lower than the plasterboard design. Especially since the competently mounted first ceiling level "eats" from a height of 5-6 cm, which does not bring any discomfort, and the correct design and color gamma can visually lift the ceiling.
Selection of the implementation scheme of the two-level ceiling
It is time to choose a specific scheme for which the ceiling will be implemented. The fact is that regardless of the infinite number of realizations of plasterboard ceilings, there are only a few standard schemes. Consider them in consistently by breaking through groups.
First level - plastered ceiling
In this case, it is possible to implement boxes (borders) on the walls of the room, and in the center leave the free space of the ceiling, which must be carefully, since with the light on, the flaws in the surface immediately will be visible. You can also organize the islands from GLC, which can be made zoning the room. Naturally, in the second level, embedded lamps are placed, and the backlight may be used as a light cord or LED (LED) tape. Currently, the price of products from LEDs is rapidly falling and can be completely allowed to allow a multicolor RGB LED tape with a control unit and remote control.
Option 1: No backlit eaves
The figure shows the design of such a ceiling in the context. PN 28 * 27 / UD 28 * 27 profile on the wall is fixed on a dowel-nail and it sets the second horizontal level of the ceiling. At the ceiling, the same profile is fixed on metal anchor-wedges, it sets its form in terms of, and it does not necessarily be rectangular. The horizontal size of the box specifies the segment of the PP 60 * 27 / CD 60 * 27 profile, inserted into the guide profile on the wall and fastened with a self-tapping screw LN9 or LB9. On the ends of the horizontal PP 60 * 27 / CD 60 * 27, the guide profile is imposed, and the segments of the same PN 28 * 27 / UD 28 * 27 are screwed from above, which will be the basis for fastening the vertical segments of the PP / CD profile. This is formed frame box.
The scheme does not indicate direct suspensions that should insure a horizontal profile. Apparently the authors of the drawing considered that with such sizes the suspensions are not needed, but the team of the authors of the article still recommends applying them.

Option 2: With a backlight eaves
The figure shows a diagram of the implementation of a two-level ceiling with a cornice, where the backlight will be placed. Previously, neon lamps were used, light cords - duralite and even christmas garlands. Now the optimal choice is LED tapes having a self-adhesive layer.

The difference between the design from the previous version is minimal. To create an eaves, the horizontal profile is lengthened by 5-10 cm. To attach a horizontal profile to the vertical need to do shorts to a depth of 2.5 cm, a wide part of the profiles of PP 60 * 27 / CD 60 * 27 Hoall inside, and the curly ends of the shelves or cut off, Or, after making an incision, press the passage. Then, through the resulting lateral paws, you can securely braid two profiles with self-draws for metal. In the end of the horizontal profile of PP 60 * 27 / CD 60 * 27, Mon 28 * 27 / UD 28 * 27 is attached. At the frame of the framework of the frame to this profile, a strip of drywall 3 cm-5 cm width is attached.

The two-level ceiling of plasterboard, in which the surface of the ceiling itself performs the first level, has a number of undeniable advantages:
- This design is easier to do.
- Material leaves much less.
- The design of the ceiling is less takes away the precious centimeters of the height of the room.
- The fastening of the frame is made directly to the building structures - the ceiling and walls, which increases reliability.
The disadvantages of such designs is:
- On the old ceilings will have to shoot down the old plaster to the base, and this is a laborious process.
- To summarize the wiring at the first level it will be necessary to the stroke.
- Ideally fly and much more difficult than perfectly smooth plasterboard sheets.
- Bad noise insulation.
That is why most often the owners and master prefer to completely cover the ceiling under drywall, under which there may be just naked overlap plates.
First Level - Plasterboard Ceiling
In this case, on all flaws of the ceiling, you can simply "close your eyes" and eventually get the perfect surface. This approach can be compared with the application of makeup, just do not need to shoot it daily, and it will serve as faithfully for a long time. Consider what options for arranging the ceiling are applied.
Option 3: Fastening the second ceiling level to the first
In this case, the frame of the first ceiling level is first mounted. For a successful framework of the frame, it is sufficient to set the guides of the first level at a distance of 5 cm from the lowest seat of the ceiling. Then the first ceiling level will lower the height of just 5 cm + 9 mm (the thickness of the GLC) \u003d 59 mm. Even indoors with the height of the ceilings 2.5 meters it will be unnoticed.

The figure shows the design of such a ceiling in the context. It is very similar to previous schemes, the only difference is that the fastening of the vertical profiles of the second level box is not made to the ceiling, but to the first-level frame. Naturally, such a ceiling can be equipped with an eaves for highlighting - the same as in the previous example.
In the figure below, it is noted that the first level under the second box is not sutured with plasterboard. And it is completely correct. What for? Although in the literature, and on the Internet is full of examples, when only after the complete cover of the first level, the second box is mounted. This option is suitable only for lovers "bury" extra square meters of drywall (which cost money), but not for a reasonable and mastic host.
The main disadvantages of such an option is a large material intensity, as well as lower reliability - because the second level is attached to the "intermediary" - the first level, and not to more durable and reliable building structures.
Option 4: Fastening of the first level of plasterboard ceiling to the second
This is the most elegant solution for the arrangement of a two-level ceiling that combines the advantages of all options. The presented scheme shows that the fastening of the second level box is made to building structures, which increases the reliability of the structure. The first level is also attached to the ceiling, and guides are fixed on the vertical surfaces of the box, which do not carry a large load, but only set the plane.

The advantages of ceilings, which have both levels "sewn" drywall are:
- The lack of the need to bind to troublesome and "wet" processes to remove old plaster and applying a new one.
- The ability to spend under drywall all the necessary communications.
- Best noise insulation.
- A relatively simple way to finish.
- Speed \u200b\u200bmounting.
The only drawback of such structures is high material consumption.
Drawing up a project of plasterboard ceiling
After there is a clear understanding of the ceiling design, the plan of the room is compiled, taking into account the real size and configuration of the room, the design option is chosen, you can begin the preparation of the project. The authors of the article immediately give advice to home masters - the previously drawn room plan is better to operate at once in several copies, since correctives can be made when drawing up a project, and the most cardinal. That is why not to overcramble several times the room plan is better to have several blanks.
When transferring the selected design to the room plan, nothing should be drawn from hand, everything should be justified from the point of view of geometry. On the sheet of paper is easy by hand draw a beautiful figure, and how to draw on the ceiling? That is why, applying only a zircule, a ruler and transportation, it is necessary to enter the selected design in strict mathematical laws. It is worth introducing such a picture - in front of the installer a clean ceiling without any marks. Having only a roulette at hand, the circus (how to do it later) and the pencil installer must transfer all the marking on the ceiling from the project.
Read the tips on the choice, in the new article, on our portal.
If it is not possible to do it yourself, you can contact the specialists who will make it all with the help of special software. An example of a competently executed ceiling plan is shown in the figure.

What should be indicated on the plan?
- First, all construction on the plan should begin with the geometric center of the room.
- Secondly, all sizes of boxes should be indicated.
- Thirdly, if the configuration of the ceiling involves roundings, the positions of the centers of circles in relation to the geometrical center and their radii should be indicated.
- Fourth, if a complex curve is assumed, it should be built by interconnecting circumference arcs that also have a center, and radii.
- Fifth, the axial lines of the location of the built-in luminaires must be indicated, their specific position and diameters of the holes below them. On direct areas with reference to the geometric center, and on arcs in polar coordinates, which implies the indication of the center of the circle, angle and radius.
- And finally, the ready-made ceiling plan is better to print or opened in several copies.
After drawing up the plan, you need to make a scheme of engineering communications, which includes:
- Place of junction boxes.
- Type of wires and cross-section.
- Method of connecting lamps. For example, if you have to light up and go all together, it is enough to bring one wire and put it with a train from one to another, providing parallel connections. If several zones or various light scenarios are assumed, then it is necessary to maintain separate wires from switches or controllers to groups or even each separate lamp.
- Wire gasket routes.
- If ducts or ventilation air ducts are held in the ceiling, then they should also specify their position.

The design of the ceiling framework should include PN 28 * 27 / UD 28 * 27 profiles and PP 60 * 27 / CD 60 * 27, position of direct or anchor suspensions, crabs, laying of plasterboard sheets. The framework of the frame is best to perform on a pre-copied ceiling plan. What should I do for this?

- From the geometric center of the room to postpone 300 mm (on scale) into each of the parties on the axes of the right rectangle D1D2D3D4 (see the room plan).
- Build a grid of mutually perpendicular straight lines with a pitch of 600 mm - it will be axial lines of PP 60 * 27 / CD 60 * 27 profiles.
- Note the position of direct suspensions at the first level of the ceiling. To do this, from the axial line up and down to postpone 250 mm (on the scale) on all the grid lines. Next, put the suspensions with an interval of 500 mm. The closest to the box the suspension should not be further 200 mm from it. In the case of which, change the arrangement scheme by changing the intervals between them towards the decrease, but at the same time the suspension should not be on the crossing line of the profile axes.
- If horizontal box profiles have a length of more than 300 mm, then designate the position of the suspensions (direct, if the distance to the ceiling is less than or equal to 120 mm or anchor, if the distance is greater).
- Denote all places at the first level of the ceiling, where the "crab" connector will be applied - it is nothing more than the point of intersection of direct.
- Make the layout of plasterboard sheets on the plan. Sheets should be located along the main carrier profiles (those on which suspensions are placed). GLCs should be laid in the disintegration, that is, the seams of the adjacent sheets should not coincide. Minimum breakdown 600 mm. All joints should have to be strictly on PP 60 * 27 / CD 60 * 27 profiles. First the first level layout is made, and the remaining pieces can be used to cover the box. When laying sheets is very convenient, pieces of cardboard on the scale of the ceiling plan, which will display the GCC (dimensions 2500 * 1200 mm). So you can, laying and trimming these pieces to estimate the desired amount of plasterboard and determine the optimal layout.
- The required number of profiles, "crabs", suspensions, drywall sheets is calculated. At this stage, it is desirable to attract an experienced installer, so as not to purchase too much, as the lack of you can buy, and the surplus is very difficult.
- When purchasing GLCs and components, it is possible to bind down to calculated numbers to add 15%, as there will be errors in the calculations, along the installation in the design, adjustments will be made, and the errors are inevitable, leading to the ceiling details breakdown.

Some home masters at the design stage are trying to count even the number of self-tapping screws needed for the installation of the ceiling. In the installer community, this is taken for a converter, so it is better to stock up two boxes of 1000 pieces of metal and plasterboard. Only at first glance is a lot, but in fact it may not be enough - it all depends on the design of the ceiling. Procurement GLC is better to produce in advance. For 7-10 days, so that the sheets are "accustomed" to the temperature and humid conditions of the room, where they will be mounted.
Marking ceiling
After drawing up plans and the project of the two-level ceiling, it is necessary to transfer the drawing from paper to the ceiling, and it is necessary to make it by geometric constructions, as well as on paper. And for this you will need the same tools: a ruler, zirkul, transportation (although the main corners of 30 °, 45 ° and 60 ° can be built only with the help of a circulation and a ruler). For the ceiling, the rule, roulette and independently manufactured circular are suitable. With the first two positions, everything is clear, but with the third it is necessary to give a few tips from practice.
spotlight
- It is necessary to designate all centers of the circles, transfer them from the plan to the ceiling. Previously, during the sizes, the diagonals were already battered, the axes are stuck, the correct rectangle is built, so there should be no difficulties in this issue.
- In the geometric center of the ceiling (at the site of the intersection of diagonals), as well as in all centers of circles, you need to drive a dowel and twist screws so that their hat performed by 10-15 mm.
- From the profile of Mon 28 * 27 / UD 28 * 27, a piece of the desired length is cut off, which should slightly exceed the largest radius of the circumference on the ceiling plan.
- At one end, a hole with a diameter of 4 mm is drilled, which will serve as the center of the circle.
- From this opening, the necessary radii is measured, according to the ceiling plan, the holes are drilled in these places where the marker or pencil will be placed. Near these holes are recorded by a subtle marker of radius values.
- If you consolidate the profile in the center of one of the circles on the ceiling, the circus is obtained for drawing circles. For this, after fixing in the center to others, the previously drilled holes are placed a marker or pencil and draws a circle or arc of the desired radius.

Circle can also be made from an unpromal cord, on which the desired cuts are measured, but the device from the profile is much more convenient to use and has better accuracy.
Tip: Prepared as a Circle Profile Mon 28 * 27 / UD 28 * 27 can be used to build straight corners. To do this, it is necessary from the center to postpone distances at 30, 40 and 50 cm. Buing a triangle Pythagora (Egyptian triangle), you can get a straight angle on any surface.
When all the tools are ready, you can proceed to markup. What, first of all, should be transferred from the project to the ceiling?
- First, on the walls it is necessary to knock off the first and second levels of the ceiling. The first level can be located at a distance from 50 mm from the lowest seat of the ceiling, and the second at a distance of 10-30 cm from the first (it all depends on the height of the ceiling and the room configuration). It is best to do this with a laser level, and in its absence - water level (Waterpas).
- secondly, all axial lines of ceiling profiles of PP 60 * 27 / CD 60 * 27 as bearing and jumpers are transferred to the ceiling. It is quite easy to do, since there is already a rectangle on the ceiling, which was drawn up when drawing up the room plan. Measuring the desired distances on the sides of the rectangle, you can build a grid of axial lines with a pitch of 600 mm.
- Thirdly, the location of the suspensions (direct and anchor) is noted.
- Fourthly, the configuration of the box of the second ceiling level is drawn, and this is done by the method of geometric constructions - a circulation made in advance, and a ruler.
- And finally, there are places of location of the built-in lamps in the box and the source of the main light (chandeliers), as well as the points where the junction boxes will be mounted.
Installation of a two-level ceiling of plasterboard
Before starting work, it is necessary to prepare the premises. For this:
- All furniture is taken out of the room.
- The floor is desirable to be seen with cardboard and plastic film, as the platforms and stepladers will often be rearranged, and there will also be a lot of dusty work.
- If there is a door in the room, it should be wrapped with a polyethylene film and caught a scotch, and if not, then a large piece of dense tissue is hanging in the doorway (for example, an old bedspread or curtains), which fully closes the opening. When dusty works are carried out, the fabric is wetted with water from the sprayer.
- The windows are also desirable to close from dust - for this, their entire window opening can be covered with a polyethylene film and enclosed by painting scotch. The windowsill can be covered with old newspapers or cloth. After completion of the work, the room needs to be used daily.
- It is desirable to have at least two bright light sources: scattered - for the entire room, and aimed in the form of carrying is to illuminate the work area.
- It is advisable to have a mounting table, as it can perform an old kitchen table or high platform.
- To collect garbage and waste, which will be enough, you need to have a big bucket.
Example 1: Plasterboard box in the kitchen
We describe the process of mounting the frame of the duplex ceiling. As a first example, we give the process of creating a box of plasterboard, which is located above the kitchenware table top. Built-in lamps must be mounted in the box, as well as duct kitchen hoods. The surface of the ceiling is leveled and past, so it is he who is chosen as the first level. All stages of installation will be imagined as a table.
| Illustration | Description of the stages of Montaja |
|---|---|
 | On the ceiling and walls are marked according to the project. Electric wiring placed in the corrugation (required!), It is best to pull the plastic clamps and fasten into the corner between the surface of the ceiling and the wall so that there is no interference when installing. |
 | On the back of the profiles of Mon 28 * 27 / UD 28 * 27, the sealing tape passes, and then they are attached to the pre-laid lines to the walls of a dowel-nail pitch with a step of 30-40 cm, and 25 cm with ancker-wedge ceiling. In the corners profile Inserted into each other and fastened with the TN9 or LN9 self-tapping screw. These guide profiles determine the dimensions of the future box. |
 | The distance from the ceiling is measured to the lower edge of the wall guide profile. From the profile of PP 60 * 27 / CD 60 * 27 cuts for metal cuts, the length of which is less than 10 mm measured distance. At the end of the segments, the side shelves are cut on 2.5 cm from the end of the profile, and the tongue is made from the back, as shown in the figure. As a result, the suspensions are obtained. |
 | The resulting suspensions are fastened with TN9 or LN9 self-testers on a ceiling profile with a step of 40-60 cm. At the same time, it is necessary to place them to the ends of the profiles, in front of any bends in the place of shests of plasterboard sheets. |
 | To the lower part (to the tongue) of the suspension, the PN 28 * 27 / UD 28 * 27 guide profile is attached. The mount is made through the back, and sharp edges should be directed to the wall. When mounting is controlled by the level of the horizontal plane formed by the lower part of the wall and mounted guide profiles. You can also control the correct installation of the roulette - the distance from the ceiling, to the bottom of the profile should be equal to all suspensions. At the ends, the mounted and wall profile should be fastened with a self-tapping screw. |
 | The ceiling, according to the project, the places of installation of the embedded lamps are scheduled. |
 | To the installation places of the lamps stretch the wire (the best PVS 2 * 0.75). Since all lamps should be turned on simultaneously, it can be stretched by a loop - on the first lamp, then from the first to the second, etc. All wires are placed in the corrugation with a diameter of 16 mm and are attached to the ceiling by plastic clamps. The length is made so that they hang below the box plane by 15-20 cm. |
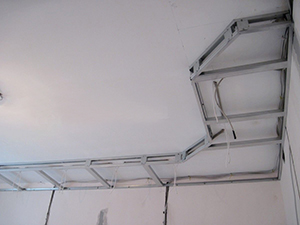 | In the outlined places, which should not have to install the lamps, the distance from the wall is measured to the back of the heading of the guide profile mounted. Slices of profile of PP 60 * 27 / CD 60 * 27 are cut, which should be 10 mm less measured distance. The segments obtained are inserted into the profiles of PN 28 * 27 / UD 28 * 27. So the guides of the lower plane of the box are formed. |
 | Horizontal profile segments are exhibited perpendicular to the wall with the help of the kitchen. |
 | And then they are fixed with TN9 or LN9 self-tapping screw. |
 | The verticality of the front part of the box is checked with the help of a square. |
 | And also attached with a self-tapping screw. It should be noted that the axial lines of vertical and horizontal profiles of PP 60 * 27 / CD 60 * 27 do not coincide so that there are no junction of the vertical and horizontal planes on the same line in the future. |
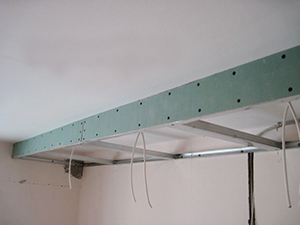 | Cutting strips of drywall of the desired size and are attached to the frontal part of the box with screws TN 25. For the kitchen it is better to use moisture-resistant plasterboard (G CLEB). The mounting step is 10-15 cm, all joints should fall on the middle of the PP 60 * 27 / CD 60 * 27 profile. |
 | All engineering communications are checked. Mounted duct kitchen exhaust. In this particular case, the rectangular air duct with a cross section of 120 * 60 mm is best suited, which allows you to install an exhaust with a capacity of up to 350 m 3 / h. |
 | Cut from the size of plasterboard sheets for the lifting of the bottom of the box. The fastening is made by TN 25 self-stakes in 10-15 cm increments. The joints should only have in the middle of the profiles. On the horizontal surface of the box immediately outlines the installation sites of the built-in lamps. To do this, you can drill small holes. |
 | The joints of the GLC are shit and strengthened with sickle, aluminum reinforcing corners are glued. Then the entire surface of the box with grinding is then sweeping. Then the cartel are glued. |
 | The cartoons and the lower plane of the box are painted in white, and the side surface is in the color corresponding to the walls. The holes in which the lamps are mounted. The box is ready. |
Constructions The most important thing is to understand the principle of constructing frames and the covering of their GLC. Then any, even the most complex design of the ceiling, will be able to be implemented independently.
Example 2: Installation of a two-level ceiling with backlit
In this example, we consider the sequence of installation of a complex two-level ceiling, in which the second level occupies the main ceiling area, and the first level is a round island, in the middle of which the hanging lamp is mounted. In this ceiling, the backlight function is additionally implemented.

Such a non-standard and beautiful solution will be justified only in rooms with high ceilings. We describe the technological process of creating such a ceiling.
| Illustration | Description of the stages of Montaja |
|---|---|
 | With the help of a hydraulic level or laser level on the ceiling, tags are set to the second level of the suspended ceiling. Tags are connected by the line using the rule. |
 | Along the line, the guide profile Mon 28 * 27 / UD 28 * 27 through the sealing tape is mounted. |
 | For the markup of the circle, the profile of the PN 28 * 27 / UD 28 * 27 is taken, one end is fixed in the center and through the pre-drilled holes with a pencil or marker, circles (internal and external) diameters are drawn. |
 | Mon 28 * 27 / UD 28 * 27 profile is cut into metal scissors to segments of 10 cm long. At the same time there is a side shelf and the backrest of the profile. |
 | The outcropped profile is applied to the outer circle on the ceiling and attached for each segment of the dowel-nail 6 * 60 mm. |
 | By applying a bubble level to the bottom plane of the wall guide profile and putting it horizontally, you can measure the distance from the ceiling in the circle area, to the lower level. It is such a width that will require a band from GLC to form a borge of the central circle. |
 | From the plasterboard sheet is cut along the band of the desired width. The back side (with marking) is rolled by a needle roller, and then wetted by painting roller with water until the plaster will stop watering water. The main thing is not to overdo it and it is not allowed that the plasterboard is not soaked with water. After about 10 minutes, it can be taken carefully. |
 | The drywall band is applied to the inside of a circle formed by a perforated profile and is screwed by self-pressing to each segment. Work is necessarily conducted with a partner. Shakes of the bands are strengthened by a piece of PP 60 * 27 with a piece of profile. |
 | Mon 58 * 27 / UD 28 * 27 profile is cut into segments of 10 cm, only in this case only the side shelves are cut. Further, it is applied to the bottom of the circle from the plasterboard strip and is attached to the TN 25 screws in each segment. |
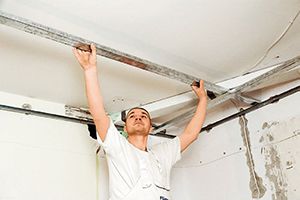 | Given the significant plane of the ceiling, the supporting profiles will be laid in two tiers, carrying the ability of such a ceiling above. The upper carrier level of profiles of PP 60 * 27 is fitted and attached on top of the wall pn 28 * 27 with an interval of 1 meter. In places of crossing a profile with a central circle, its end suits in accordance with the radius of curvature and also stacked and bonded on top of the perforated guide profile of the circle. |
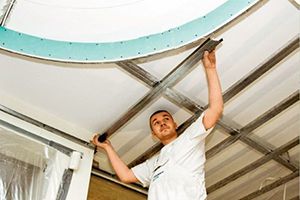 | Perpendicular to the supporting profiles in a step of 50 cm is laid down the lower level of profiles, which are already becoming the inside of the wall guide profile Mon 28 * 27. When crossing with a circle, the end cuts up in accordance with the radius of curvature and is inserted into the perforated profile of Mon 28 * 27 / UD 28 * 27 of the circle. |
 | If necessary, with an insufficient length of the profile, it is increasing its extension. |
 | In places of intersection of profiles of the upper and lower level, two-level connectors are installed (they are also called two-level "crabs"). |
 | On the top carrier level of profiles of PP 60 * 27 / CD 60 * 27, direct suspensions are installed with an interval of 50 cm (just in the middle between the intersection points with the lower tier profiles). The suspensions are attached to the ceiling with two anchor-wedges with a diameter of 6 mm. After mounting all the suspensions on the ceiling, the cord is stretched in the lower ceiling plane, all profiles are consistently set up in terms of the level and are fixed on direct suspensions with TN9 or LN9 self-stairs (4 per suspension). After that, the frame is checked and the wiring is supplied to the backlight. |
 | Plasterboard sheets are mounted on the frame with a long side parallel to the carrier (top) profiles. This method of fastening will provide a higher stiffness of the ceiling design and will ensure that all end joints of the GLC will be on the bottom level profile (the length of the plasterboard sheet is 2500 mm, and the distance between the profile axes is 500 mm). Fastening step TN25 - 200 mm. |
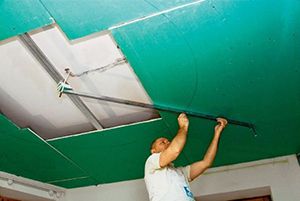 | In the area of \u200b\u200bthe central circle, plasterboard sheets are mounted with a margin, then to further form a circle of smaller diameter, so that in the resulting niche lay the hidden backlight. To draw a circle with the desired radius on the edges of the GLC, a temporary profile is attached to the projection center of the circle on the ceiling. The previously used circulation from the guide profile is attached to it and the circumference of a smaller radius is drawn than on the stream. |
 | The plasterboard sawmaker is made along the circumference line. After this edge is processed by a plasterboard plasterboard. |
 | In order to hide the lamps, you need to make a border. To do this, the profile of Mon 28 * 27 / UD 28 * 27 is cut into segments of 10 cm for metal scissors (the cut should be on the side shelf and the back). The profile is attached to the edge of the round opening (back down, sharp edges upstairs) through plasterboard from the bottom up TN25 screws for each segment. Next, it is attached to this profile a strip of plasterboard width of 5-7 cm (pre-laminated needle roller and moistened with water). |
 | The rules are brought to the placle, and then on the joint between the horizontal plane of the ceiling and the vertical plaster plate of the plasterboard, the special perforated plastic corner is superimposed and the stapler to plasterboard is "shot". |
 | The end edges of drywall sheets that do not have drunken edges are prepared for the subsequent sealing of the joints. To do this, the edges of sheets are trimmed with a building knife to form a groove. All sticking pieces of cardboard should also trim the knife. |
 | To improve the adhesion putty, all seams are processed by primer. Before it, you can wipe the entire surface of the ceiling soft, slightly moistened with a rag to remove dust. |
 | For sealing joints of HCLs, it is used specifically for this to be intended to put a putty (ready or requiring preparation). Of the most famous it is: Knauf Fougügeller, Knauf Uniflot, Logon, Old Town and others. The putty is applied to all the joints, as well as on those places where there are screws. |
 | In the fields of joints into the putty, the reinforcing ribbon-serving ribbon is plunged into the putty. After that, the following layer of putty mass is superimposed with a wide spatula. |
 | Perforated plastic corner and surfaces next to it are also processed with putty. |
 | After grinding, most likely, it turns out that another equalizing layer of putty will be required. After applying and drying, the surface is once again polished with a small grid (from 400), it is ground and painted. |
 | Fixtures are installed in a niche, which can act as luminescent lamps, light cord or LED tapes. The lamp is suspended in the center of the circle. |
Video: Secrets of skill when working with plasterboard and profile
Video: An example of mounting a two-level ceiling
Video: Duplex plasterboard ceiling in the kitchen
Video: Mounting multi-level ceiling, part 1
Conclusion
Plasterboard - a unique finish material and, above all, it is interesting in that having a very simple set of tools and elementary skills to work with it, any good owner will be able to independently create its own, beautiful and unique ceiling and other designs. The authors of the article are not in vain a lot of attention paid attention to "non-essential details": fasteners, connection profiles, fastening of the frame to building structures, design, markup, etc. The fact is that the understanding of these "little things", understanding the basic principles of working with Plasterboard will help in the future to realize any of their ideas and give her housing a unique appearance. The best design is the one that is made independently for himself. The best two-level ceiling is the one that is made with his own hands. Summing up the article, the authors want to bring several theses:
- The plasterboard ceiling can be made in a couple of weeks, and errors made at the design and installation stages will remind themselves much longer - years. Therefore, more attention should be paid to the selection of design and design.
- The plasterboard ceiling is an unbalanced design, so all engineering communications hidden behind it must be carried out and made flawlessly.
- Purchasing of drywall and components should be made only known brands and in proven sellers. Unfortunately, there are a lot of counterfeit products on the market.
- In the dispute between the album of the technical solutions of the manufacturer of plasterboard structures and the argument "I am so done so", a separate masters must win the album of technical solutions.
- With independent creation of a plasterboard ceiling, especially for the first time, the errors are inevitable, and do not be afraid of them. A good master is the one who made a lot of mistakes, but realized them, in time corrected and will not allow them in the future.
Good luck to you!
Among the many designer decisions on the design of the ceiling, more and more owners of houses and apartments tends to install two-level plasterboard ceilings.
Duplex curly ceilings will help to make the interior of the room refined and individual, opening up wide possibilities for creating light compositions. In addition, this choice allows you to get a decorative ceiling relatively and inexpensive.
Duplex ceiling: Estim dignity
Installation of duplex plasterboard ceilings, with your own hands, in particular - the process is costly in all respects: financial, temporary and attached efforts. But all this is compensated by opening the capabilities and the advantages of installing a multi-level ceiling:
- getting perfectly smooth surfaces, the ability to completely hide the defects of the draft (source) ceiling
- disguise (secretly pave) All communications and engineering networks - electrical wiring, freonons of air conditioners, TV cables, phone and internet, air ducts, heating pipes, etc.
- using installed backlight Zonate space, indicating the zone of the dining room, living room, kitchen, bedrooms, etc.
- visually block the geometry of the room, its shape, visually convert space
- the ability to create unique, multi-level lighting systems that combine various types (halogen, lED, luminescent) light sources
- the ability to re-(and repeatedly) strong ceilingto change the mood and atmosphere in the room
Methods for mounting two-level plasterboard ceilings
According to its design, two-level plasterboard ceilings are extremely diverse, but in general, two main types of installation can be distinguished, the main difference of which is to choose the top level.
The first way. The existing ceiling is used as the top level, and the drywall box is mounted only in separate areas (islands) or around the perimeter of the room. Such a method allows to significantly save materials (and therefore money) and significantly speed up the process. However, this method is applicable only with a smooth ceiling, when the main plane is enough smooth, does not require substantial repairs, it will be possible only to raise it. In this case, the second tier is set for visual separation of the room to functional zones or hide (secretive gasket) of communications.
In Fig.1, the first level is the standard ceiling (painted or plastered), second level (box) - drywall. The joint is solid, the lamps are built-in, mounted in the second level.
An option is the second tier with a visor (Fig. 2), in which light cords or lamps are placed. The first level is the prepared base ceiling, the second - plasterboard with mounted lamps. At the end of the second level, a hidden backlight is installed, giving multiple soft light. This design allows, turning off point (basic) lamps, get unobtrusive muted lighting, which creates a romantic and cozy atmosphere in the room.
The second way. In this case, both levels are made of plasterboard. Most often, this is caused by the unsatisfactory state of the plane of the draft ceiling, when all of its visually distinguishable flaws are easier to hide than to repair.
Usually, first mounted the entire base area of \u200b\u200bthe ceiling, and then the elements of the first (Basic) level are for the framework of the first (Fig. 3).
Another option (Fig. 4) - a guide profile is fixed to the installed box, on which the main ceiling plane is mounted.
Sequence of work
To competently and securely independently install two-level plasterboard ceilings, you should follow the following order of work:
- develop a draft two-level ceiling and carry out its exact markup on the mounting grid
- determine with the type of installation of a two-level ceiling and a sequence of work
- prepare a ceiling
- exactly transfer the mounting grid to the base ceiling
- collect the carcass
- magate Communication
- cut on the size of curly cladding parts, form curved elements
- lower the frame of plasterboard
- cut the ceiling finish
- install lamps
Preparatory stage
Before installing the two-level ceilings from the drywall with their own hands, it is necessary to finish all the "wet" works - the roughing of the walls, the tie of the floor, etc. Plasterboard is very sensitive to high humidity, so the air humidity indicator should not exceed 75%, the room temperature is not lower than 16C. When installing a two-level ceiling using the main ceiling as a basic, remove the former plaster, close the gaps, handle the primer and shook the ceiling, aligning it. Seeing the room and only after that start work on the installation of bunk (multi-level) ceiling.
Montage Karcasa
The frame is mounted from a galvanized cold-made metal profile not thinner 0.5-0.8 mm. It is exactly the accuracy and correctness of the installation of the frame that determines the strength and evenness of the whole structure, so it is very important at the very beginning to competently and accurately conduct markup. All stages of the frame assembly should be checked by the construction level. To secure the profile, special screws are applied for metal. The finished frame is carefully unwound in several directions before proceeding with plasterboard facing.
Tip! When installing the frame, it is important to immediately provide for the mounting place chandeliersBy laying at least two mortgage profiles - it will make it possible to securely secure the lighting device.
Smooth surfaces today are already out of fashion, and more and more often the owners are wondering how to make a two-level ceiling from a plasterboard sheet, having arranged hidden lighting on it.
Planning how to make a two-level ceiling
If a typical solution, when the ceiling is an ideal plane, you do not suit you, you need to use the unusual design already invented by someone, or create something your own. In the first case, it will be easier for you, since most often you can find a scheme for assembling profiles under plasterboard and the calculation of the required number of sheets. However, the second option is already attractive to the fact that with the successful completion of the work you will become the owner of a unique design.
Before making a two-level ceiling, decide how it will fit into the design of the room. An additional level may serve as various tasks, for example, as zoning the room, and, of course, to accommodate additional lighting points. Consist, as a rule, from the ground that can serve as the overlap itself with the perfectly smoothed surface and the covering of dry plaster, as well as from the box in which the backlight is mounted.
There are two types of fixing the entire design. The first option is a rigid fixation, when in addition to the main, leveling layer, the second tier is also attached to the walls. The disadvantage of this method lies in the fact that during earthquakes the framework may be deformed, which will lead to displacement and cracking. The second type is a floating design, without a tight connection with the walls. By itself, it is durable, it will only chamfer with underground jolts, without breaking the skin.
Duplex ceiling with your own hands from A to Z
Making a design into several tiers differs from the type-aligning plasterboard with drywall only by the complexity of the frame. This must be taken into account and not to take immediately for unusual design ideas, but try strength by making a ceiling with a fairly simple geometry. The most difficult to be considered wavy, curved lines, it is easier to work with rectangular figures. Consider the principle of installation on a typical solution of the box, located around the perimeter of the room.
Two-level ceiling with backlit - step-by-step scheme
Step 1: Pre-marking
Choose the distance from the ceiling, on which the lower level will be located (more remote from the floor), put the markers on the wall and beat the line with a coated cord.
Step 2: Determination of the position of the rear wall of the niche
Since the second tier in our project will become part of the box that envelopes the ceiling around the perimeter, we define in advance where the design end ended to the center of the room will be. We disable on the markup of the line, according to which, in turn, the guides in turn. Thus, we in stock turns out two rectangles from profiles: one on the wall, the second is slightly higher, on the ceiling.


Step 3: Installation of jumpers
Behind the ceiling guides from the walls of the walls, krepim to the overlap of the suspension, after which it is mounted to them and the wall guides to the jumpers so that they reached accurately to the ceiling profiles. For this, under the latter stretch the cord, along which we will orient the trimming of the aluminum p-shaped profile of the corresponding length.

Step 4: Installing the Low Level Guide
After all the jumpers are fixed on the suspension, we mount the guides to them exactly along the ceiling profiles.

To do this, we use a plumb or laser level, you can also navigate the previously stretched cord.

The main thing is that the ceiling and lower profiles are in one vertical plane.

Step 5: Rear Shelf Cover
Two directories located above each other form the basis for the end of the box, which will cover the perimeter of the room and at the same time will become the back wall of the niche after the formation of the latter. We need to cut off from the leaf of plasterboard several bands, the width of which will be the distance from the overlap to the edge of the lower profile.

Self-plugs are fixing the prepared fragments of dry plaster throughout the inner end of the carcass.

Step 6: Marking under the top profile
Right on the fixed bands of the drywall, we mark the position of the profiles under the top level and by markers, beaten the coated thread line.

Then, on the marked markings, the guides, measuring along the long sides of the segment design of 60 centimeters under profiles, which will be installed with the specified step.

The next markup can be done both with a pencil directly at the ceiling, and with the help of a cord attached to the screws screwed into the gypsum cabarton.
Step 7: Mounting top-level frame
We cut metal products along the length of the short side of the inner end cladding of the structure, after which we insert them into the guides along the cord or the battered lines, fixing the straight suspension to the ceiling.


We pretend the location of the sheets of dry plaster at the top level, for which it can be useful, and in the places of their joints, we set the jumpers between the base profiles.

Step 8: Covering the first tier of plasterboard
Fresh plasterboard on guides, screwing the screws on the joints in the chess order. Also, the fasteners must be used in the center of each sheet, the width of which is 120 centimeters, that is, fastening to the intermediate profile.

Step 9: Processing of the seams and edges of the first level
Carefully put all the angular compounds of plasterboard sheets, processing edges and joints.


Madely smooth off the coating from the putty when it gets dry - we rub the shallow emery paper. In other words, pre-prepare the above sections under painting or another type of finish.
Step 10: Second Tier
Mount the plasterboard on the guide of the lower level so that the edges of the fragments of sheets went beyond the end of the box of centimeters by 10-15.


It is at this stage that before collecting a two-level ceiling with their own hands finally, it is advisable to set the lighting points, strengthening the lamps on the end cover. However, it is possible to go in a simple way, using the LED tape laid in a niche. Deciding in favor of the second option, simply we are wearing a frame, forming a second level and a niche due to the removal of the sheets of dry plaster. All protrusions that make up the shelf must be on the same level.
Fix profile
It is behind him that you can hide the LED tape or other sources of lighting. To the guides, screw the narrow strips of drywall, trying to completely hide aluminum profiles.


All trimming, made to cover from dry plaster, should be one width. Next, you can proceed to putty works.
Attention! From the depth of the niche and the height of the side directly depends on the width of the light, provided by hidden lighting sources, as well as its intensity and brightness.
Device of two-level ceilings with backlit
As a rule, when a desire arises to arrange additional lighting after the ceiling is trimmed with drywall, such light sources are used as Sofita. They are convenient because they can be directed at any point of the room, especially if they are located in the corners. However, if the device of duplex ceilings is still to be used, you can take care of other options for highlighting.
In particular, point sources of lighting, whose modifications are distinguished by a large variety. But, in view of the fact that in the niche lamp, as a rule, is hidden from prying views, it is possible not to be sophisticated in the selection of the most beautiful point lamp. Can be installed in a niche and sofit. Other business is a LED tape, which is a variety of tiny light sources on a flexible base. There are also diodes enclosed in a transparent tubular shell. The most suitable option is better to choose before building a two-level ceiling to connect the appliances to the power grid in the installation process.
No one no one surprises the presence of a suspended ceiling. It can hide the wires from lighting. Next, we will show how you make a suspended two-level ceiling.
Advantages of suspended ceiling
One of his advantages is that in order to do it, you do not need to remove the old plaster from the bottom surface of the overlap. It is enough to remove fragile fragments that will prevent reliable fastening of the frame, the rest will be hidden. By the way, the suspended two-level ceiling will hide electrical cables and ventilation channels that are convenient to lead just under the ceiling.
Attention! In space under the ceiling, do not place pipes with gas. The mounting of the suspended ceiling also gives advantages in improving heat and noise insulation. Between the elements of the frame can be made with insulation from mineral wool. It suppresses noises penetrating through the two-tier ceiling and reduces the amount of heat outgoing from the room.
Installation of the suspended two-tier ceiling of plasterboard
Installation of a rectangular suspension ceiling with your own hands is not difficult. A more difficult task is to make a deepening in the form of a circle. In our case, a part of the two-level ceiling will be above the kitchen area, where it will be exposed to steam, so we chose green plates with increased resistance to moisture.
Step-by-step instruction


1. At first, you need to draw lines that mark the low level of supporting structure.


3. Determine the internal and external contour of the intended circle.
4. The walls of the guide intended for installation inside the circle must be cut to be bend.
After mounting the guide to the surface of the overlap of the dowels, the base of the wheel is formed.


5. From wall UD profiles, measure the height of the suspension.
6. From the plasterboard plate you need to cut off the bands of the desired width, and then wet them with water and exacerbate.
Attach the strip screws to the profile. At this stage of work, you need to bring wires to connect fluorescent lamps.


7. To the lower edge of the plasterboard strip, the perforated profile should be fastened.
8. Next to the perimeter, we set the CD profiles for the bottom of the two-level ceiling. To do this, secure a CD profile, laid over the wall UD profile after 1 meter. Next, every 50 cm (for a sheet of 2500 cm long) set the CD profile that starts in the UD profile perpendicular to the CD profile.


9. In places where it is necessary to lengthen profiles, we use longitudinal connectors.


10. After setting the frame, connecting the CD profiles with each other with duplex crabs. Then, to the ceiling, the suspensions are secured using 6 mm anchor-wedges for this.


11. Plasterboard plates are screwed in parallel to the supporting profiles - such a design provides higher rigidity.
12. The inner circle of the second level is made a little smaller diameter, in order to arrange luminescent lamps in it. For this, drywall sheets are screwed with a margin to make it easier to draw the circle circle, you should temporarily attach a profile in the center and with a rope or one more profile, draw a line.


13. Overnights on the edges arising after cutting around the circle (drywall sawmill) need to be ground with a plasterboard plasterboard.
14. For the lamps are not visible, along the edge of the hole we make a lid of a plasterboard plate. To attach the lid, you should consolidate another perforated profile inside the circle.


15. After grinding the edges of the plates, you should install a special perforated radius plastic corner, it is attached using a stapler or thick putty.
16. The edges of the plates where there are no special seams, you need to cut forward so that the putty can fill them and create protrusions on the surface of the two-tier ceiling. Sloped places are required to handle the primer to improve the adhesion of the putty mass.


17. The prepared special swept weight for seaming seams is applied along all seams and in places where there are screws.
18. So that the stakes of the plates do not burst, plunge in the putty mass reinforcing (sperphenka) mesh of fiberglass.


19. Also, the mass for seaming seams is applied around the hole where the plastic corner is installed. After drying, it may be necessary to apply another layer of putty, since the previous layer can be drawn or fluttering.


20. The next day, when the putty dries, the entire ceiling is grinding.
21. After pre-painting the ceiling inside the circle, we place luminescent lamps and connect to pre-prepared wires.

22. There will be a table under the circle, so in the middle of the cavity, you can still install a conventional hanging lamp. Illuminated from the inside of the circle is the original interior decoration.
 Why you can not give icons
 Is it possible to give icons as a gift: Signs, the opinion of the Church
 A year ago left her husband, and now I do not know what to do