Street brand brick with hands. Quickly and just make a barbell, do it yourself, from a brick. What is the difference between the grill, fireplace, oven and barbecue
Most people buys mangals in specialized stores, but some wishes to make something on their own, make them themselves. In this article, consider how to make the easiest and most affordable brand from brick with your own hands. Photos of the step-by-step process are also attached.
What is the difference between a simple brick brand from more complex structures
In a small grill, their bricks are missing all too much, it is perfectly simple. Also important factor is the difference in the budget: build a small brand cheaper and faster than multifunctional.
The main differences are shown in the table:
| Difference | Plain | Complicated |
|---|---|---|
| Gabarits. | on average - 1000x260x625 mm | from 1.87 m long and 2.47 m in height |
| Functionality | You can cook on skewers, grid. Also, when adhere to caution to put Kazan. | Cooking meat, fish, vegetables, soups, smoking, cauldron. |
| Secretary security | Not protected | Have an upper cover that allows you to cook during rain |
| Speed \u200b\u200bbuilding | from several hours to couple of days, depending on skills | From several days to one and a half weeks |
In this article, we will gladly tell you how to make the easiest and most affordable brick brand with your own hands. The photo of the finished model and step-by-step actions can be found right there.

Determine the place to install on the site
The first thing to start is to choose where our simplest brand is located. Should be considered:
- It is necessary to arrange a brick building away from residential premises and plants. This is important from the point of view of fire safety, as well as concerns about trees, because they can get off;
- It is best to put the design on the leeward part of the site. This item will be particularly useful for those who experience difficulties in inciting fire;
- It is extremely important that the mini brand of bricks can be at a great distance from cesspool or other landfits.

Tools and materials
To make a small brick brand you will be useful to you:
Materials:
- full brick - 53 pcs.
- cement;
- slaked lime;
- decorative rock;
- water;
- sand.
Instruments:
- master OK;
- bucket;
- sandpaper;
- cement mixing capacity;
The easiest and most inexpensive brick brazier do it yourself: photo instruction
A small brand will be only 4 rows in height - everything is required to fry the kebab! We will also bypass without the foundation. The form of construction will be as in the photo below, but only we will use a full-year brick, as in the second photo.


Examples of ordinary mangals
Before starting to build a simple brick brazier with your own hands in your country, see examples from our gallery. We hope they will inspire you for new projects!
Mangal, built with his own hands - an easy idea for every man. But you can get rid of hassle and order at the master or construction company. The last option is possible if there is no time for the construction of the mangala, but it will be more pleased that the brazier that is made with his own hands, (and the kebab is tastier on it.
If you still think about how to make a brazier with your own bricks, it is worth thinking about the construction of a whole complex on which you can cook and shish and fry various products on the grill, smoke meat, etc.
How to make a brand with your hands out of the brick, and what is needed for this
First you need to determine the place where the future brand will stand. The place must be placed to rest. For such purposes, the gazebo will be perfectly suitable, which will protect guests from the rain of snow and wind.

The most successful and popular design is at the moment a brick oven with dimensions of 1.6 m (height), 1.6 m (width), 0.8 m (depth) with a tape base.
Communication can be summed up to the Mangalu, as well as additional add-in, which will be perfectly fit into the interior of the complex, performing a practical role (you can store various kitchenware).
Near the mangala you can position the table and benches. The choice of material from which they will be manufactured depends on you.
In order to build a brazier with their own brick hands necessary:
- - gravel, sand and cement;
- - Special chimney;
- - Concrete mixer and construction tools;
- - Armature and reinforcement grid;
- - doom;
- - various sized bolts, screws and metal corners.
When building a mantal of bricks, it is necessary to take into account their weight and lay the foundation at least 50-60 centimeters depth, one brick width. First of all, place a place under the foundation, digging to a depth of 50-60 centimeters and put the reinforcement.

After we dug a hole under the foundation and laid the reinforcement, fill with concrete, quite the brand of concrete 150-200, I did concrete since the calculation:
- 1 bucket cement
- 3 buckets of sand
- 5 buckets of rubble
- 1-2 water buckets depending on the humidity of the sand
The surface of the fill align the level (it will significantly facilitate the laying of bricks) and coated with waterproofing material, I used the runneroid. A polyethylene film can be used as a waterproofing material, or just abundantly lubricate with construction mastic (this is done so that moisture from the foundation does not penetrate the brick and did not destroy it).
After the end of working with the foundation you need to wait a few days so that the foundation is finally frozen.
Laying brick mangala
Chimney brick - is the perfect option for the manga facility. This building material perfectly withstands high temperatures. One disadvantage - during a strong frost becomes very fragile.
IMPORTANT: In no case cannot be constructed by a mangon of silicate hollow bricks.
The first row of bricks is worth putting dry, without the use of the solution. This is done so that in the future it did not have to use parts of the brick and customize it in size.

The masonry must be placed and abide by it throughout the construction.
Brick absorbs water as a sponge. For this reason, a few days before the start of the masonry, you need to wet bricks from the garden hose. This procedure will prevent the water to the brick water from the solution. For masonry bricks, it is necessary to prepare a cement solution in the ratio below.
The composition of the mantle masonry:
- 1 part of cement
- 1 part of hazed lime
- 3 pieces of sand
Water is added to the composition in the required quantity and adjusted to the state of thick mass.
After laying the first row of bricks, the subsequent rows are placed with the displacement of the Polkirpich relative to each other (this seam shift is made for better dressings).
The masonry of each level starts from the corners. It is necessary to periodically check the level of masonry horizontally and vertically. Brick masonry sizes must correspond to the designed manga drawing.
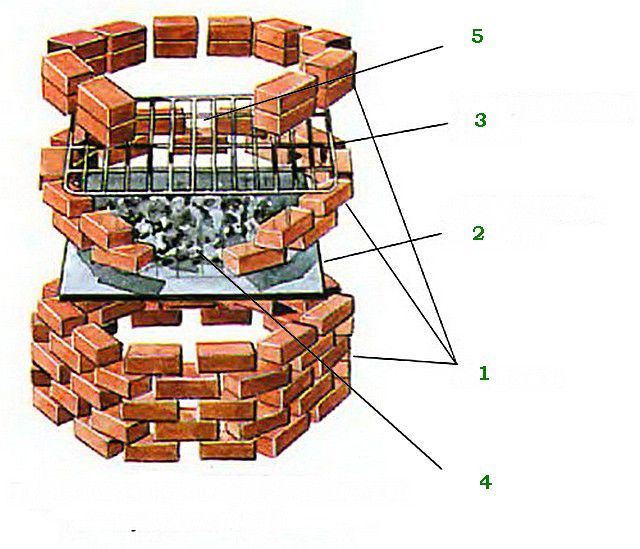
The most important element of the mangala is a brazier, stacked on metal corners, which are fixed on masonry with metal pins. The furnace is needed from the inside to put in thick metal sheets. This will prevent premature destruction of bricks from high temperatures.
For good thrust, it is enough to leave small gaps, unfilled by cement mortar. To install the grill, it is necessary to lay out several bricks inside the mangala with the same protrusion.
When developing a manga drawing, you can lay a variety of constructions designed to store wood storage for canopy, setting the decorative exhaust pipe. The whole complex can be turned into a summer kitchen, where you can receive guests at any time of the year.
Easy way to manufacture mangaal with your own metal hands

The manufacture of mangaal with their own hands from the sheet metal is not very difficult and forces to everyone. The brazier will be a symbol of rest and decoration of your home.
Historians believe that the MANGAL was invented in the Middle East. Back in ancient times, modern brazier made of steel replaced the brazier stamped from copper. Her appearance resembled a huge bowl, to which the legs were attached from below. From above, the brazier was covered with a hemispherical lid. On both sides of the brazier, the handles were mounted, which served for carrying.

For all generations, the brazier symbolizes the rest, the opportunity to go to nature, relax, squeeze the barbecue and nice to spend your free time in the society of friends, relatives and acquaintances. Any good holiday should be accompanied by the preparation of kebab or other dishes on the grill.
Compact metal brazier can be used from early spring to late autumn. Small sizes and low weight - allows you to immerse the brazier in the trunk of any car and go with the company in nature.

In the event that you have a small area near the private house, you can build a stationary brand of stone or brick. But you need to think a little, the stationary brazier occupies a place on the plot, besides, it is not so part used.
The brazier should not be large in size and mass. From metal, the brazier turns out quite durable and functional as shown in the video.
When designing a manga drawing, it is necessary to take into account the average number of your friends who are with you on vacation. It has been proven that the average company of 8-10 people is quite compact brazier with ten skewers. If you need to make a second portion. While guests enjoy the exquisite taste of kebab, you can cook the second portion of delicious meat. All subsequent actions will tell you your fantasy. Bon Appetit.
Brick mangals photo, video
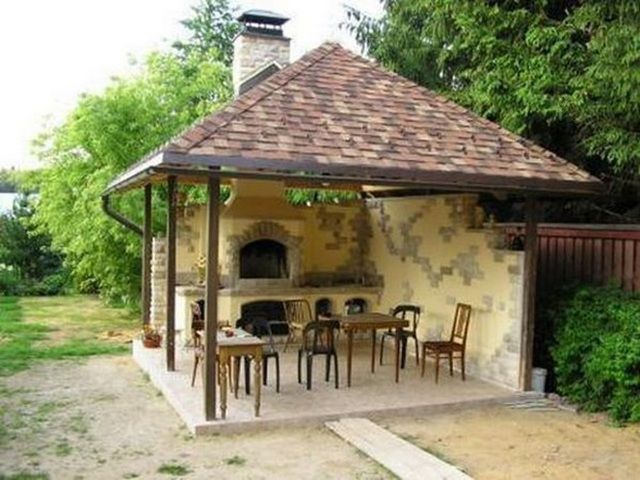
Brick mangals are ideal for a summer cottage or for the private home area. This device allows you to prepare various delicious dishes in the fresh air, enjoying the summer. Professional masters are well building brick mangals, but it is not cheap. If you have a desire to create a brazier with your own hands, and at the same time save a significant amount of money, then this article will help you with it.

The brazier built from a special heat-resistant brick, a rather complicated structure. It will rightly immediately build such a device at which you can cook not only kebabs, but also cook on the grill, smoke and fry various dishes. All functions you can choose for yourself on your own, being at the design stage of the design of the future mangaal.


The garden brazier from the brick must be placed on the site in a convenient place, the construction process is shown in detail on the video. For even more convenience, a water supply source can be brought to Mangal, to build additional economic buildings, which store various accessories and kitchen utensils.
Already built brick mangal can be decorated with decorative stone or tiles. The floor at the base of the mangala must be fascinated by paving slabs. The entire complex will decorate a large tabletop of porcelain stoneware, located in the center of the complex. Doors of various compartments need to be made from thick-walled cast iron.
A red heat-resistant brick looks perfect together with a variety of metal and wrought-iron elements. Such a building perfectly fit into the general landscape design of the household site.
If you are a lover to enjoy fried meat, you probably occurred the idea of \u200b\u200bthe stationary brick manga. We offer instructions, following which you will fold the brazier literally for the weekend, and then immediately be able to test it, manifesting all your culinary abilities.
I am preparing a place under the mangal
So that the brickwork over the years has not lost its tidy, the brazier must be located on a hard monolithic base. For these purposes, the paving slab will be most suitable, you can also use wetting plates of overlaps and other suitable concrete products.
We will consider the private case of a device of a concrete base under a barn of 2.3x1.6 m in size. The slab is divided along in half - one half under the brazier, the second remains as a platform for a convenient approach and cooking. Note that partially concreting can be replaced by a brick deficiency.
To fill the plate, it is necessary to remove the soil layer on the spade bayonet, pre-placing the spicy plot. At the walls of the received pit, it is necessary to set the segments of a thin OSP of about 30 cm wide and coping the slabs with jams on the corners. A 15-17 cm layer of rubble and sand is poured onto the bottom, the lift is condensed and spilled with water.

The stove must be reinforced at least one layer of grid with a rod 8 mm and a cell no more than 120x120 mm. The mortgage element is located with a protective layer of 60 mm from each face on remote traffic jams. The plane is poured with concrete brand B-15 or stronger, optimally, if the plate is poured 60-70 mm above the level of the soil, that is, the overall height of the screed is 12-15 cm. Drying is given by about a week, if there is no possibility to periodically make concrete - cover it film and slate.
What brick? What solution?
You must know the size of the stone in order to properly create a coach. We offer to use the burned clay brick (red) with dimensions of DHSHV: 257x123x55 mm. Give preference to full-scale materials, unless you plan to cover the masonry from above the intake stone.

It is not recommended to put a hamal with sandstone, clinker or chopped brick: on an open sky on such a cladding with a high probability, detachments will appear and cracks. Therefore, for masonry, you should sort the brick and select stones without chipping and detached corners. Also note that partially brick will be at high temperatures of the cooking zone. Consequently, chammed and silicate products are not suitable for this: one due to potential toxicity, the second due to physicomechanical disadvantages.
For the preparation of the solution, one part of the cement of 300 grade 300 per 3.5 pieces of mobby sandary sand are used. But here there is a submarine stone: some varieties of bricks the thermal expansion coefficient differs very different from the characteristics of the solution, which is why cracks may appear in the burning zone. Therefore, it is recommended to replace the cement with its mixture with chamotte clay in proportion of 1: 1.
Lay out arocal fields
It will preliminarily prevent the contours of the future manga on the screed of the outline - a rectangle 2126x926 mm. The masonry is performed in the Pollipich, ranging from the rear wall - a row of eight bricks with seams of 10 mm. On the side of the walls are reported - perpendicular rows of three bricks. Another partition is laid out flush with the fourth brick of the back wall, so the laying in the plan takes a W-shaped form.

The masonry of the second row begins with the side walls, but in this case the first brick is placed on the rear wall than the bandage is provided between the rows. In the second row, the front ends of the walls are completed by goodwood - sliced \u200b\u200bbrick-halves of bricks. The second row ends on the back wall: first 3.5 bricks of the rear wall of the lunite, then across the whole brick of the middle partition and 3 more bricks of the right compartment. The third row, like each odd, is laid out similarly to the first, fourth and all subsequent even - as well as the second.

Thus, the laying is being built by the thirteenth row inclusive. Now it is necessary to prepare a sheet of drywall or LMDF dimensions of 130x80 cm. The sheet is folded by the arc (drywall for this you need to fake) and inserted into the portion of the clip in such a way that its lower edges are on the seam between the sixth and seventh. Thus, the formwork of the arch is formed, it is necessary to stop it with vertical and oblique spacecases, which are trimmed at the place.

In the front of the Arch, the fan is laid out 7-8 bricks, in the lower part of the seam between them constitutes a little less centimeter and expands the wedge. Front ends of bricks are leveled by the rule of flush with the walls and partition. At first, the arches bricks are fixed with a solution in the rear part, aligned visually and left for an hour to set. During this time, you need to knock down and press a small shield of formwork to the front part of the mantle, the top of which comes flush with the thirteenth near the masonry.

The seams between the arches stones need to be carefully filled with a solution, the trimming of the tribe of the trim. The part of the arch, which is located dealer, can be filled with broken brick and mortar. Ultimately, a cement screed is removed with the formwork and the upper nearby.

Apartment for cooking zone: on the grid or on skewers
The fourteenth row of masonry is performed as all even, except for the sink of brick halves in the front. Instead, on the front of the mangal, a row closes four bricks. The same masonry covers a cement screed: three bricks alternate in the second horizontal row, two with half dormants in the third and so on, right up to the rear wall, that is, the bottom of the furnace is completely covered with bricks.

In the installation area of \u200b\u200bthe table top, the fair of the fourteenth row is missing and the rejection of the right side wall begins. With each new next to her depth will be reduced by half of the brick.
The mangala zone is subsended by analogy with the bottom rows. In total, there are 19 rows in the grill, that is, its overall height is just over 120 cm.

The front of the mangala remained open. It is laid in a row of a row of three bricks, then a row of two stones with hawk, on top of the masonry is performed in a quarter. Two of the same exactly laid out at the rear wall of the mangala, forming the second board. The lumen between the sides is about 70 cm, that is, on the grill, both grill grill can be used on the grill and skewers. The mangaal width is also 70 cm, that is, it is focused on the simultaneous preparation of six portions of the kebab.

There is a small trick: two rows of masonry of the front side can be successfully replaced with steel channel 180 mm. In this case, you can adjust the width of the mangaal under the skewers and the grille, alleviate the removal of ash.
Fishing or claws
So that the brazier looks like a beautiful and completed object, it is recommended to perform masonry on the technique of intake pillars. You will get uniform seams of the same thickness if you apply a solution on two rods of 10 mm smooth fittings.

As a result, the seam will take a neat semicircular shape, but you can always give the time to decorating if you fill it with bricks with bricks. First, the laying can be divided in a day after the completion of the last row. Secondly, you are right to leave everything as it is and treat the visible surfaces by sandpaper after final drying. In addition, such a ride looks good in itself, due to the lack of deepening on the seams, dust will not accumulate, and the fatty drips are relatively easily eliminated by re-grinding.
Auxiliary elements
Well, in conclusion, we mention about different subframe means that simplify the preparation of fried meat. First of all, it is a tabletop in the nearby manga branch. It can be installed on the corners attached by dowels on the inner contour. It is also possible at the construction stage to lay down under the thirteenth row several steel plates so that they act inside the "tongues" by 40-50 mm. The table top in both cases is removable and is installed as needed. For stationary installation and all-season use, only "liquid stone" is suitable.

From other additions to the Mangalu, the lattice grill will be very useful, the trash can with a pedal-driven cover, embedded in the table top of the vegetable. Do not forget to consider a flat "cover" on low legs for the mangala so that the rain suddenly began to prevent cooking. Soul feasts!
Countryside on Sundays in most cases are associated with Preparation of very tasty meat, fish and vegetable dishes on hot coals. Of course, you can always organize a small brazier on an ambulance hand, I will even simply dig a deepening in the ground and inventing any crossbars for a grid or skewers. But agree, still much better and tastier, with less fuel consumption products will be prepared, in the case of using special designs - mangal, grill or barbecue.
Owners of country sites in general, probably, do not have such devices, stationary or portable in their disposal. The stores present a fairly wide selection of such devices welded from metal. However, if the owner of the site has at least the initial skills in holding construction works or in the processing and welding of the metal, probably, for him will not submit particularly much problems to build a barbecue with their own hands, of one or another complexity.
What is hiding under the word "barbecue"?
First of all, it is necessary to figure out what we need to get if the goal is set to create a barbecue.
The etymology of this name is not entirely unequivocal - there are several versions of its origin. The most believable one seems the option connecting it from Ancient GreekAnd then the Latin word "Barbarus", which meant the apparent, alien, alien culture. In our language, the word gradually transformed into "Varvara".
Perhaps the way to cook the food of these most semi-rock nomadic tribes - barbarians - on open bonfires or in stone cavemen, and lay out the established name. But, you see that this "barbaric" way to all of us very much and really like it!
Decided to build a barbecue oven?
But before moving to the article about the barbecue, be sure to keep the brick.
In addition, a great solution is Tandyard! About your own hands, read on our portal.
But the question immediately arises - there are quite a few recipes for cooking dishes on grill on grill or on culinary barbecue technology. What is the difference in what the subtleness that distinguishes one of the other?
By and large, the difference is small, but still it is.
- An ordinary brand is usually some kind of metal or brickhouse for coal (box, box, etc.), on top of which the skewer falls or the grille is installed on which products are laid out. The installation height is not regulated in any way - the supply is always the upper edge of the mangala itself. From above, prepared products are freely blurred by air for which no obstacles are created. In the box, the holes have done to imagine the air required for burning firewood and the subsequent deposition of coal. An additional thrust in the mangale is not created in principle - only the heat transmitted by direct heat radiation is involved in the cooking process, which immediately dissipates above the level of skewers or lattice.
 The easiest in the "family" is an ordinary brand
 This is, as can be seen, the simplest of the listed devices. Cooking meat on it requires a certain skill, since the fever comes only from below, and it is important not to reap, do not overheat the side of the products facing the fire.
- The grill also implies cooking on coals, but the principle here is different - the closed volume in which the process passes. Meat products can also be riveted on skewers or laid out on the gridover on thewarming heat smoldering coals, but then the grill is necessarily closed with a lid.

Hot air in a closed volume applies more evenly, and the roasting process occurs simultaneously from all sides. Of course, for combustion, air intake channels are required and smoke outputs therefore grills are often supplemented with a small pipe.
- But the brazier barbecue occupies a certain intermediate position between the usual brazier and the grill, and is closest to the "cave", "barbaric" conditions of cooking meat. It resembles a hearth with one open face.
 For barbecue, it is necessary or closed from three sides of the center ...
 Another option is when the barbecue grid necessarily influences the side, the wall that does not allow heat immediately to diverge on the sides of the slightest breeze.
 ... or the grille is surrounded by a side-side, delaying heat at some height of roasted products
 The walls of this sideboard or focus are also heated and participate in the cooking process. It turns out a peculiar thermal pillow, which envelops the product of CH iso and from the edges, and in the case of a focal type of barbecue - also to some extent from above. It is clear that in such conditions, the meat is preparing faster, and much less risk than to cut it on the grill or even override one of the parties. As a rule, on all barbecue, one or another possibility of adjusting the height of the lattice above coals is thought out.
Artificial craving in the barbecue does not create - the slower moves hot air - the better. In the barbecue of the focal type, of course, without the organization of the hole of smoke, it is not necessary, but the pipe should not be high - usually from the level of the roaster to the upper head-up - no more than one and a half meters.
Honestly, all these three culinary devices are so "relative" among themselves, which is very often easy and simply transforming one thing. For example, installed or suspended below the level of the mangala walls, the grille immediately converts it into a barbecue. And if you close the lid on the barbecue or cover the focus door, then, accordingly, you can cook by grill technology.

Perhaps, on the part of the reader, objections to such a gradation for cooking devices on open fire and coals, as a variety of opinions on the Internet, a lot is expressed on this. Nevertheless, further in the article will consider those manufacturing or construction of a brazier barbecue, which are suitable for the criteria described above.
Barbecue Prices Forester
barbecue Forester.
The options will be considered in the sequence from easy to complex, from temporary to portable roar, and further to stationary complexes.
The simplest brazier barbecue for ten minutes
This option is available literally to all, even people, absolutely not owning Building skills. By itself, the way of the construction of such a brazier barbecue is largely reminiscent of a children's game in cubes.
To work, you will need:
- About one hundred bricks (pos. 1). Their quantity can be less - it all depends on the height of the future "facility".
- Metal sheet (pos. 2) and grille (pos. 3). The size of these elements must be approximately equal. In fact, their length and width are predetermined and the magnitude of the brazier.
The masonry will be held "on dry", that is, no building solution will not need.
- For the structure, it is necessary to prepare a smooth and solid platform, so that it is fireproof. For example, it is quite possible to lay fire on the rammed ground plot, purified from dry grass.
- A circumference of the plaffers of bricks is laid out on the finished platform, with leaving the lumen between them about 50 mm for free air from the bottom. Immediately it is necessary to compare the diameter of the laidden circle with the size of the sheet and the lattice - these metal elements should completely overlap the resulting "well". On the reduced scheme in the masonry of one row, 12 bricks are involved.
- Similarly, four more rows are neatly stacked, each with offset so that the laying was "in the dressing".
- A metal sheet is stacked on top of the fifth row. Its thickness should be at least 2 ÷ 3 mm, since it is on it that fire will be divorced, burn firewood and smoldering coals.
- The following two rows of bricks will create a kind of hearth. The principle of masonry is maintained here the same as the bottom, but there is one feature - from the front side, one brick is not seen from the bottom and, accordingly, two in the second row (pos. 4). This opening will become a flue window through which loading and risi firewood will be carried out, grinding coal.
- The next step on the brick "well" is stacked with a metal grille on which fried foods will be placed.
- On top of the lattice, two more bricks are stacked. At the same time, there should be no lumen between them - a solid side must form around the brazier, so that the "Barbecue principle" should be implemented. It is also permissible in the front part to leave a small opening, for the convenience of manipulating with a blade or tongs during turning into roasted products.
Such a brazier can be left at the site by summer period, but if there are concerns that bricks and metal parts can simply "lead" in the absence of owners, then not at all difficult It is disassembled to close the materials in the utility room. If necessary, the barbecue will not be built again and will not take much time.
Metal barbecue brass materials
If the owner of the house has good skills in the processing and welding of metal, the portable barbecue model can be a very good option. The task will be easily simplified in the case when there are old unnecessary metal barrels or gas cylinders.
In principle, you can do even without welding - precisely about this option and will be discussed. Pictures in the left column of the table can be considered more details by increasing their mouse click.
| Picture | Description |
|---|---|
 | An ordinary standard metallic barrel is taken in good condition. It is important that it is not stored in it easily ignorable products (for example, gasoline). On the barrel immediately there is an external markup - two parallel lines between the bottom and the lid. The plot that will be cut out should be approximately ⅓ surface. The figure shows the markup, made by two stripes isol (blue arrows). Pay attention to the location of the bay neck of the barrel - almost at the level of long-line markup, with a small displacement back (red arrow). This is important, since the neck will be then used for chimney. |
 | The transverse lines of the reserve are scheduled for about 50 mm from the beading connections of the lid and the bottom, and must be strictly parallel to them. Then, with the help of "Bulgarian", the outlined window is cut. It is very important to make cuts as smoothly and neat as possible, since the carved fragment will be used as a lid, and the gaps when it is closed will be minimal. |
 | Further work will be easier if you immediately build a stand for the future barbecue. Options here can be very much, but for example, a simple design can be brought, which will not require welded connections. The diagram is shown in the figure. The cuts of the pipe Ø 40 mm are required - 4 pieces with a length of 750 ÷ 800 mm (this height will provide the most comfortable use of the roaster), and 2 pieces of length equal to the length of the horizontal surface of the barrel with adding another 150 mm on the top mount nodes. The connection of the legs with the crossbars is carried out by bolts, for which the holes are drilled in the pipes (shown by the arrow) |
 | Now a turn to make jumpers, which will give the rigidity of the stand design. And cheaper, and it will be easier to make them wooden, and if more precisely, their plywood is a thickness of at least 10 mm. For this, two bands are cut 700 mm long, and two - 900 mm, with a total width of 150 mm. In two of them, the boreal Ø 42 ÷ 45 mm, equidistant from the center and the distance between the intended centers of the holes in 500 mm, is selected. In the other two holes are the same, but the distance between their centers is increased to 750 mm. It will give a small slope of the legs inward, which will increase the strength of the structure. The first pair of plywood blanks is put on the legs-pipes of both metallic halves of the frame (blue arrow). For greater rigidity, the jumpers are binding to each other with the help of diameters, also made by their plywood stripes (red arrow). By the way, this jumper can be made wide - then it will also serve as a sufficiently comfortable utility shelf. |
 | Now - how to fix this wooden strut jumper at the desired height? The easiest way to strengthen the usual clamps on each of the legs - they will not let plywood details fall down. It is important to place this node is no longer closer than 400 mm from the upper crossbars so that the wooden parts are not burned from the heat when using the barbecue. Such a fixation with the help of clamps will allow you to quickly disassemble the entire design if necessary, simply weakening the nuts and removing the parts from the legs. The lower jumpers are installed in the same way, in which the holes are set somewhat wider. The height of their location is 100 ÷ 150 mm from the ground level. It is not required to connect their acception. |
 | Everything, a barbecue stand is ready. You can install a barrel from above and continue to work. The barrel cylinder reliably stood between the metal crossbars (the blue arrow), and the ends stopped into the connecting nodes (the Red Arrow), which eliminates his movement in whatever side. Under the weight of the barrel, the entire design of the stand, located under a slight bias, is completely refined and will be fixed. |
 | We continue to work on the barrel itself. The main tools are drill, pumping, wrench, so that all connections will be threaded. Use aluminum rivets is undesirable, since the thermal resistance of this metal is low. First of all, the brackets on which the brazier grid will be laid out. These are-available steel corners, screwed by bolts just below the level of the carved opening on one side - and horizontally to them - with the opposite. Placement of corners - depending on the size and rigidity of the existing lattice, so that its reliable installation is provided with an emphasis at least throughout the four corners, and if necessary - with additional corners to avoid deflection. |
 | Most often use the collapsible grid of two halves - it is easier to establish a barrel in the cavity. The figure shows exactly this option. The arrows marked the installed brackets. |
 | It's time to go to the folding lid. On the back, the high part of the opening on the screws are attached conventional steel window loops (unbearable). |
 | The second half of the loops is screwed to the fragment cut earlier from the barrel. It is necessary to very accurately extinct the location of the loops so that the resulting cover is smoothly stood in the size of the window and the maximum closely closed it in the lower position. |
 | Now in line chimney (red arrows). The plug in the drain neck is removed, and instead, a threaded coupling of the corresponding diameter is screwed. So that a protruding threaded nozzle is obtained (pos. 1). It is screwed at 90 ° (pos. 2) to it, to which you can then connect a low tube, placing it in such a way that the smoke variables does not become an interference for a person engaged in cooking. At the bottom of the end of the barrel, it is additionally fashionable to make adjustable confused (blue arrows). For this, several holes are drilled Ø 10 ÷ 12 mm (pos. 3), and above the bolt-axis is a flap, which can be adjusted to the air intake. This is particularly important when cooking in grill mode, since with a closed roofing, burning without oxygen can simply stop. |
 | The last "strokes" remained. The chimney tube is installed (blue arrow). It is necessarily provided for the presence of a handle for which the brazier cover will be opened - barbecue. It is desirable to make it from the material that will not be very hot. Options can be different, for example, such as shown in the figure (orange arrow). If there is a desire, then you can cover the special heat-resistant paint after pre-cleaning. The master who made a barbecue, which was about which was the story, additionally strengthened the thermometer on the surface of the cover (red arrow), allowing to monitor the temperature regime during the cooking process in the grill mode. In fact, the assembly of the barbecue is completed. |
Similar or to a certain extent, modified, at the request and fancy of the wizard, barbecue can be made of their old gas cylinders. (In this case, caution must be observed during the first cutting capacity, since inside can be an explosive residual gas concentration. The balloon is recommended to rinse several times with water, and the first resist is also in the water filled with water).

A creative approach makes it possible to significantly expand the functionality of the manufactured structure. For example, it is easy to provide an additional "option" smoke, setting an additional chamber at the outlet of the smoke from the main brazier. Another option is to install a separate furnace chamber at the bottom that will be used in smoking products. And to maintain the desired temperature and the smoke concentration required for smoking, adjustable valve is installed on the chimney. A visual example of such a model of a barbecue with the possibility of transition to smoking mode - in the attached video.
Video: An interesting model of a barbecue grill with smoking
If the design is obtained by severe, then it can be equipped, for example, a uniaxial wheelchair. This will easily move it through the territory of the site or remove into a barn or garage for a period of not in demand.
Stationary brick barbecue
Those owners of country mansions that They love solidity and thoroughness, it will probably prefer something more monumental, stationary, folded for years from the brick. Well, and in this matter there is nothing impossible for an independent structure of a brazier-barbecue or even a whole complex or otherwise - a barbecue area.
Choosing an optimal place for a barbecue complex
First of all, it is necessary to determine the place. At the same time, a number of rules are taken into account:
- Very often brick barbecue is installed next to the existing seating area - terrace or arbor. It is possible to combine these buildings under one roof, naturally, taking into account the requirements of fire safety.
- It is not necessary to have the complex of the Czech Republic, it is so close to a residential building or even to add to it - it is also dictated by elementary safety rules. It is strictly forbidden to post next to garages or utility rooms, where the fuel supply may be.
- For considerations of hygienicness and comfort, a bake barbecue should not be planned in the immediate vicinity of from the walking places or cesspools, their or neighboring.
- If there is an opportunity, you should give preference to the place located with the leeward side of the residential building (taking into account the predominance of winds in this area).
- Neighborhood with high bushes and trees, whose crowns may be above the barbecue. This, firstly, is unsafe, and secondly, from high temperatures of the plant can plant and die.
- If the construction of the barbecue is planned in the already built before the gazebo, it should be provided for the placement of the furnace so that the chimney pipe does not occur to roofing rafters - it must be approximately the center between them.

- A good owner necessarily places the laying of the tracks to the barbecue area so that it can be easily approached, for example, after the rain. Of the same considerations, it is advisable to shift the platform near the oven itself.
- It will be very convenient if the barbecue zone is to spend water, at least a temporary summerture. It will never be superfluous to carry out the power line - it will provide an opportunity to organize lighting and connecting the necessary household appliances. Of course, the water supply, and electricity are optional elements, only at the request and capabilities of the owners.
- And finally, the barbecue should be placed and separated so that this construction organically fit into the overall concept of the design of the site.
After the place is chosen, go to construction. And it always begins with the foundation device.
Foundation for I am a brick barbecue stove
Barbecue Prices Greivari
Barbecue Greivari.
Any brick stationary structure always has a considerable mass, which means that a reliable basis is required for it. In the case of construction of a garden barbecue stove, a tape, and slab, monolithic foundation can be used, but the second is still preferable. The platform around, one way or another, is recommended to be closure, and will already be the basis for, for example, laying ceramic tiles. In addition, the monolithic foundation even with a slight blowout will be a steady base for the construction of the structure.
- Under the foundation rotates with such a calculation so that the obtained plate was at least 100 mm wider in any of the parties than the planned perimeter of brickwork. From the front side, the protrusion can be done more to form a small playground. The depth of the pit can be about 400 mm - this will be quite enough.
- The bottom of the recovery is falling asleep with a sandy pillow 100 mm, which is necessarily sealing with a manual traam. On top of it, also with a seal, fall asleep the same layer of gravel or rubbish. As a result, the underground fill part of the foundation will be a thickness of about 250 mm.
- A wooden formwork is installed on the perimeter of the pit. It should go over the surface of the soil about 100 mm - this will be formed the base part of the plate. It is desirable to form a formwork to strictly align horizontally - then the upper edge of the board will become a beacon for moving the solution.
- The reinforcement grid is stacked with 100 × 100 mm cells. It is better to install it on the lining, so that it comes to about the middle of the fill plate.
- A cement-sandy solution is prepared (1: 3), which is poured into the formwork until its full fill. The top is resurrected by the rule.

Now it remains to wait for the sink of the plate and set it the necessary strength. It is recommended first 3. — 4 days regularly moisturize the surface and protect it from drying out and cracking, covering the polyethylene film. The formwork can be removed in a week, well, it starts to further construction work earlier than in 3 weeks - concrete should take about 70% of the strength necessary to withstand the loading of brick walls to it.
On the finished foundation you can build the selected one. I will not consider too complex complexes. For a novice builder, one of the pretty simple models, which, however, have good functionality.
Uncomplicated version without chimney pipe

Such a stationary barbecue bracket must be able to fold any person who has the initial skills of the Mason. There is nothing complicated - even doors do not need. A sufficiently reduced scheme that can be taken as a basis, and, if desired, change the construction or its individual elements in terms of dimensions.

- The size of the width and depth of the construction will be determined by the dimensions of the existing metal sheet for the roasting (pos. 10). It is desirable that it was filled with sides, by type bent, so that the coals do not wake up. The same size should correspond to I. Lattice (pos. 9) - there may be several pieces of them, for the preparation of different products at the same time on several levels.
- The construction starts from the foundation (pos. 1). The diagram shows the already connected plate, but it is clear that the facing is done already after the construction of the entire barbecue stove.
- Construction begins with the layout of 5 P-shaped brick series (pos. 2). The remaining space remains (pos. 3) can be used to store any kitchen utensil or firewood.
- The masonry always starts from the angles of the wall (pos. 6), so that in these places there is a whole brick. Bricks themselves (pos. 7) You can use any burden - open furnaceing of the furnace does not imply critical temperatures for them. The ranks are laid out "into the dressing", with a displacement of ½ bricks.
- The thickness of the sutures formable between bricks (pos. 5) is about 10 mm. As a solution, you can apply the heat-resistant masonry mixture, which is purchased in the store. However, the design allows for a conventional masonry cement-sandy solution with the addition of clay. Another option is one part of the cement and hated lime and three parts of the sand.
- After laying the first five rows, the sixth row on both sides to bed with a cross-linked arrangement of bricks (pos. 4). Thus, the shelves are created, which will lay a brazier pallet.
- Above the masonry continues with conventional straight rows, on the height of the necessary height (seven rows are shown in the diagram). On the inside of the walls on several levels attached brackets (pos. 8), which will be stopped for laying the lattices.
Construction can be changed and a little. For example, in the photo above it is shown that several levels of deployment and lattices are provided, respectively, several rows of brick-laying. In addition, protruding outside the transversely arranged bricks can be a support for side tables, very convenient for the preparation and cutting of products right at the barbecue. To do this, lay out another brick wall with one or even on both sides.

Such a simplest barbecue does not imply directed smoke removal. True, if such a structure is supposed to be placed in a gazebo, you can hang the smoke cap, by type of kitchen hood, and it is already a conclusion from it.
Popular Barbecue Prices
A more difficult task - a barbecue with a pipe
The task can be somewhat complicated - to fold the barbecue with a fully closed from three sides by a focus and chimney. It is clear that the complexity and total costs here will be significantly higher, but the construction itself is already significantly solid and can become a decoration of the site.
To tell a lot here, probably, it is not necessary - much more information will bring a detailed order of masonry. It will only be left to make some notes to it:

- Experienced cooks are always recommended, especially beginners, prevail the laying on the solution "dry", that is, each row of bricks is first laid out without a solution. It helps to accurately decide on the configuration of the row and adjust those bricks that require cutting.
- Since in the design already - a closed hearth, then its layout (inner lining) involves the use of chamotte fire-resistant brick. In the diagram, it is shown a lighter shade.
- In the base unit, a conventional masonry solution can be used. Starting from the level of overlapping under the center and above, where there will be an area of \u200b\u200belevated temperatures, a heat-resistant masonry composition is used.
- The masonry begins with the first fully solid row. Of course, a constant horizontal check is carried out using a construction level.
- Metal corners are stacked on top of the fifth row - jumpers for which masonry will be conducted at the beginning of the sixthand then seventh solid rows. Two compartments that will be located under the hearth can be used to warm up or maintaining hot-ready-made dishes.
 Continuation of the scheme - order from the tenth row to the very top of the pipe
 - Top of the eleventh row, the bands are re-jumpers, and on top of them are two solid rows that will become a bottom of the focal chamber.
- From 14 to 21 row - the hearth, the walls of which from the inside are immediately faced with chamoten bricks. If it is assumed that the fire will be divorced not on the removable metal pallet, but directly on the surface of the hearth, then its base is also worth a skewed brick.
- After the layout of 21 rows, the jumper is installed, which will cover the facial overlap of the focus.
- In the future, the laying is strictly according to the scheme, with a gradual narrowing to the center - the pyramid part of the chimney pipe is formed.
- The stepped lift of the pipe can be subsequently lined with a thin sheet metal casing - so that rainwater or snow or snow can not be accumulated on the ledge. Completes the pipe device a rainy metal cap.
- On the side walls of the focus you can fix on several levels metal brackets for the location of the barbecue lattices.
As you can see, in this case, there is nothing critical of complex: the main thing is the sequence, maximum accuracy and accurate calculation when laying each row, with the mandatory control of the horizontal and vertical of the walls.
Again, this construction can be basic, near which will be easy to attach cutting tables.

Well, those who want to still build an independently more complex complex, with a wide functionality, with a stove, oven or cauldron for making a pilament, is invited to familiarize yourself with the detailed video instruction. This will help the tonsfully assess their means and building opportunities to take the right decision on the choice of an acceptable model.
Video: Instructions for the construction of a barbecue complex of bricks
In our leadership, we will tell you how to make a Street Mngal Complex and a brick-barbecue. Step-by-step instructions from the photo of the construction process will help you understand the details of the independent masonry of this structure.
As a result, you should have a barbecue hits as presented in the photo below.
So, you have decided on the type of mangala, its size and location. Now it is necessary to build a foundation under it.
Usually such buildings are on the street, in a gazebo or on the terrace. If the foundation of the arbor or terrace will withstand the weight of the brick furnace, and this is about 3 tons, you can start a construction at once. If you are going to build a brand from scratch, then the first thing to fill with a suitable foundation under it: a ribbon or tile.
Instructions for building such foundations you will find in our section "".
The next step will be a waterproofing device for a brick bracket. It is done to prevent the wetting of the lower bricks by the capillary sacrifice. It will be enough to be sealing a roll of rubberoid or hydroizol. At the end of the construction, you will cut the knife too much.
Barbecue BBQ with your own hands. Step-by-step instructions with photos.
Establish directly to the muggle masonry.
We recommend first to lay out the first row of bricks without a solution and evaluate how your future structure fondamation fits. Do not forget to leave the gaps between the bricks 1 cm. And also check the diagonal, they must coincide.
After that, you can begin the laying of the barbecue. The facial brick is placed on the cement-sandy solution (the ratio of cement sand 1: 3). For plasticity of the solution add lime or a special masonry plasticizer from the nearest construction store. The seams are made with dimensions of 8-10 mm, for this use metal rods, reinforcement, etc. In places, adjoining bricks without dressing, the laying is reinforced by perforated ribbon, wire, etc.

We make a laying with the displacement of each subsequent row to the Polkirpich. For sawing bricks you will need "Bulgarian" with a stone disk.
We continue to lay out the barbecue barbecue.

Do not forget to check the vertical of masonry at the corners of at least every 3 rows. And also, check the coincidence of the length of the Diagonals of the Mangala.
We continue the masonry.

After you make 8 rows of masonry, the time will come to make jumpers for mangal and countertops. They should look like presented in the photo below.

You can make such jumpers in several ways.
First, you can bind bricks with a metal pipple and mortar.

Secondly, you can use metal corners.
In our case, we took advantage of the second way. They folded the corners with each other in the form of an inverted letter T and saw half the shelves. That's what happened.

Corner take the size of at least 45x45 mm. A corner of smaller will be fed. But do not take too big so as not to play brick edges.
Make a slot in a brick with a good stock so that the metal when heated does not break the masonry.
Such a shelf is not noticeable to the eye, reliable and beautiful.

We begin to lay out under (bottom) mangaal. For firebox, we use refractory chamotte brick. Masonry make on the finished refractory mixture from the construction supermarket of clay and sand. Can be used meter. Seams we do as thinner, about 3-4 mm.
For the support of the mangala, we use corners. Do not forget to leave at least 1 cm gap between the ends of the corners and the brick. So you will save the climbing masonry when angle expansion.
On the first row of the nose of the furnace lay the second row overlapping all seams of the first. This will eliminate the roasted seams and getting coal to the firewood in the woodcut. You can, of course, pour a concrete slab instead of corner and first row of firebox. But in our case it was cheaper and faster.
If you pour the concrete overlap, it is enough and one row of refractory bricks for the bottom of the furnace.
We continue to lay the walls of the mangaal.

Masonry facial brick and fireboxes can be made both in parallel and alternately. You can first make the walls of the furnace, and then put it with facial bricks.
Important! Between facing and refractory bricks, we leave a gap of 1 cm. The firebox and facing should not come into contact.
We put the following rows of barbecue furnaces.

Come to the time of the furnace Arch. We are tuned (arc design from a tree) and install the mangaal portal. Then, perform the laying of the arches, cutting the bricks to the desired size. In the middle of the top point we put a brick castle. Arch is ready.

Note! The arc from the facial brick is covered from the inside with a smoking of chamotte brick. It puts on a metal corner a little higher than the top of the Arch so that it is not noticeable. It looks like this.

The arch is assembled, we continue to remove the walls of the mangala barbecue.
Do not forget to check the vertical of the masonry.

We approach the time the smoke collector.
Take the top of the furnace and cladding in one level and begin to lay out the smoke collector. Masonry make from full-scale brick brand not lower than M150. We put on the cement-sandy solution. The first row put the flush with the inner wall of the furnace. The remaining rows put up with a displacement about a third of the brick.
Do not shift bricks more than half, otherwise they will fall inside the furnace.

The smoke collector is carried out until the moment when the 27x27 cm chimney hole remains taking into account the seams. Your chimney size may differ from our. In this case, make a smoke collector under the size of your chimney.
Some live shops are cut off the inner edges of the bricks so that the smoke collector from the inside was smooth. We have not noticed the differences in the operation between the smooth and ribbed inner surface of the smoke collector. Of course, this is true only if you comply with the correct proportions between the size of the portal - smoke collector - pipes (read the proportions below).
So the smoke collector without curved bricks from the inside looks.

We continue the laying of the pipe. Its dimensions depend on the size of your portal mangala barbecue.
After the chimney masonry is completed, cover it with a cap to protect the fireboxes from precipitation.
Mangal He's a bake of a barbecue from brick with her own hands, we successfully built! Wait until the solution is dry and you can make a trial launch.
Here we will analyze the most common questions on the masonry of a brick mangaal (grill) with their own hands and answers to them.
What size should the smoke collector be?
The size of the smoke collector depends on the size of the furnace portal. The optimal ratio should be at least 100-120%. So in our step-by-step instructions, the height of the portal is 6 rows, and the height of the smoke collector is 8 rows.
What is the height of doing a pipe?
The height of the pipe is proportional to the height of the smoke collector and is at least 100-120% of its height.
What diameter of the chimney should be?
The cross section of the chimney pipe depends on the area of \u200b\u200bthe furnace portal. The optimal area of \u200b\u200bchimney 1/8 - 1/10 of the portal area. Extreme sizes from 1/6 to 1/13.
What to fill the gap between the furnace and facing?
From the front, around the portal you can fill the gap with basalt cardboard. The rest of the space does not make sense to fill. Therefore, it is left blank.
Do I need to paint a metal corner in jumpers?
Mangal (grill) - Barbecue from brick with your own hands. Step-by-step video instruction.
 Why you can not give icons
 Is it possible to give icons as a gift: Signs, the opinion of the Church
 A year ago left her husband, and now I do not know what to do