Refinement of the running lights. Cheapest Daytime Running Lights - Global Overhaul. LED strip running lights
It is necessary to turn on the low beam headlights or daytime running lights. The standard headlights of most cars mainly contain incandescent lamps, plus rear lights of dimensions - as a result, we get energy consumption from the battery and generator of the order of 150-300W. But nothing happens for free - this leads to unnecessary consumption of gasoline, to premature failure of the car's incandescent lamps, that is, to additional costs and loss of time for repairs.
Daytime running lights make the car stand out well on the road and are a good addition to any vehicle. However, the price of branded DRLs in our stores is usually quite high. Let's try to make them ourselves, the more the prices for materials will be minimal.
I have tried different DRL options. But always something did not suit something, the LEDs often burned out, then the light-scattering fittings quickly lost their transparency from dirt and sand, etc. But then a headlamp from the Fix Price store turned up under my arms for a ridiculous price of 50 rubles. He turned out to have a good mirror reflector and small dimensions. For the sake of experiment, it was decided to modernize it. The converted flashlight can be used both in DRL mode and as a powerful flashlight in the garage, on camping, etc.
You can watch the process of making homemade products in the video:
List of tools and materials
- headlight;
-screwdriver;
-soldering iron;
-tester;
- power supply unit 12V;
- white light-emitting diode 1W-7 pieces;
- rectifier diodes 1A-4pcs;
- foil double-sided textolite;
-thermopaste;
- silicone sealant;
- sheet brass or copper metal 0.3mm thick.
Step one. Dismantling the lantern.
We disassemble the lantern into its component parts. Disconnect the LED board from the battery case. By the way, you can make a power bank from this battery compartment by adding a battery charging board. But now we only need the body of the lantern itself with a reflector and glass.

Step two. Manufacturing of a printed circuit board, heat sinks, assembly of a lantern.
We make a printed circuit board from a double-sided foil PCB with a size of 45x45mm. With a cutter we make tracks for two groups of LEDs. The first group is for four LEDs, the second for three.

Then we install the LEDs on the printed circuit board using thermal paste and solder them according to the diagram below.


Additional diodes are used to equalize the voltage in a group of three LEDs. They are soldered to the board and protected by heat shrinkage. I dropped these diodes from the faulty electronic board of the energy-saving lamp.
On the reverse side of the printed circuit board, we solder brass strips, which are designed to dissipate the heat generated by the LEDs. We put the glass of the lantern on the silicone sealant. We fasten the reflector to the printed circuit board and assemble the lantern. Brass strips are taken out of the body of the lantern through the slots and folded into an accordion on the outside. We also treat the threaded connection with a sealant. The power wires are led out into the hole in the lamp housing through a rubber sealing tube. We fasten a homemade metal bracket to the swivel clamp for attaching to the car.
Step three. Testing the converted lantern.
We connect the converted lantern to the power source.


Comparative photo before rework.

As you can see in the photos, the result is good. When the supply voltage changes, the current through the LEDs changes sharply. At 12volt-0.25ampere, 13volt-0.48ampere, 13.4volt-0.62ampere. The maximum current for these 1W LEDs is 0.3 ampere. There are two groups of LEDs in the lamp, so I decided to increase the life of the LEDs, the total current should be within 0.5 amperes. In the car's electrical network, the voltage can fluctuate from 12 volts to 15 volts, which means that when connected in DRL mode, it is advisable to add a current stabilizer on the LM317 microcircuit.
And other daytime running lights are of good quality. But, as for the so-called "no name" products, the quality leaves much to be desired. Therefore, in the process of working with such daytime lights, they often cause problems and inconveniences, for example, they fail, or there are problems with the operation of diodes.
The appearance of all Chinese is quite stylish. They have a durable transparent plastic glass coated with a special protective film, which must be removed before installation. The body of all DRLs is strong and shock-resistant, and the metal mounting brackets are universal, allowing you to put the device on any car. There are bolts that allow you to adjust the tilt of the devices. The set comes with 4 self-tapping screws or screws, with wide and dimensional washers for fixing. This design and mounting is often ideal for Japanese automobiles.
What do we see on our roads?
The result of the acquisition of low-quality is visible on our roads. That is, acquiring unnamed Chinese-made DRLs, you can notice how some of the LEDs that make up the module do not light up or flicker, the modules do not light up, or such processes as turning off the DRL when the dimensions and dipped beam are turned on, and so on, do not function. Sometimes, with a completely poor-quality assembly, LEDs may even flash due to current breakdown.
The main malfunctions of low-quality DRL
|
Shimmer... Fast flashing of one or more LEDs occurs, which reduces the quality of the glow and affects the efficiency of the device. |
Flashing... Intermediate activation and deactivation of the light of the diodes, which also negatively affects the efficiency of the daytime running lights. |
Combined blinking... This is the most unpleasant thing in daytime lights, because alternately in one or another row, individual diodes or a whole row begin to deactivate. |
|
|
|
|
How to be, after all, it is strictly forbidden to use such running lights outside the city and in the city, since they do not meet the safety requirements of movement on the road. In order to change the position, revision should be made or tuning should be done on such running lights. Analyzing different running lights made in China, you can make sure that the design is almost identical.

The first thing that can be seen is that manufacturers of such low-quality materials have completely forgotten about what a sealant is. Despite the fact that the two parts of the module are fastened with screws, there is a gap between them, and this absolutely should not be. In rainy weather, it is through this gap that moisture and debris will get inside, which instantly disables the diodes - they simply burn out.

The second thing that is poorly made in Chinese daytime lights without a name is the board itself with LEDs. You can notice the following - the board is assembled according to the simplest principle, low-quality LEDs are taken as a basis, that is, emitters and a simple current-limiting resistor.
It is worth noting that most of the LEDs in such products are of the super-bright type, and, accordingly, they operate on direct current and a slight deviation from this norm leads to their fastest failure. Chinese manufacturers take 3 series-connected diodes and connect them to one resistor, which entails problems with the operation of the device.
To approach the issue of refinement correctly and transform low-quality DRLs, you need to stock up on the following details:
- Several stabilizers of constant voltage 12V. You can take any stabilizer with these parameters - it will be perfect.
- Electrolytic capacitor that will fit under the daytime running light housing.
- High quality silicone sealant.
- Electrical tape, soldering iron and the entire accompanying set, as well as patience, perseverance and attentiveness.

How to fix the shortcomings of the DRL?
To begin with, in order to stabilize the further operation of the LED device, it is necessary to equalize the current. That is, it is necessary to resort to installing a special voltage stabilizer. If you have a voltage of 12V on the box with diodes, then you need to purchase a miniature stabilizer with the corresponding indicator. It should be noted that in cars the voltage is not constant and even, and fluctuates from several units, which is typical at startup and can rise to 14V, which is inherent when charging the battery. If you put a stabilizer, then it will control the supply of only 12V current to the device. Also, it is very important to eliminate voltage fluctuations in order to bring the operation of the DRL to a stable mode. To eliminate this, experts recommend installing an electrolytic polarized capacitor with a large capacity characteristic. It must be installed to the common diode buses on the board itself, connecting it to the output of the stabilizer. It should be noted that it is necessary to strictly adhere to the polarity during installation.

Firstly, if you make the above manipulations, then the diodes will be ignited gradually and smoothly, which can be overlooked, but this is so. Secondly, due to the installation of the stabilizer, there is no reverse current flow, and the module is deactivated gradually, which can be seen with the naked eye. Such measures provide LEDs with better working conditions, and also allow to increase the operational life several times, which is important for you, as a buyer of this product. And the last thing to do in this case is to use a silicone sealant. They need to process the edges of all parts of the case in contact with each other in order to remove gaps and prevent moisture and dust from getting inside the case.
Well, since in a recent accident, all my left optics were covered (including my DRL - the upper tape was cut off, the cover vomited) I decided to make it a little differently.
There were ideas - like shit on a pig farm! To begin with, I decided not to put ribbons on the sides of the lining - all the same, they shone sideways and did not really affect the visibility of the car from afar and from the front. Although it was convenient in nature - I switched it on - and the whole clearing was illuminated for me!
Then I thought to put two ribbons on top: one long over the entire pad (as it was) and the second over it, but only in front. Attached, looked ... Better, but not that ...
And if, as in the factory DRLs, also put on the bevel? Attached ... Ugly. Ribbon on top, tear, ribbon down.
And then it dawned on me !!!
Why are there so many tapes? After all, they usually sell a DRL socket with 8-10-12 LEDs! So put the double tape on the bevel in the front and that's it !!!
Well, here's what happened:
1. This is a heat-shrinkable transparent tube and a piece of ordinary tape for two rows of LEDs (which, by the way, I stuck instead of all the bulbs in the cabin):

Since the tape is simple, I put it in a tube, filled it with a little transparent sealant and shrunk it down with a hairdryer. It turned out to be such a sealed socket. I pulled it to the pad with zip ties. I soldered the usual dad-mom connectors, shrinked them (mom).

The image is reduced. Click to see original.
And here's what happened in the end:

The image is reduced. Click to see original.
In the apartment, on the table, it shone like this:

The image is reduced. Click to see original.
I connected it, as always, through the fuel pump relay. Weight on the fuse box bolt under the hood. The appearance of the car became like this:

The image is reduced. Click to see original.
Close-up view with light:

The image is reduced. Click to see original.
At a distance of two entrances:

The image is reduced. Click to see original.
In my opinion, it turned out fine. Not to like it - it won't take long to remake! Moreover, I have almost all the tapes from the past DRL. And they are workers! Even on the severed tape, I threw out only 10 cm: there one LED is broken and the tracks in two places are completely severed.
And on sale these tapes for every taste.
From the leftovers I will make lighting for nature for now. And what? 12 volts, without any converters. Illuminates with dignity. At least much better than a gas lamp.
Immediately please do not write in the comments that "the DRL function is not implemented"! I know myself. I will save up some extra money - I will buy a relay - I will sell it ... And maybe 10 times I will redo my DRL!
For several years now, daytime running lights have become mandatory for installation on cars in the Russian Federation. The market is overflowing with Chinese handicrafts that in no way meet the technical requirements and GOST. Car enthusiasts were not at a loss and began to actively do DRL with their own hands.
To make the right LED DRLs, you need to know what the requirements are for them:
- Light intensity - from 400 to 800 candelas;
- luminescence angle vertically 25 degrees and 55 horizontally;
- the area that emits light must be at least 40 cm 2.
LED strip running lights
In order to implement such technical requirements in practice, we will assemble DRLs from LEDs with our own hands, using a tape of type 5050, with a density of 60 pieces / meter. To get this brightness, you need to cut off about 24 LEDs, that's 8 sections.
You can glue the tape around the headlight to the existing adhesive. A more reliable option is to use a cable channel and fix it with epoxy glue, this will be more reliable. As a result, you will get a similar construction:

Do-it-yourself flexible DRLs are made according to the same principle.
To make the tape last as long as possible, stabilize the voltage at 12 volts. With the engine running, the voltage in the on-board network can reach values of more than 14 volts. The easiest way is to use a linear stabilizer KREN or L7812.

Separate 5050 or 5730 LEDs for DRL
To make homemade running lights from LEDs of non-standard shape or use a case from foglights for this purpose, the tape can be inconvenient, so you need to make a printed circuit board.
You can use a ready-made breadboard, but this may not be so convenient solution, albeit simpler. The breadboard is not as reliable.

To make a drawing of a printed circuit board, use a program like spring layout, then you need to transfer it to a textolite. To do this, you need to print a MIRROR image of the circuit board on thin glossy paper. This is used in magazines for pages, the cover is too dense.
You need to print on a laser printer, then we take an iron and iron the glossy paper on foil textolite. When it cools down, we soak the paper under a stream of water, a drawing of future tracks will remain on the PCB.

Now it's just a small matter - to etch the board in ferric chloride or any other suitable reagent. You can find detailed information on laser-ironing technology for manufacturing printed circuit boards.

After manufacturing the printed circuit board, you need to make the basis for the DRL. To do this, we will place the LEDs on the PCB in accordance with its layout. To limit the current flowing through the LEDs, add 1 50 ohm resistor. Next, assemble a 12 volt stabilizer on the L7812 microcircuit or its analogs.
To provide the desired brightness, you need about 24 LEDs, which must be assembled into a single structure and placed in the case. We have printed narrow boards of 9 LEDs each.

If you take an acrylic tube and place the resulting boards in it, then you get such DRLs from LEDs (see below). They can be shaped by heating with a construction hairdryer and bending around the bumper.

If you want to make wide DRLs, you need to connect the boards one above the other, or separate and etch a board like this one.

By the way, more powerful 5730 LEDs are used here. As a case, you can use old foglights or use a furniture profile for lighting with a plastic cover.

Using high-power LEDs 1-3W
When making navigation lights with your own hands, in addition to the LED strip, you can use heavy-duty LEDs.
The previous solutions have one significant drawback - the inability to adjust the directivity and angle of the light flux. For high power LEDs with a power of 1-3W, there are many optical solutions on the market from 10 to 120 degrees.

To make LED DRLs with your own hands on powerful crystals, you will need:
- LEDs 1W from 3 to 5 pcs (to provide the required light intensity);
- lenses collecting at an angle of 30 degrees;
- driver for LEDs with characteristics: input voltage 12V, output current 300mA, up to 5W;
- a substrate for attaching to a radiator;
- a radiator with an area of about 100 cm 2.
The driver is needed to provide the LEDs with a stabilized current. You can also use a circuit with a damping resistor as in previous homemade products, but the power of the resistor in this case will be too large and such a solution is not reliable.
 To mount the LEDs on a radiator, you need either heat-conducting glue, or a special mounting base and thermal paste. The LED is soldered to this substrate, and it is screwed onto the radiator.
You can also find ready-made sites for installation, in some cases this is a more convenient option. Some stores have such substrates with LEDs mounted on them.

Thermal paste or thermal spacer is needed to provide better heat transfer, as well as fill irregularities in the substrate and radiator, to improve heat transfer.
When making DRLs with your own hands from LEDs using such a kit, you will need a case, you can make it yourself from scrap materials, or use old fog lamps or something similar.
The main mistakes in making DRL with your own hands
First of all, you need to figure out what kind of device it is. Daytime running lights are not dimensions! They need to be tested not at night, but during the day.
The lights must be visible from a great distance. Contrary to the common misconception, when assembling DRLs from an LED strip with your own hands, you need to use the most powerful tape available. With such dimensions as the average running lights, it is quite difficult to exceed the permissible brightness with the help of an LED strip.
Do not forget about cooling, but do not put too large radiators. Do not forget that the flow of incoming air when the vehicle is moving practically replace active cooling. Therefore, the radiator area can be half as much as in normal conditions for passive cooling of luminaires.
How to properly connect the DRL to the car?
In addition to installing and assembling the structure itself, you need to correctly connect everything to the electrical circuit of the car. The picture shows the simplest and most reliable DRL connection diagram. Let's take a closer look at it.

K1 is a relay with five contacts, one of the power contacts is normally closed, that is, it is closed when no current flows through the relay coil, and the other is normally open, it closes when current flows through the coil. This is one of the standard relays and is sold at any car dealership.

When you turn on the ignition, power is supplied to the DRL through the normally closed contacts, and when you turn on the low beam, from the power plus that goes to the lamps, the DRL relay turns on and the contacts open.
Making high-quality LED running lights for cars with your own hands is quite simple. They will surpass cheap Chinese crafts in quality and characteristics, and will last much longer.
Homemade DRLs will be cheaper than branded ones, and the experience gained is invaluable.
Hello everyone! I bought these cheap daytime running lights for the sake of the body, intending to replace them with my own filling. As a result, only the transparent protective "glass" remained intact. Dedicated to fans of alterations and improvements ...
Such DRLs have already been reviewed on MySku (https: //site/blog/aliexpress/12041.html,), and to be honest, I think that installing such flashlights makes no sense, since they have just scanty brightness, and, in principle, not can increase the "visibility" of the car on the road during daylight hours. Well, at night it will only be abnormal to turn them on instead of the dipped beam. Therefore, these kids were remade by me into such "monsters" in terms of brightness.
Those who want to see the result of the revision can skip a good half of the text, but I'll start from the very beginning.
A long time ago, in mid-June, I received a letter from DealExtrema in my mail, containing a burning (I do not quite understand the meaning of this word, but it is in place) an offer to buy LED lamps with huge discounts, etc. Okay, I think I'll take a look at what they are offering ... It seems that he was not going to buy anything. But nevertheless, I sangled for 10-watt LED modules on an aluminum substrate, bought two warm lights, two cold lights. For what application, at that time I did not know exactly, but figured out what for home lighting. 4 modules cost $ 17, which, as I found out later, was not at all cheap. I must admit that the order was somewhat hasty. Here is the link to the cold light module, the discount is much more now, and the price is now $ 3.46 per piece:
Okay, so I ordered it and waited. The package arrived in 40 days: a standard sachet, and there are 4 modules in the sachet, each tucked into a "pocket" from a "pimple". Well, it's not surprising that the mail outraged such a package: two of the four modules were bent very well. First of all, of course, the deilekstream is to blame for saving on packaging, it was possible to cram at least pieces of cardboard to give rigidity. This is how it looked:


I took these photos then for a dispute with the seller, but it turned out that I neglected the protection time of the transaction in PayPal. I often buy on Aliexpress, and their protection system suits me until I let it down (pah-pah-pah): I just keep track of the remaining "protected" time, and Aliexpress itself reminds me that time is running out. Deliextream works through Paypal, and accordingly, the protected time starts from the moment of payment, and not sending, which I did not think about. In general, summer is not the best time for a showdown with online stores: dacha, village, river, construction site, work, etc. distract from tracking online orders. Day there, day here ... and while I was preparing the "proof" of the damage to the goods, the protection time of the transaction at Paypal was over. As a result, I now more closely track orders made through Paypal, and open a dispute a few days before the end of the "protection".
Well, okay, the wood itself ... Let's start testing. I straightened the aluminum base of the damaged modules as best I could. But naturally, such a powerful mechanical effect did not pass without leaving a trace: the LED that got into the place of the bend does not light up, and if you play a bit with the bend of the aluminum base, it periodically lights up. Another LED on the other side of the module is also blinking - maybe the module was bent in this place and then straightened by the Chinese? For a less bent module, all LEDs are on and do not blink. By a “lucky chance”, one bar of cold light and one bar of warm light was bent, so I didn't get a full pair of undamaged modules, to my great regret.
The brightness of the purchased LED modules turned out to be very high, which prompted me to use them as daytime running lights. There is no DRL on my car, and the front of the car has such a design that few DRLs can be installed in it without giving the car a collective farm look. The 10-watt LED modules I bought fit perfectly into the general look of the car, and just fit into the only places possible according to GOST for installing DRLs.
I must say that several of my acquaintances have already spent the nth amount of money on DRLs at the price of 500 to 4000 rubles, both online and offline, and, despite the laudatory comments on the stores' websites, no one has yet been completely satisfied with the result. Someone's DRLs died in a matter of days, someone began to blink, someone is still working, but the brightness is many times weaker than necessary, etc. One guy put on a bought cheap DRL as a trunk light, as did the reviewer mentioned above.
I myself also looked after myself DRL, but in the end I gave up this business. I didn't want to buy branded "lights" for 3-4 thousand rubles, because the high price, judging by the experience of friends, does not guarantee quality and reliability at all. Poor soldering and assembly, savings on materials (an aluminum case is good, but for powerful LEDs the cooling surface area is still not enough), savings on a thermal interface - even expensive DRLs die from this. And from a guarantee to zero sense, it has long been noticed that it is much easier to demand money from a Chinese for a bad product than from a store in a neighboring house.
Even what the Chinese offer over $ 50 does not inspire confidence. First of all, a good LED flashlight must have a good radiator, and the Chinese have so far succeeded only in imitating the radiator fins with a plastic case profile, imitating brands. Well, it's understandable why Chinese DRLs, even with a true declared power, overheat and die. For example, here is such a "flashlight" one friend came with an aluminum case, another with a plastic one (photo for example, the seller was different):

Therefore, I decided to take a different path, abandoning the plastic housing of the DRL as the main structural element. For me, the basis of the DRL should be a radiator of a decent surface area, the DRL is also attached to the car for the radiator, as for the heaviest element. An LED module is installed on the radiator, and the transparent "glass" only serves to protect the LED module from the external environment. The idea, of course, is not new, and expensive DRLs are made just like that. Although the LED module I bought is considered waterproof, since the LEDs are filled with a compound, the elastic compound is unlikely to withstand close contact with rain, snow, ice and mud, plus washing this very dirt.
Therefore, I started looking for a suitable case, or rather, not even a case, but a protective glass for my homemade DRLs. And in the end, the choice fell on the hero of the review, as the cheapest one of a suitable size for Aliexpress. I was interested in the case itself, but neither the number of LEDs, nor their brightness bothered me, so I was looking for the lowest price for "boxes with glass". Boards with LEDs from these "boxes" can then be used somewhere, for example, for the same trunk lighting.
And now, after some 1.5 months after ordering, these DRLs came to me. The DRL box was very crumpled, but all its contents were safe and sound. Here is a photo of DRL, the "glass" is even covered with a protective film. After receiving, I checked them - they work, and they shine from 12v somehow too bright, I suspect that the current through the LEDs is too high. But for now, the fate of these 16 LEDs does not bother me.


But the filling of the DRL: a board with LEDs and a reflector - I will put it off for the time being, and in the future I will use it somewhere. The quality of the soldering on the boards is so-so.


The search for a suitable heat sink among its considerable stocks of "aluminum casting and rolled products" led to a single radiator of a suitable length (L> = 150mm) from the power supply unit of an old computer. This is the last, third such radiator from my collection - two have already been cut into pieces at different times and put into different electronic devices.


Two "strips" about 20mm wide were sawn off from this radiator, which is about 3-4mm wider than the DRL glass. No special accuracy was needed, and therefore one radiator turned out to be about 1mm wider than the second.


Further, the process of machining the radiator began using a hacksaw, a belt sander, files, grinding wheels and bars, drills, taps. The difficulty was that the surface of the radiator, where I was going to install the LED module, was not initially flat, but contained short "ribs": they had to be cut off and the surface was sanded. But with the right tool, all problems can be solved. Here is a photo of radiators at one of the manufacturing stages.


In general, for the first time I used a belt sander for processing something harder than wood, and I liked it, without a typewriter I would have spent much more time, but I still would not get a high-quality plane. The outer three edges of the radiators had to be cut off, as they would interfere with installation in the car. Here's what happened in the end:


I did not bring the plane "to zero", and did not polish it to the mirror: the resulting surface cleanliness is more than enough to cool the LED module.
Maybe someone will say that it would be easier to buy a radiator of a suitable size, cut it in half and enjoy life. I have actually worked through this version. But there was nothing suitable in the radio stores. It was possible to order a piece of an aluminum profile-radiator of the required length in some kind of Chip-Dip, but then the edges would go along the long side of the DRL, which in this case, as it seems to me, is not optimal for cooling. I preferred the edges to be across the DRL. The Chinese also offer radiators (on the same Aliexpress) in a large assortment, but with the length I needed from 150mm, the radiator pulled for $ 25 + wait another month. Well, the thickness of the radiator base is 3mm - somehow childish. Naturally, I preferred to save money, but the savings required additional efforts, the result of which is in the photo above.
The next stage is the installation of LED modules on the radiators, using the KPT-8 thermal paste (it is not over yet).


My main 25W mid-cell soldering iron failed to solder the wires to the module, which indicates good heat dissipation from the module to the heatsink. A 40W soldering iron with soldering wires to the modules coped with 5+.
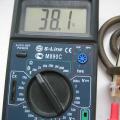
Then I connected the module to a power source, and checked the thermal mode of the DRL at a rated current of 720mA. I wondered if the thermal regime would go beyond the limits. Unfortunately, I did not write down what the voltage was directly on the module, but I vaguely remember that it was about 12.1V, which corresponds to a power of 8.7W. In this case, the module "shone like a beast" (in the pictures the current is reduced so as not to blind the camera down).


Half an hour later, the temperature of the radiator turned out to be 57 degrees: already in the first 10 minutes, the radiator warmed up to 55 degrees, and in the next 20 minutes it only increased by two degrees. I didn’t test it any longer, because I’m sure that there will be no further increase in temperature. The measurements were made with a Chinese digital multimeter with an external thermocouple (coated with thermal paste and pressed against the measurement point). For control, I checked my temperature, and the device showed 38 degrees, which is more or less true, but I fully admit the error in measuring the temperature of the radiator plus or minus a couple of degrees. Well, the thermal test was successful, 57 degrees is not so much to fear for the health of the LEDs.
Further, the DRL housing was revised so that its "glass" could be put on the radiator. I had two options for revision: to put the glass on the radiator together with the black plastic base of the case, cutting off the back of the black base. Cut:

Or use one "glass", fix it directly to the radiator, cutting off the bead from it, which previously went into the inside of the black base. Untouched glass:


It would be nice to make a groove in the radiator so that a bead of glass sinks into it, but without a CNC machine it is a little difficult. I started with the first option, intending, if I do not like the result, to move on to the second.
After sawing off the rear black part of the DRL case, I tried on the rest of the case with glass to the radiator with the module, turned on the power, and made sure that the glass works as a diffuser.


But I didn't like this design. There was too much emptiness under the protective glass, besides, I would have to seal two joints: the glass-to-plastic joint, and the plastic-to-radiator joint.
Therefore, I switched to option 2: I removed the black part of the case completely, cut off the bead from the glass, shortened the fastening "posts" into which the screws were previously twisted, cut M2.5 threads in the holes of these posts to attach the glass with M2.5 screws to the radiator. It was possible, of course, to use self-tapping screws, but I was afraid that the fragile transparent plastic would crack, especially since there was a high probability that I would have to put and remove the glass several times, and the screws were held securely only for the first time.


In general, the weakest point of my design is the output wires. Not only were there enough unnecessary holes in the radiators, which had to be closed up, but the wires also came out in not very convenient places, and it was inconvenient to seal them. But I did what I had, so I had to get out. I wanted to first lead the wires through the holes at the end of the LED module, but the wires ended up next to the radiator fasteners to the car, which was also inconvenient, so the wires were brought out between the ribs.
And here's what happened in the end:


And how they shine:


The installed glass somewhat expands the luminous flux, distributing it slightly downward, upward and to the sides, thus creating the effect that a larger area is shining than the surface area of the LED module. Which, in general, was what was needed.
When the current decreases, dead "pixels" become noticeable (first, a fully working module, then a "chipped" one):


For good, the radiator should be protected by the LPK, otherwise the silumin on the car will begin to actively oxidize. I haven’t decided yet whether I will paint it, or just varnish it. For fastening, you can use the complete brackets, although they are very flimsy. I haven't put it on the car yet, because I was a little sick, it got cold outside, and it is unlikely that the installation will take 5 minutes. Maybe I will not rush to put DRLs until spring, since in winter, in the morning and in the evening, I have to drive with headlights, and DRLs are simply not needed. In addition, I do not yet have drivers with a stable output current, I am in search, and I do not want to put resistors on the temporary hut. In addition, I have not yet decided what the final scheme for connecting the DRL to the car would be, so that the DRL would work in accordance with GOST. In general, I do not like to do something hastily.
This homemade product took more than a month, since there is very little free time left at home, and I did everything gradually, little by little: today I brought a radiator, sawed it tomorrow, sawed off one radiator the day after tomorrow, a second after the day after tomorrow, after ... the day after tomorrow I polished one, etc. ... Therefore, I lasted until the cold weather.
I have not yet coated the glass with sealant, but it is clear that it is simply necessary to do this before installing it in the car. It was necessary to cover the radiator with varnish or paint even before installing the modules and sealing the wires, but then I omitted this moment. At least I'll paint it with the "glass" removed, that's why I don't seal them.
So maybe my homemade product will lie until spring, and when I have a complete set for installation (DRL + drivers + a well-thought-out circuit), I will install it.


Well, that's all. In my opinion, normal (external) DRLs should have exactly this design: the radiator is a body, there are LEDs on the radiator, and the protection of LEDs from the external environment (glass). Everything else is from the evil one. The brightness of these converted DRLs is certainly not lower than that required by GOST, and I will try to comply with the rest of the GOST requirements during installation.
A big request not to stir up discussions on the illegality of the self-installation of DRLs. It is clear that if you turn on such flashlights at night, then you have to do it on the first bitch. These are the "daytime running lights", they will be used in daylight hours, and will be connected in accordance with the standards. Finally, the coolest collective farming option offered by one of the sellers on Aliexpress:

 How to make a boiler with your own hands from improvised means?
 How to make a crossbow: throwing an office battle!
 What to do if neighbors steal electricity What to do if electricity is stolen from a house